Article Contents:
- Why a built-in wardrobe and slatted panels should be designed together
- Where built-in wardrobes and slatted panels are most commonly found
- Hallway with built-in wardrobe
- Bedroom with dressing area
- TV area with wardrobes on both sides
- Furniture niche in the hallway
- Ceiling-height wardrobe in a study or library
- Wardrobe partition
- Option one: slatted panels on the wall next to the wardrobe
- Transition between the wardrobe and slatted panel
- Single baseboard line
- Single tone or deliberate contrast
- Option two: slatted panels on cabinet fronts
- How it works visually
- Technical nuances of slatted fronts
- Which panel to choose for cabinet fronts
- Practical zones on textured fronts
- Option three: slatted panels on the cabinet side
- Why design the side panel
- Technical details of side panel installation
- Rails on the side as a "bridge" to the slatted wall
- Option four: slatted panels in the niche of a built-in wardrobe
- Back wall of the niche
- Side slopes of the niche
- Top part of the niche and lighting
- Joint of the niche with the baseboard
- Additional slats for filling corners
- How to tie the wardrobe, slatted panel, and baseboard into a single system
- Wardrobe to the floor: where the baseboard ends
- Wardrobe on legs or plinth: baseboard passes through
- MDF baseboard for painted systems
- Wooden baseboard for natural systems
- Molding, corner, and batten for neat transitions
- Molding: decorative border
- Wooden corner: functional and decorative
- Wooden batten: extension and symmetry
- Linear moldings: for non-standard joints
- Common mistakes when combining a wardrobe with slatted panels
- What to buy for a wardrobe + slatted panel system
- Solution table: task — element — where it is used
- FAQ: answers to important questions
- About the Company STAVROS
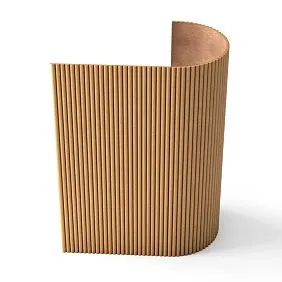
Picture this: on the left — a built-in wardrobe with smooth white fronts, on the right — a slatted wall with vertical oak slats. Between them — nothing. Just a gap with an unfinished panel edge sticking out. The wardrobe on its own, the wall on its own. Both are fine individually, but together — it feels like the interior is unfinished, like it was assembled from different projects.
This is a common situation, and it is not solved by replacing the wardrobe or re-gluing the panels. It is solved by a systematic approach from the very beginning: slatted panels for walls, furniture, baseboard, molding, and trim elements should be designed as a single whole — not as neighbors tolerating each other, but as partners enhancing the overall image.
In this article — in detail and to the point: how to properly combine slatted panels and a built-in wardrobe, what design options exist, how to handle side panels, niches, and joints, what materials are needed, and which mistakes are best avoided.


Why a built-in wardrobe and slatted panels need to be designed together
There is a temptation to do renovations sequentially: first — electrical and walls, then — furniture, then — finishing. The logic is clear, but it is precisely this that leads to the situation described above. The wardrobe is placed in a ready-made spot, the slatted panels are mounted around it, and in the end, neither feels "at home."
Why is joint design essential? Because the built-in wardrobe and the slatted wall have points of intersection — physical and visual:
-
The side panel of the wardrobe — a plane visible when entering the room. How does it relate to the slatted wall next to it?
-
The bottom gap — is the wardrobe flush to the floor or on legs? How does the baseboard fit into this space?
-
The top joint — if the wardrobe goes up to the ceiling, where does the slatted panel end? What is between them?
-
Transition at the junction — molding, corner, strip, or just a gap?
Each of these questions has an answer, and the answer must be given before installation, not after. This is what distinguishes an interior that looks designed from one that looks "as it turned out."


Where built-in wardrobes and slatted panels are most commonly found
Before diving into specific solutions, it's worth understanding in which spaces this task regularly arises.
Our factory also produces:


Hallway with built-in wardrobe
The hallway is the most common place for a built-in sliding wardrobe or a wardrobe with hinged doors. Here Slatted panels in the hallway interior they run along the free wall opposite or next to the wardrobe. The task is to make the slatted wall and the wardrobe block read as a single system, not as two different elements in one corridor.
Get Consultation
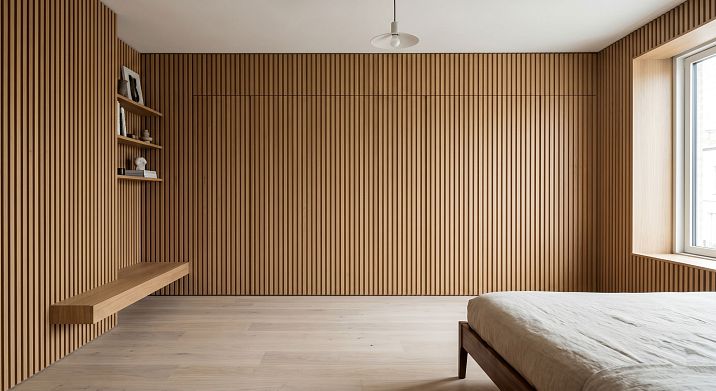
Bedroom with dressing area
In the bedroom, a built-in wardrobe often occupies an entire wall or a significant part of it. On the sides of the wardrobe or behind the bed — Slatted wall panelswhich create an accent zone. The "wardrobe + slatted wall" combination in the bedroom is one of the most sought-after interior solutions.
TV zone with cabinets on the sides
TV in the center, slatted panel behind it, column cabinets on the sides — a popular layout for a living room. slatted panel for the television in the center and furniture columns on the sides — how to connect them so the wall feels monolithic?
Furniture niche in the hallway
A niche in the wall is a natural frame for built-in storage. The back wall of the niche, side slopes, top part — all of this can be designed decorative slatted panels and turn an ordinary cabinet niche into an architectural element.
Floor-to-ceiling cabinet in a study or library
A tall shelving cabinet or sliding wardrobe reaching the ceiling next to a slatted wall — here the joints are especially noticeable. The top edges, side panels, transition to the ceiling — each node requires a well-thought-out solution.
Room divider cabinet
A cabinet dividing the space into two zones has two "front" sides. One or both can be finished with slatted panels — and then the room divider cabinet transforms from a furniture element into an architectural one.
Option one: slatted panels on the wall next to the wardrobe
Classic scheme: the wardrobe occupies its part of the wall, slatted panels — the adjacent one. This does not always require complex integration, but it does require a deliberate decision on three key points.
Transition between the wardrobe and the slatted panel
This is the most noticeable and the most complex joint. The side of the wardrobe and the end of the slatted panel meet in one vertical line. Three design options:
wooden molding vertically. A vertical molding covers the end of the panel and simultaneously creates a decorative border between the wardrobe and the slatted area. This is the cleanest and most versatile method: the end is protected, the transition is marked, the seam is not visible.
Wooden corner piece UG-001. When the wardrobe protrudes forward relative to the slatted panel (which happens with different thicknesses), a wooden corner piece covers the external corner at the transition. This is clean and technically justified.
Gap with a slope. If the wardrobe is built into a niche, there may be a visible slope between the wardrobe and the slatted panel — the side plane of the niche. This slope can also be finished wooden batten or with a small panel.
Continuous baseboard line
The baseboard should run continuously — from corner to corner — without breaking before the wardrobe. If the wardrobe goes to the floor (without legs), the baseboard meets the side of the wardrobe and stops. The joint must be neat: the baseboard is cut at 90° flush against the side.
If the cabinet is on legs, the baseboard passes under it, connecting the slatted area and the far wall. MDF Skirting Board or Wooden baseboard — the choice depends on whether the lower wall zone will be finished for painting or for wood.
A single tone or deliberate contrast
A cabinet and a slatted wall next to each other are two material presences. If they are in the same tone, the system reads as monolithic. If in different tones, contrast arises. Contrast is not a mistake, but it must be intentional.
Slat panel oak PAN-003 next to a cabinet in a white matte finish — this is a deliberate contrast of warmth and neutrality, which works well. Slatted panel PAN-003 next to a cabinet in "natural oak" from another manufacturer — this is a conflict of similar but not matching shades. The latter is undesirable.
Option two: slatted panels on the cabinet fronts
This is not just beautiful — it is a strong design technique. When the furniture panels are slatted, the cabinet fronts get the same vertical rhythm as the slatted wall. The cabinet ceases to be a separate piece of furniture and becomes part of the architecture.
How it works visually
Vertical slats on cabinet fronts visually elongate the furniture upward — it appears taller and slimmer. The relief adds depth: even on a flat front, shadows and light play appear. The cabinet no longer looks like a "slab" and gains character.
When slatted panels for the cabinet match the rhythm of a slatted wall — the rhythm of the slats "flows" from the furniture to the wall and back. The interior reads as a unified concept.
Technical nuances of slatted fronts
Handles. The relief surface of a slatted front is not the best place for built-in "shell" handles. End handles that do not interfere with the relief, or a milled groove for concealed opening (push-to-open or tip-on systems), work better.
Gaps between doors. With a frequent slat pitch (20–25 mm), the gap between adjacent doors must be sufficient so that slats from different doors do not "face" each other in a staggered pattern. Plan the slat rhythm so that it matches or is symmetrically mirrored on adjacent doors.
Opening. If the doors are hinged — when opened, the relief front moves forward. Ensure that the slats do not hit adjacent elements: the side of another cabinet, a wall protrusion, or a door casing.
Weight of the front. A slatted panel made of MDF + slats adds extra weight compared to a flat front. This must be considered when choosing hinges: they should be rated for the weight with a margin.
Which panel to choose for cabinet fronts
Slatted panel paintable PAN-002 — for monochrome solutions. The fronts are painted together with the wall in a single color: the cabinet "dissolves" into the wall, creating the illusion of a continuous slatted plane.
Decorative slatted panel PAN-001 — for accent solutions with a ready-made coating. Facades get an expressive relief without additional painting.
Slat panel oak PAN-003 — for natural wooden interiors. Facades in oak tone + slatted wall in the same tone = complete unity of furniture and wall.
Practical zones on relief facades
If the wardrobe is large and there are many facades, consider that some facades are used more intensively (children's clothes, work items, shoes in the hallway). On such facades, the slat relief quickly accumulates dust and fingerprints. Solution: a matte coating that is less prone to soiling, or a wider slat spacing on "working" facades.
Option three: slatted panels on the side of the wardrobe
The side of a built-in wardrobe is a vertical plane visible when entering the room, approaching the wardrobe from the side, or from an adjacent space. It is often huge — from floor to ceiling, 60–90 cm wide. And it can either be beautiful or just an "end piece."
Why decorate the side
A bare wardrobe side — chipboard in veneer or film — always looks like an unfinished furniture element, not a continuation of the interior. A side decorated with slatted panels ceases to be an "end piece": it becomes part of the wall, part of the system.
Lath MDF Panels on the side of the wardrobe:
-
Cover an unattractive furniture surface.
-
Make the cabinet visually less massive due to the vertical rhythm of the slats.
-
Create a transition from the cabinet to the slatted wall — if the slats continue the same rhythm.
-
Turn the side panel from a random plane into a deliberate decorative element.
Technical details of mounting on the side panel
Mounting a slatted panel on a cabinet side panel is not the same as mounting on a load-bearing wall. The side panel is a furniture panel, usually chipboard 16–18 mm thick. Attaching the slatted panel with glue + finishing nails is acceptable but requires properly selected glue.
If the cabinet may be moved in the future, it is better to use a removable fastening. If the cabinet is stationary, use adhesive fastening with additional fixation. Before installation, the cabinet side panel must be degreased and sanded for better adhesion.
The end of the side panel — bottom and top — must be covered after panel installation. Below — MDF Skirting Board or Wooden baseboard in the common line. Above — a ceiling plinth or molding. Along the outer corner of the side panel (where it faces the passage) — Wooden angle.
Slats on the side panel as a "bridge" to the slatted wall
The most striking option: the pitch of the slats on the side of the cabinet exactly matches the pitch of the slats on the adjacent wall. When viewed straight on, the rhythm of the slats "flows" from the furniture to the wall continuously, without interruption. The cabinet and wall are perceived as a single architectural object.
This requires preliminary marking: first apply the slat pitch to the wall, then transfer it to the side of the cabinet — with precise alignment. A deviation of 2–3 mm is noticeable.
Option four: slatted panels in the niche of a built-in wardrobe
A niche is a space with four planes: back wall, two side walls, and top. All of them can be finished with slatted panels. This transforms the niche from a functional recess into a deep architectural accent.
Back wall of the niche
The back wall is the most "showcase" surface of the niche. It is what is visible when looking along it. Slatted wall panel on the back wall of the niche creates depth: vertical slats draw the eye inward, enhancing the sense of space.
An important nuance: the back wall of the niche often has unevenness, cracks, or traces of old finishes. The slatted panel covers all of this — an additional practical advantage.
Side slopes of the niche
The side planes of the niche — the slopes — are most often left in plaster or painted. But if the back wall is finished with slats, then the slopes should also be finished — otherwise the "slats vs plaster" joint in the corner of the niche will look unfinished.
For side slopes, it works well Decorative wooden slat small cross-section — horizontally or vertically. Or a narrow slatted panel, trimmed to the depth of the niche. In the corner — Wooden corner bracket or Molding to close the internal corner.
Upper part of the niche and lighting
The upper plane of the niche is the ceiling of the recess. This is a natural place for hidden lighting: an LED strip along the upper perimeter of the niche, covered by a cornice or strip, provides soft, even illumination of the slatted back wall.
Wiring for lighting is laid before panel installation. The output point is a hidden socket or junction box in the upper part of the niche.
Junction of the niche with the baseboard
In the lower part of the niche, the slatted back wall panel meets the floor (if the cabinet does not cover the lower part) or the lower drawer of the cabinet. In the first case — MDF Skirting Board the baseboard around the perimeter of the niche closes the lower gap. In the second case, the gap is covered by the furniture plinth of the cabinet.
Additional slats for filling corners
In the corners of the niche — where the back wall meets the side slope — internal corners are formed. The extension Wooden plank of the required cross-section covers the internal corner and creates a clean transition line. wood trim items — trims and glazing beads — are indispensable for non-standard corner sizes.
How to connect a cabinet, slatted panel, and baseboard into a single system
The baseboard is the horizontal lower horizon of any interior. In areas where a cabinet is adjacent to a slatted wall, the baseboard must be carefully considered: it doesn't just "run along the perimeter," it connects the furniture and wall parts of the system.
Cabinet to the floor: where the baseboard ends
If the cabinet stands directly on the floor without legs — the baseboard runs up to the cabinet side and stops. The end of the baseboard must be cut evenly, at 90°, flush against the side. The gap between the baseboard and the side is a maximum of 1–2 mm, otherwise it will be visible and collect dust.
If the cabinet side is finished with a slatted panel — the baseboard should be in the same style as the baseboard under the slatted wall. Otherwise, the bottom line will be "broken."
Cabinet on legs or plinth: baseboard runs through
If the cabinet is raised on legs or a plinth — the baseboard runs as a single line along the entire perimeter, including the area under the cabinet. This creates a sense of continuity: the slatted wall and the cabinet stand on the same "foundation."
The height of the cabinet base and the height of the baseboard must be coordinated. If the cabinet base is 100 mm and the baseboard is 80 mm, the gap will be noticeable. Optimal: cabinet base height = baseboard height or slightly higher.
MDF baseboard for painted systems
buy MDF skirting board For areas where both cabinet fronts and slatted panels are painted uniformly, this is the optimal solution. An MDF baseboard is painted evenly in the same color as the panels and fronts: the bottom line 'disappears,' and the wall and furniture are perceived as monolithic.
Wooden baseboard for natural systems
solid wood baseboard For interiors where wood is present everywhere: a slatted wall in oak, cabinet fronts in wood, parquet or engineered wood flooring. In such a space, a wooden baseboard is the organic lower boundary of the entire wooden system.
The tone of the solid wood baseboard and the tone of the slatted panels should be as close as possible. Ideally, the same manufacturer, same wood species, same surface treatment.
Molding, corner piece, and batten for neat transitions
All three elements serve the same purpose — to close and finish transitions. But each works in its own way.
Molding: decorative border
wooden molding Installed where a pronounced decorative border is needed — not just a technical joint, but a deliberate line. In the 'cabinet + slatted wall' combination, molding is installed:
-
Vertically at the transition between the cabinet and the slatted zone.
-
Horizontally above the slatted insert (if it does not reach the ceiling).
-
Around the perimeter of the slatted niche as a frame uniting all planes.
The width of the molding should be proportionate to the slat spacing. If the slats have a spacing of 30 mm, the molding should be 25–40 mm wide. If too thin, it will get lost. Too wide, it will overlap the slats.
Wooden corner: technical and decorative
Wooden corner UG-001 — indispensable for three situations:
External end of the side panel. Where the cabinet side panel extends into the passage, the wooden corner covers the external corner of the slatted panel on the side panel. Without it, the end is exposed: the slats are visible in cross-section, as is the MDF cut.
Internal corner of the niche. In the corner where the back wall of the niche meets the side slope, the wooden corner covers the internal joint between two slatted planes.
Panel-to-slope transition. Where the slatted wall borders a slope (door, window, or niche), the corner creates a clean transition line.
Wooden slat: extension and symmetry
Decorative wooden slat for filling — when you need to "add" a bit of width to reach the desired size or align the symmetry of the slat rhythm on the side of the cabinet. A separate slat of the required section is attached horizontally or vertically in the right place and closes the gap or creates an additional rhythm element.
Linear products: for non-standard nodes
wood trim items — this is what does not fit into the standard categories of molding and corner. Glazing beads, layouts, transition profiles — for places where the cabinet, wall, slat panel, and niche meet in a non-standard combination. A wide range of sections allows you to close almost any non-standard joint.
Typical mistakes when combining a cabinet and slat panels
Let's analyze the mistakes that occur in real projects.
Different shades of wood without a deliberate contrast. A cabinet in "wenge," a slat wall in "natural oak" — this is not a design technique, it's a conflict. If you want contrast, it should be clear: light and dark. If you want unity, the tones must match exactly.
Door opening not taken into account. The hinged doors of a cabinet with slat facades, when opened, may hit the molding on the adjacent wall, the niche slope, or even the adjacent slat. Check the opening angle before installing the molding and before installing slat panels nearby.
Open end of the slat panel at the side. The most common mistake in this topic. The slat panel is mounted on the wall, but at the side of the cabinet, there is an open cut: the slats in cross-section and the MDF base are visible. A few minutes of work with wooden corner piece or molding solve this problem completely.
The baseboard breaks off randomly. The baseboard under the slat wall goes to the side of the cabinet and breaks off without finishing the end. The end of the baseboard is open, the corner is dusty, MDF delamination is visible. The end must be cut cleanly and finished — primed and painted or puttied.
No handles on slatted facades. How do slatted cabinet facades without handles and without a push-to-open system open? Correct — by the slats. Slats are not designed to serve as handles and with regular gripping they start to shift or get damaged. Handles or handleless opening systems are mandatory.
Too frequent slat rhythm over a large area. If you have a cabinet 3 meters wide with slatted facades and a slat spacing of 15 mm — the surface turns into a "grille" that is visually irritating. For large facade areas, a wider spacing is better: 30–45 mm.
Lighting in the niche not considered. A niche with a cabinet and slatted panels without lighting looks inexpressive: all the reliefs are lost in the shadows. Perimeter lighting in the niche or a hidden LED strip behind the cornice — and the niche turns into a real architectural accent.
Gap at the ceiling without a profile. The slatted panel on the cabinet side ends at the ceiling without any profile on top. The gap, unevenness, and open end are visible. A ceiling plinth or horizontal Wooden plank along the top edge — a mandatory finishing element.
What to buy for the "cabinet + slatted panels" system
Final kit for those ready to order and install.
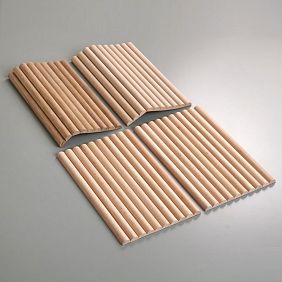
Slatted panels for walls and cabinets — the basis of the system. Three execution options: PAN-001 with decorative coating, PAN-002 primed for painting, PAN-003 in oak wood finish. For cabinet facades, sides, niches, and walls.
Wooden slat RK-001 — for filling, completing non-standard spaces, creating horizontal rhythm in the upper and lower zones of the niche.
Decorative wooden slat — wide range of sections for non-standard spaces.
MDF Skirting Board — for monochrome painted systems. A single bottom line for the cabinet and slatted wall.
solid wood baseboard — for natural wood systems. A bottom horizon unifying the floor, furniture, and wall.
wooden molding — for decorative borders at cabinet-wall transitions, for niche frames, for a horizontal belt above the slatted zone.
molding MLD-019 — for accent framing of furniture niches and slatted zones.
Wooden corner UG-001 — for open ends of side panels, external corners of niches, transitions from slope to panel.
wood trim items — for non-standard joints, complex furniture connections, layouts in niche corners.
Solution table: task — element — where it is used
| Task | Recommended element | Place of application |
|---|---|---|
| Cabinet → slatted wall transition | wooden molding vertically | Cabinet side panel / slatted end |
| Close the outer end of the side panel | Wooden corner bracket | Outer corner of the side panel |
| Single bottom line in the paint-ready system | MDF Skirting Board | Around the entire perimeter |
| Bottom line in a natural wood interior | Wooden baseboard | Around the entire perimeter |
| Frame around the slatted niche | molding MLD-019 | Niche perimeter |
| Width and symmetry filler | Wooden plank | Side panels, top gap |
| Non-standard angles and joints | Wood Trim | Any non-standard nodes |
| Cabinet fronts with relief | Panel PAN-001, PAN-002, PAN-003 | Furniture fronts |
FAQ: answers to important questions
Can slatted panels be used for a cabinet?
Yes, MDF slatted panels are well suited for furniture fronts. It is important to choose the right fastening, provide handles or a push-to-open system, and coordinate the slat pitch with the door width.
Are slatted panels suitable for cabinet fronts?
They are suitable. The panels create a relief front with a vertical rhythm. For fronts, it is better to use PAN-002 for painting or PAN-001 with ready coating.
How to design the side of a built-in wardrobe?
With a slatted panel in tone or in harmony with the wall. The outer end of the side is Wooden angle. The bottom joint is a baseboard in a single line with the entire room.
What to cover the joint between the wardrobe and the slatted panel?
Vertical wooden molding or wooden corner piece — depending on how much the wardrobe and panel are in the same plane.
Which baseboard to choose next to a built-in wardrobe?
For a monochrome painted system — MDF Skirting Board. For natural wooden interiors — solid wood baseboardThe baseboard should run as a single line throughout the entire room, including the area in front of the wardrobe.
Can slatted panels be installed in the dressing room?
Yes. The back wall of the dressing room, the wall behind the hanger, the niche for accessories — slatted panels for walls they work here both as decor and as a functional element: the slats allow the use of hooks and holders without additional wall drilling.
What is better for a wardrobe: individual slats or a ready-made panel?
A ready-made slatted panel is a more technological solution: the slats are fixed to a base with a fixed pitch, installation is faster and more precise. Individual slats are for non-standard sizes when you need to precisely adjust the pitch to specific facade dimensions.
How to design a niche with a wardrobe and lighting?
The back wall of the niche is a slatted panel. The side slopes are slats or a panel cut to depth. The top part is a hidden LED strip behind a cornice or strip. The bottom joint is a baseboard. All corners are corner pieces or moldings.
About the company STAVROS
A built-in wardrobe and a slatted wall are not competitors or random neighbors. This is a system that either works as a single organism or looks like a set of random solutions. The difference is in the details: in how the side panel end is covered, in how the baseboard meets the wardrobe, in whether the rhythm of the slats on the wall and on the facade matches.
STAVROS produces everything needed for such a system: Rafter panels in three versions for walls and furniture fronts, Wooden planks и Decorative Planks for additional elements, Moldings и corners for transitions, MDF Skirting Board и Wooden baseboard for the lower horizon, Trimming Items for non-standard joints.
STAVROS — when the cabinet and the wall speak the same language.