Article Contents:
- 1. When the top frieze is better than a full U-shaped portal
- 2. What exactly is included in the MLDPU-1-2.1 + MLDPU-001 composition
- 3. First measure the space above the door, not the ceiling height
- How to correctly measure Hfree
- A full-size template is better than a conventional standard
- Example for a door with a visible frame of 900 mm
- Table of not "standard doors" but selected design frieze lengths
- When the top frieze needs a second plank
- Door with regular casing
- Hidden door without architraves
- What to do if the slats on the left and right are at different distances
- How much to leave to the nearest slat
- A wide casing changes not only the length but also the scale
- When MLDPU-001 makes sense
- When MLD-001-MG makes sense
- There is too little clear height above the door
- The slat wall is already very busy
- The hidden door must remain truly hidden
- There is already a technical or lighting fixture on the partition
- The frieze emphasizes the asymmetry of the slats
- The full portal is already supported by other elements in the room
- 1. First assemble the composition on the wall without glue
- 2. Create a cutting map before the first cut
- 3. Prepare the base
- 4. For polyurethane, use a compatible compound without aggressive solvents
- 5. Install the central overlay along the approved axis
- 6. Close open ends if they remain visible
- 7. Plan the final painting as a single stage
- Option 1 — fully polyurethane frieze
- Option 2 — central polyurethane overlay + MDF molding
- Useful cross-linking before ordering
- Can MLDPU-1-2.1 and MLDPU-001 be installed after the slat panels and door are already fully mounted?
- Is a spare plank needed if the calculation shows a remainder of only 50–100 mm?
- Can the overlay and molding be painted before installation?
- Can the straight sections of MLDPU-001 be installed first, and the central overlay installed later?
- Can MLDPU-1-2.1 be used with a molding from another manufacturer if its cross-section is also 10 × 6 mm?
- Will the top frieze fit a double door?
- Can the remainder of MLDPU-001 after the top frieze be used elsewhere in the room?
- Can a large remainder of one plank be used for a second top frieze in the same room?
- Can the top frieze be made shorter than the outer width of the trims?
- Is it necessary to buy a full set of corner and side elements from the 001 series along with MLDPU-1-2.1?
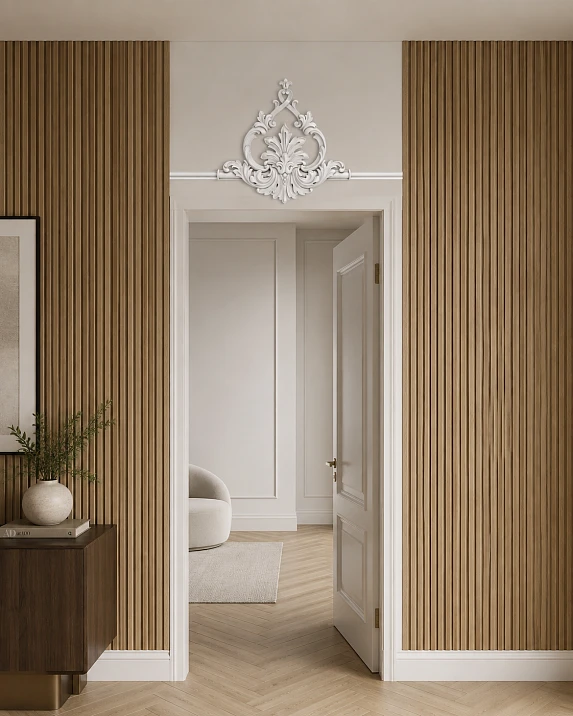
If vertical slat panels approach the doorway from both sides, a full U-shaped portal made of thin molding is not always needed. It adds two more long verticals next to the existing rhythm of slats and can make the wall look overloaded. In such a situation, it is reasonable to consider a more localized solution: leave the side of the door without stucco framing, and assemble only a horizontal decorative frieze above the opening.
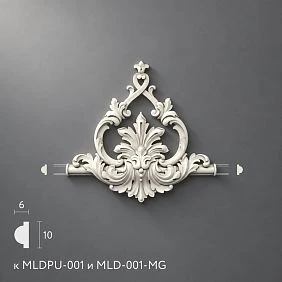
For the 001 STAVROS series, such a frieze can be built around the central decorative overlay MLDPU-1-2.1 measuring 137 × 144 × 12 mm. From it, straight sections of MLDPU-001 molding with a cross-section of 10 × 6 mm and a plank length of 2600 mm extend to the right and left. If primed MDF is needed instead of polyurethane trim, the profile MLD-001-MG 10 × 6 × 2600 mm is compatible with the same central overlay.
The main thing before ordering is not to decide by eye that "there seems to be enough space above the door," but to check four things: the height of the clear wall section, the design length of the frieze, the distance to the nearest slats, and the cutting of one 2.6 m plank. After that, it becomes clear whether the upper composition will really be lighter than a full portal and how much material needs to be purchased.

1. When an upper frieze is better than a full U-shaped portal
Slat finishing already forms a strong vertical direction. Each lamella repeats the neighboring one, so the eye reads the wall as a system of parallel lines. The door breaks this system, but the break itself does not necessarily require new vertical framing.
If MLDPU-001 is run from the floor upward on both sides of the door frame, two more thin verticals will appear next to the outermost slats. On a smooth wall, this could look like a neat portal, but within a slat composition, the molding begins to compete with the lamellas for the same function—marking the vertical boundary.
The upper frieze works differently. It introduces a single horizontal line that visually gathers the opening from above but does not repeat the direction of the slats. The central overlay MLDPU-1-2.1 becomes the semantic focal point of the composition, while the straight sections of MLDPU-001 connect it to the width of the door frame.
This solution is especially logical when:
-
the slats come close to the casing or the finished edge of the door frame;
-
the vertical sides of the opening already look finished;
-
a decorative accent is needed, but not a full classic portal;
-
a separate smooth wall section remains above the door;
-
the interior combines a modern slatted texture with a more classic relief decor;
-
we want to preserve a visual pause between the slats and the door, rather than fill it with additional profiles.
The upper frieze is not a "truncated portal." It is an independent compositional scheme. A full portal builds a frame around the opening, while the upper frieze works as an accent above the door. Therefore, it should be evaluated not by the principle of "there wasn't enough molding for the sides," but by whether one horizontal line truly interacts better with the rhythm of the slatted wall.




2. What exactly is included in the MLDPU-1-2.1 + MLDPU-001 composition
The central overlay MLDPU-1-2.1 belongs to the decor for moldings of the 001 series. The manufacturer specifies its size as 137 × 144 × 12 mm, the material as polyurethane, and compatibility with MLDPU-001 and MLD-001-MG profiles. This is important: the overlay is not simply applied over a random molding of suitable width, but is designed for a specific series of profiles.
The parameters of the basic polyurethane scheme are as follows:
| Parameter | MLDPU-1-2.1 | MLDPU-001 |
|---|---|---|
| Type | Central symmetrical decorative overlay | Thin profile molding |
| Size | 137 × 144 × 12 mm | 10 × 6 × 2600 mm |
| Material | Polyurethane | Polyurethane |
| Role in the composition | Central accent | Straight sections on the right and left |
| Price at time of check | 1,490 ₽/pcs. | 1,740 ₽/plank |
| Made to order | On average 3–7 days | On average 3–7 days |
| Product card | buy central overlay MLDPU-1-2.1 | buy molding MLDPU-001 |
There is an important detail here that needs to be checked specifically against the technical drawing, not by the order of numbers in the line "137 × 144 × 12". On the official diagram, A = 137 mm is shown vertically, B = 144 mm horizontally, C = 12 mm is the relief protrusion. Therefore, for the above-door frieze in the working orientation, we take 137 mm as the vertical dimension of the overlay and 144 mm as its horizontal coverage. For MLDPU-001, the drawing and the product card confirm 10 mm for the face size of the profile, 6 mm for the protrusion, and 2600 mm for the plank length.
This is fundamental for the calculations below: the free height formula includes 137 mm, and when determining the two straight side sections, 144 mm is subtracted from the total frieze length. This approach eliminates the error that occurs if the first number in the A × B × C notation is automatically taken as the horizontal width.
The central overlay has an almost square proportion, but according to the technical drawing, it is slightly wider than it is tall: 144 mm horizontally versus 137 mm vertically. Therefore, in the upper frieze, it is perceived not as a slight thickening of the molding, but as an independent ornamental center. This is especially noticeable next to the thin 10 × 6 mm profile: the molding line remains light, and the decorative mass is concentrated only in the middle.
One central overlay and one MLDPU-001 plank cost 3,230 ₽ excluding delivery and installation materials. For MLDPU-001, when ordering up to 150 planks, a pine backing of 390 ₽ is added to the invoice, which is needed for rigid transport packaging of long linear products. Therefore, the minimum product part of the order in this scenario is not just the price of two decorative items: the backing also needs to be included in the estimate.
Our factory also produces:

3. First measure the above-door wall space, not the ceiling height
To solve the problem, neither the total room height nor the door leaf height by itself is important. What is needed is the clear vertical dimension between the upper visible edge of the door frame and the element that limits the space from above.
The lowest point can be:
-
top of the casing;
-
top of the finished extension;
-
upper edge of the hidden door frame;
-
top of an existing decorative frame.
The highest point can be:
-
the ceiling;
-
ceiling cornice;
-
shadow profile;
-
lower edge of another wall decoration;
-
a technical line that must not be crossed.
Let's denote this clear dimension as Hfree.
According to the technical drawing, the vertical dimension of MLDPU-1-2.1 in working orientation is 137 mm, so the minimum geometric check is simple:
Hсвоб = 137 + hниз + hверх,
where hниз is the free space between the door frame and the overlay, and hверх is the space between the overlay and the upper edge of the wall segment.
The very fact that Hсвоб is greater than 137 mm does not yet mean the composition is successful. If only a few millimeters remain at the top and bottom, the overlay formally fits but looks cramped.
For a first paper mock-up, not as a mandatory standard, it is convenient to check several ranges:
| Clear height Hсвоб | What happens after placing an overlay with a height of 137 mm | How to proceed |
| Up to 180–190 mm | Less than 43–53 mm of total free space remains | First, check the option without a central overlay; perhaps leave only a thin molding or abandon stucco altogether |
| About 200 mm | 63 mm of total field remains | Geometrically possible, but the composition is dense; a full-size template is needed |
| 220–320 mm | 83–183 mm of total field remains | Convenient range for finding the position of the overlay and molding |
| More than 350 mm | There is a lot of free field | Check not for tightness, but for scale: whether the frieze gets lost on a large plane |
These ranges are not STAVROS factory instructions and do not replace the project. They are needed only as a diagnostic filter: to understand which question should be addressed next.
If Hfree is small, the task is not 'how to squeeze in the overlay at any cost', but whether it is needed at all. If Hfree is large, the problem is the opposite: one small horizontal composition may look too detached from the door or get lost on a tall wall.
Get Consultation
How to correctly remove Hfree
Measure the wall opening at least at three points: on the left, along the door axis, and on the right. This is useful even in a fresh renovation. The ceiling line, casing, or extension may have a slight level discrepancy, and the above-door frieze emphasizes the horizontal, so a misalignment that is unnoticeable without decor becomes more visible after installation.
Record the minimum actual value as a constraint for the geometry, but determine the center of the composition based on the visible door architecture, not on a single random measurement point.
A full-size template is better than a conventional norm
Before ordering, cut out a template from paper or cardboard measuring 144 mm horizontally × 137 mm vertically, representing the central overlay in the working orientation. Apply strips of painter's tape to the wall to simulate MLDPU-001, and step back to the usual viewing distance.
This immediately reveals things that a formula does not show:
-
whether there is enough air above the casing;
-
whether the ceiling cornice is too close;
-
whether the ornament conflicts with the slat pitch;
-
whether the horizontal line reads well;
-
should the frieze be made shorter or longer;
-
does one overlay not look too massive for a narrow wall section.
The template is especially useful if the height is on the boundary. Instead of an artificial rule of "minimum X millimeters," you get an answer specifically for your door, ceiling, and slat pattern.
4. How to determine the length of the upper frieze and understand whether one 2.6 m plank is enough
This article calculates a specific scheme: the central MLDPU-1-2.1 takes its place in the middle of the frieze, and two straight sections of MLDPU-001 join it on the right and left. Before actual cutting, this scheme must be confirmed by dry assembly of the product and profile: the technical drawing is more important than a conditional calculation.
Such a horizontal frieze has three independent values:
-
Lfrieze — the full design length of the composition from the left to the right edge;
-
144 mm — the horizontal dimension of the central overlay MLDPU-1-2.1 according to the technical drawing;
-
the length of two straight sections of the molding on the right and left.
If the overlay is placed strictly in the center and straight sections approach it from both sides, the length of each side section is:
Lside = (Lfrieze − 144) / 2.
In total, straight molding will be required:
Lmolding = Lfrieze − 144.
But you cannot buy material exactly to the net length. Cutting consumes part of the plank. The calculation must include a technological allowance P, which depends on the width of the cut and the number of cuts.
For the example below, we take P = 6 mm. This is not a constant characteristic of MLDPU-001, but a calculation assumption for demonstration. Before cutting, the craftsman must substitute the actual allowance of their tool.
One plank of 2600 mm is sufficient if:
Lfrieze − 144 + P ≤ 2600.
With P = 6 mm, the maximum length of a simple straight frieze without additional end returns is:
Lfrieze ≤ 2738 mm.
This is a useful limit, but it should not be perceived as advice to make a frieze 2738 mm long. The formula only answers the question of cutting one plank, not the question of design.
Example for a door with visible framing 900 mm
Suppose after fitting on the wall, a frieze length of 1100 mm is chosen. This means the design intentionally makes the composition 200 mm wider than the visible door framing. It is precisely 'after fitting' — the addition of 100 mm on each side is not a universal rule.
Calculation:
-
Lfrieze = 1100 mm;
-
horizontal dimension of the central overlay = 144 mm;
-
total length of straight molding = 1100 − 144 = 956 mm;
-
with symmetry, each side section = 956 / 2 = 478 mm;
-
with P = 6 mm, 2600 − 956 − 6 = 1638 mm remains from the plank.
That is, for such an upper frieze, one MLDPU-001 plank has a large margin.
The table is not of 'typical doors', but of selected design frieze lengths
To avoid turning a conditional addition to the door into a false standard, it is more useful to calculate from the already selected frieze length:
| Projected frieze length | One side section with symmetry | Total straight molding | Remainder from 2600 mm plank at P = 6 mm | One plank? |
| 900 мм | 378 мм | 756 мм | 1838 мм | Yes |
| 1100 мм | 478 мм | 956 мм | 1638 мм | Yes |
| 1400 мм | 628 мм | 1256 мм | 1338 мм | Yes |
| 2050 мм | 953 мм | 1906 мм | 688 мм | Yes |
| 2650 мм | 1253 мм | 2506 мм | 88 мм | Yes, but the margin is already minimal |
For a 2650 mm frieze, one plank formally still fits by length, but the remainder of about 88 mm does not give the right to promise in advance that it will be enough for decorative end trimming. If returns to the wall are planned at the edges, their length and additional cuts are taken into account before ordering, not after cutting.
When the upper frieze needs a second plank
A second plank is required if at least one of the following conditions is met:
-
the net length of two side sections with the actual allowance exceeds 2600 mm;
-
additional end segments are needed, for which the reserve of the first plank is insufficient;
-
the project involves not two straight sections, but additional inserts or gaps;
-
the craftsman includes a technological reserve due to a complex base or a high cost of error;
-
the remainder of the first plank must be kept intact for another interior element, rather than used for small additions.
Buying a second plank "just in case" or, conversely, trying to fit into one at any cost is equally a bad strategy. First, the final geometry is fixed, then a cutting map is built.
5. How to choose the length of the frieze relative to the casing and slat panels
The most common mistake in such a composition is to determine the length by the formula "door width plus 200 mm" and not check anything else. The frieze has no universal overhang beyond the casing. Its edges simultaneously interact with three objects: the door frame, the outer slats, and the central overlay.
Door with regular casing
The starting point is the visible outer width of the casings, not the width of the door leaf. A leaf of 800 mm and a finished door unit with casings are different sizes. If you calculate from the leaf, the frieze may turn out to be narrower than the visible frame and look like a random short strip.
First, measure the outer width of the finished door unit. Then use painter's tape to check at least three options:
-
frieze roughly along the outer edges of the casing;
-
frieze slightly wider than the casing;
-
a shorter composition if slats come very close nearby.
The winning length is not the maximum, but the one where the frieze ties the door together while maintaining a readable gap to the slat texture.
Hidden door without casings
The Invisible door has no pronounced outer casing, so the finished opening and panel architecture serve as the initial boundary. Here, the top frieze especially changes the door's concept: it deliberately makes the top of the opening noticeable.
If the goal of a hidden door is to dissolve the leaf into the wall, a stucco accent may contradict the intent. If Invisible is used only for a flat surface without casings, but the door still needs to be decoratively marked, the top frieze is acceptable.
Therefore, for a hidden door, the concept is decided first, and only then the length of the molding.
What to do if the slats on the left and right are at different distances
Do not automatically shift MLDPU-1-2.1 toward the nearest slat or stretch one side section more just to fill the void. The central panel is symmetrical and usually reads better when its position is tied to the axis of the door opening.
The basic check is this:
-
mark the axis of the visible door frame;
-
place the paper template of the overlay along this axis;
-
construct identical side sections;
-
estimate the distances to the outermost battens;
-
only if the result is clearly unbalanced, check the alternative length of the entire frieze or another design scenario.
Sometimes the right conclusion is not to shift the frieze, but to make it shorter. Sometimes the asymmetry of the wall is so strong that the upper classical accent only emphasizes it, and then it is better to leave the opening without molding.
How much to leave to the nearest batten
There is no strict factory standard for this gap. As a first approximation, you can check a distance of about 20–30 mm or more between the end of the frieze and the nearest pronounced vertical of the slat finish, but this is only a visual starting point.
If the gap almost disappears, the molding begins to be perceived as accidentally butting against the batten. If the distance is too large, the frieze may lose connection with the side zones of the wall. Here again, tape on the wall helps: by changing the frieze length by 20–50 mm, it is easy to see where the composition becomes calmer.
A wide casing changes not only the length, but also the scale.
With a casing of 80–120 mm, you cannot automatically increase the frieze "proportionally to the casing width." A wide door frame already has visual weight on its own. Sometimes it needs a slightly larger molding projection, and sometimes, on the contrary, a central overlay and short shoulders are enough.
Therefore, a wide casing is a reason to recheck the scale, not to apply a coefficient.
6. MLDPU-001 made of polyurethane or MLD-001-MG made of MDF
MLDPU-1-2.1 is compatible not only with the polyurethane MLDPU-001, but also with the primed MDF profile MLD-001-MG. Both have the same base cross-section of 10 × 6 mm and a length of 2600 mm, but differ in material and price.
| Parameter | MLDPU-001 | MLD-001-MG |
| Material | Polyurethane | MDF |
| Size | 10 × 6 × 2600 mm | 10 × 6 × 2600 mm |
| Compatibility with MLDPU-1-2.1 | Yes | Yes |
| Price at time of check | 1 740 ₽ | 600 ₽ |
| Made to order | On average 3–7 days | On average 3–7 days |
| Backing when ordering up to 150 planks | 390 ₽ | 390 ₽ |
| Product card | MLDPU-001 | MLD-001-MG |
If you need one short top frieze in an ordinary dry room, the choice between the two profiles often comes down to the project material, finishing method, and budget.
When MLDPU-001 is logical
The polyurethane profile forms a material-homogeneous system with the polyurethane overlay. This is convenient if the entire decorative unit is planned to be painted the same way and a unified surface preparation logic is required. Polyurethane also does not force mixing MDF and stucco decor in one small frieze.
For rooms where high humidity is possible, the polyurethane option is usually more practical than MDF, but the adhesive, finish, and base still need to be selected based on the specific room conditions.
When MLD-001-MG makes sense
The main advantage here is obvious from the estimate: one plank costs 600 ₽ instead of 1,740 ₽. At the same time, the central overlay remains the same polyurethane MLDPU-1-2.1.
The base cost of the decor is:
-
MLDPU-1-2.1 + MLDPU-001 = 3 230 ₽;
-
MLDPU-1-2.1 + MLD-001-MG = 2 090 ₽.
The difference is 1,140 ₽ on one upper frieze with one plank.
But choosing MDF only by price is not worth it. If MDF moldings are already used in the interior and there is a proven technology for priming, joining, and painting them, MLD-001-MG logically continues this system. If all the surrounding decor is polyurethane, the savings on one plank may be less important than material consistency.
7. When it is better not to install the upper frieze at all
A commercially useful choice is not always a purchase. There are situations where omitting MLDPU-1-2.1 makes the wall better.
Too little clear height above the door
If after installing the 137 mm high overlay only narrow strips remain at the top and bottom, the relief ends up squeezed between the door and the ceiling. In this case, you can only check the thin horizontal MLDPU-001 without the central overlay or leave the wall section smooth.
The slat wall is already very busy.
Contrasting slats, built-in lighting, pronounced wood grain, wide casings, and an additional molded center can compete with each other. The empty space above the door sometimes serves an important function as a visual pause.
A hidden door should remain truly hidden.
If the point of Invisible is not to show the boundaries of the opening, a decorative frieze does exactly the opposite. Then the absence of molding is not an unfinished detail, but a continuation of the architectural idea.
There is already a technical or lighting element on the wall section.
A sconce, sensor, ventilation grille, automation unit, or another noticeable element above the door divides the space. Trying to add a central overlay there can create a cramped group of several competing focal points.
The frieze emphasizes the asymmetry of the slats.
If the outermost slat on the left almost touches the door, while on the right there remains a large smooth section, a symmetrical molded frieze sometimes makes this difference even more noticeable. Before compensating for the asymmetry with a curved or offset frieze, it is better to check the option without it.
The full portal is already supported by other elements of the room.
The opposite situation is also possible. If the other doors are designed with full classic U-shaped portals, a single top frieze on one door can look like an unfinished version of the overall system. Then the unity of the interior is more important than the local desire to reduce the number of verticals.
8. Installation: from dry fitting to painting
The correct installation sequence is especially important for thin molding. Its small cross-section does not hide marking errors: even a slight slope of a long horizontal line is noticeable next to vertical slats.
1. First, assemble the composition on the wall without glue
Mark the central axis of the door frame. Apply the paper template MLDPU-1-2.1 measuring 144 mm horizontally × 137 mm vertically. Use tape to mark the left and right molding segments.
Check:
-
horizontal line by level;
-
distance to ceiling or cornice;
-
connection of the frieze to the casing;
-
side fields to the slats;
-
perception from the main entry point of the room.
After this, you can fix the final length.
2. Create a cutting map up to the first cut
On the 2600 mm plank, mark both side sections, allowances, and, if provided, small end return elements. If the remainder is needed elsewhere, this is also taken into account in advance.
This approach avoids the situation where the first long segment is cut with a large margin, and suddenly a few centimeters are missing for the second one.
3. Prepare the base
The bonding area must be strong, clean, and dust-free. If the paint is peeling or the base is chalky, the problem is not in the choice of adhesive: the decorative element will adhere to a weak finishing layer, not to the wall.
Before installation, check the compatibility of the selected adhesive with the decorative material, the wall's finish coating, and the room conditions.
4. For polyurethane, use a compatible compound without aggressive solvents
For MLDPU-1-2.1, the manufacturer recommends acrylic mounting adhesive — liquid nails without aggressive organic solvents. Compositions based on acetone, xylene, solvent, and other aggressive solvents should not be used for such a polyurethane overlay.
If a specific product from the related materials block is used, still check the adhesive's own instructions: the wall base may differ from the standard case.
For MLD-001-MG, a mounting compound intended for MDF/wooden moldings and the actual base is needed. Do not replace this check with the general phrase "D3/D4 class adhesive": the moisture resistance class of a carpentry adhesive joint by itself does not answer the question of mounting a specific molding to a specific wall.
5. Install the central overlay along the approved axis
In a typical symmetrical layout, the starting point is the axis of the visible door unit. But the word "typical" is key here: if the entire project is intentionally asymmetrical, the final position is determined by the mockup, not by a formal rule.
After fixing the center, it is easier to control the identical straight sections on the right and left.
6. Close open ends if they remain visible
For a simple horizontal frieze, the side ends of MLDPU-001 are visible. One way to achieve a neat finish is to return the profile to the wall: the main end and a small matching segment are cut at appropriate angles so that the profile visually recedes into the plane.
Such end finishing must be planned in the cutting map in advance. With a remainder of 80–100 mm, you cannot automatically assume it will be enough for both returns: it all depends on the actual geometry of the cuts and the tool.
7. Plan the final painting as a single stage
The polyurethane overlay is supplied with a surface prepared for finishing. After installation, joints, connection points, and local installation marks are brought to a single plane, then the frieze is painted according to the chosen system.
On a slat wall, two approaches are typically used:
-
in the color of the background wall — the pattern is read mainly through relief and shadow;
-
in the color of the door frame — the upper frieze is more strongly connected to the door and is perceived as its decorative completion.
A contrasting third color is also possible, but for a small upper element it sharply increases the visual weight. This option should first be tested on a mockup.
9. What to buy and how much it costs
For one symmetrical upper frieze that fits into a single plank 2600 mm long, the basic order is very short.
Option 1 — fully polyurethane frieze
| Position | Quantity | Price per unit | Sum |
| MLDPU-1-2.1 | 1 pc. | 1 490 ₽ | 1 490 ₽ |
| MLDPU-001 10 × 6 × 2600 mm | 1 slat | 1 740 ₽ | 1 740 ₽ |
| Decorative products | 3 230 ₽ | ||
| Pine backing when ordering up to 150 planks | 1 | 390 ₽ | 390 ₽ |
| Total before delivery and installation materials | 3 620 ₽ |
Option 2 — central polyurethane pad + MDF molding
| Position | Quantity | Price per unit | Sum |
| MLDPU-1-2.1 | 1 pc. | 1 490 ₽ | 1 490 ₽ |
| MLD-001-MG 10 × 6 × 2600 mm | 1 slat | 600 ₽ | 600 ₽ |
| Decorative products | 2 090 ₽ | ||
| Pine backing when ordering up to 150 planks | 1 | 390 ₽ | 390 ₽ |
| Total before delivery and installation materials | 2 480 ₽ |
Prices should be rechecked immediately before payment: the product cost may change. But the logic of the estimate remains the same — central pad, required amount of linear molding, transport backing, mounting and finishing materials, delivery.
If the calculation shows that one strip is not enough, you cannot simply double the entire estimate: a second MLDPU-1-2.1 is not needed. Only the amount of linear molding increases and, if necessary, the related delivery items.
Useful cross-linking before ordering
Links are needed for different selection steps: specific product cards — for ordering, categories — if after fitting it turns out that a different profile or different scale of decor is needed, the slat panels section — if the entire wall is still at the design stage.
10. Checklist before ordering: from measurement to cart
If the solution has not yet been fixed by the designer, it is enough to follow the sequence below. It helps avoid buying decor before the actual geometry is determined.
-
Measure the outer width of the finished door frame. Do not confuse it with the width of the door leaf.
-
Measure Hfree between the upper visible edge of the door and the ceiling/cornice at several points.
-
Mark the central axis of the door. This is the base point for a symmetrical composition.
-
Make a template MLDPU-1-2.1: 144 mm horizontally × 137 mm vertically. Do not judge the scale only by the product photo.
-
Use painter's tape to set several frieze lengths. Compare them with the casing and the nearest slats.
-
Fix the final Lfrieze. Only after this calculate the material.
-
Calculate the side section:
(Lfrieze − 144) / 2for a symmetrical scheme. -
Add the actual saw allowance. Do not copy the 6 mm from the example if your tool gives a different value.
-
Take into account end returns, if they are provided.
-
Check whether the entire layout fits within 2600 mm. If not, a second plank is needed.
-
Choose MLDPU-001 or MLD-001-MG based on the project material, room conditions, and budget.
-
Verify the article numbers and sizes in the cart. For the overlay — MLDPU-1-2.1 137 × 144 × 12 mm; for the polyurethane molding — MLDPU-001 10 × 6 × 2600 mm.
-
Include the backing at 390 ₽ if it is added to the current linear molding order.
-
Separately allocate the mounting compound and final painting. Their cost is not included in the price of decorative items.
-
Before final installation, repeat a dry fit on the wall. Even a correctly calculated frieze can be installed at an unfortunate height.
After this, the purchase ceases to be an experiment. You know how much space there is above the door, what length the frieze has, how much molding is required, which material is chosen, and why a full portal in a specific slat wall is truly not needed.
FAQ
Can MLDPU-1-2.1 and MLDPU-001 be installed after the slat panels and door are already fully mounted?
Yes, if there is a suitable base for adhesive mounting above the door and access for marking, cutting, and fixing. Moreover, in a finished interior it is easier to assess the actual distances to the outer slats and the casing. Before work, check the condition of the paint or plaster in the gluing area: the decor cannot be reliably attached to a peeling finish layer.
Is a spare second plank needed if the calculation shows a remainder of only 50–100 mm?
Not necessarily, but such cutting is already borderline. Before ordering, draw a map of all cuts, including end returns and the actual saw kerf width. If after this the margin remains minimal, a second plank may be more rational than risking ruining the only workpiece due to a cutting error.
Can the overlay and molding be painted before installation?
Pre-painting is possible, but the final appearance is often more convenient to refine after assembly: then you can treat the junction points, local installation marks, and get a continuous color line. If elements are painted in advance, leave the possibility for final touch-up after installation.
Can the straight sections of MLDPU-001 be mounted first, and the central overlay installed later?
Technically, the stages can be separated, but before fixing the straight sections, you still need to have an accurate template of MLDPU-1-2.1 and check its fit. According to the technical drawing, the central overlay occupies 144 mm horizontally, so leaving an "approximate" gap is risky: a few millimeters of error will result in a noticeable mismatch. It is more practical to first do a dry assembly of the entire composition, mark both junction points, and then glue the elements in the chosen sequence.
Can MLDPU-1-2.1 be used with a molding from another manufacturer if its cross-section is also 10 × 6 mm?
The cross-section size alone does not guarantee matching profile shape, radii, and junction line. For MLDPU-1-2.1, the manufacturer has confirmed compatibility with MLDPU-001 and MLD-001-MG. A third-party profile should first be checked by physical fitting, not considered interchangeable based only on two numbers.
Will the top frieze fit a double door?
Width and number of leaves are not a limitation in themselves. The design length of the top frieze matters. If the two side sections, after subtracting 144 mm of the horizontal dimension of the central overlay and accounting for allowances, fit into one 2600 mm plank, one plank is sufficient. For a wider composition, two will be required.
Can the remainder of MLDPU-001 after the top frieze be used elsewhere in the room?
Yes, if the remainder has sufficient length for an independent element and is not damaged by cutting. It is reasonable to include it in the project map in advance: for example, for a short section of a decorative frame, a small niche, or another node of the same series. You should not create additional decor just to "use up the remainder" — there must first be an independent task.
Can a large remainder of one plank be used for a second top frieze in the same room?
Yes, if the second frieze, after subtracting the central overlay and accounting for all cuts, actually fits into the remaining length. You need to calculate not by the nominal remainder from the first example, but by the actual piece after cutting. If end returns are planned on both friezes, they should also be included in the overall cutting map. Such joint cutting sometimes allows two doors to be finished with one plank, but only after calculating both compositions as a single task.
Can the top frieze be made shorter than the outer width of the trims?
Technically yes: the length of the molding does not have to match the outer width of the door frame. But a short frieze can easily start to look like a random strip above a wide trim. This option only makes sense as a deliberate composition — for example, when nearby slats severely limit the side space. Before ordering, it is better to show the short scheme with painter's tape at a 1:1 scale and compare it with the option at the trim width.
Is it necessary to buy the full set of corner and side elements of series 001 together with MLDPU-1-2.1?
No. For the top frieze in question, only the central overlay and the calculated amount of straight profile are sufficient. Corner and side elements are needed only when the project moves to a more complex frame or portal composition.
Conclusion
You can design a slat wall with only a top frieze above the door, and in a number of interiors this is more logical than a full U-shaped portal. The vertical slats retain their own rhythm, the sides of the door do not get additional parallel lines, and above the opening there is one controlled horizontal accent.
For this solution, the basic combination of the 001 series is the central decorative overlay MLDPU-1-2.1 137 × 144 × 12 mm and straight sections MLDPU-001 10 × 6 × 2600 mm. If you need a version made of primed MDF, the compatible straight profile is MLD-001-MG 10 × 6 × 2600 mm.
But you should not buy the set based only on a photo. First, measure the clear height above the door, make a template of the overlay, determine the length of the frieze relative to the casing and the outer slats, and then check the cutting of the 2600 mm plank. For a symmetrical layout, the formula is simple: each side section = (Lfrieze − 144) / 2. After adding the actual cutting allowance, it is immediately clear whether one plank is enough or a second one is needed.
If after a full-size trial the top frieze looks cramped, emphasizes asymmetry, or conflicts with the concept of a hidden door, the best choice is to abandon it. If the horizontal accent really brings the opening together and leaves the slats their own rhythm, after checking the dimensions you can order MLDPU-1-2.1 and the required quantity MLDPU-001 already according to the finished cutting plan.