Article Contents:
- Trim on site does not yet mean readiness for installation
- The supplier and the installation crew solve different tasks
- Why "the wall is ready" is too general a status
- Substrate passport for each zone
- Introducing the installation method code
- Why a method needs a revision
- Why you cannot choose the installation compound in the morning before work
- How to calculate if the manufacturer provides consumption per meter
- A small item can halt an expensive installation
- The installation kit for wooden moulding differs from that of a skirting board
- Cornice: readiness begins with access to the work area
- Why the tooling matters more than the name of the tool
- Tool control before mass release
- Why you cannot change the technology on your own after a failed control part
- Short-term plan for installation kits
- Which horizon to use
- Consumable stock statuses
- How to avoid buying the same consumable five times
- Why a consumable easily "disappears" in accounting
- Return of unused consumables after closing the zone
- What should remain after installation is completed
- The installation method should be kept in the as-built information
- When one fastening method can be unified
- What to do if the substrate changed after the method was approved
- The material for local touch-up must be matched to the finish
- Why the first control sample must be representative
- How to evaluate the control sample
- When to stop mass installation after the first meters
- How to hand over the installation method between shifts
- How to work with several installation crews at the same time
- How to work with tools shared by several crews
- Why this matters for planning
- How to calculate consumable requirements without universal norms
- What else to consider
- How to calculate fasteners for mechanical fixing
- Replacing a consumable requires the same discipline as replacing a profile
- How to work when the contractor proposes their own technology
- Who has the right to set the status to "done"
- When it's better not to send the crew to the site
- How to use completed zones when one queue is blocked
- How to track consumables across multiple methods
- How to store installation kits on site
- Why a kit cannot be assembled only How to check that the installation compound does not damage the finish
- How to check that the installation compound does not damage the finish
- What to do if a consumable runs out in the middle of a zone
- Why actual overspending cannot simply be carried over as a new norm
- How to record installation deviations
- When an installation matrix is truly excessive
- When an extended matrix is especially useful
- Why you cannot assign one person as responsible for "everything"
- Critical consumables must be purchased taking lead time into account
- When the control part needs to be repeated
- Access security is part of installation readiness
- Changing a design assembly automatically reopens the installation check
- How to manage approved consumable replacements
- The operational kit must be minimal but identified
- How to hand over the operating method without a long instruction
- Installation readiness is also information readiness
- How to organize a single morning meeting without unnecessary bureaucracy
- Why an article should not turn into a tool catalog
- Why the checkpoint must happen before people start
- How to identify critical and non-critical blockers
- How not to turn readiness into a formal checkbox
- Scenario: material is available, but the start is still blocked
- Scenario: the consumable is available but not assigned to a zone
- Scenario: one tool becomes a bottleneck
- How to close the checkpoint with documentation
- What to check on the eve of a mass start
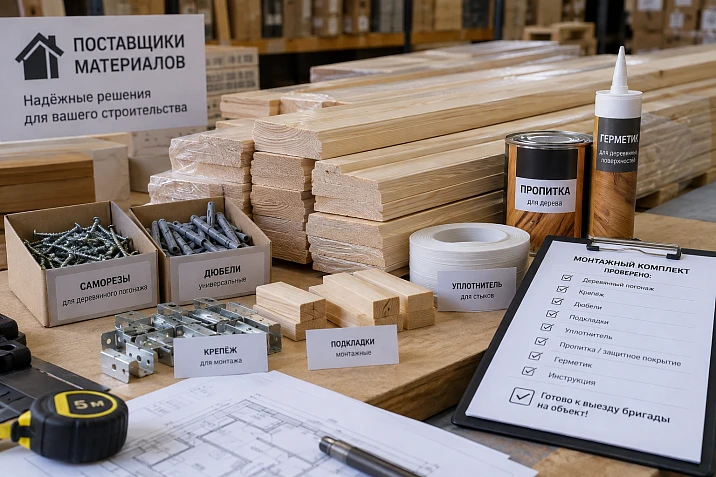
The wooden skirting board, moulding and cornice have already been selected, calculated, paid for, delivered, accepted and are lying on site. It seems the next step is obvious: bring in the crew and start installation. But in the morning it turns out that the fastening method for one wall has not been finally approved, another floor has a different substrate, the installation compound will only be enough for half of the front, there is no suitable tooling for a clean cut, and no one remembered the material for local finishing of the fastening points.
As a result, the expensive wooden trim is physically present in the warehouse, but the first metre cannot be installed properly. This is a separate B2B problem that is not solved by goods acceptance, ordinary warehouse accounting, or the installation instructions for a single skirting board.
For such a situation Material suppliers and the installation team perform different functions. The supplier is responsible for the agreed goods: SKU, material, dimensions, length, quantity and finish. The site must separately confirm installation readiness: the substrate has been checked, the fastening method has been approved, compatible consumables have been calculated, tools and tooling have been checked, and the first control piece has shown that the chosen technology works under real conditions.
TRIM READY + SUBSTRATE READY + INSTALLATION METHOD APPROVED + CONSUMABLES AVAILABLE + TOOLS AND TOOLING CHECKED = CREW READY FOR MASS INSTALLATION
The central document of the article becomes the installation readiness matrix. Until the row for a specific zone receives the status “READY”, the material is not considered fully prepared for mass installation, even if it has already been accepted by the warehouse.


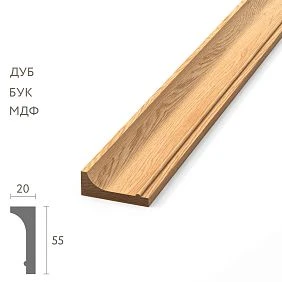
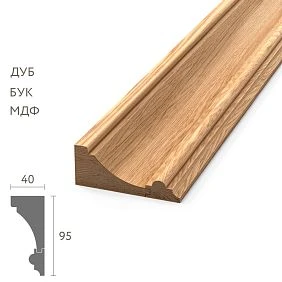

Having trim on site does not yet mean it is ready for installation
There may be 500 m of skirting, 300 m of moulding and 100 m of cornice in the warehouse, but the crew will still be idle. The reason is an incomplete installation loop.
To start work, the following must exist simultaneously:
- the correct SKU in the required quantity;
- a prepared substrate;
- an approved fixing technology;
- compatible installation compounds and fasteners;
- materials for joints and local finishing;
- suitable tools;
- suitable accessories;
- current cutting or marking plan;
- the person responsible who authorized the mass start.
If even one critical element is missing, material readiness does not equal production readiness.
| Situation | Linear molding | Base | Method | Consumables | Tool | Summary |
|---|---|---|---|---|---|---|
| Lobby | Present | done | Approved | Present | Checked | done |
| Room 201 | Present | done | Approved | Present | Required tooling is missing | BLOCKED |
| Corridor | Present | Other reason | Under review | Not calculated | Checked | ON HOLD |
This table immediately shows why material availability cannot be used as the only signal for dispatching installers.




The supplier and the installation crew handle different tasks
materials supplier confirms what relates to the supplied product: its type, SKU, material, geometry, length, finish, and quantity. The installation team works with another part of the system — the actual substrate, the chosen fastening method, and the tools available at the site.
Mixing these roles is dangerous. The supplier cannot see all the actual walls on site, hidden embedded elements, the condition of the drywall, the actual deviations of the substrate, and access to the ceiling assembly. The installer, conversely, must not arbitrarily change the approved profile or interpret a similar SKU as an acceptable substitute.
| Participant | What confirms | What they must not decide on their own |
|---|---|---|
| Supplier | Product, SKU, material, dimensions, length, finish | The actual installation method for each substrate on site |
| Designer/technical specialist | Assembly, fastening method, permissible materials | A commercial substitution without approval |
| Buyer | Product and consumables completeness | Independent change of technology |
| Installation crew | Execution of the approved scheme | Choosing a new adhesive or fastener "out of habit" |
The article does not create the impression that STAVROS is obligated to supply all tools or all consumables. Trim and the installation kit may be purchased from different suppliers. They must come together before work begins.
Our factory also produces:








First we check the substrate, then we choose the fastening
It is impossible to determine the fixing method based on the product name alone. The same skirting board can be installed on concrete, brick, drywall, a wooden wall, a panel structure, or another prepared substrate. The conditions differ, so the installation scenario may also differ.
STAVROS publishes different recommendations for different substrates, so a modern B2B article should not mechanically impose a single fastener on the entire catalog. For a project, another principle matters more: each zone must have a pre-approved installation scenario.
Before calculating consumables by zone, the following are fixed:
- base type;
- its condition;
- presence of embedded supports or framing;
- finish layer;
- flatness and local deviations;
- suitability for mechanical fastening;
- restrictions on concealed utilities;
- need to combine adhesive and mechanical fixing.
Why “the wall is ready” is too general a status
Two walls may look identically painted, but one is on brick and the other on a drywall system. For purchasing consumables, these are two different installation tasks.
Get Consultation
Substrate passport for each zone
To avoid re-discussing the walls in the morning before installation, it is convenient to keep a short substrate passport.
| Zone | Base | Finish | Embedded items | Features | Status |
|---|---|---|---|---|---|
| Lobby | Concrete/prepared layer | Painting | As per project | Feature area | Verified |
| Rooms 201–210 | Drywall | Painting | Available per the diagram | serial installation | Verified |
| Corridor | Mixed | Painting | Partially | A separate node is needed | Under review |
The passport does not replace working documentation. It links the actual substrate to the installation method and helps the purchaser understand which consumables are actually needed for each phase.
Enter the installation method code
Within the project, it is useful to use short internal codes. For example:
- M01 — approved scheme for substrate A;
- M02 — scheme for base B;
- M03 — combined fixation for a special unit.
These are not STAVROS codes and not universal standards. This is the internal language of a specific object.
Instead of the entry:
PLT-A / room 201 / glue as usual
We get:
PLT-A / room 201 / method M01 / revision 03
SKU → ZONE → BASE TYPE → METHOD CODE → CONSUMABLES → TOOL → FIRST CONTROL PIECE → MASS INSTALLATION
Why a method must have a revision
If after the first control piece the composition, fasteners, or operation were changed, the old method must not continue to be used by another crew. The revision number protects against installation according to an outdated scheme.
Why you shouldn't choose an adhesive compound in the morning before work
Improvisation is especially dangerous on a finished surface and natural wood. The installer arrives, sees that no approved compound is available, and buys the nearest "universal" adhesive in a store. After that, the project tests compatibility not on a test piece, but on the finished wall.
Before the mass start, it is necessary to determine:
- which type of compound is approved by the project;
- whether it is compatible with the substrate;
- whether it is compatible with the back side of the profile;
- whether it affects the finish;
- whether it requires mechanical support;
- how visible joints are treated;
- how local touch-up is performed.
Specific products and consumption rates are taken from the approved technology and the instructions of the manufacturers of the relevant materials.
The profile itself and the installation kit are separate purchasing items
construction materials supplier may provide the main material for the project, but this does not mean that all installation compounds, fasteners, tools, and accessories must be included in one invoice.
Convenient to separate:
| Package | Content | When it closes |
|---|---|---|
| Product package | Skirting board, molding, cornice, casing, other profiles | After acceptance of the goods |
| Installation package | Fasteners, installation compounds, consumables, accessories, finishing | Before the crew starts |
Both packages must be ready simultaneously for the zone start.
What is a zone installation kit
An installation kit is not necessarily a physical box. It is confirmation that all conditions and resources for a specific zone have been gathered.
For example:
KIT-E2-K201
may include:
- skirting board PLT-A in the calculated quantity;
- molding MLD-A;
- current cutting map;
- method code M01;
- calculated consumables;
- locally finished material;
- verified tool;
- suitable tooling;
- assembly drawing;
- status of the first control part.
While the kit is incomplete, the zone does not receive the "done" status.
Why consumables should be calculated separately from the trim itself
The linear footage of the profile and the consumption of the installation compound do not have to be recalculated with a single formula. Actual consumption depends on the technology, the substrate, the specific product, the application method, the geometry of the contact surface, and the manufacturer's requirements.
Therefore, a modern article should not use a dubious rule such as "one tube is enough for X meters" for any adhesive and any profile.
More correctly:
the consumable is calculated according to the approved technology and the data of the manufacturer of the specific consumable material.
How to calculate if the manufacturer provides consumption per meter
If the technical data for a specific product actually specifies consumption per linear meter for the selected application scheme, the calculation can be done as follows:
total requirement = length of work × specific product rate × agreed reserve.
The number of packages is rounded up taking into account the actual packaging.
If the manufacturer specifies consumption in another form — area, roller length, number of points, or another parameter — their method is used.
A small item can halt expensive installation
construction and repair goods wholesale the installation scope includes not only expensive products. Sometimes the crew is idle because of a small item that costs significantly less than the linear meterage itself.
For example, missing:
- the necessary tooling for a clean cut;
- compound for local repair;
- approved installation material;
- tool consumable;
- painter's masking protection;
- suitable abrasive;
- touch-up material;
- template or guide.
Therefore, the readiness matrix checks the entire system, not just the most expensive lines.
Wooden skirting board installation kit
for wooden baseboard the readiness kit includes not only the planks.
| Block | What to Check |
|---|---|
| Material | SKU, material, length, quantity, batch status |
| Base | Type, readiness, embedded parts, local deviations |
| Method | Approved scheme code |
| Layout | Segments, joints, priority of long planks |
| Consumables | Fasteners, installation kit, finishing per project |
| Tool | Saw, measuring tool, tooling, fixation |
| Finish | Material for local touch-up and covering visible areas |
The article does not impose a single fastening method for all skirting boards. The main task is for the chosen method to be approved before mass installation.
The installation kit for wooden moulding differs from that for skirting boards
wooden molding often forms frames, long horizontals, and corner joints. Therefore, its kit includes different risks.
Need to check:
- accuracy of corner cuts;
- compatibility of the tooling with the relief;
- a dry fit of the first frame;
- material for the joints;
- fixing until full strength is reached, if required;
- a template for identical frames;
- a method for repeating the angle across a series;
- protection of the finished finish.
Therefore, the molding set should not automatically copy the skirting set, even in the same room.
Cornice: readiness begins with access to the work area
for wooden cornice another layer appears — safe access.
Before the crew starts, they check:
- installation height;
- ladders, scaffolding, or another approved access system;
- the ability to work as a pair with a long profile;
- clear passage;
- protection of walls and floor;
- lighting at the work area;
- the ability to hold a long element during fastening;
- readiness of the ceiling junction.
The problem may not be the product or the fasteners: the curtain rod cannot be safely lifted and held at the actual height.
The tool is included in the crew's readiness, but not in the commercial specification of the trim
Having a drill, saw, or sander on site does not yet mean that the tooling part is ready.
Three states are checked:
| Status | What does it mean |
|---|---|
| Present | The tool is physically present on site |
| Checked | It works, is complete, and is safe |
| Suitable | The tooling and specifications match the specific profile and operation |
For example, a miter saw is present, but the installed blade produces a torn cut on the visible wooden edge. Formally, the tool is there. In fact, the installation system is not ready.
Why tooling matters more than the tool's name
The quality of the cut, angle, and hole is often determined precisely by the blade, drill bit, guide, template, or another consumable element. Therefore, the check "the saw is there" is too crude.
Tool control before mass output
Before starting serial installation, the crew checks:
- cutting tools;
- the tooling;
- accuracy of angles;
- measuring tool;
- drilling equipment;
- drift punches and auxiliary accessories;
- fastening means;
- dust removal and protection of the finished area.
If an operation requires a special accessory, it must not be left for the day of mass installation.
The first control part is a separate stage
This is not the same process as the 1:1 architectural test section before purchase. There, the design and the mating of profiles were checked. Here, the product has already been purchased, and the first control part answers a different question:
whether the approved installation technology works on the actual base of the site.
The first piece must verify:
- cut;
- fitting;
- fixation;
- joint;
- finish behavior;
- concealment of fasteners;
- local finishing;
- repeatability of the result.
METHOD APPROVED → TOOL VERIFIED → FIRST PIECE → EVALUATION → APPROVED OR SUSPENDED → MASS INSTALLATION
Why you must not change the technology on your own after an unsuccessful control piece
If the first part shows a poor result, this is not permission for the installer to switch to a different adhesive, different fasteners, or a different "how we usually do it" scheme.
Status:
SUSPENDED — METHOD UNDER REVIEW.
After this, the responsible person checks:
- correctness of the substrate;
- compliance of consumables;
- tools;
- condition of the profile;
- sequence of operations;
- need to adjust the technology.
The change is documented in a new revision of the method so that the next crew does not receive the old scheme.
Completeness must be checked by zones
building materials supplier can close out the delivery for an entire project, but installation readiness is always local.
Bad:
everything needed is somewhere on the project site
Good:
floor 2 / rooms 201–210 — DONE
floor 3 — BLOCKED: no consumables
| Zone | Linear molding | Base | Method | Consumables | Tool | Status |
|---|---|---|---|---|---|---|
| Floor 2 | Yes | Yes | Yes | Yes | Yes | done |
| Floor 3 | Yes | Yes | Yes | No | Yes | BLOCKED |
| Lobby | Yes | Under review | No | — | Yes | ON HOLD |
This way the crew can be sent where the work can actually be finished.
Short-term plan for installation kits
It's useful to check completeness not on the morning of the work, but in advance — by upcoming dates.
| Date | Zone | Linear molding | Consumables | Tool | Status |
|---|---|---|---|---|---|
| 14.09 | Floor 2 | done | done | done | ALLOWED |
| 15.09 | Floor 3 | done | Shortfall | done | BLOCKED |
| 16.09 | Lobby | done | done | Under review | ON HOLD |
This way, purchasing of consumables starts working ahead of time, rather than after the crew stops.
What horizon to use
It depends on the pace of the project. For active finishing, this could be several days or one to two weeks. It's important to see the next queue before it becomes urgent.
Why you shouldn't send consumables to the site in one shared box
On a large construction site, such a box quickly turns into “it should be somewhere.”
It's better to distribute by:
- floor;
- crew;
- installation queue;
- method type;
- zone.
You don't necessarily need to physically create a separate box for each room. But the warehouse must understand how much has already been allocated to the front and how much remains free.
Consumable stock statuses
For simple control, four states are enough:
| Status | Meaning |
|---|---|
| In Stock | Total actual balance |
| Reserved | Already allocated to a specific zone |
| FREE | Can be directed to the next queue |
| NEED TO PURCHASE ADDITIONALLY | After deducting the reserve, a deficit arises |
Formula:
available = actual warehouse − reserved.
Not:
available = everything physically on the shelf.
How not to buy the same consumable five times
Any foreman may say, "we urgently need more." Before a new order, the following is checked:
- total warehouse;
- reserved quantities;
- available stock;
- unused returns from closed zones;
- the requirement of the next queue.
Only after this does the real shortage amount appear.
Why consumables easily "disappear" in accounting
It may cost little compared to the linear footage, so it is rarely tracked as strictly. But a few repeat urgent purchases and crew downtime quickly make a small item expensive.
Return of unused consumables after closing the zone
After completing a floor or a series of rooms, it is useful to return to the common pool:
- unused fasteners;
- sealed and suitable installation materials;
- the entire tooling set;
- local finishing materials;
- templates;
- usable offcuts.
But returns go through a condition check. An opened product with a limited shelf life after opening cannot automatically be considered a fully usable free stock if the manufacturer's instructions say otherwise.
Installation stock and operational kit are different reserves
After the project is handed over, materials may be needed for local repairs. This is no longer the crew's stock, but an operational kit.
| Fund | Purpose | Can it be used during installation? |
|---|---|---|
| Installation stock | Current installation and local errors | Yes, according to the project rules |
| Operational kit | Future repairs after handover | Not without a separate decision |
If the maintenance kit was used before handover, it must be restored.
What should remain after installation is completed
Not a random pile of tubes, offcuts, and unidentified strips.
After closing the project, it is useful to leave:
- an identified reserve of trim;
- the finish system code;
- a description of the installation method used;
- if necessary, a maintenance set of materials;
- a link to the current documentation;
- the history of key changes.
This significantly simplifies repairs after a few years.
The installation method should be kept in the as-built documentation
For operation, it is useful to know not only:
PLT-A / oak / zone 201
But also:
method M01 / revision 03
It is not necessary to keep dozens of pages of instructions near each plank. It is enough to link the installed product to the system that was actually used.
When there are several substrates on one floor
One of the typical causes of installation errors is treating the entire floor as a single zone. In reality, some walls are concrete, some are drywall, and some are covered with panels.
In such a situation, one SKU may have several installation methods:
| Zone | Article | Base | Method |
|---|---|---|---|
| 201–205 | PLT-A | Drywall | M01 |
| 206–210 | PLT-A | Concrete | M02 |
| Corridor | PLT-A | Mixed | M03 |
The trim is the same. The installation kit is different.
When a single fastening method can be standardized
If the designer and technical specialist confirm that one method is suitable for several zones and substrates, standardization is useful. It reduces the number of consumables and simplifies training and inventory.
But standardization must be the result of verification, not an assumption.
Check:
- compatibility with substrates;
- load;
- profile geometry;
- finish;
- operating conditions;
- the result of the control sample.
What to do if the substrate changed after the method was approved
For example, the project assumed concrete, but in reality part of the wall is made with a different system. You cannot continue with method M02 just because it has already been approved on paper.
Algorithm:
- record the actual basis;
- place the zone on hold;
- review the technology;
- recalculate consumables if necessary;
- make a new control sample;
- issue a new revision of the method.
How to work with finished painted moulding
A finished surface comes with additional requirements:
- avoid damaging the face surface when cutting;
- choose suitable tooling;
- know in advance what covers visible fastening points;
- understand how fresh cut edges are retouched;
- do not use a random touch-up material of a different shade.
Therefore, the installation kit must include not only fasteners but also finishing touch-up.
The local touch-up material must be matched to the finish
You cannot keep a single can of “white paint for everything” on site.
If the moulding has several finishes, the local material is labeled the same way:
- F01;
- F02;
- F03.
Otherwise, the repair of the fastening point or end edge may be visually more noticeable than the fastener itself.
Why the first control sample must be representative
You should not choose the simplest hidden corner if mass installation will be on a feature wall with a typical substrate.
The control part must replicate:
- typical base;
- profile type;
- actual fastening method;
- typical joint;
- finish;
- sequence of operations.
Otherwise, the test confirms a scenario that will not be replicated.
How to evaluate the control part
They check more than just the appearance immediately after installation.
You need to answer:
- whether the cut is precise enough;
- whether the finish is damaged;
- is the fixation stable;
- can the operation be repeated in series;
- is it clear how to close the fastening points;
- does the joint match the approved appearance;
- is excessive manual finishing required.
When mass installation should be stopped after the first meters
Even after a positive control piece, the first few repetitions should be observed more carefully. A stop is needed if a systemic problem appears:
- corners repeat unstably;
- the tooling quickly loses quality;
- the profile is damaged during fixation;
- the adhesive behaves differently on part of the substrate;
- the finish retouches poorly;
- the installer is forced to deviate from the method.
It is better to stop ten units than to repeat a defect over a hundred meters.
Crew readiness is a separate status from material readiness
You can have material with the status "ready," but a crew without prepared tools or briefing. Therefore, it is useful for the site to separate:
| Status | What does it mean |
|---|---|
| MATERIAL READY | Trim is accepted and available |
| AREA READY | Substrate and access confirmed |
| TEAM READY | The method is clear, tools and fixtures are verified |
| MASS START | All three statuses confirmed |
How to transfer the installation method between shifts
If one team worked in the morning and another in the evening, verbal handover is risky.
The shift must receive:
- method code;
- current revision;
- photo of the reference part;
- zone map;
- critical notes;
- consumables remaining;
- tool status.
This way, the second shift doesn't start over "its own way."
How to work with multiple installation crews simultaneously
If three crews are working on different floors, the central warehouse must see the distribution of installation kits.
| Crew | Zone | Method | Consumables | Tool | Status |
|---|---|---|---|---|---|
| А | Floor 2 | M01 | Issued | Checked | done |
| Б | Floor 3 | M01 | Shortfall | Checked | BLOCKED |
| В | Lobby | M03 | Issued | Under review | ON HOLD |
This allows procurement and the site foreman to quickly see the real front.
How to work with a tool that is shared across several crews
Even if the tooling is the same and suitable, it may physically be on another floor.
In the short-term plan, consider:
- who is using the tool now;
- when it will become available;
- whether a duplicate is needed;
- whether there is a backup set;
- who is responsible for handover and condition.
This is especially important for custom tooling, without which installation is impossible.
How to account for opened installation compounds
After the first zone, several partially used packages may remain in the warehouse. Formally, the product is there. But for the next queue, it is necessary to understand whether it can be considered a full-fledged stock.
The opening date, storage conditions, manufacturer's requirements after opening, package seal integrity, actual condition, remaining quantity, and compatibility with the method of the next zone are checked.
An opened package should not automatically fall into the "available" status. If its suitability is questionable, it is either checked according to the manufacturer's instructions or excluded from the calculation.
Why this matters for planning
Otherwise, the purchaser sees three tubes in the warehouse, assumes there is enough material, and in the morning the crew discovers that one is almost empty, the second is unusable after storage, and the third is reserved for another zone.
How to calculate consumable requirements without universal norms
If the manufacturer of the consumable specifies a particular consumption rate for the selected scheme, the calculation is based on their data.
If the instructions give consumption per linear meter, the working formula looks like this: requirement = installation length × consumption of the specific product according to the instructions. Then the agreed project reserve is added, and the result is converted into a number of whole packages.
If consumption is specified by area, length of the adhesive bead, or number of points, the calculation is based on that unit. Therefore, the universal figure "one cartridge per so many meters of any skirting board" is not used in the article.
What else to consider
- losses on the first setup;
- a control part;
- complex angles;
- a local rework;
- incomplete packages;
- different methods by substrate.
How to calculate fasteners for mechanical fixing
If the project uses mechanical fixing, the quantity cannot be taken from the installer's general memory. The spacing and type of fasteners are determined by the approved method, the substrate, and the recommendations for the specific system.
For purchasing, the formula is sufficient: fastener quantity = the calculated number of fixing points according to the approved layout + project allowance.
| Zone | Base | Method | Points per layout | Requirement |
|---|---|---|---|---|
| 201–205 | Drywall | M01 | Per working layout | Calculate separately |
| 206–210 | Concrete | M02 | Per working layout | Calculate separately |
This way, procurement does not mix two types of fasteners into a single line item, "skirting board screws."
Replacing a consumable requires the same discipline as replacing a profile
If the approved composition is not in stock, you cannot automatically take a "similar" product just because it is intended for wood installation.
Compatibility with the substrate, compatibility with the profile material, impact on the finish, application conditions, setting time, the need for additional mechanical support, the manufacturer's instructions, and the result on a test piece are checked.
If the replacement affects the process, a new revision of the installation method is issued.
How to proceed if the contractor proposes their own technology
An experienced crew may have a familiar installation method. This is a useful source of practical information, but it should not automatically override the design decision.
- The contractor describes the proposed scheme.
- A technical specialist evaluates compatibility.
- If necessary, a control part is performed.
- The result is recorded.
- The method is either approved or rejected.
Thus the installer's experience is used, but the decision becomes reproducible for other crews.
When the installation kit can be considered ready
The status "ready" is assigned not by intuition, but by a closed checklist.
| Check | Yes/No |
|---|---|
| Linear stock accepted and allocated by zone | … |
| Base checked | … |
| Method approved | … |
| Consumables calculated | … |
| Consumables physically available | … |
| Tool checked | … |
| Tooling suitable | … |
| First control part accepted | … |
| Local finishing material available | … |
| Installation diagram handed over to the crew | … |
If a critical line is not closed, the zone remains "paused" or "blocked".
Who has the right to set the "done" status
On a small site, this may be the foreman. On a complex one — the technical coordinator, finishing works manager, or another designated participant.
The key is one clear decision owner. If the warehouse considers the kit ready because the goods have arrived, the purchaser because the consumables are paid for, and the foreman because the crew is already on site, three different criteria create chaos.
When it is better not to send the crew to the site
Sometimes the right decision is to postpone the start by a day rather than send people to "start something."
The crew should not be sent to mass installation if the method has not been approved, the base is still changing, a critical consumable is missing, suitable tooling is unavailable, the first control part has not been accepted, access to the cornice is not ready, there is no material for local finishing, or the design version of the assembly remains open.
The cost of one day of waiting should be compared with the cost of mass rework.
How to use ready zones if one queue is blocked
A status system allows you not to stop the entire site.
| Zone | Status | Action |
|---|---|---|
| Floor 2 | done | Send the crew |
| Floor 3 | BLOCKED | Buy additional consumable |
| Lobby | ON HOLD | Complete method verification |
The crew works where the circuit is closed, while procurement prepares the next queue in parallel.
How to account for consumables across multiple methods
If a single object uses M01, M02, and M03, consumables must be planned separately for each method.
| Method | Zones | Primary consumable | Additional items |
|---|---|---|---|
| M01 | Rooms | According to approved system | Fixing and finishing |
| M02 | Corridor | According to approved system | Other fasteners |
| M03 | Lobby | Combined method | Special tooling |
This prevents the situation where a purchaser sees a shared glue stock and assumes that any cartridge fits any zone.
How to store installation kits on site
For serial rooms, physical kitting can save time.
KIT E2 / ROOMS 201–205 may include assigned trim, consumables, method marking, cutting map, and readiness status. The tool can be physically stored centrally, but its availability is reserved according to schedule.
Why a kit cannot be assembled only
How to check that the installation compound does not damage the finish
If there is a risk of contact with the face surface or displacement of the compound from the joint, the test piece should show how excess is removed, whether a stain remains, whether the gloss changes, whether the coating is damaged, and what cleaning is permitted.
This must not be tested for the first time on an expensive feature wall.
What to do if a consumable runs out in the middle of a zone
If the accounting system does fail, the crew must stop until a compatible material is available, rather than using a random substitute.
- the remaining balance of work already completed is recorded;
- the general warehouse is checked;
- the reserve of other zones is checked;
- it is decided whether redistribution is possible;
- if necessary, an urgent purchase is made;
- the method is not changed without approval.
If there is a free balance on another floor, it can be redistributed only after the accounting is updated. Otherwise, the next zone will unexpectedly be left without its own reserve.
How to estimate actual consumption after the first zone
After installing a typical batch, the estimate and actual can be compared.
| Position | Calculation | Actual | Deviation | Action |
|---|---|---|---|---|
| Consumable A | As per project | For issue and return | … | Check the next queue |
| Fastener B | By scheme | As per actual | … | Check the cause |
If actual consumption is consistently higher than the calculated one, the cause needs to be understood: the substrate, losses, technology, excess issue, or an error in the original norm.
Why actual overconsumption cannot simply be carried over as a new norm
First, the cause is determined.
- installation error;
- unprepared substrate;
- rework;
- warehouse losses;
- incorrect method;
- genuinely higher consumption of a specific product.
Only the last scenario can become a basis for adjusting the calculation of future zones. If the overconsumption arose due to rework, increasing the planned order means cementing the error.
How to record installation deviations
If a local assembly had to be changed in a specific zone, this should not disappear after handover.
Floor 2 / room 207 / PLT-A / method M01-R04 / local change at the cabinet.
This way, operations and subsequent projects understand that the actual solution differed from the standard one.
How to use installation readiness data on future sites
After the project is completed, the company gains a useful knowledge base: which substrates were encountered, which methods actually worked, which tooling was critical, which consumables were often forgotten, what the actual consumption turned out to be, where bottlenecks occurred, and which control pieces required revision.
On the next site, this data allows the installation package to be prepared earlier. But the method should only be transferred after verifying that the substrate and conditions are truly comparable.
When the installation matrix is truly excessive
For one small room, where a single craftsman installs a few skirting boards using a familiar approved technology, a large matrix may be unnecessary.
A short checklist is enough: material is available, the substrate is prepared, the method is known, consumables are available, the tool is suitable, the control piece is completed.
The system should be proportional to the scale.
When the extended matrix is especially useful
It is justified for hotels, restaurants, public facilities, multi-story projects, serial apartments, sites with multiple crews, multiple substrate types, and expensive wooden decor.
The more repetitions there are, the more expensive a systemic error becomes and the more useful early completeness control is.
The readiness matrix must have an owner for each row
The "not ready" status by itself is of little help if no one is responsible for clearing the blocker. Therefore, every open item must have an action owner.
| Zone | Issue | Responsible | Lead Time | Status |
|---|---|---|---|---|
| Floor 2 | No consumable M01 | Procurement | 13.09 | In progress |
| Lobby | Basis not verified | Site foreman | 13.09 | In progress |
| Corridor | No suitable tooling | contractor | 14.09 | In progress |
This is how the matrix turns from a problem report into a working preparation tool.
Why you shouldn't assign one person as responsible for "everything"
The purchaser cannot confirm the basis, and the site foreman is not obliged to buy consumable material. The owner becomes the one who is actually able to clear a specific blocker.
Critical consumables must be purchased taking lead time into account
A cheap item may have an unexpectedly long lead time. For example, specialized tooling, a specific installation compound, or a finishing material may not be available at the nearest warehouse.
Therefore, it is useful to add two fields to the short-term plan:
- required date;
- actual readiness/delivery date of the consumable.
If the zone is needed in five days, but a critical item takes seven days to arrive, the problem must be visible before the crew starts.
| Position | Needed by | Confirmed | Risk | Action |
|---|---|---|---|---|
| Tooling A | 14.09 | 13.09 | Low | Receipt control |
| Consumable B | 14.09 | 16.09 | High | Reschedule the queue or agree on an alternative |
This is the same logic as for the main material: the desired date is not the same as the confirmed date.
The first control part must have acceptance criteria
The phrase "seems fine" is not suitable for a production start. Before the control installation, it is useful to define in advance what exactly counts as a successful result.
For example:
- the profile is installed without damaging the finish;
- the joint matches the approved sample;
- the fastening points are visually acceptable after finishing;
- the method does not require excessive manual rework;
- the operation can be repeated by another installer;
- the completion time matches the plan;
- material consumption does not show abnormal overuse.
If the criteria are unknown, one participant will accept the part, while another will stop the crew after the first ten meters.
When the control part needs to be repeated
After a significant change to the base, mounting assembly, fasteners, profile, tooling, or joint scheme. A minor organizational change that does not affect the result does not require a full repeat cycle.
Access safety is part of installation readiness
Especially for cornices and tall moldings, readiness cannot be reduced to having a ladder. You need to make sure that the work area actually allows you to safely hold a long profile and work with tools.
Checked:
- access to the wall;
- a stable means of access;
- lighting;
- free space for the long component;
- no conflicts with other contractors;
- protection of the floor and furniture;
- the ability to work in pairs where required by the work organization.
If the cornice is there and consumables are there, but the area is occupied by electricians and the scaffolding is not set up, the zone is not ready.
Changing the design assembly automatically reopens the installation check
On a construction site, the design changes. For example, a door was moved, a cabinet was enlarged, a wall was reinforced with a panel, or part of the base was replaced. Even if the linear footage has not changed, the installation method may no longer match reality.
Before continuing, check:
- whether the base has changed;
- whether access to the fasteners has changed;
- whether the joint has changed;
- whether other consumables are needed;
- whether a new reference part is needed.
This way, the method is tied not only to the SKU, but also to the actual assembly.
How to manage permitted consumable substitutions
On a large project, it is useful to determine in advance whether alternative products are allowed and who approves them. If the fallback option has already been checked, the absence of the primary material does not necessarily stop the crew.
| Position | Primary option | Alternative | Status |
|---|---|---|---|
| Installation compound M01 | Product A | Product B | APPROVED |
| Touch-up material F02 | System A | — | NO SUBSTITUTION |
The main thing is not to turn the list of alternatives into a right for the installer to choose any product on site. A substitution must be linked in advance to a specific method.
How to close the installation kit after completing a zone
The status "installation complete" does not mean the kit can be forgotten. After closing the zone, a short reconciliation is performed:
- how much linear stock was used;
- how many whole items remain;
- which consumables were returned;
- what became unusable;
- which actual method was used;
- whether there were any changes;
- what is handed over to the next zone;
- what is retained for operation.
This information improves the calculation of the next queue and prevents leftovers from disappearing between crews.
The operational kit should be minimal but identified
After handover, there is no point in keeping a warehouse of random materials "just in case." A small, clear kit is more useful.
It may include:
- whole spare planks of critical SKUs;
- a signed finish sample;
- local touch-up material code;
- installation method code;
- contact/link to the current product card;
- list of zones where this kit is used.
The shelf life and suitability of specific consumables are verified separately. It cannot be assumed that any opened installation compound should sit for years alongside the reserve.
How to convey the operating method without a long instruction
In the as-built schedule, the following combination is sufficient:
PLT-A / zone 201–210 / method M01-R03 / finish F01.
A separate project folder holds the detailed description of M01-R03. Operations does not need to study dozens of pages before a repair arises, but it immediately knows where to find the system actually applied.
Installation readiness is also information readiness
Even if everything is physically on site, work can stop due to the absence of an up-to-date drawing or an understanding of which revision to use.
Therefore, the set includes:
- the current diagram;
- method code;
- current cutting map;
- photo of the reference part;
- critical notes;
- the revision number.
An old printout in the tool drawer can be more dangerous than a missing tube of glue.
How to organize a single morning meeting without unnecessary bureaucracy
On large sites, a short zone-by-zone check before the shift starts is enough:
| Zone | What we check | Result |
|---|---|---|
| Floor 2 | Trim / consumables / method / tooling | done |
| Floor 3 | Consumable M01 | WAITING |
| Lobby | Control part | ON HOLD |
This allows the crew to be directed to a ready zone and a person responsible for the lockout to be assigned immediately.
Why the article should not turn into a tool catalog
The purpose of the material is to show the readiness system, not to list brands of saws, adhesives, and fasteners. The range and technical specifications of consumables change, but the principle remains:
approved technology → calculation → completeness → inspection → mass installation.
This also does not create the false impression that STAVROS necessarily sells every tool and every installation consumable mentioned in the process.
Checkpoint before crew mobilization
Before the crew actually goes to the floor, it is useful to hold one final checkpoint. It should not take half a day or turn into a meeting for the sake of a meeting. Its task is to confirm in a few minutes that all critical elements of the installation loop are truly closed.
The check is not based on the principle of “everything seems to be there,” but on actual line items:
| Block | Control question | Confirmation | If no |
|---|---|---|---|
| Molding | Is the required item code and quantity physically in the area? | Warehouse/issue | Do not dispatch the crew |
| Base | Does the actual wall match the method? | Site foreman/technical specialist | Revise the method |
| Consumables | Has the quantity been calculated and is it on site? | Purchasing/Warehouse | Close the shortage |
| Tool | Have the tools and fixtures been checked on the profile? | contractor | Perform the check |
| Documentation | Does the crew have a current revision? | Site foreman | Replace documents |
| First part | Is the result accepted? | Responsible person | Pause mass start |
If at least one critical block is not confirmed, the crew can be sent to another ready zone instead of creating downtime on site.
Why the checkpoint must be completed before people start
When the crew has already arrived with tools and is waiting in front of the wall, it is psychologically harder to stop the work. Pressure arises to "start at least something." If the check is done in advance, the project can calmly reassign people to another front.
How to identify critical and non-critical blockers
Not every open line prohibits a start. For example, additional packaging of a backup consumable can arrive later if the current quantity is sufficient for the confirmed front. But the absence of an approved method, suitable tooling, or finishing material for visible fasteners can block the entire installation.
Therefore, the matrix must distinguish:
- critical — without this, work must not begin;
- control — it must be closed during the process, but start is possible;
- information — does not affect the current operation.
How not to turn readiness into a formal checkbox
The status “done” makes sense only when confirmation can be verified. If the table says “consumables are available,” the warehouse must show a specific quantity. If “the tool is ready,” the tooling must be known. If “the method is approved,” the crew must have the current version.
Otherwise, the matrix becomes just another document that looks green but does not protect against a stoppage.
Scenario: material is available, but the start is still blocked
Floor 3 is fully equipped with PLT-A and MLD-A. The base has been accepted. But the site has no material for local touch-up of the painted skirting board, and the mechanical scheme provides for visible fastening points that must be covered after installation.
It is possible to install the entire skirting board and leave dozens of unfinished points. But this will create an additional pass, a risk of contamination, and a quality dispute. It is more manageable to close out the installation kit in advance and release the crew into a completed process.
Scenario: the consumable exists but is not assigned to a zone
There are ten packs of installation compound in the central warehouse. Each of the three crews believes the stock is shared. In the morning, the first crew takes seven packs, the second takes two, and the third is left with one, even though it has the largest front.
The problem is not the total quantity, but the lack of allocation. Therefore, the status "available on site" must be supplemented by the status "reserved for zone".
Scenario: one tool becomes a bottleneck
Two crews are ready, but there is only one specialized tool for precision cutting. If both must start at the same time, formally both zones look ready, but in production terms this is impossible.
Options:
- stagger the queues over time;
- obtain a second tool;
- reassign one crew to preparatory operations;
- change the zone schedule.
Readiness must take into account not only the availability of a resource, but also its accessibility at the right moment.
How to formally close a control point
For a large construction site, a short entry is sufficient:
Floor 2 / kit M01 / inspection completed / mass installation approved / date / responsible person.
It shows that the decision was not made verbally and makes it possible to understand which version of the method was in effect at the time of start.
What to check on the eve of a mass start
Final preparation is especially useful on the eve of the first large shift. By this point, there is no need to discuss the technology again — it is necessary to confirm that the approved solution is physically ready for work.
A short check includes: compliance of the actual substrate with the latest version, a sufficient amount of linear material specifically for the starting zone, the availability of whole packages of consumables, reserved tooling, access to the workplace, material for local finishing, an up-to-date cutting map, and a photo of the approved control part.
If one of these items remains in an uncertain status, it is better to resolve the issue before the entire crew arrives. This procedure is especially important for serial work: the first shift sets the pace, and an error at the beginning quickly spreads to dozens of rooms.
It is useful to separately check that the warehouse has not issued the reserved consumables to another zone, that the tool has not gone to a neighboring contractor, and that the printed diagram actually refers to the current revision. These simple organizational checks often turn out to be no less important than the choice of adhesive or fasteners itself.
After all critical lines are confirmed, the zone receives the status “READY FOR MASS INSTALLATION.” If the block remains, it is better to send the crew to another prepared zone than to create downtime in front of an unresolved front.
18 mistakes when preparing an installation kit
- Consider the availability of trim as readiness for installation. The rest of the system remains open.
- Choose the fastening method in the morning before work. Compatibility has not been checked.
- Use one method for all substrates. The wall construction is ignored.
- Purchase consumables before the technology is approved. An incompatible product may be bought.
- Calculate consumption using a universal figure from the internet. The specific manufacturer's data is ignored.
- Do not take the product finish into account. Fastening or cleaning damages the surface.
- Do not check the compatibility of consumables with the substrate. The method exists only on paper.
- Store all consumables in one common pile. It is unclear what has already been reserved.
- Do not link consumables to the queue. The next zone takes the previous zone's supply.
- Having the tool but not checking the tooling. The first cut turns out defective.
- Starting mass installation without a control piece. The systemic error is replicated.
- Arbitrarily changing the technology after a failed test. The project loses controllability.
- Using leftover consumables from another project without checking. Compatibility is unknown.
- Not tracking readiness statuses. The crew enters an unprepared area.
- Urgently buying what is already on another floor. A repeat purchase occurs.
- Using up the operational kit during installation. After handover there is no repair stock.
- Not saving the code of the applied method. Future repair begins with an investigation.
- Treating the end of installation as the end of accounting. Unused materials and actual changes are lost.
Final crew preparation process
1. SKU APPROVED
↓
2. TRIM RECEIVED AND ACCEPTED
↓
3. BASE VERIFIED
↓
4. INSTALLATION METHOD APPROVED
↓
5. CONSUMABLES CALCULATED
↓
6. CONSUMABLES PHYSICALLY AVAILABLE
↓
7. TOOLS AND EQUIPMENT VERIFIED
↓
8. ZONE INSTALLATION KIT ASSEMBLED
↓
9. FIRST CONTROL SAMPLE
↓
10. APPROVED OR SUSPENDED
↓
11. MASS INSTALLATION
↓
12. RETURN OF LEFTOVERS AND CONSUMABLES
↓
13. OPERATIONAL KIT
↓
14. ACTUAL METHOD RECORDED IN THE DOCUMENTATION
Conclusion: material readiness and installation readiness are two different things
Expensive wooden trim may be fully selected, paid for, delivered, and accepted, but that does not yet mean the crew can begin high-quality mass installation. Between the warehouse and the first meter of finished trim, there is a separate process of preparing the installation system.
It begins with the actual substrate. Then, for each zone, the fastening method is approved, compatible consumables are calculated, tools and accessories are checked, local finishing is determined, and an installation kit is assembled. After that, the first control piece is made. Only if it confirms that the method works does the zone receive the status "ready."
This approach does not turn the article into yet another instruction on "how to glue a skirting board." It separates responsibility: the supplier is responsible for the goods, the project for the assembly, the contractor for execution, procurement for completeness, and the technical supervisor for approval to start mass work.
For a large project, this is especially useful. The crew does not go where there are no consumables or the substrate has not been approved. Surplus materials are not purchased again. Tooling is checked before the first expensive cut. The operational kit does not disappear during installation. And the method actually used remains in the documentation and helps with future repairs.
That is why work on the "material suppliers" topic does not end at the moment of delivery. For a real project, it is important that by the start of work, not only the skirting board, moulding, and cornice are ready, but also the entire system that turns them into neatly installed trim.