
























































Article Contents:
- Interior slat RK-002: what sizes are actually available
- Why a 320 mm gap is a case where a separate slat can be more advantageous than a ready-made panel
- Decorative slat RK-002 or ready-made slat panel: you need to calculate not square meters
- How to calculate RK-002 for a 320 mm gap: ready-made scenarios for three cross-sections
- First, choose not the number of slats, but the two edge offsets
- Step 1. Determine the left margin at the cabinet
- Step 2. Determine the right margin at the wall
- RK-002 16×40 mm
- RK-002 22×60 mm
- RK-002 40×40 mm
- MDF
- MDF with oak veneer
- How much do different layouts of RK-002 cost for a 320 mm wall section
- What to do if the ceiling is 2780 mm, but RK-002 is only 2750 mm
- Option 1. Start the slats above the floor
- Option 2. Leave the top field
- Do you need a spare RK-002
- How to accept RK-002 after delivery and not ruin the layout before installation
- If the 320 mm partition is only in the center, but the size is different at the top and bottom
- Short conclusion
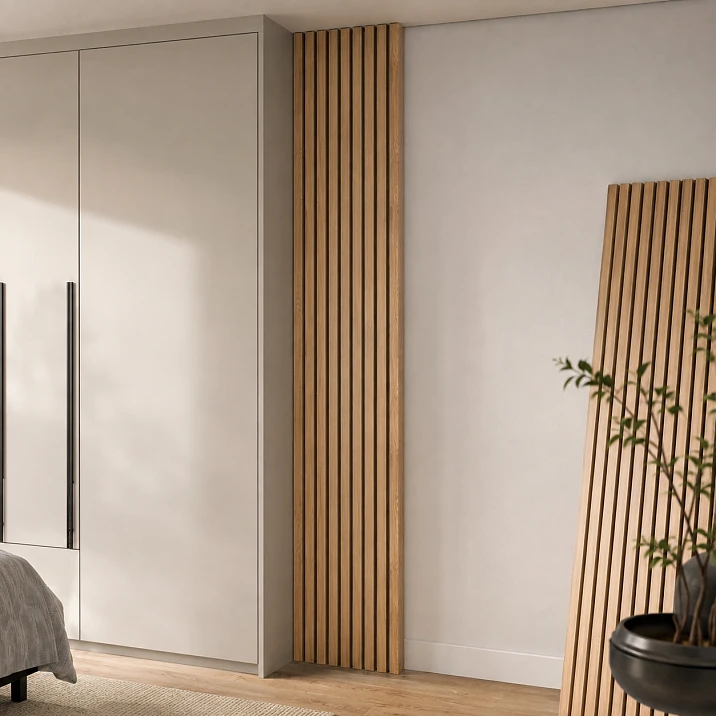
The built-in cabinet is already in place. It took up almost the entire wall, but between its side and the adjacent wall there remains a vertical strip about 320 mm wide. You could leave it smooth, but next to a large furniture surface such a wall section often looks random. The idea arises to continue the vertical rhythm — add slat decor.
The buyer has two fundamentally different paths.
The first is to buy a ready-made slat panel about a meter wide, cut 320 mm from it, and accept a large leftover.
The second is to assemble a narrow composition from individual interior slats RK-002, 2750 mm long, independently determining the number of verticals, edge margins, and gaps.
For a strip of only 320 mm, the second path often turns out to be more logical not because RK-002 is “better than a panel in general,” but because individual elements allow you to design the layout to the actual size without buying a large ready-made module for just one third of its width.
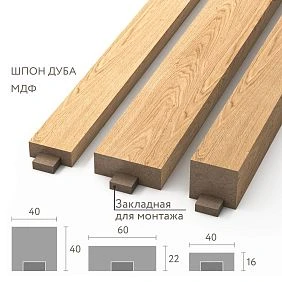
But the answer “take several slats” is also too simple. RK-002 is available in three geometries at once: 16×40, 22×60, and 40×40 mm with a length of 2750 mm, and the system has a separate mounting insert 20×8 mm. The number of slats cannot be derived by a formula 320 / 16 or 320 / 40: gaps are needed between the verticals, margins at the edges of the wall section, and the profile itself is shaped and has depth.
The correct order before ordering is as follows:
-
measure the wall section at the top, in the center, and at the bottom;
-
choose the actual working width — not the nominal "about 320", but the minimum or design width after checking the wall geometry;
-
determine the left margin at the cabinet and the right margin at the wall;
-
choose a specific RK-002 profile;
-
set the number of verticals;
-
calculate the equal spacing between them;
-
check whether the first rail conflicts with the opening of the outermost cabinet door;
-
check the height: whether 2750 mm is sufficient without an accidental extension;
-
account for the embedded insert 20×8 mm and the mounting depth;
-
only then compare the cost of several RK-002 profiles with the cost and waste of a finished panel.
If the project has not yet decided between a modular and a piece-by-piece solution, you can Buy slatted panels for wall finishing after comparing the actual layout. If the narrow wall section has already been chosen specifically for individual verticals, buy interior batten RK-002 only after the number of slats and the spacing have been calculated in millimeters.
Interior slat RK‑002: which sizes are actually available
The current RK‑002 card shows six product items: three geometries in MDF and the same three geometries in MDF/oak veneer finish.
| A × C × D × E × L, mm | Material | Price at the time of check |
|---|---|---|
| 16 × 40 × 20 × 8 × 2750 | MDF | 1,010 RUB |
| 22 × 60 × 20 × 8 × 2750 | MDF | 1,330 RUB |
| 40 × 40 × 20 × 8 × 2750 | MDF | 1,580 RUB |
| 16 × 40 × 20 × 8 × 2750 | MDF / oak veneer | 3,450 RUB |
| 22 × 60 × 20 × 8 × 2750 | MDF / oak veneer | 4,190 RUB |
| 40 × 40 × 20 × 8 × 2750 | MDF / oak veneer | 4,680 RUB |
Prices are current as of the time of verification and require re-checking before payment.
For the article about the 320 mm partition wall, the dimensions are not read as a single "16×40 strip." In the product card, A, C, D, E, and L are specified as separate parameters. In current STAVROS materials, the three variants are typically described as 16×40, 22×60, and 40×40 mm profiles, while D = 20 and E = 8 refer to the mounting insert.
Why RK‑002 cannot be called a solid oak slat
In the wood version, the base remains MDF, and the natural surface is formed by oak veneer. This is confirmed both by the product card and by the existing STAVROS article comparing RK‑001 and RK‑002. Therefore, the correct formulations are:
-
RK‑002 made of MDF;
-
RK‑002 made of MDF with oak veneer;
-
veneered interior slat.
It is incorrect to write:
"RK‑002 made of solid oak."
If the buyer needs oak throughout the entire cross-section, that is a different product scenario.
What the 2750 mm length provides
One RK-002 is a solid vertical piece 2750 mm long before trimming.
For a narrow strip near a cabinet, this is convenient: instead of buying a wide wall module, you purchase the needed number of individual verticals of the same height.
However, the 2750 mm length does not guarantee that the slat should always run from the finished floor to the ceiling. The height of the composition needs to be tied to:
-
baseboard;
-
the cornice;
-
the cabinet height;
-
the ceiling;
-
the upper field.
Why consider the 20×8 mm mounting insert
The card shows the mounting insert as a separate part of the system. This means that designing a partition wall based only on the face width of the slat is insufficient.
It is necessary to understand:
-
where is the mounting plate located;
-
how is it attached to the wall;
-
what mounting offset does the system get;
-
can it be installed flush against the side of the cabinet;
-
is the base sufficient for fastening.
The exact type of fastener is chosen based on the wall and the project, not by a universal formula.




Why a 320 mm partition is a case where a separate rail may be more advantageous than a ready-made panel
A ready-made slat panel is convenient where you need to quickly cover a large surface. It already has a set rhythm, module width, and element positions.
On a 320 mm partition, the same advantages can turn into a disadvantage.
If the original module is about 1000 mm, the conditional remainder after cutting 320 mm will be approximately:
1000 − 320 = 680 mm.
This is not automatically "waste": the remainder can be used elsewhere. But if the project does not have a second zone of the same panel, the buyer actually purchases a large module for the sake of a small strip.
RK‑002 works differently. Each vertical is purchased separately, and the width of the composition is formed by:
-
the number of slats;
-
the face width of the selected profile;
-
the intervals;
-
the edge margins.
For non-standard 320 mm, this gives more control.
What the buyer gets instead of a fixed module
You can decide independently:
-
make 4 large verticals;
-
make 5 more frequent ones;
-
place 6 narrow ones;
-
leave equal margins on the edges;
-
attach the axes to the cabinet seams;
-
move the first rail further away from the opening door.
That is, the savings are not only in rubles. The buyer pays for the exact number of elements and a controlled rhythm.
When a finished panel is still more rational
If the 680 mm remainder is needed:
-
on the adjacent wall;
-
on the end of the cabinet;
-
on the niche;
-
on the TV zone;
then the module ceases to be 'extra'.
The panel also wins if:
-
a very frequent uniform pattern is required;
-
installation must be quick;
-
there is no desire to lay out each slat individually;
-
the wall base is inconvenient for piece-by-piece marking.
Therefore, the comparison should be project-based, not ideological.
Our factory also produces:
Decorative batten RK‑002 or ready-made slat panel: you need to count not square meters
On a 320 mm strip, area seems like the main indicator, but for individual battens, linear layout is more important.
Let the width of the pier be:
W = 320 mm.
Let:
-
n— number of battens; -
A— face width of the batten; -
mL— field near the cabinet; -
mR— field near the wall; -
g— equal gap between battens.
Then:
W = mL + n×A + (n−1)×g + mR.
If the outer fields are equal mL = mR = m, the formula simplifies:
W = 2m + n×A + (n−1)×g.
From here, a step:
g = (W − 2m − n×A) / (n−1).
This exact formula is what the buyer needs before the cart.
Why can't you start with 320 / A
If you take RK‑002 16 mm:
320 / 16 = 20 slats.
But twenty verticals without gaps will turn the partition into a solid block and completely ignore the mounting system.
For A = 40:
320 / 40 = 8.
Also incorrect as a final answer: between the slats you need rhythm, and at the edges — margins.
First margins, then quantity
The built-in wardrobe and the wall set two architectural boundaries.
If the edge margins are made random — for example, 8 mm on the left and 36 mm on the right — even the correct spacing between the battens will not save the composition.
Therefore, first decide:
how much empty space should remain at the edges,
and only then choose n.
Get Consultation
How to calculate RK‑002 for a 320 mm wall section: ready-made scenarios for three cross-sections
To keep the formula from remaining just theory, let's look at several layouts. In all examples below, the edge margins are conditionally taken as 20 mm on the left and right. This is not a STAVROS standard or a universal design rule; such an offset is chosen only for comparing options.
Working width after margins:
320 − 20 − 20 = 280 mm.
These 280 mm are distributed between the battens themselves and the gaps.
RK‑002 16×40 mm: thin face strip and frequent rhythm
for A = 16 mm We get:
| Number of slats | Total face width | Gaps | Calculated equal gap |
| 4 | 64 мм | 3 | 72 мм |
| 5 | 80 мм | 4 | 50 мм |
| 6 | 96 мм | 5 | 36.8 mm |
| 7 | 112 мм | 6 | 28 мм |
| 8 | 128 мм | 7 | ≈21.7 mm |
Four narrow slats on a 320 mm strip give a very sparse pattern. Eight give a much denser one. Intermediate options of 6–8 verticals are practically interesting, but the final choice depends on the adjacent cabinet and viewing distance.
For example, 7 slats of 16 mm:
7 × 16 = 112 mm occupied by face parts.
Free after the outer fields:
280 − 112 = 168 mm.
Between the seven slats there are six gaps:
168 / 6 = 28 mm.
This gives a clear rhythm:
20 mm field → 16 mm slat → 28 mm gap → … → 16 mm slat → 20 mm field.
RK‑002 22×60 mm: a larger vertical
for A = 22 mm:
| Number of slats | Total face width | Gaps | Calculated gap |
| 4 | 88 мм | 3 | 64 мм |
| 5 | 110 мм | 4 | 42.5 mm |
| 6 | 132 мм | 5 | 29.6 mm |
| 7 | 154 мм | 6 | 21 мм |
| 8 | 176 мм | 7 | ≈14.9 mm |
On a narrow wall section of 320 mm, the 22×60 mm profile quickly creates a dense architectural band.
6 slats give:
-
132 mm of face surface;
-
five gaps of 29.6 mm each;
-
two fields of 20 mm each.
This option looks visually larger than seven 16-mm slats, although the number of verticals is smaller.
RK-002 40×40 mm: massive rhythm
for A = 40 mm:
| Number of slats | Total face width | Gaps | Calculated gap |
| 4 | 160 мм | 3 | 40 мм |
| 5 | 200 мм | 4 | 20 мм |
| 6 | 240 мм | 5 | 8 мм |
Seven slats with two fields of 20 mm each would already take up the entire working width without gaps:
40 + 7×40 = 320 mm.
For a slat pattern, this is meaningless.
On a 320 mm wall segment, the most understandable options are:
4 slats of 40 mm + intervals of 40 mm
or
5 slats of 40 mm + intervals of 20 mm.
The first option is calmer and more graphic. The second is significantly denser.
Why this table does not choose the design for the user
The same mathematical symmetry can look different next to:
-
a white cabinet;
-
an oak cabinet;
-
with vertical handles;
-
with wide facades;
-
with narrow seams;
-
with a high plinth.
The calculation answers the question "does the chosen number of slats fit and what interval will result". The design answers the question "which of these rhythms suits this particular cabinet".
First, choose not the number of slats, but two extreme offsets
A 320 mm pier has two boundaries:
-
the side of the built-in wardrobe;
-
the adjacent wall.
If you start laying out from one side and simply repeat the step, the last batten may end up almost pressed against the wall or, conversely, leave too wide an empty gap.
Therefore, the professional sequence is the reverse.
Step 1. Determine the left clearance at the cabinet
It should take into account:
-
visual gap;
-
opening of the outermost door;
-
handle;
-
protrusion of the facade;
-
possible side panel of the cabinet.
If the door opens towards the wall section, the left clearance is determined not only by aesthetics.
Step 2. Determine the right clearance at the wall
Here, check:
-
baseboard;
-
corner curvature;
-
the trim of the adjacent door;
-
switch;
-
the corner of the wall.
Step 3. Decide whether the fields should be the same
For a separate decorative insert, it is often logical to start with symmetry.
But if the cabinet is visually stronger than the adjacent wall, the designer may deliberately shift the composition.
Step 4. Only then choose n
After the fields, the formula shows the actual interval.
Example of asymmetry
Pier:
320 mm.
Field at the cabinet:
30 mm.
Field at the wall:
10 mm.
Selected 6 slats of 22 mm.
Free width between the outer fields:
320 − 30 − 10 = 280 mm.
Slats:
6 × 22 = 132 mm.
Remaining for five gaps:
280 − 132 = 148 mm.
Step:
148 / 5 = 29.6 mm.
Numerically it matches the symmetric example because the sum of the fields is the same 40 mm. But visually the composition is shifted 20 mm toward the wall.
That is why one formula is not enough.
Should the cabinet's slat rhythm be continued onto the wall?
After installing the cabinet, its facades already have their own vertical system:
-
door boundaries;
-
vertical handles;
-
milling;
-
seams;
-
decorative inserts.
RK-002 can either support this system or conflict with it.
If the edge of the facade is nearby
Let's imagine that the last seam of the cabinet is 50 mm from its side panel.
If the first slat of the partition wall is placed 20 mm after the side panel, a new rhythm emerges that has no connection to the cabinet.
Sometimes this is fine: the partition wall reads as a separate insert.
If the task is to "continue" the furniture onto the wall, it is useful to check the axes.
Snap to centers
You can extend the axis:
-
handles;
-
seam;
-
existing furniture rail.
Then the first RK‑002 is placed not by a nice field number, but by the cabinet geometry.
After that, the outermost field near the wall is recalculated.
Why you don't need to match all seams
Four cabinet doors can have a pitch of 500 mm, while the wall section is only 320 mm.
It is physically impossible to repeat such a rhythm.
Then it's better to create an independent frequent pattern than to imitate the continuation of one large module.
If the cabinet is smooth
RK‑002 can become an accent, not a continuation.
In this case, a symmetrical layout within 320 mm often looks more convincing than anchoring to non-existent verticals.
How to choose the cross-section of the RK‑002 interior slat for a narrow area
Three cross-sections provide not just different face widths. The profile depth also changes in the card.
RK‑002 16×40 mm
This is the narrowest face option.
On a 320‑mm strip, it allows placing more verticals and achieving a frequent rhythm.
Suitable if:
-
the cabinet is large and a light transition is needed;
-
The pier should look airy;
-
I don't want to turn 320 mm into a heavy column.
RK-002 22×60 mm
The face strip is wider, and the profile is deeper.
Such a batten gives a more pronounced chiaroscuro.
On a narrow pier, fewer elements are usually needed, otherwise the composition becomes very dense.
RK-002 40×40 mm
The widest face part of the three options.
Four or five verticals already create a powerful architectural rhythm.
On 320 mm, six elements leave only 8 mm between the battens with 20 mm margins. This is more of a solid relief insert than a calm batten.
Why "widest = most beautiful" is incorrect
The cross-section should be evaluated in scale.
The narrower the pier, the stronger each millimeter of face width affects the ratio:
wood/MDF ↔ empty background.
For 320 mm, it is useful to make three paper or MDF mock-ups and view them from a distance of 2–3 m.
Interior slat RK-002 made of MDF or MDF with oak veneer: what to choose near the cabinet
The material is chosen after the geometry.
MDF (740–760 kg/m³, emission class E1/E0) provides ideal geometry, uniformity, and better base for enamel: high adhesion, smooth surface, absence of knots and cracks.
At the time of checking, the following are available:
-
16×40 — 1,010 RUB;
-
22×60 — 1,330 RUB;
-
40×40 — 1,580 RUB
MDF makes sense if:
-
the slats are painted to match the wall color;
-
the cabinet is monochrome;
-
a uniform matte or semi-matte background is needed;
-
wood texture is not the goal.
MDF with oak veneer
At the time of checking:
-
16×40 — 3,450 RUB;
-
22×60 — 4,190 RUB;
-
40×40 — 4,680 RUB
The veneered option is appropriate if nearby:
-
oak floor;
-
oak facades;
-
wooden countertop;
-
natural decor.
Oak veneer is not equal to solid wood
This is fundamental.
There is a natural outer texture, but the base is MDF.
Therefore, you cannot sell the customer the expectation of a "solid oak slat throughout the cross-section."
Why the material affects the allowance
If the slats are painted with opaque enamel, a spare MDF slat is useful as:
-
test coating;
-
reserve after a cutting error;
-
repair element.
For oak veneer, an additional batten is especially valuable as a spare from the same purchase, because a later batch may differ in pattern.
How much do different RK-002 layouts cost for a 320 mm pier
After choosing the rhythm, you can calculate the product cost. Below is only the price of the battens themselves at the time of checking, excluding delivery, anchors/fasteners, finishing, and labor.
RK-002 16×40 mm
| Quantity | MDF, RUB 1,010/pc. | MDF/oak veneer, RUB 3,450/pc. |
| 5 | RUB 5,050 | RUB 17,250 |
| 6 | RUB 6,060 | RUB 20,700 |
| 7 | 7,070 RUB | 24,150 RUB |
| 8 | 8,080 RUB | 27,600 RUB |
With conditional fields of 20 mm, a variant of 7 slats gives a step of 28 mm, and 8 slats — about 21.7 mm.
RK-002 22×60 mm
| Quantity | MDF, 1,330 RUB/pc. | MDF/oak veneer, 4,190 RUB/pc. |
| 4 | 5,320 RUB | 16,760 RUB |
| 5 | 6 650 RUB | 20 950 RUB |
| 6 | 7 980 RUB | 25 140 RUB |
| 7 | 9 310 RUB | 29 330 RUB |
With the same 20 mm gaps:
-
5 slats → 42.5 mm interval;
-
6 → 29.6 mm;
-
7 → 21 mm.
RK-002 40×40 mm
| Quantity | MDF, 1,580 RUB/pc. | MDF/oak veneer, 4,680 RUB/pc. |
| 4 | 6,320 RUB | 18,720 RUB |
| 5 | 7,900 RUB | 23,400 RUB |
| 6 | 9,480 RUB | 28,080 RUB |
Here the price grows quickly not because of a "large step," but because each individual large slat costs more.
Why can't RK-002 be declared cheaper than a ready-made panel based on this table?
Ready-made panels differ:
-
material;
-
width;
-
in length;
-
in design;
-
in price;
-
in leftover after cutting.
Without a specific SKU, comparing rubles is incorrect.
Correct economic calculation:
cost of needed RK-002 + installation + finishing
is compared with:
cost of the specific panel + cost of the unused remainder or the value of its use elsewhere + installation + finishing.
If the remainder of the finished panel goes to another project, it is not a loss.
If it remains unused, piecewise slats can be more economical even at a higher price per visual meter.
Length of RK-002 2750 mm: cut to the ceiling or leave the top field
The 2750 mm length is a strong point of RK-002 on high walls, but it cannot be used automatically "from floor to ceiling".
First, measure the finished vertical of the wall segment.
Scenario: ceiling 2650 mm
If the slat goes directly from the floor:
2750 − 2650 = 100 mm
need to remove along the length.
But more often there is a baseboard at the bottom.
If the baseboard is 100 mm and the slats start above it, the working length can be:
2650 − 100 = 2550 mm.
Remainder:
200 mm.
Scenario: ceiling 2700 mm
Without baseboard:
2750 − 2700 = 50 mm.
With a baseboard 80 mm high:
2700 − 80 = 2620 mm.
Remainder:
130 mm.
Why you don't need to start strictly from the floor
If there is already a baseboard next to the cabinet, the slats can:
-
start above its top line;
-
adjoin it;
-
end at the cabinet's plinth.
The composition should follow the architectural horizontals of the room.
Top field
The slat can end below the ceiling if:
-
the cabinet also does not reach the ceiling;
-
there is a cornice above;
-
you need to repeat the top line of the facade;
-
the designer deliberately leaves the field.
Then the length of 2750 mm is simply trimmed to the required mark.
Why all slats need to be cut to one control height
If the ceiling is uneven, there are two approaches:
-
repeat its curvature with each slat;
-
make the top line of the slats perfectly horizontal and leave a variable gap.
For a narrow wall section, the second option often looks neater, but the decision depends on the project.
You cannot simply measure one height at the cabinet and cut the entire set.
What to do if the ceiling is 2780 mm, but RK‑002 is only 2750 mm
The difference:
2780 − 2750 = 30 mm.
The weakest method is to make a random 30 mm addition on top of each rail. The joint on all verticals will end up almost under the ceiling and will be noticeable under side light.
There are cleaner options.
Option 1. Start the rails above the floor
If there is a baseboard of 80–120 mm at the bottom, the working length becomes less than 2750 mm.
For example, ceiling 2780 mm and baseboard 100 mm:
2780 − 100 = 2680 mm.
RK‑002 is enough without extension.
Option 2. Leave the top field
For example, start from the floor and finish at the 2750 mm mark:
30 mm to the ceiling.
But such a field should look intentional and be connected to other lines.
30 mm is often too little for an expressive design gap, so it needs to be seen in the layout.
Option 3. Connect the top with the cabinet
If the built-in cabinet has a height of, for example, 2700 mm, you can end RK‑002 at its top line.
Then the 80 mm to the ceiling are perceived as part of the overall composition.
Option 4. Horizontal boundary
A cornice, molding, or painted strip can create a deliberate top frame.
But this is already a new element of the project, which cannot be added just to save 30 mm.
What not to promise
You cannot write:
“RK‑002 is easily extended.”
The card does not promise a standard longitudinal joining element for inconspicuous extension.
If the height exceeds 2750 mm, it is better to change the composition before ordering.
Decorative slat near the built-in wardrobe: how to avoid blocking the opening of the outermost door
The wall section starts at the side of the wardrobe, so the first RK‑002 is located next to the moving facade.
This is a technical component that needs to be checked before gluing.
What to measure
-
how much the facade protrudes beyond the side panel;
-
where it opens;
-
opening angle;
-
the handle projection;
-
distance from the side panel to the first slat;
-
depth of the selected RK‑002;
-
presence of an adjacent drawer.
Why a face width of 16/22/40 mm does not solve the issue
The risk of opening is related to the profile depth and the position of the rail relative to the facade's trajectory.
For example, 16×40 mm has a narrow front strip, but the 40 mm depth creates a noticeable protrusion from the wall.
22×60 mm is even deeper.
If the door opens toward the wall section, it may collide not with the front strip, but with the protruding part of the rail.
Dry fitting of one rail
Before placing a full order, it is useful to reproduce the selected cross-section:
-
with an exact mock-up;
-
with one real RK‑002.
Install at the intended location of the first vertical and open the outermost door several times.
Check:
-
handle;
-
facade edge;
-
side panel;
-
adjacent wall;
-
maximum angle.
If there is a conflict
It is not necessary to abandon RK‑002.
Allowed:
-
increase the outermost field of the cabinet;
-
reduce the number of slats;
-
shift the entire composition toward the wall;
-
choose a less deep cross-section.
But the symmetry is recalculated anew.
Example of shifting
Was:
-
left margin 20 mm;
-
right margin 20 mm;
-
6 slats 22 mm;
-
step 29.6 mm.
After testing, it turned out that the cabinet needs at least 40 mm.
If you leave 20 mm on the right:
total sum of margins:
60 mm.
Working width:
320 − 60 = 260 mm.
Slats:
132 mm.
remains:
128 мм
for 5 intervals:
25.6 mm.
We get an asymmetric but technically safe scheme.
Mounting anchor RK‑002 20×8 mm: why consider it before ordering
D = 20 and E = 8 mm in the RK‑002 system refer to the mounting anchor. This is a key difference from a regular decorative strip that is simply glued face-side to the wall.
What the anchor changes
It defines:
-
a repeatable mounting base;
-
the position of the rail;
-
attachment to the base;
-
actual assembly depth.
Why can't a pier be calculated using only A
The rhythm formula using A addresses the frontal view.
But next to a cabinet, the side geometry also matters.
For example, a 22×60 mm batten visually takes up 22 mm on the front, but from the wall it works as a much deeper element.
Wall base
Before installation, you need to understand what the pier is made of:
-
concrete;
-
brick;
-
gypsum board;
-
MDF panel;
-
other base.
Fasteners are chosen based on the wall.
The article does not prescribe one dowel "for all cases."
Uneven wall
Individual verticals can visually emphasize curvature.
Before installation:
-
check the plane;
-
draw a vertical line;
-
determine whether leveling is needed.
What happens at the cabinet
If the first mounting plate ends up almost flush against the side panel, the tool may not have enough space for fastening.
This is another reason not to make the outermost field zero.
Is a spare RK-002 needed
For piece slats, the logic of having a spare is clearer than abstract '+10%'.
If 6 verticals are calculated, 10% is 0.6 slats. It is impossible to buy 0.6.
Therefore, one chooses between:
6 working
or
7: six working + one spare.
When a spare is useful
-
first installation experience;
-
expensive finish;
-
oak veneer;
-
complex top cut;
-
repeat delivery is inconvenient;
-
a test paint-out is needed;
-
one rail can be damaged during transport.
Price of one spare
At the time of checking:
-
16×40 MDF — 1,010 RUB;
-
22×60 MDF — 1,330 RUB;
-
40×40 MDF — 1,580 RUB;
-
16×40 oak veneer — 3,450 RUB;
-
22×60 oak veneer — 4,190 RUB;
-
40×40 oak veneer — 4,680 RUB.
For MDF, the spare is relatively inexpensive.
For oak veneer, the reserve significantly affects the budget, so the reason must be specific.
When a spare batten is not needed
if:
-
the installer has already worked with the system;
-
the height is simple;
-
repeat delivery is available;
-
the finish is reproducible;
-
all parts are checked before cutting.
When it is still better to buy a ready-made rack panel instead of RK‑002
Individual battens are especially strong on non-standard narrow areas, but are not a universally better product.
A ready-made module is more reasonable if the wall section:
-
expands to 700–1000 mm;
-
is part of a larger slat wall;
-
should have a very frequent ready-made pattern;
-
needs to be mounted quickly;
-
installing a separate anchor for each vertical is unjustifiably labor-intensive.
Wide zone
On a 2–3 m wall, piece-by-piece installation of many RK‑002 requires extensive marking.
A ready-made panel provides a repeatable factory rhythm immediately.
Several identical piers
If a room has three strips of 320 mm, a large module can be cut into several sections and waste is not so significant.
The panel remainder has a use
The buyer should think not "680 mm of offcut = wasted money," but the real map of the entire project.
When RK‑002 wins again
If the width of each section is different:
-
280 mm;
-
320;
-
365;
individual slats allow you to build three symmetrical compositions without being tied to the factory module.
For a general choice between a solid wood model and RK‑002, you can use the existing material RK-001 or RK-002: which slat to choose, and not duplicate this comparison here.
How to mark 320 mm on the wall before buying slats
Before ordering, it is useful to do a full-size dry layout with regular painter's tape. It costs almost nothing and allows you to see the rhythm at the actual height.
Step 1. Draw two boundaries of the wall partition
Do not rely only on the nominal 320 mm.
Measure:
-
from the top;
-
at eye level;
-
from the bottom.
If the width:
-
top 320 mm;
-
center 317;
-
bottom 323,
the decorative composition cannot be built based on a single figure of 320 without deciding which line is the baseline.
Step 2. Mark the outer fields
For example, 20 mm.
Draw two vertical lines.
Step 3. Glue strips along the front width A
For RK‑002 16×40:
-
strip 16 mm.
For 22×60:
-
22 mm.
For 40×40:
-
40 mm.
Step 4. Step back 2–3 m
Rate:
-
frequency;
-
scale;
-
connection to the cabinet;
-
empty space.
Step 5. Look from the side
Masking tape does not show the depth of 40/60 mm.
Therefore, after the frontal selection, a three-dimensional mockup of at least one slat is needed.
Step 6. Open the cabinet
The first vertical should remain outside the trajectory of the facade and handle.
Why this test is better than a render
The render can be built:
-
with a different camera angle;
-
with a conditional scale;
-
without a real baseboard;
-
without wall curvature.
Full-size layout shows specific 320 mm.
How to accept RK-002 after delivery and not ruin the layout before installation
Upon receiving the order, do not immediately cut all slats to height.
First, verify
-
the RK-002 article number;
-
cross-section;
-
material;
-
length 2750 mm;
-
quantity;
-
surface quality;
-
presence/kit of mounting system according to the order.
For oak veneer, lay out all slats side by side
Natural veneer has a pattern.
Before cutting, you can distribute:
-
calmer verticals in the center;
-
more active ones at the edges;
-
or vice versa — as intended.
Check one control slat on the wall
It is placed with an embedded part or an exact mock-up of the system and checked:
-
depth;
-
edge at the cabinet;
-
baseboard;
-
the top;
-
opening.
Only after this, cut the entire set
If the first batten shows that the top mark needs to be changed by 15 mm, it's better to find this out before processing the remaining five to seven.
Marking
For example:
-
R1 — edge at the cabinet;
-
R2;
-
R3;
-
…
-
R7 — edge at the wall.
For oak veneer, this preserves the intended pattern distribution.
If the wall section is 320 mm only in the center, but the size is different at the top and bottom
After installing the built-in wardrobe, the narrow strip is rarely a perfect rectangle. The wall may be sloped, the side panel of the wardrobe may be set strictly level, and the plaster near the ceiling may protrude.
For example:
-
bottom — 323 mm;
-
middle — 320 mm;
-
top — 314 mm.
If you mark seven slats using the formula for 320 mm and simply continue the verticals upward, the right margin at the ceiling will decrease by 6 mm. On a strip only 320 mm wide, this is already noticeable.
Three ways to work with variable width
1. Take the minimum width as the working width.
In the example:
W = 314 mm.
The composition is built symmetrically within 314 mm, and the extra millimeters below remain at one or two edges as per the design.
Plus — the slats remain strictly vertical.
2. Keep the same margin at the cabinet.
If the connection to the built-in furniture is more important, the first slat is fixed along one vertical line from the cabinet, and the width change "goes" into the margin at the wall.
Then the wall shows its own curvature only along the far right field.
3. First, level the pier.
If a difference of 6–10 mm looks unacceptable and the renovation still allows for wall preparation, leveling may be better than a visual compromise.
What not to do
Do not:
-
tilt individual slats to follow the wall;
-
vary the gaps by height;
-
trim each vertical with a wedge in width.
RK‑002 should form
Mistake 13. Buying oak veneer based on a single photo
The natural pattern should be assessed on a real sample and batch.
Mistake 14. Not checking the width of the pier at the top and bottom
The curved wall breaks the symmetry.
Error 15. Build the rhythm separately from the cabinet
The verticals of the pier conflict with the seams, handles, and doors.
When it's better not to buy RK-002
Refusing the product can also be the right choice.
The pier is actually too narrow
If, after accounting for the safe clearance from the opening door and the margin near the wall, there remains, for example, 180–200 mm, large 40×40 or 22×60 tiles may overload the area.
Almost flat decor is needed
RK-002 creates deep volume.
If the task is a thin graphic line, another profile may be more appropriate.
The wall is very crooked and there are no plans to level it.
Individual verticals will emphasize the defect.
The cabinet door opens directly into the wall niche.
If the safe setback eats up a significant portion of the 320 mm, the composition may lose its meaning.
The ceiling is higher than 2750 mm, and a full-height vertical is mandatory.
If margins cannot be left and a horizontal boundary cannot be made, the standard length is insufficient.
The buyer does not want piece-by-piece marking.
Then a ready-made panel with a set rhythm is simpler.
What to send to the manager before ordering the RK‑002 interior slat.
For an accurate order, a small technical card is sufficient.
Photo
-
entire pier;
-
cabinet with open end door;
-
the top;
-
bottom;
-
baseboard;
-
side wall.
Sizes
-
width at top;
-
width at center;
-
width at bottom;
-
finished height;
-
distance to door trajectory;
-
height of the baseboard;
-
distance to cornice/ceiling.
Selected geometry
For example:
RK-002 16×40×20×8×2750 mm.
Material
-
MDF;
-
MDF/oak veneer.
Layout
For example:
7 slats / 20 mm fields / calculated gap 28 mm.
Ready-made wording
"After installing the cabinet, a 320 mm wall section remained. We plan RK-002 16×40×20×8×2750 mm, 7 verticals, symmetrical 20 mm fields, pitch about 28 mm. Please confirm the current configuration of the mounting insert, production time for the selected material, rules for edge treatment after trimming, and delivery conditions for long-length parts."
After confirmation, you can order interior slat RK-002.
If the task changes and solid wood is needed across the entire cross-section, it is useful buy wooden slats in the appropriate category, rather than calling veneered RK-002 solid wood.
Before installation, it is worth checking Mounting and finishing materials, Advice on finishing and installation и payment and delivery terms.
Control specification for a 320 mm wall section
Before payment, it is useful to record the decision in one line. For example:
RK-002 / 16×40×20×8×2750 mm / MDF / 7 pcs. working / fields 20+20 mm / calculated interval 28 mm / height after trimming ___ mm / first slat checked against cabinet opening / reserve 0 or 1 pc. / finish ___ .
For oak veneer:
RK-002 / 22×60×20×8×2750 mm / MDF with oak veneer / 6 pcs. / fields ___ / pitch ___ / pattern distribution R1–R6 approved / spare ___ .
Such a record prevents two typical mistakes: ordering "about seven slats" without an approved pitch and changing the cross-section after the wall has already been marked for a different quantity.
What to check one last time
-
actual width of the wall section;
-
extreme field near the cabinet;
-
the door opening;
-
step;
-
height;
-
mounting insert;
-
material;
-
quantity;
-
reserve;
-
packaging and delivery.
If at least one item still contains "approximately", the full order is better not considered complete.
Why precision matters more for 320 mm than on a large wall
On a wall three meters wide, an error of one gap of 3–4 mm gets lost among many verticals. On a 320 mm strip, it changes the ratio of edge fields and immediately catches the eye next to the perfectly flat side of a built-in wardrobe.
Therefore, a narrow wall section is a good scenario for individual RK‑002, but only with precise marking. The freedom of a separate slat is useful when it is controlled in millimeters.
Final check with a mockup
Before final fastening, it is useful to stick vertical strips of painter's tape on the wall along the calculated axes and place at least one real RK‑002 nearby. This simultaneously checks two things: the frontal rhythm and the real depth of the profile. If on the paper layout seven verticals look light, but the volumetric slat 16×40 next to the wardrobe turns out to be too deep, it is better to change the cross-section before drilling the wall. After such a check, no hidden variables remain: the number of slats, edge fields, pitch, height, material, and the edge at the wardrobe are confirmed on site.
Final purchasing check: make sure the number of slats in the cart matches exactly the last approved layout after the mockup. If during fitting the edge fields or cross-section changed, the old quantity must be recalculated from scratch—even if the difference seems to be just one slat.
Final decision tree: individual RK‑002 or a ready-made panel
Step 1. Is the wall section really about 320 mm and is it the only one being finished?
-
no, there are also large areas → calculate the whole project;
-
Yes → continue.
Step 2. Need an individual step?
-
yes → RK‑002 gets the advantage;
-
no → the ready-made panel remains a strong option.
Step 3. Can the extreme fields be defined in millimeters?
-
no → first marking;
-
Yes → continue.
Step 4. Is the RK‑002 cross-section selected?
-
no → make three full-size mockups;
-
Yes → continue.
Step 5. Is the gap calculated by the formula?
-
no → do not specify the quantity;
-
Yes → continue.
Step 6. Does the first rail not interfere with the cabinet door?
-
hinders → increase the field or change the cross-section;
-
does not hinder → continue.
Step 7. Is the length of 2750 mm sufficient for the selected vertical?
-
no → change the composition;
-
Yes → continue.
Step 8. Is the embedded part 20×8 mm compatible with the base?
-
not verified → confirm the installation;
-
Yes → continue.
Step 9. Is a reserve needed?
-
no → buy the working quantity;
-
yes → add one specific rail, not abstract 10%.
Step 10. Compare the final cost with a specific ready-made panel.
Only after this does the decision 'rail or panel' become commercially justified.
FAQ
What sizes does RK-002 have?
16×40×20×8×2750, 22×60×20×8×2750, and 40×40×20×8×2750 mm.
What is the length of RK-002?
2750 mm.
Is RK-002 made of solid oak?
No. The wood version is MDF with oak veneer.
What is 20×8 mm?
These are the dimensions of the mounting insert specified in the RK-002 system.
What is better for a 320 mm partition wall — RK-002 or a ready-made panel?
If only a narrow strip is being finished and a custom pitch is needed, individual RK-002 slats often provide more control and less unused material. If the remaining panel is needed elsewhere or installation must be quick, a ready-made module may be more advantageous.
How to calculate the number of RK-002 slats?
First set the edge margins, then the number of slats, and solve the formula:
g = (W − mL − mR − n×A)/(n−1).
How many 16 mm slats to place on 320 mm?
With 20 mm margins: 6 slats give an interval of 36.8 mm, 7 — 28 mm, 8 — about 21.7 mm.
How many 40 mm RK-002 slats to place?
With the same margins: 4 slats give a pitch of 40 mm, 5 — 20 mm, 6 — 8 mm.
What is the correct pitch?
There is no universal correct pitch. It depends on the cross-section, the cabinet, and the desired density.
Should the rhythm of the cabinet facades be continued?
If the task is to visually connect the cabinet to the wall, it is useful to check this. But if the scale does not match, it is better to make an independent symmetrical insert.
Can RK-002 made of MDF be painted?
Yes, the MDF version is used as a paintable interior slat. The finish system is chosen according to the finishing technology.
Can RK-002 be ordered with oak veneer?
Yes. All three geometries are available in the card in MDF/oak veneer execution.
What to do with a ceiling of 2780 mm?
2750 mm is not enough by 30 mm. It is better to change the lower/upper boundary of the composition than to make a random short extension.
Is a spare slat needed?
Not always. If 6 are calculated and there is a risk of the first cut or a test paintout is needed, it is reasonable to consider a 7th. If installation is simple and repeat delivery is available, a spare may be unnecessary.
How to check the cabinet opening?
Set the layout or one real rail to the first vertical position and open the end door to the working angle.
Where to buy RK-002?
In the STAVROS interior rail card after confirming the quantity, material, and layout.
Brief conclusion
For a wall segment about 320 mm wide, a separate RK-002 is often indeed more rational than a ready-made slat panel. The buyer is not obligated to purchase a module about a meter wide and cut a small part from it if the remaining material has no use.
But the advantage of RK-002 only appears after calculation.
You need to choose:
-
cross-section 16×40, 22×60, or 40×40 mm;
-
material — MDF or MDF with oak veneer;
-
gaps at the cabinet and wall;
-
number of verticals;
-
equal spacing;
-
height;
-
reserve.
For example, on 320 mm with 20 mm gaps, seven RK-002 with a face width of 16 mm give equal gaps of 28 mm, while five RK-002 with a width of 40 mm give gaps of 20 mm. These are two completely different visual solutions on the same wall segment.
If the first batten does not interfere with opening the cabinet, a length of 2750 mm is sufficient in height, the 20×8 mm embedded strip fits the base, and the price of the calculated set is acceptable, individual RK-002 pieces deliver exactly what one chooses a piece-by-piece system for: a controlled rhythm matched to the actual size, not to the factory width of a ready-made panel. Before payment, all that remains is to double-check the current price, availability of the selected version, and completeness of the mounting system.