Article Contents:
- Short answer: DP-001 cannot be moved from the box directly to the wall
- What is confirmed about the DP-001 wooden panel
- Identical geometry does not make wood identical
- Natural color variation is not a defect, but it needs to be managed
- Calm wall
- Expressive mosaic
- Rhythmic checkerboard
- Centered composition
- DP-001 from oak
- DP-001 from beech
- When the wood remains visible
- When an opaque coating is planned
- Why you can't assign one universal percentage
- Example of a wall with leftover width
- Openings cannot simply be subtracted from the total area
- How visual reserve differs from repair reserve
- Why reserve cannot be stored without labeling
- Record damages and visual features separately
- Why you should not place stacks directly on a cold or damp surface
- Light group
- Medium group
- Dark group
- Contrast group
- First large contrasts, then small transitions
- All fibers are oriented the same way
- Adjacent squares are rotated by 90°
- Controlled mixed layout
- Why side light changes the pattern more than frontal light
- Socket at the junction of four squares
- Socket inside one module
- Which edge to start the first row from
- Distribute evenly
- Create a deliberate center
- Move to a less visible edge
- Use for trimming
- Keep in repair reserve
- What should be in the photo of the approved layout
- What to pass to the designer
- Order only the clean area
- Take squares from boxes in a row
- Not ordering the entire volume in one batch
- Considering shade as the only criterion
- Coming up with a checkerboard pattern during installation
- Not checking side lighting
- Not marking arrows
- Not photographing the approved layout
- Not marking outlets
- Send all leftovers for trimming
- Store numbered modules mixed together
- Buy from a screenshot
- Attribute DP-001 properties of slat panels
- Make up unconfirmed glue
- Control fragment instead of hasty launch
- Who has the right to change the map
- The reserve cannot be assembled only from 'unsuitable' squares
- Documentation after completion of work
- What is the size of DP-001?
- What material is DP-001 made of?
- How many 200 × 200 mm tiles are there per 1 m²?
- Can I order exactly 25 pieces per square meter?
- Why is a dry layout needed?
- Is it necessary to rotate adjacent squares by 90°?
- Why do modules of the same color look different?
- Can oak and beech be mixed?
- Should DP-001 be ordered in one batch?
- What is visual reserve?
- How to mark squares?
- Can the number be written directly on the front side?
- Where to place the most contrasting elements?
- Is it necessary to check the wall in the evening?
- When to do a test paint?
- What to keep after installation?
- Can I buy one square later?
- How to choose between DP-001 and slatted panels?
- Is DP-001 suitable for a bathroom?
- Is glue included in the kit?
- Can I cut the module from any side?
- How to accept the batch before installation?
- When should I order a design project?
- Where to see other wall solutions?
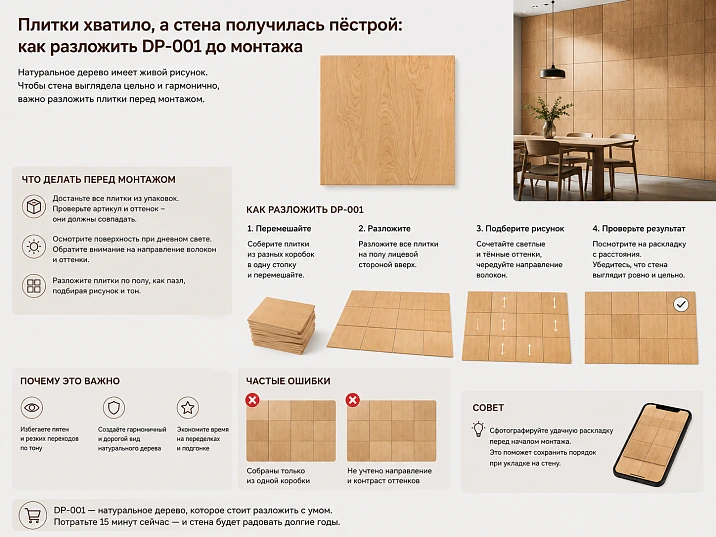
The area is calculated correctly, there are enough boxes, cuts are accounted for — it would seem the result is already predictable. But after installation, the eye catches a dark square in the center, two active patterns accidentally converge nearby, and the direction of wood grain changes without a clear rhythm. There was enough material, the geometry is correct, but the wall still looks as if the modules were taken out of packaging one by one and immediately glued on.
This is often how disappointment with natural wood begins. The reason is not the material itself or necessarily the quality of installation. The mistake occurs earlier: the batch was not treated as a single composition, not compared under real lighting, not sorted by shade, and the position of each square was not fixed. Wood is not printed in identical copies. Oak and beech elements of the same format can differ in grain pattern, tone saturation, and how the surface reacts to side light.
Buy the wooden panel DP-001 can be used for an accent wall, niche, area behind the headboard, study, hallway, or other interior space. The confirmed size of one module is 200 × 200 mm, material — oak or beech. One square covers 0.04 m², so in pure geometry, 1 m² requires 25 whole elements. But this number only answers the question about area. It does not help make the pattern calm, distribute light and dark details, or save a few suitable modules for future repairs.
The working sequence is different: first, choose the material and intended finish, then order the entire volume in one batch, accept all boxes before processing, dry-lay the squares, determine the grain direction, number the positions, and only after approving the map transfer the composition to the wall. Then the natural unevenness of wood ceases to be random and becomes part of the project.
Short answer: DP-001 cannot be transferred from the box directly to the wall
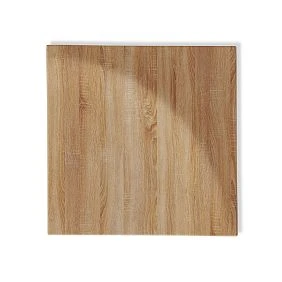
DP-001 has the same format, but not the same pattern. The 200 × 200 mm square sets the grid, but the wall's appearance is determined by many other factors: wood species, shade of each element, grain direction, lighting, and module adjacency.
Five actions must be performed before installation:
-
accept the entire order and do not mix markings from different batches;
-
inspect the front side of each square;
-
conditionally divide the elements by tone and pattern activity;
-
assemble the entire visible part of the wall dry;
-
secure the layout with a photo, numbering, and direction arrows.
Such preparation takes time but protects against the most expensive mistake — redoing an already glued surface. If the composition does not look good on the floor or a temporary board, the squares can be rearranged in a few minutes. On the wall, the same adjustment turns into dismantling, risk of damaging the pieces, and redoing the base finish.




What is confirmed for the wooden panel DP-001
| Parameter | Confirmed data | What to check before ordering |
|---|---|---|
| Article number | DP-001 | Matching article number in all packages |
| Type | Square wooden wall panel | Is the modular format suitable for the chosen wall |
| Size of one element | 200 × 200 mm | Grid, edges, and undercut placement |
| Area of one element | 0.04 m² | Net area without allowance |
| Nominal quantity per 1 m² | 25 whole modules | Actual quantity considering wall and reserve |
| Material | Oak or beech | The breed of the entire batch and future finishing |
| Product group | Tile made of wood and MDF | Not to be confused with slat panels |
| Purpose | Decorative finishing of interior walls | Specific base and room conditions |
| Price, availability, and delivery times | Checked in the product card | Up-to-date information before payment |
| Thickness, surface condition, and packaging unit | Not confirmed in the original scheme | Check in the product card or with a manager |
After the table, do not immediately proceed to calculation. First, open the product card and check the current parameters of DP-001. For a good layout, not only the width and height of the square are important, but also the delivery condition, the type of future finish, the number of elements in a package, and the possibility of obtaining the entire volume from one production batch.
Our factory also produces:
Identical geometry does not make wood identical
Two squares can match in size down to a millimeter, but be perceived completely differently. One looks calm and almost monochrome. Another shows wide contrasting lines. A third appears darker due to the fiber arrangement, although its actual tone is close to the neighboring one.
In a modular wall, the differences are amplified. A large panel has its own integral pattern, while a square tile creates many boundaries. Each boundary makes the eye compare neighboring elements. If two of the most contrasting squares happen to be next to each other, they form a visual spot. If all the active details are gathered in one corner, the surface seems unbalanced.
Four independent characteristics influence perception:
-
overall shade;
-
fiber pattern;
-
texture direction;
-
light reflection after finishing.
Sorting modules only by the "light-dark" principle is not enough. Two equally light squares can conflict due to different patterns. Conversely, a darker piece can successfully connect neighboring elements if its fibers continue the overall rhythm.
Get Consultation
Natural color variation is not a defect, but it needs to be managed
Wood remains a natural material. Complete matching of shade and pattern of all elements should not become a default expectation. Even within the same species, there are calm and active areas, more even lines, noticeable transitions, and different grain directions.
The problem begins not with the difference itself, but with its random distribution. One contrasting module placed in the center without intent looks out of place. The same expressive squares, evenly repeated across the field, create a living wall. The natural variability remains the same, but the composition is already perceived as deliberate.
Before purchasing, it is useful to determine the desired surface character.
Calm wall
Suitable for an interior where the panel serves as a backdrop for furniture, light, or art. Contrasting elements are distributed along the edges or kept in reserve. Fibers are more often oriented in the same direction.
Expressive mosaic
The wood grain becomes the main decorative content. Active modules can be left in the visible area, but their placement is built according to a scheme.
Rhythmic checkerboard
Adjacent squares rotate by 90°. The difference in direction becomes intentional rather than random. Shades still need to be balanced.
Centered composition
The most expressive details form a pre-selected center. This option requires a precise axis and symmetry relative to furniture or wall architecture.
Worth seeing before ordering types of wooden panels for interior finishing, to ensure that the modular tile truly fits the task. DP-001 offers layout freedom, but this freedom requires more preparation than a large-format solid panel.
Oak or beech: the choice affects layout as much as color
Oak and beech cannot be considered merely as two variants of the same tile. The wood species determines the pattern character, finishing method, and how carefully the adjacency of modules must be managed.
DP-001 in oak
Oak is chosen when the natural texture should remain visible. On a square format, it turns into graphics: lines run vertically, horizontally, or at their own natural angle. With a checkerboard layout, light changes the perception of adjacent squares more strongly.
It is reasonable to order oak panels in one batch and lay them out completely. The most active elements do not need to be automatically considered the worst. They can become the basis of the composition if repeated and supported across the entire wall.
DP-001 made of beech
Beech is perceived as calmer, especially under a covering finish. But this does not mean that a dry layout is unnecessary. Even after opaque painting, boundaries, geometry, light and shadow, and differences in surface treatment remain.
If beech is planned to be tinted or coated with a transparent material, checking the shade becomes equally important. One test square does not show how the entire batch will look. At least a group evaluation of several elements is needed.
| Task | Oak | Beech |
| Preserve noticeable texture | Particularly expressive | Gives a calmer pattern |
| Perform a chessboard rotation | Strong play of direction and light | More restrained effect |
| Paint with covering enamel | Possible, but the natural pattern is hidden | Often a rational choice |
| Create a calm background | Requires careful sorting | Usually easier to balance |
| Make wood the main accent | Suitable | Suitable for the chosen finish |
| Control the batch | Full dry layout needed | Layout is still necessary |
The material is selected before calculating the reserve. Mixing oak and beech in one field without a specially developed idea is not allowed: the difference in species will be noticeable both after tinting and under many types of painting.
Visible texture or opaque coating
The degree of sorting depends on whether the natural pattern remains exposed.
When the wood remains visible
Check the shade, grain lines, pattern saturation, and reaction to a test coating. After applying oil, varnish, tinting, or other material, the contrast may change. That is why it is useful to approve the final map after a control test on several different modules, rather than on a single calmest sample.
Do not apply the finish to the entire batch until the composition is understood. After painting, rearrangement is possible, but marking and groups will have to be maintained especially carefully.
When an opaque coating is planned
The initial shade of the wood becomes less noticeable, but the following remain:
-
processing direction;
-
edge geometry;
-
microrelief;
-
joints;
-
light transitions;
-
priming quality;
-
surface behavior under side light.
Solid color coating does not turn squares into a seamless sheet. If one part is rotated 90°, the change in light and shadow may remain visible. Therefore, the direction is still marked with an arrow.
Before choosing a finishing system, it is useful to study recommendations for finishing wood products, but the exact technology for DP-001 must be matched with the current state of supply and the selected material.
What to check before ordering the entire batch
The earlier the parameters are specified, the fewer decisions will have to be made on site. The application must include not only the area and article number.
Check:
-
material — oak or beech;
-
element size — 200 × 200 mm;
-
expected finish;
-
surface condition upon delivery;
-
module thickness;
-
number of elements per package;
-
minimum order quantity;
-
possibility to manufacture the entire volume in one batch;
-
production time or availability;
-
storage recommendations;
-
acceptable installation method;
-
ability to obtain a control module;
-
base requirements;
-
ability to order additional backup;
-
current price.
Some of this information is not confirmed in the original product scheme, so the article does not replace the product card and technical consultation. Before payment, you need to get specific answers for the selected modification DP-001.
Why it's better to order the entire volume at once
It is technically possible to purchase additional squares later only if the product is in stock, but expecting a complete match with the first batch is unreasonable. New elements may differ in shade, pattern, and reaction to finishing. For invisible repairs, the reserve left from the initial delivery is especially valuable.
A single order helps:
-
receive all material at once;
-
compare modules with each other;
-
build a full layout;
-
select parts for trimming;
-
leave a suitable repair reserve;
-
perform a general test paint-out;
-
save one batch marking;
-
avoid mixing different supplies.
In the application, write separately: "Please confirm the possibility of manufacturing the entire volume of DP-001 in one batch." This phrase does not guarantee absolute uniformity of natural wood, but helps manage the supply as a single project.
Calculation DP-001: 25 modules per square meter — just the beginning
One element has a size of 0.2 × 0.2 m. Its area:
0.2 × 0.2 = 0.04 m²
Nominal number of whole squares per 1 m²:
1 ÷ 0.04 = 25 pcs.
For a wall area of 6 m², pure geometry gives:
6 × 25 = 150 modules
But ordering exactly 150 elements without a diagram is not possible. The number does not account for edge trims, sockets, niches, damage during handling, visual selection, and repair reserve.
Why a single universal percentage cannot be assigned
For a wall with dimensions that are multiples of 200 mm, there may be few trims. For a wall with multiple sockets, a niche, and an external corner, the consumption will be different. If the buyer wants to set aside the most contrasting pieces, the visual reserve increases. If each module is used in an active mosaic, the selection may be less strict.
Therefore, the reserve consists of four parts:
-
technological — for trimming and processing;
-
insurance — in case of damage;
-
visual — for pattern control;
-
repair — for storage after work completion.
It is better to check the detailed geometry with the material on how to calculate panels by wall area. For DP-001, a visual reserve is added to the usual calculation, because natural squares cannot be evaluated only as identical units of area.
Example calculation with a real grid
Suppose the wall is 3.4 m wide and 2.6 m high.
Width in modules:
3.4 ÷ 0.2 = 17 squares
Height:
2.6 ÷ 0.2 = 13 squares
Clean rectangular grid:
17 × 13 = 221 modules
In this example, the dimensions are multiples of 200 mm, so the outer edges can be assembled without strip trimming. However, the number 221 cannot automatically be the final order quantity. There may be sockets on the wall, one element could be damaged, and the buyer may decide to keep some of the more contrasting modules in reserve.
If the wall dimensions are not multiples of 200 mm, you need to decide in advance where to place the trimming. A narrow strip on only one side can visually shift the entire composition. Often the remainder is distributed between two edges, but the specific solution depends on the furniture, corners, and wall axis.
Example of a wall with a width remainder
Let the width of the section be 3.55 m. Seventeen whole squares occupy 3.4 m. The remainder is 150 mm. It can be placed as one strip on the right or divided into two parts of 75 mm each. The first option is simpler in terms of the number of cuts, the second creates a more balanced frame. However, both 75 mm strips may look too narrow next to large furniture.
You cannot choose the method based solely on arithmetic. The plan should mark the door casing, corner, cabinet, baseboard, sockets, and line of sight. Sometimes it is more reasonable to start the grid from an open edge with a whole module and hide the trimming behind built-in furniture. In another room, symmetry is more important than material savings.
Openings cannot simply be subtracted from the total area
For a wall with a door or niche, the geometric area decreases, but the number of trims increases. If you subtract the door area from the rectangle and order the resulting number of squares, there may not be enough reserve for framing. Short sections, corners, and elements of complex shape appear around the opening.
First, a grid is built, then whole and trimmed positions are calculated. This method is more accurate than simply dividing the area by 0.04 m² and immediately shows which modules will be most risky during processing.
Visual reserve: material purchased not for its area
A regular reserve is needed to avoid stopping installation after a bad cut. Visual reserve solves a different problem: it allows rearranging and selecting modules.
It is especially useful when:
-
the wood remains exposed;
-
the client wants a calm surface;
-
the wall is under side light;
-
the central area is fully visible;
-
there is little furniture around;
-
a symmetrical pattern is needed;
-
some modules are noticeably more contrast;
-
complex trimming around electrical work is planned.
There is no need to consider the selected elements as waste. A contrast square may be suitable for an edge, a niche, future repairs, or a separate small area. The main thing is not to glue it in the central field just because it was the next one in the box.
How visual reserve differs from repair reserve
Visual reserve is used before installation. Suitable replacements are selected from it, and the composition is managed. Repair reserve is kept after work is completed. Its task is to replace a damaged element after several months or years.
The same square can first be in the visual reserve and then move to the repair reserve. The article number, material, batch number, direction, and finishing details are kept on the back. Without such information, it is difficult to understand which wall the remaining module belonged to after several years.
Why reserve cannot be stored without labeling
In a large project, oak panels, beech parts, coating samples, and trimmings may be used. An unsigned square can easily be mistaken for a test material and thrown away. The repair reserve is packed separately, the front side is protected, and a photo of the finished wall is attached.
Acceptance DP-001 begins before unpacking all boxes
At the site, delivery data is first recorded. The labeling is photographed, the article number and material are checked, and the packages are counted. If there are batch designations, they are preserved.
Acceptance procedure:
-
compare documents and actual number of packages;
-
check the designation DP-001;
-
ensure the material matches the order;
-
photograph the labels;
-
open packages carefully;
-
inspect front sides and edges;
-
separate elements with visible damage;
-
do not mix modules until data is recorded;
-
report discrepancies before cutting and finishing;
-
move the parts to storage conditions suitable for wooden products.
Quality requirements for wooden products help to understand the general evaluation principles, but the specific acceptance of DP-001 is carried out according to the card, order, and condition of the entire batch.
Do not start sorting until you have seen the entire volume
The first opened box may seem too light, the second — contrasting, and the third will be intermediate. Evaluating one package does not give an idea of the batch. A decision is made after all elements of the visible field are available.
If the installation is divided into stages, this is not a reason to accept modules in parts. It is worth at least photographing and comparing the entire volume, and then dividing it into zones. Otherwise, the first wall will get calm squares, and the second will get the most active ones.
Record damages and visual features separately
A dark pattern is not a defect. A chip on the edge is not related to natural color variation. During acceptance, two independent groups are created:
-
elements with pattern features;
-
elements with condition remarks.
The damaged module does not need to be automatically sent for trimming. First, the issue with the product is resolved, and only then it is determined whether the part can be used in the project.
Storage before layout and installation
Wooden modules should not lie for weeks in a random place near wet work, an open window, or a heating appliance. Even a perfect map will not save the composition if the elements change state due to improper storage.
Before installation, observe storage rules for wooden elements. Packages are placed on a level base, protected from contamination, and the marking is preserved. Do not place squares face down on a rough floor or stack them near cutting tools.
If the batch is already sorted and numbered, groups are stored separately. Each stack indicates the row or zone: A, B, C; center; edges; trimming; reserve. Then the installer will not have to reconstruct the design again.
Why stacks should not be placed directly on a cold or damp base
The article does not establish a specific storage mode for DP-001 without current documentation, but the general principle is clear: wooden elements need a level and protected area. Contact with a wet surface, sharp changes in conditions, and proximity to unfinished wet processes create a risk of changing the state of the products.
By the time of dry layout, the modules must be in the same conditions. If part of the batch was stored near a window and part in a closed room, the comparison of shades and geometry will become less reliable.
Sorting by shade without made-up "grades"
For project work, it is convenient to create four conditional groups:
-
light;
-
medium;
-
dark;
-
contrasting.
These are not commercial grades or the official STAVROS classification. The groups are only needed for the layout of a specific wall.
Light group
Elements that are perceived as lighter than the main mass. They can be evenly distributed, used in a less lit area, or linked to adjacent light furniture.
Medium group
The main mass of the party. It forms a calm background. But "average" does not mean identical: within the group, direction and pattern are also compared.
Dark group
Squares with a more saturated tone. They are distributed so that no random spot is formed. On a large wall, several dark modules are better perceived when repeated than in one dense group.
Contrast group
Elements with an active pattern, sharp transition, or feature that immediately catches the eye. They are not necessarily bad. They just need a meaningful position.
After sorting, the groups are mixed again according to the map. The goal is not to make the wall artificially uniform, but to distribute the differences.
Sorting by pattern is more important than a simple "lighter — darker" scale
Additionally note:
-
straight calm fibers;
-
diagonal pattern;
-
wide lines;
-
fine texture;
-
pronounced center;
-
sharp transition;
-
almost monochrome surface.
Two dark squares with different fiber patterns may look bad next to each other. One dark and one medium, but with a similar direction, can create a natural transition.
It is convenient to lay out modules not in stacks, but in several rows face up. From a distance of two to three meters, differences are better perceived than when examining them in hand.
First large contrasts, then small transitions
Do not start by trying to determine the ideal place for each square. First, remove obvious conflicting pairs: two darkest ones next to each other, an active pattern in a single center, a sharp transition near the main axis. After that, build smooth connections between the remaining groups.
This order is faster. Trying to assemble the final wall immediately forces you to endlessly rearrange elements and lose the overall logic.
Three fiber direction patterns
Texture direction affects both the pattern and light reflection. For DP-001, three clear patterns can be considered.
All fibers are oriented identically
Each square is rotated with one arrow pointing up. The wall feels calmer, the modular grid is less active.
Vertical orientation emphasizes height. Horizontal emphasizes width. But this effect cannot be evaluated separately from furniture and lighting. A full-size mockup of at least several rows will give a more honest impression.
Adjacent squares are rotated 90°
The first element is placed vertically, the second horizontally. The next row repeats or mirrors the pattern. A controlled checkerboard emerges.
This option emphasizes the square 200 × 200 mm format. With side lighting, adjacent elements may appear lighter and darker even with a close base tone. This is part of the intended effect, not a flaw.
Controlled mixed layout
Modules are rotated not according to a rigid checkerboard grid, but according to an approved pattern. This path offers more freedom but requires a precise map. Random direction cannot be passed off as an author's composition after installation.
| Diagram | Wall character | What to check |
| Uniform direction | Calm, seamless surface | Arrow alignment and vertical or horizontal influence |
| 90° turn | Pronounced modular checkerboard | Side light and pattern repetition |
| Mixed map | Lively original composition | Numbering each position |
| Random placement | Unpredictable pattern | It's better to exclude this option |
An arrow on the back prevents accidental rotation
After confirming the orientation, an arrow is placed on the back or on a temporary sticker. The marking method must not damage the front surface or future finish.
One arrow has two meanings:
-
direction of fibers;
-
top of the module in the finished map.
If the installer sees only the number A7 without an arrow, they may rotate the square by 180° or 90°. The number remains, but the pattern changes. Therefore, the marking must be double.
Dry layout: assemble the wall before it appears on the wall
The best way to see the result is to lay out all visible modules in the actual order. For a small area, this can be done on the floor. For a large wall, a temporary panel or a marked work area is convenient.
First, build a grid at a 1:1 scale. Each cell corresponds to a 200 × 200 mm position. Then, lay out the squares in rows.
Stages:
-
mark the outer contour;
-
apply horizontal and vertical rows;
-
mark sockets and trims;
-
lay out the middle group;
-
add light and dark modules;
-
distribute contrasting elements;
-
check the direction;
-
view the composition from a distance;
-
evaluate it under different lighting;
-
rearrange disputed positions;
-
number;
-
photograph the result.
The dry layout should cover the entire visible part, not five random squares. A small sample shows the combination but does not reveal the tone distribution across a large plane.
The wall should be viewed not only in daylight
The wood surface changes throughout the day. Light from the window emphasizes one pattern, the upper evening light another. Side lighting enhances boundaries and makes the direction of the fibers more noticeable.
Check the layout:
-
during the day in natural light;
-
in the evening under main lighting;
-
with sconces on;
-
in side light;
-
from the main entry point;
-
from the place where the wall is most often seen;
-
next to furniture and finish samples.
A photo on a phone is useful, but does not replace a live assessment. The camera can even out or, conversely, enhance contrast.
Why side light changes the pattern more than frontal light
When light runs almost parallel to the surface, it emphasizes micro-relief, processing direction, and module boundaries. Two squares of a similar shade can look different just because of the fiber rotation. This is why a layout that seems calm in even daylight can turn into a bright checkerboard in the evening.
If the project includes sconces or hidden lighting, they are turned on before the final approval of the map. In the absence of installed light, you can temporarily direct a portable source at a similar angle.
Sockets and switches must be included in the map
Electrical points break the square grid. If they are not marked in advance, the installer will face inconvenient cutting already on the wall. A socket can end up at the junction of four modules, on a narrow strip, or in the center of the most expressive square.
First, build a grid, then mark:
-
frame dimensions;
-
center of the electrical point;
-
trim boundaries;
-
adjacent whole elements;
-
possible grid offset;
-
details to be processed;
-
reserve in case of damage.
Sometimes a small change in the starting axis allows for a much cleaner trim. The decision must be made before numbering the entire wall.
Socket at the junction of four squares
This arrangement looks symmetrical in the diagram, but complicates processing: you'll have to cut four elements. The risk of accumulating small mismatches is higher than when placing the frame within one or two modules. Sometimes the grid is shifted by a few centimeters to reduce the number of cuts.
Socket within one module
Processing is concentrated on one piece, but it needs to be done especially precisely. It's wise to duplicate this square in reserve in case of error. Adjacent modules are chosen to be calm so that the electrical frame is not surrounded by the most active wall pattern.
How to work with edges if the wall is not a multiple of 200 mm
The remainder can be placed:
-
only on one edge;
-
symmetrically on the left and right;
-
hidden behind furniture;
-
tied to a corner or niche;
-
designed as a separate frame according to the project.
No single method is universal. A narrow strip near a prominent open edge often looks accidental. Symmetrical distribution improves balance but increases the number of cut pieces. Furniture can hide the edge today, but it will become visible when rearranged.
The layout map is approved together with the furniture plan. Then DP-001 is perceived as part of the interior, not as an independent grid.
Which edge to start the first row from
The starting point depends on what a person sees first. At an open external corner, one often wants to preserve a whole square and a clean edge. In a niche, central symmetry may be more important. Behind a built-in cabinet, some cut pieces can sometimes be hidden, but only if the furniture is truly permanent.
The installer must not leave the decision to "start from wherever is convenient." The starting axis must be marked on the map and transferred to the wall before applying the compound.
What to do with the most contrasting modules
There are five working options.
Distribute evenly
The contrast repeats across the entire field and becomes a natural part of the pattern. Calm transitions are left between active squares.
Assemble a deliberate center
Active elements form a composition above the console, behind the sofa, or in the center of the niche. Such a center should align with the architectural or furniture axis.
Move to a less noticeable edge
Suitable for a calm wall, but the edge should not look like a pile of "mismatched" details. Contrast is distributed gradually.
Use for trimming
The visible part will decrease, but before cutting, you need to assess whether the remainder will become even more contrasting. The active line may end up right at the edge after trimming.
Leave in repair reserve
Useful if the element matches in material and finish but does not fit into the main field.
The worst option is to decide the fate of a contrasting square at the moment of installation. The installer is not obligated to see the entire composition the same way as the designer.
Layout map: a simple system that cannot be confused
Rows are marked with letters, positions with numbers:
-
A1, A2, A3 — first row;
-
B1, B2, B3 — second;
-
C1, C2, C3 — third;
-
arrow shows top;
-
index P denotes trimming;
-
index R — reserve.
Example: C7-P — seventh module of the third row, trimmed. On the printed diagram, the same position is marked in the corresponding cell.
After numbering, modules are stacked in reverse assembly order or by rows. Each stack gets a label. Do not put all squares back into random boxes: the map will be saved on paper, but the physical order will be lost.
What should be in the photo of the approved layout
The photo is taken strictly from above or as perpendicular to the plane as possible. The frame includes the entire grid, top designation, ruler or reference size. Complex areas around sockets and trims are photographed separately.
It is useful to keep two versions:
-
a clean photo for visual inspection;
-
a diagram with numbers for the installer.
If there are too many labels on one image, the wood grain becomes unreadable.
Transfer to the wall: the installer follows the map, not chooses the next square
Before starting work, the installation team must receive:
-
a photo of the approved layout;
-
a diagram with numbers;
-
direction arrows;
-
a list of trimmed positions;
-
separate reserve;
-
starting point;
-
row order;
-
finishing details;
-
current fastening recommendations.
General preparation questions are covered in the material about п
The purchase should consider not only the squares but also the preparation of the entire job. Specific compounds are chosen after checking the condition of the delivery, base, and finish.
What to buy together with DP-001
| What to add to the project | Why | What to check | Link |
| Additional DP-001 | Visual and repair reserve | Same batch and material | Buy the wooden panel DP-001 |
| Tiles of other formats | Compare scale and pattern | Compatibility with the project | View decorative wall tiles |
| General panel catalog | Match modular and other format | Is a different type of cladding needed | Wooden Wall Panels |
| Mounting materials | Prepare the base and fixation | Compatibility with wall and DP-001 | Select materials for installation and finishing |
| Layout project | Fix the grid, trims, and numbering | Exact wall dimensions | Order the wooden wall layout |
| Sample finishing materials | Check color and contrast | Reaction of oak or beech | recommendations for finishing wood products |
The table does not assign a specific adhesive, primer, or finish. Such decisions depend on the card data and the substrate. You cannot choose an installation compound just because the package says "for wood."
A design project is needed not only for complex patterns
A square grid seems simple. But the larger the wall, the more decisions: where to start, how to distribute the remainder, in which direction to rotate the modules, what to do with outlets, and where to place active elements.
For a large accent area, you can Order the wooden wall layoutThe technical specification includes dimensions, photographs, furniture placement, outlets, switches, and the intended pattern design. The result should not be a beautiful visualization without dimensions, but a map suitable for numbering.
What to provide to the designer
One photo of an empty wall is not enough. Required:
-
width and height of the area;
-
recesses and niches;
-
outlets, wall lamps, and switches;
-
furniture plan;
-
selected material;
-
intended finish;
-
lighting direction;
-
desired wall character;
-
trimming restrictions;
-
amount of repair reserve.
The more accurate the initial data, the fewer decisions remain for the installer.
DP-001 behind the headboard
In the bedroom, the wall is viewed frontally, so variegation is especially noticeable. The center of the composition is linked to the axis of the bed. If the headboard covers the lower rows, it is better not to accidentally hide the most expressive elements behind furniture.
Sconces are applied to the map before layout. Their side light can enhance the difference in fiber direction. For a calm bedroom, a single orientation or a softly distributed mixed composition is often more suitable.
Check the height of the future headboard as well. If the furniture is not yet installed, draw its outline on the wall or map. Otherwise, the compositional center may be partially hidden.
DP-001 in the living room
Behind the sofa or in the TV area, the area is usually larger, and the gaze moves along the wall from several points. Contrasting elements gathered in one corner will be more noticeable.
If there is a wooden floor, cabinet, or door nearby, do not try to achieve a literal match of every line. It is more important to coordinate the overall tone and pattern activity. The wall can be more expressive than the furniture, but this should be chosen in advance.
In the TV area, avoid an accidental bright spot next to the screen: it will constantly distract. Behind the sofa, on the contrary, an expressive center can work as an independent composition.
Wooden tile in the study
In the study, DP-001 can provide a calm modular background behind the desk or library. A small chaotic checkerboard can be distracting. One direction of fibers looks more collected and supports the business character.
During video calls, it's worth checking how the wall looks in the frame: the camera sometimes enhances the contrast between adjacent squares. Take a test shot before installation by placing the layout in the intended frame area.
DP-001 in the hallway
In the hallway, the surface is visible from close range, and light often comes from the side. Here, edges, joints, and fiber direction are especially noticeable.
The lower part of the wall is subject to greater load. The possibility of such use, finish, and care must be coordinated with current recommendations. The article does not confirm moisture resistance or resistance to specific contaminants.
If there is an entrance door nearby, check the combination with its wood pattern. A complete match is not necessary, but two active materials should not compete for attention.
Panel in a niche
A niche sets a natural frame, so a square grid looks complete. But niche dimensions are rarely multiples of 200 mm. The remainder should be distributed so that trimming does not create an accidental narrow strip.
First, determine the central axis, then build rows from it or from the visible edge — depending on the furniture and lighting. The depth of the niche and side slopes are considered separately: tile continuation on them must be planned, not added after installing the main plane.
DP-001 in a commercial interior
In a restaurant, salon, hotel, or showroom, the project may be repeated in several rooms. Then the layout map becomes a standard: groups of shades, orientation, finish code, and reserve size are fixed.
Full repetition of the natural pattern between objects cannot be achieved, but the distribution principle can be repeated. For example: active elements are not grouped together, checkerboard orientation remains unchanged, the central axis is preserved.
For future repairs, the reserve is divided by rooms and labeled. One common box without marking will become useless in a year: it will be impossible to understand which wall a specific shade belongs to.
How not to confuse DP-001 with a slatted panel
DP-001 is a square tile 200 × 200 mm. It builds a surface from modules. The slatted system forms a linear rhythm with long profiles or ready-made slatted panels.
| Criterion | DP-001 | Slatted format |
| Geometry | Square grid | Vertical or horizontal lines |
| Element size | 200 × 200 mm | Depends on the specific batten or panel |
| Main layout task | Shade, adjacency, and rotation of squares | Step, direction, and length of battens |
| Trims | Along grid edges and around obstacles | Along the length and edges of the system |
| Visual effect | Modular wooden mosaic | Linear rhythm |
| Risk of error | Variegation and random checkerboard pattern | Uneven step and broken vertical line |
Inquiries about flexible or acoustic slat panels do not relate to DP-001. To choose between formats, it's better to first understand how to choose a wooden panel for the interior, and then proceed to the specific product card.
How not to confuse natural variability with damage
Differences in shade and grain relate to the appearance of the wood. A chip, crack, damaged edge, or sign of improper storage is a different matter.
During sorting, two independent systems are created:
-
groups by external pattern;
-
a separate zone for elements with condition remarks.
You cannot send a damaged square to the "contrast group" and hope to hide a defect on the edge. The condition of the product is assessed before processing and installation.
Mistakes that make the wall look random
Order only the clean area
The nominal quantity is enough, but there is nothing to rearrange elements or leave a reserve.
Take squares from boxes in order
Dark and active modules gather in random spots.
Not ordering the entire volume in one batch
A late additional purchase may differ noticeably from the already installed wall.
Consider shade as the only criterion
The direction and pattern of the fibers remain uncontrollable.
Come up with a checkerboard pattern during installation
Part of the wall is assembled according to the scheme, part is random.
Not checking the side light
After turning on the sconces, adjacent elements look more contrasting.
Not applying arrows
The installer rotates the square without changing its number.
Not photographing the approved layout
After packaging, no one remembers the exact adjacency.
Not marking sockets
The cut falls on an inconvenient joint.
Send all leftovers for trimming
After installation, no repair reserve remains.
Store numbered modules mixed together
The map exists only on paper, but the physical order is lost.
Buy based on a screenshot
Color and contrast look different under real lighting.
Attribute properties of slat panels to DP-001
The buyer gets a wrong expectation of the format and installation.
Make up an unverified adhesive
The composition may not match the substrate and panel condition.
Who DP-001 suits
Square wooden tiles are appropriate when:
-
a modular pattern is needed;
-
the buyer is ready to do a dry layout;
-
it is possible to order the entire volume at once;
-
natural variation is perceived as a value;
-
the project allows oak or beech;
-
the wall has a clear grid;
-
controlled fiber rotation is needed;
-
a repair reserve can be left;
-
installation is performed according to the map;
-
finishing is agreed upon in advance.
When it's better to choose a different format
DP-001 may not be suitable if:
-
a completely uniform surface without differences is needed;
-
there is no space for dry laying;
-
the installer will take parts in random order;
-
the order is to be assembled in small batches at different times;
-
the wall has too many complex cuts;
-
a slatted vertical is needed;
-
the customer is not ready to accept the natural pattern;
-
a confirmed moisture-resistant exterior finish is required;
-
no data on suitable fastening;
-
the project requires a large solid panel without modular joints.
In that case, it's worth View decorative wall tiles or go to the general section where Wooden Wall Panels different formats are collected.
Application template for DP-001
A well-written application might look like this:
A wooden panel DP-001 measuring 200 × 200 mm is required for a wall ___ mm wide and ___ mm high. Material — oak/beech. Planned finish — ___. The net grid contains ___ whole modules. Additionally, a reserve for trimming, visual selection, and repairs is needed. Please confirm the thickness, surface condition, packaging unit, minimum quantity, possibility of manufacturing the entire volume in one batch, lead time, installation recommendations, and the possibility of obtaining a control module.
Attached to the application:
-
wall diagram;
-
socket and switch dimensions;
-
photo of the room;
-
main light direction;
-
furniture plan;
-
selected fiber pattern;
-
requirement to keep the batch marking.
How to order DP-001 on STAVROS
-
Open the product card and buy the wooden panel DP-001 after checking the current parameters.
-
Choose oak or beech.
-
Specify thickness, surface condition, and packaging unit.
-
Provide the wall dimensions.
-
Calculate the net grid based on a 200 × 200 mm module.
-
Add a justified allowance per the project.
-
Request the entire volume to be manufactured in one batch, if possible.
-
Agree on the proposed finish.
-
Prepare the area for receiving and dry laying.
-
After delivery, photograph the labeling.
-
Sort and lay out the entire visible part of the wall.
-
Number the positions and save the backup.
-
Pass the approved map to the installer.
Select materials for installation and finishing It is necessary after the state of DP-001 and the wall base are confirmed. A random composition should not become part of the order just for completeness.
Check before the first glued square
When the map is approved, there is a dangerous feeling that the preparation is complete and you can start immediately. In practice, it is at this moment that it is useful to stop and perform a final check. An error at the starting point is transferred to the entire grid: each subsequent row will geometrically depend on the first.
Before starting, the installer and the customer verify:
-
dimensions of the work area;
-
position of the first vertical and horizontal line;
-
number of the starting module;
-
direction of the arrow;
-
position of sockets and trims;
-
order of stacks;
-
presence of layout photo;
-
separate storage of repair reserve;
-
compatibility of selected materials with the base;
-
wall readiness for work.
The first row is assembled with particular care. After several squares are installed, step back and compare the pattern with the photo. If the initial axis is shifted, correction is done immediately, not after filling half the wall.
Test piece instead of hasty launch
For a large wall, it is reasonable to first install a small agreed section in a less risky area or assemble a test piece on a temporary basis if the project allows. It shows the actual joint, perception of the finish, and the effect of light already in a vertical position.
The test piece should not become a separate random layout. For it, positions from the approved map are taken, and after checking, return to the overall sequence.
Who has the right to change the map
An unforeseen situation may arise at the site: an unevenness is detected, a module is damaged, an electrical point is shifted relative to the plan. The installer must stop and coordinate the change. Rearranging one square independently sometimes forces changes to neighboring positions because the new shade or direction disrupts the transition.
In the working documentation, it is useful to specify the name of the person who approves the replacement. This eliminates the chain of verbal decisions when the designer, client, and team consider different options as agreed.
One batch for multiple walls: how not to give all the calm pattern to the first room
If DP-001 is used in the bedroom, study, and hallway simultaneously, it is not enough to divide the quantity by area. First, you need to determine the character of each zone. The bedroom may require a calm background, the study a more graphic checkerboard, and the hallway an expressive surface that is examined up close.
The entire batch is evaluated together, then distributed among the rooms:
| Room | Desired character | Which modules to highlight | What to keep in reserve |
| Bedroom | Calm | Medium tone, uniform direction | Several squares with similar shades |
| Office | Graphic | Controlled fiber rotation | Modules for replacing the central area |
| Hallway | Expressive | More active pattern | Parts with suitable finish for lower rows |
| Commercial area | Repeatable principle | Evenly distributed groups | Signed reserve for a specific room |
This distribution is not a sorting of goods by quality. It links the natural pattern to the task of the room. After separation, each zone gets its own map and separate marking.
The reserve cannot be assembled only from "unsuitable" squares
For repairs, a module is needed that can replace a noticeable position. If only the most contrasting or inconvenient elements are sent to the reserve, the future replacement will stand out. In each room, at least a few squares are kept that are close to the main field in tone and pattern character.
Documentation after completion of work
Along with the reserve, the order number, material, date, layout scheme, finish code, and photos in daylight and evening light are saved. In a few years, this information will be more useful than memories of "which exact oak was used then."
Questions and answers about DP-001
What is the size of DP-001?
The confirmed size of one square module is 200 × 200 mm.
What material is DP-001 made of?
Two options are confirmed in the product scheme: oak and beech.
How many 200 × 200 mm tiles are there per 1 m²?
Nominally 25 whole modules, because the area of one square is 0.04 m².
Can I order exactly 25 pieces per square meter?
Only for pure geometry without cuts and reserve. A real order takes into account edges, electrical, visual selection, and future replacement.
Why is a dry layout needed?
It shows how shades, fibers, and contrasting elements look next to each other. Before the adhesive, the composition can be corrected without dismantling.
Is it mandatory to rotate adjacent squares by 90°?
No. You can choose a single direction, a checkerboard pattern, or a controlled mixed map.
Why do modules of the same color look different?
The perception is affected by the direction of the fibers and lighting. With side light, one square may seem darker than the neighboring one.
Can oak and beech be mixed?
Without a special project, it is not recommended. The difference in species will be noticeable in the grain pattern and reaction to finishing.
Should DP-001 be ordered in one batch?
For a large wall, this is preferable. It makes it easier to assess the entire volume, perform the layout, and keep a reserve with similar characteristics.
What is a visual reserve?
These are additional modules that provide freedom for sorting and rearranging. It is not equal to the usual allowance for trimming.
How should squares be marked?
Use row and position codes: A1, A2, B1. Add a direction arrow and a separate index for trimming or reserve.
Can the number be written directly on the front side?
No. Marking must not damage the surface or affect subsequent finishing.
Where to place the most contrasting elements?
They can be distributed evenly, gathered into a planned center, moved to the edge, or kept in reserve. The decision is made on the full layout.
Do you need to check the wall in the evening?
Yes. Artificial and side lighting can significantly change the perception of the shade and the direction of the fibers.
When to perform a test coating?
Before finishing the entire batch. It is better to use several modules with different patterns rather than one random sample.
What to keep after installation?
Several signed modules from the same batch, finishing details, a photo of the layout, and order information.
Can I buy one square later?
The possibility depends on current availability or production. Full matching of a new delivery with the previous batch is not guaranteed.
How to choose between DP-001 and slat panels?
DP-001 creates a square modular grid, while the slats create a linear rhythm. The choice depends on the desired wall geometry.
Is DP-001 suitable for a bathroom?
The original specification does not confirm that installation in wet areas is permitted. Such use must be approved separately.
Is adhesive included in the kit?
The inclusion of installation materials is not confirmed. Check the product page and select a composition suitable for the substrate.
Can the module be trimmed on any side?
The original data does not confirm this possibility. The processing method must be verified against the current documentation.
How should the batch be accepted before installation?
Check the article number, material, number of packages, labeling, face sides, and edges. Discrepancies are recorded before processing.
When should a design project be ordered?
For a large wall, complex grid, multiple outlets, centralized pattern, or commercial interior, a professional layout reduces the risk of errors.
Where can I see other wall solutions?
You can open the catalog and View decorative wall tiles, then compare it with other wall panel formats.
Bottom line: a beautiful wall is created not by the amount of tile, but by an approved layout
DP-001 provides clear geometry: a 200 × 200 mm square, oak or beech, 25 whole elements per 1 m². These data help calculate the area but do not assemble the composition. Natural wood requires a different approach: the entire order must be seen at once, distributed by tone and pattern, choose the direction of the grain, and fix each position.
Before purchasing, clarify the surface condition, thickness, packaging unit, finish, and the possibility of receiving the entire volume in one batch. After delivery, do not rush to the wall. First, conduct acceptance, do a dry layout, view it in daylight and evening light, mark cuts, and keep a repair reserve.
STAVROS allows you to choose DP-001, compare it with other wooden panels, order a layout project, and select materials for subsequent work. This route turns the natural heterogeneity of wood from a risk into an advantage: the wall remains alive but looks intentionally assembled, not composed of random boxes.