Article Contents:
- Wooden finial L-115: first the exact product, then the place on the cabinet
- The cornice hides the silhouette: what measurements to take from the room
- Will the finial be visible behind the cornice: calculating the line of sight
- How to find the maximum setback
- Can the project be accepted if the finials on the wardrobe are barely visible, but are clearly visible from the entrance?
- Is it necessary to repeat the check after replacing the chair with a lower one?
- Can one L-115 be turned around if it is better visible from the side this way?
- Is an image of the finial overlaid on a photo of the wardrobe sufficient?
- Can I first buy one unit and order the second one after a fitting?
- What to do if the calculation passed, but the real mock-up almost blends with the background?
- Will the calculation work for a wardrobe under a sloped ceiling?
- When is it better to refuse a pair of finials?
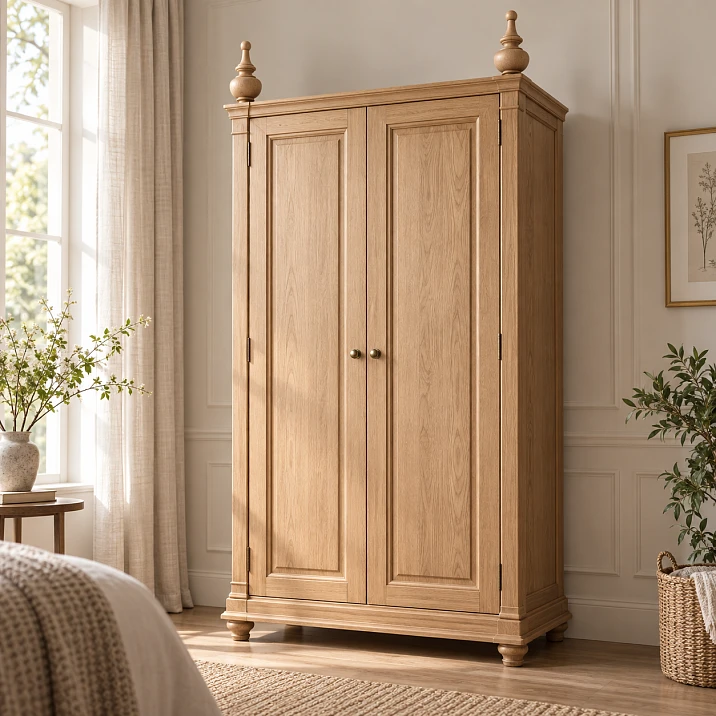
On the facade sketch, the tall cabinet looks complete: cornice, two vertical axes, finials at the edges. The buyer is ready to order wooden parts L-115, but from the armchair notices something else: only small tops will remain visible above the front edge. The most expressive part of the shape will be hidden behind the cornice.
Before purchasing the pair, you need to check the line of sight from the room and only then approve the position of the finials. Free space up to the ceiling is not enough: the part may physically fit on the cabinet, but barely participate in its design. Sometimes a slight forward shift fixes the situation. Sometimes it is impossible due to the top construction, and the project itself has to be changed.
The goal is to get an approved view from usual spots: from the entrance, from the armchair, and in front of the cabinet. It is not necessary to fully expose every part from all directions. You need to decide in advance which silhouette you want to see, and then link this requirement to dimensions, safe mounting, and the specific order.
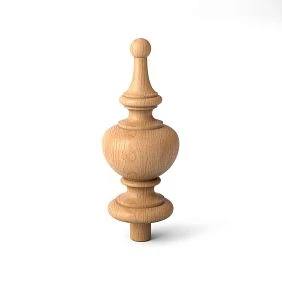
Wooden finial L-115: first the exact product, then the place on the cabinet
For this composition, L-115 in beech or oak is considered. Before buying the wooden finial L-115, lock in the execution according to the product table, not by the approximate size in the photo.
| Parameter | Execution for approval |
|---|---|
| Article number | L-115 |
| Size A × B × C × E | 238 × 78 × 90 × 208 mm |
| Wood | Beech or oak |
| Sanding | «Prestige» |
| Grade of lamination in the selected base configuration | "Under enamel" |
| Quantity in the composition under consideration | Two separate parts |
The size range is given according to the trade table as of September 6, 2026. It identifies the product but does not describe the entire mounting assembly. From the four numbers, one cannot independently derive the size of the support platform, the seating depth, or the height that will remain exposed above the cornice. The difference between A and E should also not be taken as a mounting allowance.
Three views will be needed for approval. The front view shows symmetry relative to the doors and stiles. The side section explains the overlap by the cornice. The mounting assembly determines what the wooden part rests on and how it is held. A beautiful frontal drawing does not replace the other two documents.
The top piece is placed on a confirmed base provided by the furniture manufacturer. A thin decorative strip on which the part looks good in a sketch does not yet become a suitable support. Until the seating is clarified, the position of L-115 on the cabinet remains a design option.




The cornice hides the silhouette: which dimensions to take from the room
First, choose the places from which the cabinet is actually viewed. For a living room, these could be the entrance door and a favorite armchair; for a bedroom, the entrance and the usual position near the bed. A third check is needed right in front of the cabinet, where a person uses the doors. Do not replace a seated viewpoint with a photo taken while standing.
Measure heights from a single finished floor mark. Measure the distance to the cornice horizontally, not along an inclined line from the face to the top edge. If the cabinet is still being manufactured, its position, height, and cornice projection are taken from the approved project.
The side section requires the following values:
| Designation | What to measure or determine |
|---|---|
| Ze | Height of the observer's eye from the floor |
| Zc | Height of the edge blocking the view |
| d | Horizontal distance from the eye to this edge |
| s | Offset of the checked point of the top piece beyond the edge, into the depth of the cabinet |
| Zp | Height of the checked point of the top piece from the floor |
The control point is selected on the actual contour or an accurate model. Start with the top, but add points on the part of the shape for which the decor was chosen. For a three-dimensional product, they may be at different depths. Substituting a single center offset for the entire silhouette is incorrect.
Check the cornice itself separately. The front protrusion, a higher rear step, or another part of a complex profile may block the view. For a preliminary calculation, a specific edge is selected; for a final decision, the entire cross-section is shown.
Do not mix the top plane of the body and the overlapping edge. For example, the top piece may sit on the lid behind a higher side. For the line of sight, the height of the side is needed, and for placing the part, the mark of its base. If both values are recorded as "cabinet height," the check loses meaning. In the cross-section, they are labeled separately and linked to a single floor mark.
If the project is accompanied by a visualization, ask to label the camera height and its location on the room plan. An angle from the level of the top of the cabinet is useful for discussing assembly but proves nothing about the view from the chair.
Our factory also produces:
Will the finial be visible above the cornice: calculating the line of sight
Let's imagine a side cross-section: the observer is in front of the cabinet, the cornice edge is between them and the checked point of the finial. In the horizontal direction, the scheme looks like this:
Eye E → distance d → edge C → offset s → point P.
Each position has a height: Ze, Zc, and Zp, respectively. Through the eye and the top of the edge, a straight line can be drawn and extended into the depth of the cabinet. At the level of point P, this line defines a boundary above which the edge no longer blocks the view.
Zlim = Zc + (Zc − Ze) × s / d.
If Zp > Zlim, the checked point passes above this edge. If it is lower, the edge hides it. Equality means the line of sight touches; such a position should not be taken as confident visibility.
This is a simplified geometric model of one cross-section, not a mounting characteristic of L-115. It is applicable with a positive distance d and the checked point located behind the obstacle. All dimensions in the following example are conditional.
Let the eye be at a height of 1600 mm, the overlapping edge at 2300 mm, and the point of interest of the decor at 2370 mm. Let's compare three positions.
| Distance d | Offset s | Boundary Zlim | Point at height 2370 mm |
|---|---|---|---|
| 1500 мм | 200 мм | 2393.3 mm | Below the boundary by 23.3 mm: hidden |
| 3000 мм | 200 мм | 2346.7 mm | Above the boundary by 23.3 mm |
| 1500 мм | 80 мм | 2337.3 mm | Above the boundary by 32.7 mm |
For the first row, the calculation is as follows: 2300 + (2300 − 1600) × 200 / 1500 = 2393.3 mm. The point is located below the obtained boundary, although it is itself 70 mm above the cornice. This is why comparing two heights on the facade gives an incomplete picture.
In the second row, the person moves further away. In the third row, the design position of the point changes: its offset decreases. Both actions improve visibility in this model, but have different practical meanings. Moving the chair for decoration is not necessarily reasonable; moving the finial is only possible where the support node allows it.
Get Consultation
How to find the maximum offset
With the same heights and a distance of 1500 mm, the point will be on the boundary when:
s = 1500 × (2370 − 2300) / (2300 − 1600) = 150 mm.
For it to pass above the edge, the offset must be less than 150 mm. This is the geometric limit of the educational example, not a recommended installation distance. A value of exactly 150 mm provides no margin; the permissible position is chosen after accounting for measurement accuracy and the actual profile.
The seated viewpoint is checked again. If the conditional eye height decreases to 1200 mm with d = 1500 mm and s = 200 mm, the boundary rises to 2446.7 mm. The previous point is hidden again. The standing check does not confirm the result for a seated person.
The formula only answers the question about one point and one obstacle. It does not show the entire terrain, does not account for the side wall, and does not prove the visibility of the full detail. After the calculation, multiple points need to be checked and the composition needs to be tried out in volume.
Closer to the front edge or elsewhere: we change the design, not file down the finial
An unsuccessful calculation result does not mean you should immediately order larger decor. First, ask the furniture maker to show the area where L-115 is allowed to be installed at all. Compare it with positions suitable for visibility.
If these areas overlap, you can choose a new location within the permitted mounting area. However, the shift is evaluated together with the facade: the finial may continue the axis of a pilaster, post, or corner element. A part moved forward becomes more noticeable but can break the connection with the lower part of the cabinet.
When the furniture has not yet been manufactured, a change to the upper structure is discussed: the location of the support platform, the height, or the projection of the cornice. The craftsman must show an updated cross-section. A verbal promise of "we'll raise it a bit during assembly" is not enough, since both the fastening and the clearance to the ceiling change.
The decorative base under the finial is also a separate part of the design. It adds height, forms a new joint, and can become visible from the room. Random shims, unconfirmed overhang, and trimming the product do not replace such a solution.
If the cabinet structure cannot be changed and the required part L-115 remains hidden, it is more reasonable buy wooden finials another suitable shape after a similar check. When there is actually no space above the cornice, you can abandon vertical finials and buy decorative wooden furniture elements for another agreed composition. These are alternatives to the original order, not mandatory additions to it.
Two parts and three angles: checking both sides of the cabinet
On the facade, the pair can be strictly symmetrical, but from the room they may be perceived differently. The left finial hides the edge of the niche, the right one is visible against a free background. Or from the chair, the near part is open, while the far one falls behind the side protrusion of the cornice.
Therefore, two L-115 parts are marked separately: H1 — left, H2 — right, when viewing the cabinet from the front. At each selected viewpoint, both parts are checked. For an oblique view, a single central side section is not enough: a corresponding spatial line of sight or an accurate model is needed.
| Observation point | What to record for H1 and H2 |
|---|---|
| Room entrance | Are both parts visible and perceived as the intended set |
| Main seating position | Which parts of each silhouette remain above the cornice |
| Usual position in front of the cabinet | How the overlap changes up close and whether this view is acceptable |
Before the fitting, formulate the criterion in words: for example, "from the chair, the top and the selected main part of both pieces are visible; partial overlap near the cabinet is acceptable." Mark this part of the contour in the image. The wording is more precise than "it should look nice" and does not require a universal visibility percentage.
The fitting is performed in the model or with a safely secured lightweight mock-up based on confirmed geometry. Do not place heavy unsecured finials on a tall cabinet for a photo. The worker organizes the procedure at height and the holding of the mock-up.
For each side, it is useful to record not only "visible" or "not visible," but also the reason for failure. If H1 overlaps the cornice, the installation depth is discussed. If H2 is covered by the side wall of the niche, moving it forward may not solve the problem: a separate check of the viewing direction is needed. Identical comments about two pieces do not mean they will need to be corrected in the same way.
A rectangle based on external dimensions is suitable for preliminary screening but does not replace the L-115 shape. Save photos from the same spots, without raising the camera for a better result. Label the position of the pieces and the project version: these images will be needed during final installation.
What the wooden finial is attached to: visibility does not replace support
The chosen position is communicated to the furniture manufacturer to check the base and connection. They need the material and construction of the cabinet top, the mounting geometry of the finial, its actual weight, and access to the fastening. The article number alone does not answer these questions.
It is necessary to understand where the force is transmitted: to the load-bearing element of the body, a designated platform, or another engineered support. Attachment to a decorative cornice can only be discussed together with its own structure, not because there happens to be a flat spot on top.
The method of retention, fasteners, and preparation of contact surfaces are assigned for this joint. There is no universal screw or single adhesive for any cabinet here. After agreeing on the technology, you can buy materials for installing wooden decor; a set from a category by itself does not confirm the reliability of the crown attachment.
Check not only the final position, but also the assembly sequence. A part that fits under the ceiling may require additional movement during installation. If the connection is serviced from below, intended access to it must remain after assembling the internal shelves and the top panel.
On the overall model, show open doors and trajectories of moving elements. Do not connect the fixed part of the body and the door with a single decorative joint. If an existing cabinet is being updated, first assess its condition; adding crowns does not eliminate furniture wobbliness.
The convenience of future maintenance is also discussed before finishing. Is disassembly required, can the surface be safely reached, is it necessary to reach through a fragile contour? The answers affect the joint, but do not mean that the buyer needs to remove the decor on their own during every cleaning.
Beech or oak for a tall cabinet: finishing after checking the silhouette
When the location is found, the material and coating are chosen. Start with a sample next to the facade and the background behind the crown. If the cabinet stands against a light wall, check how clearly the light detail reads; if the background is uneven, evaluate the composition under normal room lighting.
Contrast helps distinguish the open part of the shape, but does not return what the cornice physically covers. Therefore, changing the color instead of checking the position is pointless. Finishing solves the next task, after geometry.
When choosing L-115, separate three characteristics. "Prestige" denotes surface sanding, including detailed hand processing, not applied paint. "Under enamel" and "under tinting" refer to the grade of veneer splicing of the blank. The final coating is a separate agreement. These differences help choose the wood and preparation for finishing, corresponding to the intended result.
Opaque enamel is considered when a specific color is needed. For a semi-transparent coating, a suitable blank and acceptable pattern differences are agreed upon in advance. The choice of oak itself does not replace the choice of veneer grade. Two parts of the same species should also not be considered a promise of absolutely identical texture.
Pass the approved sample, gloss requirements, and the list of visible surfaces to the finisher. First, agree on where the contact zones for installation are and in what order the work will be performed. Tips for finishing wooden products help discuss the preparation and application of the coating, but do not replace the technology of the selected materials and the mounting design.
It is not necessary to make the finials from the same species as all parts of the cabinet. The requirement is determined by the external result and structural compatibility. The surcharge for material should be evaluated on a real sample, not just by the name of the wood.
Price of a pair of L-115: what to include in the full estimate
For a preliminary budget, we use the prices from the trade table as of September 6, 2026. The calculation applies to two separate items of the same finish, without custom finishing and installation.
| Material, "Prestige" sanding | One L-115 | Two L-115 |
|---|---|---|
| Beech | 3 390 ₽ | 6 780 ₽ |
| Oak | 5 140 ₽ | 10 280 ₽ |
The difference between the two variants of the pair is 3,500 ₽. It shows the difference in the cost of wooden parts, but not the full project. If the grade of lamination or other conditions change, the amount must be confirmed again.
The estimate is compiled from the products, the agreed finish, necessary mounting elements, labor, packaging, and transportation. If the top of the cabinet needs to be redone for visibility, this work is listed separately. It cannot be considered included in the price of the crown.
Compare offers with the same level of result readiness. A pair without finish and an installed painted pair are different order compositions. Materials already included in the invoice should not be added a second time; unknown labor costs are left for approval, not replaced with an arbitrary amount.
When picking up from the workshop, appoint a person in advance who will check the workmanship and hand over the items to the finisher. If the parts first arrive home, discuss subsequent transportation. Payment and delivery terms for crowns are clarified together with the address, recipient, and order composition.
Before payment, it is worth getting two comparable options when this truly helps the choice: keep the existing top of the cabinet or change it for a more open silhouette. Both proposals must include the same crowns and finish. Then it is clear how much the design change costs. Comparing a beech pair without installation with an oak pair on a modified base will not provide such information.
Scheduling installation based only on the production lead time is risky: between product readiness and installation, there remain receiving, inspection, and finishing. The schedule should include separate agreed stages, not a single date "cabinet ready."
How to order L-115 so the result matches the view from the room
The seller needs an exact product line. For the pair in question, it might look like this:
Please calculate two separate L-115 units sized A × B × C × E 238 × 78 × 90 × 208 mm. Wood: ____. Sanding: "Prestige". Glue-up grade: ____. Intended finish: ____. Please confirm execution, delivery set, provide a legible drawing for fit approval, specify packaging and lead time. Address: ____. Recipient: ____.
Do not use the phrase "under enamel" instead of ordering painting. If finishing is assigned to an external workshop, this must be clear to all parties, otherwise the product may arrive at the site before the required contractor is ready.
The cabinetmaker is given a different task: a facade with markings H1 and H2, sections with coordinates, a confirmed support node, and images from selected room locations. Each view marks the part of the silhouette the customer wants to see. Such a criterion applies to a custom cabinet project, not as an additional characteristic of a product card.
Mark project changes with a date or version number. If after review a different cornice is chosen, the support platform is moved, or the cabinet height is changed, old photos no longer confirm the new version. Repeat only the affected checks and pass updated documents to all contractors. This is especially useful when the body fabrication, finishing, and installation are done by different workshops.
Upon receipt, check the article number, quantity, material, agreed dimensions, and condition of parts before irreversible processing. If the actual fit differs from that in the model, first clarify the project. Do not compensate for the discrepancy with unplanned trimming or moving the mounting on site.
Final acceptance combines two checks: the contractor confirms correct installation, and the customer evaluates the composition from agreed viewpoints. One does not replace the other. If the required part of the decor is still hidden, a more impressive top-down photo does not fix the result.
When the position, mounting, and finish are agreed, you can choose L-115 material and approve the order. Before payment, check the current price of the selected execution.
Questions before purchasing wooden cabinet tops
Can the project be accepted if the cabinet's top crown is barely visible up close, but is clearly visible from the entrance?
Yes, if such a result suits the client in advance. Up close, a tall cornice may hide more decor. Agree on priority viewing points and acceptable overlap for each of them, without requiring the same picture from the entire room.
Is it necessary to repeat the check after replacing the chair with a lower one?
Yes. The eye height changes and possibly the distance to the cabinet. Use the new values in the calculation and repeat the fitting from the position where the person actually sits, not with the neck stretched upward.
Can one L-115 be rotated if it is better visible from the side this way?
This option should first be checked against the exact geometry of the part and its placement. Do not assume that the product looks the same from all sides. The rotation should also be evaluated together with the second part on the common facade.
Is an image of the crown overlaid on a photo of the cabinet sufficient?
It helps discuss the composition, but a regular overlay does not calculate overlap. If the contour is simply placed in front of the cornice in a graphic editor, the image will show even the part that the real structure will hide. A cross-section or a correct spatial model is needed.
Can one unit be purchased first, and the second ordered after the fitting?
Such a sequence can be agreed with the seller and the cabinetmaker. Include the suitable trial unit in the final two pieces. Before reordering, record its finish and detailing; the same article number does not guarantee a full match of the natural wood grain pattern.
What to do if the calculation went through, but the actual layout almost blends into the background?
This is a matter of visual perception, not overlap. Check the shape against the working background, the light direction, and the coating sample. Do not change position, color, and lighting at the same time: otherwise, it will be hard to tell which change helped.
Will the calculation work for a cabinet under a sloped ceiling?
It can check a single edge in a selected section. But the slope and other elements are added to the model manually: the formula does not check collision with the ceiling or assembly feasibility. Real contours of all obstacles are needed.
When is it better to skip a pair of finials?
When there is no suitable position in terms of visibility and mounting, and the client is not ready to change the cabinet. Also, you should not pay for a pair just for an approved front sketch if only inexpressive fragments are visible from the main viewpoints. In such a case, a different cabinet top finish would be more honest to the original intent.