


Article Contents:
- Why final finishing determines the overall impression of the renovation
- What defects appear after installing MDF baseboards
- Gap between the baseboard and the wall along the top edge
- Exposed end at the doorway
- Noticeable joint along the length
- Chip or burr after cutting
- Uneven miter cut in the corner
- Glue residue on the front surface
- Color difference between the cut edge and the front surface
- Sealant for MDF baseboards: when, which, and how to use
- What tasks is sealant suitable for
- Which sealant to choose for MDF baseboard
- Proper technique for applying sealant
- When sealant won't help: limits of application
- Putty for MDF baseboard: when the joint requires a more serious approach
- Which putty is suitable for MDF
- Preparing the MDF end before puttying
- How to repair a chip on an MDF baseboard
- Puttying joints along the length before painting
- Touch-up of cuts and ends: why this is a mandatory step
- Tools and materials for touch-up painting of the end
- Rule: always prime the end
- When touch-up painting doesn't help: corner as a solution
- MDF baseboard joint along the length: how to make the connection invisible
- Where to place the joint
- Straight or angled joint
- Preparing ends before joining
- Final joint finishing
- MDF baseboard corners: how to handle internal and external corner joints
- Internal corner: small gaps and their filling
- External corner: corner piece or precise cut
- What to do if the angle is not 90°: non-standard situations
- MDF baseboard for painting: advantages for a perfect finish
- Putty and paint hide everything
- Ability to paint in the wall color
- Easier to work with sealant and putty
- Surface preparation requirements
- Work order: wall first, then baseboard
- How to treat the top joint of the baseboard: thin, even, invisible
- Step-by-step guide for a perfect joint
- Details at the doorway: joining baseboard with trim
- Options for finishing the joint between baseboard and trim
- Gap between the baseboard and the door casing
- Mistakes in the final finishing of the baseboard: analysis of typical errors
- Comparison of materials for the final finishing of MDF baseboards
- What to buy for a clean final result
- FAQ: Answers to Popular Questions
- About the Company STAVROS

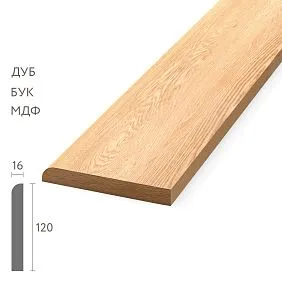
The baseboard is installed. The glue has set, the corners are cut, the fasteners are hidden. And at this moment, when the work seems complete, the eye begins to notice details: a thin gap along the top edge near the wall, an exposed gray end at the doorway, a noticeable seam line in the middle of the wall, a chip from an unsuccessful cut in the corner. Each of these defects individually is a trifle. Together, they create a feeling of an unfinished renovation that haunts you every time your gaze sweeps across the lower tier of the room.
Final finishing MDF Skirting Boards is not a bonus stage done 'if there is time left.' It is part of the installation, without which the result remains incomplete. Sealant for MDF baseboards, proper putty, touch-up paint for cuts, treatment of ends — all of this turns 'the baseboard is installed' into 'the baseboard is installed correctly.'
This article is a detailed practical analysis: what defects occur after installing MDF baseboards, how and with what to eliminate them, when sealant is needed and when putty, how to make the ends invisible, how to hide joints, and how to achieve a perfectly clean result in the corners. With specific materials, tools, and a sequence of actions.


Why final finishing determines the overall impression of the renovation
The human eye is designed to notice details at a level of 20–40 cm from the floor. That is where the lower contour of the baseboard, the transition line from the wall to the floor, the ends at doorways, corners, and joints are located. Expensive laminate, high-quality paint on the walls, beautiful doors — all of this can fade if the lower contour of the room looks sloppy.
Paradoxically: the baseboard itself MDF Skirting Board can be of excellent quality, precisely cut and securely mounted — but without final finishing, the gap at the wall, exposed cuts, and unsealed joints create an impression of rushed work. Finishing the baseboard is the last 10% of effort that yields 50% of the final quality result.


What defects appear after installing MDF baseboards
Knowing your enemy is the first step to eliminating it. After installing MDF baseboards, typical problems arise, each with its own solution.
Our factory also produces:


Gap between the baseboard and the wall along the top edge
The most common defect. The wall is rarely perfectly flat — minor waves of 1–3 mm create a gap along the top edge of the baseboard in certain spots. Even with good adhesive bonding, in areas where the wall recedes, the baseboard does not fully adhere.
This gap needs to be closed. For widths up to 2 mm — use acrylic sealant. For widths over 2 mm — pre-fill with putty, then apply sealant on top.
Get Consultation
Exposed end at a door opening
The cut end of an MDF baseboard is a gray, porous surface, completely unlike the decorative coating or the painted front side. An exposed end at a door opening is visible from the side and immediately reveals unfinished work.
Solution: paint the end to match the baseboard color or cover it wooden corner piece.
Noticeable joint along the length
Where one plank ends and the next begins, a vertical seam is visible. If the joint is not properly prepared, the line remains noticeable under side lighting.
Chip or burr after cutting
Even with a correct saw blade, MDF with a decorative coating sometimes produces a small chip along the cut line. Especially common in corners: a 45° angle requires precise tools and proper feed.
Uneven cut in the corner
Real room corners are rarely exactly 90°. If the cut is made 'standardly' without accounting for the actual wall angle, a gap of varying width remains in the corner, which needs to be fixed after installation.
Glue marks on the front side
Glue squeezed out from under the baseboard during installation is another source of problems. On wood-grain decor, a glue stain may be almost invisible. On a white baseboard, it is clearly visible.
Difference in color between the cut and the front surface
MDF in cross-section is gray-beige, matte, and porous. Against a background of white enamel or oak decor, the contrast is striking. Painting all cuts is a mandatory step in finishing installation.
MDF baseboard sealant: when, which and how to apply
Sealant is the most in-demand material for finishing baseboards. But it is used incorrectly more often than correctly. Let's analyze it in detail.
What tasks is sealant suitable for
Sealant for MDF baseboards solves one specific task — filling a thin linear joint along the top edge between the baseboard and the wall. This is a joint with a width from fractions of a millimeter to 1.5–2 mm, which occurs due to minor wall irregularities.
Sealant works perfectly here: it fills the gap, remains elastic after drying (which is important for slight baseboard movements due to temperature changes) and, if the right type is chosen, is compatible with painting.
Which sealant to choose for MDF baseboards
Acrylic sealant is the optimal choice. Suitable for joint filling along the top edge of the baseboard. After drying, it paints well with any water-based or alkyd paint. White acrylic sealant for a white baseboard is an ideal match: the joint after painting the wall blends completely with the background.
Silicone sealant is not suitable for MDF baseboards in living spaces. Silicone cannot be painted — paint applied on top does not adhere. Additionally, silicone attracts dust, and after a few months the joint darkens. The exception is the bathroom, where silicone is justified due to high humidity, but only for baseboards without subsequent painting.
Polyurethane sealant is acceptable, but works worse than acrylic for thin joints: it is slightly harder to smooth out and dries a bit slower.
Correct technique for applying sealant
The mistake most people make is applying sealant "by hand" with a gun and leaving it as is. The result: bumps, uneven lines, and crushed edges. The correct sequence:
-
Before applying sealant along the top seam of the baseboard, stick painter's tape on the wall strictly along the top edge of the baseboard. Leave a gap of 1–1.5 mm above the baseboard edge.
-
Apply sealant from the gun in a continuous thin line. It's better to apply slightly less than too much.
-
Smooth the seam with a finger moistened with water or a special jointing tool. One confident pass along the entire length.
-
Immediately (while the sealant has not yet set) remove the painter's tape. Remove it at a 45° angle to the surface, smoothly without jerking.
-
Allow to dry for 2–4 hours (depends on the composition).
The result is a perfectly smooth thin seam line without drips or unevenness.
When sealant won't help: limits of application
Sealant does not work for gaps wider than 2 mm. A thick layer of sealant in a wide gap:
-
Dries slowly (dries on the outside, remains soft inside)
-
Over time, it shrinks and cracks
-
Looks dirty — bumps, absorbs dust
For a gap of 2–5 mm, putty is needed. For a gap of more than 5 mm, rethinking the installation is required: either additional fastening to press the baseboard, or replacement with a taller baseboard.
Putty for MDF baseboard: when the joint requires a more serious approach
Putty in the context of MDF baseboards is used in three scenarios: to fill wide gaps before sealant, to cover chips and tears after cutting, and to prepare the baseboard surface for painting — especially at attachment points.
Which putty is suitable for MDF
Fine polymer putty is the optimal choice. Fine-grained, adheres well to MDF, easy to sand, and does not shrink when applied in a thin layer.
Acrylic putty is an alternative, especially good for filling gaps along the top edge before applying sealant. It is more elastic than polymer putty after drying.
Gypsum putties — use with caution. They work fine on the MDF baseboard itself, but are undesirable in damp rooms. When applied to the baseboard-wall joint area, they may crack.
Preparing the MDF end before puttying
The MDF end is porous and absorbs any compound well. Before applying putty or paint, the end must be primed. Without primer:
-
Putty is absorbed unevenly, resulting in varying gloss and texture
-
Paint applies patchily and does not cover the surface in the first coat
-
The coating adheres worse
MDF primer is acrylic, with deep penetration. Apply in a thin layer, dry for 30–40 minutes. After priming, the end is 'sealed', and putty or paint applies evenly.
How to repair a chip on an MDF baseboard
A chip after an unsuccessful cut is a local destruction of the decorative film and MDF base. Restoration algorithm:
-
Clean the chip area of loose particles (with a soft brush or compressed air)
-
Apply a thin layer of finishing putty, filling the depression. Do not try to do it all in one layer — two thin layers are better
-
After the first layer dries — light sanding (P220–P240)
-
The second layer is the finishing layer, flush with the front surface
-
After complete drying — sanding (P280–P320)
-
Priming the restoration area
-
Painting in the color of the baseboard (for paintable baseboards) or tinting with a touch-up marker/paint to match the decor (for wood baseboards)
Puttying the joints along the length before painting
for MDF skirting boards for painting Joints along the length must be puttied — otherwise the connection line will remain visible through the paint. Sequence:
-
Ensure the ends in the joint area are precisely cut at 90° and fit tightly together
-
Fill the connection line with a thin layer of finishing putty
-
Smooth it flush with the baseboard surface
-
After drying — sanding P280
-
If necessary — a second thin layer
-
Priming and painting
Details on the nuances of proper installation of MDF baseboard — including the procedure for working with joints — in the full guide.
Touching up cuts and ends: why this is a mandatory step
An open cut of an MDF baseboard is a gray-beige porous surface that visually "stands out" from any decor. On a white baseboard — a gray spot on the end. On a baseboard imitating oak — a gray-beige cut next to a warm wood decor. On a dark baseboard imitating wenge — a light gray end as a deliberate accent in the wrong place.
Touching up ends is 5–10 minutes of work that dramatically changes the result.
Tools and materials for touching up the end
For white baseboard: white acrylic or alkyd enamel, a soft flat brush 10–15 mm wide. Apply in 2 coats with intermediate drying.
For a baseboard to be painted (unpainted): touch up the end with the same paint used for the front surface. Priming the end is mandatory.
For a baseboard with wood decor: special tinting markers in the decor color (oak, walnut, wenge). These are produced by decorative coating manufacturers and allow precise color matching. An alternative is tinting paste applied with a thin brush. For serious matching, mix tints to achieve the desired shade.
For a "wood-look" baseboard with a complex shade: prime the end + apply a base shade + finish with a marker to simulate grain. Sounds labor-intensive, but actually takes 3–4 minutes per end with practice.
Rule: always prime the end
Regardless of the type of finish coating, the MDF end must be primed before painting. Without primer, paint absorbs unevenly into porous MDF: some areas become matte, others glossy. This is especially noticeable on white baseboards — the white end looks "spotty."
Primer — acrylic, thin layer, complete drying (at least 30 minutes). After that, paint or tint applies smoothly and evenly.
When touch-up doesn't help: the corner as a solution
Sometimes access to the end is limited — the door casing is flush against the baseboard end, or the passage angle makes the end visible from the side with every pass. In these cases, touch-up is a half-measure: the color isn't visible, but it's still clear that "something is off."
Wooden corner bracket Vertically at the doorway — an architectural solution that completely covers the baseboard end. It is glued to the wall and baseboard, acts as a decorative plug, and simultaneously adds a "framing" effect to the doorway. Paired with wooden casings, it looks organic.
MDF baseboard joint along the length: how to make the connection invisible
The standard length of an MDF baseboard plank is 2.4 or 2.7 meters. In a room with a wall perimeter of 4–6 meters without openings, there will inevitably be one or more joints along the length. And if they are done carelessly, they are visible under any lighting, especially side lighting.
Where to place the joint
The rule of an experienced installer: the joint along the length should not be in the most visible place. The wall opposite the front door, the end wall opposite the window in daytime side light, the wall near the TV are areas of maximum visibility.
It is better to place joints:
-
In less lit areas
-
Behind furniture (if it will be placed against the wall)
-
Closer to corners, where the transition is less noticeable
-
On walls that are seen from the side, not head-on
Before installation, you should enter the room and mentally imagine where the gaze will most often fall. Joints should not end up there.
Straight or angled joint
Butt joint (90° end) — standard and most common. With good end preparation and seam filling, it is invisible.
Miter joint (45° end with overlap) — used less often, but provides more reliable concealment of the connection line. During seasonal movement of the baseboard (slight expansion), the miter joint "overlaps" itself, while a butt joint may show a visible gap.
Preparing End Cuts for Joining
The ends of both pieces being joined must be:
-
Exactly perpendicular (for a butt joint) — checked with a square
-
Sanded with fine sandpaper to remove burrs and rough edges
-
Primed (for baseboard to be painted)
-
Matching in decorative pattern if possible (for wood-look baseboard)
Final finishing of the joint
After installing both strips — inspect the joint under side lighting. If a line is visible:
-
For baseboard to be painted: thin layer of finishing putty, sanding, primer, painting
-
For baseboard with decor: touch up the joint line with a tinting marker in the matching shade. Move the marker along the imaginary wood grain, mimicking the continuation of the texture
For a baseboard with an active decorative pattern (pronounced oak grain), it is better to hide joints in "quiet" areas of the pattern — where pores are minimal and color is uniform.
MDF baseboard corners: how to handle internal and external corner joints
Corners are the most complex nodes. Here, two pieces of baseboard meet at a 45° cut, and any mismatch is immediately visible. But with proper finishing, even an imperfect cut becomes unnoticeable.
Details on proper cutting of baseboard with a clean cut at corners are described in the material about How to cut MDF skirting board.
Internal corner: small gaps and their filling
At an internal corner, two planks meet at 45° cuts. The actual wall angle is rarely exactly 90°: more often 88–92°. With a standard 45° cut, this creates a gap at the top of the corner or at the base.
Gap at the top of the corner (at wall level): filled with acrylic sealant or finishing putty. The layer should be minimal — just fill the gap. Smooth with a moistened finger.
Gap at the base (at floor level): as a rule, it is hidden by the baseboard itself with proper pressing. If it still remains — thin sealant from below.
For baseboard to be painted: putty in the corner joint, sanding, primer, painting. The result is a monolithic corner without a visible joint line.
External corner: corner piece or precise cut
The external corner is the most vulnerable spot. A sharp edge at the junction of two 45-degree cuts:
-
It chips easily at the first impact
-
With the slightest mismatch of cuts, it creates a noticeable gap
-
Even with a precise cut — open ends at the meeting point
There are two ways:
The first way — precise cut + final finishing. The cut is checked and adjusted if necessary. The meeting point of the cuts — touch up the ends to match, putty the micro-gap, sanding, painting. A good result with very precise work.
The second way — a wooden corner piece. Wooden corner bracket vertically on the external corner. It covers the ends of both pieces of baseboard, hides the mismatch, protects against impacts. Installed with glue. With the right shade selection — an organic element, not a "plug".
What to do if the angle is not 90°: non-standard situations
If the wall angle differs from 90° by more than 3–4° — a "half-angle" cut (at 45°) does not provide a tight fit. Solutions:
Cut to fit. Measure the actual angle with a protractor or angle gauge. Divide by 2 — this is the miter angle. Set on the miter saw and cut.
Or — a wooden corner piece. At any wall angle, it mounts vertically, completely hiding the ends and requiring no precise cut.
MDF baseboard for painting: advantages for a perfect finish
If the goal is a completely clean result with no visible seams, joints, or ends, — is a horizontal element that frames the room at the bottom of the walls where the wall meets the floor. Skirting boards perform several functions: they hide the technological gap between the wall and floor covering (necessary for thermal expansion), protect the lower part of the wall from mechanical damage, create visual completion, and may conceal wiring. — it's the best choice. Here's why.
Putty and paint hide everything
On a paintable baseboard, all joints, ends, and attachment points are puttied and sanded as a single surface. After priming and two coats of paint — a monolithic smooth surface without a single seam. Neither sealant on a decorative baseboard nor a touch-up marker gives such a result.
Ability to paint in the wall color
White MDF Skirting Board — is the standard choice. But a paintable baseboard can be painted any color — to match the wall (then it 'dissolves' and the lower boundary of the room becomes imperceptible), or in a contrasting color as a design accent.
Easier to work with sealant and putty
On a surface for painting, you don't need to match the shade of sealant and putty — they are hidden by paint. On a decorative baseboard, you need to match the shade, otherwise touch-ups will be noticeable.
Requirements for surface preparation
A baseboard for painting requires careful preparation:
-
All joints along the length — putty, sanding
-
All ends — primer, putty if necessary, primer again
-
The top seam at the wall — acrylic sealant before painting
-
The surface of the baseboard — light sanding with P220 along the entire length
-
Priming the entire surface
-
Painting in 2 coats with intermediate drying
The result of following this order is a baseboard that looks like part of the wall, not a separate element.
Work order: first the wall, then the baseboard
Whether the wall is painted before or after installing the baseboard is a fundamental question. Answer: painting the wall — before installing the baseboard. Painting the baseboard — after installation. This allows you to paint over the sealant in the baseboard-wall joint along with the wall (final coat of the wall) and not worry about wall paint getting on the front surface of the baseboard.
If the baseboard is painted separately (already installed, only it is being painted) — painter's tape along the top edge of the baseboard on the wall, painter's tape along the bottom edge on the floor.
How to treat the top joint of the baseboard: thin, even, invisible
The top joint of the baseboard is the "face" of the finishing. It is what people look at first. And this is where mistakes are most often made: too thick a layer of sealant, bumps, uneven line, sealant on the wall instead of the joint.
Step-by-step instructions for a perfect joint
Step 1 — Painter's tape. Apply painter's tape to the wall strictly along the top edge of the baseboard. The bottom edge of the tape should be exactly along the top edge of the baseboard. The tape protects the wall from sealant getting above the required area.
Step 2 — Applying sealant. Acrylic sealant from a gun in a thin line. The cartridge nozzle should be at a 45° angle to the joint. Continuous movement, even speed. It is better to apply a little less than too much.
Step 3 — Smoothing. A finger (index finger) moistened with water — one confident pass along the entire length. Continuous movement, without stopping. Remove excess sealant without smearing.
Step 4 — Removing the tape. Immediately, before the sealant sets. Remove smoothly at a 45° angle. The tape is removed along with the excess sealant, leaving a clear, even joint line.
Step 5 — Correction. If there are minor imperfections, correct them with a moistened finger within the first 5–7 minutes, while the sealant is still open.
When done correctly, such a joint is thin, even, and almost invisible. After painting the wall, it becomes completely invisible.
Details at the door opening: joining the baseboard with the casing
The door opening is the most challenging place for baseboard installation. Here, the baseboard meets the vertical casing, and the joint must be clear, neat, and without gaps.
More details on proper joining are described in the article about MDF baseboard and door trim.
Options for finishing the joint between the baseboard and casing
Option 1: The baseboard butts against the casing. The end of the baseboard is straight (90°), fitting tightly against the side plane of the casing. The gap is minimal. Paint the end of the baseboard + thin sealant in the gap if necessary.
Option 2: Beveled end. The end of the baseboard is cut at a slight angle (5–10°) for a tighter fit against the casing. Used when the casing is not strictly vertical or has a bevel.
Option 3: Wooden corner piece vertically. Placed between the end of the baseboard and the casing. Completely covers the joint. The cleanest solution for cases where precise fitting is unattainable.
Gap between the baseboard and casing
Standard situation: after installation, a gap of 1–3 mm remains between the end of the baseboard and the casing. Solution: acrylic sealant matching the baseboard color (white for white baseboard, transparent for decorative). Apply thinly, smooth out, remove excess.
Important: the sealant here is an elastic filler, not a structural element. A gap larger than 5 mm is not closed with sealant — the end needs to be recut.
Mistakes in finishing baseboards: analysis of typical errors
1. Filling gaps of 3–5 mm with a thick layer of sealant. Sealant is for thin joints. A thick layer doesn't dry completely, cracks, and looks dirty. For gaps over 2 mm — first putty, then sealant as a finishing layer.
2. Not painting the ends. An exposed gray MDF end is the first thing noticed near a doorway. Painting takes 5 minutes of work that changes everything.
3. Using silicone sealant for painting. Silicone doesn't take paint. After a few months, the paint peels off in the joint area, and the joint darkens. Only acrylic for painting.
4. Not sanding the joint before painting. Putty after drying is rough and textured. Painting without sanding creates a noticeable bump at the joint.
5. Making the joint in the most visible place. A joint opposite the front door, on the wall near the TV, in the center of a partition — noticeable under any lighting. Joints should be in inconspicuous places.
6. Leaving chips after cutting. A chip is not cosmetic but a structural defect that expands over time. Putty + primer + painting — mandatory.
7. Painting without primer. Especially critical for ends and putty areas. Without primer, paint applies unevenly, gives different sheen, and adheres poorly.
8. Not checking the match of white shades. White MDF and 'white' sealant are different whites. White wall paint and white baseboard are also different shades. Check the match before application, not after.
9. Applying sealant without painter's tape. The result without tape is smeared sealant on the wall and baseboard, an uneven joint line that then takes hours to fix.
10. Do not start finishing until the glue is completely dry. The glue reaches full strength within 24 hours after installation. Until then, the baseboard may move slightly. Sealant applied during this period may crack if the baseboard moves.
Comparison of materials for finishing MDF baseboards
| Task | Material | Application |
|---|---|---|
| Top seam (up to 2 mm) | Acrylic sealant | Main method |
| Gap 2–5 mm | Putty + sealant | Putty fills, sealant finishes |
| End at the door | Primer + paint/marker | Mandatory |
| Chip after cutting | Finishing putty | Two coats + sanding |
| Longitudinal joint | Putty + painting | For paintable baseboard |
| Internal corner (gap) | Sealant or putty | Depending on width |
| External corner | Corner bead or precise cut + finishing | Corner bead is more reliable |
| Glue traces | Solvent (before polymerization) | Remove immediately |
What to buy for a clean finish
MDF Skirting Board — a quality base with even geometry simplifies final finishing: fewer gaps, fewer chips, less work to fix installation issues.
— is a horizontal element that frames the room at the bottom of the walls where the wall meets the floor. Skirting boards perform several functions: they hide the technological gap between the wall and floor covering (necessary for thermal expansion), protect the lower part of the wall from mechanical damage, create visual completion, and may conceal wiring. — optimal choice for a perfect clean finish. All seams, joints, and ends are hidden under paint. The result is a monolithic surface with no visible connections.
White MDF Skirting Board — with factory enamel. Important: for final finishing of white baseboard, choose white acrylic sealant and white caps for fastening points in the same shade.
Wooden baseboard — natural solid wood. Final finishing: wax crayons matching the wood tone for ends, acrylic sealant for the top seam, tinting oil for sanded areas.
Wooden corner bracket — indispensable at external corners and doorways. Hides ends, protects corner edges, adds architectural character to the opening.
wooden molding — for complex transition areas: floor level changes, transition from baseboard to casing in non-standard nodes, vertical filler elements near doorways.
Trimming Items — full range of additional elements for any non-standard finishing tasks.
Information on proper selection which MDF baseboard to choose for a specific type of interior and floor — in a separate guide.
FAQ: Answers to popular questions
How to fill the gap between an MDF baseboard and the wall?
For gaps up to 2 mm — acrylic sealant with smoothing. For gaps 2–5 mm — first finishing putty, after drying — a thin layer of acrylic sealant on top. For gaps over 5 mm — additional pressing of the baseboard to the wall (fasteners) or replacement with a taller baseboard is needed.
What is better: sealant or putty for MDF baseboards?
Different tasks require different materials. Sealant — for a thin linear seam along the top edge, remains elastic. Putty — for filling chips, wide gaps, preparing the surface for painting. For longitudinal joints before painting — putty. For the top seam near the wall — sealant.
How to cover the end of an MDF baseboard at the door?
Prime the end (acrylic primer), apply paint matching the baseboard color in 2 coats. For decorative baseboards — a tinting marker matching the decor. Alternative: a wooden corner piece vertically at the door opening — completely covers the end and adds a neat architectural frame.
Can MDF baseboard be painted after installation?
Yes, that is exactly how it is done for baseboards intended for painting. Sequence: puttying joints → sanding → priming the entire surface → painting in 2 coats with intermediate drying. Before painting — acrylic sealant in the top seam, painter's tape on the floor for protection.
How to hide the MDF baseboard joint along the length?
For baseboard to be painted: putty the joint line, sand with P280, prime, paint. For decorative baseboard: tinting marker matching the decor, move along the imaginary wood grain. Additionally: place joints in less visible areas.
How to fix a chip on an MDF baseboard?
Clean the chipped area, apply finishing putty in two thin layers with intermediate drying and sanding. Prime the area. For baseboard to be painted — paint; for decorative — touch up with a tinting marker matching the color and imitating the texture.
How to treat an MDF baseboard cut at a corner?
Cut at 45° — prime the end, paint to match the coating. If there is a gap in the corner joint — acrylic sealant or a thin layer of finishing putty. For baseboard to be painted — putty the seam + paint.
How to make a white baseboard without visible seams?
Use — is a horizontal element that frames the room at the bottom of the walls where the wall meets the floor. Skirting boards perform several functions: they hide the technological gap between the wall and floor covering (necessary for thermal expansion), protect the lower part of the wall from mechanical damage, create visual completion, and may conceal wiring. instead of baseboard with factory white enamel. Putty all joints, ends, and attachment points. Sand. Prime. Paint in 2 coats of white acrylic enamel. Result — a monolithic white surface without a single visible seam.
About the company STAVROS
Finishing starts with the right baseboard. A baseboard with even geometry, stable dimensions, and a quality decorative coating means fewer gaps after installation, fewer chips when cutting, and less work to fix defects.
STAVROS manufactures MDF skirting boards with an E1 base density of 820–850 kg/m³ and a full-wrapping decorative coating — including the end edges of the profile. The geometry of the planks is controlled during production: straightness, thickness consistency, and cut edge quality.
The STAVROS range includes MDF skirting boards for painting and with factory finish, solid wood skirting boards, decorative corners and moldings for clean finishing of corners and openings, as well as a full set of linear products for any finishing tasks.
Check the assortment, MDF skirting board price per linear meter and place an order with delivery — on the STAVROS website.


