Article Contents:
- First, determine the working area of the facade
- How to build the working area step by step
- When the top and bottom margins may differ
- How to set the margin from the edge
- How to quickly evaluate a profile before buying a sample
- Profile width and viewing distance
- MLD-002: compact frame
- MLD-003: more prominent line
- MLD-008: large profile
- Section shape and light-shadow
- How to dimension a frame on a production sheet
- The profile axis is not always needed, but sometimes it prevents confusion
- Single and double frame
- Why the angle must be checked before painting
- Checking diagonals
- The template must define more than just the outer contour
- Checking the first five
- Not enough space for drilling
- Not enough space for a grip
- The composition is disrupted
- If the cabinet has a central pair of doors
- If the fronts are of different widths
- Dresser and drawers of different heights
- Complete example of cutting ten facades
- Why this calculation cannot be automatically transferred to another profile
- Long parts are reserved first
- How to account for leftovers
- Material affects cutting not only by price
- Comparison of MLD-002, MLD-003 and MLD-008 on one facade
- MLD-002 — 22 mm
- MLD-003 — 35 mm
- MLD-008 — 60 mm
- MLD-027: compact semicircular profile
- Oak
- Oak
- MDF
- How to choose the material for an entire furniture series
- When it is acceptable to change the material while keeping the profile
- Molding for enamel finish
- Oak molding for clear finish
- Purchasing line
- Finished Parts List
- What to Save After the First Completed Order
- If the Profile Has to Be Replaced
- Buy the Profile First, Then Draw the Frame
- Specify Only the Outer Dimension
- Marking each door separately
- Count only total footage
- Not Accounting for the Handle
- Mixing Materials Under a Clear Finish
- Trying to Hide an Inaccurate Corner with Enamel
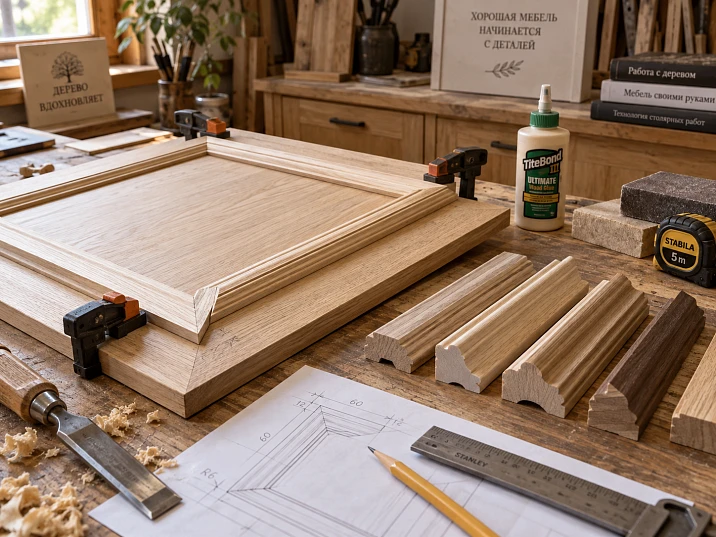
Molding is often chosen too early. The craftsman sees a beautiful profile, orders several strips, and only then starts "fitting" them into an existing facade. That is exactly when it turns out that the frame eats up almost the entire free field, the handle ends up too close to the profile, the molding looks heavy on the top drawer, and four identical doors somehow got slightly different offsets.
A furniture frame should follow the reverse order.
First, there is a facade. Then the working field, handle position, edge offset, and the size of the future frame are determined on it. Only after that is a specific wooden profile chosen.
Workflow:
facade size → working field → frame offset → allowable profile width → outer and inner contour → four parts → corner cuts → test frame → material and finish → SKU → cutting map → facade series → purchasing.
This is how molding stops being a decorative strip that is "tried on site" and becomes a proper part of a furniture project.


First, determine the working area of the facade
The entire surface of a door or drawer is rarely available for decor.
Part of the space is already occupied or limited:
- by the edge of the facade;
- a handle;
- by holes for fasteners;
- hinges;
- by the adjacent door;
- Milling;
- a panel;
- by a decorative overlay;
- by the top cornice;
- by the lower part of the cabinet;
- gap between the fronts.
Therefore, before choosing a wooden molding, draw the front at full size and mark everything that must not be crossed.
Let's imagine a 600 × 900 mm door. At first glance, the surface is large. But if there is a cornice on top, a handle on the right, and a calm free edge is needed around the perimeter, the actual field for the frame will turn out to be noticeably smaller.
It is useful to divide the front into three zones:
- edge zone — the distance from the front's edge to the frame;
- the frame itself — the width of the selected molding;
- the inner field — what remains after the frame.
It is the inner field that most often shows whether the profile fits or not.




How to build the working field step by step
If the front is still only being designed, it is more convenient to start not with the molding line, but with the restricted zones.
First apply:
- outer dimensions of the facade;
- technological gaps around the perimeter;
- the position of the handle;
- drilling points;
- hinges or other hardware on the cabinet side;
- the central axis;
- decorative elements that have already been approved.
After that, a free area remains, within which the frame can actually be moved.
This approach is especially useful on narrow drawers. Before the handle is applied, it seems that the entire surface is available. Once the actual handle dimensions appear, the free zone sometimes shrinks by a third.
For a tall facade, another technique can be used: first determine the central field that should remain visually calm, and then build the frame around it. This protects against the situation where a wide profile gradually “eats up” the middle.
If the furniture consists of several types of facades, it is not necessary to give them all the same frame size. It is better to preserve the overall system:
- the same profile;
- the same indent principle;
- a unified character of proportions;
- the same relationship with the handles.
Then a small door, a tall door, and a drawer will be related, but will not look like mechanically scaled-down copies of each other.
Our factory also produces:






When the top and bottom indents can differ
Symmetry is convenient, but not mandatory.
For example, above the frame there may be a cornice, and below it a tall plinth. In such furniture, identical numerical indents at the top and bottom do not always produce a visually balanced facade.
The frame can be shifted by a few millimeters or tens of millimeters if this is related to the overall composition of the furniture.
The main thing is to fix the decision in the drawing and repeat it on all identical facades.
There is no need to correct the composition with installation markings “by eye.”
If after marking it has become too narrow, the problem is not with the facade. The profile is simply too large for this plane.
Get Consultation
How to set the offset from the edge
It would be convenient to adopt a rule: "the frame is always 50 mm from the edge." For real furniture, this is too rough.
The offset depends on:
- molding width;
- facade size;
- profile depth;
- handle position;
- adjacent facades;
- presence of a second frame;
- scale of the entire furniture;
- how large the central section should appear.
On a tall cabinet door, equal top and bottom margins can look calm. On a low drawer, the same 50 mm can take up too much of the height.
That is why the specific number matters less than a unified alignment system.
If a cabinet consists of four identical doors, the frames should start according to the same logic. If a chest of drawers has drawers of different heights, the same margin principle can be kept, but the frame sizes themselves will differ.
A good furniture drawing answers two questions:
where do we measure the frame from?
и
which dimension should repeat on all fronts of the same type?
Do not leave this decision to on-site marking.
The width of the molding changes not only the appearance, but also the inner field
A wide profile physically takes space away from the central part of the front.
If the outer frame size is already specified, the inner field can be approximately estimated as follows:
inner width = outer frame width − 2 × profile width
inner height = outer frame height − 2 × profile width
This formula works as a simple way of comparison if the profile width is perceived as the strip it occupies on the facade plane. For a complex cross-section, the final size is still verified against the drawing of the specific product.
Let's imagine an outer frame of 500 × 800 mm.
If the profile occupies 22 mm on the plane:
- inner field width ≈ 456 mm;
- height ≈ 756 mm.
If the profile occupies 60 mm:
- inner width ≈ 380 mm;
- internal height ≈ 680 mm.
The outer contour is the same.
But visually these are already two completely different frames.
Therefore, comparing moldings only in a separate photo is useless. They need to be placed inside a real facade.
How to quickly evaluate a profile before buying a sample
Draw three rectangles of the same size on paper or in a drawing and set a different frame width for each.
For example, for an outer contour of 500 × 800 mm:
- 22 mm;
- 35 mm;
- 60 mm.
Even without drawing the actual relief, it will become clear how much area remains in the middle.
After that, add depth with a conditional shadow on the side. A 60 × 24 mm profile will stand out significantly more than a 22 × 11 mm one.
This simple sketch is more useful than a dozen catalog photos, because the profile is immediately compared with your facade.
Profile width and viewing distance
A small chest of drawers is usually viewed from a distance of one to two meters. A large wardrobe may be perceived from the other end of the room.
Therefore, a thin frame on a large wardrobe sometimes looks weaker than on a compact cabinet, even though the profile is physically the same.
And vice versa: a wide molding on a small facade quickly turns from a frame into the main mass of the surface.
A profile should be evaluated not only in millimeters, but also in the scale of the finished item.
Narrow, medium, and wide profile: how the scale of the frame changes
In the current STAVROS catalog, the difference between several ready-made profiles is clearly visible.
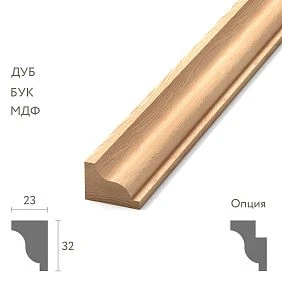
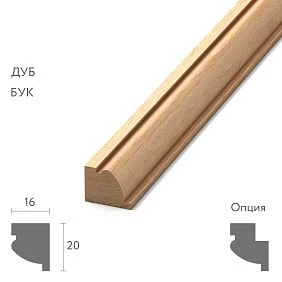
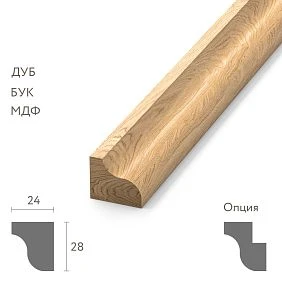
Wooden Moulding MLD-002 has a cross-section of 22 × 11 mm.
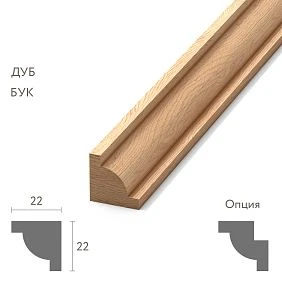
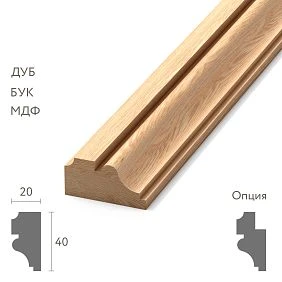
Molding MLD-003 — 35 × 12 mm.
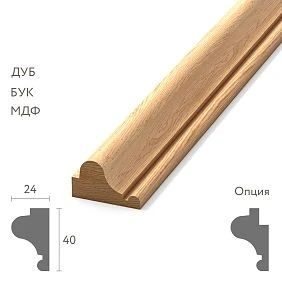
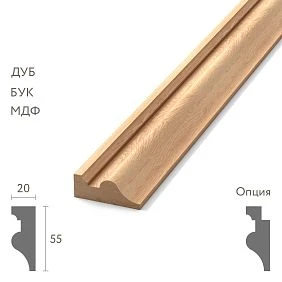
MLD-008 — 60 × 24 mm.
Even without stylistic analysis, it is clear: these profiles occupy different amounts of space on the facade.
MLD-002: compact frame
The 22 × 11 mm profile allows for a relatively large inner field.
This size is convenient to check first for:
- small furniture doors;
- drawers;
- narrow fronts;
- double compositions;
- projects where the frame should remain a thin line.
This does not mean that MLD-002 suits any small door. But its scale is easier to fit where a 60-millimeter profile would already become too heavy.
MLD-003: a more noticeable line
35 × 12 mm — already a different character.
On the same facade, the frame occupies more surface area and divides the door more strongly into an outer band and an inner field.
Such a profile can be more interesting on tall cabinets, wide doors, and facades where the decorative frame should read well from a distance.
MLD-008: a large profile
60 × 24 mm — this is already a noticeable volume.
On a small door, it can take up a disproportionately large amount of space.
However, on a large facade, panel, or wide furniture section, such a line may be more appropriate than an overly thin profile.
The conclusion is simple:
the width of the molding should match the scale of the facade, not the scale of the product photo.
Cross-section shape and light-and-shadow
Two profiles of the same width can produce completely different results.
A flat strip looks like an applied band.
A quarter-round creates pronounced light-and-shadow on one side.
A semicircular profile gives a softer line.
A textured molding can look visually heavier than a simple one even at similar dimensions.
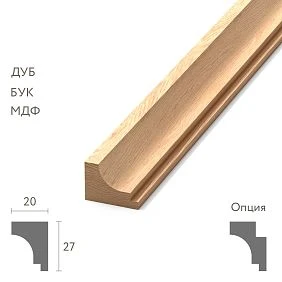
A good example is MLD-027. The current product card has two cross-sections: 14 × 8 and 20 × 11 mm. These are compact sizes, but the semicircular shape makes the profile noticeable through light and shadow.
It is useful to compare such moulding not only by the number of millimetres, but also by how the line will read on a painted or wooden facade.
With side lighting, a rounded profile will appear more voluminous.
With even frontal lighting, it feels calmer.
In other words, the choice of shape is also connected to the lighting of the furniture in the interior.
How to set a frame on a drawing: outer contour, inner contour and axes
One of the common mistakes in a drawing is specifying only the overall size of the frame.
For example:
500 × 800 mm
But it is unclear what this is:
- outer contour;
- the inner contour;
- the size along the profile axis.
For a furniture workshop, such a designation is dangerous.
You need to choose one system and specify it explicitly.
For example:
outer frame size: 500 × 800 mm
and nearby:
molding: MLD-002, 22 × 11 mm
After that, the inner size can be determined from the actual cross-section.
If the workshop is used to specifying the frame by the inner edge, that is also acceptable. The main thing is not to change the rule from one facade to another.
How to specify frame dimensions on the production sheet
For one frame, a few dimensions are enough if they are chosen correctly.
For example:
- facade: 600 × 900 mm;
- outer frame: 480 × 780 mm;
- profile: MLD-002;
- left and right margin: 60 mm;
- top and bottom margin: 60 mm.
If the dimensions are symmetrical, there is no need to add a dozen identical chains.
For a series of fronts, it is useful to assign the frame its own designation:
F-01
And then write:
Front 01 — frame F-01
Front 02 — frame F-01
If another drawer has the same logic but a different size:
F-02
This way, production can see where the same geometry repeats and where a genuinely new type appears.
The profile axis is not always necessary, but sometimes it saves you from confusion
For a simple symmetrical molding, the outer or inner contour is sufficient.
But if the profile has pronounced asymmetry, it is useful to show its axis or the direction of the face side.
This prevents the part from being flipped on one of the sides of the frame.
The top and bottom horizontals are checked especially carefully: the profile must maintain the same direction along the entire contour.
A mix of systems within a series is especially dangerous:
- one door is marked along the outer contour;
- another — along the inner one;
- the third — “along the center of the molding.”
Visually, the error will appear as different indentation and different inner padding.
Single and double frame
A single frame is the most straightforward scheme.
There is the edge of the facade, a free indent, the profile, and the central field.
A double frame is more complex. There are already five zones:
- the edge of the facade;
- first frame;
- the gap;
- the second frame;
- the central field.
If the profile is wide, two frames quickly fill the entire facade.
Therefore, it is better to start a double composition not by choosing the second molding, but by calculating the remaining field.
Let's imagine a door 700 mm high.
If you leave 45 mm of free edge at the top and bottom, and then place two 35 mm frames with a 30 mm gap, the vertical space alone is already occupied:
45 + 35 + 30 + 35 + 45 = 190 mm
This leaves 510 mm for the inner part of the composition.
On a tall door, this can work.
On a 250 mm high drawer, it no longer does.
A double frame is not a “richer” version of a single one. It is a separate geometric system.
45° angle: the frame is assembled from four precise parts
Furniture moulding most often meets in a rectangular mitered frame.
A 45° angle looks simple only until four parts need to be assembled into a closed contour.
Errors show up immediately:
- one corner opens up;
- the outer line does not meet;
- the inner line drifts;
- a step appears;
- the frame stops being rectangular;
- one vertical segment turns out longer than the other.
Therefore, dimensions cannot be taken "approximately along the facade."
First, the exact outer or inner contour is defined.
Then the four parts are cut in a single measurement system.
For the outer dimension:
- the two verticals have the same length at the long points;
- the two horizontals have the same length at the long points.
If a complex profile is used, it is also important not to mix up its orientation.
For some sections, the inner and outer sides look different.
Before the batch, label a sample: which is the inner side of the frame and which is the outer.
Why the angle needs to be checked before painting
A dry fit shows the geometry most honestly.
If there is a gap between two parts, a layer of primer and enamel will not turn a bad joint into a good one.
After painting, the defect may become even more noticeable: a uniform color emphasizes the joint line, and side light reveals the step.
Therefore, the correct sequence is:
precise cut → dry fit → squareness check → marking parts → finishing → final assembly.
If the profile is finished before installation, keep in mind that the coating layer must not interfere with a tight miter joint.
Checking diagonals
After dry-assembling the frame, measure the two diagonals.
If they are equal, the rectangle is assembled correctly.
If they differ, the problem should be sought not in the facade, but in the lengths and angles of the four parts.
On a small frame, the difference may be almost invisible to the eye, but across a series of facades even a slight deviation creates a different gap at the corners.
Test facade and template: how to transfer an approved frame into a series
Even if the drawing looks flawless, it is better to first assemble the new profile on one facade or on a full-size template.
Sequence:
product code → one facade → dry layout → cutting four corners → handle check → inner field check → approval → series.
On the test frame, check:
- true scale;
- profile width;
- the depth;
- chiaroscuro;
- accuracy of angles;
- indent from the edge;
- the position of the handle;
- finish;
- general view next to the adjacent facade.
If the frame is too heavy, this becomes clear before cutting the entire batch.
If the profile needs to be shifted by 8–10 mm, only the template changes, not twenty finished doors.
For a small series, this is one of the most useful checks.
The template should define not only the outer contour
For a repeatable series, it is convenient to make a template that shows:
- frame position;
- the central axis;
- control points;
- the position of the handle;
- drilling boundaries;
- indication of the frame type.
If a craftsman simply traces one finished facade onto another, errors gradually accumulate.
It is better to work from consistent base lines: the edges of the facade or the central axis.
Checking the first five
Even after the sample is approved, it is useful to separately check the first few production facades.
Compare them in a stack or place them side by side.
This quickly shows:
- whether the top margin is the same;
- whether the verticals match;
- whether the template has changed;
- whether the handles are installed identically.
After that, production can continue according to the established scheme.
The handle and molding must appear on the same drawing
On narrow fronts, the handle often conflicts with the frame.
There are three types of problems.
Not enough space for drilling
The hole ends up too close to the molding or right in its area.
Not enough space for grip
The hand catches on the profile.
This is especially noticeable with protruding moldings.
The composition is disrupted
The handle is on one axis, the frame is on another, and the door looks random.
Therefore, before finalizing the frame, apply the handle at actual size.
For the bracket, the following matter:
- length;
- center distance;
- overhang;
- finger position.
For the button:
- diameter;
- base;
- distance to the profile.
On a tall cabinet, the handle can sometimes be placed inside the frame.
On a narrow drawer, it makes more sense to leave a separate clear zone.
There is no single right solution. But the decision must be made before drilling.
How to repeat the frame on cabinets, dressers, and fronts of different heights
You can create a beautiful frame on a standalone front.
A wardrobe has a more complex task: several frames stand side by side and begin to be compared with each other.
A person immediately sees:
- whether the top margin is the same;
- whether the bottom aligns;
- whether the verticals are on the same line;
- whether the inner field is the same;
- whether the profile width repeats.
If a wardrobe consists of four identical doors, the frames are easier to design as one common rhythm.
For example:
- the common top of the frames is at the same level;
- the common bottom is at the same level;
- the side margins are the same;
- the internal verticals form an even spacing.
This is how individual doors visually come together into a single furniture wall.
This is precisely where the request for a "cabinet molding" differs from the task of a single decorative frame.
Repeatability becomes more important than the effect on a single door.
If the cabinet has a central pair of doors
In a four-door cabinet, the outer and inner doors are in different surroundings.
If the frame comes too close to the inner joint of the two central doors, the middle of the cabinet visually becomes heavier.
Sometimes it is worth slightly increasing the inner offset or changing the position of the handles so that two adjacent frames do not merge into one wide strip.
If the fronts are of different widths
A built-in cabinet may have one wide central door and two narrow side doors.
Copying a single external frame dimension does not work here.
It is better to keep:
- one profile;
- the same padding;
- the same height for the top and bottom borders;
- a similar proportion of the inner field.
This keeps the system consistent, even though the frame widths differ.
Chest of drawers and drawers of different heights
In a chest of drawers, the top drawers are often shorter than the bottom ones.
If you take one frame and simply reduce its height without changing the logic, the top drawer may end up with a central field that is too narrow.
It is more rational to preserve what should truly repeat:
- one profile;
- the same indent principle;
- the same relationship to the handle;
- the same orientation of the molding.
And adapt the frame size to the specific facade.
Example:
the top drawer — one small frame;
the bottom one — a taller frame;
the large door — a frame of the same profile, but a different scale.
Then the furniture retains a common language without trying to make all facades geometrically identical.
How to calculate the molding length for one frame
For a simple rectangular frame, the theoretical length along the selected contour:
2 × height + 2 × width.
For example, the outer frame size:
420 × 760 mm
Theoretical sum of four parts:
2 × 420 + 2 × 760 = 2360 mm.
This is not yet the purchase quantity.
Why?
Because in reality you need to account for:
- kerf width;
- trimming of the ends;
- possible defects;
- direction of wood defect;
- commercial length of the strip;
- cutting plan.
The theoretical perimeter answers the question “how many millimeters of finished parts will be in the frame”.
Purchasing answers a different question:
how many product bars are actually needed to obtain these four parts.
These are different numbers.
How to calculate molding for a facade series and create a cutting map
Let's imagine ten identical facades with a frame of 420 × 760 mm.
For one facade you need:
- 2 verticals of 760 mm;
- 2 horizontals of 420 mm each.
For ten:
- 20 parts of 760 mm;
- 20 parts of 420 mm.
Total length of finished parts:
20 × 760 + 20 × 420 = 23,600 mm
or 23.6 m.
If you write to supply:
need 23.6 m MLD-002
this is not enough.
MLD-002 in solid wood currently has, in particular, commercial lengths of 1000 and 2400 mm. In MDF — 2600 mm.
For solid wood with a length of 2400 mm, it is necessary to understand exactly how the parts are laid out.
For example, without taking the saw kerf into account:
- 3 × 760 = 2280 mm;
- 5 × 420 = 2100 mm.
But a mixed cutting layout sometimes gives a better result.
The task is no longer about the total number of meters, but about the distribution of lengths.
Complete example of cutting ten fronts
Let's take a frame with an outer size of 420 × 760 mm.
Per one facade:
- two verticals of 760 mm each;
- two horizontals of 420 mm each.
For ten fronts:
- 20 verticals of 760 mm each;
- 20 horizontals of 420 mm each.
Theoretical length of finished parts:
15,200 + 8,400 = 23,600 mm.
Let's assume a solid wood profile with a commercial length of 2,400 mm is selected.
If verticals are cut separately:
- one strip yields 3 pieces of 760 mm;
- 120 mm remains before accounting for the saw kerf and trimming.
For 20 verticals, a minimum of 7 strips is needed: six will yield 18 pieces, the seventh — two more.
Horizontals:
- one strip theoretically yields 5 pieces of 420 mm;
- that is 2100 mm.
For 20 horizontals — a minimum of 4 strips.
Total with this simple scheme:
7 + 4 = 11 strips of 2400 mm.
Purchase length:
26,400 mm.
Theoretical linear footage of parts:
23,600 mm.
The difference:
2800 mm before accounting for saw kerf, end trimming, and actual defects.
This is not necessarily the best cutting layout. A mixed scheme may produce a different result. But the example shows the main point: 23.6 m of finished parts and 23.6 m of purchased material are not the same thing.
Why this calculation cannot be automatically transferred to another profile
Another SKU may have:
- different commercial length;
- different material;
- a different frame size;
- a different number of defective sections;
- a different allowance for end trimming.
Therefore, the cutting map is drawn up after selecting a specific product variant.
Not before.
Therefore, for a series, create a separate parts list.
First, reserve the long parts
When cutting long-length profiles, there is a simple practical rule:
first protect the longest and rarest workpieces.
If a 2400 mm strip is needed for:
- two long verticals;
- several short horizontals,
you should not start by cutting all the short parts.
A short part can often be obtained from the leftover.
A long one cannot.
For a series of frames, it is useful to divide the cutting plan into three lists:
- long verticals;
- medium parts;
- short horizontals and extensions.
After this, the strips are distributed so that the long elements have guaranteed blanks.
This is especially important for solid wood: a local defect in the wood can make part of the length unsuitable for a face part.
Therefore, the purchasing stock is better determined by the actual cutting map, rather than by a universal “plus ten percent.”
How to account for leftovers
A leftover is not always waste.
If after a long part there remains a piece from which a horizontal of another frame can be obtained, it must be returned to the cutting map.
It is useful to divide leftovers into three groups:
- suitable for face parts;
- suitable only for short internal parts;
- waste.
This way, the workshop does not order extra strips just because all offcuts were formally written off.
For a large batch, you can keep a simple table:
| Remainder | Length | Where to use |
|---|---|---|
| O-01 | 510 мм | horizontal P-02 |
| O-02 | 300 мм | short part |
| O-03 | 90 мм | Waste |
This is especially useful with expensive solid wood.
Material affects cutting not only by price
In natural wood, the face area may be limited by a knot, crack, noticeable grain transition, or another defect that the craftsman does not want to leave on the front.
Therefore, the mathematically available 2400 mm is not always equal to 2400 mm of usable face length.
For MDF to be painted, the situation is different: the wood pattern does not limit the selection of face areas, but requirements for the integrity and quality of the surface remain.
That is why it is better to determine the allowance after reviewing the material and the actual cutting plan.
Comparison of MLD-002, MLD-003, and MLD-008 on a single front
Let's imagine the outer contour of a 500 × 800 mm frame.
We use only the width along the plane as a simplified way to compare scale.
MLD-002 — 22 mm
Inner field approximately:
456 × 756 mm
MLD-003 — 35 mm
Inner field approximately:
430 × 730 mm
MLD-008 — 60 mm
Inner field approximately:
380 × 680 mm
The difference between the first and third options in internal width is 76 mm.
This is no longer just a slightly wider molding.
This is a different facade composition.
At the same time, MLD-008 is also deeper: 24 mm versus 11–12 mm for the more compact examples. This means not only the internal area changes, but also the relief.
On a real facade, such a profile creates a stronger shadow and protrudes more relative to the handle.
Therefore, the size must be assessed in two directions at once:
along the facade plane
и
in depth.
MLD-027: compact semicircular profile
Semicircular MLD-027 is useful as an example that a small size does not mean a flat line.
The current product card lists the following cross-sections:
- 14 × 8 mm;
- 20 × 11 mm.
The rounded surface creates a soft shadow along the edges.
On a painted front, this can create a neat frame without the feel of a heavy architectural profile.
This option is worth considering for:
- small doors;
- thin double frames;
- fronts where the central panel should remain large;
- compositions where a handle or central overlay already plays an active role.
But even a compact molding needs to be checked at the corners.
A semicircular profile has no carved pattern, but any mismatch at the joint is clearly visible along the smooth line of the profile.
Oak, beech, or MDF: the material is chosen together with the finish
For a furniture frame, the material cannot be chosen separately from the future finish.
Beech
It fits well into an opaque painting scenario if the selected item is available in beech and the workshop plans a single color for the facade and molding.
The wood texture is secondary here.
More important:
- quality of preparation;
- sanding;
- soil;
- enamel;
- color stability.
Oak
It makes sense where the wood should remain visible.
Under:
- clear lacquer;
- oil;
- stain;
- tinting.
Then the profile works simultaneously as form and as the natural wood pattern.
MDF (740–760 kg/m³, emission class E1/E0) provides ideal geometry, uniformity, and better base for enamel: high adhesion, smooth surface, absence of knots and cracks.
Suitable for projects where the corresponding product variant is selected and the frame is intended for painting.
MLD-002 and MLD-003 in the current product pages have MDF versions 2600 mm long, including primed options.
For a furniture maker, this is a separate purchasing item, not just “the same moulding in another material.”
Therefore, in the specification, the material must be written next to the item code.
How to choose the material for an entire furniture series
If one furniture model is produced several times, it is better to establish the logic in advance:
- profile;
- the material;
- the length of the product strip;
- finish;
- the type of frame.
For example:
R-01 — MLD-002 — beech — enamel
Or:
R-02 — MLD-003 — oak — clear tint.
In this case, a repeat order does not start with a new discussion of materials.
When it is acceptable to change the material while keeping the profile
Sometimes the same molding is used in different projects:
- beech for enamel;
- oak for clear finish;
- MDF for painting.
The geometry is similar, but these are three different purchasing items.
If the material changes, you need to recheck:
- the length of the available strip;
- finish;
- surface quality;
- Cutting;
- the visual result.
Replacing oak with MDF cannot be considered "just another material" without revisiting the technology.
Molding for enamel
If the facade, frame, and other parts must be the same color, it is more convenient to treat them as a single finishing set.
Work sequence:
test frame → preparation → primer → enamel → joint inspection → color approval → production run.
Particular attention should be paid to the corners.
After painting, a thin gap at the miter joint becomes more noticeable, especially on light enamel.
Therefore, the quality of the frame cannot be fixed with a coat of paint alone.
First — precise joinery geometry.
Then — finishing.
For a production run, it is useful to paint a test facade completely, rather than a separate piece of molding. Then you can see:
- how the profile looks on a flat surface;
- how strong the shadow is;
- whether the color matches;
- whether the texture has become too heavy after painting.
Oak molding for a clear finish
If the frame remains natural or tinted, it becomes a noticeable material boundary of the facade.
Then it is important what they are made of:
- the facade itself;
- handle;
- adjacent trim;
- Plates;
- cornice;
- furniture legs.
If the facade is oak, oak molding can be included in a single finishing system.
If the facade is painted while the frame remains natural, the molding becomes a contrasting accent.
Both solutions are possible.
The problem begins when the material changes randomly.
For example, one door gets an oak profile, while the adjacent one gets a beech profile under clear lacquer. The difference in texture will be noticeable even when the color is similar.
For a clear finish, it is better to evaluate the batch together before installation.
When additional decor is needed inside the frame
Once the frame has been determined, the central field can be left empty.
This is often the best solution.
But in classic furniture, an additional center is sometimes required:
- carved overlay;
- rosette;
- a small finial;
- a symmetrical decorative element.
In this case, the order should remain the same:
first the frame → then the central decor.
Not the other way around.
If you first choose a large overlay and then try to surround it with molding, the facade will quickly become overloaded.
For verification, you can use carved overlays for furniture fronts и Wooden sockets.
It is useful to leave a calm free space between the frame and the central element.
It is precisely this that allows the two types of decor not to compete with each other.
How to add molding and frame to the specification
Entry:
molding — 8 meters
too weak.
It does not answer:
- which SKU;
- which material;
- what cross-section;
- what product length;
- which parts need to be cut;
- how many fronts;
- what finish.
It is better to split the information into two parts.
Purchasing line
For example:
MOL-01 | STAVROS | MLD-002 | beech | 22 × 11 | strip length 2400 mm | number of strips
Finished parts list
For example:
V-01 | 760 mm | 20 pcs.
G-01 | 420 mm | 20 pcs.
This way, on a repeat order, the workshop understands not only how much material was purchased, but also why.
If the material changes from beech to oak or MDF, this is a separate purchasing line.
If the MLD-027 cross-section changes from 14 × 8 to 20 × 11, this is also a separate variant, even with the same model name.
What to keep after the first completed order
For repeatable furniture, it is useful to archive:
- facade drawing;
- frame type;
- molding SKU;
- cross-section;
- the material;
- commercial length;
- parts list;
- cutting map;
- color or finishing system;
- photo of the approved front.
A year later, the product page link will no longer tell you exactly how the frame was attached to the front.
But the production archive will.
If the profile has to be replaced
A new moulding cannot simply be substituted into an old schedule.
They re-check:
- width;
- the depth;
- inner field;
- the handle;
- corners;
- Cutting;
- the material;
- finishing.
Even the difference between 22 and 35 mm changes the geometry of the frame enough to require recalculating the facade.
Typical mistakes with a wooden moulding frame
Buying the profile first, then drawing the frame
Consequence: the facade is dictated by the random size of the moulding.
Better approach: first determine the allowable width based on the working field.
Specifying only the outer dimension
Consequence: the craftsman does not understand where the inner contour runs.
Better approach: establish the measurement system and the profile article number.
Mark each door separately
Consequence: the frames "drift" by several millimeters.
Better: use a single template for identical fronts.
Calculating only the total footage
Consequence: there are not enough long blanks, and too many short offcuts.
Better: count the number of parts for each length.
Not accounting for the handle
Consequence: holes or grip conflict with the frame.
Better: the handle should be on the same drawing.
Mixing materials under a clear finish
Consequence: adjacent parts differ in texture.
Better: define the wood species logic in advance.
Trying to hide an inaccurate angle with enamel
Consequence: after painting, the gap remains visible.
More correct: first achieve a precise dry joint.
Final check of the frame before starting the batch
Before cutting the entire batch, check:
- front size;
- working field;
- indent from the edge;
- outer contour of the frame;
- the inner contour;
- molding SKU;
- cross-section;
- the depth;
- profile orientation;
- the handle;
- four corners;
- the material;
- finish;
- commercial length;
- number of long parts;
- number of short parts;
- cutting map;
- test facade;
- consistency of the template across the batch.
If at least one of these points is still being resolved "on site", it is better not to start the batch.
Where to buy wooden mouldings for furniture
The main category can be opened via Wooden moldings for furniture.
A wider selection of trim is available in the section trim pieces made of solid wood and MDF.
For a practical size comparison, it is convenient to start with several profiles:
But you should not choose the “best moulding.”
You need to find the profile that fits your specific facade:
by width → by depth → by shape → by material → by length → by cutting plan.
The main principle of the entire process is simple:
the molding does not define the frame. The frame defines the requirements for the molding.
When the facade, free field, indents, and four finished parts are calculated first, purchasing becomes predictable. The workshop receives not random decorative trim, but a repeatable structural element that can be installed identically on a single door, four cabinet facades, or an entire furniture series.