Article Contents:
- The square matched, but the composition still didn't come together
- Why matching A and B doesn't guarantee a proper fit
- The front view can be convincing, but the side view can be heavy
- Why the installer shouldn't decide the proportion on site
- 80 × 80 × 26 mm — a small but not flat piece
- 100 × 100 × 33 mm — a transitional size
- 120 × 120 × 39 mm — the size that is easily mistaken for an exact match
- 130 × 130 × 42 mm — larger not only in the face
- 150 × 150 × 49 mm — an independent architectural volume
- The shadow makes the relief larger
- Coincidence of top points does not necessarily mean the same depth
- The adhesive layer and base add millimeters
- Moving parts require a separate gap
- The socket protrudes and becomes the main accent
- The top point of the socket is close to the height of the molding
- The socket is partially recessed
- What data is needed before building the section
- Where to get the official drawing
- How to build the side profile
- Checking at full scale
- The field is small, the frame is thin
- Medium-sized field, expressive molding
- Large ceiling coffer
- Narrow pilaster
- Furniture panel
- Why a small rosette can get lost
- Why a large rosette can overload the frame
- Light fixture next to a rosette
- Repeating ceiling
- Central element of one panel
- Repeating frames
- Panel above the console or fireplace
- Boiserie in the passage area
- Checking opening
- Connection with the handle
- Front thickness and base
- Decor on already painted furniture
- Pilaster as part of an architectural composition
- Interior column
- Arched opening
- Fireplace area
- Beech for opaque painting
- Oak for finishing with visible texture
- "Standard" or "Prestige"
- One finishing sample for the entire group
- Moldings and decor in the same artistic language
- Carved decor to expand the composition
- Installation materials
- Materials for oak and beech
- This is not an electrical outlet
- This is not a flat overlay
- This is not a connector socket for joining moldings
- This is not a ceiling rosette for a light fixture
- This is not any square socket
- Ceiling grid
- Wall panels of different scales
- Symmetrical Pairs
- Control part
- Batch and visible group
- Required fields
- Dry layout
- Plane control
- Center Marking
- Finishing check
- Acceptance before gluing
- Mistake 1. Chose only by A × B
- Mistake 2. Left the field exactly the size of the socket
- Mistake 3. Compared C with only one digit of the molding
- Mistake 4. Did not account for the base and mounting layer
- Mistake 5. Placed a large size on a small facade
- Mistake 6. Decided to recess the socket after delivery
- Mistake 7. Mixed beech and oak in one repeating group
- Mistake 8. Did not specify "Standard" or "Prestige"
- Error 9. Bought glue without checking the base
- Error 10. Ordered the entire batch without a control sample
- Error 11. Evaluated the part only in daylight
- Error 12. Called R-075 just a "wooden socket"
- Suitable
- Fits provided a design check is done
- May not fit
- When to look at other collections
- Step 1. Choose the field size
- Step 2. Check C
- Step 3. Choose material and sanding
- Step 4. Calculate quantity
- Step 5. Check price and availability
- Step 6. Check warehouse options
- Step 7. Arrange delivery
- Take not just one measurement, but a field map
- Do not choose a size "flush" without a mockup
- A finished frame does not need to be saved with a random backing
- When reworking the frame is more reasonable than a compromise
- Daylight shows soft volume
- Directional light emphasizes every millimeter of C
- Painting in the background color does not make the socket flat
- Oak tinting enhances internal transitions
- Lay out positions by full dimensions
- Check control dimensions
- Compare visible details with each other
- Do not mistake damage for future sanding
- Pass not only the boxes to the installer
- One style does not mean one size
- One size does not guarantee a unified perception
- Common finishing ties together different scales
- What sizes are available for R-075?
- What does parameter C mean?
- Why can't you choose a rosette by width alone?
- Should R-075 be flush with the molding?
- What size is suitable for a 120 × 120 mm coffer?
- Can a large R-075 be installed on a furniture facade?
- How does beech differ from oak in this model?
- What to choose: 'Standard' or 'Prestige'?
- Can R-075 be trimmed on site?
- Is a 1:1 template needed?
- How do I calculate the quantity for a coffered ceiling?
- Is a spare needed?
- Can I order one R-075 for a trial fit?
- What glue is needed?
- Can R-075 be glued to an already painted wall?
- Can R-075 be used near a light fixture?
- Is R-075 suitable for a fireplace?
- Where can I see other Gothic elements?
- Where can I buy R-075?
- What should I check in the cart before payment?
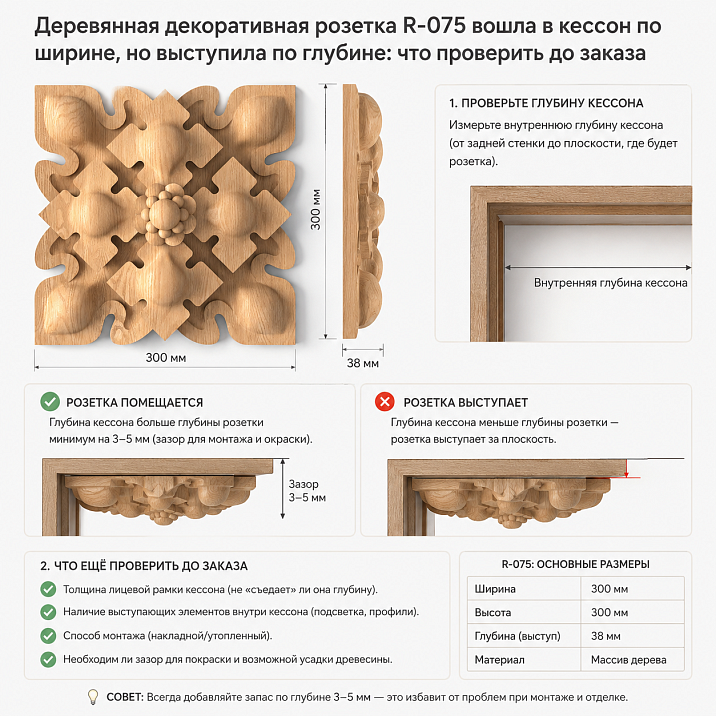
The drawing of the ceiling coffered panel leaves a central square of 120 × 120 mm. The client finds a wooden decorative rosette R-075 of the same size and decides the task is solved: the width matches, the height matches, and the ornament fits the style. After a test fit, a third value emerges — the depth of 39 mm. The relief protrudes noticeably above the molding, casts a heavy shadow, and turns the neat center of the composition into a separate protruding block.
This is why the query "Buy a wooden decorative rosettecannot be reduced to choosing a picture and two face dimensions. For R-075, A, B, and C all change at once: along with the width and height, the depth of the carving increases. The 80 × 80 mm version has a C of 26 mm, while the 150 × 150 mm variant already has 49 mm. A difference of 23 mm can completely change the side profile of a coffered panel, wall panel, pilaster, or furniture panel.
R-075 is a square Gothic element in the form of a complex four-leaf clover. The model is available in beech and oak, with a sanding quality of "Standard" or "Prestige." It can be used on ceilings, wall panels, pilasters, interior columns, arches, and fireplace compositions. But the same product in these places requires different seating. In some places, the rosette should protrude and catch the light; in others, it should approach the height of the molding; and in still others, it should be partially recessed into a prepared base.
Below is not an abstract overview of wooden decor, but a practical route to ordering: how to read all three dimensions of R-075, check it in front and side views, choose the appropriate scale, agree on beech or oak, calculate the quantity, and compile a specification that the manager, designer, and installer will understand as the same task.

The square matched, but the composition still didn't come together
The error begins with the usual way of measuring. When a square element is in front of you, a person automatically checks the width and height. If the field in the caisson is 120 × 120 mm and the socket has the same A and B, the choice seems accurate. However, the decorative part exists not in a flat picture, but in volume. The caisson is seen at an angle, the ceiling is lit by side light, the wall panel is perceived during movement, and the furniture facade opens and closes.




Why matching A and B does not guarantee a fit
Dimensions A and B determine whether the outer square will fit into the allotted field. They do not show:
-
how far the thread peak will deviate from the base;
-
whether the molding will be lower or higher than the central decor;
-
whether a deep shadow will appear around the perimeter;
-
whether the relief will come close to the door, handle, or adjacent overlay;
-
whether the installer will be able to press the base evenly against the plane;
-
whether the intended transition between the frame and the center will be preserved.
Checking only the front plane answers one question: "will the square fit." The project needs a different answer: "how the square will look and work in the finished volume."
Our factory also produces:


The front view can be convincing, but the side view can be heavy.
In frontal visualization, R-075 is perceived as a symmetrical Gothic quatrefoil. Depth almost disappears, especially if the model is painted the same color as the panel. In a real room, a person rarely looks strictly along the central axis. From a side angle, the height of the relief, shadow, thickness of the base, and distance to the surrounding profile become noticeable.
If the molding protrudes from the plane by a conventionally smaller amount, and R-075 rises noticeably higher, the center of the composition will dominate. This can be a deliberate decision. The error arises not from the protrusion itself, but from the fact that no one planned it.
Get Consultation
Why the installer should not decide the proportion on site
When the rosette has already been delivered and the caisson is assembled, the installer has few options: install as is, add a base, choose another location, or stop the work. None of these options replaces a design decision. Trimming the complex relief, changing the size, or arbitrarily recessing the part after receipt cannot be done without separate approval.
The correct sequence is the reverse: first the section, then the order. Before buying a wooden rosette R-075, the designer should show not only the square on the layout, but also the profile of the composition from the side.
Five sizes of R-075 and one parameter that is most often forgotten
The R-075 card presents five size rows. Each row describes an independent volume, not just an enlarged pattern.
| Variant R-075 | Size A × B | Depth C | Depth difference relative to 80 mm | What to check first |
|---|---|---|---|---|
| Compact | 80 × 80 mm | 26 мм | 0 мм | small field, low molding, narrow pilaster |
| Small | 100 × 100 mm | 33 мм | +7 mm | frame depth and side shadow |
| Medium | 120 × 120 mm | 39 мм | +13 mm | match with the caisson profile |
| Enlarged | 130 × 130 mm | 42 мм | +16 mm | Distance to adjacent parts |
| Large | 150 × 150 mm | 49 мм | +23 mm | independent volumetric accent and base |
The table does not assign a single place to each size. It shows a pattern: as the face square grows, C noticeably increases. Therefore, you cannot first choose A × B and treat depth as a secondary characteristic.
80 × 80 × 26 mm — a small but not flat part
The 80 mm version is suitable for testing on small facades, narrow pilasters, compact frame fields, and compositions with relatively shallow surrounding decor. But 26 mm is still a full-fledged relief. If the adjacent molding is almost flat, even a minimal R-075 can become the main volume.
For a small part, the scale of the ornament is especially important. The quatrefoil should be readable from the intended distance. On a ceiling with great height, a compact version may get lost, whereas on a door panel or furniture panel it will be perceived in detail.
100 × 100 × 33 mm — a transitional size
The 100 mm option often seems like a safe compromise: already more noticeable than 80 mm, but not as large as 120–150 mm. However, the depth increases to 33 mm. If the project is built on thin profiles, this size may unexpectedly become more voluminous than the frame.
Check not the abstract "moderation" of the model, but the specific cross-section. For a wall panel, it is useful to compare C with the molding height, base thickness, and the shadow gap between parts.
120 × 120 × 39 mm — the very size that is easy to mistake for an exact match
The 120 mm size is especially illustrative. A 120 × 120 field and a 120 × 120 rosette match arithmetically, but leave no side clearance. If the frame has an internal opening exactly matching the part's dimensions, the slightest installation deviation will become noticeable. Additionally, the 39 mm depth may turn out to be greater than expected from the photo.
Therefore, the commercial request "order R-075 measuring 120 × 120 × 39 mm» should only appear after checking three values. In the specification, the size cannot be shortened to «120 mm».
130 × 130 × 42 mm — larger not only in face
The difference between 120 and 130 mm seems small, but C increases to 42 mm. On repeating panels, this changes the shadow strength and visual mass of the center. If the 130-millimeter part is chosen for all sections of the boiserie, one unaccounted millimeter conflict multiplies across the entire run.
In a project with multiple fields, it is better to print two templates — 120 and 130 mm — and make a simple depth model from cardboard or foam board. Frontal comparison shows scale, side comparison shows profile.
150 × 150 × 49 mm — an independent architectural volume
A large R-075 with a depth of 49 mm is no longer perceived as a light overlay. It is suitable for testing in a large ceiling coffer, a massive wall panel, a fireplace or arch composition, where the center should be pronounced. On a small furniture facade, such a volume can take up almost the entire field and interfere with neighboring elements.
Before buy oak R-075 in a large size, it is useful to assess the weight of the visual accent: viewing distance, room height, frame width, depth of adjacent carving, and light direction.
Why depth C changes the interior more than it seems
The depth of a decorative element affects several things at once: the strength of the shadow, the visible scale, the connection with the surrounding profile, safety during movement of parts, and the base technology. This is not a "third dimension for reference," but a working parameter of the composition.
The shadow makes the relief appear larger
Under side lighting, a 49 mm protrusion casts a more noticeable shadow than 26 mm. The eye reads not only the wood but also the darkened contour. Therefore, a large model visually seems even more massive, especially if painted in a contrasting color or installed on a light surface.
In a ceiling coffer, the direction of light depends on windows, chandeliers, cornice lighting, and spot sources. The same profile may look soft in the morning and sharp in the evening. It is useful to view the model under two lighting scenarios.
Matching top points does not necessarily mean the same depth
Two elements may have similar maximum height but different rise shapes. A molding rises gradually from the edge to the peak, while a rosette may have a steep central relief. Even with similar numbers, the silhouette from the side will differ.
Therefore, one cannot limit oneself to comparing "rosette C against molding height." Profiles of both elements are needed. Ideally, they are overlaid on the same cross-section at the same scale.
The adhesive layer and base add millimeters
The card describes the product size. The finished composition includes the base, possible backing, adhesive layer, finish, and surface features. These values cannot be invented in advance; they are set after choosing the mounting system and inspecting the base.
If the rosette should approach the molding plane, even a small additional layer can change the result. Mounting materials are chosen not on the principle of "what the crew has," but after checking the base and manufacturer recommendations. For configuration, one can prepare in advance buy materials for installing wooden decorbut the actual composition and consumption are determined by the project.
Moving parts require a separate clearance gap
On a furniture facade or door, it is important to check the opening trajectory. The three-dimensional rosette must not collide with the adjacent leaf, handle, casing, or body. The frontal drawing does not show this.
If the R-075 is placed next to a drawer, not only the static distance but also the path of movement is measured. For paired doors, both leaves are checked simultaneously.
Three ways to integrate R-075 into the plane
There is no universal answer that "the rosette must be flush with the molding." The project can be based on one of three solutions. The mistake is to choose none and leave the result to the installer.
The rosette protrudes and becomes the main accent
In this scenario, the R-075 is deliberately raised above the surrounding frame. Its deep four-leaf shape captures light and sets the center. This solution suits a large coffered ceiling, fireplace composition, or panel where the decorative element should be readable from a distance.
To make the protrusion look intentional, sufficient space is left around the rosette. If the edges almost touch the molding, the volume feels cramped. Free space helps the shadow work without turning the center into a heavy block.
The top point of the rosette is close to the height of the molding
A calmer solution is to select a size and base such that the maximum height of R-075 approaches the height of the surrounding profile. The composition remains relief-like but does not break apart into a frame and a separately standing center.
This requires a precise section. You cannot assume that the same number automatically gives the same silhouette. The shape of the rise, the width of the base, and the location of the maximum point matter.
The rosette is partially recessed
If a large size is chosen and the project requires a moderate protrusion, a prepared recess or different base may be possible. Such a solution is designed in advance. You cannot cut a niche in a finished panel "on site" without checking the thickness of the structure, fastening, and final finish.
Partial recessing requires coordination with the designer, furniture maker, or panel manufacturer. For a complex composition, it is reasonable to order a design project for the wall panel, so that the front view and section are approved before manufacturing the parts.
The section resolves the dispute before installation begins
The elevation shows the composition face-on. The section answers whether it will work in volume. For R-075, a simple design document is sufficient if real dimensions are preserved and base layers are not omitted.
What data is needed before constructing the section
Collect the initial information:
-
the size of the field inside the caisson or frame;
-
the profile and height of the surrounding molding;
-
the thickness of the panel, panel insert, or base;
-
the selected R-075 row with A, B, and C;
-
the location of adjacent overlays;
-
the door opening direction, if the decor is installed on furniture;
-
the intended finishing method;
-
the mounting system confirmed for the base.
If one parameter is missing, it is not replaced with an approximate number in the final specification. First, obtain a drawing or clarification.
Where to get the official drawing
For accurate comparison, you can download drawing R-075 and check how A, B, and C are marked. A general article should not replace the manufacturer's document. It is the drawing that shows where dimensions are taken from and what the profile looks like.
Save the file along with the specification. It is useful to supplement the document name with the selected size, material, and grinding quality so that the installer does not open a diagram of a different model.
How to construct the side profile
The cross-section sequentially shows:
-
the load-bearing plane;
-
the decorative panel or base;
-
the molding with its actual profile;
-
R-075 with the depth of the selected option;
-
installation layer without an assumed thickness;
-
possible recess, if recessing is provided;
-
light line and expected shadow;
-
adjacent moving part, if present.
It is not necessary to create a complex 3D model. Even a neat cross-section at a scale of 1:1 or 1:2 will reveal a conflict that is not visible in the visualization.
Checking at full scale
For a small element, a simple volumetric mock-up can be made. The front shape is printed to the dimensions A × B, and the depth is set with cardboard layers. The mock-up will not replicate the carving, but it will show how far the center will protrude from the plane.
Look at the composition from the distance at which it will be perceived in the interior. A ceiling coffer is assessed from below, a panel — at the entrance to the room and along the wall, a facade — in closed and open positions.
How to choose the size of R-075 for a specific field
The size is not chosen on the principle of "the largest one that fits." Space should be left between the edge of the rosette and the frame, corresponding to the design intent. At the same time, the depth, viewing distance, and saturation of the adjacent carving should be checked.
The field is small, the frame is thin
For a compact field, start fitting with 80 × 80 × 26 mm or 100 × 100 × 33 mm. This is not a ready-made recommendation, but a reasonable starting point. If the ornament should be readable from a close distance, a smaller model often looks more precise.
When choosing through the catalog, you can buy a square wooden rosette after filtering by shape, but the final check remains with the specific product card and drawing.
Medium-sized field, expressive molding
For a medium-scale frame, compare 100, 120, and 130 mm. It is important not only to fill the center, but also the balance of shadow. The rosette may be slightly smaller than expected on the front plane, but due to the depth it can appear large enough.
To avoid mistakes, make three paper templates and one side mockup. Often after such a check, the 120 mm option wins over 130 mm not because of width, but because of a calmer C.
Large ceiling coffer
In a large field measuring 150 × 150 × 49 mm, it can become an independent center. But the ceiling requires checking from a distance: a part that seems massive on the table may be perceived as more delicate up above. At the same time, deep relief can cast a strong shadow under cornice lighting.
For inspiration and scale checking, it is useful to look at ceilings with wooden coffers, and then transfer the solution to your own section. A finished project of another room does not replace your own dimensions.
Narrow pilaster
On a pilaster, the field width is limited, and the R-075 edge may approach the side edges. Compact versions are usually easier to check, but depth still matters: the protrusion should not ruin the silhouette of the vertical when viewed from the side.
If the pilaster is in a passageway, the risk of accidental contact is assessed. Deep relief in a narrow space requires more careful placement.
Furniture panel
On a cabinet or door, the field may be perfectly square, but handles, moldings, and hinges are nearby. R-075 is tried on the closed facade, then opening is checked. The size is chosen so that the central decor does not compete with the handle and does not cross the frame line.
For furniture, it is useful to order sockets for furniture and wall panels in one series, but do not mix sizes without an approved scheme.
R-075 in a ceiling coffer: the center is visible from below, and the depth works with light
The ceiling is one of the most demanding scenarios. Here, the socket is rarely viewed strictly from the front. It is above eye level, light falls at different angles, and distance smooths out small details while enhancing the overall mass.
Why a small socket can get lost
The higher the ceiling and the larger the coffer, the less the face pattern is perceived. The 80 mm option may look good on a sample but disappear in the finished field. Therefore, the size is assessed from below at full scale, not on a table.
Depth partially compensates for a small A × B through shadow, but relying only on relief is not enough. The ornament must maintain a readable form.
Why a large socket can overload the frame
A size of 150 mm with C 49 mm can dominate a thin molding. If the coffer consists of light lines, the deep center will look like a separate insert. This can be expressive, but only with a deliberate contrast.
Compare the area of free space around the piece. When the edges almost touch the frame, the composition becomes cramped. Sometimes a smaller R-075 gives a more architectural result.
Luminaire next to the socket
If a luminaire is located in the center of the caisson, R-075 cannot be automatically considered a ceiling rosette or a technical part for electrical work. It is a decorative wooden rosette. The placement of the luminaire, wiring, mounting, and thermal conditions are designed separately.
Do not make holes or modify the product design without approval. If the rosette is used near a light source, a design solution that meets the electrical and fire safety requirements of the specific site is required.
Repeating ceiling
In a grid of multiple caissons, one mistake will repeat many times. Before ordering the entire batch, produce one control unit. Check the size, depth, finish, position relative to the molding, and lighting.
Once the result is approved, you can order rosettes for all caissons in one batch. The order specifies the same dimensions A × B × C, material, and sanding quality.
R-075 in wall panels and boiserie
On the wall, the side profile is especially noticeable. A person walks along the panel, looks at an angle, and sees the shadow and the gap between the decor and the molding. Therefore, depth C cannot be hidden by a favorable frontal render.
Central element of one panel
If R-075 is placed in the center of the frame, first determine its role: a calm point, equal in strength to the molding, or an independent accent. For a calm composition, the top line of the relief should not accidentally outpace all other elements. For an accent one, leave air around it.
You can explore wall panel ideas with carved decor, but the specific size is chosen based on the panel's own width and profile depth.
Repeating frames
On a long wall, several identical rosettes create rhythm. Even a slight variation in position or size is noticeable. All centers are marked using a unified system, and the details of the visible group are ordered in one execution.
Do not mix 120 and 130 mm just because the margins differ by a few centimeters. If the project involves different sizes, the transition should be systematic and shown in the elevation.
Panel above a console or fireplace
Furniture and a fireplace add horizontal lines. The rosette should relate not only to the frame but also to the object below. A deep center can well support a massive console, while above a light object it may look heavy.
Check the entire composition: from the floor to the top molding. An isolated square does not provide the answer.
Boulangerie in the passage area
If the panel is located close to a passage, depth affects practicality. The protruding part should not be at a height where it is constantly bumped. This is especially important in narrow corridors and commercial spaces.
For such a scenario, it is reasonable to consider a smaller C or change the installation height, rather than hoping that users will walk around the decor.
R-075 on a furniture front and door panel
The official purpose of the model allows use in furniture and architectural compositions, but the front imposes special requirements: it moves, has limited thickness, and interacts with handles, adjacent doors, and the cabinet body.
Check opening
When the cabinet is closed, R-075 may look flawless. When opened, the protruding relief can approach the adjacent door or side panel. The trajectory is checked on the drawing and mock-up.
For paired doors, both leaves are opened. If one rosette is located close to the central gap, the counter-movement is taken into account.
Connection with the handle
The rosette and handle should not compete for the center. On a front with a large R-075, the handle is often shifted or a more subdued one is chosen. But there is no universal scheme: the solution depends on the door size, opening type, and hardware design.
The physical distance for gripping is checked separately. The relief should not interfere with the hand.
Facade thickness and base
Overlay decor increases the overall door profile. If the facade fits into a niche or opens next to a wall, this increase is taken into account. The mounting method depends on the material and construction of the facade; it cannot be assigned based on a photo alone.
Before installation, the craftsman must receive a part drawing, center marking, and confirmed adhesive system composition.
Decor on already painted furniture
Installation on finished finish requires checking adhesion, material compatibility, and risk of coating damage. Sometimes it is safer to mount the rosette before final painting and finish the composition with a single layer. Sometimes the project requires a contrasting finished element.
In both cases, the decision is made before ordering the quality of sanding and material.
Pilasters, arches, interior columns, and fireplace compositions
R-075 can work not only in a square frame. On vertical and curved architectural elements, the depth is even more noticeable because the side angle becomes the main one.
Pilaster as part of an architectural composition
On a narrow plane, the edges of the quatrefoil approach the boundaries. A size of 80 or 100 mm can be quite expressive. More importantly, check whether C disrupts the calm vertical.
If a pilaster consists of several profiles, the rosette is matched with the most protruding one, not just with the flat background.
Interior column
On a column, the decor is visible from several sides. The square R-075 on the front face must account for the width of the face itself and the transition to the side planes. A large model may visually extend beyond the boundaries, even if it physically fits.
The model is rotated or viewed at an angle, not evaluated from a single frontal frame.
Arched opening
In an arch, the rosette can complete the vertical or connect decorative lines. Here, not only the depth is checked, but also the direction of the ornament relative to the curve. R-075 is symmetrical, but the surroundings set the compositional axis.
If the element is above a passage, the height and distance to the viewer are taken into account. The deep relief must be securely attached to a suitable base.
Fireplace Area
In a fireplace composition, R-075 can support a Gothic theme, but wooden decor cannot be automatically placed near a heat source. Design distances, base materials, and compliance with the requirements of the specific equipment are needed.
General advice is especially dangerous here. The decision must be confirmed by the fireplace designer or the responsible organization.
Beech or oak: the material is chosen together with the finish
The R-075 card provides for beech and oak. The wood species affects the surface pattern and the way of visual integration, but does not cancel the dimensional check. Two rosettes with the same A × B × C remain identical in size, but after finishing they may be perceived differently.
Beech for opaque painting
Beech is often chosen when the composition will be painted with enamel to match the panel, ceiling, or furniture. The calm surface helps achieve a uniform color block where the pattern is created by the chiaroscuro of the carving.
If an opaque finish is planned, this is noted in the order and the surface preparation is agreed upon. Do not automatically call any beech rosette "for enamel" without checking the selected version in the product card.
Oak for finishes with visible texture
Oak is chosen when the project wants to preserve the character of the wood. Tinting and transparent coatings highlight the grain, and the deep relief provides additional tonal variations.
Before order a gothic rosette made of oak, coordinate the finish sample together with the molding and panel. Different wood species or different coating systems can disrupt the unity of the composition.
"Standard" or "Prestige"
These options relate to the quality of sanding. The choice depends on project requirements and further preparation. For complex final finishes, the amount of additional work needed on site is determined in advance.
In the specification, the sanding quality is written as a separate field. The wording "standard" or "good" is not suitable. If a more prepared option is needed, you can buy R-075 with "Prestige" sanding after checking the specific size line.
One finish sample for the entire group
When sockets are repeated in multiple coffers or panels, the color and gloss must be coordinated. A test finish is done on the same wood species and with the same preparation quality that will be in the order.
Do not approve the shade based on the screen. Light, camera, and monitor change the perception of wood.
What to order together with R-075
A socket rarely exists in isolation. It needs surrounding profile, base, mounting system, finish, and sometimes design development of the entire wall or ceiling. Related items are chosen not to increase the cart, but so that the finished composition does not fall apart in style, depth, and color.
| What to add to the purchase | Why is this needed | Where it is especially useful | What to check before ordering |
| Wooden moldings and carved decor | assemble a frame and connect the center with the surroundings | coffers, panels, pilasters | profile, height, collection, material |
| Installation materials | secure the part on a specific base | ceiling, wall panel, furniture | compatibility, surface preparation, consumption |
| Finishing materials | Coordinate color and texture | Beech under enamel, oak under tinting | coating system and test application |
| Drawing | check A, B and C | Any scenario | current version and selected size |
| Design project or section | agree on protrusion and position | complex coffered ceilings, boiserie, fireplace areas | front view, side view and installation details |
| Delivery in one batch | do not separate the visible group | repeating panels and ceilings | quantity, packaging, address and deadlines |
Moldings and decor of one artistic language
R-075 belongs to the Gothic direction. If the surrounding frame is built on a different ornament, the combination must be deliberate. It is easier to start the selection from the page where you can buy Gothic wooden rosettes and see neighboring elements of the same style.
This does not mean that all details must be from the same collection. But the rhythm, depth and character of the carving should speak to each other. A random thin molding next to a heavy R-075 often looks like an incomplete composition.
Carved decor for expanding the composition
In a large interior, one rosette may not be enough. Corner elements, overlays, baguette or other wooden details are added to it. It is convenient to select them in the section where you can Buy carved wood decor by purpose and style.
But each addition increases the density of the ornament. Before ordering, not only the compatibility of the pattern is checked, but also the total depth of the entire group.
Installation materials
Installation requires a system suitable for the base and mass of the part. In the section you can buy mounting glue for a wooden rosette, however, the choice of a specific composition depends on the wall, panel, wood, finish, and operating conditions.
Do not buy glue just because it is called "universal." Check the instructions, working surfaces, fixation time, and preparation requirements.
Materials for oak and beech
Oak R-075 may require a system that preserves the texture, while beech may require opaque painting. In the same category you can order oil for oak R-075 or select materials for painting beech, if this corresponds to the approved technology.
The main thing is not to mix different systems without a test. A trial coating is done before finishing the entire batch.
How not to confuse R-075 with similar products
The name "rosette" is used in different product groups. A buyer may be looking for an electrical frame, a ceiling bowl for a chandelier, a connecting element for molding, or a carved overlay. For SEO and ordering, the wording needs to be clarified: wooden, decorative, carved, square, R-075.
This is not an electrical outlet
R-075 does not belong to electrical fittings. It does not replace the housing of an electrical outlet, switch, or mounting box. In the text and specification, always add the words "wooden decorative" or "carved."
This context is especially important for the key "buy wooden rosettes." Without clarification, the query is ambiguous.
This is not a flat overlay
Some decorative elements have a small depth and work as an almost flat ornament. R-075 with C from 26 to 49 mm forms a pronounced volume. If the project needs a light graphic center, other models should be compared, rather than trying to make a deep rosette flat after purchase.
For an overview of different solutions, you can view all sizes of carved rosettes and filter not only by A and B, but also by C.
This is not a connecting rosette for molding joints
R-075 can be placed in the center of the frame, but its purpose does not automatically imply a connector function. If moldings must fit into the part or hide joints, the assembly is designed according to drawings. The ornament on the object must not be filed down without approval.
This is not a ceiling rose for a light fixture
Decorative use on the ceiling does not turn R-075 into a technical ceiling rose. The hole for the wire, the mounting of the light fixture, and safety requirements are addressed separately.
This is not just any square rosette
The square shape does not determine the ornament, depth, or collection. R-075 is a specific gothic quatrefoil with five size rows. If the specification states "square rosette 120 mm," the supplier cannot unambiguously select a model.
How to calculate the quantity without random surplus
The quantity depends on the composition pattern. One rosette may be placed in each coffered cell, in every other module, only in the central panel, or on several facades of different sizes. First, count the installation locations, then group them by size.
Ceiling grid
If the ceiling consists of 12 identical coffered cells and each requires one center, the base quantity is 12 pcs. However, before ordering, ensure that all fields are indeed identical and that the same R-075 row is used in them.
The formula is simple:
Number of rosettes = number of approved fields × number of rosettes in one field.
Stock is added only after a decision is made about its necessity. It should not mask inaccurate calculation.
Wall panels of different scales
For example, there are four narrow panels and two wide panels on a wall. The project may use R-075 80 mm for the narrow ones and 120 mm for the wide ones. Then these are two separate line items:
-
80 × 80 × 26 mm — 4 pcs.;
-
120 × 120 × 39 mm — 2 pcs.
The entry "R-075 — 6 pcs." does not allow assembling the order.
Symmetrical pairs
On pilasters, portals, and furniture, decor is often placed in pairs. Count the left and right sides separately, especially if the elements are in different rooms. It is convenient to add a "zone" or "panel number" column.
Control sample
For a large project, you can first order one rosette of the selected size for testing. However, the possibility and conditions of such an order should be clarified in the product card or with a manager. After fitting, the control sample is included in the total quantity if it was not damaged and matches the final finish.
Batch and visible group
Sockets located nearby are better to be ordered in one batch and finished according to one sample. This simplifies control of identical material, polishing quality, and color.
When the calculation is complete, you can order the R-075 kit with delivery with separation by size rows.
A specification that makes it impossible to mix up the size
A good specification answers the manager's questions before they arise. It contains no words like "approximately," "as in the picture," or "average size."
Required fields
For each item, specify:
-
full name: wooden decorative rosette R-075;
-
size A × B × C;
-
article R-075;
-
size A × B × C;
-
material;
-
sanding quality;
-
absence of damage;
-
quantity match;
-
match with the cut;
-
position on each field type.
-
minimum and maximum width of the internal opening;
-
minimum and maximum height;
-
diagonals;
-
frame depth at several points;
-
base irregularities;
-
distance to adjacent elements;
-
center mark relative to the entire composition.
-
article number;
-
full size;
-
material;
-
sanding;
-
quantity;
-
the room or panel number.
-
approved layout;
-
section;
-
size table;
-
distribution by zones;
-
finishing sample;
-
instructions for the selected mounting system;
-
control unit or photos of its approval.
Trial fitting before installation and base preparation
Even a precise specification does not eliminate trial fitting. A real wall may have deviations, a panel may have actual thickness, and a molding may have joint features. On-site control is needed before applying adhesive and final finishing.
Dry layout
The rosette is installed without adhesive in the design position and secured in a safe way for temporary evaluation. The center, distances to the frame, and the view at an angle are checked.
On the ceiling, temporary fixation must be professional and safe. Do not hold a heavy part over people with makeshift means.
Plane control
The base must be level and suitable for installation. If the center of the panel is convex or concave, the rosette may not fit evenly. Gaps along the edges change the shadow and reduce the contact area.
Base problems are corrected before installation, not filled with an arbitrary thick layer of adhesive.
Center marking
For a symmetrical frame, the center is found along the axes. Do not rely only on the visual middle after molding installation: small deviations can accumulate. The marking is compared with the project and adjacent panels.
Finish test
If the rosette and background are painted in one color, the joint can be prepared before the finishing layer. If the part is contrasting or tinted, it is finished according to the approved technology and the surface is protected during installation.
Acceptance before gluing
Check:
After gluing, correcting an error becomes more difficult.
Errors that make R-075 look like a foreign part
Error 1. Selected only by A × B
Result — unexpected protrusion. Fix: compare C with the profile of the surrounding decor.
Error 2. Left the field exactly the size of the socket
The result is a tight contour and noticeable deviations. Fix: design a free field and check the layout.
Error 3. Compared C with only one digit of the molding
The result is a mismatched silhouette. Fix: overlay real profiles on the section.
Error 4. Did not account for the base and installation layer
The result is a finished protrusion larger than the design. Fix: show all layers of the structure.
Error 5. Placed a large size on a small facade
The result is the decor approaching the edges, handle, and adjacent panels. Fix: try it at full scale and check the opening.
Error 6. Decided to recess the socket after delivery
The result is reworking the panel and risk of damage. Fix: design the niche in advance.
Error 7. Mixed beech and oak in one repeating group
Result — difference in texture and finish. Fix: one visible group — one consistent material, unless the project does not provide for contrast.
Error 8. Did not specify "Standard" or "Prestige"
Result — expectations for preparation do not match the order. Fix: fix the quality of sanding.
Error 9. Bought glue without checking the base
Result — unreliable or careless fastening. Fix: choose the mounting system according to materials and instructions.
Error 10. Ordered the entire batch without a control unit
Result — one mistake repeats on all coffers. Fix: check a sample or one module.
Error 11. Evaluated the part only in daylight
Result — in the evening the shadow becomes too sharp. Fix: check both daylight and artificial scenarios.
Error 12. Called R-075 simply a "wooden socket"
Result — risk of model substitution. Fix: full article number, dimensions, and material in each line.
When R-075 is suitable, and when it's better to choose a different model
Suitable
R-075 is appropriate when the project requires a square Gothic quatrefoil with pronounced relief. It works well in coffers, panels, pilasters, arches, and architectural compositions where depth is part of the design intent.
Suitable subject to design verification
For furniture, doors, narrow passages, and areas near light fixtures, R-075 can only be considered after checking movement, base, distances, and safety requirements.
May not be suitable
If an almost flat center is needed, the minimum depth of 26 mm may be excessive. If the field is smaller than 80 × 80 mm, no standard line will fit. If the project's ornament is not related to Gothic style, the quatrefoil may look random.
When to look at other collections
If the shape fits but the style does not, compare other rosettes in the catalog. The collection page helps select R-075 and other elements of the same styleand the general category is to see alternative ornaments and depths.
How to order R-075 on STAVROS without a size error
Start with the card, not the general image from the project. Select a specific line A × B × C, material, and grinding quality. Then match it with the drawing, section, and quantity schedule.
Step 1. Select the field size
Measure the actual internal opening of the frame or coffer. For a finished panel, take measurements at several points, because the actual geometry may differ from the project.
Step 2. Check C
Compare the depth of the rosette with the molding, base, and adjacent parts. Decide whether the element should protrude, match at the top point, or be partially recessed.
Step 3. Select material and grinding
Beech or oak are chosen together with the finish. "Standard" or "Prestige" are fixed in the same line.
Step 4. Calculate the quantity
Divide positions by size and installation location. Do not combine different options into one line.
Step 5. Check price and availability
Current data is viewed directly in the product card. You can find out the price of R-075 from the catalog for the selected size, but do not transfer the cost from the article to a long-term estimate without re-checking.
Step 6. Check warehouse options
If the deadline is critical, you can look at carved rosettes in stock in Moscow or wooden rosettes from the warehouse in St. Petersburg. Availability of a specific R-075, size, material, and quality is checked at the time of ordering.
Step 7. Coordinate delivery
For a batch of multiple sizes and accompanying materials, it is useful to calculate delivery of wooden rosettes as a single order. Before payment, check the address, packaging, number of packages, and contents of the shipment.
If the coffered ceiling or panel is already ready
The most tense situation arises when the decorative frame is installed, painting is completed, and R-075 is chosen last. The designer can no longer freely change the width of the molding and the thickness of the base. It remains to check the actual opening and choose a solution that will not require destructive rework.
Take not just one measurement, but a field map
A finished square is rarely mathematically perfect. Measure the width and height on all four sides, check the diagonals, and note the maximum protrusion of the molding. For repeating coffers, do not transfer the result of the first measurement to all others: small deviations may differ.
The field map should contain:
For selection, use the minimum guaranteed opening, not the largest value. Otherwise, one side will fit freely, while the other will be tight.
Do not choose a size "flush" without a mockup
If the inner field almost matches A × B, the paper template should repeat the full outer contour. A square sheet of nominal size does not show the petals and recesses of the ornament, but helps to assess the extreme points. For precise fitting, use a drawing or product outline.
With a minimal gap, any shift of the center becomes noticeable. Even if the part physically fits, the composition may look cramped. In a finished caisson, it is sometimes better to choose R-075 one size smaller and keep a free field.
A finished frame does not need to be saved with a random backing.
The backing increases the protrusion, changes the shadow, and requires separate finishing. If it was not in the project, a layer cannot be added just to bypass an unevenness or cover a gap. First, a new section is built with actual dimensions, then it is decided whether the backing is acceptable structurally and visually.
The same applies to a recess. Cutting a seat in an already painted panel can only be done after checking its construction. If the thickness or material of the base is unknown, it is safer to stop the work and obtain the data.
When reworking the frame is more reasonable than a compromise
Sometimes no R-075 size gives the desired proportion. The smallest model is too deep for a thin profile, and another rosette that fits in depth does not match the Gothic style. In such a situation, a partial rework of the frame may be more honest than trying to hide the conflict with paint.
The decision is compared by three criteria: cost of the change, visual result, and technical risk. The article does not automatically assign a rework, but helps to see that "install at any cost" is not the only path.
Light-and-shadow check of R-075 before painting
The relief of a wooden rosette is read through light. The color of the finish changes the contrast but does not cancel the geometry. Therefore, a sample is checked before the entire batch is painted or tinted.
Daylight shows soft volume
By the window, the shadow moves during the day. In the morning, one petal of the four-leaf clover may be brighter, in the evening—another. Look at the mockup during the hours when the space is used most often. For a living room, this may be evening; for an office, daytime; for a restaurant, artificial lighting after opening.
Do not judge only by the photo. The camera evens out exposure and can hide overly deep shadows.
Directional light emphasizes every millimeter of C
A spot light or hidden backlight enhances the relief. The 150 × 150 × 49 mm option looks significantly deeper with a side beam than with uniform diffused light. If the project involves backlighting of coffers, include it in the mock-up.
Shifting the light source by a few centimeters can change the shadow pattern. The positions of light fixtures and outlets are coordinated together, not as two independent schemes.
Painting in the background color does not make the outlet flat
A monochrome composition reduces color contrast, but chiaroscuro remains. White R-075 on a white panel still shows the depth of C, especially under side light. Therefore, painting 'in one color' does not fix an incorrect protrusion.
On the contrary, uniform painting sometimes makes the volume more architectural: the eye sees the form without distraction from the material. But the result must be verified on a sample.
Toning oak enhances internal transitions
Semi-transparent finish highlights the grain and recesses. In deep areas, the color may appear more saturated. Before finishing the entire batch, agree not only on the overall shade but also on the appearance of the relief under real lighting.
For a repeating group, the sample is labeled: wood species, sanding quality, finishing system, color number, and gloss level. Without such labeling, the statement 'as per sample' loses precision.
How to accept batch R-075 before handing it over to installers
Acceptance is not a formality. The five size variants look similar externally, and a mistake in the configuration may only be discovered after laying out. Checking must be done before distributing to rooms and certainly before applying the finishing coating.
Lay out the items by full dimensions
Do not group all R-075 into one pile. Create separate zones for 80 × 80 × 26, 100 × 100 × 33, 120 × 120 × 39, 130 × 130 × 42, and 150 × 150 × 49 mm if the order includes multiple versions.
On each package, mark:
Such labeling eliminates the situation where an installer picks a part of "approximately the same size."
Check the control dimensions
Compare the actual part with the approved order line and drawing. Measurement during acceptance should not turn into an independent change of tolerances: the task is to ensure that the selected version was delivered and there is no obvious substitution.
If a value raises questions, do not start processing or installation. Record the packaging, labeling, and measurement, then contact the manager.
Compare visible details with each other
Sockets of one group should be checked side by side before finishing. Evaluate the material, surface preparation, and integrity of the relief. Natural wood has natural variations, but the project may require distributing elements by the degree of texture visibility.
For symmetrical pairs, it is useful to select details side by side, then mark the left and right positions. This does not change the article number, but facilitates artistic layout.
Do not mistake damage for future sanding
A chip of a complex petal, a crack, or deformation of the base should not be hidden by the reasoning 'it will be painted anyway.' Finishing does not automatically restore geometry. Disputed details are separated from the batch before work begins.
Hand over not only the boxes to the installer
Along with the products, hand over:
If the installer received only a box labeled R-075, the project information is lost.
Project matrix for multiple rooms
A large object may include a coffered ceiling, wall panels, and furniture facades. Using one R-075 size everywhere is not necessary. But the variety must follow a clear system.
| Zone | Possible role of R-075 | What determines the size | What determines the depth |
| Large ceiling coffered panel | main center | ceiling height, field, distance | frame profile, backlight |
| small ceiling cell | repeating sign | grid step, free field | adjacent moldings |
| Wall panel | Frame center | panel width, furniture nearby | side view, passage |
| Pilaster | vertical accent | front face width | pilaster profile protrusion |
| Cabinet | facade center | door frame, handle, scale | opening, adjacent leaf |
| fireplace composition | stylistic node | common portal | design distances and base |
The matrix helps avoid mixing solutions. For example, a large 150-millimeter model can work on the ceiling, while an 80-millimeter one can be used on pilasters. In the specification, these groups get different lines, but common material and finish can tie the interior together.
One style does not mean one size
The collection connection is built through ornament. The scale changes with the surface architecture. Therefore, using multiple sizes is acceptable if the transition is explainable: larger fields — larger, narrow elements — more compact.
One size does not guarantee a unified perception
The same R-075 120 × 120 × 39 mm on the ceiling and on the cabinet will look different. Distance, light, and surrounding profile change the scale. Verification is carried out for each zone, even if the article number matches.
Common finishing ties together different scales
Beech under one opaque paint or oak under an agreed tint can unify sizes. But samples must account for vertical and horizontal positioning: light on the ceiling and wall reveals texture differently.
Final check before payment
| Checkable item | What should be in the order |
| Model | R-075 |
| Type | wooden decorative carved rosette |
| Shape and style | square gothic quatrefoil |
| Size | one of five full rows A × B × C |
| Material | Beech or oak |
| Sanding | "Standard" or "Prestige" |
| Quantity | for each dimension separately |
| Installation location | coffer, panel, facade, pilaster, and zone number |
| Section | approved protrusion relative to the molding |
| Finishing | according to the approved sample |
| Installation | materials and substrate confirmed |
| Delivery | batch composition and address verified |
If C is absent from the table, the order is not ready yet.
Frequently asked questions about the wooden decorative rosette R-075
What sizes are available for R-075?
The card shows 80 × 80 × 26, 100 × 100 × 33, 120 × 120 × 39, 130 × 130 × 42, and 150 × 150 × 49 mm.
What does parameter C mean?
C indicates the depth in the R-075 dimension table. The exact measurement direction should be checked against the official drawing.
Why can't you choose a socket by width alone?
Because matching the square footprint doesn't show the protrusion. Depth affects the shadow, side view, relationship with the molding, and adjacent details.
Should the R-075 be flush with the molding?
Not necessarily. It can protrude, approach the top point of the profile, or be partially recessed. The decision is fixed on the section before ordering.
What size fits a 120 × 120 mm coffer?
You cannot automatically assign R-075 120 × 120 mm. You need to check the free field, tolerances, 39 mm depth, and frame profile.
Can a large R-075 be installed on a furniture front?
This option can be considered only after checking the scale, front thickness, opening, handles, and adjacent doors.
How does beech differ from oak in this model?
Both wood species are available in the card. Beech is more often considered for opaque finishes, oak for finishes with visible texture, but the specific coating system is agreed upon separately.
What to choose: "Standard" or "Prestige"?
These are grinding quality options. The choice depends on the requirements for preparation and finishing; the value must be specified in the specification.
Can R-075 be trimmed on site?
You should not modify a complex carved element on your own without approval. Trimming may damage the ornament, symmetry, and base.
Is a 1:1 template needed?
Yes, the template helps check A × B, and the volumetric mock-up helps check depth C. For the ceiling, it is evaluated from a real distance below.
How to calculate the quantity for a coffered ceiling?
Count the number of approved fields and multiply by the number of rosettes in one field. List different sizes in separate lines.
Is a reserve needed?
A reserve is added only by project decision. First, the exact quantity, size lines, and the possibility of reordering are approved.
Can I order one R-075 for a trial?
The possibility and conditions for ordering a single item are clarified in the card or with the manager. For a large batch, a control sample is useful.
What glue is needed?
The specific composition depends on the base, wood, finish, and operating conditions. Choose it according to the instructions and the confirmed installation technology.
Can R-075 be glued to an already painted wall?
The possibility depends on the type of coating and its adhesion. The base is checked before installation; weak or incompatible finishes cannot be considered a reliable surface.
Can R-075 be used near a light fixture?
Only as part of a design solution. A decorative wooden rosette does not replace technical mounting and electrical fittings.
Is R-075 suitable for a fireplace?
The card indicates use in fireplace compositions, but distances to the heat source and the assembly design must be confirmed by the designer of the specific fireplace.
Where can I see other Gothic elements?
You can order carved decor from the "Gothic" collection and select adjacent parts by pattern and scale.
Where can I buy R-075?
The model is ordered in the official STAVROS product card after selecting the full size line, material, and sanding quality.
What to check in the cart before payment?
SKU, A × B × C, material, sanding, quantity, mounting materials, and delivery conditions. A size without C is considered incomplete.
First the cut, then the order
R-075 is easy to choose incorrectly precisely because its square shape seems obvious. If A and B match, it should fit. In practice, the composition is determined by the third value: as the model height increases, the depth grows from 26 to 49 mm. This difference changes the shadow, the strength of the accent, the position relative to the molding, and the possibility of installation on a facade or panel.
Before purchasing, take four steps: select the full A × B × C line, overlay the profile on the cut, approve the beech or oak along with the finish, and count each installation location. After that, you can buy wooden carved rosettes without guesswork and assemble one consistent batch.
STAVROS combines the R-075 card, the wooden rosette catalog, the Gothic collection, drawings, mounting materials, design, and delivery into a clear ordering route. One critical limitation remains: width and height do not replace depth. If C is verified on a real cut, the rosette becomes part of the architecture, not a random protrusion in the center of a finished coffered ceiling.