Article Contents:
- What are decorative polyurethane overlays: material, shape, logic
- Where PU overlays are used: five spatial scenarios
- On Furniture Facades
- On interior doors
- On wall panels
- In niches and portals
- On the Ceiling
- Which overlay shapes to choose: application guide
- Polyurethane overlays or wooden ones: an honest choice
- How to choose the overlay size: ten parameters
- Width and height of the facade
- Size of the free field
- Distance to moldings
- Relief thickness
- Central axis
- Need one overlay or a paired composition
- Will there be a molding frame
- Furniture or door style
- Painting
- Installation height and depth from the edge of the part
- How to combine overlays with moldings: the 'frame + center' system
- Installation of decorative polyurethane overlays: precise, clean, long-lasting
- Surface Preparation
- Marking
- Applying adhesive
- Clamping and fixation
- Drying and painting
- How to assemble a purchase kit: step by step
- Mistakes when choosing and installing PU overlays
- FAQ: everything you need to know
- STAVROS: relief that transforms space

Furniture speaks. Not with words — with form, relief, detail. A smooth painted cabinet front is one story. The same front with a central overlay, a frame of moldings and corner elements is a completely different story: a story about taste, about the character of the space, about the fact that in this interior they thought about the details.
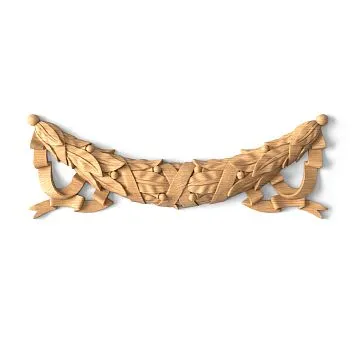
Decorative polyurethane overlays for furniture and doors — these are lightweight relief elements that are glued to the surfaces of facades, door panels, wall panels, niches and frames made of moldings. They add volume, ornament and classic character where there was previously just a flat surface. They do not require carpentry skills, special tools or lengthy surface preparation — only the correct choice of shape, size and location.
In the STAVROS catalog PU overlays are presented in a wide range of shapes: square, round, rectangular, corner, symmetrical, central, vertical, horizontal, S-shaped, C-shaped, asymmetrical, crown-shaped and diamond-shaped. These are not just "overlays" — they are a vocabulary of forms from which interior statements are built.


What are decorative polyurethane overlays: material, form, logic
Polyurethane overlays are not plaster or wood. They are an independent material with their own logic. Cast polyurethane of interior formulation — dense, lightweight, elastic, without pores on the surface — reproduces the smallest details of the relief: acanthus curls, leaves, volutes, geometric ornaments, rosettes, cartouches — with the precision of a tooled form.
Technical specifications:
-
Density: 350–400 kg/m³ (interior formulation)
-
Surface: white matte, factory-primed
-
Weight: 0.3–0.8 kg for most overlays (depending on size)
-
Relief thickness: 10–60 mm
-
Ready for painting: without additional preparation
-
Installation: special polyurethane adhesive + if necessary, a finishing screw through the back in a hidden area
The main difference between a polyurethane overlay and carved wood or cast plaster is the combination of three qualities at once: precision of relief + lightness + readiness for painting in any color. Plaster is fragile and heavy. Wood requires tinting or staining. Polyurethane is paintable, easily glued, and does not deform under a layer of paint.
Shapes of polyurethane overlays STAVROS covers all the main configurations used in classic and modern interior decor — from a strict square to a complex asymmetrical cartouche.


Where PU overlays are used: five spatial scenarios
Our factory also produces:


On furniture facades
This is the most common application scenario. Sliding wardrobes, clothes closets, chests of drawers, sideboards, display cabinets, TV stands, kitchen sets — all of them get a new look with one or two overlays in the right places.
The logic of choice for furniture: the cabinet facade is a rectangular field. It has a center, corners, vertical and horizontal axes. The overlay is placed according to one of these points. Central — along the axis of symmetry. Corner — in the four corners. Vertical — along the central vertical. Horizontal — in the upper third of the facade as a "crown".
Popular solutions for furniture:
-
One central overlay + frame of of polyurethane moldings
-
Four corner elements + central ornament
-
Vertical overlay across the entire height of the facade as a decorative "axis"
-
Horizontal "crown" overlay on the upper part of a two-door cabinet
Polyurethane decorative appliques For furniture, they are mounted on MDF, painted chipboard, plywood, laminate — practically any smooth surface that is degreased and clean.
Get Consultation
On interior doors
A door is the largest vertical "screen" in an interior. An interior door 2000–2200 mm high and 700–900 mm wide is a huge field for decor. Yet most doors remain either completely smooth or with simple milled panels.
PU overlays allow adding:
-
Central ornamental motif in the middle part of the panel
-
Corner decor in the upper or lower corners
-
Horizontal "crown" overlay in the upper third of the door
-
Symmetrical pair of vertical overlays on both sides of the central axis
-
Relief element above the lock or at handle level
For doors, the relief thickness is especially important: no more than 15–25 mm, so the overlay does not conflict with the casing when opening. On hinged doors, check for free clearance from the jamb.
Versailles collection overlays — a classic choice for doors in neoclassical and Empire style: acanthus leaves, cartouches, medallions with ornament.
Modern collection overlays — for doors in a modern interior: clean forms, geometric ornament, minimalist relief.
On wall panels
Wall panels are one of the main trends in modern classical and neoclassical interiors. Frames made of moldings on the wall create structure, and overlays inside these frames provide content: central ornament, corner elements, decorative medallion.
Common scheme: Molding forms a rectangular frame on the wall + a central overlay inside. This is a "canvasless painting": the frame is there, the content is a relief ornament.
For high walls (from 3 m) — vertically elongated frames with a long vertical overlay. For wide piers — horizontal panels with rectangular or round central elements.
Polyurethane wall decor STAVROS is a separate direction that includes both moldings for frames and accent overlays for panel centers.
In niches and portals
A decorative niche in the wall, a door portal, an arched opening, a mirror frame — in each of these places there is a "central field" that begs for ornament. An overlay in the center of a niche or at the top of a portal frame is the final accent that makes the niche a complete composition.
Decor for Molding STAVROS includes elements that are specifically designed for intersections of moldings, joints of frames, corner areas — that is, precisely for complex interior compositions with niches and portals.
On the ceiling
A ceiling overlay is not the same as a ceiling rosette. It is an additional ornamental element in a composite ceiling composition: between moldings, in the corners of a ceiling frame, in the center of a coffered ceiling. Where a rosette provides a "round center," an overlay can provide a square, diamond-shaped, or rectangular accent — depending on the shape of the coffered ceiling.
Which overlay shapes to choose: a guide to application
| Shape | Typical application | Visual effect |
|---|---|---|
| Central | Center of facade, door, frame | Ornamental focus |
| Corner | Corners of frames, panels, doors | Frame completion |
| Vertical | Narrow facades, doors, piers | Pulls the proportion |
| Horizontal | Top of the facade, wide panel, portal | Makes an accent on top |
| Square | Strict symmetrical compositions | Geometric rhythm |
| Round | Soft central accent | Classic neutrality |
| Rectangular | Universal facades, doors, niches | Proportional center |
| S-shaped | Paired decorative lines | Dynamics, movement |
| C-shaped | Corner framing, side accents | Asymmetric elegance |
| Asymmetric | Modern accent solutions | Surprise, liveliness |
| Crown | Upper part of the facade, "crown" | Completion of a tall facade |
| Rhombus | Geometric interiors, piers | Strict decorative rhythm |
Square and rectangular overlays are universal. They work in most styles, from strict neoclassicism to modern classicism. They are preferred by those who do not want to risk with "excessive" ornament.
Round and symmetrical ones are for a soft accent. They do not compete with the rest of the decor, but complement it.
S-shaped and C-shaped ones are for paired solutions. An S-shaped overlay is placed mirrored — resulting in a pair forming a single ornamental belt. A C-shaped one is used as a corner element or as an asymmetrical accent in the area of the handle or lock.
Rectangular polyurethane overlays STAVROS is one of the most sought-after types: universal size, clean profile, organic in any interior from classic to modern style.
Polyurethane overlays or wooden ones: an honest choice
The question "which is better — polyurethane or wood" is actually solved simply: for what tasks? For decor under painting, for a modern interior, and for quick furniture updating — polyurethane wins. For restoring antique wooden furniture or for an interior with an open natural texture — wood.
| Task | Optimal choice |
|---|---|
| Decor for painting in wall color | Polyurethane |
| Painting in white or enamel | Polyurethane |
| Quick installation without carpentry work | Polyurethane |
| Light decorative wall panels | Polyurethane |
| Furniture facade renewal without repainting | Polyurethane (primer + paint) |
| Open natural wood texture | Wood |
| Restoration of antique or solid wood furniture | Wood |
| Classic beech or oak furniture under varnish | Wood |
| Paired decor with precise relief symmetry | Polyurethane (cast form = perfect repeatability) |
There is another argument in favor of polyurethane that is rarely mentioned: repeatability. A carved wooden overlay is a one-of-a-kind product. Two copies of the "same" ornament from different craftsmen or batches always differ slightly. Polyurethane overlays from the same mold are identical. This is critically important for symmetrical paired solutions.
How to choose the overlay size: ten parameters
Width and height of the facade
The main guideline. The overlay should not occupy more than 30–40% of the facade width — otherwise it will "overload" the field. For a facade 400 mm wide — overlay no wider than 120–160 mm. For a facade 600 mm wide — 160–240 mm.
Height: similarly — 20–30% of the field height. For a door 2000 mm high — overlay height 400–600 mm maximum (if it is a vertical overlay). For a central ornament — 150–300 mm.
Free field size
If the facade already has a frame of moldings, the overlay is placed inside this frame. The free field inside the frame = the real guideline. The overlay occupies 25–40% of this field.
Distance to moldings
The gap between the edge of the overlay and the inner edge of the molding — at least 40–60 mm. Otherwise, the overlay "bumps" into the frame and the space becomes compressed.
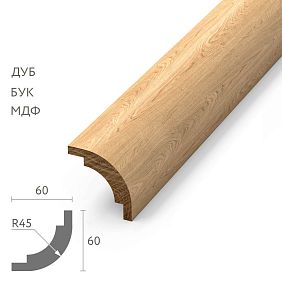
Relief thickness
For doors — no more than 20–25 mm. For furniture facades — 15–40 mm. For wall panels — 20–60 mm. The thicker the relief, the more expressive the shadow — but also more noticeable in volume. For delicate decor — flat relief 10–20 mm. For rich classic — 30–50 mm.
Central axis
The overlay is always placed along the symmetry axis of the facade or along the frame axis. A shift of the axis even by 5 mm is noticeable. Marking the center with a tape measure and a soft pencil is a mandatory step before installation.
Need one overlay or a paired composition
For single-door facades — typically one central element. For double-door facades — a pair of symmetrical (identical or mirrored). S-shaped and C-shaped overlays are always used in pairs: mirror reflection creates a complete ornamental motif.
Will there be a frame of moldings
An overlay without a frame is possible but requires greater "self-sufficiency" of the ornament. An overlay inside a frame is a more strict and complete solution. If a frame is planned, it should be selected and planned simultaneously with the overlay — not after.
Style of furniture or door
Classic and neoclassical: acanthus leaves, cartouches, medallions, volutes, symmetrical floral motifs. Versailles Collection — for this style.
Modern classicism: geometric ornament, strict rectangular shapes, minimalist relief. Modern Collection — the ideal choice.
Eclecticism and Art Deco: asymmetrical elements, diamonds, crowns, S-shaped overlays.
Painting
White overlay on a white facade — only relief, only play of light and shadow. White overlay on a colored facade — a contrasting accent. Overlay in the color of the wall — integrated decor. Gilded overlay — a baroque accent.
Consider painting before installation: sometimes it is more convenient to paint the overlay separately and then install it. Especially with a contrasting two-color solution.
Height and depth of installation from the edge of the part
For doors: the central overlay is installed at a height of 900–1100 mm from the floor — at eye level of a standing person. This is the "working zone" of perception. The decor in the upper part of the door (crown) — at a distance of 150–200 mm from the top edge of the panel.
How to combine overlays with moldings: the "frame + center" system
Molding and overlay are not competitors. They are partners, each with its own role. Molding sets the structure: horizontal and vertical lines, frames, field divisions. The overlay gives content to this structure: ornament, focal point, volume in the center.
Complete interior scheme "frame + center":
-
Moldings made of polyurethane form a rectangular frame
-
In the corners of the frame — Decor for Molding (corner rosettes, lockups)
-
In the center of the frame — central overlay of the PU
-
Along the perimeter of the wall above the frame — cornice or molding fillet
These are four levels of detail in one interior field. Each adds depth without overwhelming the space.
Proportions for matching molding and overlay:
-
Molding width 40–60 mm → overlay 100–200 mm
-
Molding width 60–90 mm → overlay 150–300 mm
-
Molding width over 90 mm → overlay 250–400 mm
Too thin molding with a large overlay — disproportion. Large molding with a small overlay — hierarchy violation (frame more important than content).
molded decoration made of polyurethane STAVROS is a complete interior system: moldings, overlays, corner elements, molding decor, ceiling plinths, cornices — all in unified proportions and style series.
Installation of polyurethane decorative overlays: precisely, cleanly, durably
Surface preparation
The surface must be dry, clean, and degreased. For painted furniture facades — sanding with P180 sandpaper in the installation area (30 × 30 mm around the contact point). For unpainted MDF — priming with a penetrating primer.
Do not glue onto silicone coating, oily varnish, polished surfaces without sanding — the adhesive will not bond.
Marking
This is the most important step — and the most frequently skipped. Marking first on paper (scale sketch of layout on the sheet), then transfer to the facade with a pencil.
Mandatory control points:
-
Vertical axis of symmetry of the facade
-
Horizontal axis (for central overlays)
-
Distance from edges and moldings
-
For paired overlays — symmetrical distance from the axis
Tip: cut out the overlay silhouette from paper or cardboard and temporarily attach it to the facade with painter's tape. Look from a distance. Adjust the position before applying glue.
Applying adhesive
Special glue for polyurethane decorative elements — acrylic or solvent-based (check compatibility with the painted surface). Application: along the contour of the back surface of the overlay + several dots in the center.
For small overlays (up to 150 × 150 mm) — glue only along the contour. For large ones — additional zigzag in the center.
Pressing and fixation
After applying glue and placing the overlay — press for 30–60 seconds with moderate pressure. Secure with painter's tape for the glue curing period (20–40 minutes, depending on the glue brand).
For large or heavy overlays: a thin self-drilling screw through the back in a hidden lower area — as a safety point. Putty the head.
Drying and painting
Full glue curing period — 24 hours. Do not start painting before that. Fill gaps (if any) with acrylic compound, sand after drying.
Painting: one coat of water-based primer, two coats of finish paint. Brush — for relief areas, thin artist brush — for small ornament details. Ensure paint penetrates all relief recesses — that's where the shadow forms, making the decor lively.
How to assemble a purchase kit: step by step
Step 1. Determine the location: furniture, door, wall, niche, ceiling.
Step 2. Measure the free field — the width and height of the area where the overlay will fit.
Step 3. Choose the type of overlay — central, corner, vertical, horizontal, paired.
Step 4. Select the molding — if a frame around the field is needed. Molding and overlay from the same series guarantee stylistic unity.
Step 5. Check the relief thickness — especially for doors, where the relief should not interfere with the casing.
Step 6. Decide on painting — before or after installation? One color with the facade or contrast?
Step 7. Select corner elements — for molding frames, be sure to choose Decor for Molding.
Step 8. Do a "dry" layout — paper templates on the facade before installation.
Step 9. Check symmetry — for paired and corner solutions.
Step 10. Order the kit — overlays, moldings, corner elements, glue — in one batch, one STAVROS series.
Mistakes when choosing and installing PU overlays
They buy without measuring the facade. "I'll take the average" — and the average turns out either too small or too large. Measuring is always the first step.
Too large a relief for a small door. An overlay with a 50 mm relief on a kitchen cabinet door 300 mm wide is overload. For small facades — a thin flat relief of 10–20 mm.
A small overlay on a large wall panel. An 80 × 80 mm overlay in the center of a 600 × 900 mm field gets lost. It needs to be larger — or abandon the central overlay in favor of a frame.
They don't account for the relief thickness for doors. An overlay with a 40 mm relief on a door opening into a narrow opening interferes with the casing.
No central axis. The overlay is shifted 8 mm from the center of the facade "by eye." On fresh paint, this is immediately visible.
They buy one overlay instead of a pair. A two-door cabinet with an overlay on only one door — asymmetry that reads as a mistake.
They mix ornaments of different styles. A Baroque medallion with geometric moldings in Art Deco style — a stylistic conflict.
They don't think about painting before installation. Some overlays are more convenient to paint before installation — especially with a contrasting two-color solution.
They glue without a "dry" layout. Trying a paper template once saves hours of corrections.
They take overlays separately from moldings. Moldings and overlays from different series do not match in proportions and relief — the style falls apart.
FAQ: everything you need to know
What are decorative polyurethane overlays?
These are lightweight, relief ornamental elements made of cast polyurethane for decorating furniture, doors, wall panels, molding frames, and niches. They add volume, pattern, and a classic or modern character where there was previously a flat surface.
Where are PU overlays used?
On furniture facades (cabinets, dressers, sideboards, kitchens), on interior doors, on wall panels, in niches and arched portals, on the ceiling as part of coffered compositions.
Are polyurethane overlays suitable for furniture?
Yes — provided the surface is prepared: degreased, and if necessary, matted. They are glued to MDF, painted chipboard, plywood, laminate.
Can PU overlays be glued to doors?
Yes. Important: the relief thickness should be no more than 20–25 mm for swing doors so that the overlay does not interfere with the casing. Use mounting adhesive + a hidden screw if necessary.
How to choose the size of a decorative overlay?
The overlay occupies 25–40% of the width of the free field or facade. For a 400 mm facade, the overlay is 100–160 mm. The gap from edges and moldings should be at least 40–60 mm.
Which is better: a central or corner overlay?
It depends on the task. A central overlay creates one accent in the middle of the field. Corner overlays create four accents at the corners of the frame. Corner overlays only work with a molding frame; a central overlay works alone or inside a frame.
Can polyurethane overlays be painted?
Yes, definitely. The factory-primed surface is ready for painting without preparation. Use acrylic interior paint in any color. For relief areas, use a brush; for recesses, use a thin brush.
How to combine overlays with moldings?
The molding is the frame, the overlay is the center. The width of the overlay should be 2–4 times the width of the molding. Both elements should be from the same STAVROS series.
How do polyurethane overlays differ from wooden ones?
Identical repeatability of the relief (cast form), lightness, readiness for painting in any color, easy installation without carpentry work. Wooden overlays are suitable where a natural texture is needed.
Where to buy decorative polyurethane overlays?
In the Stavros catalog — PU overlays all shapes, sizes and collections. Delivery across Russia.
STAVROS: relief that transforms space
A good interior is not about the amount of furniture. It's about the quality of details. And a decorative overlay on a cabinet door or wall panel is exactly that kind of detail. Small, light, inconspicuous on its own — and decisive in the overall picture of the space.
STAVROS manufactures Polyurethane decorative appliques in several collections and dozens of shapes — from strict rectangles to complex ornamental cartouches. Each overlay is coordinated in scale and style with moldings, decor for moldings и wall decor a unified system — so that you choose not an element, but a solution.
STAVROS — stucco decor that lives in the details.