


Article Contents:
- When furniture decoration is better than buying new
- An honest talk about practicality
- Which wooden elements are used for furniture decor
- Decorator's arsenal
- Decorating a wardrobe with wooden overlays
- Wardrobe — the main candidate for renewal
- What is decorated on the wardrobe
- Example: transforming a white wardrobe into a classic style
- Decorating a chest of drawers and a bedside table with wooden elements
- Chest of drawers: a small item with big possibilities
- Three levels of chest of drawers decor
- Bedside tables: nightstand, TV, shoe
- Moldings and layouts for furniture facades
- The most affordable transformation tool
- How to create a classic "panel" with molding
- Flat layout: horizontal lines and zoning
- Wooden baguette for display inserts
- Handles and legs as part of the decor
- No detail is too small
- Wooden handles: typology and application
- How to choose handles to match the style
- Wooden legs: height, shape, style
- Decorative bracket: structure and decor in one
- How to choose a style: classic, neoclassical, Provence, modern classic
- Style navigation for beginners
- Classic and neoclassic
- Provence
- Modern classicism
- Scandinavian Style
- Table: style and decorative elements
- Furniture decor for painting
- When one color is the best solution
- Single-tone painting technology
- What matters when choosing parts "for painting"
- How to create an ensemble from different furniture pieces
- Unity through decor
- Connection with the interior
- Practical guide: decorating plan
- Where to start — step by step
- Common mistakes when decorating furniture
- Mistake 1: Too Many Elements
- Mistake 2: Scale mismatch
- Mistake 3: Different styles of overlays and handles
- Mistake 4: Asymmetry
- Mistake 5: Heavy decor on a small item
- Error 6: Purchase without a scheme
- Error 7: Ignoring surface condition
- Error 8: Different wood species in one system
- FAQ: Popular questions about decorating furniture with wood
- Where to buy wooden decor for furniture
- STAVROS: Wooden decor for furniture — a complete system for renewal

Furniture doesn't always need to be replaced. Sometimes it's enough to add the right details — and an item that stood in the room as an unnoticed background suddenly gains character, style, individuality. This is not magic or an expensive renovation. This is decorating furniture with wooden overlays — one of the smartest and most economical ways to transform an interior.
decor for furniture made from natural wood — this is not a compromise or a temporary solution. This is a full-fledged design tool used by master woodworkers since furniture production began. Carved overlays, profile moldings, wooden handles, turned legs, brackets — all of this turns simple cabinet furniture into an item with history and character.
This article is a practical guide. For those who look at an old cabinet and think: "throw it away or keep it?" Keep it. Add details. The result will surprise you.


When decorating furniture is better than buying new


An honest talk about practicality
New furniture means a huge budget, delivery, assembly, getting used to a new item in a familiar space. And it doesn't always end up being what you wanted. Decorating furniture with wooden elements is an alternative that is undeservedly underestimated.
When replacement is not needed, but Furniture Decoration — the right choice:
The furniture is sturdy but visually outdated. Cabinet furniture from Soviet and Russian production of the 1990s–2010s was often made from quality chipboard or MDF with durable hardware. Mechanically, it is flawless. Visually, it is outdated. A few overlays, new handles, wooden legs — and it's already a different item.
The facades are boring and faceless. Smooth flat facades without relief are the simplest candidates for decorating. Molding around the perimeter of the doors, a carved overlay in the center, decorative trim — three operations that turn a "box" into furniture with a classic character.
You want a specific style. You bought an apartment, renovated it in a classic spirit — but the furniture remained from a previous life. Not neutral, but not classic. Wooden overlays in a classic style, white paint, new legs and handles — full visual compliance with the style without buying new furniture.
You need to combine different furniture into a single system. A cabinet from one set, a dresser from another, a nightstand from a third. A single set of decorative elements, a single paint tone — and three items from different "families" become a coordinated ensemble.
Children's furniture grows with the child. A white wardrobe in the nursery looked cute for a baby, but now a more mature aesthetic is needed. Add moldings, change the handles, paint it in a neutral tone — the furniture has "grown up" along with the child.
Our factory also produces:


What wooden elements are used for furniture decor
Get Consultation
Decorator's arsenal
Before moving on to specific pieces of furniture, it is important to understand the entire set of tools that one works with Furniture Decoration wood. Each element solves its own task.
Decorative overlays. Flat or three-dimensional elements that are glued to the surface of the facade. They create relief, a visual accent, a decorative center of the composition. They can be geometric (rectangular, square, diamond-shaped) or organic (leaves, floral rosettes, volutes, cartouches).
Moldings. Profiled long-length elements that create frames, lines, borders. They are glued along the perimeter of doors, drawers, side panels. A thin molding creates a "panel" — a classic frame on the facade.
Trims. Flat or beveled strips that create decorative lines and horizontal transitions. For dividing the facade into zones, for imitating frame structures.
Wooden baguette. A profiled element for framing — display cases, mirror inserts, decorative panels on facades.
Handles. Wooden furniture handles are one of the most effective tools for changing style. New handles completely change the perception of the item — it's quick and inexpensive.
Ножки. Деревянные мебельные ножки поднимают предмет над полом, добавляют лёгкость или монументальность в зависимости от профиля. Точёные конусные — для классики и прованса. Квадратные прямые — для современной классики и скандинавского стиля.
Brackets. Decorative brackets reinforce structural joints — corners of shelves, transitions between horizontals and verticals. They simultaneously bear load and add a decorative motif.
Carved decor. Carved rosettes, corner elements, decorative friezes — for classic, neoclassical, and baroque styles. Maximally expressive and rich decor.
All decorative elements for furniture made of solid wood — beech, pine, oak — in the STAVROS catalog.
Decorating a cabinet with wooden overlays
A cabinet is the main candidate for an update
A cabinet is the largest item in most rooms. It sets the tone for the visual space. If the cabinet is unexpressive — the room is unexpressive.
Furniture Decoration they start with the cabinet, because the result here is most noticeable.
What is decorated on the cabinet
Door facades. The main field for decor. Several scenarios:
Molding frame. Glued along the perimeter of the door Molding — thin or wide, depending on the style. This creates a "panel" — a classic frame pattern for the facade. One door can have one frame or two (upper and lower sections). For a sliding wardrobe — a horizontal layout at 1/3 or 2/3 of the panel height.
Central overlay. In the center of the door — a decorative overlay: a carved rosette, a rectangular ornamental element, corner "wings". The facade gains a focal point around which the entire composition is built.
Corner overlays. Four corner elements along the perimeter of the door — a lighter version of frame decor. Corner overlays create the illusion of a full frame without requiring molding along the entire perimeter.
Side panels of the cabinet. Visible side edges — often completely bare. One vertical layout or molding in the center of the side panel changes its perception. The side ceases to be a "backdrop" — it becomes part of the decorative system.
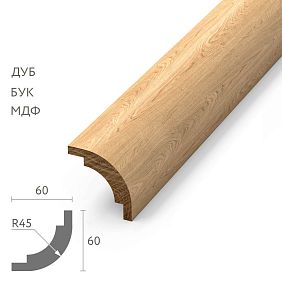
Top cornice. A cabinet without a cornice looks "cut off" at the top. A wooden cornice profile along the top edge of the cabinet completes the silhouette. For this task, use Wooden trim — a cornice strip that extends 20–30 mm beyond the cabinet body and creates a shadow underneath.
Bottom line. The bottom cornice or base profile — a symmetrical counterpart to the top. Creates a "pedestal" on which the cabinet "stands".
Handles. New wooden handles — the final touch. furniture handle made of solid wood: bracket, knob, rail — selected to match the style and profile of the overlays.
Example: transforming a white wardrobe into a classic style
Original: white sliding wardrobe with smooth matte fronts.
What is being done:
-
Around the perimeter of each door — beech molding, 20 mm. Two frames: upper (1/3 height) and lower (2/3 height).
-
In the center of the upper frame — a small carved overlay.
-
Along the top edge of the wardrobe — a cornice strip 60 mm made of beech.
-
Handles: wooden beech knobs with white coating.
-
Everything is painted with white enamel in a single tone.
Result: the same wardrobe — but now with a pronounced classic character.
Decorating a chest of drawers and a nightstand with wooden elements
Chest of drawers: a small item with big possibilities
A chest of drawers is a compact item that is easiest to decorate yourself. The area of each drawer is small, the overlays are simple, and the handles are the main accent.
Three levels of chest of drawers decor
Minimum level: only handles.
The simplest update. Wooden legs + new handles — two actions that completely change the impression. Turned wooden legs 100–150 mm high are installed on a chest of drawers with low plastic legs — the item "rises" and becomes light. Old handles are replaced with wooden brackets or solid wood knobs.
Result: the same body — a different silhouette, a different feel.
Medium level: handles + drawer overlays.
A molding frame or a central decorative overlay is added to the front of each drawer. It is important to maintain symmetry: all drawers are decorated identically. The exception is that the bottom drawer may have a wider frame if its height is greater.
Full level: handles + overlays + top part.
Trims are added to the side ends, a small cornice profile along the top edge of the chest, and wooden furniture legs on the legs. Complete transformation.
Cabinets: bedside, TV, shoe
Bedside table. A small item that is always in sight. Decorative overlay on the drawer front + wooden knob handle + wooden legs. For a classic bedroom — an overlay with a soft floral motif.
TV cabinet. A horizontal item with a large front area. Molding frames around the perimeter of the doors create a rhythm of horizontal sections. Wooden pull handles made of solid wood — matching or contrasting with the finish.
Shoe cabinet in the hallway. Often the most 'forgotten' piece of furniture. Decorative trim along the top line, overlays on the doors, wooden legs — and the hallway gains completeness.
Moldings and trims for furniture fronts
The most affordable tool for transformation
Wooden moldings — these are profile strips that are glued to the surface of the front and create a relief decorative pattern. Neither veneer, nor paint, nor new cladding gives the effect of depth and 'handcraftedness' like real wooden profile.
How to create a classic 'panel' with molding
A panel is a frame pattern on the front. A classic of furniture production. It is what distinguishes 'just a door' from 'a furniture front with architectural character'.
Step 1. Determine the number of sections. A narrow dresser drawer is one frame. A tall cabinet door is two or three vertical sections.
Step 2. Mark the position of the molding. Indent from the edge of the facade is 15–30 mm depending on the width of the molding and the size of the door.
Step 3. Cut the molding at 45° — corner joints for a rectangular frame. Check dry assembly before applying glue.
Step 4. Glue the molding with woodworking PVA glue. Press with painter's tape or clamps until dry (4–6 hours).
Step 5. Paint in a single tone with the facade or in a contrasting color.
Flat layout: horizontal lines and zoning
Flat wooden strip creates horizontal decorative lines on the facade. For a tall cabinet, the layout at 1/3 of the height divides the facade into two visual parts. For kitchen facades, a horizontal layout at the countertop level connects the facades of lower and upper cabinets.
wooden floor 20–40 mm wide is glued horizontally to the surface of the facade. Tone — matching the facade or slightly darker for expressive contrast.
Wooden baguette for display inserts
If the cabinet or sideboard facade has a glass insert — a display case — a mandatory element around the glass is Wooden Picture Frame as a frame. Without it, the glass "hangs" loosely in the body. With a baguette, the insert is framed, finished, and looks expensive.
The profile for a furniture display baguette is narrow, with a soft rounded edge or a thin straight profile. Not wide — otherwise it will cover part of the glass.
Handles and legs as part of the decor
No detail is too small
There is a common misconception: handles and legs are "hardware," secondary details. Practice immediately disproves this. Just change the handles on furniture — and the item changes. Add wooden legs to a low dresser — and it stops "lying" on the floor, it starts "standing."
furniture elements — this is not only the body and facade. It's everything that defines the appearance of the item. And handles with legs are among the most influential "small" details.
Wooden handles: typology and application
Knob handle. A small three-dimensional element, attached with one screw in the center. For small doors, drawers, cabinets. wooden button handle — the most versatile and "quiet" option: does not overload the decor, suitable everywhere.
Bracket handle. A horizontal or vertical bracket, attached with two screws. For dresser drawers, kitchen cabinet fronts, cabinet doors. wooden hook handle With coating — for those who want a tinted or painted handle. Without coating — for self-finishing.
Carved handle. Figurative handle with decorative relief. For classic furniture, sideboards, display cabinets, library bookcases.
How to choose handles to match the style
| Furniture style | Handle type |
|---|---|
| Minimalism | Knob or pull without decoration |
| Scandinavian | Knob made of light wood, simple shape |
| Classic, neoclassic | Carved knob or decorative pull |
| Provence | Knob with a soft rounded shape |
| Modern Classic | Pull with straight lines, moderate profile |
Wooden legs: height, shape, style
Wooden legs completely change the silhouette of the piece. A heavy rectangular chest of drawers, standing "Soviet-style" flush to the floor, with wooden turned legs 100 mm high turns into a light elegant piece.
Turned tapered legs. Mid-20th century classic — "Danish" style. Moderate height (80–120 mm), tapering downwards. For sofas, armchairs, cabinets, small cupboards.
Straight square legs. For modern classic and neoclassical styles. Strict, without extra ornamentation. Height 100–150 mm.
Ornate turned legs. Classic option — "Empire" or "Baroque" leg with figured transitions. For sideboards, chests of drawers, dressing tables in classic style.
Buy furniture legs — all options in the catalog: Buy furniture legs for a 200-room hotel project — this is not an ordinary deal, but a partnership requiring a special approach..
Decorative bracket: structure and decor in one
Decorative Bracket made of wood — a supporting element with a decorative shape. Installed in corner areas: under shelves, under consoles, under hanging cabinets. The bracket bears the load and simultaneously adds a decorative motif — figured profile, carved element.
In a classic interior, a decorative bracket under a bookshelf is not just a fastener. It is an architectural detail.
How to choose a style: classic, neoclassical, Provence, modern classic
Style navigation for those just starting out
I want to update my furniture with wooden decor — where to start? With the answer to the question: what style do I want to achieve? Everything depends on the answer: the type of overlays, the shape of handles, the height of legs, the profile of molding.
Classicism and neoclassicism
Rich expressive decor. Carved overlays with floral motifs, complex moldings with multiple profile elements, shaped brackets, turned legs with intricate transitions, carved handles.
Color: white enamel (the most classic option), dark walnut, light cream with gold details.
Wooden decoration for classic style — voluminous overlays, carved corner elements, decorative cartouches, leaf ornaments.
Provence
Soft, romantic decor. Simple moldings with rounded profiles, small rosette overlays, knob handles with soft shapes, tapered or curved legs. Color: white, milky, mint, gray-lilac.
The main thing in Provence style is that overlays should not be too complex. A simple frame of molding and a wooden handle in matching tone is enough.
Modern classic
Strictness + decor. Straight lines of moldings, geometric overlays, handle brackets without extra embellishments, straight square legs. Colors: white, gray, dark gray, natural wood.
Key principle: less decor, but it is clear and precise. One type of molding, one type of handle, one type of leg.
Scandinavian style
Minimal decor. Simple thin trims, button handles made of light wood without coating, turned tapered legs made of light beech. Colors: white, light gray, natural light beech or ash.
Scandinavian approach: less is better. Every element must be justified functionally or minimalistically.
Table: style and decorative elements
| Style | Overlays | Moldings | Handles | Legs |
|---|---|---|---|---|
| Classic / neoclassical | Carved, voluminous | Complex profile | Carved, shaped | Turned, complex |
| Provence | Small, soft | Rounded profile | Rounded buttons | Tapered or S-shaped |
| Modern Classic | Geometric | Straight, strict | Bracket without decoration | Square straight |
| Scandinavian | Minimal or none | Thin layouts | Buttons, light wood | Tapered, thin |
Furniture decor for painting
When one color is the best solution
decorating furniture with wooden overlays followed by painting in a single color — the most "designer" of all approaches. Why?
Because when all elements are painted in one tone, the boundary between the "native" facade and the "added" details disappears. Overlays cease to be visible glued strips — they become part of the form. This is exactly how furniture made entirely with decorative elements looks.
Technology of painting in a single tone
Step 1. Surface preparation. The old coating is sanded: grit 120, then 180. The surface is degreased. Overlays and moldings are glued.
Step 2. Puttying joints. All joints between overlays and the facade are puttied with a thin layer of acrylic putty. After drying — sanding (220).
Step 3. Primer. 1–2 coats of primer over the entire surface. Complete drying. Light sanding (280) before painting.
Step 4. Painting. Water-soluble enamel — 2–3 coats with drying. Even tone without streaks. For a glossy finish — final sanding and polishing.
What is important when choosing parts "for painting"
Overlays and moldings that will be painted can be made of pine or beech — the wood species is not critical for painting. The main thing is that the surface is well sanded, without chips and open fibers.
decor for furniture uncoated — ready for painting. Handles are also selected uncoated or with the possibility of repainting.
How to create an ensemble from different pieces of furniture
Unity through decor
The most common design challenge is when a room has several pieces of furniture from different 'stories'. Bought at different times, from different manufacturers. All functional, but they don't look good together.
The solution is a unified system of decorative elements:
-
A single type of molding for all facades.
-
A single type of handle for all furniture in the room.
-
A single type of legs.
-
A single paint color.
These don't have to be identical details — it's important that they are from the same style family. Molding with a soft rounded profile on the wardrobe + knob handles with a similar soft shape on the dresser + tapered legs on the nightstand. All made of beech, all in white enamel. Different items — one system.
Details on the principles of creating a furniture ensemble — in the article about furniture elements.
Connection with interior
Furniture and Decor should be coordinated not only with each other, but also with the interior as a whole. If the room has wooden baseboards, cornices, and wall moldings — the furniture decor should be in the same wood species and the same tone.
Example: walls with beech moldings, tinted "natural." A cabinet with beech moldings — the same tinting. Handles — beech buttons without coating. Legs — made of beech. The room reads as a cohesive space where furniture and walls "speak" the same material language.
Practical guide: decorating plan
Where to start — step by step
Many stop at the idea stage: I want to update the furniture, but I don't know where to start. Here is a concrete plan.
Stage 1: Inventory. Examine all furniture items you plan to decorate. Write down: what it is, the size of the facades, whether there are handles/legs currently, the condition of the surface.
Stage 2: Style definition. Choose one style — and stick to it for all furniture in the space. Mixing styles is only acceptable for professionals.
Stage 3: Creating a diagram. Draw a diagram of each facade — where the overlays will be, where the moldings, where the handles. It is advisable to draw the diagram to scale. This allows you to check proportions before purchasing.
Stage 4: Selecting elements. Based on the diagram, calculate the required quantity and length of molding, the number of overlays, handles, and legs. Choose all elements from one catalog — for material and tone consistency.
Stage 5: Purchase with a margin. Molding — with a 15% margin for corner cuts and errors. Overlays and handles — in exact quantity + 1–2 spares.
Stage 6: Trial assembly. Before gluing — assemble everything dry, without glue. Ensure proportions are correct and symmetry is maintained.
Stage 7: Installation and finishing. Glue, putty the joints, prime, paint.
Common mistakes when decorating furniture
Mistake 1: Too many elements
Carved overlays + corner elements + central cartouche + complex molding — on one door this is overload. Each element competes with others. Rule: one main decorative motif per facade.
Error 2: Scale Mismatch
A large carved overlay 150×200 mm on a dresser drawer 100 mm high — the overlay is larger than the drawer. The scale of the decor should be proportional to the surface.
Mistake 3: Different styles of overlays and handles
Classic carved overlays + modern straight-line brackets — a stylistic contradiction. All details — from one stylistic language.
Mistake 4: Asymmetry
A molding frame with uneven margins from the edges is the most noticeable mistake. Symmetry is checked with a tape measure before applying glue.
Mistake 5: Heavy decor on a small object
Voluminous turned legs 200 mm high under a small cube-shaped nightstand — the legs are larger than the object itself. The proportion is broken.
Mistake 6: Buying without a plan
"I'll buy beautiful overlays, and then decide where to glue them" — a classic mistake. As a result, the overlays don't fit in size, don't match each other, there aren't enough, or there are too many.
Mistake 7: Ignoring the surface condition
Overlays are glued to a properly prepared surface. Greasy, dirty, or peeling surfaces — the glue won't hold. Degreasing and sanding are mandatory.
Mistake 8: Different wood species in one system
Beech overlays + pine handles + oak legs — with the same tinting, they will yield different results due to varying porosity. Use a single wood species for all decor.
FAQ: Popular questions about decorating furniture with wood
Can I glue wooden overlays onto laminated chipboard?
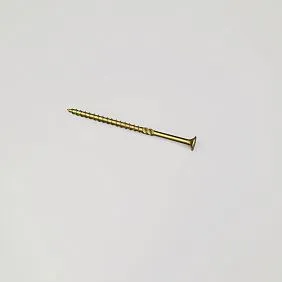
Yes. The surface is degreased, lightly sanded (grit 180) for adhesion, and the overlay is glued using contact adhesive or liquid nails. For reliability, additionally secure with painter's tape until dry.
Do I need to remove old handles before painting?
Absolutely. The handles are removed, the surface is painted, and the handles are reinstalled (or replaced with new ones). Painting furniture with metal handles installed always results in poor quality.
What glue should I use for wooden overlays?
For overlays on wood — PVA wood glue (long setting time, strong bond). For overlays on chipboard and laminate — contact adhesive "Moment Joiner" or liquid nails D3. Secure with clamps or painter's tape until fully dry.
How to update furniture without painting?
Wooden overlays and moldings can be tinted to match the facade color — the color is selected according to a sample. Handles — made of natural wood without coating, matching the body. The result is an update while preserving the natural wood surface.
Can I decorate kitchen furniture?
Yes. Wooden overlays and moldings on kitchen facades must have a lacquer or enamel coating resistant to steam and light wiping. The wood species is beech with good primer.
How to calculate the length of molding for a frame?
Frame perimeter = 2 × (height + width). Plus 20% for corner cuts. Example: frame 400×600 mm → perimeter 2000 mm → with allowance 2400 mm.
How many overlays per cabinet?
Depends on the number of doors and the chosen scheme. For a two-door cabinet with one central overlay on each door — 2 overlays. With corner accents — 4×2=8. Plan the scheme in advance.
Where to buy wooden decor for furniture
Full STAVROS assortment:
-
decor for furniture — decorative overlays, rosettes, carved elements.
-
Wooden decoration — full catalog of furniture decor.
-
Moldings — profile strips for frames and facades.
-
Wooden molding — flat and profile moldings.
-
Wooden Picture Frame — for display case inserts.
-
furniture handle — full catalog of wooden handles.
-
wooden hook handle — coated staples.
-
wooden button handle — uncoated buttons.
-
Wooden legs — solid wood furniture legs.
-
Buy furniture legs for a 200-room hotel project — this is not an ordinary deal, but a partnership requiring a special approach. — uncoated legs.
-
Decorative Bracket — wooden brackets.
-
Furniture and decor from solid wood — complete product catalog.
-
Wooden trim — millwork products for furniture and interiors.
STAVROS: wooden decor for furniture — a complete system for renewal
decorating furniture with wooden overlays — this is not a compromise. It is a conscious choice of people who value natural wood, understand design, and know how to work with details.
STAVROS produces and offers a full range furniture decorative elements of solid wood: overlays, moldings, handles, legs, brackets, trims, baguettes. Everything — from one catalog, one wood species, in unified tones. For classic and neoclassical, for Provence and Scandinavian style, for those who want to update an old cabinet or create a new decorative ensemble from scratch.
STAVROS works with private clients, designers, and furniture manufacturers across Russia. A wide range, precise dimensions, consistent quality, and prompt shipping.


