Article Contents:
- Where to use wooden slats on the wall
- Seven scenarios where slats work best
- Why wooden slats are relevant again in interior design
- Not a trend — a principle
- What exactly slats do to the space
- Slat, batten, molding, and layout: what's the difference
- Clear definitions without confusion
- Table: how they differ
- How to choose the size of wooden slats
- This is the most important section of the article
- Slat width: from 15 to 60 mm
- Slat thickness: from 10 to 30 mm
- Spacing between slats: calculation
- Slat height: floor to ceiling or partial
- Size recommendation table
- Wooden slat for accent wall
- What is a "proper" accent wall
- Wall behind the sofa: step-by-step selection logic
- Wall behind the bed: features
- TV zone: slats as an architectural frame
- Wooden slats for zoning
- Slat as a lightweight partition
- Zoning without a partition: slats on the wall
- What to pair with wooden slats
- Slats + baseboard: bottom system
- Slats + cornice: top finish
- Slats + moldings: two levels of decor
- Slats + corner trim: joints and transitions
- Slats + furniture decor: a unified ensemble
- Material and finish of wooden wall slats
- Wood species: what to choose
- Slat finishing options
- How to match slat tone to interior
- Wooden slats for furniture and facades
- Slats not just on the wall
- Installing Wooden Planks on Wall
- Tools and Materials
- Two installation methods
- Work procedure
- Important nuances
- Common mistakes when choosing and installing slats
- Mistake 1: Slat too thin for a large wall
- Mistake 2: Spacing too frequent
- Mistake 3: Color mismatch with baseboard and cornice
- Error 4: Different wood species on the same level
- Error 5: Choosing only by photo without measurements
- Error 6: Installation without a level
- Error 7: Acclimatization not considered
- Error 8: Unaccounted utilities in the wall
- Wooden slats and wooden moldings: a complete finishing system
- A system, not a set of individual parts
- FAQ: popular questions about wooden slats on the wall
- Where to buy wooden slats for the wall
- STAVROS: wooden slats on the wall and a complete system of wooden moldings

There are things in design that are hard to explain in words but easy to feel. When you enter a room and it immediately "reads" — there is depth, rhythm, texture — it is almost certainly the work of wooden slats. Not loud decor, not an expensive finishing material, not complex architecture. Just a few vertical planks on the wall — and the space becomes different.
Wooden plank for wall — is one of the most popular decorative techniques of recent years. But popularity is not a guarantee of correct application. Slats are placed too often, too rarely, the wrong size, the wrong color, without connection to the rest of the interior. And instead of a cozy warm accent, you get either emptiness or overload.
This article is for those who want to do it right. We will break down everything: where, why, what size, what material, how to install, and how not to make mistakes. Read carefully — there are no general words here, only specifics.


Where to use wooden slats on the wall


Seven scenarios where slats work best
Before choosing wooden strip, you need to understand which scenario it is being used for. This is fundamental: slats for an accent wall and slats for a zoning partition are different sizes, different spacing, different logic.
Scenario 1: Accent wall behind the sofa. The most common use. Vertical slats across the entire height of the wall behind the sofa in the living room create a decorative background, highlight the seating area, and add texture. Slats are installed with equal spacing — 50–100 mm between planks.
Scenario 2: TV area. An accent wall with a TV and wooden slats is one of the most common techniques in modern interiors. Slats create a "frame" for the TV, break the wall into verticals, and give the area richness.
Scenario 3: Bed headboard in the bedroom. The wall behind the bed with vertical slats is a soft, warm accent. Slats run across the entire width of the wall or only in the headboard area — within 1.5–2.0 m from the center.
Scenario 4: Hallway. The hallway is a transit zone where walls often remain completely empty. One wall with wooden slats turns the hallway into a space with character.
Scenario 5: Study and workspace. The wall behind the desk with vertical slats is a psychologically structuring element. It creates the feeling of a "study wall," separating the workspace from the rest of the space.
Scenario 6: Children's room. Slats in a children's room are safe, natural decor. No sharp corners, made of non-toxic wood, with the possibility to paint in any color. Plus, the slats can be used to attach shelves and organizers.
Scenario 7: Zoning an open-plan layout. A slatted "partition" — slats on a frame without a solid panel — visually divides the kitchen-living room space without blocking light. An architectural and functional technique in one.
Our factory also produces:


Why wooden slats are relevant again in interior design
Get Consultation
Not a trend — a principle
Calling wooden slats a "trend" means underestimating them. Slats didn't appear "suddenly" a few years ago. They have existed in interiors for centuries — in the wooden panels of Japanese houses, in classic European interiors of the 18th century, in Scandinavian functionalism of the 20th.
Why are they at their peak again? Because the demand for interiors has changed. People are tired of cold "Euro-renovations" with white gloss and neutral surfaces. They want warmth, texture, naturalness — and that's exactly what Wooden plank.
What exactly does a slat do to a space
This is not an abstraction — these are specific visual effects:
Vertical rhythm. Evenly spaced vertical slats create a rhythmic structure. The wall ceases to be a monotonous plane — it becomes "breathing," rich.
Visual elongation. Vertical lines always increase the visual height of a room. Slats from floor to ceiling on a wall with low ceilings literally make the room taller.
Shadow and depth. Each slat casts a shadow on the wall surface. This shadow changes throughout the day — one in the morning, another in the evening. The wall becomes alive.
Natural texture. Wood is a warm material. Its texture, smell, and color add coziness to the room that no synthetic alternative can provide.
Connection with furniture and flooring. Wooden slats on the wall 'talk' to the wooden floor, wooden furniture, and wooden doors. The room becomes cohesive — a unified material ensemble.
More about how Wooden boards in interior they work with different styles — in a special article on the STAVROS website.
Slat, batten, molding, and layout: what's the difference
Clear definitions without confusion
In the market of wooden moldings, there are many terms that buyers often confuse. We'll explain once and for all.
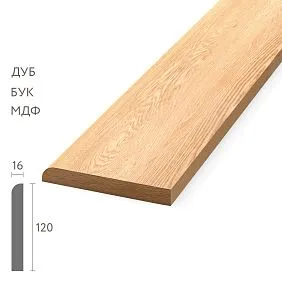
Wooden plank — a long plank with a rectangular or square cross-section. Minimal profile, most often without a decorative shaped element. Width is usually 20–50 mm, thickness 10–25 mm. Function: a linear decorative element creating rhythm and verticals.
Wooden block — a more massive workpiece with a square or rectangular cross-section. Cross-section from 30×30 mm and larger. Used in construction as a structural element, for making furniture and frames. About the use of wooden beams in furniture and decor — in the article on wooden beam for furniture and decor.
Moldings — decorative profiled strips with a pronounced shaped cross-section. Not just a rectangle, but a complex profile with convexities, concavities, and bevels. More about moldings — in the article on wooden moldings for walls and furniture.
Wooden molding — a flat or slightly beveled strip for covering joints, framing inserts, creating decorative horizontal lines. Wider than a batten, but thinner. About flat trim — a separate article on flat wooden layout.
Table: how they differ
| Element | Section | Profile | Main application |
|---|---|---|---|
| Rail | Rectangular / square | Simple | Decorative verticals, panels |
| Block | Square / rectangular (larger) | Simple | Structural, furniture, frame |
| Molding | Figured | Complex | Frames, decorative lines |
| Layout | Flat / slight bevel | Minimal | Joints, horizontal lines |
How to choose the size of a wooden slat
This is the most important section of the article
The wrong slat size is the most costly mistake. Slats are bought, installed — and they don't look right. They either get lost or feel overwhelming. Reinstallation means extra costs and time. So take size selection very seriously.
Slat width: from 15 to 60 mm
15–20 mm. Thin slats — for delicate, unobtrusive decor. They create a light grid of verticals without overwhelming the wall. Good for small rooms, narrow hallways, children's rooms. Spacing — 30–50 mm.
25–35 mm. The optimal universal range. The slat is clearly visible, creates an expressive rhythm, yet doesn't feel heavy. For living rooms, bedrooms, studies with standard and high ceilings. Spacing — 50–80 mm.
40–50 mm. A more expressive slat. For large accent walls, zoning partitions, and interiors in loft and industrial classic styles. Spacing — 60–100 mm.
50–60 mm and above. A massive slat — for high ceilings, large spaces, interiors with a pronounced character. Single wide slats with large spacing create a rare rhythm — less dense, more monumental.
Slat thickness: from 10 to 30 mm
Thickness determines the shadow. The thicker the slat, the deeper the shadow on the wall behind it. This is important:
-
10–15 mm: minimal shadow. The slat "lies" almost flat against the wall.
-
18–22 mm: optimal shadow for most interiors.
-
25–30 mm: expressive shadow, volume. For interiors where texture and depth are a priority.
Spacing between slats: calculation
Spacing — the distance from one slat to the next (from center to center or from edge to edge — agree on the measurement system in advance).
Dense spacing (distance between slats = slat width or less). The dark gap is almost invisible. Slats create an almost continuous wooden surface with vertical slits. For "warm panels," studies, restaurant style.
Medium spacing (distance between slats = 1.5–2 slat widths). Balance of wood and wall. Both slats and the wall behind them are visible. Optimal for most accent walls.
Wide spacing (distance between slats = 3–5 slat widths). Sparse slats. The wall background dominates, slats are accents. For minimalist interiors, small walls, narrow spaces.
Slat height: floor to ceiling or partial
Floor to ceiling. Maximum vertical elongation effect. Slats fit tightly to wooden floor baseboard the bottom and to wooden cornice the ceiling at the top.
Partial height — lower panel. Slats at a height of 90–120 cm from the floor — a "panel" solution. Above — painted or plastered wall. Transition between slats and upper part — horizontal strip (molding or trim).
Partial height — upper panel. Slats from 1.2–1.5 m level to ceiling. Less commonly used, but effective in tall rooms.
Size recommendation table
| Wall area / ceiling height | Batten width | Thickness | Step |
|---|---|---|---|
| Small wall / low ceiling | 15–20 mm | 10–15 mm | 30–50 mm |
| Medium wall / 2.6–2.9 m | 25–35 mm | 15–22 mm | 50–80 mm |
| Large wall / 3.0–3.5 m | 35–50 mm | 20–25 mm | 70–100 mm |
| High ceilings / grand space | 40–60 mm | 25–30 mm | 80–120 mm |
Wooden slat for accent wall
What is a "proper" accent wall
An accent wall is not just "one wall of a different color" or "one wall with decor." It is a wall that becomes the semantic center of the zone. Behind it is the main furniture or main activity: sofa, bed, TV, desk.
Wooden boards in interior on an accent wall work better than many other materials precisely because they create texture, not just color.
Wall behind the sofa: step-by-step selection logic
Step 1. Determine the width of the wall — exactly in millimeters.
Step 2. Decide: do the slats run across the entire width of the wall or only in the area behind the sofa? If the wall is wide and the sofa occupies the central part, the slats can run only behind the sofa, with symmetrical gaps at the edges. Or — across the entire wall without gaps.
Step 3. Calculate the number of slats and spacing. Formula: total wall width (in mm) divided by (slat width + spacing). This gives the number of slats. Check that the outer slats are symmetrical.
Step 4. Choose the color of the slats. Slats matching the wall tone — a single monochrome shade, only texture. Slats darker than the wall — expressive contrast. Slats lighter than the wall — soft contrast.
Wall behind the bed: features
In the bedroom, the accent wall should be cozy, not active. For the bedroom:
-
Warm wood tones: light walnut, teak, natural beech.
-
Tighter spacing: the slats create a "feeling of embrace," warmth.
-
Height of the slats — either the entire wall, or only in the headboard area — from the floor to a height of 1.6–1.8 m.
TV area: slats as an architectural frame
A TV on a wall with wooden slats is a very popular solution. Principles:
-
The slats run behind the TV, creating a backdrop.
-
The TV is mounted on a bracket over the slats, or a gap is left between the slats for cables.
-
A TV stand or wall-mounted console — in the same wood species and tone as the slats.
Wooden slats for zoning
Slat as a lightweight partition
In open-plan layouts — studios, combined kitchen-living rooms, bedroom-dressing rooms — the challenge is to divide the space without blocking it. A slatted partition is the ideal solution.
Principle: vertical slats on a frame without a solid panel. Light passes through. Visual contact remains. But the boundary of zones is clearly defined.
Options for slatted partitions:
-
Floor-mounted: a frame from floor to ceiling, slats vertically with gaps. Light, openwork, divides zones without creating a wall.
-
Cantilevered: a structure hanging from the ceiling with slats — a visual screen without a floor mounting point.
-
Built-in: slats between two building structures (columns, walls) — as an "insert" element.
Zoning without a partition: slats on the wall
Another technique — slats on adjacent walls of different zones. In a kitchen-living room: the living room wall — warm-toned slats, the kitchen zone wall — without slats. Different wall finishes create visual boundaries of zones without physical partitions.
What to combine wooden slats with
Slats + baseboard: lower system
with a classic profile creates a sense of solidity, reliability. and wooden slats on the wall — elements of one system. Principles:
-
One type of wood: beech slats + beech baseboard.
-
One tone: slats in "dark walnut" tint + baseboard in the same tint.
-
Installation logic: slats fit flush against the baseboard from below. Or the baseboard overlaps the lower end of the slats — if installed afterwards.
Slats + cornice: top finish
If the slats go up to the ceiling, the top finish can be done in several ways:
-
The slats fit flush against the ceiling without a cornice — minimalist.
-
A horizontal strip — molding or trim — is installed along the top edge of the slats.
-
Along the entire perimeter of the room at the ceiling — wooden cornice in the interior as the top finish of the system.
wooden cornice in a unified system with the slats — from the same species, in the same tone. The cornice completes the vertical — it "covers" the wall from above.
Slats + moldings: two levels of decor
Slats and Wooden moldings in one room — not a contradiction, but a complement. The logic of placement:
-
The lower part of the wall (up to a height of 1.0–1.2 m) — wooden panels or slats.
-
The upper part — moldings in frames.
-
A horizontal strip at the transition point.
Or alternatively:
-
An accent wall with slats.
-
The other three walls — molding frames.
One principle: slats and moldings from the same wood species, in the same tint. Stylistic unity above all.
Slats + corner profile: joints and transitions
Wooden corner bracket appears where the slatted panel reaches the corner of the wall. External corners — the corner profile covers the ends of the slats with a neat angular profile. More details in the article about wooden corner profiles for wall finishing.
Slats + furniture decor: a unified ensemble
Wooden slats on the wall work best when they are in visual dialogue with the furniture. decor for furniture from the same wood species, Wooden decoration on the facades — connect the wall and furniture into a single system.
Example: beech slats on the wall, tinted "natural", and a cabinet with beech moldings, same tint. The room reads as a whole.
Full range furniture and decor made of solid wood — in the STAVROS catalog.
Material and finish of wooden slats for the wall
Wood species: what to choose
Beech. Dense, uniform, with a fine even texture. Ideal for painting and tinting: the surface accepts any coating without spotting. Beech slats under white enamel are a classic of modern interiors. Under "walnut" tinting — a warm natural palette.
Pine. More affordable. Characteristic texture with a pronounced fiber pattern. Under varnish — a very lively and beautiful surface. For painting — requires good priming. Small knots add character in country, rustic, Scandinavian styles.
Oak. The most expressive option in terms of texture. Large, beautiful grain pattern, high density. Oak slats under clear oil or varnish are a status material that immediately sets the tone for the space. More expensive, but the result is obvious.
Ash. Light wood with expressive straight grains. Under oil or clear varnish — a Scandinavian look. Under tinting — you can achieve a shade from light honey to dark bronze.
Slat finish options
No coating. Supplied as a sanded slat without primer. The buyer paints, tints, or varnishes independently to the desired shade. Maximum flexibility.
Tinting + varnish. The most common option for a natural look. The shade is matched to furniture, flooring, or doors. Varnish protects against dirt, moisture, and mechanical damage.
Natural oil / wax. For slats with an open, lively texture. The surface remains matte, tactilely warm, and breathable. Requires renewal once every 2–3 years.
White or colored enamel. For monochrome interiors, Scandinavian style, modern classics. Slats in the color of the wall — only texture, no color contrast. Slats in contrast — a bright accent.
Staining (wood stain). For dark, rich tones: wenge, dark walnut, mocha, espresso. For interiors with dark furniture, formal living rooms, studies.
How to choose the tone of slats for the interior
Three working principles:
To match the floor. Slats on the wall in the same tone as the wooden floor create a "wooden cocoon," a warm space where the floor and wall are from the same material world.
Matching the furniture. Slats in the same tone as the key furniture — sofa, bed, wardrobe. Connects the wall and furniture into a single system.
Contrast to the wall. Dark slats on a light wall — classic contrast. White slats on a dark wall — reverse, less common, but very striking option.
Wooden slat for furniture and facades
Slat not only on the wall
A separate and important scenario is a wooden slat on furniture facades. Slatted furniture facades are a modern classic look: cabinets, nightstands, kitchen fronts with vertical slats instead of a smooth panel.
A slatted facade is created like this: vertical slats are glued onto a flat facade with equal spacing. The result is a textured surface with a vertical rhythm, tactile texture, and visual depth.
Recommended slat sizes for furniture facades:
-
Width: 15–30 mm.
-
Thickness: 8–15 mm.
-
Spacing: equal to the slat width (slat and gap are the same) or twice as wide (gap is twice the slat width).
Mounting wooden strips on the wall
Tools and materials
For installing slats you need:
-
Level — laser or bubble: for precise vertical marking.
-
Measuring tape and pencil.
-
Miter saw or circular saw — for accurate length cuts.
-
Drill and dowels — for wall mounting (concrete, brick, aerated concrete).
-
Finish nails 30–50 mm — for fastening to a wooden frame or drywall.
-
Liquid nails — as additional fixation to a flat surface.
-
Wood putty — for filling nail holes.
Two installation methods
Method 1: Direct wall mounting. Slats are attached directly to the wall surface: liquid nails + finish nails or dowels. Suitable for flat walls. Slats lie flush against the surface — minimal shadow.
Method 2: Mounting on horizontal guides. Horizontal battens are attached to the wall (top and bottom, and if height exceeds 1.5 m — another in the center). Vertical slats are attached to these guides. Advantage: slats are slightly offset from the wall (by the thickness of the guide), creating a deeper shadow. The method is more reliable and gives a better visual result.
Work order
-
Mark verticals by level — with a pencil or painter's tape.
-
Install guides (for the second method).
-
Cut the slats to height with an accuracy of 1 mm.
-
Install the first slat exactly level — it sets the reference for all subsequent ones.
-
Attach the slats while checking vertical alignment and equal spacing.
-
Fill the holes with wood putty.
-
Paint / varnish / oil — if the slats were unfinished.
Important nuances
Wood acclimatization. Before installation, the slats must rest in the room for 24–48 hours. The wood adapts to the room's humidity and temperature — this prevents warping after installation.
Bottom gap. Between the lower end of the slat and the baseboard — a minimum gap of 1–2 mm. Or the slat goes behind the baseboard from below. Never press the slat tightly against the floor without a baseboard.
Top gap. Similarly — do not press the slat tightly against the ceiling without a cornice. Either a small gap, or a horizontal strip covers the transition.
Common mistakes when choosing and installing slats
Mistake 1: Slat too thin for a large wall
A 15 mm slat on a wall 4 m wide and 2.7 m high gets lost, barely visible. Too little contrast, too little shadow. For a large wall, use slats at least 30 mm wide.
Mistake 2: Spacing too frequent
Slats are placed so tightly that the wall behind them is almost invisible — resulting in an almost solid wooden surface. If the 'wooden panel' effect was not intended, this is overkill. Check on a mockup: draw the slats to scale on paper.
Mistake 3: Color mismatch with baseboard and cornice
Dark slats + white baseboard — a visual break. The elements do not form a system. Principle: all wooden elements in the space should follow a unified tonal logic.
Mistake 4: Different wood species at the same level
Beech slats + pine baseboard + oak cornice — three different tones even with the same stain. Choose one wood species for all trim elements in the room.
Mistake 5: Choosing only by photo without measurements
The photo in the catalog does not convey the real scale. A batten that looks thin in the photo may turn out to be massive next to a real wall. Always check the dimensions in millimeters.
Error 6: Installation without a level
A batten installed "by eye" will sooner or later end up slightly tilted. This is especially noticeable if the batten runs the full height of the wall. A level is a must.
Error 7: Acclimatization not taken into account
Battens installed immediately after delivery to a cold room may slightly warp after the room warms up. 48 hours of acclimatization is the minimum.
Error 8: Unaccounted utilities in the wall
Before installation, be sure to check the location of electrical wiring, water pipes, and ventilation ducts in the wall. A nail into a cable is a serious problem.
Wooden batten and wooden molding: a complete finishing system
A system, not a set of individual parts
The most successful interiors with wooden battens are those where the battens are integrated into a system. Not just "one wall with battens," but a vertical finishing system from baseboard to cornice.
Wooden trim This is exactly a system: baseboard → batten → molding → cornice. All elements from the same catalog, same wood species, same tone.
Lower level: with a classic profile creates a sense of solidity, reliability. — floor-to-wall transition.
Main level: wooden battens on the wall — vertical rhythm.
Additional level: Moldings — horizontal division or frames on the walls.
Upper level: wooden cornice in the interior — completion.
Corner transitions: Wooden corner bracket.
Joints and trims: wooden layout made of wooden trim.
All together is not a set of parts. It is the architectural system of the room.
FAQ: popular questions about wooden slats on the wall
Which wooden slat to choose for an accent wall?
Optimal width is 25–35 mm, thickness is 15–22 mm, spacing is 50–80 mm. For large walls, use wider slats and larger spacing. For small ones, use thinner slats and closer spacing.
Do I need to prime the slats before painting?
Absolutely. Primer evens out surface porosity, ensures even paint application, and improves adhesion. Apply 1–2 coats of primer, let dry, then paint in 2–3 coats.
How is a wooden slat different from molding?
A slat is a simple rectangular or square cross-section, a linear decorative element. Molding is a complex shaped profile with decorative transitions, intended for frames, borders, and decorative lines with relief.
Can planks be installed by oneself?
Yes, with a level, saw, and basic woodworking skills. The key is precise marking and controlling the verticality of each slat.
Which wood is best for wall slats?
For slats to be painted — beech. For slats with natural finish — oak or ash. For a budget option under varnish or paint — pine with good primer.
How to calculate the number of slats?
Wall width (mm) / (slat width + gap between slats). Example: wall 3000 mm, slat 30 mm, gap 60 mm → 3000 / 90 = 33.3 → 33–34 slats. Plus 10% extra for offcuts.
How to remove slats without damaging the wall?
If slats are on liquid nails — carefully pry with a chisel, pull off slowly. After that, remove glue residue with solvent, putty any damage. If on dowels — remove dowels, fill holes.
Where to buy wooden slats for the wall
Full range:
-
Wooden plank — solid beech and pine slats.
-
Wooden trim — complete catalog of linear molding products.
-
Moldings — decorative profiles.
-
with a classic profile creates a sense of solidity, reliability. — floor skirting boards.
-
wooden cornice — solid wood cornices.
-
Wooden corner bracket — corner elements.
-
Wooden decoration — applied decor.
-
decor for furniture — carved overlays and elements.
-
Furniture and decor from solid wood — full STAVROS catalog.
STAVROS: wooden slats for walls and a complete wooden molding system
Wooden plank for wall — it's not just a decorative detail. It's a tool that changes the perception of space. One correctly chosen size, one correct tint — and the room gains character.
STAVROS manufactures Wooden rails made from solid beech and pine: various cross-sections, for painting and tinting, for walls, furniture facades, and zoning partitions. Slats are part of a complete wooden molding system: baseboards, cornices, moldings, corners, trims, decorative overlays — all from one catalog, one wood species, in unified tones.
STAVROS works with designers, furniture manufacturers, construction teams, and private clients across Russia. Precise dimensions, consistent quality, fast shipping.