Article Contents:
- Why the joint between the baseboard and the door casing often ruins the renovation
- What problems occur most often with a door frame
- How to choose a baseboard for doors and casings: a system, not a coincidence
- Skirting board matching door color
- Baseboard matching the color of architraves
- Baseboard in wall color
- Baseboard in floor color
- White MDF baseboard under white doors: a universal standard
- Baseboard for wood and wooden doors
- Baseboard height and casing height: the proportion that solves everything
- When an 80 mm MDF baseboard is the optimal choice near a door
- When 100–120 mm is justified near a door frame
- The baseboard should not visually 'argue' with the casing
- Baseboard thickness and casing thickness: three scenarios
- Scenario 1: Architrave thicker than skirting board
- Scenario 2: Skirting board thicker than architrave
- Scenario 3: Skirting board and architrave almost flush
- How to finish the end of an MDF skirting board at a doorway
- Method 1: End goes under the architrave
- Method 2: Straight clean end
- Method 3: End cut at a slight angle
- Method 4: Decorative cap or extension
- Method 5: Wooden corner piece as decorative finish
- Method 6: Skirting board for painting — final coating hides everything
- How to join a skirting board with a door casing: four working methods
- Method 1: Butt joint (end to plane)
- Method 2: Joint with a small gap
- Method 3: Joint through a decorative vertical element
- Method 4: Joint for painting with final finishing
- White MDF skirting board, for painting or wood-like: selection for specific doors
- White MDF skirting board: for white doors and light walls
- MDF skirting board for painting: for non-standard colors and complex joints
- MDF skirting board wood-like: for wooden and veneered doors
- Solid wood skirting board: for natural interiors
- Cutting MDF baseboard at a doorway: error-free technique
- Straight end cut at 90°
- Beveled cut for a smooth transition
- Cutting the corner at an opening: when the baseboard goes behind the opening
- MDF baseboard and hidden doors: a special case
- How to run baseboard at a hidden door
- Straight profile for hidden doors
- Extension and baseboard: how to design the transition
- Mistakes when finishing the joint between baseboard and casing
- What to buy for a neat doorway finish
- Step-by-step guide: installing baseboard at a doorway
- FAQ: Answers to Popular Questions
- About the Company STAVROS
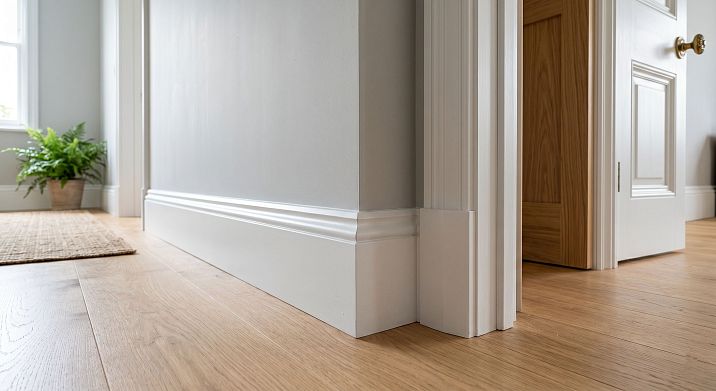
There are details in an interior that either tie the space together or subtly ruin it. The joint between the baseboard and the door casing is exactly such a detail. Your eye catches it every time you enter a room. And if this joint is done carelessly — an exposed end, a color mismatch, a step in thickness, an awkward gap — neither expensive flooring nor beautiful doors will save the overall impression.
MDF Skirting Board At a doorway, it's not just "cut the strip and lean it against the casing." It's a junction where the horizontal floor, the vertical door, and the wall boundary meet. And this is exactly where mistakes are most often made, which are later regretted.
This article is a detailed breakdown: how to properly join the baseboard with the casing, finish the end, choose the height and color, avoid typical miscalculations, and achieve the result where the opening looks like a finished architectural element, not a point of unfinished renovation.


Why the joint between the baseboard and casing often ruins a renovation
If you've ever noticed that in a beautifully finished apartment something "feels off" near the doors — the reason is most likely this junction. A doorway is where several finishing elements converge: the casing, the frame, the extension, the baseboard, and the flooring. Each has its own dimensions, thickness, color, and profile. And if they are not coordinated in advance — the result is predictable.
Let's look at what exactly ruins the joint:
Exposed baseboard end. MDF in cross-section is a dense gray-brown mass, nothing like the white color of enamel or the texture of wood. If the end is not treated, not painted, and not hidden — it immediately catches the eye.
Plane mismatch. The casing protrudes from the wall by 10–14 mm. The baseboard — by 12–16 mm. When they stand next to each other and one surface "bulges" more than the other — a step is formed, which the brain perceives as an error.
Color gap. Baseboard in oak wood, doors in wenge color, casing white — these are three different "voices" in one place. Without a deliberate concept, such a combination looks chaotic.
Gap at the base of the casing. The casing does not always reach the floor. Sometimes there is an empty space between the bottom edge of the casing and the baseboard that cannot be covered.
Uneven corner at the opening. Walls near door openings often have slight deviations: plaster has sagged, the corner is "leaning." In such a corner, the baseboard does not fit perfectly against both the wall and the casing simultaneously.
That is why the joint between the baseboard and the casing needs to be thought out in advance — even when choosing doors and baseboards, not when everything is already installed.


What problems most often occur at a door opening
Before looking for a solution, it is worth naming the problem precisely. Here are seven situations that are most commonly encountered:
1. The baseboard is higher than the lower part of the casing. If an MDF baseboard with a height of 100–120 mm is chosen, and the casing starts at a height of 80 mm from the floor, the baseboard physically "overlaps" the casing. This situation needs to be resolved in advance at the selection stage, not during installation.
2. The casing is thicker than the baseboard. The casing protrudes from the wall plane by 14 mm, the baseboard by 10 mm. From a side view, there is a noticeable step. The transition is unattractive and visually breaks the bottom horizontal line.
3. The baseboard is thicker than the casing. The opposite situation: the baseboard protrudes further. The end of the baseboard is "exposed" on the casing side, and the transition looks as if one element accidentally overlapped another.
4. The end of the baseboard remains untreated. The MDF cut is not painted, not coated, not hidden by a decorative element. The material in cross-section is visible — gray, without texture, without color.
5. The color of the baseboard does not match the door frame. Different shades of white for the baseboard and casing is a common and painful issue. Especially if one has a cool undertone and the other a warm one.
6. The angle at the opening is uneven. The wall near the door frame is often "sloped" — the trim is not perfectly perpendicular to the wall, and the baseboard, pressing against it, either pulls away from the wall or creates a gap at the trim.
7. The joint remains noticeable after painting. If the joint line was not worked out before painting — the paint only emphasizes the relief and shadow along the edge. What seemed insignificant before painting becomes clearly visible afterward.
Our factory also produces:


How to choose baseboards for doors and trims: a system, not a coincidence
The key word here is system. Doors, trims, and baseboards should be chosen as a single ensemble, not as three independent elements.
Get Consultation
Skirting in the color of the doors
The most logical and most frequently used system. MDF Skirting Board matches the color of the door leaf. White doors — white baseboard. Oak doors — MDF baseboard in oak wood. Gray doors — gray baseboard for painting.
In this system, the trim acts as a connecting link: if the trim and door are the same color (which is standard), then the baseboard, trim, and door leaf form a single vertical and horizontal framing element of the room.
Baseboard matching the architraves
A slightly different approach: doors can be dark or accent, while the trim is white. In this case, the baseboard is chosen to match the trim color. White baseboard + white trims form a unified "architectural framing" system regardless of the door leaf color itself.
This technique is actively used in modern interiors: dark doors without visible trims (hidden installation) or with white trims — and white White MDF Skirting Board around the entire perimeter. Clean, uncluttered architecture.
Baseboard in wall color
One of the boldest and most stylish design moves. The paintable baseboard is painted the same color as the wall. It visually "disappears," making the boundary between the wall and floor a clear geometric line without emphasis. The door casing then becomes the only expressive vertical frame.
This approach requires — is a horizontal element that frames the room at the bottom of the walls where the wall meets the floor. Skirting boards perform several functions: they hide the technological gap between the wall and floor covering (necessary for thermal expansion), protect the lower part of the wall from mechanical damage, create visual completion, and may conceal wiring. — only then can you achieve an exact match with the wall color.
Skirting Board in Floor Color
With dark laminate or parquet, a baseboard in the same shade "raises" the floor along the wall, creating the effect of a deep dark base. White doors against a dark floor and dark baseboard visually "float" in the space. This is a working technique but requires consistency: if the floor is "walnut" and the baseboard is "wenge," the effect is ruined.
White MDF baseboard with white doors: a universal standard
White baseboard + white doors + white casings is the most common and foolproof combination. This is why white MDF baseboard accounts for up to 70% of the market. It works in any style, with any floor, with any wall color.
The only nuance is the shade. White can be "warm" (slightly creamy) or "cold" (pure optical white). If the baseboard and casing have different shades of white, it's immediately noticeable at the door junction. Buy all white items from the same manufacturer or compare samples.
Baseboard matching wood and wooden doors
Wooden doors are a classic that never goes out of style. Baseboard MDF in wood decor — the right partner for such doors. MDF with a laminated surface "like oak" or "like walnut" creates a visual dialogue with the natural wood of the doors.
Important point: "under the tree" is a broad concept. Shades of natural oak range from light honey to rich nutty. A skirting board in a "bleached oak" finish next to a "natural oak" door will create dissonance. Rule: if a match is impossible, choose contrast instead of "similarity." Either the skirting board is exactly the same tone, or intentionally a different color (e.g., white).
Skirting board height and architrave height: the proportion that decides everything
The height of the skirting board at the doorway is not only an aesthetic issue but also a practical installation concern. The higher the skirting board, the more precise its joint with the architrave must be.
When an 80 mm MDF skirting board is the optimal choice near a door
With standard ceiling heights of 2,500–2,700 mm and standard doors 2,000–2,100 mm high, an 80 mm skirting board is a delicate, unobtrusive height. It does not require complex solutions at the opening: the lower part of a standard architrave ends at the floor, and the skirting board simply abuts it from the sides.
Learn more about optimal MDF skirting board sizes for different rooms and ceiling heights in a separate guide.
With an 80 mm skirting board, the end at the architrave is compact and unobtrusive. Even if it is slightly exposed, it is visually less critical than with 120 mm. With proper installation, 80 mm is the most "forgiving" size at the doorway.
When 100–120 mm at the doorway is justified
Baseboard 100 mm and 120 mm — an expressive height that requires more thoughtful work near the door. At a height of 100 mm, the end at the casing is 100 mm — this is a noticeable vertical cut strip that must either be hidden under the casing or neatly finished with a decorative element.
A tall MDF baseboard with classic doors and wide casings looks organic. A casing 70–80 mm wide and a baseboard 100 mm high are visually "proportional" — both elements are massive enough to appear as a single architectural detail.
For hidden doors without casings, a tall baseboard requires special attention to the end: there is no casing to hide it. The end must be perfectly finished or covered with a decorative corner piece.
The baseboard should not visually "argue" with the casing
This rule is hard to formalize but easy to feel. If the casing is thin (40–50 mm wide) and simple, while the baseboard is 120 mm high with a shaped profile — they "argue": one is heavy, the other is light. The interior loses integrity.
If the casing is wide (70–80 mm), profiled, with a pronounced relief — an MDF baseboard 100–120 mm with a similar profile looks like a continuation of the same design theme. They support each other.
Balance rule: the scale of the baseboard should match the scale of the casing. A simple narrow casing — a modest baseboard. A wide decorative casing — an expressive tall baseboard.
Baseboard thickness and casing thickness: three scenarios
This is the most technically specific question. Let's break down all three possible scenarios.
Scenario 1: Casing is thicker than baseboard
The casing protrudes from the wall by 14–16 mm. The baseboard by 10–12 mm. Result: the casing stands 'in front of' the baseboard, forming a step. In side view, the transition is rough and illogical.
Solution: the baseboard is brought flush against the casing. The end of the baseboard butts against the side face of the casing. The gap between the planes is covered with a small decorative element — an extension strip, sealant, or wooden molding matching color. Alternatively, the end of the baseboard is slightly beveled at an angle, tapering to nothing towards the casing.
Scenario 2: Baseboard thicker than casing
The baseboard protrudes by 14–16 mm, the casing by 10–12 mm. The end of the baseboard 'overhangs' the casing. This is the most visually unpleasant scenario: it creates the feeling that the baseboard has 'ridden over' the door frame.
Solution option A: transition via a decorative Wooden corner bracketcorner. The corner is installed vertically at the junction point, hiding the difference in planes and the end of the baseboard simultaneously.
Solution option B: a vertical extension strip in the junction area. It visually 'fills' the difference in planes and creates a smooth transition.
Solution option C: when choosing a new baseboard, select a profile with the same protruding plane as the casing. This is the ideal solution if the renovation is still in progress.
Scenario 3: Baseboard and casing almost in the same plane
This is the best scenario: both surfaces are at the same distance from the wall (±1–2 mm). The end of the baseboard adjoins the casing, and the transition is almost invisible in the side view.
How to achieve this scenario in advance: when purchasing baseboards and casings, measure the thickness of both products. A standard casing is 12–14 mm. Choose a baseboard with a similar base thickness. This is not always possible in ready-made kits, but it is what you should aim for.
How to finish the end of an MDF baseboard at a doorway
The end of the baseboard at the door is a detail that determines half of the overall impression. Let's consider all available ways to finish it.
Method 1: The end goes under the casing
This is the ideal option. The casing is installed so that its lower part slightly covers the end of the baseboard. The MDF end is completely hidden, and the joint is minimal.
Condition: the casing must be installed with a slight overhang beyond the floor plane — or the baseboard is installed before the casing to fit precisely under it. Professional finishers always consider this order: first the floor, then the baseboard, then the casing on top.
Method 2: Neat straight end
The end of the baseboard butts against the side edge of the casing. The cut is straight, at 90°. The MDF at the end is primed and painted to match the baseboard color. The gap between the end and the casing is minimal — up to 1 mm.
This is a realistic and common option. The main condition is that the end must be treated: primed and painted. Exposed gray MDF at the end is unacceptable in any finish.
Method 3: End cut at a slight angle
The end of the baseboard is cut not at 90°, but at 75–80° — with a slight bevel towards the wall. This creates a visual effect of the baseboard "converging" towards the door casing and makes the transition slightly less noticeable. Works well with a baseboard that is thicker than the door casing.
Method 4: Decorative cap or extension
Special end caps for baseboard ends — plastic or wooden overlay elements that hide the cut. They are produced in colors matching the main laminated baseboard decors. Easy to install: inserted into a groove or glued on.
For a baseboard intended for painting, a small MDF extension strip of the same thickness, painted in the same color, can serve as a "cap."
Method 5: Wooden corner piece as a decorative finish
Wooden corner bracket It is installed vertically at the junction point of the baseboard and the door casing. It covers the end of the baseboard, hides the difference in planes, and simultaneously serves as a decorative accent. For interiors with wooden doors and wooden elements, this is the most organic solution.
A wooden corner piece made of solid oak or beech does not deform, does not yellow, and holds up to load. Its surface can be tinted to the same shade as the doors or Wooden baseboard.
Method 6: Baseboard for painting — the finish coat hides everything
An MDF baseboard intended for painting is puttied, sanded, and painted after installation. The end, painted in the same color as the front surface of the baseboard, visually "disappears" — the color unifies all planes. A small gap between the end and the door casing is sealed with acrylic sealant before painting.
How to join a skirting board with a door casing: four working methods
Joining an MDF skirting board with a door casing is a technical issue with several solutions. Each one fits its own situation.
Method 1: Butt joint (end to plane)
The skirting board is brought flush to the casing. The end butts against the side surface of the casing. The gap is minimal, up to 1 mm. It is filled with acrylic sealant.
This is the most common method. It works cleanly when the planes match in thickness. If they don't match, a step is formed that needs additional finishing.
Method 2: Joint with a small gap
The skirting board stops 5–10 mm from the casing. The small distance visually removes the need for precise abutment. The space between the end and the casing is decorated with a trim: a corner piece, molding, or just a neatly painted gap.
This method is used in modern minimalist interiors as a deliberate design technique: the boundary between the skirting board and the door frame is intentionally highlighted by air.
Method 3: Joint through a decorative vertical element
At the junction point, a decorative vertical strip is installed — a molding, corner piece, or overlay frame. It hides the end of the skirting board, covers the difference in planes, and simultaneously forms a complete visual node.
wooden molding as a vertical "separator" between the casing and the baseboard — a technique found in classical and neoclassical interiors. It not only hides the joint but also adds architectural character to the entire doorway.
Method 4: Paint-ready joint with final finishing
A paintable baseboard is installed flush with the casing. All gaps, joints, and exposed ends are filled with finishing putty, sanded smooth, primed, and painted. After painting, the entire joint area becomes a single painted surface.
This method yields the "cleanest" result when executed carefully. The boundary between the baseboard and casing is minimal, and the ends are invisible. It requires patience and consistency.
About how to properly execute Installation of MDF Skirting Board taking into account all the nuances, is described in a separate comprehensive guide.
White MDF baseboard, paintable or wood-look: choosing for specific doors
When doors and casings have already been selected, the task is to choose the right baseboard for them. This is a commercial decision that determines the entire outcome.
White MDF baseboard: for white doors and light walls
White MDF Skirting Board with factory enamel — the most in-demand solution on the market. It is installed without additional painting, ready for installation immediately.
Perfect partners: white doors, white architraves, light walls of any color. With white walls — it "disappears" in the interior. With colored walls — it creates a clear white contour of the lower part of the wall.
Requirement when working near a doorway: the ends must be primed and painted white (acrylic white enamel). An exposed gray MDF end next to a white architrave is a gross mistake.
MDF skirting board for painting: for non-standard colors and complex joints
If you need an exact match with the wall or architrave color — only — is a horizontal element that frames the room at the bottom of the walls where the wall meets the floor. Skirting boards perform several functions: they hide the technological gap between the wall and floor covering (necessary for thermal expansion), protect the lower part of the wall from mechanical damage, create visual completion, and may conceal wiring.. No laminate will give an exact match with an individually mixed paint color.
At the junction with the architrave, a skirting board for painting is the most "forgiving" solution: putty, primer, and paint hide all minor mismatches and gaps. After painting — a single surface.
Especially effective with hidden doors without architraves: a skirting board for painting in the color of the wall creates the feeling of a monolithic surface, in which the door "appears" like magic, without visible boundaries.
MDF skirting board for wood: for wooden and veneered doors
Doors in natural wood or veneered decor — an eco-friendly and warm choice. Baseboard MDF in wood decor continues this theme at the floor.
Selection rule: look for a match in tone (light to light, dark to dark) or a deliberate contrast (white baseboard with dark doors). "Similarity" without an exact match is the worst option: both elements appear random.
Solid wood baseboard: for natural interiors
solid wood baseboard — a choice for those who value material authenticity. Natural solid oak or beech next to wooden doors is a dialogue of equal materials. The wood texture on the baseboard echoes the texture of the door leaf, creating a warm, lively interior.
At the doorway, a wooden baseboard is finished the same way as MDF — with a neat end, decorative corner, or insertion under the casing. The advantage of solid wood: its end can be coated with the same impregnation or oil as the surface, and it will look organic.
MDF baseboard cutting at the doorway: error-free technique
Cutting at the doorway is not a 45° angle like in a room corner. The tasks here are somewhat different.
Straight end cut at 90°
The main working cut at the doorway is strictly at 90°. Use a miter saw with a fine-tooth blade (at least 60 teeth for MDF). The cut must be perpendicular to the face plane of the plank.
After cutting, mandatory end treatment. Prime with an acrylic primer-sealer (it blocks paint absorption into MDF) → paint in the baseboard color. Two thin coats are better than one thick one.
Beveled cut for a smooth transition
If there is a difference in thickness between the baseboard and the casing, the end is beveled at an angle of 70–80°. The bevel is directed toward the wall. This creates the illusion of the baseboard "merging" into the casing and eliminates a sharp step.
The bevel angle is selected experimentally: cut a piece of the strip at the desired angle, apply it to the joint, and evaluate. If the transition becomes smoother, the angle is chosen correctly.
Cutting the angle at the opening: when the baseboard goes behind the opening
For some doors (arched openings, doors without casings), the baseboard needs to be wrapped "around the corner" of the opening. Here, the same 45° cut (or at the actual wall angle at the opening) is used as for room corners.
Details on working with corners of wooden baseboard and the principles of proper cutting are described separately — there, the nuances of non-standard angles are also covered.
MDF baseboard and hidden doors: a special case
Hidden doors without visible casings are a special and increasingly popular case. There is no casing to lean the end of the baseboard against. The door leaf "disappears" into the wall, and the opening is framed only by a trim — a thin frame flush with the wall surface.
How to run the baseboard at a hidden door
The baseboard runs continuously along the entire perimeter of the room, including the doorway area. At a hidden door, it simply "crosses" the opening: it goes to one edge of the opening, is interrupted for the width of the opening, and starts again from the other edge.
The ends of a hidden door are the most visible ends in the entire renovation. Here, a casing will not hide the cut — the entire junction area is exposed. Both ends must be impeccably finished: primed, painted, and, if necessary, covered with decorative caps.
A skirting board for painting near a hidden door is the best choice. The ends are painted the same color as the front surface. After the final coat of paint, it becomes a single colored surface where the end is indistinguishable from the front plane.
Straight profile for hidden doors
A hidden door has no vertical framing — everything is 'clean'. A shaped skirting profile looks excessive here: fillets and coves require a casing to 'complete' their theme. A straight flat profile is the only logical choice for a minimalist space with hidden doors.
Extension and skirting board: how to design the transition
An extension is an extension board that fills the space between the door frame and the wall. It is installed where the wall is thick and a standard frame does not cover it.
The extension creates another layer of door opening framing. And it is usually thinner than the casing. This means that at the bottom edge of the extension, the skirting board adjoins a different plane than the main casing.
How to solve this junction:
-
If the extension is located to the side of the main casing, the skirting board is brought to the extension, not to the casing. The end is finished similarly.
-
If a step forms between the extension and the skirting board, use acrylic sealant or a thin decorative strip to fill it.
-
A paintable baseboard is once again the best choice: final painting unites the trim, wall, and baseboard into a single surface.
About how which MDF skirting board to choose for a specific type of flooring and door framing, is covered in a separate article.
Mistakes when joining baseboard and casing
Mistakes in this joint are not isolated cases, but a systemic issue. Here are the most common ones:
1. Choosing a baseboard without considering the casings. Casings are bought, doors are installed — and only then does the baseboard selection begin. Result: mismatch in thickness, color, and profile. Correct order: all elements are chosen together.
2. Installing a tall baseboard with a thin, simple casing. 120 mm height and 40 mm casing width — a disproportionate pair. A tall, heavy baseboard next to a thin casing will unbalance the entire doorway.
3. Leaving the end untreated. The most common and most noticeable mistake. The MDF end must be primed and painted. No exceptions.
4. Not touching up the cut after installation. Even if the end was painted before installation, the cut can be damaged during setup. After installation — inspect and touch up all visible cuts.
5. Making the joint in the most visible spot. If a baseboard lengthwise joint is necessary on a long wall, do not place it right by the doorway. A joint by the door is a double emphasis on imperfection.
6. Do not account for the door opening direction. The door opens inward and may hit the baseboard against the wall when opened. If the door leaf is wide and the baseboard is protruding, a thud will be heard every time it is opened. Check the gap with the door open before installation.
7. Mix different shades of white. "White" encompasses hundreds of shades. A "warm white" baseboard next to a "cool white" casing is a very noticeable mismatch, especially in daylight near a window.
8. Combine MDF with a wood grain finish with another wooden door decor without matching. "Similar" wood shades that do not match exactly are worse than a deliberate contrast. If unsure about matching, choose a white baseboard or a paintable baseboard.
What to buy for neat doorway finishing
Complete list of elements needed for a flawless result at the doorway:
MDF Skirting Board — the foundation of the entire assembly. Selected by height (to match ceiling and casing), profile (to match door style), and decor (to match doors or walls).
MDF baseboard for painting — for any non-standard color solutions. Especially valuable for hidden doors and when needing to blend the baseboard into the wall.
White MDF Skirting Board — for white doors and casings. Universal and reliable. Requires matching the shade with other white elements.
solid wood baseboard — for interiors with natural wooden doors. Living texture and the possibility of multiple restorations.
Wooden corner bracket — decorative finishing of the doorway end. Hides the cut, covers plane differences, adds decorativeness. Suitable for any style with proper material and tone selection.
wooden molding — a vertical decorative element at the junction of the baseboard and the casing. In classical and neoclassical interiors, it is an organic completion of the doorway from below.
Trimming Items — additional elements, transition strips, decorative rails for solving any non-standard tasks near the opening.
Step-by-step instructions: installing baseboard near a doorway
For convenience, here is a brief workflow:
Step 1 — Measurements. Measure the height of the lower edge of the casing from the floor. Ensure the selected baseboard height does not exceed this level. Measure the thickness of the casing and the thickness of the baseboard.
Step 2 — Choosing the end finishing method. Based on the thickness ratio, determine: end under the casing / butt end / wooden corner / additional strip.
Step 3 — Cutting the end. Make a cut at 90° (or at the required angle for a bevel). Treat the end with primer. Let it dry.
Step 4 — Dry fit. Place the baseboard against the wall without fastening. Check: contact with the casing, alignment of planes, absence of gaps.
Step 5 — Installation. Apply glue, fix the baseboard. Near the opening, add an additional fastening point with a finishing nail or clip no further than 100–150 mm from the end.
Step 6 — Final finishing. Sealant along the top joint of the baseboard and wall. Sealant or putty at the junction of the end with the casing. Touch-up painting of the end and reworked areas.
Step 7 — Installing a decorative corner (if necessary). The corner is glued after the skirting board adhesive has fully dried.
Details on How to install MDF skirting board various bases and situations — in the complete installation guide.
FAQ: Answers to popular questions
How to join an MDF skirting board with a door casing?
Three main methods: the end of the skirting board goes under the casing (best option); the end butts against the side edge of the casing and is neatly finished; the joint area is covered with a decorative corner or molding. In any case, the MDF end must be primed and painted.
What to do if the skirting board is higher than the lower part of the casing?
A situation where the skirting board height exceeds the distance from the floor to the lower edge of the casing requires a solution at the selection stage. After installation — only decorative finishing: trimming (if permissible) or visual softening with a corner and painting.
How to finish the end of the skirting board at the door?
Four ways: the end goes under the casing; a straight finished end (primed, painted); a wooden corner covers the end vertically; a skirting board for painting with final putty and painting of the entire assembly.
Which skirting board to choose for white doors?
White MDF baseboard with factory enamel is a straightforward and win-win solution. The only condition: check the shade of white on the baseboard and the casing. They must match.
Can you paint MDF baseboard the color of the wall?
Yes, that's exactly what paintable MDF baseboard is for. After installation, it is primed, puttied, and painted the same color as the walls. The result is a 'disappearing' baseboard, with the wall and floor boundary as a clear geometric line.
What is better: baseboard in the color of the floor or doors?
It depends on the task. A baseboard in the color of the doors creates a unified vertical-horizontal framing system. A baseboard in the color of the floor 'raises' the floor along the wall, creating a depth effect. Both approaches work. A baseboard in the color of the casings is the most architectural option.
How to close the joint between the baseboard and the extension?
If the step between the baseboard and the extension is insignificant — acrylic sealant and painting. If the plane difference is noticeable — a thin extension strip or a decorative molding in the adjoining area.
Is a wooden corner needed at the doorway?
Not always, but in some cases it is the best solution. Especially: when the baseboard is thicker than the casing; with hidden doors without casings; in interiors with wooden doors; with uneven walls near the opening. The corner hides the end, smooths the transition, and adds completeness.
How to properly touch up the end of an MDF baseboard?
Acrylic primer-isolator — 1 coat on the end, let dry. Then — acrylic enamel in the color of the baseboard, 2 thin coats with intermediate drying. Brush — thin, stiff. It's easier to paint before installation; after installation — touch up with a thin brush.
About the company STAVROS
The joint between the baseboard and door casing is a small detail with great significance. And the right material here is just as important as the right installation technique.
STAVROS is a Russian manufacturer of decorative products from solid wood and MDF. The company's catalog includes MDF baseboards in all popular heights with a wide selection of profiles and decors: white with factory enamel, for painting, wood-look (oak, walnut, wenge). The base of the planks is dense MDF class E1 with a thickness of 12–16 mm: exactly the parameter that ensures alignment with the casing and clean installation near the opening.
STAVROS produces a complete system of elements for designing the lower contour of the interior: wooden corners for ends and external corners, moldings for horizontal framing, solid wood baseboards for natural interiors, and linear products for any additional tasks. All elements are manufactured in a unified style and size standard — this guarantees that the baseboard, corner, and molding from STAVROS will fit together as a single system, not as a random set of parts.
buy MDF skirting board with delivery to Moscow, St. Petersburg, and other cities of Russia — in the catalog on the website. Consultation on choosing the profile, height, and decor for specific doors and casings — also there.