Article Contents:
- Why Corners Matter in Architectural Wall Design
- What Is Polyurethane Corner Molding?
- 1. Outside Corner Trim for Projecting Wall Edges
- 2. Inside Corner Molding Connections
- 3. Decorative Corner Blocks for Wall Molding Frames
- Inside Corners
- Outside Corners
- Nonstandard Wall Angles
- Flat Frame Corners Are Different
- Reproduction of Detailed Profiles
- Relatively Low Weight
- Paintable Surfaces
- Detailed Ornamental Corner Elements
- Material Limitations
- Face Width
- Projection
- Profile Geometry
- Material Compatibility
- MLDPU-001: Delicate Architectural Framing
- MLDPU-004: A Balanced Decorative Profile
- MLDPU-002: Stronger Classical Definition
- MLDPU-003: More Substantial Decorative Framing
- When Decorative Corner Blocks Make Sense
- Corner Blocks vs. Decorative Corner Overlays
- MLDPU-1U-1.1: Compact Decorative Corner Block
- MLDPU-4U-1.1: A Larger Symmetrical Corner Accent
- MLDPU-2U-2.1L: Left-Hand Decorative Corner
- MLDPU-2U-2.1R: Right-Hand Decorative Corner
- Decorative Corner Product Comparison
- Step 1: Measure the Actual Corner
- Step 2: Determine the Miter Saw Setting
- Step 3: Identify the Cutting Direction
- Step 4: Cut Test Pieces
- Step 5: Cut the Final Molding
- Step 6: Dry-Fit Both Pieces
- Step 7: Install and Secure
- Method 1: Mitered Inside Corner
- Method 2: Coped Inside Corner
- Method 3: Dedicated Corner Transition
- Which Method Is Best?
- Example: A 135-Degree Bay Window Corner
- Why Test Cuts Are Important
- When a Flexible Profile Is Necessary
- Establish the Frame Layout
- Select a Coordinated Molding System
- Check the Corner Ornament Dimensions
- Choose the Installation Sequence
- Install and Finish the Composition
- Calculate the Nominal Perimeter
- Determine the Stock Requirement
- Calculate the Corner Components
- Prepare the Purchasing Specification
- Project 1: A Projecting Column in a Living Room
- Project 2: Picture Frame Molding Across Two Adjacent Walls
- Project 3: Decorative Trim Around a Doorway Reveal
- Project 4: A Three-Faceted Bay Window
- Project 5: A Decorative Wall Niche
- Classical Interiors
- Neoclassical Interiors
- Transitional Interiors
- Contemporary Interiors
- Art Deco-Inspired Interiors
- Eclectic Interiors
- Drywall
- Plaster
- Brick and Concrete
- Painted Surfaces
- Wallpapered Surfaces
- 1. Prepare a Dimensioned Layout
- 2. Check Product Compatibility
- 3. Establish Reference Lines
- 4. Cut and Dry-Fit the Components
- 5. Apply Compatible Adhesive
- 6. Position the Components
- 7. Provide Temporary Support
- 8. Allow the Adhesive to Cure
- 9. Finish the Joints
- 10. Paint the Assembly
- Monochromatic Finishing
- Contrasting Decorative Trim
- Matte and Satin Finishes
- Avoid Heavy Paint Buildup
- Inspect Under Side Lighting
- Misaligned Molding Heights
- Incorrect Miter Direction
- Assuming Every Corner Is Exactly 90 Degrees
- Confusing Flat Decorative Corners With Wall Edge Trim
- Combining Incompatible Product Series
- Choosing Oversized Corner Ornaments
- Using Too Much Filler
- Ignoring Exposure to Impact
- Inadequate Material Allowance
- Straight Molding Quantities
- Decorative Corner Quantities
- Material Schedule Example
- What Is Polyurethane Corner Molding?
- What Is the Difference Between Inside and Outside Corner Molding?
- Can Regular Polyurethane Molding Be Used Around Corners?
- What Angle Do You Cut Molding for a 90-Degree Corner?
- What Miter Saw Setting Is Used for a 135-Degree Corner?
- Should Inside Corners Be Mitered or Coped?
- What Are Decorative Molding Corner Blocks?
- Can Decorative Corner Blocks Be Used on Actual Outside Wall Corners?
- How Do You Hide Polyurethane Molding Joints?
- Do You Need to Prime Polyurethane Corner Molding?
- Can Polyurethane Corner Trim Be Painted?
- Is Polyurethane Suitable for Bathroom Corners?
- Can Corner Molding Protect a Wall From Damage?
- How Much Extra Molding Should I Order?
- Can Decorative Corner Molding Be Used on Furniture?
- Where Can You Buy Polyurethane Corner Molding?
- Polyurethane Molding Profiles
- Decorative Molding Corner Blocks
- Polyurethane Decorative Onlays
- Complete Architectural Decoration
- What to Verify Before Ordering
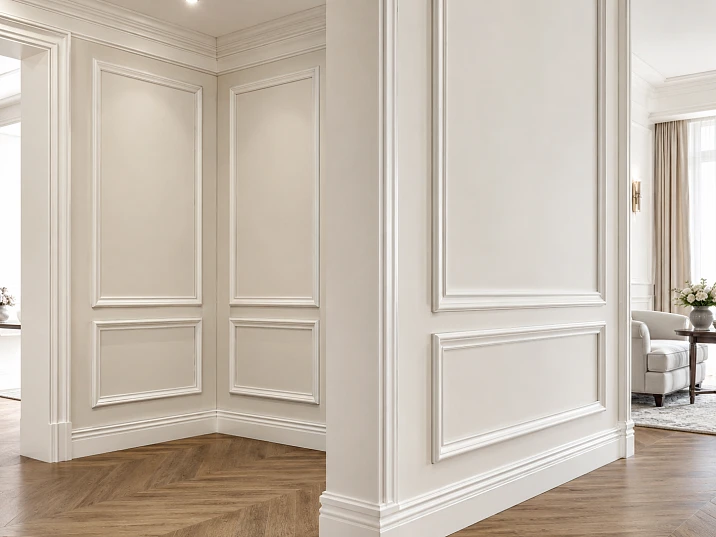
A beautifully decorated wall can lose much of its architectural impact at one poorly finished corner. Straight molding may look perfectly aligned, picture frame panels may have balanced proportions, and the selected paint may complement the entire interior. Yet when a decorative profile reaches the junction between two walls, an exposed end, uneven miter, or mismatched corner element can interrupt the visual continuity of the composition.
Corners are among the most demanding details in architectural trim work because they bring together geometry, material behavior, installation accuracy, and decorative design.
A corner is also an opportunity. Properly selected corner molding can turn an ordinary wall junction into an intentional architectural feature, protect a vulnerable outside edge, or complete a classical decorative frame with an ornamental accent.
Modern polyurethane molding makes many of these applications practical for residential interiors. Its molded profiles can reproduce detailed architectural ornament while remaining relatively lightweight and suitable for paint-grade decorative work.
However, not every product sold as decorative corner molding serves the same purpose.
A molding designed to wrap around the outside edge of a wall is fundamentally different from a decorative corner applique used inside a rectangular wall frame. Similarly, a mitered joint connecting two straight molding lengths is not the same as a purpose-manufactured corner profile.
Understanding these distinctions is essential when choosing materials, planning an installation, or comparing products.
This comprehensive guide explains how to use decorative molding, polyurethane corner trim, outside corner profiles, inside corner joints, and ornamental molding corner blocks in American residential and selected commercial interiors.
It also examines real products from the STAVROS polyurethane molding collection and shows how coordinated profiles and decorative elements can transform ordinary walls into architectural compositions.






Why Corners Matter in Architectural Wall Design
A flat wall provides a relatively simple surface for decorative molding.
The profile follows a defined horizontal or vertical line. When installed accurately, it creates a continuous shadow and establishes the intended architectural division.
A corner changes the geometry.
The molding may need to turn onto another wall, stop at an exposed edge, wrap around a projecting architectural feature, or connect to another profile at a precise angle.
Each situation introduces different technical requirements.
The challenge is not simply making two pieces touch.
A successful corner must maintain the continuity of the molding's face, preserve its cross-sectional geometry, control visible joints, and support the intended architectural style.
Consider a living room with picture frame molding installed along several walls.
If the frames are perfectly aligned on one wall but change height on the adjacent wall, the decorative scheme may appear inconsistent.
Likewise, if a horizontal molding passes around a projecting column and the profile does not align at the corner, the interruption becomes particularly noticeable under directional lighting.
In classical architecture, corners are often treated as significant compositional points.
Decorative capitals, ornamental blocks, scrollwork, and other details can emphasize intersections rather than conceal them.
Contemporary interiors may take the opposite approach, using precise mitered joints and restrained profiles to create visually continuous lines.
Both approaches can be effective.
The difference lies in choosing an appropriate solution for the architectural task.




What Is Polyurethane Corner Molding?
The expression polyurethane corner molding describes several different categories of architectural trim.
In American building and interior design terminology, it is important to distinguish three principal applications.
Наша фабрика также производит:


Смотреть весь Каталог продукции
1. Outside Corner Trim for Projecting Wall Edges
Outside corner trim is designed to finish the exposed edge where two wall surfaces meet at an outward-projecting corner.
This situation occurs around projecting walls, partitions, columns, architectural returns, and certain doorway or window reveals.
A true angle-shaped corner profile may have an L-shaped cross-section that sits against two adjoining surfaces.
It can create a finished decorative transition along the edge.
Some outside corner products are also intended to provide impact protection.
However, decorative polyurethane trim should not automatically be regarded as a protective corner guard unless the specific product has appropriate documented performance.
The important feature is its geometry: an actual outside corner profile must be manufactured or fitted to accommodate two intersecting planes.
Получить консультацию
2. Inside Corner Molding Connections
An inside corner occurs where two walls meet to form a recess.
The most common example is the junction between two perpendicular walls in a rectangular room.
When a decorative molding runs continuously from one wall to the next, the installer must create a suitable connection.
This may involve mitering, coping where the product permits, or using a dedicated transition component.
The choice depends on the profile, wall angle, installation method, and visual requirements.
An inside corner joint is therefore usually a connection between molding lengths rather than a separate ornamental product.
3. Decorative Corner Blocks for Wall Molding Frames
Decorative corner blocks and ornamental appliques are installed at the corners of picture frame molding, wall panel molding, decorative furniture panels, and similar compositions.
They generally attach to a single flat surface.
A corner ornament may cover the intersection of two straight molding pieces or provide a designed transition between them.
The result is an ornamental frame with a more elaborate architectural character.
The STAVROS molding decor collection includes polyurethane corner elements designed for these decorative framing applications.
An essential distinction: A flat ornamental corner applique is not automatically suitable for wrapping around the physical outside corner of a wall. These are different product geometries and should be specified separately.
Inside Corners, Outside Corners, and Nonstandard Angles
The first step in choosing the correct molding solution is identifying the geometry of the installation.
Inside Corners
An inside corner is formed when two surfaces meet in a recessed junction.
Typical examples include ordinary room corners, the inside of a recessed niche, wall-to-wall intersections, and the interior surfaces of architectural openings.
For a conventional 90-degree corner, two suitable flat-backed molding lengths can often be connected using complementary 45-degree miter cuts.
However, actual wall angles may differ from exactly 90 degrees.
Small deviations can create visible gaps when the pieces are cut using an assumed angle.
This is why professional installers measure the actual corner instead of relying entirely on the room's nominal geometry.
Outside Corners
An outside corner occurs where two wall surfaces meet along an outward-projecting edge.
Examples include partial-height partitions, projecting columns, pilasters, wall returns, and certain doorway reveals.
Outside corners are often more visually prominent because the joint is visible from multiple directions.
They are also more exposed to accidental contact.
A poor joint on an outside corner may create a conspicuous shadow or leave a sharp, vulnerable edge.
Depending on the design, the appropriate solution may be a correctly mitered connection, a suitable angle-shaped trim profile, or another specifically designed corner treatment.
Nonstandard Wall Angles
Not every room has square corners.
Bay windows, angled corridors, polygonal rooms, and contemporary architectural layouts may contain corners measuring 120, 135, or other angles.
Existing buildings may also have slightly irregular corners due to construction tolerances or subsequent repairs.
These conditions require accurate measurement.
Use an adjustable angle finder, digital protractor, or suitable template to establish the actual relationship between the surfaces.
For complex compositions, verify the geometry with test pieces before cutting the final decorative molding.
Flat Frame Corners Are Different
A rectangular decorative molding frame installed on one wall also has four 90-degree corners.
However, these are two-dimensional intersections of molding lengths on a single surface.
They are not the same as inside or outside wall corners.
This is precisely the situation for which many ornamental polyurethane corner blocks are designed.
Confusing these applications can lead to purchasing products that look appropriate in photographs but cannot be installed as intended.
Why Polyurethane Is Useful for Decorative Corner Trim
Polyurethane has several characteristics that make it relevant to architectural decorative molding.
Reproduction of Detailed Profiles
Decorative molding frequently includes raised beads, stepped transitions, curved surfaces, and fine ornamental details.
When profiles meet at corners, their geometry becomes especially important.
Molded polyurethane allows repeated profiles and complementary decorative elements to be manufactured with consistent dimensions.
For wall panel systems, this consistency helps create the appearance of coordinated architectural millwork.
Relatively Low Weight
Polyurethane decorative components are generally lighter than comparable solid plaster elements, although actual weight depends on product density and dimensions.
Reduced weight can simplify handling and positioning.
For suitable lightweight interior applications, a manufacturer-approved adhesive may provide the required attachment to a properly prepared substrate.
Larger decorative components or installations exposed to greater stress require additional assessment.
Paintable Surfaces
Many polyurethane molding products are supplied with a surface intended for painting.
Some STAVROS polyurethane profiles are factory-primed.
After suitable installation, joint preparation, and finishing, straight molding and decorative corner elements can appear as one architectural composition.
This is particularly valuable for monochromatic wall treatments.
Detailed Ornamental Corner Elements
Polyurethane is well suited to sculptural corner decoration.
Floral motifs, acanthus leaves, classical scrollwork, and other complex forms can be reproduced as individual decorative components.
These details are useful when a designer wants the corner of a wall frame to become a visible accent rather than a nearly invisible joint.
Material Limitations
Polyurethane products vary in their rigidity, density, impact resistance, fire performance, and coating requirements.
The material should not be assumed to be indestructible, permanently dimensionally stable, or suitable for every environment.
For exposed corners, consider the likelihood of impact.
For bathrooms or kitchens, evaluate the complete installation system.
For commercial buildings, verify applicable fire-performance and code requirements.
For exterior use, confirm that the exact product is approved for the expected environmental exposure.
Choosing Polyurethane Molding for Corner Applications
Selecting the correct profile begins with the architectural task.
A product suitable for delicate decorative frames may be inappropriate for a projecting wall edge.
Likewise, a large ornamental corner applique may overwhelm a compact wall panel.
Face Width
Face width determines how much visible surface the molding occupies.
Narrow profiles produce relatively delicate architectural lines.
Wider profiles create stronger emphasis.
For compact decorative frames, a profile approximately 3/8 to 5/8 inch wide may be sufficient.
For larger wall panel compositions, widths approaching 7/8 to 1 1/2 inches can create more pronounced architectural definition.
These ranges are design starting points, not fixed rules.
Projection
Projection is the distance the molding extends outward from the mounting surface.
A deep profile creates stronger shadows.
However, it also makes joints more visually prominent and increases the importance of clearances.
On exposed outside corners, excessive projection may increase the likelihood of accidental contact.
Profile Geometry
A simple rounded profile is generally easier to integrate into restrained contemporary designs.
A stepped profile produces multiple shadow lines.
An ornamental profile may require pattern matching at corners.
The more complex the cross-section, the more carefully the installer must consider the method of joining adjacent sections.
Material Compatibility
A project may use straight polyurethane molding together with polyurethane decorative corners.
Some decorative systems also combine polyurethane ornaments with primed MDF profiles.
This can be a valid specification, but the materials must be clearly identified.
If a project requires an entirely polyurethane decorative assembly, verify the material of every selected component.
STAVROS Polyurethane Molding Profiles for Decorative Frames
The STAVROS catalog contains several molding profiles that can be coordinated with decorative corner elements.
The following examples illustrate different scales of architectural relief.
| Profile | Approximate face width | Projection | Stock length | Typical application |
|---|---|---|---|---|
| MLDPU-001 | 0.39 in | 0.24 in | 102.36 in | Fine decorative frames |
| MLDPU-004 | 0.59 in | 0.31 in | 102.36 in | Narrow to medium wall panel detailing |
| MLDPU-002 | 0.87 in | 0.43 in | 102.36 in | Pronounced classical frames |
| MLDPU-003 | 1.38 in | 0.47 in | 102.36 in | Larger architectural panel compositions |
MLDPU-001: Delicate Architectural Framing
The STAVROS MLDPU-001 polyurethane molding provides a relatively narrow decorative profile.
Its compact width makes it useful for smaller wall panels, restrained neoclassical frames, and selected furniture or door decorations.
When several small frames are repeated across a wall, a delicate molding can create architectural rhythm without visually overloading the room.
MLDPU-004: A Balanced Decorative Profile
The STAVROS MLDPU-004 polyurethane molding has a 0.59-inch face width and approximately 0.31-inch projection.
Its cross-section includes a rounded central feature and stepped transitions.
This provides more visual depth than a very narrow bead while preserving a relatively restrained appearance.
It is suitable for classical and transitional wall panel compositions.
MLDPU-002: Stronger Classical Definition
The STAVROS MLDPU-002 molding measures approximately 0.87 inch wide and 0.43 inch deep.
It has a more substantial cross-section.
This makes it useful for larger decorative frames, formal rooms, and projects where the molding must remain visible at normal viewing distances.
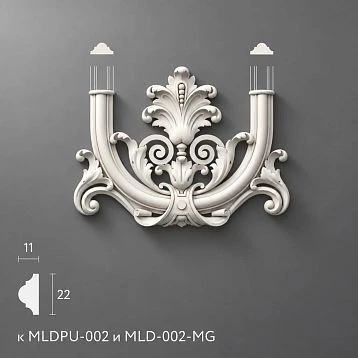
The series also has compatible ornamental corner elements.
MLDPU-003: More Substantial Decorative Framing
The STAVROS MLDPU-003 polyurethane molding has a face width of approximately 1.38 inches.
Its larger scale can establish a more prominent architectural border.
It is particularly relevant when the design includes expansive wall panels or when decorative framing is intended to become an important visual feature.
Before combining this or any other profile with a corner applique, confirm product-series compatibility.
Decorative Molding Corner Blocks: A Different Approach to Corners
A mitered joint attempts to make two molding pieces meet with a continuous profile.
An ornamental corner block follows a different architectural principle.
Instead of minimizing the corner, it gives the intersection a deliberate decorative identity.
In classical interiors, important architectural intersections often receive special treatment.
The corner may feature a rosette, shell, floral ornament, or other sculptural detail.
Modern polyurethane components allow designers to recreate this approach in wall panel compositions.
When Decorative Corner Blocks Make Sense
Ornamental corner blocks are useful when the design calls for visible decorative emphasis.
They can also simplify the treatment of certain frame corners when the product is designed to connect or overlap straight molding sections.
For example, a rectangular frame with four ornamental corners may appear more formal than the same frame assembled using simple miters.
The decorative blocks establish four visual anchor points.
However, corner blocks should not be used automatically.
A highly ornamented corner may look excessive in a minimalist room.
The goal is to match the detail to the architectural language of the interior.
Corner Blocks vs. Decorative Corner Overlays
A corner block may receive molding ends directly.
A decorative overlay may instead be positioned over an already assembled corner joint.
These are different installation arrangements.
The correct sequence depends on the specific product.
Some systems are easiest to install with corner components positioned first, followed by straight sections.
Others require the straight molding frame to be installed and cured before the decorative overlay is attached.
Confirm the design and installation method before cutting the molding.
Compatible STAVROS Decorative Corner Elements
The STAVROS catalog includes corner decorations designed for particular molding series.
These products are intended primarily for ornamental frame intersections on a flat surface.
MLDPU-1U-1.1: Compact Decorative Corner Block
The STAVROS MLDPU-1U-1.1 polyurethane corner element measures approximately 3.82 × 3.82 × 0.39 inches.
It is designed for coordinated use with MLDPU-001 and the corresponding MLD-001-MG molding system.
Its square geometry creates a balanced ornamental corner for relatively delicate wall frames.
Four matching elements can be used to emphasize the corners of one rectangular frame.
This approach works particularly well in classical bedrooms, traditional dining rooms, and restrained decorative wall compositions.
MLDPU-4U-1.1: A Larger Symmetrical Corner Accent
The STAVROS MLDPU-4U-1.1 decorative corner measures approximately 5.71 × 5.71 × 0.55 inches.
It is associated with the MLDPU-004 molding series and its primed MDF counterpart.
The square decorative format allows the corner to become a stronger architectural accent.
For a medium-sized framed panel, four such elements can introduce an ornamental rhythm without requiring the entire molding perimeter to be highly decorated.
MLDPU-2U-2.1L: Left-Hand Decorative Corner
The STAVROS MLDPU-2U-2.1L corner element measures approximately 7.87 × 5.31 × 0.79 inches.
It is designed for coordinated use with MLDPU-002 and MLD-002-MG molding systems.
The ornamental design has a specific left-hand orientation.
This matters when a project requires a symmetrical arrangement of decorative corners.
MLDPU-2U-2.1R: Right-Hand Decorative Corner
The STAVROS MLDPU-2U-2.1R corner element is the corresponding right-hand component.
It has the same nominal dimensions but a mirrored ornamental orientation.
A conventional rectangular frame using this matched system may require two left-hand and two right-hand corner elements.
The final orientation should be verified against the product drawings and the proposed frame layout before ordering.
Decorative Corner Product Comparison
| STAVROS product | Approximate dimensions | Matching molding system |
|---|---|---|
| MLDPU-1U-1.1 | 3.82 × 3.82 × 0.39 in | MLDPU-001 |
| MLDPU-4U-1.1 | 5.71 × 5.71 × 0.55 in | MLDPU-004 |
| MLDPU-2U-2.1L | 7.87 × 5.31 × 0.79 in | MLDPU-002 |
| MLDPU-2U-2.1R | 7.87 × 5.31 × 0.79 in | MLDPU-002 |
These products provide different levels of ornamental emphasis.
The appropriate choice depends on the width of the frame, the amount of surrounding wall space, and the desired architectural character.
A larger ornament is not automatically better.
The strongest design usually preserves a clear hierarchy between the corner elements and the straight molding.
How to Cut Polyurethane Molding for Outside Corners
Outside corners are among the most visible trim joints.
A correctly fitted outside miter should maintain the profile's geometry as the molding changes direction.
The following method applies to suitable flat-backed decorative molding cut in a conventional flat orientation.
It does not automatically apply to crown molding, which may require compound miter and bevel settings.
Step 1: Measure the Actual Corner
Place an angle finder against the adjoining wall surfaces.
Determine the included angle between the molding runs.
For a conventional square corner, the two runs meet at 90 degrees.
However, an existing wall may be slightly out of square.
Even a small deviation can affect the fit of the joint.
Step 2: Determine the Miter Saw Setting
For two equal, flat miter cuts meeting at a corner, the appropriate saw setting depends on the included angle.
On a conventional miter saw, zero degrees represents a square cut across the molding.
For a 90-degree corner, each piece normally requires a 45-degree miter setting.
For other included angles, use the relationship:
Miter saw setting = (180° − included angle) ÷ 2
Examples:
| Included corner angle | Approximate miter saw setting for each piece |
|---|---|
| 90° | 45° |
| 120° | 30° |
| 135° | 22.5° |
| 150° | 15° |
These values assume a simple flat miter joint and the usual saw-scale convention.
The physical angle between the cut face and the length of the molding is a different measurement.
Always verify the actual joint with test pieces, particularly when the corner geometry or saw setup is unusual.
Step 3: Identify the Cutting Direction
Inside and outside miters use different orientations.
The two pieces must be cut as complementary parts of the same joint.
Mark the profile's visible face and the intended installation direction before cutting.
This reduces the risk of producing two identical cuts when the joint requires mirrored cuts.
Step 4: Cut Test Pieces
Before cutting the final stock, prepare short test pieces.
Place them against the actual corner.
Inspect the joint from multiple directions.
Check whether the visible profile continues smoothly.
If the cut is incorrect, adjust the saw setting in small increments.
Step 5: Cut the Final Molding
Use a suitable fine-tooth blade and secure the profile against the saw fence.
Support longer pieces to prevent movement.
Cut carefully to preserve the edge geometry.
Thin decorative sections may be vulnerable to damage if the blade is dull or the molding is inadequately supported.
Step 6: Dry-Fit Both Pieces
Hold the pieces against the corner simultaneously.
Check that the mitered faces meet properly.
Look for gaps along the visible face and at the back of the joint.
A joint that only closes when the molding is forced into position should be corrected before installation.
Step 7: Install and Secure
Use an adhesive compatible with the polyurethane product and receiving substrate.
Where the molding system specifies a joint adhesive, apply it according to the manufacturer's instructions.
Position both pieces and verify alignment.
Provide temporary support as needed.
Allow the adhesive to cure according to its technical requirements.
How to Finish Inside Corners With Polyurethane Molding
Inside corners require a different approach because the joint is recessed rather than exposed.
A clean result depends on the profile, wall geometry, and appropriate joining method.
Method 1: Mitered Inside Corner
For suitable decorative polyurethane profiles, a mitered joint can provide a continuous appearance.
The process begins with accurate measurement of the included wall angle.
For a true 90-degree corner, complementary 45-degree cuts are a common starting point.
If the corner is not square, adjust the cuts accordingly.
Dry-fit the two sections before applying adhesive.
The visible profile should continue smoothly through the junction.
A small cosmetic imperfection may be repairable during finishing, but large gaps indicate that the pieces should be recut.
Method 2: Coped Inside Corner
Coping is a traditional finish-carpentry technique often used with wood trim.
Instead of joining two angled faces, one molding section terminates against the wall while the second is shaped to follow the first profile's cross-section.
This can create a joint that is more tolerant of certain wall irregularities.
However, coping suitability depends on the molding material and profile.
Some polyurethane products may be too brittle, thin, or intricately shaped for convenient coping.
Use this method only when appropriate for the selected product.
Method 3: Dedicated Corner Transition
Some decorative systems incorporate a manufacturer-designed corner transition.
A suitable component may allow the straight molding lengths to terminate at a defined junction.
However, the part must be specifically designed for the relevant wall geometry.
A flat decorative corner applique intended for picture frame molding should not be assumed to fit a three-dimensional inside wall corner.
Which Method Is Best?
For a simple flat-backed decorative profile, an accurate miter is often a practical solution.
For suitable conventional trim, coping may offer advantages.
For a purpose-designed architectural system, a compatible transition component may simplify installation.
The decision should follow the actual product geometry and wall conditions rather than a universal rule.
Decorative Corner Molding for Nonstandard Angles
Angled walls require particular care.
A bay window, for example, may contain several wall planes connected at obtuse angles.
A molding that crosses these intersections must preserve its position, profile, and visual continuity.
Example: A 135-Degree Bay Window Corner
Suppose two flat wall sections meet at an included angle of 135 degrees.
The direction change between the molding runs is 45 degrees.
For a conventional flat miter joint, two 22.5-degree saw settings create the required complementary cuts.
This is different from cutting a standard 90-degree wall corner.
The correct process is to measure the actual angle, mark the profile orientation, cut test pieces, and adjust the fit as necessary.
Why Test Cuts Are Important
Real corners may deviate from the nominal design angle.
The walls may also have local irregularities.
A mathematically correct saw setting does not guarantee a perfect joint if the receiving surfaces are uneven.
Short test pieces allow the installer to identify these issues before using the final material.
When a Flexible Profile Is Necessary
If the design follows a genuinely curved wall rather than a sequence of flat facets, mitering straight pieces may not create the intended appearance.
A flexible molding system may be more appropriate.
However, not every polyurethane profile is flexible.
Confirm that a compatible flexible version exists and that its minimum bending radius accommodates the design.
How to Use Decorative Corner Blocks in Picture Frame Molding
Picture frame molding is a common architectural wall treatment in American homes.
It uses straight molding lengths to create rectangular or geometric frames.
Decorative corner blocks can make these frames more elaborate.
Establish the Frame Layout
Begin with a wall elevation showing the position and dimensions of every frame.
The layout should relate to furniture, doors, windows, electrical fixtures, and the overall architecture.
For repeated frames, maintain consistent margins and spacing.
Select a Coordinated Molding System
Choose the straight molding according to the intended architectural scale.
Then select corner elements designed for that molding series.
For example, a delicate frame using MLDPU-001 can be coordinated with its matching corner decoration.
A stronger frame using MLDPU-002 may benefit from the larger MLDPU-2U series ornaments.
Check the Corner Ornament Dimensions
The size of the decorative corner influences the visible proportions of the frame.
A large applique occupies more of the horizontal and vertical frame lengths.
On a small frame, this can make the straight sections appear too short.
Before ordering, compare the complete corner dimensions with the proposed frame.
Choose the Installation Sequence
The correct sequence depends on how the corner product connects to the straight molding.
For a corner block designed to receive square-cut molding ends, it may be practical to position the blocks first.
For a decorative overlay intended to cover an assembled corner, the straight molding may need to be installed before the applique.
A dry-fit mock-up is valuable in either case.
Install and Finish the Composition
Attach the components using compatible materials.
Verify alignment and symmetry.
Allow the adhesive to cure.
Prepare visible transitions using appropriate filler or joint treatment.
Apply the selected finish so that the different components form one coherent architectural arrangement.
A Worked Example: Three Decorative Wall Frames With STAVROS Corner Elements
Consider a living room accent wall with three rectangular decorative frames.
Each frame has outside dimensions of 30 inches wide and 60 inches high.
The frames use a coordinated polyurethane molding system.
Calculate the Nominal Perimeter
For one rectangular frame:
2 × (30 + 60) = 180 inches.
For three frames:
3 × 180 = 540 inches.
This equals 45 linear feet.
Determine the Stock Requirement
Suppose the selected molding is supplied in nominal 102.36-inch lengths.
Each frame requires two vertical pieces and two horizontal pieces.
For three frames, the preliminary cutting requirement is six vertical pieces and six horizontal pieces.
Under a simple mitered-frame cutting arrangement, one stock length can potentially yield one 60-inch vertical and one 30-inch horizontal piece, allowing sufficient room for ordinary saw kerf.
This produces a theoretical requirement of six stock lengths.
However, if the design uses decorative corner blocks or overlays, the finished lengths may differ.
The cutting schedule must therefore be adjusted to the actual connection details.
An additional length may be appropriate as a reserve.
Calculate the Corner Components
Three frames contain twelve corner positions.
For a symmetrical system using mirrored left- and right-hand elements, the preliminary requirement may be six left-hand and six right-hand pieces.
For example:
Six MLDPU-2U-2.1L corner elements.
Six MLDPU-2U-2.1R corner elements.
Confirm orientation against the final drawing and product configuration.
Prepare the Purchasing Specification
The order should identify the straight molding series, corner element codes, required quantities, adhesive, joint treatment, and finishing materials.
This is more reliable than ordering decorative pieces independently.
Architectural Applications for Corner Molding
Corner molding can solve different problems throughout the home.
The correct treatment depends on whether the corner is structural, decorative, or part of a larger composition.
Project 1: A Projecting Column in a Living Room
Suppose a living room contains a projecting wall pier approximately 10 inches wide and extending nearly 10 feet vertically.
The pier may appear as an interruption in an otherwise flat wall.
A carefully designed trim arrangement can make it read as an intentional architectural feature.
One approach is to use restrained molding profiles on the visible faces, with accurately fitted transitions around the corners.
The main decorative lines should remain aligned across adjoining surfaces.
If the design includes a capital-like accent near the upper portion, select a component whose geometry suits the pier.
An ornamental wall applique may be used on the front face.
A true outside corner profile may be used along the edge if the design requires a continuous angle-shaped treatment.
These products serve different roles.
Painting the pier and decorative elements in one color can integrate the composition into the room.
Project 2: Picture Frame Molding Across Two Adjacent Walls
Consider a bedroom in which decorative panel molding appears on the headboard wall and continues onto an adjacent wall.
The two walls meet at a conventional inside corner.
The frames should be planned as related but separate architectural fields unless the design specifically requires a molding line to cross the wall junction.
If a horizontal molding does cross the corner, the connection must be designed accordingly.
A compatible mitered joint can preserve continuity.
The decorative frames themselves may use ornamental corner blocks on their flat surfaces.
The result is a coordinated room-wide architectural treatment.
Project 3: Decorative Trim Around a Doorway Reveal
An open interior doorway may have a reveal approximately 6 inches deep.
The junction between the main wall and the reveal creates an outside edge.
The junction between the reveal and adjacent interior surfaces may create additional corners.
A complete decorative treatment should distinguish the front-facing casing from any trim installed on the reveal.
A suitable angle-shaped trim profile may be used at the outside edge.
Straight decorative molding can provide additional framing.
Ornamental corner blocks may be used where two molding lengths meet on the same flat face.
The design should preserve all necessary opening clearances.
Project 4: A Three-Faceted Bay Window
A bay window may have multiple wall planes joined at obtuse angles.
The decorative scheme should be planned as one continuous composition.
Use an angle finder to measure each transition.
For a nominal 135-degree included angle, a 22.5-degree flat miter saw setting is a conventional starting point.
Check the actual geometry before cutting.
The profile should remain consistent across the individual facets.
The final appearance depends on precise alignment and controlled joint treatment.
Project 5: A Decorative Wall Niche
A recessed wall niche may contain both inside and outside corners.
The visible front opening may be framed with decorative molding.
Inside the recess, other surfaces may require simpler edge treatment.
Do not assume that one decorative corner product will solve every junction.
Select a suitable profile for each location.
For a traditional design, ornamental corner appliques may be used on the front-facing decorative frame.
For a modern design, clean miters and restrained profiles may provide a more appropriate result.
Selecting Corner Molding by Interior Design Style
Architectural corner details should support the overall character of a room.
Classical Interiors
Traditional classical design often uses symmetrical decorative frames and ornamented corner elements.
Floral appliques, scrollwork, and sculptural corner blocks can reinforce the architectural composition.
The ornament should be proportionate to the frame.
A heavily decorated corner may require simpler straight molding to maintain visual balance.
Neoclassical Interiors
Neoclassical interiors combine traditional proportions with more restrained decoration.
A medium-width molding and carefully selected corner elements can create an elegant result.
Monochromatic paint often works particularly well.
The decorative detail remains visible through the play of light and shadow.
Transitional Interiors
Transitional interiors allow classical profiles to coexist with contemporary furnishings.
A restrained ornamental corner can add personality without turning the entire room into a historical composition.
A useful approach is to use accurate mitered joints for most frames and reserve decorative corner elements for selected focal areas.
Contemporary Interiors
Modern interior design generally favors clean geometry.
Simple profiles and precise joints are often more appropriate than elaborate corner ornaments.
A subtle polyurethane molding can create architectural depth without introducing strong historical references.
Art Deco-Inspired Interiors
Art Deco design often emphasizes geometric order, symmetry, and strong architectural lines.
Stepped molding profiles and selected geometric corner details can support this language.
The corner ornament should reinforce the geometry rather than interrupt it.
Eclectic Interiors
Eclectic interiors can combine different architectural references.
However, decorative corner elements should still relate to the molding profile, surrounding materials, and overall scale.
A consistent color or finish can help unify components from different visual traditions.
How to Prepare Walls Before Installing Polyurethane Corner Trim
A professional result depends on the condition of the receiving surface.
Drywall
Drywall is common in American homes.
For lightweight decorative polyurethane trim, properly prepared drywall may provide a suitable receiving surface for an approved adhesive.
Inspect the existing paint.
Peeling or poorly bonded coatings must be repaired.
Do not attach decorative elements over loose drywall paper or unstable joint compound.
Plaster
Older homes may contain plaster walls.
Inspect the surface for loose material, cracks, or damaged areas.
Repair unstable sections before installation.
A decorative molding cannot compensate for a failing substrate.
Brick and Concrete
Masonry can provide a durable base, but surface texture and porosity affect adhesion.
Some installations require preparation, leveling, or specific primers.
Use attachment materials compatible with both the polyurethane product and masonry substrate.
Painted Surfaces
A sound painted surface may be suitable for certain adhesive installations.
However, glossy, contaminated, or weakly bonded paint may require additional preparation.
Follow the adhesive manufacturer's instructions.
Wallpapered Surfaces
Installing molding directly over wallpaper may be unreliable because the connection depends on the wallpaper adhesive.
Where necessary, remove wallpaper from the intended bonding area and prepare the underlying surface.
Installing Straight Molding and Decorative Corner Elements
The overall installation process should follow a consistent sequence.
1. Prepare a Dimensioned Layout
Identify every corner and determine whether it requires a miter, a special transition, or an ornamental corner applique.
Mark the positions on a wall elevation.
2. Check Product Compatibility
Confirm the selected molding profile and any corresponding decorative corner components.
Do not rely solely on visual similarity.
Compare product codes, dimensions, relief depth, and intended installation geometry.
3. Establish Reference Lines
Use a laser level or reliable level to mark the installation height.
For molding continuing across adjacent walls, carry the reference line through the corner.
This helps prevent a visible vertical offset.
4. Cut and Dry-Fit the Components
Prepare each molding section according to the final cutting schedule.
Dry-fit the entire corner assembly.
Inspect the profile alignment and any ornamental pattern.
5. Apply Compatible Adhesive
Use an installation adhesive approved for the selected polyurethane product and substrate.
Apply it in accordance with the manufacturer's instructions.
Some systems may require a separate joint adhesive.
6. Position the Components
Attach the molding to the reference lines.
Check alignment.
For a mitered outside corner, it is often useful to fit and position both adjoining pieces within the adhesive's working time.
For decorative corner overlays, follow the connection sequence required by the product.
7. Provide Temporary Support
Use appropriate temporary support where necessary.
Painter's tape may be sufficient for some lightweight elements.
Other products require more substantial support during curing.
8. Allow the Adhesive to Cure
Follow the specified curing requirements.
Do not begin aggressive finishing or place stress on the connection before the adhesive has developed the required strength.
9. Finish the Joints
Use the correct material for each type of joint.
Suitable rigid fillers may be used for certain cosmetic defects.
Compatible paintable caulk may be appropriate for selected molding-to-wall transitions.
Flexible caulk generally should not be treated as a sandable filler.
Avoid using excessive material to hide poor cutting.
10. Paint the Assembly
Clean the surface.
Apply primer where required.
Finish the molding and decorative corner elements using a compatible coating system.
For a monochromatic treatment, the molding and wall may be painted in the same color and sheen.
This can create the impression of a continuous architectural surface.
How to Paint Polyurethane Corner Molding Professionally
Painting is not simply a cosmetic final step.
It determines whether the completed decorative system appears coherent.
Monochromatic Finishing
Painting the molding, corner ornaments, and wall the same color emphasizes the physical relief.
This approach is particularly effective in contemporary neoclassical interiors.
The corner detail becomes visible through shadow rather than contrasting color.
Contrasting Decorative Trim
White decorative molding on a colored wall creates a more traditional architectural appearance.
The contrast makes the molding geometry clear.
However, it also emphasizes irregular joints and inconsistent alignment.
Matte and Satin Finishes
Matte paint creates a restrained appearance.
Satin paint reflects more light and may emphasize rounded or stepped profiles.
The choice depends on the desired aesthetic and the expected cleaning requirements.
Avoid Heavy Paint Buildup
Fine ornamental details can lose definition when paint accumulates in their recesses.
Apply thin, controlled coats.
Use brushes and rollers appropriate for the profile and paint.
Inspect Under Side Lighting
Directional light reveals the quality of a corner joint.
Before applying the final coat, inspect the assembly with a work light directed along the wall.
Correct visible gaps, raised edges, and surface defects before finishing.
Common Corner Molding Mistakes and How to Avoid Them
Several mistakes repeatedly reduce the quality of decorative molding installations.
Misaligned Molding Heights
When a molding continues around a wall corner, both sections should meet at the intended elevation.
A vertical offset cannot be corrected with caulk or paint.
Carry the layout reference across both walls before installation.
Incorrect Miter Direction
A correct saw angle cut in the wrong direction produces an unusable joint.
Mark the visible face, top edge, and installation orientation before cutting.
Assuming Every Corner Is Exactly 90 Degrees
Existing walls may be out of square.
Measure the actual angle and use test pieces.
Confusing Flat Decorative Corners With Wall Edge Trim
An ornamental corner applique designed for a flat picture frame should not be purchased as an L-shaped outside wall corner profile.
Verify the actual cross-section and mounting geometry.
Combining Incompatible Product Series
A decorative corner from one molding series may not align properly with another.
Check documented compatibility.
Choosing Oversized Corner Ornaments
Large decorative corners can dominate small frames.
Evaluate the size of the ornament relative to the complete composition.
Using Too Much Filler
Large quantities of filler can soften the molding profile and create visible surface differences.
Correct the underlying joint whenever possible.
Ignoring Exposure to Impact
An outside corner in a narrow hallway may be struck by furniture or luggage.
Select the profile and installation system according to expected use.
Where actual impact protection is needed, choose a product intended and rated for that function.
Inadequate Material Allowance
Complex projects may require additional stock because of mitering, cutting mistakes, or ornament matching.
Prepare a cutting schedule before ordering.
How Much Polyurethane Corner Molding Should You Buy?
Material estimation should distinguish straight molding from individual decorative components.
Straight Molding Quantities
Measure every straight run.
Record the required finished dimensions.
Account for stock lengths, miter cuts, and installation waste.
A nominal percentage allowance can be useful for budgeting, but the actual quantity should follow the cutting plan.
Decorative Corner Quantities
Count the corner positions that will use ornamental components.
For symmetrical square corner blocks, a rectangular frame typically uses four pieces.
For mirrored left- and right-hand designs, calculate each orientation separately.
Material Schedule Example
| Material | Purpose | Quantity method |
|---|---|---|
| Straight polyurethane molding | Decorative frame perimeter | Cutting schedule |
| Inside or outside corner trim, if specified | Transition at actual wall edges | By run and profile length |
| Decorative corner blocks | Flat frame intersections | Number of specified corner positions |
| Central decorative onlays | Architectural accents | By design |
| Compatible installation adhesive | Attachment | Manufacturer coverage |
| Joint adhesive or compatible filler | Joint preparation | Product requirements |
| Paintable caulk | Suitable wall transitions | Actual joint lengths |
| Primer and paint | Finish | Surface area and coating coverage |
For multiroom projects, organize the schedule by room, wall, and product code.
This makes purchasing and installation more predictable.
How Much Does Decorative Corner Molding Cost?
The cost of a completed architectural molding project depends on several factors.
The selected molding profile affects material cost.
The number of corners influences cutting and joint preparation.
Ornamental corner blocks introduce additional components.
Complex wall geometry can increase installation labor.
Painting and surface preparation also contribute to the total.
When comparing two design options, calculate the completed cost rather than only the price per molding length.
A simple mitered frame may require fewer decorative products.
A frame with four sculptural corner elements may require more material but create a stronger classical appearance.
The additional expense may be justified by the architectural intent.
For current STAVROS pricing, consult the relevant product pages and confirm availability and delivery conditions before ordering.
Frequently Asked Questions About Polyurethane Corner Molding
What Is Polyurethane Corner Molding?
Polyurethane corner molding is decorative architectural trim used in corner-related applications.
Depending on the product, it may finish an actual wall edge, form a mitered transition between molding runs, or provide an ornamental corner for a decorative frame.
These products are not interchangeable.
What Is the Difference Between Inside and Outside Corner Molding?
Inside corners occur where surfaces meet in a recess.
Outside corners occur at projecting edges.
The required molding geometry and joining method depend on the type of corner.
Can Regular Polyurethane Molding Be Used Around Corners?
Yes, suitable flat-backed polyurethane molding can often be cut and joined at corners.
Accurate angle measurement, cutting, and installation are essential.
Some applications may benefit from dedicated transition components.
What Angle Do You Cut Molding for a 90-Degree Corner?
For a conventional flat miter joint, two complementary 45-degree cuts are commonly used.
Verify the actual wall angle before cutting.
What Miter Saw Setting Is Used for a 135-Degree Corner?
For two flat molding runs meeting at an included angle of 135 degrees, a conventional miter saw setting of 22.5 degrees on each piece is the usual starting point.
This assumes the molding is cut flat and the saw scale measures deviation from a square cut.
Should Inside Corners Be Mitered or Coped?
Both methods may be appropriate depending on the product and installation.
Coping is common with certain traditional trim materials and profiles.
For decorative polyurethane, follow the manufacturer's guidance and evaluate whether the profile can be coped without damage.
What Are Decorative Molding Corner Blocks?
They are individual ornamental components installed at the corners of decorative frames.
They may conceal or replace the visual emphasis of a conventional miter joint.
STAVROS offers compatible corner elements for several molding series.
Can Decorative Corner Blocks Be Used on Actual Outside Wall Corners?
Not automatically.
Most flat ornamental frame corners are designed for a single planar surface.
A true outside wall corner requires a component or joint suited to the geometry of two intersecting surfaces.
How Do You Hide Polyurethane Molding Joints?
Begin with accurate cuts and a suitable connection method.
Use the specified joint adhesive where required.
Correct small cosmetic defects with compatible finishing materials.
Prime repaired areas when necessary and apply the final coating.
Do You Need to Prime Polyurethane Corner Molding?
That depends on whether the product is factory-primed and on the selected coating system.
Unprimed surfaces, exposed cut ends, and repaired areas may require additional preparation.
Can Polyurethane Corner Trim Be Painted?
Many polyurethane decorative products are designed for painting.
Use compatible architectural coatings and follow the manufacturer's preparation instructions.
Is Polyurethane Suitable for Bathroom Corners?
Certain polyurethane products may be suitable for bathroom applications.
The complete installation system must be appropriate for moisture exposure.
Do not assume that every decorative polyurethane molding is approved for direct wet locations.
Can Corner Molding Protect a Wall From Damage?
Some purpose-designed corner guards and protective profiles provide impact protection.
Ordinary decorative polyurethane molding should not be assumed to offer the same performance.
Select products according to their documented intended use.
How Much Extra Molding Should I Order?
The required reserve depends on the stock length, number of cuts, corner geometry, and complexity of the layout.
A detailed cutting schedule is more reliable than a fixed universal percentage.
Can Decorative Corner Molding Be Used on Furniture?
Suitable polyurethane decorative elements may be used on cabinet fronts, furniture panels, and other approved surfaces.
Check adhesive compatibility, product dimensions, and clearances around moving components.
Where Can You Buy Polyurethane Corner Molding?
STAVROS offers decorative polyurethane molding profiles and compatible ornamental corner elements for wall frames, furniture panels, and selected architectural applications.
Explore the STAVROS molding decor catalog and polyurethane molding collection.
Buy Polyurethane Molding and Decorative Corner Elements From STAVROS
A professional decorative molding project begins with selecting a complete system.
Straight molding establishes the architectural lines.
Corner connections preserve continuity.
Ornamental appliques introduce visual emphasis where the design requires it.
STAVROS offers coordinated polyurethane molding profiles and decorative elements for classical, neoclassical, transitional, and other interior compositions.
Polyurethane Molding Profiles
Explore the STAVROS polyurethane molding collection to compare profile dimensions, relief depth, and suitable decorative applications.
The MLDPU-001, MLDPU-004, and MLDPU-002 series provide different scales of architectural framing.
Decorative Molding Corner Blocks
The STAVROS molding corner and decorative accents collection includes ornamental pieces intended for coordinated frame systems.
Choose the corner elements according to the matching molding series.
Where directional left- and right-hand components are required, specify the correct quantities.
Polyurethane Decorative Onlays
For additional sculptural details, explore STAVROS polyurethane onlays and appliques.
These products can be used as focal points within suitable wall panels, decorative frames, and other approved interior applications.
Complete Architectural Decoration
For projects involving multiple coordinated decorative elements, browse the STAVROS polyurethane relief decoration catalog.
A complete specification should identify each product code, dimensions, quantities, intended mounting surface, and finish.
What to Verify Before Ordering
Before purchasing, confirm the actual function of each corner component.
Determine whether the project requires a physical wall-edge profile, a mitered connection, or an ornamental corner applique.
Check the product's material, dimensions, orientation, and compatibility with adjacent profiles.
Review the intended installation method and coating requirements.
For projects in the United States, verify international shipping availability, delivery cost, and applicable import arrangements before finalizing the order.
This ensures that the selected decorative system is appropriate for both the architectural design and the practical requirements of the project.
Conclusion: The Best Corner Details Make the Entire Design More Convincing
Corners are among the smallest architectural details in a decorative wall system, yet they often determine whether the installation appears carefully designed or improvised.
A precise miter can allow molding to continue smoothly from one surface to another.
An appropriate outside corner profile can provide a clean transition along a projecting edge.
A coordinated ornamental corner block can transform a simple rectangular frame into a more expressive classical composition.
Polyurethane expands these possibilities by allowing detailed profiles and sculptural accents to be produced as consistent decorative components.
However, the material alone does not guarantee a professional result.
The correct corner geometry must be identified. Profiles must be proportionate to their surroundings. Decorative components must be compatible. Cuts must be accurate, joints properly finished, and the final paint system carefully selected.
The strongest architectural interiors are built from precisely coordinated details.
A well-designed corner does not merely connect two lines of molding. It connects the entire architectural composition.
Explore STAVROS polyurethane molding, decorative corner elements, and architectural onlays to create cohesive wall panel systems, decorative frames, and refined interior details.