Article Contents:
- What exactly we are buying: MLDPU-027 14 × 9 × 2600 mm
- Why a room height of 2700 mm cannot be automatically converted into 2700 mm of molding
- The 100 mm threshold: the main calculation for a 2.7 m wall
- Measure at the location of the future molding, not in the center of the room
- What to consider the lower and upper points of MLDPU-027
- From below
- From above
- When one plank is definitely enough
- The baseboard already shortens the vertical
- There is a cornice or another profile on top
- There is both a bottom and a top finish
- When the second plank is truly inevitable
- Why a short 100 mm insert usually looks worse than a pre-designed joint
- If a second plank is needed, it's not necessary to keep the first one intact
- Where the joint of a vertical molding is usually less noticeable
- The joint cannot be hidden at the cost of poor cutting of the entire composition
- One vertical 2700 mm: what to actually buy
- Why you can't promise that the packaging frame 390 ₽ is always calculated the same way
- If the working length is 2620–2699 mm: why the solution still doesn't come down to a short offcut
- If the working length is 2601–2610 mm
- Is an installation allowance needed when the length is exactly 2600 mm
- If there are several vertical joints, you need to calculate the overall cutting layout, not "two planks for each"
- Two verticals of 2700 mm: how to avoid two 100 mm inserts
- Three verticals of 2700 mm: one additional profile can cover all three
- General formula for the number of planks for multiple verticals
- Table for multiple transitions of 2700 mm
- Why equal joint heights across multiple verticals usually looks more professional
- The remainder of the second plank is material, not waste
- What to do if there is only one transition in the room and the remainder has nowhere to be used
- Straight or angled joint along the length: first choose the technology, then the connection point
- Why the position of the seam matters more than the fact of joining itself
- Do not place a joint directly on the boundary of another material without a reason
- A joint near the baseboard: a good option only if a normal segment remains
- Why 14 × 9 mm does not automatically make a joint invisible
- How to mark the vertical between slats and a painted wall
- Molding should not fix incorrect installation of slat panels
- Transition depth: slat surface and painted wall can be in different planes
- Why you should finish the slat panel first, then measure the molding
- Should MLDPU-027 be painted before or after installation
- Matching the painted wall
- In the color of the slat panels
- Contrast color
- Why different colors of slat and wall increase verticality requirements
- The joint of two segments is better finished as one unit, not painting parts separately until the end
- Cutting priority: first continuous lines, then composite ones
- How to calculate leftovers without complex cutting software
- Why cutting cannot be calculated only by total millimeters
- When MLDPU-027 is not needed at all at the boundary of battens and paint
- When MLDPU-027 is especially useful
- How many slats to order: table by working length of one vertical
- Mistake: calculating height based on the rough room
- Mistake: taking the nominal baseboard height as the full deduction
- Mistake: making a joint where the first slat ended
- Mistake: hiding a short piece at the top under paint
- Mistake: buying two slats for each vertical
- Error: trying to use every remainder
- Error: not checking that all transitions are of the same height
- Error: forgetting about the packing frame when comparing budgets
- How to prepare an order if there are four or five such transitions
- How to place an order if only one solid vertical is needed
- How to place an order if one composite vertical of 2700 mm is needed
- How to place an order if there are two or three verticals
- The joint needs to be checked on the mock-up before installation
- Installation sequence for a vertical transition
- If the skirting board has not been chosen yet, it is better not to fix the quantity of MLDPU-027 definitively
- If the ceiling cornice has not been chosen yet
- If there is a shadow gap on top
- If the vertical line ends at the furniture
- If the profile is needed on both sides of the slat insert
- If the slat area adjoins only one painted wall
- The transport end cannot be automatically considered a finished end
- Can you order one MLDPU-027 strip from STAVROS with a length of 2700 mm at once?
- Can MLDPU-027 14 × 9 be joined with the remaining piece of the 20 × 12 version?
- If the working length is 2598 mm, should I still take two strips for extra margin?
- Can the MLDPU-027 joint be hidden behind a switch?
- What to do if the height on the left of the slat insert is 2580 mm, and on the right it is 2620 mm?
- Can the MLDPU-027 offcut be used as a sample for future repairs?
- If a stretch ceiling is installed above, can MLDPU-027 be glued to the fabric?
- Do I need to order an extra strip in case of a cutting error?
- Can the joint be made exactly behind a tall console or cabinet?
- What to do if after purchase it turns out that the clear vertical is only 2500 mm?
- Can MLDPU-027 simultaneously serve as the end profile of a slat panel?
- What to check when receiving a long plank of 2600 mm before cutting?
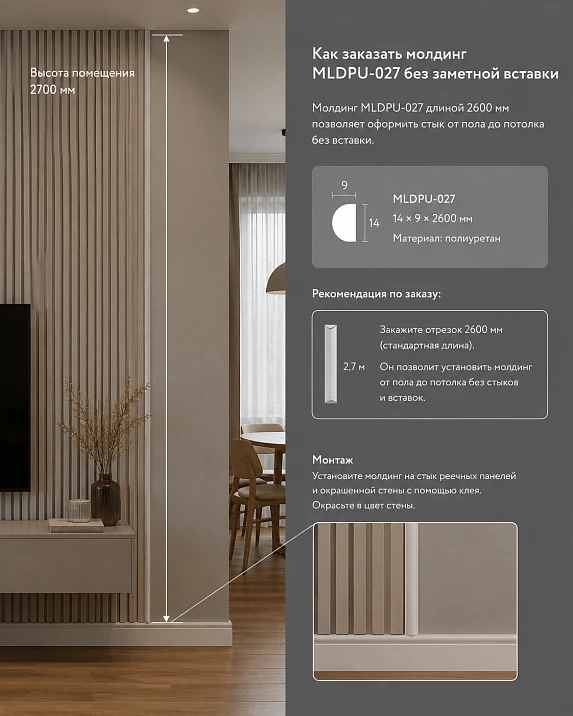
A room height of 2700 mm by itself does not mean that for one vertical boundary between slat panels and a painted wall, two MLDPU-027 planks are necessarily required.
For ordering, you need to measure not the room height, but the actual length of the decorative line: from the real lower point of the molding to the real upper point. If the line starts above the baseboard at the bottom and ends under the cornice, ceiling profile, shadow gap, or another finished zone at the top, the working length may turn out to be 2600 mm or less. Then one MLDPU-027 plank 14 × 9 × 2600 mm is sufficient.
For a 2700 mm room, a simple threshold applies:
lower offset + upper offset ≥ 100 mm → one 2600 mm plank can cover the vertical without a joint.
For example, if the molding starts 80 mm above the floor due to the baseboard and ends 20 mm below the ceiling, the working line is:
2700 − 80 − 20 = 2600 mm.
In this scenario, a second plank for one vertical is not needed.
If the decorative profile must run almost from floor to ceiling and the actual length is indeed 2700 mm, one plank is physically insufficient. But even in this case, a bad strategy is to automatically glue a whole 2600 mm plank and add a short 100 mm piece on top. Such a fragment turns a technical lack of length into a noticeable compositional error.
When a second plank is needed, the joint is better designed in advance: choose a larger second segment, move the connection to a less noticeable area, use the remainder of the second plank on the next vertical, or recalculate the overall cutting of all "slat / paint" transitions in the room.
According to the current STAVROS product card, the MLDPU-027 modification under consideration has dimensions of 14 × 9 × 2600 mm, material — polyurethane, price — 3,990 ₽ per strip. The order also includes a rigid packaging frame for 390 ₽.
Buy MLDPU-027 polyurethane molding
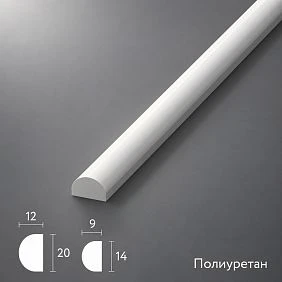
What exactly we are buying: MLDPU-027 14 × 9 × 2600 mm
The MLDPU-027 card has two modifications, but only one is needed for this task: 14 × 9 × 2600 mm. The second version, 20 × 12 × 2600 mm, exists, but its dimensions and price are not needed to solve the issue of the vertical joint length. Mixing the two modifications in one calculation would be a mistake.
| Parameter | MLDPU-027 in this article |
|---|---|
| Product type | Polyurethane molding |
| Size | 14 × 9 × 2600 mm |
| Length of one plank | 2600 мм |
| Material | Polyurethane |
| Price per 1 pc. | 3 990 ₽ |
| Additional packaging | rigid frame 390 ₽ per the card's terms |
| Task | vertical boundary between slat panels and painted wall |
For calculating the quantity, the length of 2600 mm is critical. The cross-section of 14 × 9 mm is important for the scale of the line and fit at the junction of two finishes, but it does not change the arithmetic by height.
The product card labels dimensions as A × C × L, where L = 2600 mm. Therefore, the article does not require guessing which of the three numbers indicates the length of the strip: it is directly specified by the manufacturer.




Why 2700 mm of room height cannot be automatically turned into 2700 mm of molding
The most common mistake occurs even before the purchase: a person sees a height of 2.7 m in the plan or in the room's passport and immediately assumes that the vertical molding should also be 2.7 m long.
But the decorative line rarely starts and ends strictly at the geometric points of "finished floor" and "finished ceiling".
At the bottom, there may be:
-
baseboard;
-
a tall baseboard with its own top line;
-
a floor profile;
-
furniture plinth;
-
another decorative element.
At the top, there may be:
-
ceiling cornice;
-
the shadow gap;
-
a stretch ceiling profile;
-
a decorative top rail;
-
a section that is intentionally left free.
To order MLDPU-027, you need to measure exactly the distance between the actual points of the start and end of the profile.
Formula:
Lwork = Hroom − Hbottom − Htop
Where:
-
Lwork — working length of the molding;
-
Hroom — actual height at a specific point;
-
Hbottom — the zone that the molding does not pass through from below;
-
Htop — the zone that the molding does not pass through from above.
If the result is ≤ 2600 mm, one plank covers the vertical length.
Our factory also produces:

Threshold 100 mm: main calculation for a 2.7 m wall
For a room height of 2700 mm, the shortage of one MLDPU-027 plank is:
2700 − 2600 = 100 mm.
But this figure needs to be interpreted correctly.
It does not mean "a 100 mm insert is needed."
It means: if the total decorative line is at least 100 mm shorter than the room, both from the bottom and top, a second plank is not required.
Several different combinations yield the same working result:
| Lower zone without molding | Upper zone without molding | Working length | One plank 2600 mm |
| 100 мм | 0 мм | 2600 мм | Yes |
| 80 мм | 20 мм | 2600 мм | Yes |
| 70 мм | 30 мм | 2600 мм | Yes |
| 60 мм | 40 мм | 2600 мм | Yes |
| 50 мм | 50 мм | 2600 мм | Yes |
| 80 мм | 40 мм | 2580 мм | yes, a 20 mm margin remains |
| 100 мм | 30 мм | 2570 мм | yes, a margin of 30 mm remains |
This is not a recommendation for the height of the plinth or the top offset. The table only shows the geometry of the solution.
The buyer must substitute their actual dimensions, not choose a row from the table as a ready-made design.
Get Consultation
Measurements should be taken at the location of the future molding, not in the center of the room
Even if the total room height is stated as 2700 mm, the actual distance from floor to ceiling may vary slightly along the wall.
The reasons are common:
-
floor level difference;
-
ceiling deviation;
-
finishing layer;
-
stretch ceiling;
-
local box;
-
Different coating thickness.
For a long vertical profile, a few millimeters already matter. A 2600 mm long strip should not be purchased based on a single design dimension if installation is taking place at a different location.
Before ordering, measure the vertical directly where the slat panel ends and the painted wall begins.
It is better to take at least three measurements:
-
the actual room height in that area;
-
the height of the top point of the baseboard or other lower finish;
-
the position of the bottom point of the upper junction.
After that, the net length is calculated.
If there are several transitions, each must be measured separately: the geometry of one corner of the room does not guarantee an identical size for another.
What to consider the bottom and top points of MLDPU-027
A vertical molding must have two predetermined termination points. If they are not fixed before ordering, the quantity calculation will be formal.
From below
If the baseboard is already installed and has its own finished shape, the vertical MLDPU-027 is often terminated above it or brought to its upper profile. In this case, only the zone that the molding does not actually pass through is subtracted from the room height.
If the profile should visually extend to the floor, the baseboard cannot be subtracted. Then a separate junction of the two profiles needs to be designed.
From above
If there is a ceiling cornice, the working line may end at its lower edge. If there is no cornice, the termination point can be a shadow gap, a stretch ceiling profile, an upper decorative line, or the ceiling itself.
The key principle is the same: only the actually excluded part can be subtracted from 2700 mm.
You cannot artificially lower the top of the molding by 100 mm just to "fit" into one plank. First, an architectural decision is made, then the material is calculated.
How to proceed if the working vertical is longer than 2600 mm
When one plank is definitely sufficient
One MLDPU-027 2600 mm covers a transition without a longitudinal joint if the working length after all real deductions does not exceed 2600 mm.
There are three typical scenarios.
The baseboard already reduces the vertical.
If the molding starts above the baseboard, its height can fully or partially resolve the 100 mm shortfall.
There is a cornice or another profile on top.
Then part of the wall is already occupied by another architectural element, and MLDPU-027 does not have to reach the ceiling.
There is both a lower and an upper finish.
This is the most likely way to get a clean line without a joint: small real areas at the top and bottom together provide the necessary 100 mm or more.
In each scenario, the solution is confirmed by a tape measure, not by assumption.
When a second plank is truly unavoidable
If the measured working vertical is longer than 2600 mm and there is no need to change it architecturally, one plank is not enough.
For example:
-
working length 2620 mm;
-
working length 2660 mm;
-
working length 2700 mm.
In all three cases, additional material is required.
But the difference between them is important not for the answer "is a second plank needed," but for designing the joint.
The smaller the excess, the stronger the temptation to make a short insert. This is exactly where you need to stop and not turn the remainder of 20, 60, or 100 mm into the automatic length of a second visible segment.
The second plank is needed as a source of material for a properly designed cut, not necessarily as a short top add-on.
Why a short 100 mm insert usually looks worse than a pre-designed joint
If the working line is indeed 2700 mm, the most obvious installation approach looks like this:
-
install a whole 2600 mm plank;
-
add a 100 mm piece on top.
Materially, this works. Visually, not always.
The problem with a short insert is that it reads not as part of the composition, but as a leftover used to "stretch" the profile to the ceiling. This is especially noticeable on the vertical boundary between slat panels and a smooth wall: the molding itself should create one calm, continuous line, but the short top segment immediately reveals the joint.
This solution has several risks:
-
the joint ends up close to the ceiling, where side lighting highlights any unevenness;
-
a short piece is harder to align precisely on the same axis as the long plank;
-
even a slight difference in seam thickness looks like a step;
-
a difference in paint finish between the two parts can emphasize the boundary;
-
a short segment is psychologically perceived as a "patch."
This does not mean that connecting MLDPU-027 is not allowed. Joining trim pieces is a normal installation operation. The question is where and how it appears.
A good joint looks like a pre-planned part of a long line. A bad one looks like a solution thought up after the material ran out.
If a second plank is needed, it is not necessary to keep the first one intact.
The main idea that changes the cutting layout: having a plank 2600 mm long does not obligate you to use it entirely.
If the working vertical is 2700 mm, it can be assembled not only from 2600 + 100 mm, but also from more balanced segments.
For example:
-
1800 + 900 mm;
-
1700 + 1000 mm;
-
1600 + 1100 mm;
-
1500 + 1200 mm.
All options give 2700 mm.
This doesn't mean that any of them is automatically better. The joint location is chosen based on the wall architecture, visibility, furniture, lighting, and the ability to use leftovers.
But the principle itself is important: the second plank is bought not for the 100 mm, but for the freedom of cutting.
If you have only one vertical, after such cutting there will be a lot of material left. If there are several verticals, the leftovers from the second and subsequent planks can already be distributed among them much more efficiently.
Where the joint of a vertical molding is usually less noticeable
There is no universal connection height. But there is a logic for choosing the location.
It is better not to place the joint where:
-
hard side light falls on it;
-
it is exactly at eye level;
-
another horizontal line ends nearby;
-
the wall surface is uneven;
-
the transition is constantly examined up close;
-
a shelf, switch, or other object adjoins the profile, emphasizing the seam.
A calmer area can be:
-
closer to the lower part of the wall;
-
behind furniture;
-
near an area that is rarely viewed frontally;
-
where the light is diffused;
-
in the same position on several parallel verticals.
The last point is especially important. If there are three identical transitions of “slat panels / paint” in a room, it is better for the MLDPU-027 connections to be at the same logical height, rather than appearing randomly at 100, 350, and 720 mm from the ceiling.
The joint cannot be hidden at the cost of poor cutting of the entire composition.
Sometimes the desire to make the seam completely invisible leads to another defect: the molding is cut into inconvenient pieces, resulting in too much waste or uneven connections.
You need to find a balance between three tasks:
-
the joint should not become the main object on the wall;
-
the layout should use material rationally;
-
all identical verticals should look systematic.
If for one line it is optimal to place the joint at a height of 900 mm from the floor, and for the second, due to another obstacle, 1200 mm is better, this is acceptable. But the decision must be explained by real geometry, not by a random leftover of the plank.
One vertical 2700 mm: what to actually buy
If after measuring the clean decorative line is exactly 2700 mm, the minimum number of products needed is two MLDPU-027 planks.
Cost of the molding itself:
2 × 3 990 = 7 980 ₽.
The product card separately indicates a rigid packaging frame of 390 ₽. If it is added to such an order as one packaging item under the specified conditions, the sum of the molding and the frame will be 8,370 ₽, excluding delivery and installation materials.
For comparison, if after measuring it turned out that the working length is ≤ 2600 mm:
-
one plank — 3,990 ₽;
-
plus the specified frame 390 ₽;
-
together — 4,380 ₽ without delivery.
The difference between one and two MLDPU-027 in the cost of the planks themselves is 3,990 ₽.
That is why 100 mm cannot be considered a trifle. Correct measurement before ordering really changes the cart by almost the cost of one more item.
Why you cannot promise that the packaging frame of 390 ₽ is always calculated the same way
The MLDPU-027 card directly states that a rigid packaging frame of 390 ₽ is added to the order cost, and for the 14 × 9 × 2600 mm modification, the packaging standard is specified as up to 70 pieces.
This allows 390 ₽ to be considered as a separate line in the preliminary calculation of the current order, but it should not be turned into a universal formula for any future deliveries.
Before payment, you still need to check the cart total: packaging conditions, price, and logistics may change.
In the article, this amount is needed not to artificially complicate the estimate, but so that the buyer understands: you need to compare the full current order cost, not just the price of one plank on the card.
If the working length is 2620–2699 mm: why the solution still doesn't come down to a short extension
Let's imagine that after accounting for the baseboard and the top joint, we get not 2700, but 2640 mm.
Shortage of one plank:
2640 − 2600 = 40 mm.
Buying a second plank for a visible 40 mm piece is even less reasonable than for 100 mm. But physically, the material is still insufficient.
Here you need to check alternatives in the correct order:
-
can the vertical be architecturally finished 40 mm earlier without breaking the composition;
-
is the starting point at the bottom chosen incorrectly;
-
can MLDPU-027 be joined with another existing top or bottom element;
-
if the full length is mandatory — where to place a proper joint of two reasonable segments.
Important: you cannot shorten the line just to save money if it makes the transition illogical. But buying two strips so that a decorative meaningless 40 mm piece appears on top is also weak design.
If the working length is 2601–2610 mm
This is the most unpleasant borderline case.
Formally, a single strip is short by just a few millimeters. On site, there is a temptation to "stretch" the seam, increase the gap at the bottom or top, or install the profile with tension.
You should not do this.
First, you need to re-check:
-
measurement;
-
position of the finished floor;
-
actual end point;
-
possible technological gap;
-
ceiling geometry.
If the working length after re-measurement is indeed greater than 2600 mm, the material should not work "at the limit" without an installation allowance.
The nominal product length is not a reason to refuse precise cutting and fitting. It is better to revise the joint than to create a taut structure for the sake of saving a second strip.
Is an installation allowance needed when the length is exactly 2600 mm
If the calculation gives exactly 2600 mm, mathematically one strip matches the working length.
But actual installation depends on the accuracy of the base and cutting.
Need to check:
-
how level the top and bottom points are;
-
whether the end needs to be trimmed;
-
whether there is a slope in the floor or ceiling;
-
whether the transport end is damaged;
-
Is technological refinement needed?
Therefore, "exactly 2600" is a borderline result, not an automatically comfortable one.
If it's possible to make the working line slightly shorter through a real architectural node—for example, bringing the profile to the baseboard or cornice along the design line—that's more reliable than relying on using the full factory length without a single millimeter of adjustment.
Multiple vertical transitions: overall cutting layout instead of doubling the order
If there are several vertical joints, you need to calculate the overall cutting layout, not "two planks for each one"
For one transition of 2700 mm in length, the minimal answer is simple: a second plank is needed. But as soon as there are two, three, or four such transitions, the calculation of "two pieces per vertical" almost always overestimates the order.
The reason is obvious: the second plank after cutting the first vertical leaves a large remainder. This remainder can be used for the next transition.
Therefore, for several identical lines, first calculate the total required length, then build the cutting layout based on 2600-millimeter planks.
For example, two verticals of 2700 mm each require:
2 × 2700 = 5400 mm of material.
Two strips give only:
2 × 2600 = 5200 mm — not enough.
Three strips give:
3 × 2600 = 7800 mm.
The total length of three items is already sufficient. So, there is no need to buy four strips, 'two for each vertical.'
Cost of three MLDPU-027:
3 × 3 990 = 11 970 ₽.
If you order four strips, the price of the profiles themselves will be 15,960 ₽. The difference is another whole strip, 3,990 ₽.
This is a good example of why cutting multiple transitions should be done before checking out the cart.
Two verticals of 2700 mm: how to avoid two 100 mm inserts
If you use two full strips of 2600 mm, each vertical will indeed require a 100 mm addition. A third strip can easily provide two such pieces, but the result will be visually weak.
It is much better to use the same three strips but redistribute the lengths.
For example, each vertical can consist of:
1800 + 900 = 2700 mm.
For two lines you need:
-
two segments of 1800 mm;
-
two segments of 900 mm.
Two 1800 mm segments can be obtained from two planks. Two 900 mm segments fit into the third plank.
The final quantity is the same — 3 planks, but instead of two tiny 100 mm inserts, you get two deliberate joint lines with 900 mm segments.
Another option:
1700 + 1000 mm.
Here, you can also build a layout from three planks.
Which option is better is decided by the interior. If the lower part of the wall is covered by a console or furniture, the joint can be lowered. If the lower area is open, it is wiser to shift it higher.
The main idea: the number of slats is determined by the total length, and the size of the visible second segment is a separate design decision.
Three verticals of 2700 mm each: one additional profile can cover all three
Three transitions require:
3 × 2700 = 8100 mm.
Three MLDPU-027 slats give:
3 × 2600 = 7800 mm — not enough by 300 mm.
Four slats give:
4 × 2600 = 10,400 mm.
That is, in terms of quantity, 4 slats are enough, not six.
But again, there is no need to turn the fourth into a source of three short 100 mm inserts.
You can, for example, build the same scheme:
1850 + 850 = 2700 mm for each vertical.
Three segments of 1850 mm are obtained from three slats. Three segments of 850 mm total 2550 mm and fit into the fourth slat.
As a result:
-
all three joints are located at the same height;
-
every second segment is large enough;
-
there are no random 100-millimeter add-ons;
-
only four items are used.
This is already a real commercial gain from calculating the cut layout.
General formula for the number of slats for multiple verticals
If all transitions have the same working length Lраб, and their number is N, first calculate the total linear footage:
Lобщ = Lраб × N.
Minimum number of slats based on total length alone:
K = rounding up (Ltotal / 2600).
But this is only the first filter.
After that, you need to check whether K slats can actually be cut into the required segments. Sometimes the material is formally sufficient in total length, but the selected identical pieces do not fit into the blanks without excessive waste.
Therefore, the calculation is always two-stage:
-
check the minimum quantity based on total length;
-
build a specific cutting map.
It is the cutting map that protects against a situation where everything "adds up" arithmetically, but the required segments do not fit on the table.
Table for multiple transitions of 2700 mm
If each vertical is indeed 2700 mm, the minimum number of 2600-mm slats based on total length looks like this:
| Number of verticals | Overall length | Minimum of 2600 mm planks by linear footage |
| 1 | 2700 мм | 2 |
| 2 | 5400 мм | 3 |
| 3 | 8100 мм | 4 |
| 4 | 10,800 mm | 5 |
| 5 | 13,500 mm | 6 |
| 6 | 16,200 mm | 7 |
For these values, each new transition actually adds 2700 mm, and each plank adds 2600 mm. Therefore, with a small number of identical verticals, you often get an N + 1 plank scheme rather than 2N.
But the table shows only the minimum linear footage. Before ordering, cutting is still needed.
Why the same joint height on several verticals usually looks more professional
Let's imagine three transitions next to each other:
-
on the first, the joint is 900 mm from the floor;
-
on the second — at 420 mm;
-
on the third — at 100 mm from the ceiling.
Technically, all lines can be assembled. Visually, they will appear as random use of remnants.
If three boundaries are in the same room and viewed together, it is better to set one connection height in advance.
This creates:
-
rhythm;
-
predictability;
-
a sense of a design solution;
-
easier installation control.
However, the connection height does not have to be strictly the same if the architecture of each wall differs. But then the difference should have a reason: furniture, a niche, a door, a cornice, another intersection.
The remainder of the second plank is material, not waste
For a vertical of 2700 mm, the buyer may perceive the second plank as an "expensive plank for 100 mm." This psychologically pushes toward questionable decisions.
In fact, the remainder can be used:
-
on the second vertical edge;
-
on a short horizontal section;
-
on another frame made of the same profile;
-
on a local decorative transition;
-
as a reserve for trimming if the project is large.
But the remainder should only be used where it fits the design. You cannot add extra molding to an interior just because the material has already been purchased.
A rational scheme is to first list all places where MLDPU-027 is actually needed, and then distribute the planks among them.
What to do if there is one transition in the room and the remainder has nowhere to be used
This is the most inconvenient commercial scenario.
If the working length is 2700 mm and there are no other MLDPU-027 sections, two strips leave a significant remainder.
Options should be considered in this order:
-
check whether a working length of ≤ 2600 mm can be achieved using actual baseboards and the top junction;
-
check whether a more logical architectural completion of the line exists;
-
if a full vertical is mandatory — buy two strips and make a proper large second segment;
-
keep the remainder as a repair reserve or use it only where truly needed.
A bad option is to create a noticeable 100-millimeter extension piece to save money.
Savings are measured not by the number of centimeters of remainder, but by the quality of the entire finished wall.
How to design and execute the longitudinal joint of MLDPU-027
Straight or angled joint along the length: first choose the technology, then the connection point
The long vertical MLDPU-027 has a separate question: what exactly should the seam between two segments be.
STAVROS's own materials show different approaches. In one guide, a straight joint of trim is described as connecting two ends cut at 90°. In another material on wall moldings, an angled joint at 45° is recommended for longitudinal connections, because the seam line can read more softly.
Therefore, it is wrong to declare one option as universally the only correct one without considering the specific mounting system, adhesive, profile, substrate, and the installer's skill.
For this article, three conditions are more important, which are the same regardless of the chosen method:
-
the two segments must continue one vertical axis;
-
there must be no step on the front surface;
-
the joint after finishing must not turn into a noticeable thickening.
Before cutting all strips, it is useful to make a test joint on MLDPU-027 scraps. Then the installer will see which method on a specific 14 × 9 mm profile turns out neater.
Why the position of the seam is more important than the fact of joining itself
Polyurethane molding can be joined along its length. The issue is not the presence of the seam itself, but its quality and location.
On the vertical boundary of the slat / paint, the eye reads the molding as one long line. If the seam is located in an area with strong side lighting, any micro-difference casts a shadow.
If the joint is located near a horizontal shelf, the top of a dresser, or another noticeable line, the eye automatically compares the geometry and notices the defect.
If it is hidden in a calm area and finished with high quality, the line is perceived as almost continuous.
Therefore, before cutting, you need to take a photo of the wall and mark 2–3 possible connection levels on it. This is faster and safer than determining the location after the first cut.
Do not place the joint directly on the boundary of another material without a reason
The vertical MLDPU-027 already forms the transition between slat panels and the painted wall. If a horizontal boundary of another material passes through the point of the longitudinal connection of the profile at the same time, a complex node is formed.
For example:
-
top of the panel;
-
edge of the countertop;
-
decorative belt;
-
shelf;
-
Horizontal molding.
Sometimes such an intersection helps hide the joint. But sometimes, on the contrary, it gathers too many lines at one point and highlights any mismatch.
Such a place should only be used after a mock-up. You cannot automatically assume that 'the seam is not visible behind the horizontal line.'
Joint near the baseboard: a good option only if a normal segment remains.
If a large lower segment, for example 900 or 1000 mm, is chosen for a 2700-mm vertical, the joint ends up relatively low and may be less noticeable.
But this logic cannot be applied to a 100-mm insert.
A 100-mm-high segment above the baseboard also looks like an add-on, just from the bottom.
The problem is not whether the short piece is at the top or bottom. The problem is that a fragment that is too small is not perceived as an independent part of a long profile.
Therefore, with two strips, you should design two normal segments, not swap 2600 and 100.
Why 14 × 9 mm does not make the joint automatically invisible.
MLDPU-027 in this version has a compact cross-section, and it seems that on a thin profile the seam will almost disappear.
But the small line width does not negate three factors:
-
plane difference;
-
gap;
-
difference in finish paint color.
On a thin molding, even a small step can cast a sharp shadow, because the entire decorative line itself is narrow.
Therefore, the quality of fitting is more important than trying to "hide" the seam only through a small profile.
How to mark the vertical between slats and a painted wall
Before installation, one control axis is needed.
If the molding should visually separate the slatted surface from the painted one, first determine the actual boundary of the materials. It must be straight.
Then check:
-
how vertical the edge of the slat system is;
-
is there a wave on the painted wall;
-
where exactly will the MLDPU-027 axis run;
-
does the profile overlap the technical joint as intended;
-
does it look the same along its entire height.
For vertical marking, a laser level or a long, verified guide is convenient.
You cannot glue the first strip relying only on the edge of the slat panel if that edge itself has a deviation. Otherwise, the molding will repeat the defect and make it more noticeable.
The molding should not correct improper installation of slat panels
MLDPU-027 can neatly finish the transition of materials, but it should not become a way to hide a serious mistake.
If the edge of the panels:
-
deviates from vertical;
-
has a large difference;
-
protrudes in depth;
-
damaged;
-
has an open base;
first, the slat system itself needs to be put in order.
A thin decorative profile cannot physically level the wall. Moreover, a straight MLDPU-027 line next to a curved edge will emphasize the difference.
This is an important condition before purchase: sometimes the problem is solved not by an additional molding strip, but by adjusting the last element of the slat finish.
Transition depth: the slat surface and the painted wall may be in different planes
Slat panels often protrude relative to the smooth wall. MLDPU-027 is installed on a specific base and does not have to cover the entire depth difference like a technical corner.
Before ordering, look at the joint from the side.
You need to understand:
-
on which plane will the back side of the molding lie;
-
how much the rails protrude;
-
does the profile cover the visible edge;
-
does a deep shadow gap remain;
-
is another structural element required for the very end of the panels.
If MLDPU-027 is used specifically as a decorative line on a smooth wall, that is one scenario. If it is expected to function as an end profile, the actual geometry needs to be checked separately.
Why you should first finish the slat panel and then measure the molding
The design edge of the panels and the actual edge after installation may differ by a few millimeters.
If MLDPU-027 is ordered and cut in advance, and then the last slat shifts, the vertical line will end up not where planned.
Correct sequence:
-
finish the slat surface;
-
determine the finished edge;
-
finish the plinth and the top junction;
-
measure the working vertical;
-
after that, calculate MLDPU-027.
It is this order that makes it possible to understand whether one or two strips are needed.
Painting and finish: how to make a composite line visually seamless
Should MLDPU-027 be painted before or after installation
At the boundary between slat panels and a painted wall, the color of the molding affects not only the appearance but also the visibility of the joint between segments.
There are three working approaches.
Matching the painted wall
The calmest option. MLDPU-027 becomes a relief line rather than a separate colored strip. With proper preparation, the longitudinal seam is easier to hide with a common final paint coat.
In the color of the slat panels
This way, the molding visually connects with the panel area and becomes its completion. But if the slats are dark and the molding contrasts with the wall, any profile joint will be more noticeable.
Contrast color
Black, bronze, or another accent tone turns MLDPU-027 into an independent graphic line. In this case, the requirements for the location and quality of the longitudinal joint are maximum.
If the profile consists of two segments, it is useful to perform the main joint preparation before the final coat of paint. Then a single coating helps to visually unify the parts.
Why different colors of the slat and the wall increase the requirements for verticality
If the slat area is dark and the painted wall is light, the boundary of materials is very contrasting even without a molding.
MLDPU-027 in such a situation must run especially straight. Even a slight deviation from vertical is easily read against the background of two different colors.
If the molding is painted in the color of the wall, it integrates more softly into the smooth surface.
If in the color of the slats, it visually expands the panel zone.
Before painting, it is worth making a small color mockup. Sometimes the choice of color changes the decision about how much the profile itself is needed.
The joint of two segments is better finished as a single unit, rather than painting the parts separately to the end
If MLDPU-027 consists of two parts, the final finish should treat them as a single line.
If each segment is fully painted in advance, after installation there will remain a connecting seam, which will still require local touch-up. The touched-up strip may differ in gloss.
Therefore, when there is a longitudinal joint, it is more logical to:
-
prepare the parts
Cutting priority: first solid lines, then composite ones
For an object with multiple transitions, a simple priority is convenient.
First: keep intact all verticals that actually fit within 2600 mm.
Second: for lines longer than 2600 mm, choose a deliberate joint location.
Third: use remnants from composite lines among themselves.
This is better than trying to align all joints at any cost.
A joint is an acceptable technical element, but its number should be minimized where a solid plank already solves the task.
How to calculate leftovers without a complex cutting program
For a few verticals, a simple sheet or table is enough.
Make four columns:
Plank First segment Second segment Remainder №1 … … … №2 … … … №3 … … … First, fill in the longest whole segments.
Then distribute the second segments of composite verticals.
After each cut, account for the actual tool kerf if it is significant for the chosen technology. Do not design the cutting layout "to zero" when the sum of segments is exactly 2600 mm without considering trimming and finishing.
The main task of the table is to see which leftover is actually suitable for the next section and which is already too small.
Why you cannot calculate the cutting layout only by the total sum of millimeters
Suppose the total needed is 7700 mm. Three strips give 7800 mm — it seems perfect.
But if each of the three required segments has a length of 2566–2567 mm, cutting is possible.
And if the project requires a complex set of segments, individual combinations may not fit into the strips due to the distribution of lengths and technological trims.
Therefore, the total length formula only answers the question:
"What is the minimum number of strips that is definitely not enough?"
The cutting map answers another:
"Can all the required parts actually be obtained from this quantity?"
Both checks are needed before ordering.
When MLDPU-027 is needed at the boundary of slats and paint, and when it is better to do without it
When MLDPU-027 is not needed at all at the boundary of slats and paint
Molding is not a mandatory element of any transition between materials.
If the slat panel has a neatly finished end, and the painted wall meets it cleanly without a gap, the open boundary can look quite finished.
Avoiding MLDPU-027 is especially logical if:
-
the interior is minimalist;
-
the last slat itself forms a beautiful vertical line;
-
there is an intentional shadow gap between materials;
-
the molding creates an unnecessary third line;
-
the profile color cannot be matched with either the slats or the wall;
-
the technical joint is already covered by the standard end cap of the panels.
A commercial article should allow such an outcome. Buying molding is worth it when it improves a specific joint, not because the material transition 'must' have decor.
When MLDPU-027 is especially useful
The profile gains a clear function if the edge needs to be made architectural.
It can be useful when:
-
the end of the slat zone looks too technical;
-
a clean vertical line is needed between two finishes;
-
the interior already uses thin moldings;
-
the transition should be noticeable but not massive;
-
a color boundary requires a neat divider;
-
the slat insert is perceived as a separate decorative panel.
In such a situation, MLDPU-027 does not just cover the joint, but forms a frame or dividing line.
Buy polyurethane wall moldings
How many slats to order: table by working length of one vertical
For one boundary, it is convenient to use a simple range.
Working length of the vertical Minimum number of planks Main logic up to 2550 mm 1 solid piece with allowance for fitting 2551–2590 mm 1 solid piece, allowance decreases 2591–2600 mm 1 borderline zone, precise check needed 2601–2699 mm 2 a second profile is needed, it's better not to make a short extension 2700 мм 2 design a full-fledged joint more than 2700 mm 2 or more calculate the actual length and cutting map The boundaries of 2550 and 2590 mm here are not factory standards. They are needed as a practical gradation of margin. The closer the working size is to 2600 mm, the less freedom there is for trimming.
The exact order is determined by actual measurements.
Errors that cause an extra plank or a noticeable joint
Error: calculating height based on the rough room
If slat panels and painting are not yet finished, the rough height may differ from the finished height.
After installation:
-
the floor;
-
the baseboard;
-
ceiling;
-
cornice;
-
finishing layers
the working vertical changes.
If you order MLDPU-027 by an early size, you can buy an extra plank or, conversely, find a shortage.
The right moment to measure is when the positions of the lower and upper nodes are already defined by the project and are as close as possible to the finished state.
Error: taking the nominal height of the plinth as the full deduction
The plinth may have a height, for example, H, but the vertical molding does not necessarily end strictly at its top point.
If the profiles intersect, overlap each other, or connect through a separate node, the actual deduction will be different.
Therefore, measure the distance from the floor not "to the top number of the plinth in the catalog," but to the real point where MLDPU-027 should end.
Error: making a joint where the first plank ended
This is the most straightforward error.
If a whole MLDPU-027 2600 mm is glued from the bottom point upward, the joint location is automatically determined by the end of the product.
With a working length of 2700 mm, 100 mm remains.
The problem could have been solved before installation if both planks were first laid out and two deliberate segments were chosen.
Therefore, in a composite vertical, the first plank cannot be considered an inviolable whole piece.
Error: hiding a short piece at the top under paint
Finish painting helps unify the joint but does not change the geometry.
If a short 100-millimeter segment has:
-
misalignment;
-
step;
-
uneven seam;
-
a different axis,
paint will not make it part of a continuous line.
First, proper assembly, then finishing.
Mistake: buying two slats for each vertical
For two transitions of 2700 mm, this would give four pieces, although the overall cutting layout can be built from three.
For three, six instead of four by minimal linear footage.
The more identical boundaries, the more expensive such a mistake.
Before purchasing, always combine all lines into one cutting list.
Mistake: trying to use every leftover
The remainder has value only when it produces a genuinely needed part.
A 400 mm piece should not be turned into a decorative strip on the adjacent wall just for the sake of "zero waste."
Good cutting minimizes excess ordering but does not force the interior to conform to waste.
Mistake: not checking that all transitions are the same height
In one room, the ceiling may have a box, a step, or a local lowering.
The baseboard can also be interrupted by furniture or a door.
Therefore, three visually identical boundaries do not always have the same working length.
If you assume everything is 2700 mm without measuring, the cutting map will be incorrect.
Mistake: forgetting about the packaging frame when comparing budgets
When a buyer compares one and two planks, they often look only at 3,990 and 7,980 rubles.
But the current card indicates a separate rigid packaging frame 390 ₽.
This line needs to be seen in the budget, although it does not change the main conclusion: the main difference between one and two bars is the price of another MLDPU-027.
How to prepare an MLDPU-027 order for a specific object
How to prepare an order if there are four or five such transitions
First, make a list:
Transition Working length solid / composite Planned joint area А … … … Б … … … В … … … Г … … … After that:
-
assign solid lines up to 2600 mm to separate bars;
-
group composite lines;
-
select identical or logically related joint levels;
-
distribute segments into 2600-mm blanks;
-
add technological allowance where it is really needed;
-
only after that determine the number of products.
Such a sheet is much more useful than the formula "perimeter divided by the length of the strip," because here the task consists of vertical parts with specific connection points.
How to place an order if only one solid vertical is needed
If after measuring the working length turned out to be, for example, 2570 or 2580 mm, the purchase is simple: one MLDPU-027 14 × 9 × 2600 mm strip.
Before payment, it is still worth checking four things:
-
whether there is a second such transition in the room;
-
whether a short section of the same profile is required elsewhere;
-
whether there is a risk of damage to the end during trimming;
-
how delivery of the 2600-millimeter linear material will be organized.
The card indicates a rigid packaging frame for transportation. This is especially relevant to consider for long profiles: the delivery issue should not be left until after payment.
If there is one strip and the working length is close to 2600 mm, it is useful to prepare the exact size in advance, so as not to discover after delivery that the actual vertical is a few millimeters longer.
How to place an order if you need one composite vertical of 2700 mm
For one full line of 2700 mm, two strips will be required.
But before ordering, it is worth deciding where the joint will be.
Procedure:
-
choose a possible joint area;
-
determine the approximate lengths of the two segments;
-
make sure that both segments are obtained from two strips with a normal margin;
-
decide what to do with the large remainder;
-
only after that buy.
If the remainder is not needed anywhere else, it is still better than a noticeable 100 mm insert. It can be saved as repair material.
In an interior with expensive finishes, a small surplus is often more useful than trying to use material without waste at any cost.
How to place an order if there are two or three verticals
Here, a general cutting layout is needed first.
For two lines of 2700 mm, three planks are minimally sufficient in terms of linear footage.
For three — four.
But before payment, you need to check the actual segment layout. If the joints must be in the same position, choose a short segment size that is convenient to cut from an additional plank.
For two lines, the example 1800 + 900 mm gives a clear layout.
For three — 1850 + 850 mm allows you to get three short segments of 850 mm from one 2600 mm plank.
These numbers are cutting examples, not mandatory installation heights. Their purpose is to show that one additional plank can serve several long verticals.
The joint needs to be checked on a mock-up before installation.
If line quality is critical, do a simple test on small remnants.
Check:
-
how accurately the profile aligns;
-
whether a step is formed;
-
what the seam looks like after filling;
-
how the paint lays;
-
whether the joint is visible under side light.
Such a test is especially useful with contrasting MLDPU-027 coloring.
If the test seam looks rough, it is better to change the joining technique before working on the main wall.
Installation sequence for vertical transition
Logical order:
-
finish the slat panels;
-
prepare the painted wall;
-
install or finally mark the baseboard;
-
determine the top junction;
-
measure the working length;
-
mark the vertical axis;
-
perform cutting of MLDPU-027;
-
assemble the composite line dry;
-
check the joint and overall verticality;
-
only after that proceed to fixing;
-
prepare the seam;
-
perform the final painting.
If the profile is composite, dry assembly is especially important. Gluing the lower segment while the upper one is not yet fitted is risky.
If the baseboard has not been chosen yet, it is better not to fix the quantity of MLDPU-027 definitively.
For a 2700 mm wall, it is the lower joint that can decide the issue of one or two planks.
Since it is not yet known where the vertical molding will end relative to the baseboard, the working length is not determined.
For example, a difference of just a few centimeters can move the project from the 2600 mm zone to 2620–2640 mm, and that already means a second plank.
Therefore, first approve the baseboard and its junction, then calculate the vertical profile.
If the ceiling cornice has not been chosen yet
The situation is similar.
The cornice can "remove" enough height from the vertical so that one MLDPU-027 covers the transition entirely.
But you cannot choose a cornice specifically to save on the molding. It must match the interior.
After the cornice is approved, the exact bottom line appears, up to which the vertical profile is brought.
If there is a shadow gap on top
A shadow gap often requires leaving a clean upper zone and not bringing the decorative profile close to the ceiling.
If the project already specifies such an offset, it must be taken into account in the working length.
But the size of the shadow zone itself is determined by the ceiling system, not by the length of MLDPU-027.
First the structural node, then the deduction.
If the vertical line ends at furniture
Sometimes the slat zone and the painted wall are separated by a molding only on the visible section, and below there is a built-in wardrobe, cabinet, or other stationary piece.
Then the working length can be noticeably less than 2600 mm.
Furniture can only be deducted from the calculation if it is truly permanent and the molding does not continue behind it per the design.
For a freestanding dresser that could be moved tomorrow, it's better not to accidentally break the architectural line.
If the profile is needed on both sides of the slat insert
The slat zone can be a local insert on a smooth wall. Then it has two vertical boundaries.
If both have a working length up to 2600 mm, two full slats are needed.
If both are 2700 mm, the overall calculation shows three slats with thoughtful cutting, not four.
This is one of the most commercially significant scenarios in the article: two sides of one slat insert are often visible simultaneously, so it's better to align the joint locations on them.
If the slat zone adjoins only one painted wall
Then the entire calculation applies to one line.
Here it is especially important to first try to obtain a full profile through the actual working length. If that's impossible, a second slat is inevitable, and the fate of the large leftover must be decided.
Allowance for actual trimming: why you can't design a cutting layout "to zero"
Even precise calculation to the millimeter doesn't equal a finished cut. Long stock has transport ends, possible local unevenness of the cut, and the actual kerf width of the tool. Therefore, a layout where from one 2600 mm plank you need to get parts with a sum of exactly 2600 mm requires separate verification.
For example, the mathematical notation:
1750 + 850 = 2600 mm
looks perfect. But during actual cutting, part of the material goes into the kerf, and both resulting ends may require minimal finishing. So, such a layout should not automatically be considered guaranteed feasible just because the arithmetic adds up.
It's safer to build the layout so that each workpiece retains a small real reserve, the size of which is determined by the tool and the craftsman's technique. The article cannot assign universal "5 or 10 mm" for any object: different tools give different kerfs, and the condition of the transport end is unknown in advance.
Before ordering, it's useful to do one more check:
-
mark all required finished lengths;
-
determine which ends will be factory-made and which will be cut;
-
find out the actual kerf width of the selected tool;
-
remove from the map combinations that converge only mathematically without technological reserve;
-
after that, recalculate the number of planks.
This check is especially important in borderline cuts, where one additional MLDPU-027 worth 3,990 ₽ appears or disappears from the order due to a few millimeters.
The transport end cannot be automatically considered a finished end
If the vertical needs almost all 2600 mm, the buyer naturally wants to keep the factory length completely. But before installation, both ends need to be inspected.
If one edge is damaged during transport, has a chip, or requires leveling, the actual usable length after trimming will become less than the nominal length. That is why the option with a working vertical of 2598–2600 mm should be considered borderline.
For the 2500–2550 mm line, such correction usually does not affect the quantity: the margin is large. For the almost 2600 mm line, one damaged end can already change the purchasing decision.
This is another reason not to order MLDPU-027 based only on the design height. The closer the calculation is to the maximum plank length, the more important the actual condition of the product and the accuracy of the installation technology become.
Checklist before purchasing MLDPU-027
This list is needed right before the cart, when the transition design has already been chosen. It helps separate three different reasons for buying a second plank: actual lack of length, technological reserve, and an error in the preliminary measurement. If the second MLDPU-027 appears only because the room height of 2700 mm was entered into the calculation without verification, it is too early to proceed to the order.
Before placing your order, check:
-
specifically selected MLDPU-027 14 × 9 × 2600 mm;
-
measured actual height at the joint location;
-
determined the lower point of the molding;
-
determined the upper point;
-
calculated the net working length;
-
checked the 2600 mm threshold;
-
if the length is greater — selected the joint location;
-
short insert of 100 mm is not automatically included;
-
calculated all transitions in the room;
-
a cutting plan has been made;
-
checked the remainders;
-
the color of the molding is determined;
-
the plane of the joint between the slats and the wall is checked;
-
the packaging frame is taken into account;
-
the final price is checked in the card before payment.
If this list is filled out, the quantity is determined not by "ceiling height" but by the actual project.
Final recommendation
For a wall 2.7 m high, MLDPU-027 14 × 9 × 2600 mm cannot be automatically considered short by 100 mm.
First, the clear vertical between the actual lower and upper finishes is measured.
If the baseboard, cornice, shadow gap, or other design zones collectively reduce the line by 100 mm or more, one plank is sufficient.
If the actual length is indeed greater than 2600 mm, a second plank is needed. But it should be used not as a source of a random 100 mm piece on top, but as material for a pre-designed joint.
If there are several transitions, calculate the total cutting. For two verticals of 2700 mm each, three planks by linear footage are enough; for three, four. This is more economical than the "two planks per boundary" scheme and allows joints to be made in one well-thought-out zone.
The main action before the basket:
measure the actual line → determine the number of transitions → decide which lines can be made solid → design the joints of composite lines → create the cutting plan → only then order MLDPU-027.
Thus, a 2600-mm molding ceases to be a problem for a 2700-mm wall: either one plank is enough after proper measurement, or the second one is used rationally and without a noticeable 100-mm leftover piece.
FAQ
Can you order one MLDPU-027 plank from STAVROS with a length of 2700 mm at once?
In the current product card, the standard length of the selected modification is 2600 mm. The general STAVROS FAQ states that the service of trimming or cutting to an individual size is not provided, and size changes are only possible for bulk orders upon separate agreement. Therefore, for a regular single-item purchase, you cannot count in advance on a ready-made 2700-mm plank.
Can MLDPU-027 14 × 9 be joined with a remaining piece of the 20 × 12 version?
For a continuous vertical line, this is a bad idea: the cross-sections differ. Even if both products have the same designation MLDPU-027 and the same length of 2600 mm, the 14 × 9 profile and the 20 × 12 profile do not visually or in relief form one continuous line. For a composite vertical, you need to use one selected modification.
If the working length is 2598 mm, is it still worth taking two planks for the sake of a margin?
Not automatically. In terms of length, one 2600-mm plank formally fits, but the margin of only 2 mm is practically nonexistent. First, you need to repeat the measurement and check the need for trimming the ends. If the actual geometry requires correction, it is better to change the assembly or make a different purchasing decision than to rely on the nominal two millimeters.
Can the MLDPU-027 joint be hidden behind a switch?
The switch should not overlap the molding or lose service access to hide the seam. If electrical fittings are nearby, the joint can be placed in a less visible area, but the profile itself should not interfere with removing the switch frame or servicing the mechanism.
What to do if the height to the left of the slat insert is 2580 mm, and to the right it is 2620 mm?
Count the two boundaries separately. The first can be done with one solid plank. For the second, additional material or a revision of the top/bottom finish will be required. There is no need to split both sides just for the sake of having the same number of segments: what matters more is that each line is technically correct and visually consistent.
Can the MLDPU-027 offcut be used as a sample for future repairs?
Yes, if the offcut is of sufficient length and has been stored without deformation or damage. Such a piece is convenient for checking the color, joint technique, and possible future local repairs. But it only makes sense to store it in conditions where the profile will not be warped or damaged.
If a stretch ceiling is installed above, can MLDPU-027 be glued to the fabric?
No, a decorative wall molding should not be designed as something glued to the stretch ceiling fabric. The top finish must be anchored to a stable wall base or to a designated structural node, without interfering with the ceiling system. The exact endpoint is determined before measuring the working length.
Is it necessary to order an extra plank in case of a cutting error?
For a simple solid vertical, a mandatory spare of one whole plank may be economically excessive. For a complex project with multiple composite lines, a reserve makes more sense. The decision depends on the cutting plan, installation experience, the possibility of repeat delivery, and downtime costs. First calculate the actual material, then decide separately on the safety stock.
Can the joint be made exactly behind a tall console or cabinet?
If the furniture is stationary and truly permanently covers this part of the line, such a spot may be convenient. But if the piece is freestanding and can be moved, the seam should be considered potentially visible. An architectural molding should not be designed based on the temporary position of furniture.
What to do if after purchase it turns out that the clean vertical is only 2500 mm?
One 2600 mm plank covers it entirely, and the remaining about 100 mm becomes a regular offcut, not an insert. A second plank for this single vertical is not needed. If it has already been purchased, it should only be used on another actually planned section or kept, rather than adding extra decor just to use up material.
Can MLDPU-027 simultaneously serve as an end profile for a slat panel?
This depends on the actual geometry of the panels and the junction assembly. MLDPU-027 is a decorative polyurethane molding. If it is required to physically cover a deep open end of a panel system, first check whether its cross-section suits this task. It cannot automatically replace the standard technical profile just because it is installed near the edge of the slats.
What should be checked upon receiving a long 2600 mm plank before cutting?
Verify the article number and size, inspect the profile along its entire length, check the ends and the absence of damage after transport. If the plank is needed almost entirely for a 2590–2600 mm vertical, the condition of both ends is especially important: a damaged end may require trimming and reduce the available working length.
-