Article Contents:
- Short answer: a hollow column cannot be drilled like a solid wooden blank
- What is known about L-123 before starting the design of the side joint
- Hollow does not mean empty: what is inside the column
- The outer wall forms the geometry but does not replace the embedded insert
- The vertical embedded insert solves a different task
- The internal cavity limits the choice of fasteners
- The connection point depends on the profile
- An inclined handrail changes the shape of the junction
- A horizontal platform handrail creates a different joint
- The handrail determines the visible result
- What is checked for PR-001
- Why the product name does not replace the drawing
- Beech or oak for a unified system
- The under-rail strip affects the height
- The end face of the handrail support strip also requires a solution
- Why can't L-123 be painted first
- From which mark is the height measured
- Which point of the handrail is tied to the height
- How the angle of the flight is taken into account
- A pair of posts must have a common system of marks
- The left and right posts may become different parts
- A two-sided connection requires a separate solution
- Changing the side on an object may be impossible
- General overall view
- Vertical section
- Horizontal section at handrail height
- Connection detail for a specific handrail
- Orientation diagram
- Fastener may fall into a void
- Attempting to find the embedded part turns into a series of holes
- The paint layer is damaged
- The hole may cross a vertical channel
- The post is already fixed and inaccessible from inside
- The height of the left and right nodes diverges
- Fixing it violates the installation deadline
- Install the post in the design position
- Bring in the actual handrail
- Check the end connection
- Align the fastener with the embedded part
- Check PR-003
- Install adjacent balusters
- Disassemble and mark the parts
- Beech for opaque finishing
- Oak for visible wood
- Uniform wood species for the entire railing
- Holes and finishing cycle
- Modern geometry
- L-117 as a companion model
- The outermost baluster affects access to the side node
- Starting post at the bottom of the flight
- Support post on the landing
- Post at the edge of the interfloor slab
- A pair of posts in one span
- Landing railing with a horizontal handrail
- Post between the flight and horizontal sections
- Mistake 1. Perceiving the size 115 × 115 mm as a solid array
- Mistake 2. Considering any internal insert suitable for the handrail
- Mistake 3. Choosing the handrail after painting the post
- Mistake 4. Marking the hole along the top line of the handrail
- Mistake 5. Not accounting for the angle of the flight
- Mistake 6. Drilling after the final enamel
- Mistake 7. Trying to find the insert with several holes
- Mistake 8. Using the longest possible self-tapping screw
- Error 9. Direct the side fastener to the central stud
- Error 10. Order only the post
- Error 11. Consider mounting hardware as part of standard configuration
- Error 12. Order one M12 stud without calculating the length
- Error 13. Choose an anchor without information about the base
- Error 14. Not provide access to the top nut
- Error 15. Glue the finial before tightening the stud
- Error 16. Not mark the side of the handrail
- Error 17. Call the posts left and right without a point of observation
- Error 18. Consider two identical L-123 as fully interchangeable
- Error 19. Do not take into account PR-003
- Error 20. Choose balusters after marking the handrail
- Error 21. Mix beech and oak under a clear finish
- Error 22. Buy the second post later
- Error 23. Repair a wrong hole with putty on oak
- Error 24. Paint the post without a test assembly
- Error 25. Do not check the end of the handrail
- Error 26. Rely only on visualization
- Error 27. Consider the drawing of the external dimension as installation
- Error 28. Do not specify the height point
- Error 29. Measure from the subfloor
- Error 30. Not checking the double-sided connection
- Error 31. Installing an additional embedded part without calculation
- Error 32. Considering a cavity a product defect
- Error 33. Pouring the internal volume without permission
- Error 34. Mounting the handrail only with decorative adhesive
- Error 35. Closing the joint with a decorative cap without checking the fasteners
- Error 36. Starting from one side and fitting the second one in place
- Error 37. Not accounting for tool access near the end baluster
- Error 38. Damaging the finish with a strap or clamp
- Error 39. Remove packaging long before installation
- Error 40. Fail to perform final fence inspection
- Open the main L-123 card
- Don't limit yourself to one post
- Select the railing profile
- Add PR-003 when the corresponding system is used
- Define the balusters
- Get working materials
- Compile a hardware list
- Coordinate preparation before finishing
- Combine the delivery
- Is L-123 actually hollow inside?
- Does this mean the post has no internal components?
- What is the size of L-123?
- What type of wood is the post made from?
- Can L-123 be used as a starting post?
- How is L-123 attached to the floor or step?
- What stud is recommended?
- Is the M12 stud included in the kit?
- Is the anchor included?
- Are a washer and nut needed?
- How do I access the top nut?
- Can the finial be glued before installation?
- Where is the side mounting plate for the handrail?
- Does the absence of coordinates mean there is no mounting plate?
- Can L-123 be drilled at a convenient height?
- What happens if the fastener only hits the wall?
- Can a longer screw be used?
- What diameter should the side bolt be?
- How long should the side fastener be?
- Can a metal stud be used for the side connection?
- Is an additional embedded part needed?
- What should the additional embedded part be made of?
- Can the cavity be filled with a wooden block by myself?
- Can the post be filled with mounting compound?
- Where should the vertical stud pass?
- Can the side fastener cross M12?
- What should be chosen first: the post or the handrail?
- Will PR-001 fit L-123?
- Will PR-002 fit?
- Is PR-003 required for PR-002?
- Can PR-001 be replaced with PR-002 after drilling the post?
- How to determine the handrail height on the post?
- Can I use a universal height from another staircase?
- What does the handrail approach side mean?
- Do I need to specify the side in the order?
- Can the post be rotated after painting?
- Are separate left and right posts needed?
- Can handrails be mounted on both sides?
- Where can I get the drawing for L-123?
- Is the overall dimension drawing sufficient?
- What should be requested from the manufacturer?
- When should the holes be made?
- Can drilling be done after painting?
- Why is it better to check the hole before finishing?
- Can the post be installed first and then the handrail brought up?
- Is a trial assembly necessary?
- Is it necessary to try on the actual parts?
- Can a handrail template be used?
- Does the handrail need to be cut at an angle?
- Who should perform the cutting?
- How to check for the absence of a gap?
- What to do if the post is already painted, but the embedded part is not?
- Can the finial be removed and reinforcement installed from the top?
- Can part of the side wall be cut out?
- Is beech suitable for white enamel?
- Is oak suitable for clear varnish or tinting?
- Can an oak post and a beech handrail be ordered for enamel?
- Do I need to buy two L-123 from the same batch?
- Can I purchase the post later?
- Which baluster pairs with L-123?
- How many balusters will be needed?
- Is the handrail included in the L-123 set?
- Is PR-003 included?
- Is the handrail mounting hardware included?
- What should I check upon receiving L-123?
- Do I need to check the internal embedded plate upon acceptance?
- How should I accept the holes for the handrail?
- Can L-123 and the handrail be painted separately?
- What should be done with the end of the handrail?
- How to protect the painted column during installation?
- Can a ladder or tool be leaned against the column?
- Is it necessary to check the fastening after assembly?
- How to write L-123 in the specifications?
- What question should be asked to the STAVROS manager?
- What question should be asked to the designer?
- What question should be asked to the carpenter?
- What question should be asked to the installer?
- What question to ask a painter?
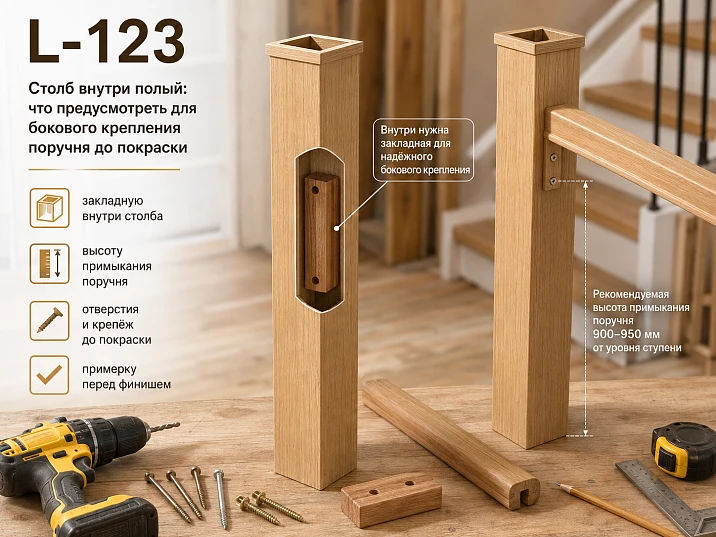
The post has already been selected. Its strict geometry suits a modern staircase, the size is agreed with the project, beech or oak is determined, the color is approved. In the visualization, the handrail neatly enters the side face of L-123, as if the two wooden parts were originally created as a single unit. All that remains is to order the products, paint, and assemble the railing.
It is at this moment that a question arises that cannot be postponed to the construction site: where will the side fastening of the handrail go if the L-123 post is hollow inside?
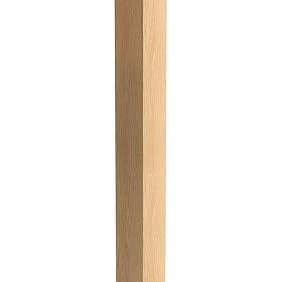
The external size of the post is 1220 × 115 × 115 mm, but the massive square silhouette does not mean that the entire internal volume is filled with wood. The L-123 structure is hollow. Inside, embedded parts with through holes are provided for vertical fastening on a metric stud; for this node, an M12 stud is recommended in the card. The top nut becomes accessible through a removable cap and is covered by it after tightening.
This confirmed scheme explains how the post is connected to the floor, step, or another calculated base along the vertical axis. It does not show where inside the side wall the reinforcement for the handrail is located. The coordinates of a possible side embedded part, permissible drilling zones, and the design of the connection with a specific handrail profile are not specified in the published description.
Fixing such an error after painting is expensive and difficult: the hole has to be moved, the coating is damaged, and the place of the first drilling remains on the front surface.
Before buy stair post L-123, you need to agree not only on the wood species and finish. The project must show in advance:
-
which handrail suits the railing;
-
from which side it comes to the post;
-
at what angle is it located;
-
at what height does its axis pass;
-
which section of the profile adjoins L-123;
-
is there a standard internal reinforcement in the required zone;
-
is an additional embedded part required;
-
what fasteners are used for the connection;
-
does the side node intersect with the vertical M12 stud;
-
which holes need to be prepared before applying the finish coating;
-
who is responsible for the calculation and fabrication of the load-bearing connection.
L-123 should be purchased not as a separate decorative post, but as part of the stair railing: together with the handrail, balusters, under-rail strip for the selected system, vertical mounting hardware, and a working diagram of the side node.
Short answer: a hollow post cannot be drilled like a solid wood blank.
The side mounting of the handrail to the L-123 must engage the load-bearing part of the structure, not just hold onto the decorative wall of the hollow body. For this, even before ordering and painting, it is necessary to obtain or develop a drawing showing the height of the handrail approach, the connection side, the handrail profile, the position of the vertical pin, and the internal reinforcement for the side mounting.
If the published drawing does not show an embedded insert at the required point, you cannot assume on your own that it is there. There are three possible working scenarios:
-
The manufacturer confirms the standard embedded insert and the permissible drilling zone.
-
For the selected handrail, additional internal reinforcement is provided in advance.
-
The designer develops a different joint that does not require random drilling of the hollow wall.
A universal hole coordinate, screw length, side bolt diameter, or embedded insert size cannot be assigned from a photo. This is a load-bearing joint of a stair railing. It must be confirmed by the manufacturer, designer, or a qualified stair fabricator.




What is known about the L-123 before designing the side joint
| Parameter | Confirmed value | What this means for the buyer |
|---|---|---|
| Article number | L-123 | The exact model must be specified in the documents |
| Purpose | Stair post for approach or support | The specific role is determined by the fencing scheme |
| Size | 1220 × 115 × 115 mm | The dimensions affect the height, scale, and placement of the handrail |
| Material | Beech or oak | The wood species is chosen together with the handrail and balusters |
| Construction | Hollow | The handrail cannot be arbitrarily attached to any side point |
| Vertical mounting | Through internal embedded inserts with through holes | The post has a calculated vertical mounting axis |
| Recommended stud | M12 | The complete fastening assembly is selected according to the project |
| Top access | Through a removable top cap | After tightening, the nut is covered with a cap |
| Mounting hardware | Not included in the set | Anchor, stud, washer, nut, and other parts are ordered separately |
| Side bracket for handrail | Not shown in the published card | Its presence and position must be confirmed before drilling |
| Finishing | Selected for beech or oak | Preparatory holes should preferably be coordinated before finishing |
| Compatible handrail | Determined by the project | Profile PR-001 or PR-002 is checked before marking the post |
This table does not contain a ready-made installation instruction, because the product card does not confirm it. The buyer receives the initial data: the structure is hollow, the vertical joint is known, the lateral one requires separate coordination.
Our factory also produces:
Hollow does not mean empty: what is inside the column
The word "hollow" is sometimes misunderstood. One buyer imagines a thin decorative shell without internal elements. Another, on the contrary, assumes that embedded parts are placed inside for any possible connection.
Both extremes are dangerous.
Inside the L-123 there are structural elements related to vertical installation. A mounting axis passes through them, connecting the column to the calculated base. At the top, the joint is tightened with a nut, accessible after removing the cap.
But the presence of internal parts along the vertical axis does not prove that the entire lateral surface is reinforced. An embedded part intended for an M12 stud may be far from the point where the handrail arrives, or have a shape that is not designed for lateral fastening.
Get Consultation
The outer wall forms the geometry, but does not replace the embedded part
The outer faces of the L-123 create a square size of 115 × 115 mm and a finished look of the column. From a single photo, it is impossible to determine the thickness of each wall, the location of internal partitions, and the permissible drilling depth.
A self-tapping screw that enters the wooden shell may initially seem reliable. It tightens, the head presses the handrail, and the connection does not wobble under a light manual check. But a stair handrail bears not only its own weight. People lean on it, pull it, push it, and use it when going up and down. Confirming the ability of the lateral wall to hold such loads without calculated reinforcement is not possible.
The vertical embedded part solves a different task
The bottom mount prevents the post from shifting and tipping relative to the base. The side joint connects L-123 to the handrail. The directions of forces and the geometry of the connections differ.
Having a good post-to-floor mount does not automatically make the handrail-to-side-face connection reliable.
The internal cavity limits the choice of fasteners
For a solid post, the length of the fastener can use a significant thickness of wood. For a hollow structure, after passing through the wall, the fastener enters the internal space if it does not meet an embedded insert.
Therefore, the question "which screw is longer" is posed incorrectly. What is needed is not the longest possible fastener, but a confirmed joint that fits into the reinforcement intended for it.
Vertical and side mounting cannot be combined into one common scheme
It is convenient for the buyer to think of post installation as a single operation. In practice, L-123 has two independent connections:
-
post with base;
-
post with handrail.
They must be coordinated with each other, but are designed separately.
| Criterion | Vertical mounting L-123 | Side mounting of handrail |
|---|---|---|
| Main task | Secure the post to the base | Connect the handrail to the post |
| Confirmed design | Internal embedded parts and through axle | Not disclosed in the published card |
| Recommended element | Stud M12 | Type of fastener is determined by the project |
| Access | Through the lower and upper parts of the post | Through the side face and internal reinforcement |
| Final closing | The top nut is closed with a finial | The masking method depends on the node |
| Main risk | Incorrect anchor or base | Hitting a cavity or vertical channel |
| When to design | Before base installation | Before drilling and painting the post |
| Who confirms | Staircase designer or manufacturer | Manufacturer, designer, or qualified fabricator |
The general procedure for vertical installation can be studied in the material on how to install a wooden post vertically. But this information does not specify the location for side drilling L-123.
Why the handrail should be chosen before drilling the post
The phrase "the handrail will come from the side" is too vague. To prepare the internal insert, you need to know the specific profile.
Handrails differ in cross-section, shape of the lower part, method of connection to balusters, and position of the working surface. Two profiles may pass at the same overall height but contact the post at different points.
The connection point depends on the profile
Let's imagine two handrails. For one, the lower part is located closer to the geometric center of the profile. For the other, a system with an under-rail strip is provided. If you mark the hole before choosing the profile, after the handrail is delivered, its end may end up higher, lower, or to the side of the prepared insert.
An inclined handrail changes the shape of the junction
On the flight, the handrail approaches the post at an angle. Its end needs to be trimmed and mated with the face of L-123 according to the working drawing. The contact height on one side of the profile differs from the other.
One dimension of "handrail height from floor" is not enough. Needed are:
-
handrail axis;
-
march angle;
-
actual profile;
-
end cut line;
-
approach side;
-
fastener placement inside the end;
-
location of the internal post insert.
The horizontal handrail of the landing creates a different joint
On the landing, the handrail may approach horizontally. The connection point and end shape will differ from the flight variant. If one L-123 connects inclined and horizontal sections, each side requires separate coordination.
It cannot be automatically assumed that one embedded bracket fits both directions.
The handrail determines the visible result
The fastener must not only hold the joint. It must not damage the profile, protrude onto the visible surface, or create a gap between the end of the handrail and the post.
First the handrail is selected, then the embedded bracket is designed, not the other way around.
PR-001: first the profile, then the coordinates of the embedded bracket
As one of the system options, you can purchase a finger-jointed handrail PR-001. Before preparing L-123, it is necessary to obtain the actual profile dimensions and build the real connection.
What is checked for PR-001
-
cross-section;
-
the upper and lower lines of the profile;
-
position of the end face relative to the face of the post;
-
height of the working surface;
-
march angle;
-
possibility of forming a neat end joint;
-
mounting location;
-
need for an additional part between the handrail and the post;
-
compatibility of wood and finish.
Why the product name does not replace a drawing
The entry "L-123 + PR-001" shows the selected item numbers, but does not describe the connection. The same handrail can be used on flights with different angles and heights.
The specification must include a drawing of the specific joint.
Beech or oak for a unified system
If L-123 is selected from oak, the handrail is usually also checked in an oak configuration when a uniform wood grain is required. For opaque enamel, beech can be considered, but the wood species of all components must be specified in the order.
A complete match of natural wood texture is not guaranteed even within the same species. However, a single batch and a single finish help avoid random inconsistencies.
PR-002 and the sub-rail strip: the top assembly becomes a system
Another option is Buy handrail PR-002. In the railing scheme, it is complemented by the sub-rail strip PR-003.
This means that the designer must consider not only the handrail itself, but the entire top assembly.
The sub-rail strip affects the height
The strip is located between the balusters and the handrail. It participates in the overall geometry of the railing, so marking only along the bottom edge of the handrail may be incorrect.
Before preparing the post, determine:
-
profile PR-002;
-
dimensions of PR-003;
-
position of the baluster tops;
-
total assembly height;
-
line of approach to L-123;
-
method of finishing the rail near the post;
-
handrail fastening;
-
internal reinforcement.
The end of the sub-rail strip also requires a solution
If PR-003 ends at L-123, you need to determine in advance whether it adjoins the post, fits into a separate groove, is covered by the handrail, or terminates otherwise. Card L-123 does not assign a universal scheme.
You can buy the under-handrail plank PR-003 after the upper assembly of the railing is fully constructed.
Why you cannot paint L-123 first
If after painting it turns out that the under-rail strip requires notching, an additional hole, or a different junction point, the finish will have to be compromised. Repeated local painting on the open face of the post may differ in shade or gloss.
How to choose between PR-001 and PR-002 for L-123
| Question | PR-001 | PR-002 |
|---|---|---|
| Is it a separate handrail | Yes | Yes |
| Does the profile require checking before drilling L-123 | Yes | Yes |
| Is the connection with PR-003 confirmed | Not specified in the provided diagram | Yes |
| Can one attachment point be assigned based on the name | No | No |
| Is a drawing of the end junction required | Yes | Yes |
| Is it necessary to coordinate the height | Yes | Yes |
| Is it necessary to check the wood species and finish | Yes | Yes |
| Can one profile be replaced with another after preparing the post? | Not without re-checking | Not without re-checking |
The choice is not determined by which railing you "like more in the photo." You need to assemble a system of balusters, top rail, posts, and fasteners. In the general category, you can buy a stair railing after comparing available profiles.
Additional help is provided by an article on how to choose a wooden railing, but the final compatibility with the hollow L-123 is confirmed by the working project.
Railing arrival height: writing down the number is not enough
The specification often includes a line: "Railing — 900 mm." Even if the height is determined by the project, it is unclear to which point it refers:
-
to the top of the handrail;
-
to its axis;
-
to the bottom edge;
-
to the attachment point;
-
to the line on the front side of the post;
-
to the step level;
-
to the finished floor;
-
to the step nosing;
-
to the horizontal platform.
For the side embedded part, a precise coordinate system is needed.
From which mark is the height measured
The project must specify the reference level. On a flight, the height may be related to the line of the steps, on a landing — to the finished floor. You cannot transfer a single figure between these zones without a drawing.
Which point of the handrail is tied to the height
If the project specifies the top of the handrail, the mounting hardware may be significantly lower. The embedded part is placed not along the top line, but according to the actual center of the connection.
How is the angle of the flight taken into account
The inclined profile intersects the face of the post at an angle. Its top and bottom points arrive at different marks. The drawing must show the entire contour of the end face.
A pair of posts must have a common system of marks
If the staircase has two L-123, the holes cannot be marked independently with a tape measure from random bases. A unified design system is needed.
The side of the handrail arrival is determined before manufacturing and painting
Externally, L-123 looks geometrically calm and may seem identical from all sides. But after installing the internal embedded part, preparing holes, or other processing, the post acquires a specific orientation.
The left and right posts can become different parts
If the handrail enters one side face, the embedded plate is located on the corresponding side. For a mirrored section, mirrored preparation is needed.
In the order, you cannot simply write "L-123 — 2 pcs." You should specify:
-
L-123 left per the diagram — 1 pc.;
-
L-123 right per the diagram — 1 pc.;
-
the side of handrail entry is shown on the drawing;
-
the height and angle are specified;
-
the orientation of the top and bottom nodes is fixed.
The words "left" and "right" must be tied to the viewpoint. It is more reliable to use position numbers on the plan.
A double-sided connection requires a separate solution
On the platform, handrails may approach the post from two sides. It cannot be assumed that one embedded plate automatically allows for two side connections.
Check:
-
intersection of fastener axes;
-
position of the vertical stud;
-
internal volume;
-
ability to install two embedded plates;
-
assembly sequence;
-
tool access;
-
method of tightening each joint.
Changing the side on the object may be impossible
After internal reinforcement and drilling, it is impossible to rotate the post to another face without revising the entire project. Therefore, marking is done before painting.
Which drawing to request before ordering L-123
The phrase "need a post drawing" is too general. A dimensional image of 1220 × 115 × 115 mm is insufficient for a side connection.
The following materials are requested or being developed.
General overall view
It shows:
-
height;
-
width;
-
depth;
-
the shape of the finial;
-
main transitions;
-
the position of the post relative to the floor or step.
Vertical section
It must show:
-
the cavity;
-
internal elements;
-
the axis of the M12 pin;
-
top access;
-
location of washer and nut;
-
boundaries of the removable finial.
Horizontal section at handrail height
This very document answers the main question of the article. It should show:
-
thickness of side parts;
-
internal cavity;
-
vertical channel;
-
existing or designed embedded part;
-
permissible attachment point;
-
distances to edges;
-
fastening direction.
Connection node of a specific handrail
On a separate fragment, the following are shown:
-
PR-001, PR-002 or another approved profile;
-
angle;
-
end cut;
-
position relative to L-123;
-
fasteners;
-
embedded insert;
-
decorative cover;
-
assembly tolerances, if assigned by the designer.
Orientation diagram
It connects the post to the stair stringer:
-
item number;
-
staircase side;
-
direction of ascent;
-
handrail entry side;
-
baluster direction;
-
landing position.
You can download drawing L-123 as source technical material. If it lacks information about the side anchor plate, the required joint should be requested additionally or developed as part of the staircase project.
Working map of side connection
Before sending the product for finishing, fill in the table. Empty cells mean that the post is not yet ready for drilling.
| Parameter | Value per project |
|---|---|
| Pole position | ___ |
| Article number | L-123 |
| Size | 1220 × 115 × 115 mm |
| Material | Beech / Oak |
| Installation type | Entry / support per project |
| Base | ___ |
| Vertical stud | M12 or other confirmed option |
| Handrail approach side | ___ |
| Handrail profile | PR-001 / PR-002 / other approved |
| Handrail angle | ___ |
| Elevation mark | ___ |
| Point to which the mark refers | ___ |
| Handrail support strip | PR-003 / not provided / other node |
| Side mounting plate | Standard confirmed / additional / other node |
| Mounting plate coordinates | According to working drawing |
| Side fastener type | As per project |
| Conflict with vertical axis | Checked / not checked |
| Holes before painting | ___ |
| Holes after painting | Only confirmed operations |
| Finish | ___ |
| Node responsible | ___ |
This map helps divide responsibility. The manager confirms the product configuration, the designer confirms the geometry and load-bearing scheme, the carpenter confirms the manufacturing, the painter confirms the finishing, and the installer confirms the assembly according to the approved coordinates.
Why drilling after painting creates several risks at once
Sometimes preparation is postponed for an understandable reason: the installer wants to see the post on the actual step and only then determine the position of the handrail. For a solid blank, this approach already requires caution. For the hollow L-123, it is especially risky.
Fasteners can fall into a void
From the outside, the internal structure cannot be seen. After the first confident pass through the wall, the drill enters the cavity. The hole is already made, but there is no calculated base for the fastener.
Trying to find the embedded part turns into a series of holes
The installer shifts a few millimeters and drills again. Marks appear on the painted surface that cannot be completely hidden by the handrail.
The paint coating is damaged
The drill and tool can cause:
-
chip;
-
scratch;
-
coating peeling at the edge;
-
dent;
-
contamination;
-
difference in gloss of local restoration.
The hole may intersect the vertical channel
At the center of the structure is the vertical mounting axis. Side fastening cannot be directed without considering its position.
The post is already fixed and inaccessible from the inside
If it turns out that an additional embedded part is needed, its installation may require disassembly, removal of the top, dismantling of the post, or other intervention. The possibility of such an operation is not guaranteed in advance.
The height of the left and right nodes differs
Marking in place on different sides of the staircase is often done from different surfaces. A few millimeters become noticeable on a long handrail line.
The correction violates the installation deadline.
A painted pole has to be returned to the workshop, refined, have its coating restored, and then delivered again.
It is easier to approve the working section once before finishing.
Which operations are advisable to complete before final painting
The exact sequence depends on the project and the finishing system, but before applying the final coating, all operations that could damage the surface or alter the structure should typically be resolved.
The preliminary approval list includes:
-
installation of an additional embedded part, if needed;
-
preparation of technological access;
-
marking of the side;
-
drilling of confirmed holes;
-
vertical channel check;
-
test assembly with handrail;
-
trial installation of PR-003;
-
check of top nut and finial;
-
fitting to the base;
-
position marking;
-
removal of permissible machining marks;
-
final surface preparation.
It cannot be claimed that all holes must always be finally drilled before painting. Some systems provide for finish drilling through prepared guides after finishing. But this should be specified in the technology, not decided on site.
Test assembly before finishing
The most reliable way to check a joint is to assemble it without final finishing and without irreversible fixation where the technology allows.
Set the post to its design position
The vertical axis, orientation side, and access through the top are checked.
Bring in the actual handrail
Do not use an abstract batten of a different cross-section. For control, use the selected PR-001, PR-002, or an exact profile template.
Check the end abutment
There should be no random gap left between the handrail and the post face that is later planned to be filled with finishing material.
Align the fastener with the embedded part
Not only the external hole is checked, but also the alignment with the intended reinforcement.
Check PR-003
If a sub-rail is used, its end and height are checked simultaneously with the handrail.
Install adjacent balusters
They show the actual line of the top node and help identify a height error.
Disassemble and mark the parts
After individual fitting, the post, handrail, and adjacent elements receive numbers. They cannot be swapped after painting without a new check.
Beech for enamel or oak for tinting
L-123 is made from beech and oak. The choice of wood species affects not the principle of the internal insert, but the external result, the overall staircase specification, and the restoration of the finish after processing.
Beech for opaque finishing
Beech is often chosen for enamel painting when the staircase needs to have a uniform white, gray, graphite, or other color.
For a hollow post, unplanned modifications after painting are especially undesirable. A locally restored area may differ in:
-
shade;
-
gloss;
-
invoice;
-
thickness;
-
repair boundary.
Therefore, the side joint and all related preparatory operations are fixed before the painting stage.
Oak for visible wood
Oak is chosen when the natural grain needs to be preserved. Transparent or tinted finish highlights the fibers, but at the same time makes any transferred hole more noticeable.
Putty on an oak surface does not reproduce the natural grain. A side drilling error may remain visible even after careful repair.
Uniform wood species for the entire railing
The post, handrail, balusters, and under-rail strip must be coordinated in material. Accidental mixing of beech and oak is especially noticeable under transparent finish.
Before ordering, you can to choose beech for enamel or oak for tinting and fix one option for the entire system.
Holes and finishing cycle
After preparing the side assembly, the painter is given a diagram:
-
which holes have already been made;
-
which surfaces are face surfaces;
-
which areas cannot be filled with coating;
-
where the handrail will be located;
-
which ends will require finishing;
-
when the test fitting is performed;
-
which parts are painted in one batch.
A complete railing set starts with a list, not a post
Purchasing one L-123 does not create a finished staircase. Even vertical mounting requires separate elements that are not included in the kit. The side node is connected to the handrail, top rail, and balusters.
| What to add | What is required for | What to coordinate |
|---|---|---|
| Handrail PR-001 or PR-002 | Forms the grip line and connects to the post | Profile, angle, height, wood species, and side mounting |
| Handrail bracket PR-003 | Used in the corresponding railing and baluster system | Adjoins to L-123 and the overall height |
| Balusters | Fill the railing between support elements | Spacing, height, material, and top connection |
| Baluster L-117 | Stylistically linked to the modern geometry of L-123 | Dimensions, quantity, and project compatibility |
| Stud M12 | Recommended for vertical mounting of L-123 | Length and base joint are assigned by the project |
| Anchor | Connects the pin to the base | Floor or step material |
| Washer and nut | Tighten the vertical joint | Dimensions and access through the top cap |
| Side mounting plate | Accepts the handrail fastener, if provided | Position, material, and installation method |
| Side mounting | Connects the handrail to the embedded part | Type and dimensions are assigned by the designer |
| Finishing materials | Create a unified wood finish | System for beech or oak |
| Assembly drawing | Eliminates accidental drilling | All coordinates and sides |
| Labeling | Preserves part orientation | Positions on the plan |
| Protective packaging | Protects the coating until installation | Storage and transportation method |
In the catalog you can buy components for a wooden staircase and assemble posts, handrails, and balusters in one specification.
Balusters define the actual handrail line
The height and position of the handrail cannot be designed separately from the balusters. Their upper parts form the support under the handrail or under the sub-rail plate.
Modern geometry
L-123 has a restrained square silhouette. For such a composition, you can buy modern wooden balusters and compare shapes in one layout.
L-117 as a related model
In the L-123 card, L-117 is listed among related items. You can buy the L-117 baluster after checking its height, placement, and connection with the selected handrail.
Mentioning a related product does not mean the entire system is automatically ready. You need to calculate:
-
number of balusters;
-
step;
-
attachment points;
-
top cut;
-
connection with PR-003;
-
wood species;
-
finishing;
-
position of the outermost baluster near L-123.
The outermost baluster affects access to the side node
If it is located close to the post, the installer may find it difficult to bring the tool or tighten the connection. The assembly sequence is determined before painting.
Practical scenarios: where exactly the need for a side embedded plate arises
Starting post at the bottom of the flight
The handrail approaches L-123 at an angle. The post is attached to the bottom step, podium, or another calculated base.
You need to determine:
-
exact mark of the handrail start;
-
angle;
-
position of the end;
-
side of approach;
-
possibility of tightening the side node;
-
distance from it to the vertical pin;
-
shape of the decorative finish.
On the lower post, the connection is clearly visible, so a relocated hole or a sloppy plug is especially noticeable.
Support post on the turntable platform
L-123 can be approached by railing sections from different directions. Even if the connection is provided only on one side, the adjacent horizontal section affects the overall height.
If handrails approach from both sides, each side node is designed separately.
Post at the edge of the interfloor slab
The base, access from below, and anchor placement may differ from installation on a step. The vertical fastening and side embedded part must be coordinated with the floor structure.
Pair of posts in one span
Two L-123 must have the same handrail line height, but mirrored orientation. In the documents, each is assigned a separate number.
Platform railing with horizontal handrail
The connection is simpler in terms of end shape, but does not become universal. You need to know the profile and the mounting coordinate.
Post between the flight and horizontal sections
One handrail comes at an angle, the other horizontally. Internal fasteners may intersect. Solution without cutting the post
Ordering a single post versus ordering a node — what's the difference
| Separate purchase of L-123 | Agreed stair node |
| Part number is known | All items are known |
| Beech or oak selected | Wood species agreed for post, handrail, balusters, and rail |
| External dimensions known | Vertical and side sections constructed |
| Color selected | Holes and anchors agreed before finishing |
| Handrail to be selected later | PR-001, PR-002, or other profile selected |
| Installer will decide on site | Fastener type and coordinates specified by project |
| Hardware is not rated | Stud, anchor, washer, nut, and side node are included in the specification |
| Orientation is not specified | Each item is marked |
A separate post can be useful as a sample or replacement in an already developed project. For a new staircase, it is safer to buy a system.
What to convey to the manufacturer L-123
The request should be specific.
Post L-123 — ___ pcs.
Size — 1220 × 115 × 115 mm.
Material — beech / oak.
Purpose — entry / support according to the attached diagram.
Finish — specify.
Handrail — PR-001 / PR-002 / other confirmed profile.
Arrival side — shown on the drawing.
Handrail angle — ___°.
Control point height — ___ mm from the specified level.
Under-rail strip — PR-003 / not used / other option.
Vertical mounting — on M12 stud per working project.
Side mounting — confirmation of internal embedded part required.
Additional embedded part — provide if standard one is absent in the required zone.
Before painting, coordinate the section and perform the required preparation.
Mounting hardware — select separately.
Marking of posts — according to positions on the plan.
What to pass to the installer
The installer must receive not only ready painted parts.
The set of documents includes:
- stair plan;
- post numbers;
- elevation marks;
- direction of lifting;
- side of handrail approach;
- profile;
- section L-123;
- position of M12 stud;
- coordinates of side embedded part;
- fastener type;
- assembly sequence;
- permissible operations after painting;
- surface protection method;
- PR-003 diagram;
- location of extreme balusters.
The phrase "assemble by photo" is not acceptable for a load-bearing railing.
What to pass to the painter
The painter must know which surfaces are already prepared and which holes must retain their dimensions.
The task specifies:
- breed;
- color or transparent finish;
- gloss level;
- part numbers;
- side hole zones;
- vertical channel;
- removable top piece;
- ends that will be visible after assembly;
- zones covered by the handrail;
- need for trial assembly;
- requirements for protection of threaded and mounting areas;
- date of transfer for installation after technological holding.
It is useful to study in advance recommendations for installation of wooden posts and coordinate them with the project's finishing system.
Mistakes that cause the handrail to hold onto the shell or require repainting the column
Mistake 1. Treating the 115 × 115 mm size as a solid mass
The fastener is selected based on the external thickness and ends up in the cavity after passing through the wall.
How to avoid: request a horizontal section at the handrail height.
Mistake 2. Assuming any internal embedded part is suitable for the handrail
Vertical mounting elements are confirmed inside, but not lateral reinforcement at an arbitrary point.
How to avoid: separately confirm the lateral embedded part.
Mistake 3. Choosing the handrail after painting the column
The actual profile arrives at a different height.
How to avoid: first PR-001, PR-002 or another profile, then marking.
Error 4. Marking the hole along the top line of the handrail
The connection center is located below.
How to avoid: tie coordinates to a specific point on the profile.
Error 5. Not accounting for the flight angle
The end of the handrail does not match the prepared platform.
How to avoid: construct an inclined joint in the section view.
Error 6. Drilling after the final enamel
The coating chips at the hole.
How to avoid: coordinate preparation before painting.
Error 7. Trying to find the stud with multiple holes
Marks remain on the front side.
How to avoid: do not drill without a diagram of the internal structure.
Error 8. Using the longest possible self-tapping screw
Greater length does not create load-bearing wood inside and may intersect another joint.
How to avoid: the type and size of fasteners are specified by the designer.
Error 9. Directing side fasteners toward the central stud
The connections conflict.
How to avoid: check the intersection of axes on the horizontal section.
Error 10. Ordering only the column
The object has no handrail, fittings, or under-rail strip.
How to avoid: compile a complete list of items.
Error 11. Counting mounting hardware as part of standard equipment
The stud, anchor, washer, and nut are not included with the post.
How to avoid: add fasteners as separate items according to the project.
Error 12. Ordering one M12 stud without calculating the length
It may not match the base and height of the assembly.
How to avoid: the size is determined by the installation project.
Error 13. Choosing an anchor without information about the base
The fastener does not match the step or the floor slab.
How to avoid: first determine the base structure.
Error 14. Not providing access to the top nut
The finial is already fixed or the coating prevents disassembly.
How to avoid: keep it removable until installation is complete.
Error 15. Gluing the finial before tightening the stud
The vertical joint becomes inaccessible.
How to avoid: follow the assembly sequence.
Error 16. Not marking the side of the handrail
The painted post is turned with the embedded part facing the other way.
How to avoid: number and orientation arrow.
Error 17. Calling posts left and right without a point of observation
The manufacturer understands the designation differently.
How to avoid: use a plan with numbers.
Error 18. Considering two identical L-123 as fully interchangeable
After preparing the internal brackets, they are oriented differently.
How to avoid: maintain position correspondence.
Error 19. Not taking PR-003 into account
The total height of the top node changes.
How to avoid: design the handrail, rail, and balusters simultaneously.
Error 20. Choosing balusters after marking the handrail
Their top line does not match the prepared node.
How to avoid: approve the entire system.
Mistake 21. Mixing beech and oak under a transparent finish
The post stands out from the fence.
How to avoid: one wood species in a coordinated set.
Mistake 22. Buying a second post later
The wood species and finish shade may require re-approval.
How to avoid: order a pair in one batch.
Mistake 23. Repairing a wrong hole with putty on oak
The wood grain is not restored.
How to avoid: exclude trial drilling on the face panel.
Error 24. Painting a post without a test assembly
After finishing, trimming is required.
How to avoid: assemble the unit in a rough state.
Error 25. Not checking the end of the handrail
A gap remains between it and the post.
How to avoid: perform a full-size fitting.
Error 26. Relying only on visualization
It does not show internal fasteners.
How to avoid: add a working section.
Error 27. Treating the external dimension drawing as an installation drawing
It has no side embedded part.
How to avoid: request a horizontal section.
Error 28. Not naming the elevation point
The number in the specification is interpreted differently.
How to avoid: specify what the mark refers to.
Error 29. Measuring from the rough floor
After finishing, the height changes.
How to avoid: tie the project to an approved level.
Error 30. Not checking the double-sided connection
Two fasteners intersect inside.
How to avoid: build both nodes on the same section.
Error 31. Perform an additional embedded part without calculation
It interferes with the vertical axis or is insufficient by design.
How to avoid: the size and material are assigned by a specialist.
Error 32. Consider the cavity a product defect
The buyer tries to fill it with random material.
How to avoid: use the standard design and an approved node.
Error 33. Fill the internal volume without permission
The design changes, but the calculation is not confirmed.
How to avoid: do not modify the post arbitrarily.
Error 34. Mounting the handrail only with decorative glue
The load-bearing capacity of the connection is not confirmed.
How to avoid: use a calculated fastening.
Error 35. Closing the joint with a decorative cap without checking the fasteners
The connection looks complete but remains weak.
How to avoid: first the load-bearing joint, then the decorative finish.
Error 36. Starting from one side and fitting the second one in place
The handrail line loses its overall geometry.
How to avoid: mark the entire run at once.
Error 37. Not accounting for tool access near the end baluster
The fastener cannot be tightened.
How to avoid: approve the assembly sequence.
Error 38. Damaging the finish with a strap or clamp
A dent remains on the post.
How to avoid: prepare protective pads and a fixation technique.
Error 39. Removing packaging long before installation
Painted edges get scratched on site.
How to avoid: keep protection until the appropriate stage.
Error 40. Not performing a final inspection of the railing
An externally neat assembly is accepted without project control.
How to avoid: hand over the system to a responsible specialist.
When L-123 fits the project
A column is worth considering if:
- modern square geometry matches the staircase;
- size 1220 × 115 × 115 mm is agreed upon;
- the railing structure is designed in advance;
- there is an option to obtain a section or develop a side assembly;
- the wood species is selected;
- the handrail is known before preparing the post;
- internal reinforcement can be confirmed;
- vertical stud M12 is aligned with the base;
- mounting hardware is included in a separate list;
- finishing is done after a trial fitting;
- post, handrail, and balusters are ordered as one system.
When it is better to choose a different post or change the project
Another option is more reasonable if:
- the installer plans to drill any face without a drawing;
- the location where the handrail arrives is still unknown;
- the handrail will be selected after the post is installed;
- it is impossible to obtain a diagram of internal elements;
- an additional embedded part cannot be provided;
- The side mounting intersects with the vertical axis;
- A non-standard double-sided connection is required without calculation;
- Size L-123 does not match the height of the railing;
- The base does not allow the calculated vertical mounting;
- The deadlines leave no time for a test assembly;
- The customer needs a solid post with a different mounting logic.
In the category you can Choose a post of a different size and compare models before manufacturing the railing.
How to place an order for STAVROS
Open the main card for L-123
Check the material, size, and current conditions for the selected configuration. In the main card, you can check the price of L-123 made of beech or oak.
Do not limit yourself to one post
Immediately determine which sections of the fence belong to L-123. It is convenient in the general section to order posts, balusters, and handrails as one set.
Select the handrail profile
Compare PR-001, PR-002 and other items in the category. The cross-section should be known before marking the side mounting plate.
Add PR-003 for the corresponding system
The under-rail strip affects the overall height and the junction.
Determine the balusters
Check L-117 and other modern models in the general layout.
Get working materials
The dimensional drawing is supplemented with a horizontal section at the handrail height. For complex connections, you can order a stair railing project.
Compile a hardware list
It includes:
- anchor;
- stud;
- washer;
- nut;
- side mounting;
- embedded part, if required;
- Additional elements of the specific project.
Coordinate preparation before finishing.
Neither the painter nor the installer should independently choose the side drilling point.
Combine the delivery.
After approval of the nodes, you can order L-123 with Contact us to confirm shipping to your destination. together with handrails and other approved parts.
Frequently asked questions about L-123 and side mounting of the handrail
Is L-123 actually hollow inside?
Yes. The hollow structure is confirmed by the product diagram.
Does this mean the post has no internal parts?
No. Inside, embedded plates with through holes are provided for vertical mounting.
What is the size of L-123?
1220 × 115 × 115 mm.
What type of wood is the post made from?
in beech or oak.
Can L-123 be used as a starting post?
Yes, it can be used as a starting or support element according to the staircase design.
How is L-123 attached to the floor or step?
The card describes hidden vertical installation via internal embedded plates and a metric threaded rod.
Which threaded rod is recommended?
M12.
Is the M12 stud included in the kit?
No. Mounting hardware is not included in the pole's delivery set.
Is the anchor included?
No, it is selected separately based on the base material and the project.
Are washers and nuts needed?
They belong to the vertical mounting assembly, but their parameters and quantity are determined by the project.
How do I get access to the top nut?
Through the removable top cap L-123.
Can the top cap be glued on before installation?
You should not cover access to the top nut until tightening is complete and the vertical assembly is checked. The exact sequence is confirmed by the staircase manufacturer.
Where is the side embedded plate for the handrail?
In the published card, its coordinates are not specified.
Does the absence of coordinates mean that there is no embedded plate?
No. This means that its presence and location cannot be assumed without additional confirmation.
Can L-123 be drilled at a convenient height?
No. First, you need to know the internal layout and the position of the load-bearing reinforcement.
What will happen if the fastener only hits the wall?
The reliability of such a connection is not confirmed. The handrail must be attached according to the calculated scheme.
Can a longer self-tapping screw be used?
Length does not solve the problem of the missing embedded plate. A longer fastener can go into the cavity or cross the vertical channel.
What diameter of the side bolt is needed?
Without a project, the diameter cannot be assigned.
What length should the side fastener be?
The length depends on the handrail profile, the embedded part design, and the connection scheme.
Can a metal stud be used for the side connection?
Only if such a joint is developed and confirmed by a specialist.
Is an additional embedded part needed?
Possibly, if there is no standard reinforcement at the handrail arrival point. The need is determined by the section and the project.
What should the additional embedded part be made of?
The material and dimensions are assigned by the designer or the staircase manufacturer. A universal option is not confirmed.
Can the cavity be filled with a wooden block independently?
The internal structure cannot be modified without approval. The block must have a calculated position and connection to the body.
Can the column be filled with mounting compound?
Unauthorized filling does not replace the calculated embedded part and can alter the structure.
Where should the vertical stud pass?
Along the internal mounting axis shown in the technical diagram.
Can the side fastener cross M12?
Yes, if the directions are not checked in the cross-section. That is exactly why a drawing is needed.
What should be chosen first: the column or the handrail?
The column and handrail models can be selected in parallel, but drilling L-123 is allowed only after the specific handrail profile is approved.
Will PR-001 fit L-123?
It can be considered as part of the system, but the end connection and side mounting must be designed according to the drawing.
Will PR-002 fit?
It can also be considered after checking the profile and system with PR-003.
Is PR-003 mandatory for PR-002?
The provided product scheme indicates that PR-002 is supplemented with the sub-rail strip PR-003. The specific assembly is confirmed by the project.
Can PR-001 be replaced with PR-002 after drilling the post?
Not without re-checking. Profiles and connection points may differ.
How to determine the height of the handrail on the post?
According to the staircase project with precise indication of the initial level and the control point of the profile.
Can I take a universal height from another staircase?
No. The geometry of the flight, steps, and selected handrail may differ.
What does the handrail approach side mean?
This is the edge of L-123 to which the end of the handrail adjoins.
Do I need to specify the side in the order?
Yes, if the post receives an internal insert or preparatory holes.
Can the post be rotated after painting?
Only if its internal preparation and all components maintain correct orientation. After installing a one-sided insert, arbitrary rotation is impossible.
Are separate left and right posts needed?
With mirrored handrail placement, posts may require different preparation. They are best designated by position numbers.
Can handrails be mounted on both sides?
Only after a separate calculation of the two connections and verification of their mutual positioning.
Where can I get the L-123 drawing?
In the STAVROS technical materials section.
Is a dimensional drawing sufficient?
No. For side mounting, a cross-section of the internal structure at the handrail height is required.
What should be requested from the manufacturer?
The location of internal elements, the permissible drilling zone, and the possibility of installing an additional embedded part.
When should the holes be made?
At the stage specified in the technological map. All structural decisions are made before final painting.
Can you drill after painting?
Only if it is provided for by the approved technology and pre-defined coordinates are used. You cannot search for the embedded part by drilling.
Why is it better to check the hole before finishing?
An error on an unpainted part is corrected without damaging the finished coating.
Can you first install the post and then attach the handrail?
The sequence is possible only according to the project. The joint must be designed before installing the post.
Is a trial assembly needed?
For a non-standard side connection, it is extremely useful and reduces the risk of mismatch.
Do you need to try on the actual parts?
Yes. The actual profile of the handrail is more reliable than a conventional batten.
Can a railing template be used?
An accurate full-size template is suitable for preliminary checking, but does not replace verification of the load-bearing connection.
Does the railing need to be cut to the angle?
On an inclined flight, the end connection is developed according to the actual angle.
Who should perform the cutting?
A qualified staircase manufacturer, according to the working drawing.
How to check that there is no gap?
By a trial assembly before final finishing.
What to do if the post is already painted, but the embedded part is not?
Installation must be stopped and the joint handed over to the designer or manufacturer. Random drilling and weak fastening are unacceptable.
Can the finial be removed and reinforcement installed from the top?
The possibility depends on the internal structure. Having top access to the nut does not prove the feasibility of installing a side anchor.
Can part of the side wall be cut out?
Only according to an approved technology with subsequent restoration of the structure and finish.
Is beech suitable for white enamel?
Beech can be considered for opaque finishes. The preparation system and color are approved based on a sample.
Is oak suitable for clear lacquer or tinting?
Yes, if the project provides for visible wood and the selected finishing system is confirmed.
Can I order an oak newel post and a beech handrail for enamel?
Technical feasibility does not imply visual and design appropriateness. It is better to coordinate the wood species and finish for the entire system.
Do I need to buy two L-123 from the same batch?
For matching the wood, preparation, and finish, this is preferable.
Can I purchase the post later?
Yes, but a re-check of the material, shade, internal preparation, and orientation will be required.
Which baluster pairs with L-123?
The L-117 is indicated as the matching model. The final choice depends on the project.
How many balusters will be needed?
The quantity is calculated based on the railing length, post placement, and project requirements. A universal number is not assigned.
Is the handrail included in the L-123 set?
No. The handrail is selected and ordered separately.
Does PR-003 include it?
No. The sub-handrail strip is a separate item.
Does the handrail fastening include it?
Standard configuration and the specific side assembly need to be clarified. In the product diagram, the post fastening is not included.
What should be checked upon receiving L-123?
Article number, size, wood species, quantity, surface condition, removability of the finial, and compliance with the agreed preparation.
Should the internal embedded part be checked upon acceptance?
Yes, if it was separately specified in the order. Its position is checked against the working drawing.
How to accept the holes for the handrail?
Check coordinates, side, angle, absence of damage, and alignment with the profile template.
Can L-123 and the handrail be painted separately?
It is possible using a single approved system. After assembly, color and gloss should be perceived consistently.
What should be done with the end of the handrail?
Its finishing and processing order are determined by the assembly technology.
How to protect a painted post during installation?
Use approved protective materials and do not press tools against visible faces without padding.
Can a ladder or tool be leaned against the post?
The finished surface must be protected from accidental loads and impacts until the railing is handed over.
Is it necessary to check the fastening after assembly?
Yes. The railing is accepted by a responsible specialist in accordance with the project.
How to write L-123 in the specification?
Specify the article number, size 1220 × 115 × 115 mm, wood species, quantity, position, finish, and preparation for the handrail.
What question should you ask the STAVROS manager?
"Confirm the L-123 configuration and the possibility of obtaining data on internal reinforcement for the side mounting of the handrail according to my drawing."
What question should be asked to the designer?
"Where should the embedded part be located so that the side fastener does not cross the vertical pin and transfers the load to the load-bearing part of the post?"
What question should be asked to the carpenter?
"Is it possible to perform and check the internal reinforcement before painting and maintain access for final assembly?"
What question to ask the installer?
"What operations will be performed after painting and by what coordinates?"
What question to ask the painter?
"What holes and ends need to be prepared before finishing so that after assembly there is no need to repair the coating?"
Purchasing L-123 starts with a drawing of the side assembly
The hollow post L-123 does not prevent using the post in a well-designed stair railing. It only changes the order of work. The external size 1220 × 115 × 115 mm, beech or oak, and the recommended M12 threaded rod provide initial data but do not determine the attachment point of the handrail.
Before painting, you need to choose the handrail profile, calculate its height and angle, specify the side of approach, check the vertical axis, and confirm the internal embedded insert. If there is no standard reinforcement at the required point, an additional solution is developed before finishing. Mounting hardware is included in a separate list, and each post receives a number and orientation.
STAVROS company allows you to assemble an order not from random parts, but from interconnected elements: L-123, handrails PR-001 or PR-002, under-rail strip PR-003, modern balusters, technical materials, and project support. When the side assembly is agreed upon in advance, the installer does not have to search for support with a drill, and the finished coating remains intact.