Article Contents:
- One belt for the entire wardrobe — yes. One physical strip across multiple doors — no
- KPU-046 in numbers: why all three sizes really matter
- Ninety millimeters is already a decorative belt, not a thin line
- A wardrobe up to the ceiling has a problem not only with flatness, but also with endless verticality
- At what height to run KPU-046
- Belt in the handle zone
- Belt above the handles
- Belt below the handles
- Position between other horizontal lines of the room
- Continuous ornament across the entire wardrobe
- Repeating motif on each door
- First level — pure square footage
- Second — cutting by two meters
- Third — ornament
- Can one KPU-046 be glued to two doors at once?
- Why then can the belt be considered single?
- What is the size of KPU-046?
- What material is KPU-046 made of?
- How much does one element cost?
- Is KPU-046 a molding?
- Can a frame be made from it on a door?
- Is it necessary to leave a gap between pieces on adjacent facades?
- How to maintain the continuity of the ornament?
- Should the door gap itself be considered as part of the pattern?
- Can the same motif be started anew on each door?
- What is better — a continuous pattern or a repeat on each door?
- At what height should the belt be placed?
- Can KPU-046 be run directly through the handle area?
- Will 8 mm interfere with opening?
- How to check the thickness before purchasing?
- Why is it mandatory to make a template 90 mm wide?
- How many KPU-046 are needed for a cabinet 2200 mm wide?
- How to calculate material for four doors?
- What margin should be taken?
- Can a joint of two KPU-046 be made in the middle of the door?
- Do I need to buy a separate KPU-046 for each door?
- Can I buy one strip first?
- Can KPU-046 be mounted on an already painted facade?
- If the paint on the facade does not hold well, will glue help?
- Can KPU-046 be painted to match the cabinet color?
- Can the belt be made contrasting?
- Is a second belt needed?
- How is KPU-046 different from a decorative overlay?
- How is KPU-046 different from a molding?
- Where can I see other molding models?
- Can KPU-046 be combined with a top cornice?
- If the cabinet already touches the ceiling, why add a horizontal belt?
- Can the belt be extended onto a fixed side panel?
- Can KPU-046 be extended along the wall?
- Is this scheme suitable for a sliding-door wardrobe?
- What to do if 90 mm is too much?
- What to do if the ornament is too busy?
- Will KPU-046 suit a minimalist wardrobe?
- Should all doors be decorated the same way?
- Can I use the remnants of one plank on another door?
- Where to start the calculation if the wardrobe is only being ordered?
- Where to buy KPU-046?
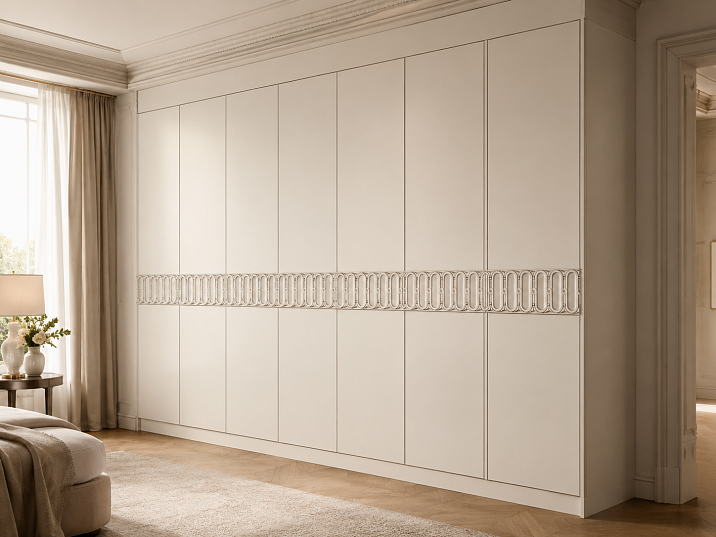
For a built-in wardrobe with four, five, or six smooth doors almost reaching the ceiling. The facades are even, the proportions are good, the color is well chosen, but the entire piece of furniture is perceived as one large plane. Making a separate molding frame on each door is not desirable: it would result in a completely different character. It is much more interesting to run a single horizontal ornamental line across the entire wardrobe—like a carved belt extending from the left edge of the furniture to the right, binding all facades into a unified composition.
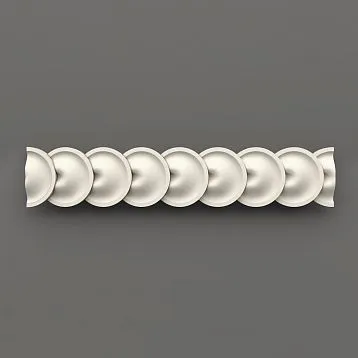
For such a task, KPU-046 can be considered—a carved polyurethane molding measuring 90 × 8 × 2000 mm. But there is a fundamental point to understand before purchasing: this belt will be unified only visually. Physically, one two-meter plank should not connect two independently opening doors. At the boundary of each door, KPU-046 is divided into separate fragments, and the pattern is arranged so that when the wardrobe is closed, the eye sees one continuous line.
This is precisely the whole task. It is not enough to measure the total width of the wardrobe, divide it by two meters, and order the required number of planks. You need to decide in advance at what height the belt runs, how it relates to the handles, where the furniture gaps will be, how to preserve the continuation of the ornament between the doors, and whether the 90 mm width will be too massive for the specific facades.
If after a full-size mock-up the proportions are suitable, you can buy the carved molding KPU-046 and build from it a single horizontal rhythm without reworking the wardrobe body and without mandatory frames on each door.

One belt for the entire wardrobe — yes. One physical bar across several doors — no
Imagine a wardrobe three meters wide with four hinged doors. When closed, the facades form an almost solid wall. That is why there is a natural desire to take a long carved profile and run it continuously across.
Visually, the idea is correct.
Structurally — only after separation.
If you glue one piece of KPU-046 to two doors at once, it will physically connect the panels through the working gap. Opening one door will become impossible or will create unnecessary stress on the decor, the connection, and the adjacent facade. Even a small bridge across the inter-facade gap turns the decorative profile into a link between two moving parts.
Therefore, a good project has two layers.
The first is seen by the eye: one carved belt.
The second is understood by the craftsman: several independent segments, each belonging only to its own panel.
This is not a compromise or a forced simplification. This is how a decorative line should work on movable furniture. When the doors are closed, the technological gaps coincide with the existing seams between the facades and cease to be perceived as a separate problem. When a panel opens, its fragment of KPU-046 moves with it and does not hold the neighboring one in any way.
Hence the main rule of the entire composition:
The pattern must be continuous, not the piece of material itself.
If you understand this in advance, further calculation becomes much clearer.




KPU-046 in numbers: why all three dimensions really matter
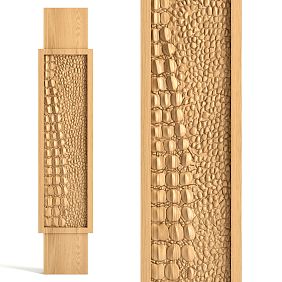
KPU-046 is not a thin decorative strip. The 90 mm width turns it into a noticeable standalone belt. The 8 mm thickness creates relief above the facade plane. The 2000 mm length determines how many initial elements will be needed for the entire cabinet and where you will have to plan the continuation of the pattern.
| Parameter | KPU-046 | What this means for the cabinet |
|---|---|---|
| Product type | Carved polyurethane molding | An extended ornamental element, not a point appliqué |
| Article number | KPU-046 | This exact article is checked before ordering |
| Size | 90 × 8 × 2000 mm | 90 mm is the width of the belt, 8 mm is its relief, 2000 mm is the length of one element |
| Material | Polyurethane | Molding can be used as applied furniture decor with a suitable mounting and finishing system. |
| Price at the time of writing the article | 12,440 ₽ per element | The final budget depends on the number of two-meter elements. |
| Main task | Horizontal carved belt across several facades | Each facade receives a separate segment. |
| Main limitation | You cannot connect two independently opening doors with a single strip. | Working gaps between facades are preserved. |
| Product card | carved molding KPU-046 90 × 8 × 2000 mm buy | Before purchase, parameters and current price are checked again. |
Three values work simultaneously.
If you look only at the length, it is easy to make a mistake in scale.
If you think only about the width of 90 mm, you can forget that the decor will protrude 8 mm from the plane of the facade and end up closer to neighboring doors and hands.
If you ignore the length of 2000 mm, the quantity calculation will turn into too rough a division of the total footage in half.
Our factory also produces:
Ninety millimeters is already a decorative belt, not a thin line.
A width of 90 mm on a furniture facade is perceived confidently.
Imagine a cabinet door 450–600 mm wide. A strip 90 mm high takes up a noticeable part of its surface. On a tall door, it can become exactly the horizontal counterbalance that the elongated vertical was missing. But on a very narrow facade, the same profile can look heavy.
Therefore, KPU-046 cannot be chosen based on the principle "the larger the pattern, the richer the cabinet will be."
First, make a full-size strip exactly 90 mm wide from paper or cardboard. There is no need to replicate the entire ornament yet. The task is simpler — to see the scale.
Attach the mock-up across the entire width of the cabinet.
And immediately cut the paper tape at the door boundaries.
Even this simple experiment will show how a real structure should work: with closed fronts, the strip is perceived as a whole, but any door can be opened independently.
Step back to the opposite wall.
Look at the cabinet together with the ceiling, baseboard, room door, bed, wall panels, or other large furniture.
If the belt instantly becomes the heaviest item in the room, perhaps 90 mm is too much for these doors. In that case, it is better to compare another Carved polyurethane molding, rather than trying to make KPU-046 look thinner with complex painting.
If the paper strip finally brings the cabinet together, balances its height, and makes a wide furniture wall more interesting, you can move on to the drawing.
Get Consultation
For a cabinet up to the ceiling, the problem is not only in the plane, but also in the endless vertical
A tall built-in cabinet leaves almost no pause for the eye.
The vertical seams between the doors rise upward.
The side panels stretch toward the ceiling.
If the handles are long and also oriented vertically, the effect becomes even stronger.
As a result, the furniture may appear taller, stricter, and flatter than desired.
One horizontal line changes this logic.
KPU-046 crosses the vertical seams and makes the eye travel from left to right. Individual doors begin to be perceived more strongly as parts of one architectural surface.
That is why the idea of a carved belt is especially interesting for built-in wardrobes that occupy the entire wall.
But it does not follow from this that the belt should be placed exactly in the middle of the height.
The middle is just one of the options.
At what height to place KPU-046
A universal distance from the floor would be bad advice here.
Cabinets differ:
-
by overall height;
-
by door width;
-
by handle position;
-
by plinth height;
-
by presence of a top cornice;
-
by adjacent architectural lines;
-
by room proportions;
-
by the placement of horizontal details of other furniture.
Therefore, instead of one number, it is better to try several heights.
Belt in the handle area
This option can tie the hardware and ornament into a single horizontal line.
But a practical question immediately arises: won't the hand constantly touch the relief?
If a long handle crosses the profile itself, a second question appears: how is its mounting physically arranged?
One should not automatically consider KPU-046 as a decorative backing for the handle. Molding and hardware perform different functions, and the possibility of combining them in one unit requires checking a specific facade.
Belt above the handles
The handles remain an independent functional zone.
KPU-046 works more like a furniture frieze.
On a very tall cabinet, this often helps to visually stop the vertical without interfering with the daily grip.
Belt below the handles
The upper part of the facades remains more free and light.
This option sometimes works well if there is already a noticeable cornice or ceiling molding above the cabinet and you don't want to add another strong line too close to the top.
But the belt cannot be lowered so much that it ends up pressed against the plinth or the bottom edge of the doors.
Position relative to other horizontals in the room
Sometimes the best height is suggested not by the cabinet itself, but by the interior.
For example, a decorative panel runs nearby.
There is a line of door panels.
There is a chest of drawers of a certain height.
There is a molding division on the wall.
If KPU-046 falls into one of these axes, the furniture becomes more connected to the room.
However, the match must be precise and meaningful. A line that almost matches but differs by a few centimeters for no reason looks worse than a deliberately separate level.
You should check the height not by standing half a meter from the cabinet.
When a person glues a paper template, they naturally look at it up close.
This is good for checking joints.
Bad for checking the composition.
Step back to the doorway of the room.
Sit where you usually see the cabinet from.
Look from the bed, armchair, or workspace.
Take photos of three height options.
Then reduce the photos on the screen.
In the small image, you can immediately see which horizontal line actually assembles the furniture and which one accidentally cuts it in half.
Handles are the first real conflict of KPU-046 with everyday life
Before ordering, stand in front of the cabinet and open it several times with your usual motion.
See where your palm lands.
Where your fingers go.
At what height the lower part of the long handle is.
If the intended belt falls into this zone, a flat paper strip is not enough.
You also need to simulate the 8 mm thickness.
Attach a spacer of appropriate thickness to the template and open all doors again.
Do your fingers catch it?
Does the ring on the hand touch the edge?
Do you have to change your natural grip?
Does the handle visually blend with the ornament?
Then the height is chosen poorly.
Furniture should remain comfortable after decorating, not just look good on a closed facade.
Eight millimeters seem small while the doors are closed
In a flat frontal image, 8 mm is almost imperceptible.
But the doors move.
The edge of one panel changes position relative to the adjacent one.
An angle appears.
The relief follows the curve along with the facade.
Therefore, the KPU-046 fragment cannot simply be brought all the way to the edge of the door and assume that the existing furniture gap will automatically be sufficient.
The exact geometry depends on the specific hinges, door thickness, gap width, and opening angle.
There is one universal rule here:
the volumetric mockup must go through a full opening cycle without touching the adjacent decor.
The middle doors of a large wardrobe are checked especially carefully. They have adjacent panels on both sides, meaning two boundaries require attention.
Do not reduce the furniture gap for the sake of a beautiful pattern
The desire to achieve a completely continuous ornament is understandable.
Because of it, an idea sometimes arises to bring two pieces almost flush against each other.
But the seam between the doors is not a designer's whim.
It ensures the movement of the facades.
Therefore, the decorative break must yield to the furniture, not the other way around.
If the cabinet has a functional gap between the doors, KPU-046 is also interrupted at that point.
The right edge of the left segment remains on the left door.
The left edge of the next one is on the right door.
Neither of them creates a bridge across the seam.
This is how a closed cabinet can look unified while remaining mechanically a set of independent doors.
How to make the break almost invisible: the pattern continues mentally
The most interesting part of the project begins here.
Imagine a cabinet without door gaps.
A continuous KPU-046 runs through it.
Now, in places of real gaps, very narrow strips seem to disappear from this imaginary tape.
The next piece starts not where the previous profile physically ended, but from the section of the pattern that would logically be located after the width of the furniture seam.
The result is an effect of a skipped, rather than misaligned, pattern.
The eye easily fills in a small pause.
This is how visual continuity works.
If, on each door, the ornament starts from the same arbitrary point, the result will not be a single line, but a series of separate decorative inserts.
This is also an acceptable option.
Just a different one.
Two ways to lay out the KPU-046 pattern
Continuous ornament across the entire wardrobe
The tape mentally goes from the left edge of the cabinet to the right.
Each door gets its own section of this common sequence.
The inter-facade gap becomes a missing small fragment.
This method unites the cabinet the most.
It works especially well on identical doors when the furniture is perceived strictly frontally.
A repeating motif on each door
Each door gets a beautifully centered section of KPU-046.
On the adjacent facade, the composition repeats.
The height, width, color, and character of the ornament remain common, but the pattern itself starts anew.
This method is useful when doors differ greatly in width or when the pattern repetition reads better as separate modules.
It cannot be said that one option is professional and the other is not.
You just need to avoid mixing them accidentally.
Do not calculate the ornament period of KPU-046 from a photo.
The size of the product itself is confirmed: 90 × 8 × 2000 mm.
But this does not mean that you can accurately determine the length of the repeating motif from a product photo and find the perfect cut point.
For a complex cabinet, it is more reasonable to work with a physical element or an accurate scale drawing, if the necessary parameters are available on it.
This is especially important if a real continuous pattern is planned across five or six doors.
Therefore, it makes sense to split a large project into two purchases.
First, one KPU-046 for testing.
Then, the main batch after final cutting.
This is not excessive caution. One real two-meter profile simultaneously answers three questions: whether 90 mm fits the scale, what the 8 mm relief looks like, and how the pattern actually repeats.
The overall horizontal line is more important than each individual door.
Even the most beautiful pattern won't save a belt that goes in steps.
Therefore, a single level is first set on the cabinet.
Only then are individual segments marked out.
Do not align with the top of each door individually if the cabinet has slight installation deviations.
Do not repeat the position of handles if the hardware is installed with a barely noticeable difference.
Do not trust a single glance.
The belt must have its own common axis.
If it is straight, several facades come together into one composition.
If each piece "correctly stands on its own door," but does not match the neighboring one, the idea of a single KPU-046 disappears.
What to do if the facades differ slightly in height
Built-in furniture may have slight differences related to door adjustment.
Before installing the decorative belt, it is better to make sure that the doors themselves are already positioned as they should be in operation.
Otherwise, after adjustment, the door will move, and the glued KPU-046 will move with it.
Decorative marking cannot be used as a way to compensate for a poorly adjusted facade.
First, furniture.
Then the ornament.
What to do with different door widths
For example, two central doors are 600 mm each, the outer ones are 450 mm.
With a continuous layout, this is not a problem.
Each facade gets a section according to its width.
Complexity appears in the pattern.
A narrow door may have a less expressive fragment of the ornament.
If the result looks random, you can switch to a modular scheme and center similar sections separately.
That is, a single band does not have to be a literal copy of one endless pattern.
Its unity can be based on:
-
common height;
-
width of 90 mm;
-
one color;
-
same depth of relief;
-
on the general character of the drawing;
-
a repeating system on all panels.
Two doors — the most understandable option
A two-door wardrobe has one central seam.
After choosing the height, the task reduces to two fragments.
One belongs to the left door.
The second — to the right.
A working gap remains between them.
If the total width of the belt is less than 2000 mm, one KPU-046 may be sufficient for the clean length.
But this is not the final answer yet.
It is necessary to understand how much material will be used for selecting the starting point of the ornament and matching the pattern at the central seam.
Therefore, a cabinet 1800 mm wide does not automatically mean "we buy exactly one plank and don't think about anything else."
With three doors, the central panel becomes the compositional anchor.
On a three-door cabinet, the layout can be built from the center.
This is especially convenient if the middle door is located on the room's axis or opposite the bed.
First, a beautiful section of the ornament is determined for the central facade.
Then the pattern develops to the left and right.
This approach can yield a more balanced result than simply starting KPU-046 from the left edge of the furniture.
But it can increase material consumption because the start of the original two-meter piece has to be shifted to achieve the desired pattern phase.
Such decisions cannot be seen in a simple calculation of linear meters.
Four doors require not just measurement, but a cutting layout map.
Four leaves — three inter-facade seams and four separate decorative segments.
First, the entire facade plane is drawn.
Door widths are marked on it.
Then the actual gaps.
Handles.
Total height of KPU-046.
Only after this is the pattern laid out over the diagram.
If the total width exceeds 2000 mm, at least two source elements will be needed. But the transition point between the first and second KPU-046 is better determined deliberately.
If it can be placed at the boundary of the leaves — excellent.
If not, you need to assess how noticeable the additional joint inside one door is.
Six doors: small errors begin to accumulate
On a long wardrobe wall, every small shift becomes part of a big mistake.
If the pattern is slightly off on the first seam, a bit more on the second, and the craftsman adjusts it "by eye" again on the third, the overall band may noticeably lose its rhythm by the right edge.
Therefore, a long cabinet cannot be marked using the "fit the next piece to the previous one" method.
All doors receive coordinates from one common scheme.
Then the error does not travel from door to door.
Cabinet wider than two meters: where to put the transition between original elements
KPU-046 has a length of 2000 mm.
Most built-in cabinets with multiple doors are wider.
This means the band is physically assembled from several original strips.
The most convenient solution is when the end of one two-meter element falls on the inter-facade seam.
Then the next source KPU-046 starts already on the adjacent door, and there is no additional connection inside the facade.
But real geometry rarely conforms to exactly two meters.
If the transition falls inside a wide door, there are several options:
-
accept an additional joint if the pattern allows making it neatly;
-
change the layout;
-
redistribute segments among the source planks;
-
use more material to obtain a specific facade from a single piece.
That is why KPU-046 should be purchased after the cutting map.
The theoretical minimum and the actual quantity are two different numbers
The first calculation is elementary:
total length of the future belt ÷ 2000 mm, the result is rounded up.
This shows the theoretical minimum.
But it does not take into account:
-
the phase of the ornament;
-
centering of the pattern;
-
door seams;
-
unwanted joints inside the facade;
-
sections that will have to be removed to continue the pattern;
-
a test segment;
-
Technological reserve.
The final order is calculated only after virtual cutting of all two-meter elements.
Example: four facades of 550 mm each
Net length:
550 × 4 = 2200 mm.
One KPU-046 with a length of 2000 mm is clearly not enough.
At least two elements are needed in length.
But this does not mean that exactly two will always be enough for a beautiful pattern.
If the first fragment needs to start not from the very edge of the original plank, part of the material already falls out of the useful length.
If on one sash you want to preserve a solid ornament without an additional joint, the cutting changes again.
Therefore, two elements are the starting point of the calculation.
The final quantity is confirmed by the scheme.
Example: a cabinet almost four meters long
Two KPU-046 strips give exactly 4000 mm of initial length.
It would seem ideal.
But a project where the net requirement is also almost 4000 mm has no margin at all.
If you shift the pattern, remove a section for pattern matching, or change the joint point, two elements may no longer be enough.
That is why “four meters of cabinet = two two-meter strips” cannot be turned into a universal rule.
A margin percentage is less useful here than a real cutting layout.
For ordinary smooth trim, it is sometimes convenient to say: add a certain percentage.
KPU-046 — carved.
Here, consumption depends more on the pattern.
Therefore, it is much more accurate to calculate not percentages, but actual leftovers.
Draw two rectangles 2000 mm long.
Lay out all future segments on them.
Mark where the pattern start needs to be shifted.
See what leftovers actually remain.
If the segments do not fit, add one more element.
Such a calculation may take fifteen minutes, but it is more honest than a random reserve.
Where to start the ornament: from the edge of the cabinet or from the center
This is not a technical question, but a compositional one.
If the cabinet stands between two walls and is symmetrical relative to the center of the room, the pattern can be built from the central axis.
If one side of the cabinet ends with an open side panel and the other goes into the wall, it is sometimes more natural to start from the visible edge.
If there is a door, portal, or other furniture nearby, the start of the belt can be linked to them.
The main thing is not to start KPU-046 from an arbitrary point just because it is more convenient to use a whole two-meter plank without waste.
The material must obey the composition.
Not the other way around.
Where is the best place to hide the inevitable joint
If the connection of two original KPU-046 cannot be placed at the door boundary, choose a less noticeable zone.
For example, not the center of the widest facade, if direct light always falls exactly there.
Not a place next to a contrasting handle that will draw the eye to the seam.
Not the area where the most complex part of the pattern makes the mismatch especially noticeable.
The position of the joint is planned together with the ornament.
After a uniform paint job, a neat joint can become much calmer, but you shouldn't rely on paint alone.
Light can reveal what is not visible on the mockup.
Carved molding is read through shadows.
On the cabinet opposite the window, the relief will look different throughout the day.
Side sunlight will emphasize every protrusion.
In the evening, overhead light can make the lower part of the pattern darker.
Therefore, a full-size paper template shows the scale but does not fully imitate the real KPU-046.
If the project is expensive and the cabinet occupies the main wall of the room, one physical plank before purchasing the entire batch provides significantly more information.
Already painted cabinet: the weak point may not be in the polyurethane
If the cabinet is ready, KPU-046 will be attached to the existing finish.
It becomes part of the mounting system.
A solid, well-adhering surface is one situation.
Peeling paint or film is quite another.
You cannot promise reliable installation without knowing the facade material and coating.
Before work, it is necessary to determine what exactly the adhesive will interact with and select a compatible composition.
To understand the general principles, you can separately look at the material about molded decoration adhesive.
If the facade finish is weak, first put the base in order.
The beautiful KPU-046 should not be held together with a peeled-off layer of coating.
If the cabinet is not yet painted, designing the belt is easier
New facades give more freedom.
You can in advance:
-
choose the height;
-
lay out the pattern;
-
check the handles;
-
prepare each segment;
-
test the opening;
-
assemble the final finish as a single system.
After the overall painting, KPU-046 is perceived more as part of the door itself, rather than an item added after the cabinet was manufactured.
But the exact priming and finishing technology must be selected for the specific facade and materials used. There is no universal scheme for any furniture.
In the color of the facade or as a contrast
A long horizontal element reacts more strongly to color than a small overlay.
The contrasting KPU-046 turns into a graphic stripe that crosses the entire furniture.
This is a very noticeable gesture.
If the cabinet is wide, such a line can visually divide it into upper and lower parts.
The solid-color option works differently.
When the carved molding is painted in the color of the facades, the eye first sees the overall plane, and then notices the relief.
Light and shadow show the ornament without a new color boundary.
For the first fitting, this option is safer.
The contrast can be checked separately on a color mockup.
The same KPU-046 in white and dark colors is perceived differently.
On a light matte facade, the pattern may appear very softly.
On a deep dark color, shadows in the carving become more active.
On a glossy surface, reflections change their character again.
Therefore, the width of 90 mm is a physical constant, but the visual "heaviness" of the belt also depends on the finish.
If the cabinet is already painted in a saturated color, do not evaluate KPU-046 only by the white product sample.
Make at least a color mockup.
KPU-046 does not replace the upper cornice of the cabinet.
A cabinet up to the ceiling may have another horizontal detail — a cornice at the top.
His task is different.
The cornice finishes the furniture at the ceiling.
KPU-046 runs along the facades themselves and organizes their plane.
One does not have to replace the other.
If the question is specifically about designing the top line, it is more useful to first look at cornice for a built-in wardrobe.
If the top is already decided, and smooth doors still seem empty, then a carved belt really adds a new level.
Cornice plus KPU-046: two horizontals require air between them
A tall wardrobe can handle more decorative levels than a small dresser.
But even here you can overdo it.
If the large upper cornice and a 90 mm wide belt are too close, the upper part of the furniture becomes visually heavy.
If a large calm plane remains between them, they read as two different architectural lines.
The cornice completes.
The belt divides.
That is why they first need to be seen together in a general photo of the cabinet.
KPU-046 is not a molding, not a baguette, and not a decorative overlay.
The correct name helps to choose the correct scheme.
| Type of decor | What it does on the cabinet | When it fits |
|---|---|---|
| KPU-046 is carved polyurethane trim. | Forms an extended ornamental belt 90 mm wide. | When one horizontal line across several facades is needed |
| Molding | Creates a thinner line or frame | When the perimeter of each door needs to be emphasized |
| Baguette strip | Forms a pronounced frame contour | When the facade is built as a separate architectural panel |
| Decorative overlay | Provides a local accent | When one medallion, leaf, rosette, or another individual motif is needed |
If the original idea sounds like "one wide carved strip across the entire cabinet," molding is indeed closer to the task.
If the idea sounds like "I want paneled doors," a different approach is needed.
Why molding frames produce a completely different effect
The frame emphasizes the boundary of each door panel.
Four doors become four separate compositions.
The horizontal KPU-046 does the opposite.
It crosses the inter-facade lines and connects all the furniture.
Therefore, the choice between a frame and a belt is not a question of "which decor is prettier."
This is a choice of architecture.
Frames enhance the rhythm of the doors.
The belt weakens their separation.
If the cabinet seems too fragmented by vertical seams, KPU-046 is especially interesting.
If, on the contrary, a huge surface needs clear division into separate panels, it is more useful buy polyurethane moldings.
Why KPU-046 cannot simply be called a baguette
A baguette is primarily associated with framing.
It goes around a painting, mirror, panel, or door.
KPU-046 in our composition does not frame anything.
It crosses the facade.
The carved character may visually resemble baguette work, but the product and compositional role here is different.
By calling the product molding, we immediately remember the length, pattern repeat, cutting, and the extended line.
Polyurethane and wooden molding are different materials
The word "molding" unites a large number of products.
But wood and polyurethane should not be considered interchangeable just because of the same product group name.
If the project is built around natural wood, a carved wooden profile may have its own logic.
If you specifically need KPU-046 with dimensions 90 × 8 × 2000 mm, we are talking about polyurethane.
The material article helps to understand the very principle of selection. wood and polyurethane moldings.
What to buy together with KPU-046
The KPU-046 itself is the main element of the project. Other purchases should arise only from a real task.
| What to look at | What for | When it is really needed |
|---|---|---|
| buy the carved molding KPU-046 | Assemble the main horizontal belt | If the 90 mm wide mock-up fits |
| Buy polyurethane trim | Compare other sizes and patterns | If KPU-046 does not match the scale of the cabinet |
| Moldings for Furniture | Develop the facade composition with other polyurethane elements | If one belt is objectively not enough |
| decorative polyurethane elements | Add local details | When the overall scheme requires additional accents |
| buy polyurethane moldings | Build frames or additional lines | If geometry is needed, not just a frieze |
| Suitable mounting compound | Secure individual segments on facades | Selected to match polyurethane and the specific furniture coating |
| Finish system | Combine decor and facades | If KPU-046 is painted together with the cabinet |
There is no point in buying everything from the table as a "set" just to fill the project.
The clearer the idea of one belt, the fewer random additions it needs.
When one KPU-046 is truly enough
The cabinet already has a good top line.
The handles match the interior.
The plinth is neat.
The facades are just too smooth.
Here, one carved belt can be stronger than a set of different overlays.
It creates a horizontal rhythm and stops there.
This approach is especially good for modern classics, where ornament is needed but you don't want to turn every door into a complex standalone panel.
When the belt still needs frames
After trying on KPU-046, it may turn out that the horizontal line is good, but the huge surfaces above and below it are still too empty.
Then try paper frames.
Not real moldings right away.
First, thin strips of masking tape.
If the frames improve the composition — only after that is a profile selected.
This way the project develops gradually:
-
belt;
-
assessment;
-
additional geometry if necessary.
This is much safer than ordering KPU-046, moldings, trims, and corner pieces at the same time, and then finding out that the cabinet is overloaded.
When it is better to use molding instead of KPU-046
There are a few honest signs.
The facades are very narrow.
90 mm takes up too much of the door.
The handles do not leave a convenient horizontal level.
The interior is strict and geometric.
The ornament seems excessive.
You want not a transverse strip, but classic rectangular panels.
Then buy polyurethane moldings will be more logical than trying to make a wide carved molding solve someone else's task.
Can central overlays be added to KPU-046?
Yes, but first answer: why?
If
Study: a belt can connect the cabinet to the room's architecture
A tall library or built-in cabinet in a study often coexists with door portals, panels, and cornices.
KPU-046 can be placed at the level of one of the existing horizontals.
Then the cabinet becomes part of the architecture.
But if the line differs by just a few centimeters from the adjacent one without an obvious reason, it will result in a visual error.
Either we match deliberately.
Or we separate the levels noticeably.
Modern classic: one wide belt is sometimes better than a dozen frames
Smooth cabinet.
Calm color.
Laconic handles.
Carved KPU-046 in a single line.
Such a set can give a classic mood without literally repeating traditional paneled doors.
This is exactly where the strength of the idea lies.
The molding does not disguise ready-made simple furniture as antique.
It adds one architectural layer to it.
Strict minimalism: the surface can be correct from the start
Not every cabinet that seems "too simple" actually requires molding.
If the interior is built on smooth monolithic surfaces, shadow gaps, and a complete absence of ornament, KPU-046 will change the very style of the room.
Technically, the solution is possible.
Stylistically, perhaps not.
Therefore, before purchasing, ask yourself an honest question:
do I want to fix the emptiness or completely change the character of the cabinet?
If the latter does not suit you, leave the facades smooth or use a more neutral profile.
Cabinet with two facades: minimum seams, maximum attention to the center
One central gap becomes a very noticeable spot.
If the KPU-046 ornament has an expressive motif, do not let the seam accidentally cut it at the most inconvenient point.
Lay out the pattern in advance.
Sometimes it's better to shift the entire belt a few centimeters in the pattern phase so that the central gap passes through a calmer area.
The geometric axis of the cabinet itself remains the same. It's not the position of the belt that shifts, but the start of the ornament within it.
Four facades: can all pieces be made the same length
Only if the doors themselves are identical.
But even with equal width, decorative pieces may differ in pattern if literal continuity is being built.
The first segment contains the beginning of the common strip.
The second is the continuation.
The third is the next section.
The fourth is the end.
Therefore, you should not ask the installer to "cut four identical pieces" before the ornament pattern is chosen.
The size may be the same.
The content of the pattern — no.
If the cabinet has fixed false panels
Built-in furniture often includes side and top filler elements.
You can continue KPU-046 on them if it improves the composition.
But the transition is again made with separate segments.
A sliding door should not be connected to a fixed panel by a single piece of decor.
Even if the seam between them is small.
The rule of mechanical independence applies everywhere.
Can a belt be installed on the side wall of a cabinet?
If the side panel is visible, an interesting idea arises to continue the ornament around the corner.
This is no longer just a frontal belt, but a wrapping composition.
Here, the turn, the joining method, and the fitting of parts need to be designed separately.
You cannot simply bend a straight KPU-046 if the product is not intended for such bending.
Therefore, it is better to finish the basic project at the frontal boundary. Any turn is considered a separate unit.
Can the belt be continued on the wall nearby?
Visually — yes.
For example, the cabinet does not occupy the entire wall, and it is desired for the ornamental line to continue into the interior.
But furniture and walls have different bases and different mechanics.
So, separate sections of decor are used.
You cannot connect the wardrobe door to the wall with a single piece of KPU-046.
Before such a more complex system, it is useful to watch the material about molding for built-in furniture and facades and first decide on the overall architecture.
A sliding wardrobe is a completely different case
On sliding doors, the panels pass relative to each other.
There, not only the seam line is critical, but also the distance between parallel planes.
An 8 mm relief can get into the trajectory of the adjacent door.
Therefore, the scheme for a hinged wardrobe cannot be automatically transferred to a sliding one.
First, the actual system structure is measured.
If protruding decor does not fit between the doors during movement, KPU-046 cannot be used in that position, even if the closed cabinet looks great.
Mistake #1: gluing one two-meter strip onto two doors
This is the main structural mistake.
It turns the decor into a bridge between the doors.
Each door gets only its own section of KPU-046.
Mistake #2: starting cutting before overall marking
If the profile is already cut, but the height and pattern are not yet determined, you have to adjust the composition to fit the ready pieces.
The correct sequence is the opposite.
First, the cabinet.
Then the scheme.
Only then the segments.
Mistake #3: reducing the inter-facade gap for the sake of continuity
Impossible.
The door seam retains its functional width.
The decor obeys it.
Mistake #4: calculating consumption only by total length
A two-meter source element does not mean two thousand millimeters of useful ornament for any layout.
Part may go to choosing the start of the pattern or a better joint location.
Mistake #5: forgetting that KPU-046 has a width of 90 mm
In the photograph, the ornament looks elegant.
At full scale, this is almost nine centimeters.
On the narrow facade, the difference is huge.
Mistake #6: forgetting about the 8 mm thickness
The closed cabinet passes the check.
The opening doors do not.
Always test the movement with a volumetric mockup.
Mistake #7: placing the rail where the palm rests
A beautiful relief becomes an obstacle every time it is opened.
The height should be chosen together with the handles and the habitual hand movement.
Mistake #8: starting the drawing from scratch on each door when dealing with a continuous band
This creates a modular repeat.
It can be good.
But this is already a different drawing.
If the effect of a single ribbon is needed, the ornament is first laid out entirely.
Mistake #9: assuming that the door gap does not affect the continuation of the drawing
If a precise illusion of continuity is required, the seam should be perceived as a small missing section of the ornament.
Otherwise, the drawing will slightly "compress" after each break.
Mistake #10: using KPU-046 as a door amplifier
Decorative trim.
It does not tighten the facades.
It does not fix the skew.
It does not replace the furniture structure.
Mistake #11: gluing onto weak finish
Poor adhesion of the coating to the facade will remain poor after installing the molding.
First, the base is checked.
Mistake #12: buying exactly the theoretical minimum
If the total footage is almost equal to the total length of the original elements, the slightest adjustment to the pattern creates a shortage.
A cutting map is mandatory.
Mistake #13: making a contrasting belt without a color mockup
The contrast visually weighs down the 90-millimeter horizontal line.
First, a check.
Then, paint.
Mistake #14: adding a second KPU-046 automatically
One wide belt is already active enough.
The second one should have a separate reason.
Mistake #15: evaluating only one facade
KPU-046 is purchased for the entire furniture wall.
It's the whole cabinet that is the unit of composition.
Mistake #16: fitting each next piece "by eye"
On five or six doors, small deviations add up.
Use one common marking system.
Is a second carved belt needed?
A tall cabinet sometimes provokes repeating the ornament twice.
For example, one belt at the top, the second at the bottom.
This is possible, but it already creates completely different furniture.
Two strips 90 mm wide each give a strong horizontal division.
On a very large cabinet, it may be appropriate.
In an ordinary bedroom, it is excessive.
The best test is simple.
First, leave one paper belt.
Take a photo.
Add the second one.
Take a photo again.
If the second one doesn't solve the new problem, it's not needed.
How not to confuse KPU-046 with a similar product
Before purchasing, check four items.
Article number — KPU-046.
Type — carved polyurethane molding.
Size — 90 × 8 × 2000 mm.
Task — an extended ornamental belt.
If a similar product is in the molding section, it may work completely differently.
If it's an overlay, it will create a local accent.
If it's a cornice, it will be intended primarily for finishing an edge.
If you need a wide horizontal carved frieze, the starting point is — Buy polyurethane trim.
Practical scenario: four identical hinged doors
Here the idea is revealed especially clearly.
One height.
Four segments.
Three working gaps.
One pattern.
If the handles are below the belt, the ornament gets its own zone.
If the handles cross it, the height is adjusted at the paper mockup stage.
When calculating, first add four clean widths, then the segments are laid out on KPU-046 with a length of 2000 mm.
Two wide central and two narrow outer doors
Literal continuity can result in an asymmetric distribution of expressive parts of the pattern.
Therefore, it is especially useful here to compare two approaches:
- continuous ornament;
- repeating centered motif.
Do not decide in advance which one is "more correct."
Look at both on the full facade.
A wardrobe from wall to wall with a width of more than four meters
On such furniture, the belt ceases to be just a decoration of one door.
It becomes an interior horizontal line.
This is where it is especially important to plan transitions between the original elements of 2000 mm each.
A random joint in the middle of the most visible facade can spoil the impression more than a small door seam.
A cutting map for such a wardrobe is a mandatory part of the purchase.
The wardrobe already has an expressive top cornice
KPU-046 should not be placed too close to it just because there is free space above.
Two strong lines require a calm plane between them.
If the layout shows a heavy top, the belt should be lowered or abandoned.
Cabinet without handles
Formally, there is more free surface.
But a person still interacts with the facade.
Determine the actual pressing or gripping area.
Do not place relief where fingers will touch it every day.
Old built-in wardrobe after repainting
Such a project is especially logical.
The body remains.
The doors remain.
The visual character changes.
But after repainting, you first need to make sure that the coating is already ready for further installation and is compatible with the selected mounting system.
Don't rush to turn freshly painted facades into a test stand.
The new cabinet is still being designed.
This is the most convenient situation.
KPU-046 can be laid in right away.
The position of the handles is chosen taking into account the belt.
All seams are known.
The ornament is laid out before production or finishing.
The amount of material is calculated before ordering.
No rework of finished doors is required.
How to calculate the quantity of KPU-046 without guessing
The working calculation consists of three levels.
The first level is the net footage
Add up the widths of all facade sections where KPU-046 will be used.
The second is cutting into two-meter pieces
Place each future facade segment on conditional elements 2000 mm long.
The third is the pattern
Shift the segments to where the pattern should start and end.
See how much material is actually left.
Only now does it become clear how much KPU-046 needs to be purchased.
This method is more accurate than a simple formula and does not require inventing a universal safety percentage.
When it's worth ordering one element first
If the wardrobe is large, one trial KPU-046 is especially useful in three cases.
You are not sure about the 90 mm width.
You want a true pattern match.
You don't know how the 8 mm relief will behave near door seams and handles.
After a physical trial, further purchasing becomes much more accurate.
Who KPU-046 suits especially well
Those who already have a tall built-in wardrobe assembled, but the facades are too neutral.
Those who don't want to outline each door with a separate frame.
For those who need one prominent horizontal ornament.
For those whose doors are wide enough for a 90 mm belt.
For those who are ready to first mark out all the furniture, and only then cut the profile.
For those who are close to the idea of one architectural line instead of many small decorations.
In which cases it is better to choose a different decor
KPU-046 should not be bought automatically if:
- the doors are very narrow;
- 90 mm visually overload the facades;
- the 8 mm relief conflicts with opening;
- handles occupy the only suitable height;
- the cabinet is intended to be strictly minimalist;
- a thin frame is required, not a wide carved frieze;
- the existing facade covering requires preliminary repair;
- the ornament does not match the interior;
- the sliding system does not leave enough space for the protruding decor.
In such cases, it is better to look at another Polyurethane trim or switch to a molding scheme.
How to arrange a purchase without excess material
Before order KPU-046 made of polyurethane, a ready-made cabinet map should be in front of your eyes.
It marks:
- width of each door;
- inter-facade seams;
- total height of the belt;
- handles;
- start and end points of the ornament;
- assumed joints of the original two-meter elements;
- number of required segments;
- remnants after cutting.
If doubt remains only about the scale, you can first compare Carved polyurethane molding.
If it becomes clear that the cabinet requires not just one frieze, but a whole decorative system, it makes sense You can buy ready-made stucco matching the Baroque style. Calculate the quantity: linear meters of cornices and moldings, number of rosettes, pilasters, consoles, corner elements. Add a ten to fifteen percent allowance for trimming. and reassemble the overall composition of the facades.
FAQ: questions about the single belt KPU-046 on the cabinet
Can one KPU-046 be glued to two doors at once?
No, if the doors must open independently. The profile will physically connect the two leaves through the working seam. Each door needs its own separate piece.
Why then can the belt be considered single?
Because the height, width, color, and pattern remain unified. The physical breaks coincide with the inter-facade seams and do not prevent visually reading one horizontal line.
What is the size of KPU-046?
The size of KPU-046 is 90 × 8 × 2000 mm.
What material is KPU-046 made of?
It is a carved polyurethane molding.
How much does one element cost?
At the time of writing the article, the card shows a price of 12,440 ₽ for KPU-046 with a length of 2000 mm. The cost should be rechecked before ordering.
Is KPU-046 a molding?
No. In this project, it should be considered as carved polyurethane trim.
Can it be used to make a frame on a door?
Extended trim can have various decorative applications, but the article focuses on a horizontal belt. For classic frames, it is more logical to compare moldings separately.
Should a gap be left between pieces on adjacent facades?
Yes. The working inter-facade gap cannot be covered by a decorative profile. Its exact size is determined by the design of the specific furniture.
How to maintain the continuity of the ornament?
First, the pattern is laid out across the entire width of the cabinet as one long strip, and then divided along the door seams. The next fragment continues the overall logic of the previous one.
Should the door gap itself be considered as part of the pattern?
For the most accurate illusion of continuity — yes. It is convenient to perceive the seam as a small missing section of the overall tape.
Can the same motif be started anew on each door?
Yes. Then you get a modular belt with repeating fragments. It will be less continuous, but may look better on facades of different widths.
What is better — a continuous pattern or a repeat on each door?
A continuous pattern unites the cabinet more strongly. A repeating motif emphasizes individual panels. The choice depends on the proportions of the furniture and the KPU-046 pattern.
At what height should the belt be placed?
There is no single number. Compare several levels relative to handles, plinth, top cornice, and room horizontals.
Can KPU-046 be run directly through the handle area?
Only after checking convenience and the specific hardware assembly. You should not consider the carved profile as a standard backing for a handle without confirming such a design.
Will 8 mm interfere with opening?
They can, if the decorative edges come too close to each other. Therefore, a full-size fitting on all leaves is necessary.
How to check the thickness before purchasing?
To a paper template 90 mm wide, you can temporarily add a layer of material of approximately the corresponding thickness and check the full opening of the doors.
Why is it mandatory to make a template 90 mm wide?
Because it is the width that determines the visual weight of KPU-046. From a photo, it is impossible to reliably understand whether the belt will turn out too large on a specific door.
How many KPU-046 are needed for a cabinet 2200 mm wide?
By net length, at least two elements of 2000 mm each. But the final quantity depends on cutting and pattern matching.
How to calculate the material for four doors?
Add up the length of the four facade segments, lay them out across the original two-meter elements, then adjust the placement considering the pattern.
What margin should be taken?
For a carved belt, it is more accurate to first create a cutting map and see the actual leftovers. A universal percentage can give an error in both directions.
Is it possible to make a joint of two KPU-046 in the middle of the door?
If the pattern and future finish allow it to be done neatly, this option is possible. But with a good cut, it is easier to move the transition to the inter-facade seam.
Do I need to buy a separate KPU-046 for each door?
No. One original element 2000 mm long can be divided into several facade segments, if the cutting and pattern allow it.
Can I first buy one strip?
Yes. For a large cabinet, this is a reasonable way to check the actual width, relief, and pattern repeat before purchasing the entire batch.
Can KPU-046 be mounted on an already painted facade?
The possibility depends on the type and strength of the coating and the compatibility of the mounting compound with polyurethane and the furniture surface.
If the paint on the facade does not hold well, will glue help?
No. Weak coverage will remain a weak foundation. First, the surface issue needs to be resolved.
Can KPU-046 be painted to match the cabinet color?
Yes, if the chosen finish system is compatible with the project materials. A solid-color belt is usually perceived as lighter because the pattern is read through light and shadow.
Can the belt be made contrasting?
It can, but the 90-millimeter strip will become significantly more noticeable. This option should definitely be checked with a full-size color mockup.
Is a second belt needed?
Not necessarily. One KPU-046 already creates a strong horizontal line. A second level is added only when it truly improves the proportions.
How is KPU-046 different from a decorative overlay?
The trim creates a long linear composition. The overlay works locally at a single point on the facade.
How is KPU-046 different from molding?
In this task, KPU-046 is used as a wide carved ornamental belt. Molding is more convenient for thin lines and frames.
Where can I see other molding models?
You can Buy polyurethane trim after comparing the sizes and patterns of different models.
Can KPU-046 be combined with the top cornice?
Yes, if the two horizontal lines do not overload the furniture. A visually clear plane should remain between the cornice and the belt.
If the cabinet already touches the ceiling, why add another horizontal belt?
The top junction finishes the cabinet from above, while KPU-046 organizes the facades themselves. These functions differ.
Can the belt be continued onto a fixed side panel?
Yes, as a separate fragment. You cannot connect a moving door to a fixed part with one physical piece.
Can KPU-046 be continued along the wall?
Visually possible, but the wall section must be separate. Furniture and wall have different bases and different mechanics.
Is this scheme suitable for a sliding wardrobe?
It cannot be transferred automatically. For sliding doors, you first need to check the distance between the planes and the trajectory of movement, taking into account the 8 mm relief.
What to do if 90 mm is too much?
Choose another one Carved polyurethane molding of a smaller scale.
What to do if the ornament is too active?
You can refuse the carved belt and buy polyurethane moldings for a calmer geometric scheme.
Will KPU-046 suit a minimalist wardrobe?
Only if you deliberately want to make the wardrobe more decorative. The carved belt significantly changes the character of smooth furniture.
Do all doors need to be decorated the same way?
The height and width of the belt must form a system, but the specific phase of the ornament can be either continuous or modularly repeating — depending on the chosen scheme.
Can remnants of one plank be used on another door?
Yes, if the length, pattern, and position of the fragment match the overall layout. A remnant cannot be used just because it physically fits.
Where should I start the calculation if the wardrobe is only being ordered?
With the facade drawing. Already on it, you can determine the height of the belt, the width of each segment, the placement of handles, and the preliminary quantity of KPU-046.
Where can I buy KPU-046?
In the STAVROS product card, you can buy the carved molding KPU-046, after first verifying the size, quantity, and current price.
The carved belt should visually unify the facades, not mechanically connect them.
The idea of running KPU-046 through the entire wardrobe really works.
Moreover, for a tall built-in wardrobe, it may prove more interesting than standard frames. Frames emphasize each door individually. A carved belt does the opposite — it gathers several tall panels into a single horizontally organized plane.
But the main secret of a good result is almost paradoxical:
to make the belt look continuous, it must be properly broken.
Each door receives its own separate fragment.
The gap between facades remains free.
The 8 mm thick relief is checked with full opening.
The pattern continues mentally through the seam or repeats according to a pre-selected modular scheme.
The 90 mm width first appears on the wardrobe as a full-size mockup.
And only then is the material calculated.
When calculating, it is not enough to divide the total length by 2000 mm. The two-meter KPU-046 pieces need to be laid out across specific panels, choose the starting points of the ornament, decide where joints are acceptable, and look at the actual leftovers.
If after such a fitting the wide carved belt truly suits the cabinet, it can be carved molding KPU-046 90 × 8 × 2000 mm buy no longer as a beautiful strip "for trial", but as a calculated part of a specific furniture composition.
If 90 mm turned out to be too large, STAVROS allows Buy polyurethane trim a different scale. If the full-size mockup showed that one belt is not enough and the cabinet requires a more developed architecture, it is possible Buy Polyurethane Molded Decoration to additionally complement the facades with moldings or other elements.
STAVROS here is valuable not for the amount of decor on a single door, but for the ability to select the precise tool for a specific idea. For a cabinet with several tall doors, such a tool can be precisely KPU-046: one relief horizontal bar instead of many separate frames.
When the height, scale, layout, and door movement are verified in advance, what the whole project was started for happens: the cabinet remains fully functional, each door opens independently, but in the closed state several separate facades are perceived as one integral architectural surface.