Article Contents:
- Why the area near the door is more complex than a regular wall
- Where slat panels are used near a door opening
- Entryway at the entrance
- Hallway with interior doors
- Accent wall near the door in the living room
- Bedroom next to the passage
- Arch or wide opening without a door
- Niche next to the door frame
- Dressing room or built-in wardrobe area
- Main issue: joint with the trim
- Option 1. Panel ends with a gap to the trim
- Option 2. Panel fits flush against the trim
- Option 3. Molding between panel and trim
- Option 4. Edge covered with a wooden corner piece
- Option 5. Trim and panel in the same color
- Option 6. Trim and panel in contrast
- How to cover the end of a slatted panel near a doorway
- Wooden corner piece: precise, protected, modern
- Molding: decorative transition with character
- Wooden slat: laconic vertical trim
- Linear products: for non-standard joints
- Baseboard at the doorway: lower horizon with finish
- How to connect a slat panel to a baseboard at the doorway
- The logic of a continuous baseboard
- When the baseboard is thicker than the panel
- When the baseboard is thinner than the panel with slats
- White MDF baseboard with panels for painting
- Wooden baseboard matching wood with oak panel
- Five designs for arranging a slatted panel near a doorway
- Scheme 1. Panel with a gap to the trim + painted strip
- Scheme 2. Panel + narrow molding between panel and trim
- Scheme 3. Panel + wooden corner piece at the end
- Scheme 4. Panel + baseboard and trim in the same color
- Scheme 5. Slatted panel as a doorway frame
- Installation nuances near a doorway
- Typical mistakes when arranging slatted panels near a door
- What to buy for neat arrangement of slatted panels near a doorway
- Decision table for situations near a doorway
- FAQ: Answers to the Most Important Questions
- About the Company STAVROS

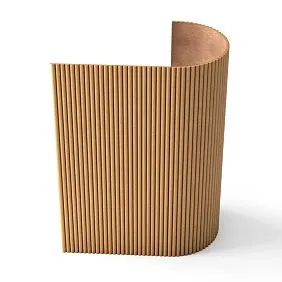
Picture this: a wall with slatted panels is installed perfectly — the slats are straight, the spacing is precise, and the tone is chosen wisely. But the wall ends at the door. And where the vertical rhythm of the slats meets the door casing, something goes wrong. The panel end is exposed. The casing "doesn't get along" with the slatted area. The baseboard stops short before the frame. The transition looks random, as if the finish stopped in confusion, unsure where to go next.
This is a common story. The area around the doorway is one of the most technically challenging during installation slatted wall panels. Here, several planes and elements converge: the panel itself, the door frame with casing, the baseboard, the corner, and often a switch or extension. Solving this junction neatly means making the entire wall complete.
That's exactly what this article is about. We'll break down each scenario: from an interior door in a hallway to a wide arched opening in a living room. With specific solutions, diagrams, and recommendations for selecting elements.


Why the door area is more complex than a regular wall
An open wall without openings is a simple task. Panels run from corner to corner, the bottom edge is covered by a baseboard, the top by a cornice or ceiling profile. Nothing extra.
A doorway changes everything. It introduces at least three new elements into the equation: the casing (vertical and horizontal frame of the box), the extension (a flat element covering the wall thickness in the opening), and the baseboard, which must reach the frame and finish properly.
What exactly complicates the situation:
The casing protrudes from the wall. A standard casing with a thickness of 10–12 mm protrudes above the wall plane. The slatted panel also protrudes: its slats add another 15–25 mm above the base surface. At the meeting point of these two protruding elements, a plane difference occurs, and it needs to be resolved neatly.
Different thicknesses create a step. Where the casing is thinner than the slatted panel with slats, a "step" is visible. Where it is thicker, the panel "bumps" into the casing. In both cases, a transition element is needed.
The baseboard ends at the door frame. The lower horizon of the wall — the baseboard — should neatly approach the door frame and "end." If the baseboard and casing are of different styles or colors, a conflict arises. If the baseboard is cut off without trimming, it's a carelessness visible to everyone.
The rhythm of the slats "breaks off" at the opening. The vertical rhythm of the panel is its main visual element. When this rhythm abruptly breaks off at the door casing without any transition profile, the wall looks unfinished precisely at that spot. A "completion point" for the rhythm is needed.


Where slatted panels are used next to a door opening
Before analyzing the solutions, it's important to understand the context. In which specific spaces does the "slatted panels + door" task most often arise?
Our factory also produces:


Entryway at the entrance
The first and most tense spot. The front door is the main door block of the apartment, heavy, with a massive frame and, as a rule, a thick casing. Slatted panels in the hallway usually run along the perimeter of the space and inevitably meet the front door. Here, the joint must be not only beautiful but also durable: the entry zone involves impacts, loads, and accidental contact.
Get Consultation
Corridor with interior doors
A corridor typically has several doors on one or two walls. slatted panels in the corridor cover the wall sections between doors. Each wall section ends at two door openings — left and right. Multiply that by the number of doors, and you understand the scale of the task.
Accent wall at the living room door
In the living room, a slatted panel is often made as an accent wall — on one wall, behind the sofa or behind the TV. If there is a door on the same wall, the panel either runs flush to it or ends in the wall section next to the opening. Aesthetics are key here: the joint should look like a design solution, not a structural awkwardness.
Bedroom next to a passageway
In the bedroom, slatted panels are often placed in the headboard area or along one wall. If the wall ends with a door to a bathroom, walk-in closet, or hallway, the same task of finishing the joint arises. In the bedroom, this is solved more softly: delicate transitions are appropriate here, rather than rigid corner profiles.
Arch or wide opening without a door
A wide arched or rectangular opening is a separate story. There is no trim in the usual sense, but there is the end of the slatted panel on the reveal. How to extend the slats into the opening, how to finish the end on the reveal, how to connect slatted surfaces inside the arch — these are questions that require precise answers.
Niche next to a door frame
A niche by the door is a combined task. Outside the niche, there is a wall with slatted panels; inside, there may be a different finish. At the intersection of the niche and the main wall, a corner profile is needed. Add a door nearby, and there are even more junction points.
Walk-in closet or built-in wardrobe area
A sliding wardrobe or built-in walk-in closet often has its own 'box' without trim. A slatted panel that approaches the wardrobe body requires the same neat end solution as at a door frame.
Main problem: the junction with the trim
This is the most technically delicate point. Let's consider all solution options — from simple to more complex.
Option 1. The panel ends with a gap to the trim
The most common approach. The slatted panel is installed with a setback from the trim — 5–15 mm. This results in a small strip of the main wall between the panel edge and the trim.
This only works in one case: if the wall between the panel and the trim is painted in the same tone as the back side of the slat or molding. Then the wall strip is not perceived as a gap — it is seen as part of the system.
If the wall is light and the panel is dark, the gap looks like an installation error. The open cut on the gap side is also visible and spoils the impression.
Option 2. The panel fits flush against the trim
The panel edge is pressed against the trim. Technically, it's clean: no gap, no wall strip. But there is another problem: the thickness difference. The trim (10–12 mm) is thinner than the slatted panel together with the slats (25–40 mm). A step forms at the junction.
This step is especially noticeable from the side — when viewed at an angle to the wall. It is solved either by a molding profile between the trim and the panel end, or by selecting a trim with a lip that covers the end.
Option 3. A molding between the panel and the trim
This is the most elegant solution for neoclassical and classic interiors. wooden molding It is mounted vertically between the end of the panel and the casing. It covers the gap, hides the panel end, and creates a decorative vertical element.
The molding acts as a connecting link: casing + molding + slat panel is a system with rhythm. This looks especially beautiful when the molding matches the casing in style.
Option 4. The edge is covered with a wooden corner piece
Wooden corner bracket — for modern interiors where a clean geometric edge without a decorative profile is needed. The corner piece is mounted vertically on the panel end and to the casing (or to the wall next to the casing), covering the cut and creating a clear vertical line.
This is a technically clean solution: the corner piece covers everything — the MDF cut, the thickness difference, and the gap between the panel and the frame.
Option 5. Casing and panel in the same color
Not about profiles, but about system logic. If the casing and slat panel are finished in one color — white enamel, gray paint, or a dark tone — the transition between them is perceived as a single whole. The technical joint "disappears": even if there is a small gap or clearance between them, the uniform color makes the transition unnoticeable.
This is especially relevant for slatted panels for painting: in a monochrome system, casings, panels, moldings, and baseboards are painted in a single color — and all joints become a design detail, not a structural flaw.
Option 6. Contrasting trim and panel
A dark slatted panel + white trim is an intentional contrast. Here the joint should be clear and deliberate: without gaps, without uncovered ends. Either a corner piece in the panel color, or a molding that transitions from the panel to the trim and creates a clean vertical border.
How to cover the end of a slatted panel at a doorway
Let's break down each additional element — with specific parameters and application conditions.
Wooden corner piece: precise, protected, modern
Buy a wooden corner piece — the first solution for any open end of a panel at a doorway. Its design: two shelves at a right angle. One shelf attaches to the end of the panel base, the other fits against the wall or trim.
Selection parameters:
-
Shelf: from 15 mm — enough to cover the end of a standard thickness panel. For thick panels with high slats — a shelf of 20–25 mm.
-
Height: to the height of the slatted area + 2–3 cm allowance.
-
Material: wood. Compatible with wooden panels and MDF for painting.
-
Color: matching the panel or contrasting.
Where it is used at the door:
-
On the open side edge of the opening without a casing.
-
On the external corner edge, if the panel wraps around the corner near the door.
-
On the slope, where the slatted panel ends and the opening begins.
Molding: a decorative transition with character
Decorative wooden moldings MLD-019 — when the corner piece is too "rough", but a profile with relief and character is needed. Molding is a decorative line: it not only covers the edge but also creates a visual transition.
At the door, the molding works as a vertical divider between the slatted area and the casing. Its width — 30–60 mm — allows covering any gap and creating a significant visual accent.
The molding works especially well paired with a casing if they have a similar profile. Then the door block and the slat area merge into a single extended-format "door frame."
Wooden slat: a concise vertical extension
Decorative wooden slat at the door — it is the "last slat" that covers a gap or asymmetry. If the panel ends at the door and the last slat turns out to be narrower than the others, an extension slat of the required cross-section corrects the situation.
This is the most unobtrusive option: the slat continues the language of the slatted wall right up to the casing, without adding new profiles.
Trim profiles: for non-standard joints
wood trim items — is a catch-all category that includes glazing beads, moldings, and transition profiles. They are needed at a door opening where neither a corner, molding, nor slat fits geometrically: a non-standard gap, a curved casing, or a junction of several materials simultaneously.
Buy trimmings in addition to the main set — this is a rule for hallways with multiple doors, where each opening may have its own installation specifics.
Baseboard at the door opening: the lower horizon with a finish
The baseboard at the door opening requires special attention. It must approach the frame, finish neatly, and — ideally — match the casing in style.
MDF Skirting Board — for monochrome systems intended for painting. It cuts cleanly, without chipping. It fits flush against the frame with a minimal gap, which is sealed with acrylic sealant.
Wooden baseboard — for interiors with natural wood and shaped profile. At the door frame, the baseboard is cut along the profile or finished with a special corner piece.
How to connect a slatted panel to the baseboard at a doorway
A baseboard is a horizontal continuous contour at the base of the wall. It runs along the entire wall and ends at the door frame. The slatted panel "stands" above the baseboard or starts from it. How are these two elements connected?
The logic of a continuous baseboard
The correct approach: the baseboard runs the entire length of the wall — including along the slatted area. The panel is mounted on top of or flush with the baseboard, but not instead of it. The bottom gap between the slatted panel and the floor is covered by the baseboard — and the baseboard "passes through" the entire wall without interruption.
At the doorway, the baseboard reaches the door frame and ends. The frame accepts the end of the baseboard. If the frame has a lower casing, the baseboard joins with it. If not, the baseboard is cut flush against the frame.
When the baseboard is thicker than the panel
If Wooden baseboard thicker than the base of the slatted panel — it "protrudes" beyond the edge of the panel. This is not critical if there is a molding or corner piece in front that covers the transition. But if the joint is open, the difference will be visible.
Solution: the baseboard is installed before the slatted panel — that is, it is attached to the wall first. The panel is pressed against the baseboard from above. The baseboard covers the bottom end of the panel.
When the baseboard is thinner than the slatted panel
Here the situation is reversed. A baseboard 80 mm high, a slatted panel with slats protruding 25 mm — the slats "overhang" the baseboard. This is normal: slats are a decorative element, their overhang above the baseboard creates a play of shadows and is perceived as part of the relief. The baseboard meanwhile performs its function — covering the bottom gap.
White MDF baseboard with panels for painting
buy MDF skirting board and paint it the same color as Paintable lath panels — the optimal scheme for monochrome hallways and corridors. A single color unites all elements: panel, baseboard, possibly — trim. The joint between them disappears: everything becomes a single painted system.
Wooden baseboard matching wood with oak panel
solid wood baseboard + slatted panel in oak wood finish — a natural wood system. Here consistency of tones is important: baseboard in the same oak tone or slightly darker — "grounds" the wall. Different wood shades without a system — that's a conflict.
Five schemes for arranging a slatted panel near a doorway
This is a section for making a specific decision. Five real scenarios with logic and recommendations.
Scheme 1. Panel up to the trim with a gap + painted strip
When suitable: the trim itself is beautiful and doesn't need to be covered; the interior is modern and minimalist.
Logic: the panel is installed with a 10–15 mm gap from the trim. The wall strip between the panel and the trim is painted to match the molding or darker than the wall. The open end of the panel is primed and painted.
Result: the transition is "readable" but doesn't look rough. The trim remains an independent element without competing with the panel.
What to buy: slatted panels for walls + MDF Skirting Board or Wooden baseboard.
Scheme 2. Panel + narrow molding between the panel and the trim
When suitable: classic or neoclassical interior, trims with shaped profiles, bedroom or living room.
Logic: the slatted panel ends at the casing. Between the end of the panel and the casing, a molding MLD-019 vertically. The molding covers the end and creates a decorative transition — an "additional casing."
Color: the molding matches the casing or the panel. If it matches the casing, an extended door frame is created. If it matches the panel, a boundary between the slatted area and the door.
What to buy: decorative slatted panels + wooden molding + Wooden baseboard.
Scheme 3. Panel + wooden corner at the end
When suitable: modern interior, corridor, hallway, high-traffic area.
Logic: the slatted panel ends at the opening. On the side end, a wooden corner UG-001 is installed. The corner covers the cut, protects the end, and creates a clean vertical line.
Color: the corner matches the panel — a monochrome solution. White corner with a dark panel — a clear contrast.
What to buy: Wall slatted panels + Wooden corner bracket + MDF Skirting Board + Trimming Items.
Scheme 4. Panel + baseboard and casing in the same color
When it fits: monochrome system for painting, modern or Scandinavian interior.
Logic: Paintable lath panels + MDF Skirting Board + MDF casings — everything is painted in a single color. Transitions between elements "disappear" under a single coating.
What to buy: Painted MDF plank panels + MDF Skirting Board + molding MLD-019.
Scheme 5. Slatted panel as an opening frame
When it fits: wide arched or rectangular opening without a door, transition between rooms, accent portal.
Logic: the slatted panel runs not only along the wall but also along the opening slopes. Corner transitions are covered wooden corner pieces. At the top — a horizontal molding belt. Result: the opening is "dressed" in slat finish and looks like an architectural portal.
What to buy: slatted panels for walls + Wooden angles + Molding + Decorative wooden slat for extension on the slopes.
Installation nuances near a door opening
Even correctly selected elements will yield a poor result if installation is done without considering technical nuances.
The installation order matters. Correct sequence: install door frame → install baseboard → install slat panel → install trim profiles (corner, molding) → final painting or varnishing. If installed in a different order, you'll have to cut or redo.
Gap at the frame — 2–3 mm. The slat panel should not press tightly against the door frame. A deformation gap of 2–3 mm is necessary. This gap is later covered with molding, corner trim, or sealant.
Treating the ends before installing profiles. The MDF cut on the panel end needs to be primed before installing the corner or molding. Otherwise, the end will start to absorb moisture even under a closed profile.
Aligning the corner and molding vertically. A deviation of the vertical profile by 2–3 mm will be very noticeable next to the vertical of the door frame. Use a level when installing each vertical element.
The baseboard is trimmed to match the frame profile. The end of the baseboard at the door frame should follow the frame profile or be cut evenly. Hand-cutting results in an uneven end that stands out.
More about installing slatted panels and about that, How to attach slat panels to the wall — in separate materials.
Typical mistakes when finishing slatted panels near a door
Let's break down specific oversights — to avoid repeating them in your own renovation.
Bring the panel flush to the trim without a gap or profile. A slat panel and a trim are two different elements, both protruding from the wall. If you join them tightly without a transition profile, you get a pressure line: at the slightest movement of the frame or panel, the joint will open. A deformation gap plus a covering profile is a mandatory condition.
Leave an open cut of the panel. The MDF cut near the opening is a vulnerable point. Especially at the entrance door, where humidity and mechanical loads are maximum. An unprotected cut deteriorates within 1–2 years. Buy a wooden corner piece and installing it takes 15 minutes of work that extends the panel's life for years.
Not accounting for the trim thickness. If you don't measure how much the trim protrudes from the wall plane during planning, it may turn out during installation that neither the corner piece nor the molding covers the difference. Measure the trim thickness before ordering additional elements.
Install a baseboard of a different style. Slatted panels for interior finishing in a modern minimalist style + a classic baseboard with a rich profile = a style conflict at the doorway that immediately catches the eye. The baseboard should be stylistically from the same family as the panels.
Use a corner that is too thin. A corner with a 10 mm shelf for a slat panel thickness of 14–16 mm does not fully cover the end. Choose a corner with a shelf margin.
Not calculating the end pattern of the slats. If the slat spacing is 30 mm and the distance from the last full slat to the trim is 10 mm, the last slat will be cut and look like a narrow strip. Plan the slat layout from the center of the zone to the edges — then the cut slats will be symmetrical on both sides.
Breaking the baseboard before the panel. The baseboard should run continuously — including under the slatted zone. If it is cut off before the panel, the lower horizon of the wall is broken, and the installation looks unfinished.
Mixing different wood shades. Three different "wood" tones on one wall by the door is chaos. A panel in one oak tone, a baseboard in another, a corner profile in a third — this only works with a unified color scheme. Either monochrome for painting or a single stain for all elements.
What to buy for neat finishing of slatted panels near the opening
Final order list — for the 'slatted panel + door opening' scenario.
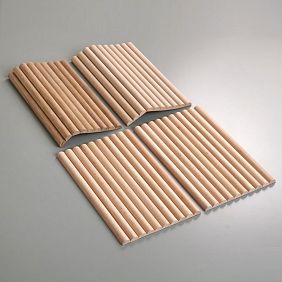
slatted panels for walls — main material. In three options: PAN-001 with decorative coating, PAN-002 primed for painting, PAN-003 oak wood finish.
Wooden corner piece UG-001 — for open ends and external corner transitions. Count: one for each open end at the opening.
wooden molding / moldings MLD-019 — for decorative transition between panel and trim, for frames around accent areas.
Wooden batten RK-001 — for additional areas, continuing the rhythm of slats on slopes and at non-standard junctions.
Decorative wooden slat — for a wider range of additions in areas with non-standard geometry.
MDF Skirting Board — for monochrome systems for painting, clean geometry, cuts well.
solid wood baseboard — for natural and classic interiors with wood texture.
wood trim items — for all non-standard joints at door frames, sockets, and furniture.
Questions about joints of slatted panels — in a separate article.
Solution table for situations at a doorway
| Situation | Recommended element |
|---|---|
| Open end at the opening | Wooden angle |
| Transition to the trim with a gap | molding MLD-019 |
| Monochrome system | MDF Skirting Board + panels for painting |
| Natural wood at the door | Wooden baseboard + corner piece |
| Non-standard joint at the frame | Trimming Items |
| Slat rhythm does not match the edge | wooden plank as an extension |
| Opening without a door (arch) | Corner on slopes + Rail for extension |
| Hallway with loads | Corner + high baseboard |
FAQ: answers to the most important questions
Can slatted panels be placed next to the door?
Yes, this is a completely workable solution. It is important to properly finish the joint with the trim and baseboard. For slat panels in the hallway и slatted panels in the corridor — this is a standard task that is solved with extension elements.
How to join a slatted panel with a trim?
Three options: with a gap + painted wall strip, through wooden molding between the panel and the trim, or flush with a corner at the end. The choice depends on the interior style and the thickness of the trim.
How to cover the end of the panel at the doorway?
wooden corner piece — for a modern interior. molding — for classic. With an extension strip — to continue the rhythm of the slats.
Is a wooden corner needed near the door?
If the panel ends with an open end near the opening — yes, a corner is needed. It covers the material cut, protects the end from damage, and creates a clean vertical finish line.
Which baseboard to choose for slatted panels in the hallway?
For the hallway — Wooden baseboard made of solid wood, 100–120 mm high: stronger, protects the lower area. For monochrome systems for painting — MDF Skirting Board.
Can an opening without a door be finished with slatted panels?
Yes. A slatted panel on the slopes of a wide opening is an impressive technique. Corner transitions are covered wooden corner piecesnon-standard places — mouldings.
What is better near the door: molding or corner profile?
A corner piece is for a modern, laconic, technically clean transition. A molding is for decorative framing, a border, classic or neoclassical interior. In hallways and corridors with high traffic, a corner piece is often preferred; in living rooms and bedrooms, a molding.
How not to ruin the joint between the panel and the baseboard?
Install the baseboard before the slatted panel. Ensure the baseboard is continuous along the entire wall length. Choose baseboard and panel in the same style register. Neatly trim the baseboard end at the door frame.
About the company STAVROS
The area near the doorway is one of the most telling in any renovation. This is where you can see whether the material set is well thought out or hastily assembled.
STAVROS produces everything needed for neat wall finishing near the door: Rafter panels in three versions — with coating, primed for painting, and oak wood; Wooden corner pieces for ends and corner transitions; Moldings for decorative frames and transitions; Wooden baseboard и MDF Skirting Board for the lower horizon; Wooden planks и Trimming Items for all non-standard places.
STAVROS is a system where every element knows its place. Including next to the door.