Article Contents:
- KPU-074 is carved molding, not a regular covering strip
- Why 50 mm cannot be evaluated separately from the pattern
- First, look at the joint from the side
- Why a standard "waste percentage" on top of three strips is not needed in this case
- What real losses include
- First the ornament, then the millimeters
- Height of the lower slat zone
- Contrast between panels and paint
- Width of the wall itself
- Viewing distance
- Side lighting
- Presence of other horizontal lines
- Option 1. The molding is entirely placed on the painted wall
- Option 2. The molding partially overlaps the top of the panels
- Option 3. The molding is positioned with a slight visual gap above the panels
- 1. The length exactly along the installation line
- 2. The length up to visible limiters
- 3. The actual height of the panel boundary
- 4. The step between materials
- 5. All extensions around the corner
- 6. Locations of outlets, switches, and wall-mounted elements
- Matching the painted wall
- In the color of the slat panels
- In a separate contrasting color
- One color does not negate the difference in textures
- The joint is already neat and doesn't require an accent
- The room already has a lot of ornament
- The top of the panels runs too high
- The base doesn't provide a proper bonding surface
- The room requires minimalist geometry
- Budget matters more than decorative complexity
- Step 1. Mark one control horizontal line
- Step 2. Choose the joint pattern
- Step 3. Lay out the parts face up
- Step 4. Do a trial joint on the floor
- Step 5. Check the wall ends
- Step 6. Only after the full layout, proceed to installation
- Frequent thin slats
- Wide slats with large spacing
- Panels with Pronounced Wood Grain Texture
- Solid panels for painting
- Mistake 1. Buying three slats just because 6 m is more than 4.8 m, and not planning the joints
- Mistake 2. Considering KPU-074 as a technical profile for any type of panels
- Mistake 3. Estimating the 50 mm width from the product card
- Mistake 4. Ignoring side light
- Mistake 5. Buying a fourth slat 'just in case' without calculation
- Mistake 6. Making a joint directly above the main object on the wall
- A door breaks the frieze line
- A window or niche is above the frieze
- A tall cabinet covers part of the wall
- The radiator does not cross the line, but affects perception
- Inside corner
- Outside corner
- Why the angle can change the number of planks
- Protect the lower slat zone
- Check adhesion not only of the glue but also of the paint
- Do not rely on glue to level out a large wave
- First assemble the visual line, then finish the joints
- Use the remainder as a training sample
- Scenario A. Panels 1100 mm, calm solid paint on top, interior with classic details
- Scenario B. Graphite panels, top of wall white, furniture without handles, hidden doors
- Scenario C. The frieze runs 4.8 m and then turns onto the adjacent wall for another 1.3 m
- Can I order two KPU-074 and make one joint with an insert from another profile?
- Is a fourth batten needed if the wall has an internal corner at the end?
- Can the factory length of 2000 mm be preserved in the center of the wall?
- If the top of the slat panels is uneven, will KPU-074 hide the difference?
- Can KPU-074 be glued after the wall is fully painted?
- Is it worth buying KPU-074 if the panels and the wall are the same color?
- Can I use leftover pieces of about 600 mm on the door opening?
- What is better for a small wall: KPU-074 or a narrower carved molding?
- Do I need to align the ornament with the step of the slat panels?
- Can KPU-074 be finished freely in the middle of a wall?
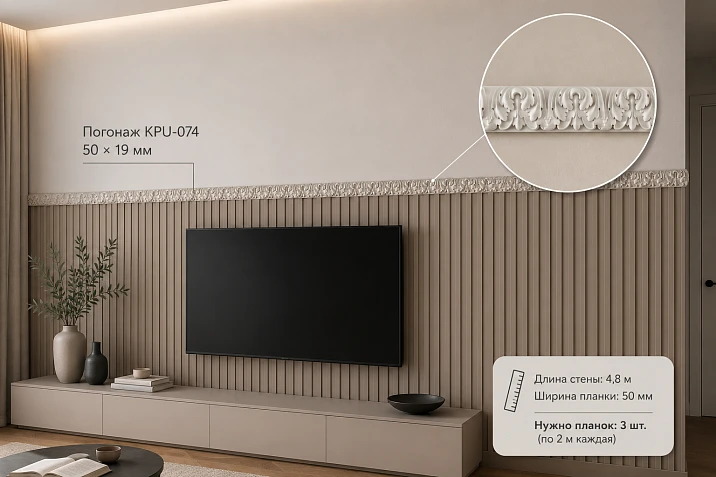
Slat panels end roughly in the middle of the wall, leaving a smooth painted surface above. A long horizontal boundary appears between the two finishes: it can be left almost invisible, covered with a simple molding, or, on the contrary, turned into an independent decorative band. KPU-074 belongs to the third scenario. It is a carved polyurethane trim 2000 mm long with a front dimension A of 50 mm and dimension C of 19 mm. It can make the top of the slat area a noticeable architectural frieze, but buying it only as a "strip to cover a gap" is not always rational.
For a wall 4.8 m long by net footage, three KPU-074 pieces are needed: two strips give only 4 m, while three give 6 m. The nominal surplus is 1.2 m. At the current price of 13,500 ₽ per piece, three strips cost 40,500 ₽ excluding delivery, installation, and finishing materials.
However, the right decision starts not with arithmetic. Before ordering, you need to understand two things. First, whether the joint should really become a carved decorative frieze, because KPU-074 is noticeably more active than a smooth technical edging. Second, how to distribute three two-meter strips along the wall so that the joints are not random and the ornament does not "break" in the most visible place.
If the task is only to neatly finish the top of the slat panels and hide the technological boundary, it is useful to also look at polyurethane wall moldings. If, however, an expressive horizontal band is needed, it makes sense to consider KPU-074 further.
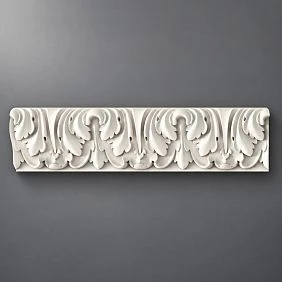
KPU-074 is a carved trim, not a regular covering strip
In the STAVROS catalog, KPU-074 belongs to polyurethane trim. Its purpose is broader than that of a simple smooth molding: the carved pattern is designed to be visible. Therefore, in the interior, it works not only as a dividing line between two materials, but also as a decorative band that changes the proportions of the wall.
| Parameter | KPU-074 |
|---|---|
| Product type | Carved molding |
| Material | Polyurethane |
| Size A | 50 мм |
| Size C | 19 мм |
| Length of one plank | 2000 мм |
| Price per 1 pc. at the time of preparing the material | 13 500 ₽ |
| Quantity per straight line 4.8 m | 3 pcs. |
| Cost 3 pcs. | 40 500 ₽ |
| Nominal total length 3 pcs. | 6000 мм |
| Nominal remainder relative to 4800 mm | 1200 мм |
The product card indicates dimensions in the format A × C × L = 50 × 19 × 2000 mm. For calculating the quantity, the critical dimension is specifically length L — 2000 mm. Dimension A of 50 mm sets the scale of the visible decorative belt, and dimension C of 19 mm should be considered when fitting the profile in cross-section: it affects how prominently the molding will be perceived relative to the painted wall and the top edge of the panel area.
If the decision has already been made, you can purchase carved molding KPU-074 made of polyurethane in the card of the specific product. But before adding to the cart, it is better to do a full-size mock-up of a section at least 300–500 mm long: on the wall, the width of 50 mm is perceived differently than in the product photo.




Why 50 mm cannot be evaluated separately from the pattern
The size of 50 mm by itself does not make the profile excessively wide. For the top edge of wall panels, both narrower and wider solutions are found. The problem with KPU-074 is not the number 50, but the combination of three factors: width, carved ornament, and a noticeable profile in cross-section.
A smooth strip 50 mm wide can read very calmly, especially if painted in the wall color. Carved molding of the same width creates many light-and-shadow transitions and therefore visually weighs more. On a wall where dozens of vertical slat lines already work below, a horizontal carved strip can either successfully tie the composition together or create a second competing rhythm.
Therefore, before ordering, it is better to formulate the question as follows: is a decorative border needed here, or only a neat finish of the material? If a border is needed, KPU-074 is logical. If you only need to cover the top edge or a small technical gap, it is worth first comparing it with a calm smooth profile.
Our factory also produces:
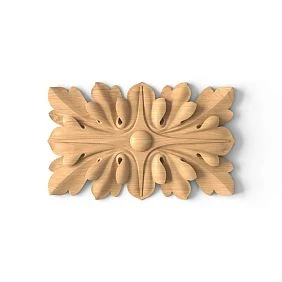
A technical joint and a decorative frieze are two different tasks
One of the most common mistakes when choosing molding for a combined wall is to consider any profile a "transition piece." In practice, joining two finishes may require two different functions.
The first function is technical. You need to cover the end of a panel, an uneven paint edge, a small installation gap, or a difference between materials. Here, the geometry of the joint, the bonding area, and the profile's ability to physically cover the problem area are important.
The second function is decorative. The border is already neatly done, but looks too simple. Then the profile does not have to save a bad joint; it creates a horizontal line, sets the scale of the lower panel, and makes the transition intentional.
KPU-074 should be evaluated primarily as a decorative molding. You cannot automatically assume that its profile will suit any end of a slat system. Different wall panels vary in base thickness, lamella height, distance from the face surface to the wall, and the construction of the top edge. If the decorative band must also cover this edge, you need to check the actual joint in cross-section.
Get Consultation
First, look at the joint from the side
A frontal photo is not enough. Approach the wall from the side and determine:
-
whether the painted plane and the panel base are flush or have a step;
-
how far forward do the rails themselves protrude;
-
is there a continuous flat strip to which the molding can be glued;
-
should the profile overlap the top of the rails or be positioned on the painted wall directly above them;
-
there is no shadow gap that the project has deliberately left open.
If the top of the slat area forms a comb-like relief, gluing a long horizontal element directly onto individual protruding slats without checking the support is risky. The molding must have a clear and stable base along its length. Sometimes it is more correct to first structurally complete the panel system with its standard profile, and use KPU-074 above as a separate decorative frieze.
This approach is more expensive and complex, but it separates functions: the technical component handles the panel finishing, and the decorative molding handles the appearance.
How many KPU-074 are needed for a 4.8 m wall
The basic calculation here is simple and unambiguous:
4800 / 2000 = 2.4 strips.
A fractional strip cannot be ordered, so we round up:
need 3 KPU-074.
Two strips give 4000 mm and do not cover a line of 4800 mm. Three give 6000 mm.
6000 − 4800 = 1200 mm of nominal margin.
At the current product price:
3 × 13 500 = 40 500 ₽.
This is the cost of the linear material itself. Mounting materials, delivery, base preparation, and final painting are calculated separately.
Why a standard "waste percentage" is not needed on top of three strips in this case
Sometimes for linear materials it is advised to automatically add 5–10% or even 15%. For a specific wall of 4.8 m, this approach should be applied thoughtfully. Three standard strips already provide a margin of 1200 mm, i.e., nominally a quarter more than the net wall length. Buying a fourth strip just for an abstract percentage would increase the order by another 2000 mm and by 13,500 ₽.
Therefore, first check the cutting layout. For one straight wall without continuation around a corner and without additional fragments, three strips have a large built-in margin. A fourth becomes justified not because of a percentage, but due to specific additional consumption: for example, if the frieze continues onto an adjacent wall, returns are needed, there is a complex joint pattern with large waste, or part of the material is required for another area of the room.
What is included in real losses
The nominal 1200 mm cannot be considered a guaranteed useful remainder. During cutting, the length is reduced:
-
width of cuts;
-
possible alignment of ends;
-
selecting the cut location according to the pattern;
-
rejecting a section with damage;
-
additional trimming at corners or near junctions;
-
test cut if the installer is working with such a profile for the first time.
But the 1200 mm allowance is so much larger than typical technological losses that for a straight 4.8 m line, the decisive factor is not "whether the length is enough," but how to reasonably distribute three planks and two main joints.
Where to make joints on a 4.8 m wall: three cutting schemes
If you simply start from the left edge and lay factory two-meter lengths in a row, you get the scheme 2000 + 2000 + 800 mm. Technically it works, but decoratively it is not always the best: the last section is noticeably shorter than the previous two, and the joints end up at the 2.0 and 4.0 m marks. On a calm smooth profile this may be unnoticeable, but on a carved frieze the asymmetry is more striking.
It is much more useful to choose a joint scheme in advance.
| Diagram | Sections along the wall | Joint position | What it gives |
| Sequentially from the edge | 2000 + 2000 + 800 mm | 2000 and 4000 mm | Minimum planning, but short edge section |
| Symmetric with a solid middle | 1400 + 2000 + 1400 mm | 1400 and 3400 mm | Solid central section and symmetry relative to the middle of the wall |
| Three equal sections | 1600 + 1600 + 1600 mm | 1600 and 3200 mm | Uniform rhythm of joints, but each plank is cut |
For a wall perceived frontally, 1400 + 2000 + 1400 mm often proves to be a strong starting scheme: the central two-meter plank remains whole, and the two joints are positioned symmetrically. From the other two planks, side sections of 1400 mm are cut out. Nominally, after this, approximately 600 mm remains on each side before accounting for the saw cut and trimming.
However, this is not a universal rule. If the KPU-074 pattern has pronounced repeating motifs, the cut location must be chosen so that the design at the joint looks logical. The exact repeat step of the pattern is not specified in the available product characteristics, so it cannot be guaranteed in advance that the geometric scheme of 1400 + 2000 + 1400 mm will give a perfect pattern match without additional trimming.
First the pattern, then the millimeters
The correct sequence is as follows:
-
Lay out three planks side by side on the floor or a long table with the face side up.
-
Find the repeating elements of the pattern.
-
Identify potential cut locations where the motif can be joined most naturally.
-
Match these places with the desired wall symmetry.
-
Only after this, transfer the final lengths to the parts.
If the central axis is especially important on the object — for example, a console, mirror, painting, or TV stands in the middle of the wall — it is better to move the joints away from this axis. A solid central fragment usually gives a calmer perception than joining two carved strips right in the center of the composition.
How to check if KPU-074 is too active against the background of vertical slats
Slat panels already create a strong vertical rhythm. KPU-074 adds a transverse horizontal. Such a combination is not an error in itself: a horizontal band can just stop the vertical movement and visually complete the lower part of the wall. The question is how complex this band will be.
At least six parameters influence perception.
Height of the lower slat zone
If the panels end at approximately 900–1200 mm, the carved band is perceived close to the classic boundary of panel finishing. With a much higher lower zone, the horizontal shifts closer to eye level and becomes more noticeable. Therefore, the same KPU-074 on two different walls can look completely different.
There is no universal height at which the profile automatically "fits." You need to look at the proportion: how much wall remains above the frieze, how high the ceiling is, and whether there are other large objects on the upper painted part.
Contrast between panels and paint
If the lower slat zone is dark and the top of the wall is light, the boundary is already contrastive on its own. A carved frieze adds a third active entity. In such a situation, painting KPU-074 in the color of one of the adjacent surfaces helps avoid the effect of a separate "strip."
If the panels and the top of the wall are close in tone, the ornament can become the main way to mark the transition. Then KPU-074 works more confidently.
The width of the wall itself
On a 4.8 m line, a 50 mm profile does not look large only because the wall itself is long. But on a long wall, the repetition of the ornament is especially well read. That is why the quality of joining and the same installation height are more important here than on a short fragment near the door.
Viewing distance
From the center of the room, the carving is perceived as a general textured strip. From a distance of 0.5–1 m, a person sees every joint and individual element of the pattern. If the main walking route runs along the wall, the quality of details becomes more critical.
Side light
Light from a window or wall lamp coming along the wall enhances the relief. Size C 19 mm in such lighting will produce a noticeable shadow. This may be exactly the effect for which KPU-074 is chosen, but on a very active slat wall, side light can simultaneously enhance both the vertical slats and the horizontal carving.
Presence of other horizontals
A windowsill, a long console, a sofa back, a TV stand, a shelf, or a color boundary already create horizontal lines. The molding should be tied to the overall composition, not considered separately. If a long furniture line already runs at the same height, the frieze can support it. If there are several different heights nearby, a new strip sometimes increases visual noise.
A full-size mockup is better than any product photo
Before ordering three expensive planks, it is worth spending 15–20 minutes on simulating the frieze at a 1:1 scale. To assess the width, a strip of thick paper, cardboard, or masking tape 50 mm wide is sufficient. To assess the relief, a flat mockup is not enough, so at least on a small area it is useful to add volume on the order of the profile or look at a real sample from the side.
Make a strip on the wall 1.5–2 m long at the intended height and look at it:
-
from the opposite end of the room;
-
from the entrance;
-
sitting down, if this is a living room;
-
in daylight;
-
in the evening under the main artificial lighting.
Then compare two options: a smooth strip 50 mm wide and a narrower one, for example about 20–30 mm. This is not a choice between specific items, but a test of visual weight. If even a smooth 50-millimeter strip looks heavy, the carved KPU-074 will be even more noticeable. If 50 mm feels natural, you can already evaluate the character of the ornament.
How KPU-074 should run relative to the top edge of the slat panels
There are three fundamentally different mounting options, and it depends on them whether the trim performs a technical function.
Option 1. The trim is entirely located on the painted wall
The lower edge of KPU-074 fits flush against the top line of the panel area, but the profile itself is glued to the flat wall above. This is the most straightforward option in terms of the base: the decorative strip does not depend on the relief of the slats.
The downside is that if the top end of the panels itself requires covering, the trim may not cover it. Then you first need a neat technical joint, and KPU-074 becomes a second, decorative layer of the solution.
Option 2. The molding partially overlaps the top of the panels
This can give the feeling of a real "crowning" frieze. But this scenario requires checking the cross-section on site. There must be a sufficient flat bonding area, and the profile should not hang on individual slat tops or wobble due to plane differences.
You cannot rely only on the 50 × 19 mm size and assume the profile will automatically cover any step. An actual wall cross-section template is needed.
Option 3. The molding is placed with a small visual gap above the panels
A narrow painted strip remains between the top of the slat finish and the carved belt. Then the two systems do not touch structurally, and KPU-074 works as an independent frieze.
This option is especially useful if the slat panel has a complex top edge that is already covered by its own standard element. However, the gap cannot be chosen randomly: it must read as a deliberate design choice, not as an installation error.
What to measure on the wall before ordering three strips
The calculation 4800 / 2000 = 2.4 is only correct when 4.8 m is the actual length of the decorative line. On site, it often turns out that "a 4.8 m wall" and "a 4.8 m frieze" are not the same thing.
Before ordering, take at least the following measurements.
1. The length exactly along the installation line
Measure not by the floor or ceiling, but at the height where the KPU-074 will be. If the walls have a slight turn or unevenness, the values may differ. For a straight wall, the difference is usually small, but on a long profile, errors are clearly visible.
2. Length to visible stops
Determine where the frieze ends: into a side wall, door trim, tall cabinet, window slope, or freely on the plane. If furniture is flush against the wall on one edge, it is sometimes more logical to stop the decorative line before the furniture rather than run invisible 300–500 mm behind it.
3. Actual height of the panel boundary
Check the level along the entire 4.8 m length. If the top of the slat zone varies by a few millimeters, the rigid horizontal trim will emphasize this. First, decide which line aligns the composition: the actual top of the panels or the laser level with local adjustment of the joint.
4. Step between materials
Measure the difference in planes at the top and bottom. This determines whether one KPU-074 can simultaneously fit against the wall and cover the panel edge.
5. All extensions around the corner
If the decorative strip must extend to the adjacent wall by at least 300–700 mm, the calculation changes. For example, 4800 + 600 = 5400 mm of clean length; three planks of 2000 mm still give 6000 mm, but the margin reduces to 600 mm before accounting for cuts. With two long extensions, a fourth plank may become necessary.
6. Locations of sockets, switches, and wall-mounted elements
If there is a switch, sconce, thermostat, or decorative panel at the frieze height, it is better to resolve the collision before ordering. Bypassing the obstacle may require an additional fragment and creates a new joint.
How to use 1200 mm of leftover usefully
After installing 4.8 m from three two-meter planks, nominally 1.2 m of material remains. Depending on the cutting layout, this may be one long fragment or several short ones.
With the 1400 + 2000 + 1400 mm scheme, two pieces of approximately 600 mm each remain before accounting for cuts. They can be saved for:
-
a short decorative insert on an adjacent wall, if it does not break the composition;
-
finishing a small furniture facade;
-
repairing a section in the future;
-
test painting and finish selection;
-
testing glue and joint treatment on a separate sample.
Do not plan a complex second composition from the leftover in advance until the main frieze is cut. The pattern may require additional cut offset, and the useful length of the leftovers will change.
From a practical standpoint, one saved piece of 300–600 mm is valuable as repair material. In a few years, finding an absolutely identical batch and finish is sometimes harder than replacing the damaged section from your own leftover.
Paint KPU-074 in the color of the wall, panels, or make it contrasting
Color changes the visual weight of a carved profile no less than size.
Matching the painted wall
The calmest scenario. The molding is read through light and shadow, not through color contrast. It completes the slat zone, but the top of the wall remains whole. This option is especially useful if the panels themselves are dark or have a pronounced wood texture.
In the color of the slat panels
A horizontal frieze becomes the "lid" of the lower zone. This reinforces the feeling that the panels form an independent architectural plinth or boiserie. If the panels are wood-toned and KPU-074 is painted in a close shade, you need to decide in advance whether you want to imitate a single material or deliberately leave a difference in textures.
In a separate contrasting color
The most active option. It is justified when the frieze is an independent accent and this color is already repeated in the interior: for example, in handles, lamps, door hardware. Using a third contrasting color only for one long strip is risky—it may start dividing the wall in half more than intended.
One color does not cancel the difference in textures
Even if KPU-074 and the wall are painted the same, the carving will remain noticeable due to the shadow. So "paint everything white—the profile will disappear" does not work. It will become calmer, but it will not turn into a smooth molding.
When three KPU-074 is a justified purchase for 40,500 ₽
The price itself does not answer the question of whether it is expensive or reasonable. You need to look at what function the interior gets for that money.
Three strips are justified when several conditions are met simultaneously:
-
a 4.8 m long joint is in plain sight and is perceived as an important line of the room;
-
the lower slatted zone should look like a finished architectural part of the wall;
-
an ornamental, not technical, profile is needed;
-
the style of the room allows for a carved motif;
-
full-size 50 mm templates do not overload the wall;
-
the relief looks appropriate in side lighting;
-
the base allows for reliable installation of a long horizontal element;
-
the joints of the three strips can be arranged symmetrically and neatly.
In this case, 40,500 ₽ is the cost not of a "joint plug," but of a nearly five-meter decorative frieze.
If, after a fitting, it becomes clear that only a smooth transition between materials is needed, the same amount becomes hard to justify. Then it's better to go to the section Buy polyurethane wall moldings and compare smooth profiles.
When it's better not to buy KPU-074
Refusing a specific product is also a normal result of making the right choice.
The joint is already neat and doesn't require an accent
If the slat area ends with a perfectly even factory edge, and the transition to paint looks finished, adding a carved belt may not improve the wall. An empty border is sometimes stronger than a decorative one.
The room already has a lot of ornament
Active wallpaper, a carved cornice, paneled doors, complex furniture, and decorative lighting create sufficient richness. KPU-074 will add another pattern on the longest horizontal line of the room.
The top of the panels runs too high
The closer the frieze is to eye level, the better all the details of the carving and joints are visible. If the slat panels end high, it is worth checking the layout especially carefully.
The base does not provide a proper bonding surface
Trim should not become a way to "bridge" an unpredictable gap between protruding slats and a recessed wall. The structural joint must be resolved first.
The room requires minimalist geometry
If the interior is built on smooth surfaces, hidden doors, and thin shadow gaps, a carved frieze may contradict the overall logic. Here, a laconic molding or no additional decor at all would be more convincing.
Budget matters more than decorative complexity
Three KPU-074 units — 40,500 ₽ just for the main parts. If the goal is to neatly close the material boundary, it makes sense to direct the budget toward a more suitable profile, quality joint preparation, and painting.
KPU-074 or a calm molding: how to choose in five minutes
| Question | If the answer is "yes" | If the answer is "no" |
| Do you want the top of the panels to be a noticeable decorative band? | Consider KPU-074 | Look at smooth moldings |
| Is the carved motif supported by other interior details? | KPU-074 is easier to fit in | There is a risk of accidental ornament |
| Does the 50 mm strip look good in a 1:1 mockup? | The scale fits | Need a narrower/calmer profile |
| Is the base along the installation line even and continuous? | The installation is realistic | First solve the joint node |
| 40,500 ₽ for 3 planks corresponds to the role of a frieze in the interior? | The order is logical | Compare alternatives |
| Can the ornament be joined without ugly breaks? | You can confirm the cutting layout | Need a different scheme or a different profile |
If the first five questions get confident "yes" answers, order KPU-074 50 × 19 × 2000 mm in the quantity of three pieces for a straight wall of 4.8 m — a logical solution.
If two or three answers raise doubts, you don't need to convince yourself just because the footage has already been calculated. In the catalog carved polyurethane molding You can compare other scales and character of the drawing, and for a smoother transition, move on to moldings.
How to prepare the layout before installation
On a long wall, the main mistake is to start gluing the first plank from the corner without laying out the entire composition. For KPU-074, it is better to first decide the entire five-meter line "dry" before applying adhesive.
Step 1. Mark one control horizontal line
Do not rely only on the top of the slats until you have checked it with a level. The control line shows where the trim should run. If the top of the panels has slight deviations, this will be visible before installation.
Step 2. Choose the joint pattern
For the front wall, start with the 1400 + 2000 + 1400 mm option. It provides symmetry and a solid central plank. Then match this geometry with the ornament.
Step 3. Lay out the pieces face up
Select the pattern before cutting. Mark with a pencil not only the length, but also the specific place in the pattern where the cut will pass.
Step 4. Do a trial joint on the floor
The two segments must form a visually clear continuation of the ornament. If the motif "breaks off," shift the cut and recalculate the side lengths. A 600 mm allowance on each side strip in a symmetrical layout provides space for such adjustment.
Step 5. Check the ends of the wall
Decide how the frieze ends on the left and right. If the profile butts against a perpendicular wall, a neat straight end is needed according to the actual angle. If it ends freely on a flat surface, the finishing method should be designed in advance, not appear after gluing the last piece.
Step 6. Only after the full layout proceed to installation
A long carved frieze does not tolerate improvisation. An error in the first segment shifts both subsequent joints.
What is especially important on a wall 4.8 m long
The longer the horizontal profile, the more it reveals the geometry of the room. A wave in the wall, a deviation of the top edge of the panels, or a change in the gap of 3–5 mm may be unnoticeable without decor, but becomes apparent next to a straight line of the molding.
Before gluing, apply a long straightedge or pull a control line along the wall. If local dips prevent the profile from fitting evenly, it is better to prepare the base in advance. Do not try to forcefully pull the decorative element to a curved surface: this creates internal tension and highlights the unevenness with light.
The same applies to corners. Nominally, the room may have 90°, but the actual angle differs. If KPU-074 continues onto the adjacent wall, the cut is made according to the real geometry of the object.
With which slat panels does the carved frieze look more convincing
The material of the panels themselves does not determine the choice, but their pattern affects the composition.
Frequent thin slats
They create a dense vertical background. A carved horizontal belt can effectively "stop" this graphic, but a complex ornament is better not to be enhanced with a contrasting color without necessity.
Wide lamellas with a large step
The wall looks calmer, so the decorative frieze has more visual space. Here, KPU-074 more easily becomes an independent detail.
Panels with pronounced wood texture
Wood already contains an active pattern. If acanthus or another carved molding motif competes with wood grain, one of the elements should be calmed with color.
Solid panels for painting
This is the most flexible background. The molding can be painted together with the lower zone, with the wall, or left as a separate line. But the final choice still needs to be viewed at the room scale.
If slat finishing is still planned, the assortment can be viewed in the section Buy slatted panels for wall finishing. For an already finished wall, this link does not determine the choice of KPU-074 — the geometry of the existing panel needs to be measured on site.
Typical mistakes when ordering KPU-074 for panel transitions and paint
Mistake 1. Buying three strips just because 6 m is more than 4.8 m, and not thinking through the joints
Why it happens: the calculation ends with the quantity.
Consequence: an 800 mm piece ends up in the most visible edge, and the connections are asymmetrical.
How to check: draw the wall to scale and mark three cutting options.
How to avoid: before ordering, choose a preliminary layout of 1400 + 2000 + 1400 mm or another symmetrical arrangement, then adjust it according to the pattern.
Mistake 2. Considering KPU-074 as a technical profile for any type of panels
Why it happens: the word "molding" is perceived as a universal covering strip.
Consequence: the profile does not fit the relief of the slats or does not cover the required step.
How to check: create a cross-section diagram of the actual joint.
How to avoid: first decide on the constructive completion of the panel, then the decorative one.
Mistake 3. Estimating the 50 mm width from the product card
Why it happens: there is no wall scale on the screen.
Consequence: after installation, the frieze seems heavier than expected.
How to check: glue a full-size 50 mm strip on 1.5–2 m of the wall.
How to avoid: look at the mockup from the main points of the room.
Mistake 4. Ignoring side light
Why it happens: the fitting is done during the day in diffused lighting.
Consequence: in the evening, the relief becomes much more contrasting.
How to check: illuminate the mockup or sample with the lights that are actually used.
How to avoid: make decisions in daytime and evening scenarios.
Mistake 5. Buying a fourth plank "just in case" without calculation
Why it happens: the habit of adding a standard percentage of reserve.
Consequence: an extra 13,500 ₽ and almost 2 m of unused material.
How to check: create a map of each segment and actual waste.
How to avoid: buy the fourth plank only for a specific additional expense.
Mistake 6. Making a joint directly above the main object on the wall
Why it happens: installation starts from the edge without a compositional layout.
Consequence: the connection of two carved fragments falls on the central axis of the picture, sofa, console, or TV zone.
How to check: mark the axes of furniture and decor before cutting.
How to avoid: leave a solid central section if the ornament allows it.
Practical algorithm: from wall measurement to basket
-
Measure the installation line, not just the room length along the floor.
-
Check the top of the panels with a level along the entire length.
-
Draw a cross-section of the joint and determine if there is a flat base for KPU-074.
-
Make a 50 mm wide mock-up and assess the decorative weight.
-
Decide whether a carved frieze is needed at all. If not, compare smooth moldings.
-
Record the clean length. If it is indeed 4800 mm, the base order is 3 planks of 2000 mm.
-
Lay out the joint pattern. Start with 1400 + 2000 + 1400 mm as a symmetrical option.
-
Check the ornament pattern and shift the cut locations if necessary.
-
Count additional sections — adjacent walls, returns, obstacle bypasses.
-
Decide on the fourth plank only after this calculation. For a single straight wall of 4.8 m, it is usually not required based on the clean length.
-
Order finishing and installation materials compatible with polyurethane and the wall substrate.
-
Keep the useful leftover after installation for repairs or test painting.
Final specification for the base scenario of 4.8 m
If the wall is straight, the decorative line does not continue around corners, the technical joint is already prepared, and the full-size mockup confirmed that the carved frieze suits the interior, the base specification looks like this:
| Position | Quantity | Calculation |
| KPU-074 50 × 19 × 2000 mm | 3 pcs. | 6000 mm of total nominal length |
| Clean wall line | — | 4800 мм |
| Nominal stock | — | 1200 mm before accounting for cuts |
| Cost of KPU-074 | — | 40 500 ₽ |
| Mounting compound | According to instructions and actual consumption | Count separately |
| Materials for joints and finish | According to installation technology | Count separately |
| Paint | According to the selected painting scheme | Count separately |
For such a wall, three strips is the correct quantity by length. But the right choice of the KPU-074 itself depends on whether you want to see a decorative carved frieze at the material boundary.
If after trying it on you need a more neutral transition, you should not buy KPU-074 just because the calculation has already been made. Compare Polyurethane trim и Moldings made of polyurethaneand then select a profile based on the actual role of the joint.
If the task goes beyond a single horizontal line — for example, you need to connect a frieze with sockets, overlays, or other wall decor — it is useful to look at decorative polyurethane elements. For a wider selection of products of different types, there is a general section You can buy ready-made stucco matching the Baroque style. Calculate the quantity: linear meters of cornices and moldings, number of rosettes, pilasters, consoles, corner elements. Add a ten to fifteen percent allowance for trimming.. These categories are not meant to complicate the composition, but to compare KPU-074 with alternatives before purchase.
How to relate a 50 mm strip to the height of slat panels
The width of a decorative belt cannot be chosen based only on the wall length. The same KPU-074, 50 mm wide, is perceived differently with a lower slat zone height of 800, 1100, or 1500 mm. The lower the panels, the larger the share of their height the frieze occupies; the higher the panel part, the calmer the same strip looks in the overall proportion.
It is useful to look not at the abstract "is 50 mm a lot or a little," but at the ratio of the frieze to the lower zone. For example, with a slat panel height of 1000 mm, a 50 mm strip makes up 5% of that height. At 1500 mm — about 3.3%. This is not a design standard or a selection formula, but such a calculation helps to understand the scale: a small number in the product card becomes part of a real wall.
| Slat zone height | Ratio of 50 mm to panel height | The 50 mm width falls within the working range, but the thread changes the perceptionFor the STAVROS "panels + paint" transition, a separate material on finish joints gives a guideline of 40–70 mm for the upper molding. Therefore, KPU-074 with size A of 50 mm cannot be considered excessively wide based on a single number. In width, it falls within this general range. But a smooth 50 mm molding and a carved 50 mm profile are not the same thing. A smooth profile is perceived as an architectural line. KPU-074 adds ornament, relief, shadows, and pattern repetition over 4.8 m. Therefore, its visual "mass" is determined not by width, but by the entire set of characteristics. This is a fundamental point for purchase. If a person is looking for the answer "is 50 mm suitable or not," the correct answer is that in size it fits as a real scale for the upper decorative profile, but the character of KPU-074 needs to be separately coordinated with the interior. For a general understanding of different transition options, you can look at the STAVROS material about the joint of paint, panels, and other finishes. It addresses a broader task, whereas here we are talking about the specific KPU-074 and the specific 4.8 m line. What changes if there is a door, window, or tall cabinet in the wallThe number 4.8 m is sometimes perceived as the full length of the wall, although the decorative frieze is actually divided into several independent sections. This is important not only for the footage, but also for the pattern. A door breaks the frieze lineIf the door opening extends above the panel level, the profile on the left and right of the door becomes two separate sections. The total footage may remain the same, but additional visible ends appear, and there is the possibility of separately centering the ornament on each side. For example, instead of one 4800 mm line, there may be sections of 1700 and 2300 mm on different sides of the door. The net total is 4000 mm, and arithmetically two strips are enough. But two factory lengths of 2000 mm each will not yield a 2300 mm segment without a joint, so the cutting pattern changes. Sometimes a third strip is needed not because of the total length, but to avoid an inconvenient joint on a short section. A window or niche is located above the friezeIf they do not cross the horizontal line KPU-074, they do not affect the quantity calculation. But compositionally, it is important that the frieze does not come too close to the windowsill, niche shelf, or another horizontal element. Two parallel lines with a small gap can look accidental. A tall cabinet covers part of the wallIf the cabinet is installed flush and is not intended to be moved, it is not necessary to run expensive carved molding behind it. However, such a solution ties the finish to the furniture. If the interior should remain versatile, it is more reasonable to finish the wall completely and count all 4.8 m. The radiator does not cross the line but affects perceptionThe radiator itself is usually lower, but its top edge creates another long horizontal line. If it almost matches the height of KPU-074, the composition becomes more structured; if it differs by a small amount, a sense of an accidental "staircase" arises. This is best seen in a frontal sketch of the wall. What to do at external and internal cornersFor a single straight wall 4.8 m long, the calculation is simple. As soon as the frieze turns around a corner, a separate cutting task arises. Inner cornerTwo sections meet at the corner of the room. You cannot simply cut both pieces "at 45°" by nominal value without checking the actual angle. In a real room, it may differ from 90°. The more relief the profile has, the more noticeable the gap in the front part. If KPU-074 ends at the corner and does not continue further, the end must still be fitted to the actual wall. If it continues, first calculate the total length of both walls, then choose joint locations so that short remnants do not accumulate near the corner. External cornerHere the end face is especially visible. The carved motif should logically conclude on two converging planes. If the profile protrudes relative to the wall, the external corner requires more careful fitting than a straight joint of two segments. Why the corner can change the number of planksSuppose the main wall is 4800 mm, and the frieze should continue another 900 mm along the adjacent one. The total net length becomes 5700 mm. Three planks give 6000 mm, and nominally only 300 mm remains before accounting for cuts and pattern matching. In this configuration, three planks may still be enough, but the margin is no longer comfortable. The decision is made based on the specific layout, not by rounding 5700/2000. If the continuation is 1300 mm, the total footage is 6100 mm — three planks are physically insufficient, a fourth is needed. This example shows why the original 3 pieces are correct specifically for a straight line of 4.8 m, not automatically for the entire room. How to install a decorative frieze on an already finished renovationThe advantage of this scenario is that the slat panels and paint already exist: a decision can be made after actual fitting. But a finished renovation raises the cost of mistakes, because incorrect marking or adhesive can damage the finish surfaces. Protect the lower slat zoneBefore cutting and fitting, cover the top of the slats from dust and accidental drops of mounting compound. This is especially important for wood and veneered surfaces, where adhesive marks are harder to remove without changing the sheen. Check adhesion not only of the adhesive, but also of the paintThe adhesive holds not to "the wall in general," but to the top layer. If the paint is poorly bonded to the plaster, the decorative element can tear it off along with itself. On an old or recently repainted wall, a local test is useful. Don't expect glue to level out a large waveThe mounting compound can compensate for small local irregularities only within its technology limits. It should not turn into a thick pad that holds the trim on a curved wall. The geometry of the base is corrected before gluing. First assemble the visual line, then finish the jointsDon't paint each segment separately as a final step if the end goal is a monolithic frieze of one color. After installation, check the joints, perform treatment compatible with the material, and only then get a unified surface. If a decorative finish with patina or complex painting is chosen, test the technique on a leftover piece. Use the leftover as a training sampleWith three planks per 4.8 m, enough material remains for tests. This is the best way to check cutting, sanding, primer/paint, and mounting compound without risking the main frieze. Such a leftover provides practical value, not just lies around after installation. Budget comparison of three design optionsA person chooses not only between product codes, but also between different roles of the border in the interior. It's useful to compare the logic of costs itself.
This table shows why KPU-074 cannot be assessed as an "expensive molding." It performs a different visual task. If decor is what is needed, comparing it to the cheapest technical strip is incorrect. If only a technical joint is needed, on the contrary, carved trim is hard to justify. To the cost of three KPU-074, not only glue should be added. Wall preparation, consumables for trimming and joining, final painting, and delivery are possible. An exact full estimate cannot be given without the chosen technology and site, so it is better to separate the confirmed product price and variable installation costs. Three practical scenarios in which the decision changesScenario A. Panels 1100 mm, above is a calm solid-color paint, the interior has classic detailsCarved trim can connect the lower modern slatted texture with the classic part of the room. A 50 mm strip looks proportional in the mockup, and the ornament is supported by doors or a cornice. Here, three KPU-074 are a deliberate decorative choice, not a joint cover-up. Purchase result: 3 KPU-074 for a straight line of 4.8 m. Scenario B. Panels are graphite, the top of the wall is white, furniture without handles, hidden doorsThe boundary is already very contrasting, and the entire interior is built on minimalism. A carved belt will add a complex texture that exists nowhere else. The full-size mockup looks alien. Purchase result: do not buy KPU-074; choose a calm molding or leave a technically neat joint. Scenario C. The frieze runs 4.8 m and then turns onto the adjacent wall for another 1.3 mThe KPU-074 itself visually fits, but the net length is already 6100 mm. Three two-meter strips give only 6000 mm even without losses. Purchase result: you need at least 4 KPU-074, and the cutting layout is recalculated taking into account the angle and pattern. These three scenarios answer different questions: visual compatibility, product rejection, and quantity changes. This is how it is more useful to expand the calculation than to repeatedly calculate walls of 4.6, 4.7, and 4.9 m using one formula. FAQCan I order two KPU-074 and make one joint with an insert from another profile?Technically, you can combine different elements, but that would already be a different composition. Two KPU-074 give only 4000 mm, so on a 4800 mm wall, 800 mm will remain. If you insert another profile there, it should be a deliberate central or side accent, not a way to save on a third strip. For a continuous identical carved frieze, you need three KPU-074. Is a fourth strip needed if the wall has an internal corner at the end?The very fact of a corner does not require a fourth strip. It is needed if the decorative line continues onto the adjacent wall or if cutting at the corner along with pattern matching consumes so much material that three strips are no longer enough. First, add the actual continuation length to 4800 mm and create a cutting layout. Can the factory length of 2000 mm be preserved in the center of the wall?Yes, this is one of the convenient schemes. For a 4800 mm wall, you can leave the middle strip whole and make the side sections approximately 1400 mm each. This layout is symmetrical. The final cut locations are adjusted according to the pattern, because a beautiful pattern match is more important than mathematical symmetry on paper. If the top of the slat panels is uneven, will KPU-074 hide the difference?A decorative strip can mask a slight visual unevenness, but it should not replace leveling the base. A long horizontal profile, on the contrary, makes a wall's wave more noticeable. If the top of the panels deviates significantly from level, it is better to prepare the joint before installing the trim. Can KPU-074 be glued after the wall is fully painted?Installation after final painting is possible only if the adhesive composition is compatible with the specific coating and the paint itself is sufficiently strong. A weak paint layer may peel off along with the decor. Before installation, check the recommendations for the chosen adhesive and the condition of the base; if in doubt, test on an inconspicuous area. Is it worth buying KPU-074 if the panels and the wall are the same color?Yes, if you need a boundary through texture rather than color. In a monochrome scheme, the carved relief reads more softly and often looks calmer. If the transition is already expressive enough without trim, an additional frieze may be unnecessary—this is verified with a mockup. Can I use leftover pieces of about 600 mm on a door opening?Only after the main cutting and a visual check of the pattern. Two leftovers from different planks may start at different phases of the design. Do not incorporate them into the door decor until the main frieze is installed and the actual leftovers are measured. What is better for a small wall: KPU-074 or a narrower carved trim?Wall size is only one factor. On a short surface, a large ornament may look more concentrated, but sometimes that is exactly what is needed. Compare full-size templates and the actual pattern. If you just need a delicate transition, it makes sense to look at narrower options in the trim category or a smooth molding. Do I need to align the ornament with the spacing of the slat panels?There is no mandatory rule that the thread repeat must coincide with each vertical batten. These are two different rhythm systems. More important is that the horizontal frieze has neat own joints and the overall line is even. Coincidence of individual motifs with battens can be used as a design technique, but not as a mandatory condition. Can KPU-074 be finished freely in the middle of a wall?Yes, but the free end of the carved profile must look intentional. If the frieze does not abut a corner, trim, or another architectural element, its end becomes a noticeable detail. The finishing method is better determined on a mock-up before cutting; a random straight cut in the middle of a wall often looks unfinished. |