Article Contents:
- Bedside area: why pairing solves everything
- Set for two bedside tables: what's included and why
- Wood for tables: where hands and load meet
- Polyurethane for the bedside area: decor, atmosphere, style
- How to choose legs for a bedside table: proportions and load
- Handles for bedside tables: convenience in the dark
- Facade decor for tables: overlays, frames, rosettes
- Moldings on the wall behind bedside tables: symmetry as a principle
- Ready-made sets: five design scenarios
- Minimal classic set
- Classic pair set
- Soft classic: gentle classic
- Formal bedroom: rich look
- Small bedroom: without overload
- How to make bedside tables look more expensive: specific techniques
- Proportions and consistency: how to avoid mistakes when calculating
- Installation: what's important to know before starting work
- What to buy together: complete shopping map
- Mistakes when buying decor for bedside tables
- FAQ: answers to the most common questions
- Which legs to choose for a bedside table?
- Can you combine wooden bedside tables with polyurethane stucco?
- What to buy for two bedside tables?
- How to make bedside tables look more expensive without replacing furniture?
- Where should you not use polyurethane decor on a bedside table?
- What glue to use for polyurethane moldings in the bedroom?
- Is a spare needed when ordering moldings?
- Which baseboard to choose for a bedroom with bedside tables?
- About the Company STAVROS
There is one detail in the bedroom that almost everyone underestimates. Not the bed, not the headboard, not the chandelier. Bedside tables. Two small items on either side of the bed — and they determine whether the bedroom looks put together, thoughtful, expensive or not. Bedside tables in a classic style are not just a stand for a glass of water and a phone. It is the point where furniture meets the wall, where wood coexists with stucco, where legs and handles either complete the look or ruin it. This article is for those who want to design the bedside area correctly: with an understanding of which details require wood, which require polyurethane decor, and how to assemble a symmetrical pair set where each element works towards the overall result.


Bedside area: why pairing solves everything
Nightstands are the only piece of furniture in the bedroom that initially comes in a pair. One bed, one wardrobe, one mirror. Nightstands — two. And this changes everything: every decision you make for one nightstand automatically doubles. Legs bought in a quantity of four — that means you need eight. Handles chosen — you take at least four. Molding on the wall behind the nightstands — symmetrical, the same size, at the same height. That is why the bedside area requires planning before the first purchase, not after. A mistake on one nightstand is a mistake on two. Mismatched legs on one side and the other, different handles, asymmetrical molding — and a classic bedroom turns into unintentional eclecticism. A buyer who comes for details for classic-style nightstands is not assembling one detail — they are assembling a symmetrical interior ensemble. wooden furniture legs, Furniture Handles, decorative elements for furniture, Moldings made of polyurethane — all of this is needed in pairs, with a pre-calculated margin and a unified style solution.


Kit for two nightstands: what's included and why
Before moving on to the details, let's record the full list of what will be needed. This is not an abstract list — it is a real purchasing map for someone decorating a bedside area in a classic style:
-
wooden furniture legs — 4 pieces per nightstand, total at least 8 pieces of the same model
-
furniture legs — if the nightstand is heavy or has drawers
-
Wooden handles — 1–2 per nightstand depending on the number of doors and drawers
-
decor for furniture — overlays on facades, corner strips, central rosettes
-
Moldings made of polyurethane — for symmetrical frames on the walls behind the nightstands
-
Polyurethane appliqués — for facade frames for painting
-
Decor for Molding — corner sockets, decorative inserts
-
Polyurethane wall decor — for wall panels in the cabinet area
-
Baseboard — along the bottom line of the wall, including the area behind cabinets
-
Adhesive for mounting polyurethane elements
-
Fasteners for wooden parts
-
Acrylic sealant for joints
-
Primer for wood and polyurethane
-
Paint in the selected shade
-
Varnish or oil for final wood protection
-
Reserve 5–10% for each item
The key idea to grasp even at the list-making stage: nightstands work in pairs, so everything is purchased in pairs, calculated symmetrically, and installed simultaneously, not one at a time with a month-long gap.
Our factory also produces:


Wood for nightstands: where hands and load meet
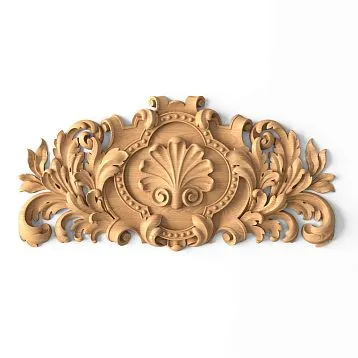
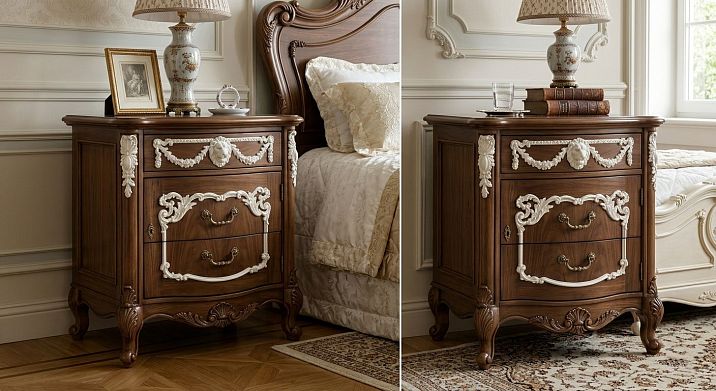
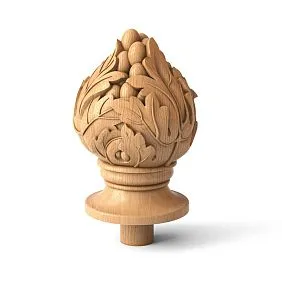
A classic bedroom is built on tactile contact. In the evening and morning, a person reaches for the nightstand — to open a drawer, grab a phone, set down a glass, press a nightlight button. All of this happens half-asleep, in the dark, often without visual control. That's why the parts of a nightstand that hands constantly touch should be made of wood — a warm, dense, pleasant-to-the-touch material that doesn't slip, doesn't feel cold, and doesn't lose its appearance from daily use. Furniture legs made of solid wood — this is not decoration. It is a structural element that supports the nightstand body with its contents: books, chargers, a lamp, medications — everything typically stored by the bed. Legs made of beech or oak withstand static load without deformation and do not loosen over time with proper installation. Thin decorative legs made of soft woods or artificial materials start to creak and wobble after a year or two — this is an axiom proven by practice. Wooden handles for nightstands — a separate topic. A handle is opened in the dark, often with one hand — the other holds a book or phone. It should be comfortable to grip, not protrude too much to avoid catching on bedding, and be sturdy enough not to loosen from daily use. Wooden handles made of beech with a coating are the optimal choice: warm, non-slip, aesthetic. The STAVROS collection offers handles in the form of a bracket, oval overlay, button — in several colors and textures, allowing you to choose an option for any nightstand style. decorative elements for furniture made of wood — overlays on facades — also fall into the durability zone. A nightstand facade opens and closes several times a day. The wooden overlay on it must hold securely: it is glued with wood glue and additionally secured with fasteners. Carved overlays made of oak or beech with a classic-style ornament withstand such use without losing shape or appearance for years. The bottom panels and side elements of the nightstand are also areas for wood. The sides are often bumped during cleaning, come into contact with bedding, and take accidental hits. Wooden decor here is stronger and more durable than polyurethane.
Get Consultation
Polyurethane for the bedside area: decor, atmosphere, style
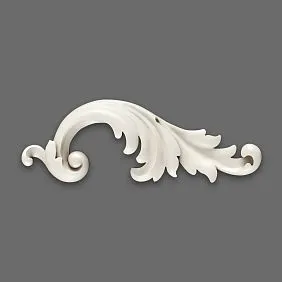
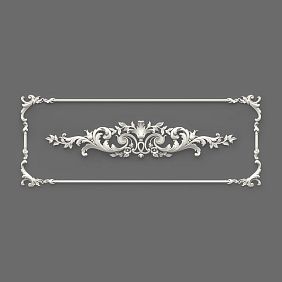
If wood is about durability and contact, then Polyurethane moldings is the atmosphere of a classic bedroom. Polyurethane decor in the bedside area creates that very image of an "expensive interior" that is so hard to describe in words but instantly felt when looking at a photo or entering a room. The wall behind the bedside tables is an ideal place for symmetrical molding frames. Two identical frames on either side of the headboard, at the level of the nightstands, create an architectural accent — and are in a zone of minimal mechanical contact. They are hardly ever touched: they simply exist as decorative planes that set the classic rhythm of the space. Moldings made of polyurethane are mounted with glue, easily painted in any color — from pure white to cream, gray, dusty green — and create the feeling of expensive architectural finishing without complex renovation. Polyurethane appliqués On the facades of the nightstands — a separate issue. Caution is needed here: polyurethane facade overlays are only permissible where there is no direct daily contact with hands. If we are talking about the lower decorative panel or the upper frame, which is hardly ever touched — polyurethane will work. For the central part of the facade, which is grasped by hands when opening, it is better to use wooden parts. The baseboard along the bottom line of the wall is a traditional area for polyurethane decor. A polyurethane baseboard is easily cut to any size, accepts paint well, is not afraid of wet cleaning, and is installed faster than a wooden one. In a classic bedroom, the baseboard should run behind the nightstands without visible joints — this requires precise length calculation and correct profile selection. Elements near the sconces — molding frames, decorative overlays — are also made of polyurethane. The sconce is attached to the wall at a certain height, and the molding or frame around it creates the feeling of a built-in light fixture rather than a surface-mounted device. Decor for Molding — corner rosettes — complete the frames in the corners and give them a finished, professional look. Without corner elements, molding frames look unfinished, especially in a classic style where the purity and precision of lines are critically important.
How to choose legs for a bedside table: proportions and load
The height of legs for a bedside table is not a matter of taste; it is a matter of ergonomics. The standard height of a mattress from the floor is 55–65 cm for modern beds with a lifting mechanism and a high base. The nightstand should be approximately at this same height or slightly lower: the user should be able to reach it effortlessly while lying on their side. If the nightstand is too low — it's uncomfortable. If it's too high — it's unaesthetic and also uncomfortable. The height of the nightstand body is usually 40–50 cm without legs. Legs add 5–20 cm depending on the model. The final height of the nightstand with legs should correspond to the height of the top surface of the mattress. This needs to be checked not by standard, but against the specific bed — with a ruler. furniture legs in the STAVROS collection are produced in several heights — from short 5-centimeter support pads to elegant turned legs 20 cm high and more. This allows you to select the exact height for a specific bed and a specific nightstand body. The diameter and shape of the leg affect the visual weight of the furniture. Thin conical legs make the nightstand airy — it seems to 'float' above the floor. This works well in modern classic and neoclassical styles. Massive turned supports with relief add weight and status — this is the language of formal classicism and Empire style. When choosing legs for paired nightstands, one rule is important: both nightstands must stand on identical legs from the same batch. Different batches of the same model may differ slightly in wood shade or texture character — and this will be noticeable in a pair. Order all eight legs simultaneously, from one order.
Handles for bedside tables: convenience in the dark
A handle for a bedside table is a detail that is chosen last and thought about the least. But in vain. The right handle makes the nightstand convenient to use and completes the stylistic image. The wrong one catches on the bedding, is uncomfortable to grip, and ruins the visual harmony. What does 'right' mean for a bedside table? Firstly, the grip shape. A U-shaped bracket is a classic, convenient for gripping with one finger in the dark, and does not protrude too far from the facade. A button overlay is minimalist, requires pressing, which is less convenient when opening half-asleep. An oval overlay handle is more aesthetic than a button and more comfortable to grip. Secondly, the projection. The handle should not protrude more than 2.5–3 cm from the facade — otherwise it will catch on the bedding when making the bed and create a risk of snagging in the dark. Furniture Handles made of solid wood by STAVROS are produced in several projection and shape options, allowing you to choose the optimal option for a bedside table. Thirdly, the coating. Wooden handles with a matte finish — varnish or oil — do not glare in the dark, are not slippery, and do not feel cold to the touch. This is especially important for the bedside area, where contact occurs at night. Fourthly, the number of handles per nightstand. If the nightstand has one drawer — one handle. If it has a drawer and a door — two. Both handles must be of the same model, same color, with the same placement. Important: for paired nightstands, all handles are ordered in one batch. The color of the wood may vary between different batches — especially for handles with a natural finish.
Facade decor for nightstands: overlays, frames, rosettes
The facade of a classic-style bedside table is a small architectural plane. It is small — 30–50 cm wide — but it is here that the entire style is concentrated. A properly designed facade turns a simple nightstand into an object classic furniture with character. Wooden overlays on the facade are the most reliable and durable way to add relief. Wooden decoration made of beech or oak: corner overlays, central rosettes, ornamental strips — they are glued to the facade and create visual volume without the risk of peeling during daily contact. The STAVROS catalog features over 400 models of decorative overlays — from laconic straight strips for modern classics to lush baroque rosettes with acanthus leaves. The choice depends on the style of the table and the overall look of the bedroom. Polyurethane facade frames for painting are an alternative for those who want to create a molding relief on the facade without using solid wood. Polyurethane appliqués they are glued to the facade, primed, and painted in a single color with the body — this creates the effect of expensive painted furniture in the style of Provence or neoclassicism. This approach is acceptable for the lower part of the facade or for decorative inserts, but the central part of the door, where the handle is located, is better left wooden — for strength. The key rule for paired tables: the facades must be mirror-symmetrical. The overlays must be identical in size and placement. The handles must be at the same height. This creates the feeling of a paired set, rather than two randomly placed items next to each other.
Moldings on the wall behind bedside tables: symmetry as a principle
The wall behind the bedside tables is a special zone. It occupies the side parts of the bedside wall and visually "holds" the tables, creating the feeling that the furniture is built into the room's architecture, rather than just placed next to the wall. Molding frames on the wall behind the tables are one of the most elegant and easy-to-execute techniques of a classic interior. The size of the frame should be slightly larger than the width of the table — by 5–10 cm on each side. The height of the frame is determined from the baseboard to the level of the sconce or switch. Two identical rectangles on either side of the bed — and the wall behind the tables acquires an architectural rhythm. Polyurethane wall decor allows you to create more complex wall panels — with a division into upper and lower zones, with additional horizontal moldings inside the frame. This works well in bedrooms with a ceiling height of 2.7 m or more: with low ceilings, vertical molding adds a sense of height; with high ceilings, horizontal molding creates a sense of coziness. When installing molding frames behind bedside tables, several practical points need to be considered. First: sockets and switches. The molding should not cover electrical points — their location must be marked out before installation begins. Second: sconces. If sconces are planned on the wall, their mounting points are also marked before the molding layout — and the frame is designed around them, not bypassing them. Third: the height of the baseboard. The bottom line of the molding frame should start from the top edge of the baseboard — otherwise, the joint between the baseboard and the molding will look untidy. Decor for Molding — corner rosettes and decorative inserts at intersections are a mandatory element for classic frames. Without them, the corners look technical, like a construction joint, rather than an architectural detail.
Ready-made sets: five design scenarios
Minimal classic set
For those starting small and wanting quick results: wooden furniture legs on both cabinets + Wooden handles one model + polyurethane baseboard along the bottom wall line + one horizontal molding behind each cabinet. This set transforms the look of the cabinets in one day of installation: legs lift the furniture, handles add a style accent, molding and baseboard create a horizontal structure. Minimum cost — maximum visual impact.
Classic paired set
Full solution: Wooden legs with classic profile + Wooden handles in body color + decorative elements for furniture on the fronts + symmetrical molding frames on the walls behind the cabinets + baseboard. This solution creates a complete interior look: the cabinets appear as Classic Furniture, the walls behind them as an architectural backdrop. Everything works together as a unified ensemble.
Soft classic: gentle classic
A direction popular in modern interiors with a neutral palette: simple cone-shaped legs of low height + thin laconic handle brackets + calm Polyurethane moldings in the color of the wall behind the cabinets. Everything is in a single shade: walls, moldings, baseboards, legs, and handles are painted in one color. This direction does not require complex facade decor — the right proportions and a unified color concept are enough. This approach works especially well in small bedrooms, where an excess of decor would create a feeling of overload.
Formal bedroom: rich look
For a bedroom with high ceilings and ambitious classic design: carved Wooden decoration with baroque ornament on the cabinet facades + turned figured legs with decorative relief + facade polyurethane moldings around the perimeter of the doors + symmetrical wall frames with decor for moldings in the corners + wide baseboard with profile. This set requires precise calculation of proportions and preliminary coordination of all elements with each other in terms of relief scale. Large overlays on the cabinet facade must be coordinated with the scale of the molding on the wall — otherwise one will 'shout' and the other will 'whisper'.
Small bedroom: without overload
A compact bedroom requires a fundamentally different approach: everything is thinner, smaller, lighter. Small elegant Furniture legs 8–10 cm high + modest wooden knob handles + thin Moldings made of polyurethane with a small profile + light painting of all elements in a single color. No large overlays, no deep relief, no contrasting accents. The goal is to create a feeling of air and lightness while maintaining a classic character. A single color for furniture, legs, handles, moldings, and walls is the most effective technique for visually expanding a small bedroom.
How to make bedside tables look more expensive: specific techniques
A question almost everyone asks — how to make bedside tables look more expensive without spending a lot of money? The answer lies in the details, not the furniture itself. The first technique: put the tables on legs. This is the simplest and most effective change. A table on wooden furniture supports looks fundamentally different from the same table without legs: it "floats" above the floor, appears lighter and more expensive. It's easier to clean under a table on legs — and that's a practical bonus. The second technique: change the handles. With a few minutes of screwdriver work, the table transforms beyond recognition. Furniture Handles made of solid wood instead of plastic — and you have a different piece of furniture before you. The third technique: add facade decor. A single wooden overlay on the door facade turns a smooth surface into a textured classic panel. decorative elements for furniture are glued in an hour and last for years. The fourth technique: draw a frame on the wall with molding. Two horizontal and two vertical of the polyurethane molding behind each table — and the wall gains architectural volume. The tables cease to be "placed against the wall" and become part of the interior scene. The fifth technique: unified painting. The legs, handles, moldings, baseboard, and the furniture itself — all in one color. White, cream, light gray — any neutral shade, but uniform. This turns a set of individual details into a well-thought-out concept.
Proportions and consistency: how to avoid mistakes when calculating
The bedside area is a small space with many details. Precise proportions are crucial here, and any inconsistency will be immediately visible. Height of the table with legs: should match the height of the mattress. Check with a ruler before ordering legs. Width of the molding frame on the wall: should be slightly wider than the table — by 5–15 cm. A frame that is too narrow "compresses" the table, while one that is too wide loses its connection to it. Height of the molding frame: from the top edge of the baseboard to the level where the decorative wall zone ends. In a standard bedroom with a ceiling height of 2.7 m, this is usually 1.5–1.8 m from the floor. Scale of the molding profile: a thin profile — for a small table and a small frame. A wide profile — for a large table and voluminous frames. Mismatched scales create disharmony. Placement of handles: handles on both tables should be at the same height from the floor — this ensures visual symmetry. If one table has a drawer and the other a door, the handles are installed at the same height relative to the body.
Installation: what's important to know before starting work
Surface preparation is the foundation of successful installation. The wall for moldings must be leveled, puttied, and primed. Polyurethane moldings should not be mounted on wallpaper — this is one of the most common mistakes. If wallpaper is already applied, it should be removed in the areas where moldings will be installed, and the surface cleaned. The adhesive for polyurethane elements is chosen based on the surface type and room conditions. The correct choice of adhesive is a critical factor in the durability of the decor. A detailed guide to adhesive compositions and application techniques is in the material what to glue polyurethane molding with On the STAVROS website. Wooden legs are installed on special bolts or ties that screw into the lower part of the cabinet body. For chipboard cabinets, reinforced fasteners with metal inserts are used, which will not pull out under load. After installing the legs and before placing the cabinet in its final position, check the horizontality using a spirit level. Wooden parts — handles, overlays, decorative strips — are processed before installation: sanded, primed, painted or varnished in the desired color. After installation, touch-up of seams and fastener points is done with a small brush using a minimal amount of paint. Joints of moldings on the wall are filled with acrylic sealant and, after drying, sanded with fine sandpaper. Then the entire painted surface — moldings, baseboard, legs, and handles — is covered with a final coat in a single color.
What to buy together: complete shopping list
An experienced craftsman never does installation "in parts" — first moldings, then legs, then handles. Everything is ordered simultaneously, from the same batch, with compatibility of colors and scales checked before work begins. For two bedside tables in a classic style, the recommended order list is:
-
wooden furniture legs — 8 pieces of the same model (+ 2 spare in case of defects during installation)
-
Furniture Handles — according to the number of facades of both cabinets + 1–2 spare
-
decor for furniture — according to the number of facades + 10% spare
-
Moldings made of polyurethane — calculated based on the length of the frames for both cabinets + 10% spare
-
Decor for Molding — according to the number of corners in the frames (4 corners × 2 frames = 8 elements + 2 spare)
-
Polyurethane appliqués — if polyurethane facade frames are planned
-
Polyurethane wall decor — for more complex wall panels
-
Baseboard — calculated along the perimeter of the zone + 10%
-
Glue for polyurethane elements
-
Fasteners for wooden parts (bolts, screws, metal inserts)
-
Acrylic sealant — 1–2 tubes
-
Primer: for wood and for polyurethane — separately
-
Paint in the desired shade — with extra for touch-ups
-
Varnish or oil for final protection of wooden parts
All of this is available in the STAVROS catalog. It is important to order everything at once, check the article numbers and colors before installation, and ensure that the selected legs are compatible with the attachment system of the cabinet bodies.
Mistakes when buying decor for bedside tables
Let's go over typical mistakes — not to scare you, but to save time and money.
Buying decor for only one table. It seems obvious, but it happens. Especially with decorative overlays: you buy for one table, then try to order more — but the needed model is no longer in stock or it's from a different batch. Buy for both at once.
Do not ignore pairing when choosing legs. Eight legs from the same batch is not a whim, it's a necessity. Wood texture and shade vary from batch to batch.
Choose handles without checking grip comfort. A beautiful handle that is inconvenient to open in the dark is a bad handle for a bedside table. Grip shape is more important than aesthetics.
Do not take legs that are too high without calculating mattress height. A nightstand that ends up higher than the mattress is a visual and functional mistake. Check the height before ordering.
Do not place large relief in a small bedroom. Deep overlays with voluminous ornament in a small bedroom create a feeling of overload. A small bedroom requires fine details.
Do not forget about sockets and sconces when designing molding frames. Molding that covers a socket or conflicts with a sconce means rework. Mark up considering all electrical elements.
Do not disconnect nightstands from the baseboard. The baseboard should run behind the nightstands as a single line, not be interrupted where furniture stands. Calculate it in advance.
Do not skip ordering extra molding. When cutting at angles, there are always offcuts. Without a reserve, you'll have to reorder — and that costs time and money for delivery.
Do not use polyurethane overlays in areas of direct hand contact. The central part of the nightstand facade, where you grab to open — only wood. Polyurethane won't withstand daily use here.
FAQ: answers to the most common questions
Which legs to choose for a bedside table?
Choose wooden furniture legs Made of hardwoods — beech or oak. Height is selected based on mattress height: the final height of the nightstand with legs should be approximately equal to the height of the mattress top surface. Shape depends on style: conical for modern classic, turned figured for formal. All eight legs from the same batch.
Can wooden nightstands be combined with polyurethane stucco?
Yes, this is a classic and very effective combination. Polyurethane moldings used for wall moldings, baseboards, and decorative frames — that is, where there is no direct mechanical contact. Wood is for legs, handles, and facade overlays. A single color unites different materials into a harmonious ensemble.
What to buy for two bedside tables?
Eight wooden legs of one model, Wooden handles by the number of facades, decorative elements for furniture on the facades, Moldings made of polyurethane for symmetrical frames, corner decorations for moldings, baseboard, glue, fasteners, sealant, primer, paint, and a reserve of 5–10% for each item.
How to make bedside tables look more expensive without replacing the furniture?
Install Furniture legs made of wood, replace handles with wooden ones, add facade overlays, install symmetrical molding frames on the walls behind the tables, and paint all elements in a single color.
Where should polyurethane decor not be used on a table?
On facades in areas of direct hand contact — where you grab when opening a drawer or door. Also, do not install large polyurethane elements on the lower part of the table that gets bumped during cleaning. polyurethane decor designed for walls, frames, baseboards, and decorative areas without load.
What glue to use for polyurethane moldings in the bedroom?
With special glue for polyurethane products, on a prepared (leveled, primed, cleaned of wallpaper) surface. For detailed information on choosing glue and application technology, read the article. what to glue polyurethane molding with.
Is a reserve needed when ordering moldings?
Absolutely. Minimum 5%, optimally 10%. When cutting at angles, scraps always form, and installation errors are possible. Reordering a single strip due to shortage means risking a shade mismatch and additional shipping costs.
Which baseboard to choose for a bedroom with bedside tables?
Polyurethane baseboard with a profile scaled to match the wall moldings. In a small bedroom — a thin profile. In a spacious or formal one — wider and more voluminous. The baseboard runs behind the tables as a continuous line — without visible joints in the furniture area.
About the company STAVROS
A classic-style bedside area is not a random set of details, but a well-thought-out ensemble where every element knows its place. STAVROS — a Russian manufacturer of wooden decor and polyurethane products — produces all the necessary elements for this ensemble: from furniture legs и wooden handles to of polyurethane moldings и wall decor. The STAVROS catalog features over 130 models of legs, 32 models of handles, more than 400 types of decorative overlays made of beech and oak wood, and a wide range of moldings from polyurethane — moldings, cornices, baseboards, applique, Decor for Molding и Wall Decor. STAVROS works with orders from a single piece, provides delivery across Russia and CIS countries. All products are made from selected natural wood using 3D milling and undergo strict quality control at every stage. For professional buyers — designers, furniture manufacturers, and construction companies — STAVROS develops exclusive models according to technical specifications and fulfills serial orders of any volume. When classic-style bedside tables must look impeccable — details matter. STAVROS produces exactly those details that make the difference.