Article Contents:
- Why plastic skirting boards are increasingly being replaced
- Polyurethane, polystyrene, duropolymer: how to understand the terminology
- Polyurethane
- Polystyrene
- Duropolymer
- Material Comparison Table
- Where polyurethane skirting board for painting is especially appropriate
- Entry Hall
- Hallway
- Kitchen-living room
- Children's room
- Bedroom and living room with white walls
- How to choose the height of the skirting board: precise logic
- Low baseboard: 40–60 mm
- Medium skirting: 70–100 mm
- High skirting board: 120–200 mm and more
- How to match the height of the skirting board with architraves
- White or colored: how to choose the color of the skirting board
- White baseboard: a classic that always works
- Baseboard in wall color
- Baseboard matching the door color
- Contrasting baseboard: when it's justified
- Impact-resistant baseboard for hallway and corridor: profile requirements
- What happens to the baseboard in the hallway
- Bottom profile: how it protects the wall
- Top profile: how it fits against the wall
- Baseboard for the kitchen: special conditions
- Wet Cleaning
- Joint with kitchen cabinetry
- Kitchen-living room area
- Installation of polyurethane baseboard: from marking to finish
- Tools and consumables
- Installation Sequence
- Joints and corners: the hardest part
- Polyurethane baseboard and other decorative elements: interior system
- Floor and ceiling baseboard from the same series
- Baseboard and wall moldings
- Mistakes when choosing and installing baseboard
- What to check before buying: a detailed checklist
- FAQ: answers to the most frequently asked questions
- Can polyurethane baseboard be painted?
- Which is better: polyurethane, polystyrene, or duropolymer baseboard?
- Will such a baseboard work for the hallway?
- How is polyurethane baseboard better than plastic?
- Can a paintable baseboard be installed in the kitchen?
- What to cut polyurethane baseboard with?
- What kind of glue is needed for installation?
- About the Company STAVROS
There is a moment in renovation when everything is already done: walls painted, floor laid, doors hung — and only one thing remains. The baseboard. And it is here that many make a mistake that devalues months of work: they grab the first plastic profile with caps and connectors they see, which starts pulling away from the wall and yellowing at the corners within a week.
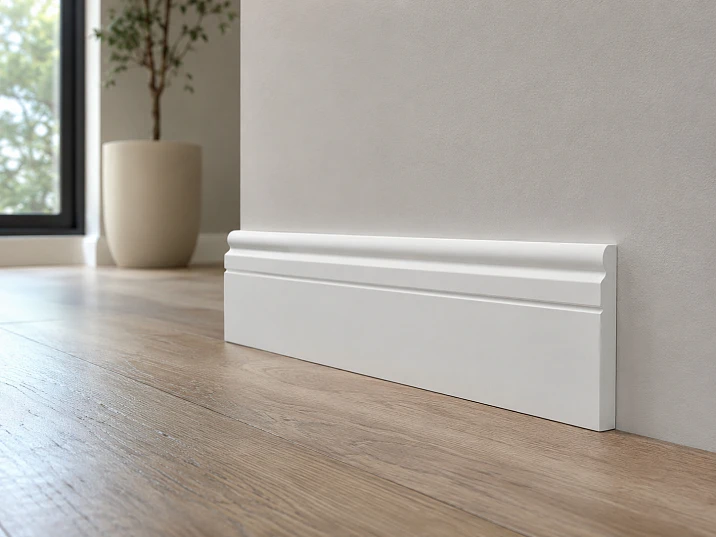
Polyurethane skirting board for painting — that is a different choice. It is a clean white line that blends with the wall, does not reveal technical joints, and turns the floor-to-wall junction into an architectural detail, not a renovation necessity.
View floor baseboards made of polyurethane and polystyrene STAVROS — for painting, impact-resistant, with profiles for different interior styles.




Why plastic baseboards are increasingly being replaced
A plastic baseboard is not a bad product. It is simply not the right product for a renovation that has had effort and money invested in it. And it is not about the price of the baseboard itself.
A plastic profile reveals itself in several ways — and all of them are unpleasant.
Caps and connectors. A plastic baseboard is installed with visible end caps and coupling connectors. At the joints, these parts are always noticeable — especially if the baseboard is light-colored and the connector is a slightly different shade or does not quite match the profile.
Impossibility of painting. Most plastic baseboards cannot be painted — more precisely, paint does not adhere to the smooth plastic surface without special preparation. Matching the exact shade of the wall or doors will not be possible.
Visible technicality. The plastic profile looks technical — like a plumbing part, not architecture. In an interior where walls are painted with expensive paint and the flooring is high-quality, a plastic baseboard becomes a weak point.
Brittleness under impact. Plastic, when subjected to a point impact — for example, from a shoe in the hallway or a furniture leg — cracks or chips. Repairing such a chip is almost impossible: you will have to replace the section.
MDF is not much better. MDF baseboard looks more noble than plastic, but is afraid of moisture: the ends swell when water gets in, the laminating film peels off. For the kitchen, hallway, corridor, or bathroom, MDF is a risk.
Polyurethane baseboard or polystyrene solves all these problems simultaneously: it is paintable, installs without visible connectors, is not afraid of normal household impact, and creates a neat monolithic look.




Polyurethane, polystyrene, duropolymer: how to understand the terminology
When a person starts searching for a "duropolymer baseboard," "polyurethane profile," or "polystyrene baseboard" — they most often mean the same thing: a white profile for painting that looks better than plastic. Let's break down the terms honestly and without unnecessary confusion.
Our factory also produces:

Polyurethane
Polyurethane (PU) is a foamed elastic polymer of high density. It is lightweight, quite resilient, and holds its shape well. Polyurethane baseboards are easy to cut, glued with construction adhesive, and accept acrylic paint without priming.
Polyurethane is slightly softer than polystyrene — under a strong point impact, it is more likely to dent than crack. For the hallway and corridor, this is a plus: deformation without destruction.
Get Consultation
Polystyrene
Polystyrene (PS) is a harder material. Baseboards made of polystyrene have a sharper and stiffer profile, better maintain geometry on long sections. They are somewhat denser than polyurethane ones.
An important nuance: polystyrene is sensitive to solvents. The glue and paint must be water-based or acrylic-based — nitro and alkyd compounds destroy the material.
More details about working with polystyrene profiles — in the article how to cut polystyrene molding.
Duropolymer
Duopolymer is a marketing name used by some manufacturers for dense polyurethane or polystyrene profiles. “Duro” comes from the Latin “durus” (hard). In essence, Duro-polymer skirting board it is the same polyurethane or polystyrene profile of increased density.
It is important for the buyer to know not the name of the material, but its actual characteristics: density, impact resistance, paintability, installation method. All three materials — polyurethane, polystyrene, and duopolymer — serve one purpose: a neat white baseboard for painting without a plastic look.
Material comparison table
| Parameter | Polyurethane | Polystyrene | Duropolymer |
|---|---|---|---|
| Density | Medium | High | High |
| Elasticity | High | Low | Medium |
| Reaction to impact | Dents | Chips | Medium |
| Painting | Acrylic | Acrylic | Acrylic |
| Installation | Glue/screw | Glue | Glue |
| Reaction to moisture | Neutral | Neutral | Neutral |
| Cutting | Hacksaw, knife | Hacksaw | Hacksaw |
Where polyurethane skirting board for painting is especially appropriate
Not every room requires the same approach. But there are spaces where impact-resistant floor skirting board for painting is not a matter of aesthetics, but a practical necessity.
Entryway
The hallway is the most "aggressive" room for skirting boards. Shoes constantly hit the bottom line of the wall. Brushes, vacuum cleaners, wet cloths — everything is here. Guests don't think about where they put their feet. Children even more so.
Impact-resistant floor skirting board in the hallway must withstand daily household contact. Polyurethane profile handles it: it does not chip upon impact, does not yellow from wet cleaning, and can be easily repainted if necessary.
Corridor
The corridor is a transit zone where furniture, bicycles, and household appliances are carried. Walls and skirting boards in the corridor suffer regularly. Here, not only impact resistance is important, but also the possibility of local restoration: a slightly scratched polyurethane skirting board can be easily touched up, and the mark disappears.
Kitchen-living room
In open-plan kitchen-living rooms, a single skirting board around the entire perimeter is important. The transition from the kitchen area to the living room area should not be marked by a joint or a change in profile. White floor skirting board for painting allows you to make the perimeter a single clean line.
In the kitchen area, it is important to properly join the baseboard with the flooring and the bottom row of the kitchen set — more on this in the section on installation and errors.
Children's room
In the children's room, the baseboard leads a special life. Cars, blocks, construction sets — all of this flies into the walls and the baseboard. Markers and paint remain on the surface. Paintable skirting board here — it is the ability to repaint a damaged area to match the wall color in 15 minutes, without replacing the entire section.
Bedroom and living room with white walls
In a bedroom with white or light walls, a polyurethane baseboard for white paint creates a perfect clean line. No visible transitions, no decorative frames. Just clean geometry at floor level — that which creates the feeling of a neatly done renovation.
In the living room — the same thing. A white baseboard instead of a plastic one of various shapes makes the walls calm and allows interior accents to work without competing with technical details.
How to choose the height of the baseboard: precise logic
The height of the baseboard is both an aesthetic and spatial issue. The wrong height can visually shorten the walls or, conversely, fragment the space.
Low baseboard: 40–60 mm
A low baseboard — a choice for minimalist interiors and for rooms with low ceilings (2.4–2.6 m). It almost disappears at the base of the wall: it hides the technical gap between the floor and the wall, but does not draw attention to itself.
For Scandinavian, Japanese minimalism, or a laconic modern apartment, this is the right choice. The baseboard is there, but it doesn't assert itself.
Medium baseboard: 70–100 mm
A medium baseboard is a universal option for most apartments with ceilings of 2.6–2.8 m. It is noticeable enough to create an architectural line at the base of the wall, yet modest enough not to overwhelm the space.
For modern classic, neoclassical, and mixed-style apartments, the medium height works flawlessly.
High baseboard: 120–200 mm and more
A high baseboard is an architectural statement. In a classic interior with ceilings of 3 m and higher, a tall white baseboard creates a solid wall foundation. Together with polyurethane moldings on the walls — paneling and cornices — it forms a complete classic finish.
A high baseboard also visually increases the perceived height of the walls: the eye perceives it as an extension of the flooring, and the wall starts higher — thus appearing taller.
How to match baseboard height with door casings
A practical rule: the width of the door casing at the base (the plinth block) should match the height of the baseboard or be slightly higher. If the baseboard is higher than the casing base, the joint will look awkward.
If the casings are already installed, measure the width of their lower part and choose a baseboard no higher than this value.
White or colored: how to choose the color of the baseboard
This question seems simple, but in practice it determines the character of the entire space.
White baseboard: a classic that always works
White floor skirting board — this is the most common solution in modern renovations. It visually "cuts off" the floor from the wall with a clean line, creating a sense of neatness and order.
White baseboard works:
-
With white walls — complete monolithicity, the wall continues to the floor without accents
-
With colored walls — a contrasting line that emphasizes the boundary and structures the space
-
With any flooring — white does not compete with parquet, tiles, or laminate
Skirting Board in Wall Color
If the walls are painted in a rich color — gray, blue, green — a baseboard in the same shade makes the wall visually endless: it "flows" from ceiling to floor without interruptions. The room appears taller.
For this effect Paintable skirting board — an ideal tool. You paint the walls — you paint the baseboard with the same paint, and the border disappears.
Baseboard matching the door color
If the doors are varnished or painted in a specific shade, a baseboard of the same color creates a horizontal band that ties all doorways into a single system. This is a classic design technique: doors, architraves, and baseboard in one color — and the room takes on a finished look.
Contrasting baseboard: when it is justified
A dark baseboard on a light wall is a strong accent. It creates a heavy foundation that "grounds" the room. In the right interior — with dark parquet, dark furniture — this works.
But contrast requires awareness. A random dark baseboard in a light room is not design, it's a mistake.
Impact-resistant baseboard for hallway and corridor: profile requirements
The hallway and corridor are high-traffic areas. Here, the baseboard has special requirements that cannot be ignored when choosing.
What happens to the baseboard in the hallway
Imagine a typical day: in the morning, people rush to work, accidentally hitting the baseboard with their shoes. In the evening, they bring in bags, catching the corner. Once a week — wet cleaning. Once a month — moving a cabinet or coat rack. The baseboard in the hallway gets more contact in a year than the baseboard in the bedroom in five years.
Impact-resistant floor skirting board must:
-
Do not crack under point impact from shoes
-
Do not chip under accidental impact from an object
-
Withstand wet cleaning without deformation
-
Be available for local repainting
A high-density polyurethane profile meets all these requirements. Upon impact, it deforms slightly but does not break. During wet cleaning, it does not change its geometry.
Bottom profile: how it protects the wall
A good baseboard has a small protrusion at the bottom or a sealing groove that ensures a tight fit to the floor. This is not just aesthetics — it protects the gap between the floor and the wall from water ingress during cleaning.
In the hallway and corridor, the tightness of the baseboard to the floor is a practical hygiene issue.
Top profile: how it fits against the wall
The top edge of the baseboard fits against the wall. If the wall is uneven, a gap appears that needs to be filled with acrylic sealant. When choosing a baseboard for walls with minor irregularities, it is better to choose a profile with a slightly wider top shelf or a protrusion that covers the unevenness.
For very uneven walls, a more massive profile is suitable — it allows for greater deviations from the plane.
Baseboard for the kitchen: special conditions
The kitchen is a space where additional requirements are added to the baseboard: moisture, grease, frequent cleaning, contact with furniture and household appliances.
Wet cleaning
Polyurethane baseboard It is not afraid of wet cleaning — that's a fact. But it is important that the painting is done with high quality: acrylic paint forms a film that does not allow water to pass through. A thin layer of paint without proper preparation will begin to peel over time.
Rule: in the kitchen, the baseboard is painted in 2–3 layers of acrylic paint with intermediate drying. This ensures long-term moisture resistance of the coating.
Joint with the kitchen unit
This is the most vulnerable point in the kitchen. The lower row of the unit stands on legs or on a hidden plinth. The baseboard in this place either goes under the unit or is cut at the level of its edge.
Solution: trim the baseboard exactly to the edge of the unit, and fill the joint with acrylic sealant. A neat filled joint is hygienic and visually clean.
Kitchen-living room area
In an open-plan kitchen-living room white baseboard for painting ensures perimeter unity. One profile, one height, one color — and the kitchen area smoothly transitions into the living room area without a visible boundary at the baseboard level.
Installation of polyurethane baseboard: from marking to finish
Installation of polyurethane or polystyrene baseboard is a job that one person can do without special tools.
Tools and consumables
-
Hacksaw for metal or miter box with saw
-
Solvent-free mounting adhesive (liquid nails)
-
Acrylic sealant
-
Painter's tape
-
Acrylic paint
-
Brush or small roller
Installation order
Step 1: Surface preparation. The floor and wall in the installation area must be dry and free of dust.
Step 2: Cutting. The baseboard is cut to the required lengths. For straight sections — a straight cut. For inside corners — a 45° cut. For outside corners — also 45°, but in the opposite direction.
For how to cut the profile correctly, see the article DIY installation of polystyrene baseboard.
Step 3: Applying glue. Glue is applied to the back surface of the baseboard — along the entire length of the lower and upper edges, plus a zigzag in the center. For long sections (over 1.5 m), apply glue more thickly.
Step 4: Pressing. The baseboard is pressed against the wall from bottom to top: first the lower edge to the floor, then the upper edge to the wall. Hold for 1–2 minutes. If necessary, use painter's tape until set.
Step 5: Filling gaps. After installation, all gaps along the top edge (between baseboard and wall) and along the bottom edge (between baseboard and floor) are filled with acrylic sealant. Smooth the sealant with a finger or spatula, remove excess with a damp cloth.
Step 6: Painting. After the glue has fully set and the sealant has dried, paint. Apply acrylic paint with a brush or small short-nap roller in 2 coats.
For detailed painting rules, see the article Painting and Finishing of Polystyrene Baseboards and Moldings.
Joints and corners: the hardest part
Joints are where skill level becomes visible. And this is where plastic baseboard noticeably loses to polyurethane.
Plastic baseboard is joined using connector caps — visible plastic parts that protrude at the joint. For polyurethane profile, a joint on a straight section is simply two ends pressed tightly together, with the gap filled with sealant. After painting, the joint disappears.
Inside corners are cut at 45°. With a good cut, the gap is minimal; it is filled with sealant and disappears under paint.
External corners are also 45°, but in a mirrored version. For polyurethane, slight compression in the corner joint is typical — this is normal and is fixed with sealant.
Polyurethane baseboard and other decorative elements: interior system
A baseboard is the bottom line of a wall. But the wall also has a top line — Polyurethane Ceiling Skirting Board. And if both elements are made from the same material and in the same style — the interior gains a completeness that is hard to achieve by other means.
Floor and ceiling baseboards from the same series
When the floor baseboard and ceiling cornice made of polyurethane are executed in the same profile language — identical motifs, similar proportions — the wall between them is perceived as an organized plane. This is a classic technique that makes the room architecturally sound.
For modern interiors — a smooth ceiling cornice and a smooth floor baseboard made of polyurethane. For neoclassicism — with a light ornament.
Skirting boards and wall moldings
Moldings made of polyurethane on the walls create frame panels — classic decor that turns an ordinary painted wall into something more. If in such a system the floor baseboard serves as the lower "base" of these panels — everything together looks like a unified, well-thought-out finish.
Mistakes when choosing and installing a baseboard
These are situations that occur regularly — and are easy to avoid if you know about them in advance.
Mistake 1: choosing based on material name without checking density. "Duropolymer baseboard" sounds solid, but if a specific model has low density — it's soft and easily dented. Check not only the name but also the actual profile density.
Mistake 2: not checking height compatibility with architraves. A baseboard higher than the architrave's base creates an ugly joint at the doorway. Measure the width of the architrave's lower part before buying the baseboard.
Mistake 3: choosing too thin a profile for uneven walls. A thin baseboard with a narrow back flange won't cover wall deviations from vertical. Gaps at the top edge look bad and require a lot of sealant. For walls with deviations over 3–5 mm, use a profile with a wide back flange.
Mistake 4: not accounting for painting when calculating height. After two coats of paint, the baseboard visually becomes slightly thicker. For baseboards with fine relief, this can smooth out pattern details. For smooth profiles, it's not a problem.
Mistake 5: not allowing extra for cutting. When cutting at corners, each corner consumes a fragment of length. Order 10–15% more than the calculated amount.
Mistake 6: using glue with solvent on polystyrene. Solvents — acetone, white spirit, nitro-based — destroy polystyrene. Only acrylic mounting adhesive.
Mistake 7: installing baseboard before final wall painting. Correct order: first paint walls down to the floor, then install baseboard, then paint baseboard. This avoids struggling with the boundary between wall and baseboard.
Mistake 8: not filling the joint with the floor with sealant. The gap between baseboard and floor is not just an aesthetic issue. It's where dust accumulates and water gets in during cleaning. Sealant closes the gap and makes cleaning easier.
Mistake 9: choosing a profile without considering joints on long sections. On a 5 m wall, you can't install a single baseboard element — a joint is needed. Polyurethane baseboard allows making it invisible: two ends tightly together, sealant, painting. Plan joints in advance, placing them in the least noticeable spots.
Error 10: painting the baseboard with nitro paint. The nitro base destroys polystyrene and impairs adhesion on polyurethane. Only acrylic compounds.
What to check before buying: a detailed checklist
-
Ceiling height — determines the optimal profile height
-
Wall flatness — determines the width of the profile's back shelf
-
Door and trim color — coordinate with the height and color of the baseboard
-
Wall color — white baseboard or paintable to match the same shade
-
Room type — hallway, kitchen, bedroom (different density requirements)
-
Perimeter length — calculate total quantity with a 10–15% margin
-
Number of corners — internal and external (each requires extra allowance)
-
Floor type — laminate, parquet, tile (affects the fit of the bottom shelf)
-
Is painting needed — now or later (this changes the order of work)
-
Glue — acrylic mounting, solvent-free
-
Sealant — acrylic, matching the paint color
-
Allowance for trimming — add 10–15% to the calculated length
FAQ: answers to the most frequently asked questions
Can polyurethane baseboard be painted?
Yes, that's exactly why it's most often chosen. Polyurethane baseboard painted with acrylic paint in 2–3 coats — white, to match wall color, or to match door color. Detailed instructions are in the article Painting and Finishing of Polystyrene Baseboards and Moldings.
Which is better: polyurethane, polystyrene, or duropolymer baseboard?
All three solve the same problem. Look at density, profile, and glue compatibility. Duro-polymer skirting board — this is most often a polyurethane or polystyrene profile of increased density.
Will such a baseboard work for the hallway?
Yes. impact-resistant floor skirting board Made of dense polyurethane, it withstands daily contact with shoes, furniture, and cleaning equipment. If damaged, it can be easily repainted.
Why is a polyurethane baseboard better than a plastic one?
It can be painted (plastic cannot), installed without visible plastic connectors, does not crack upon impact, does not yellow over time, and creates a neat, monolithic look at the base of the wall.
Can a paintable baseboard be installed in the kitchen?
Yes. You need to choose a dense profile, use acrylic adhesive, carefully fill all joints with sealant, and paint in 2–3 coats with moisture-resistant acrylic paint.
What to use to cut polyurethane baseboard?
A hacksaw for metal or a miter box. A fine saw tooth gives a clean cut. For cutting nuances, see the article. how to cut polystyrene molding.
What kind of adhesive is needed for installation?
Acrylic mounting adhesive without organic solvents — liquid nails or a special compound for decor. Adhesive with solvent destroys polystyrene and impairs polyurethane adhesion.
About the company STAVROS
STAVROS is a Russian manufacturer of decorative products made of polyurethane and solid wood. In the STAVROS catalog — Polyurethane baseboards for painting, ceiling cornices and moldings made of polyurethane, full range moldings from polyurethane for interior decor of any complexity.
STAVROS works with private clients, designers, builders, and finishing crews. All products are made from high-quality polymer materials, with a precise profile, ready for installation and painting.
If you need buy polyurethane baseboard for painting for an apartment, cottage, or commercial property — the STAVROS catalog offers profiles that transform the bottom line of the wall from a technical detail into a pure architectural element.