


Article Contents:
- What is a polyurethane window sill belt
- Why you need lower window decor: more than meets the eye
- Where to use a window sill belt: application scenarios
- On facade windows of a private house
- On first floor windows
- On windows with a sandrik
- On window portals
- On facades with rustication
- Window sill belt, casing or sandrik: what to choose and for which task
- How to choose the size of a window sill belt: specific parameters
- Window width
- Profile height
- Overhang from the wall
- Moulding Width
- Ceiling and floor height
- Alignment with facade horizontals
- Window sill belt profiles: from minimalist to ornate
- How to combine a window sill belt with other facade decor
- Belt + casings
- Belt + sandrik
- Belt + keystone
- Belt + facade moldings
- Belt + rustication
- Belt + base cornice
- Belt + entrance group
- Moisture resistance and durability: why the window sill area requires special attention
- Installation of the window sill belt: step-by-step technology
- Surface Preparation
- Marking
- Fitting and trimming
- Applying adhesive and installation
- Screws
- Joint sealing
- Painting
- How to calculate your purchase: step-by-step instructions
- Typical mistakes when choosing and installing
- FAQ: Answers to the Most Important Questions
- STAVROS: architectural decor you can trust

Look at any classic facade with beautifully designed windows. The eye glides upward — a sandrik with an elegant canopy, a keystone in the center, side architraves in strict symmetry. And then the eye reaches the lower part of the window — and there is emptiness. A bare plane of plaster, a thin line of the window sill, and no completion. All the effort at the top is devalued at the bottom.
This is exactly what most even expensive country houses look like, where polyurethane window sill belt for facade they just didn't think about it. And it's a pity. Because the lower element of the window frame is not an addition or decoration for decoration's sake. It is the structural point of the entire window composition: it is the window sill belt that creates the horizontal rhythm of the facade, connects disparate windows into a single whole, and gives the wall that feeling of architectural completeness that most private houses lack.
This article provides a detailed breakdown: what a window sill belt is, why it is needed, how to choose the right profile, calculate the size, combine it with platbands, a sandrik, and other facade decor. And why polyurethane is the best material for this task.


What is a polyurethane window sill belt
Let's start with a definition — precise and practical. A window sill belt is a decorative horizontal profile that is mounted directly under the window opening and completes the window frame from below. In classical architecture, it was called differently: window sill cornice, lower platband, apron, window sill belt. The meaning was always the same — to create a "support" under the window, visually supporting the vertical composition of the platbands.
As an element of the facade system, it performs several tasks simultaneously. First, it completes the window frame from below — where the side platbands end. Second, it forms a horizontal line that, if there are several such windows, unites them into a single tier. Third, it protects the lower slope — the area of most active contact with moisture flowing down the glass. Fourth, it makes the window architectural, not just a technical opening in the wall.
Polyurethane as a material for the window sill belt is the optimal choice specifically for facade use. The density of STAVROS facade polyurethane is 350–420 kg/m³. This is not an interior material: the composition is specially adapted for outdoor use, contains UV stabilizers, frost-resistant modifiers, and provides hydrophobicity at the molecular structure level. The window sill area is the "wettest" place on the window facade: rainwater flows here, snow accumulates here, and condensation forms here during temperature changes. The requirement for moisture resistance here is maximum — and polyurethane fulfills it.
Framing windows with polyurethane stucco as a system includes an upper sandrik, side platbands, corner elements, and a lower window sill cornice — all four elements form a complete window portal. Buying one sandrik without a belt is like hanging an expensive picture frame and leaving the bottom edge uncovered.


Why you need a lower window trim: more than meets the eye
Almost everyone who encounters facade decor for the first time asks themselves this question. It seems that the upper part of the design is more important — after all, the gaze slides upward, and the pediment is immediately visible. This is flawed logic. The lower part of the window is perceived differently: not immediately, but upon closer inspection, it determines whether the framing looks "anchored" or "floating."
Here are the specific reasons why a window sill belt is necessary:
Completion of the composition. Side trims — vertical elements — need to end somewhere. Without a lower horizontal element, they simply "hang" in the air. The belt provides them with support, creating the "base" of the entire framing.
Horizontal rhythm of the facade. If you have three or four windows at the same level, the line of window sill belts beneath them forms a continuous horizontal band. This is one of the basic techniques of facade composition: horizontals structure the wall, create a sense of floors, and readability of volume.
Protection of the lower slope area. The joint between the window unit and the wall at the bottom is a risk zone. Water flows down the glass, hits the lower slope, and seeps into the seam between the frame and the plaster. A belt with the correct overhang (30–50 mm) and a drip edge on the lower edge diverts water away from the wall, protecting the installation seam.
Concealing installation defects. When installing a window unit, the lower joint is almost never perfect: hardened foam, uneven plaster, gaps. The belt covers all of this.
Increasing the visual value of the house. A properly designed window — with trims on the sides, a pediment on top, and a belt on the bottom — is perceived as an architectural element. Such a window reads as a design feature, not as a "hole in the wall with plastic."
Facade window decor made of polyurethane — this is exactly the case where a competent combination of elements turns an ordinary window into an architectural accent. And the window sill belt in this system plays a role no less important than the pediment.
Our factory also produces:


Where to use a window sill belt: application scenarios
Get Consultation
On the facade windows of a private house
This is the main and most common scenario. A plastered facade of a cottage or country house is an ideal base for installing polyurethane decor. The surface is smooth, the glue adhesion is high, and installation is simple.
For a private house, the visual value of the first glance is especially important: it is the facade that shapes the impression of the house for guests, neighbors, and passersby. Polyurethane molding for house facades — cornices, architraves, belts — these are not a luxury, but a tool of architectural expressiveness, accessible on any budget.
For houses with three or more windows on the facade, a polyurethane window sill belt creates a "second-plan horizontal" — a line that ties all windows into a single system. This is a professional architectural technique that instantly elevates the facade to a different level of perception.
On the first floor windows
The first floor windows are closest to the human eye level — they are the first to come into view. Therefore, the window sill belt here should be the most expressive: with a clear relief, proper projection, and proportionate to the side architraves.
On the first floor, it is acceptable to use a richer profile with a drip edge on the lower edge, with a small ornament, and with a pronounced vertical cross-section. These are details visible from a few meters away — and they create a feeling of quality, thoughtfulness, and luxury.
On windows with a sandrik
If a sandrik — a horizontal canopy or pediment — is installed above the window, then the absence of a belt below creates a visual imbalance: the upper part is "heavy" and decorated, the lower part is empty. It's like a hat without a brim: the function is there, but the proportion is broken.
The sandrik in facade decoration serves a dual function: it protects the window from rain from above and creates a decorative crowning. The window sill belt symmetrically repeats this logic from below: it protects the lower slope and creates a decorative base. Together they form a complete "frame."
On window portals
A classic window portal is a full-fledged architectural structure: side pilasters or wide architraves + upper sandrik + central a polyurethane keystone + lower window sill belt. Each element plays its role in the system — removing one means breaking the logic.
For portals, the window sill belt is chosen to be more massive than for simple framing: a higher profile, greater projection, possibly with decorative brackets or corner inserts.
On facades with rustication
If the corners of the house are decorated with polyurethane rustication for the facade — vertical rows of rusticated blocks — then the horizontal belts under the windows support their rhythm. The horizontality of the belts + the verticality of the rustication = an architectural grid that organizes the facade plane.
In this case, it is recommended to check whether the line of the window sill belt coincides with the horizontal seams of the rustication — the visual alignment of these lines creates a sense of regularity and deliberate design.
Window sill belt, architrave or sandrik: what to choose and for which task
This is a question that often confuses buyers when first getting acquainted with facade decor. All three elements belong to window framing — but perform completely different tasks.
| Task | What to choose |
|---|---|
| Close the side parts of the window | Door casings |
| Finish the window from above, divert water | Sandrik |
| Accent the center of the upper part | Keystone |
| Finish the window from below, create a horizontal line | Window sill belt |
| Strengthen the corner areas of the facade | Rusts |
| Assemble a full classic portal | Casing + sill strip + belt + keystone |
| Strict neoclassicism without excess | Straight profile without ornament |
| Rich classic with details | Profiled cornice with relief |
Important clarification: the casing and the window sill strip are not the same thing, although they look similar. The side casing is a vertical element, its width is determined by the width of the slope and the style. The window sill strip is horizontal, its length is greater than the width of the window opening, it has an overhang and a drip edge for water drainage. Confusing them when ordering means getting an incorrectly functioning set.
How to choose the size of the window sill strip: specific parameters
This is where most buyers make a mistake: they choose a profile "by eye" or take what seems suitable from a photo in the catalog. The result is a disproportionate element that does not fit into the overall system.
Let's go through the parameters in order.
Window width
The length of the window sill belt should equal the width of the window opening plus the width of the casings on both sides — this is the minimum. Ideally, with a slight overhang beyond the casings: 30–60 mm per side. This creates the impression that the belt "supports" the entire structure from below, rather than just being "inserted" between the casings.
Example: window 1200 mm, side casings 120 mm each. Belt length: 1200 + 240 + 60 × 2 = 1560 mm.
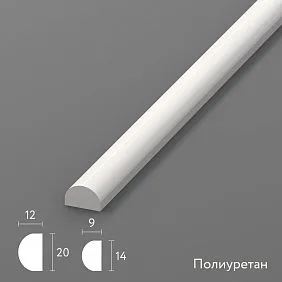
Profile Height
This is the vertical dimension of the belt. For small windows (up to 1000 mm wide), a profile height of 80–120 mm is sufficient. For windows 1000–1800 mm — 120–180 mm. For wide and tall panoramic windows or portals — 180–250 mm and above.
General rule: the height of the belt should be proportional to the width of the side casings. If the casings are 100 mm, a belt of 80–120 mm is harmonious. If the casings are 200 mm and the belt is 80 mm — disproportion is obvious.
Overhang from the wall
Overhang is the distance the profile protrudes from the wall plane. This is a functionally critical parameter: the overhang ensures water drainage from the wall.
Minimum overhang — 40–50 mm. Recommended for facades with heavy rainfall — 60–80 mm. For rich portals — up to 100 mm. The top edge of the belt should have a slight outward slope (2–3° from horizontal), the bottom edge should have a drip edge: a protruding "beak" 5–8 mm wide, from which water drips down without flowing back onto the wall.
Molding width
This is a key spatial reference. A belt chosen without considering the width of the casings will disrupt the scale of the entire system. Practically: belt profile height ≈ 80–120% of the side casing width. If the casing is 120 mm, a belt of 100–140 mm is optimal.
Ceiling and floor height
The higher the floor, the larger the profile can be — the facade "allows" more monumental elements. For a one-story house with a ceiling height of 2.7–3 m, it's better to limit yourself to a modest belt of 80–120 mm. For a two-story house with high ceilings, you can use 150–200 mm.
Alignment with facade horizontals
If the facade has an interfloor molding belt, the line of the belt under the first-floor windows should either align with it or harmoniously complement it. Arbitrary horizontals not connected to the overall system disrupt the rhythm of the facade.
Window sill belt profiles: from minimalist to ornate
There is no single "correct" profile — there is one appropriate for a specific style. Let's consider the main options.
Simple rectangular profile. A horizontal slab with straight or slightly beveled edges, projection 40–60 mm, height 80–120 mm. Suitable for minimalism, neoclassicism, modern architecture. Works through relief and shadow, without ornament.
Multi-tiered cornice profile. Several horizontal steps, each projecting slightly more than the previous one — from bottom to top. Classic cornice principle. Suitable for strict classicism, Empire style. Projection 60–80 mm, height 120–180 mm.
Profile with a drip edge at the bottom. The lower edge is designed with a "drip" — a narrow protruding "spout" from which water drips off. This is both a functional and decorative element. Essential for facade use in areas with high rainfall.
Profile with an ornamental frieze. Between the upper and lower shelves — a band with a repeating ornament: meander, palmettes, ovoli. Suitable for rich classical facades with ornamental architraves.
Profile with brackets. The belt is "supported" by decorative brackets — small consoles evenly spaced along its length. Creates the impression that the slab rests on supports rather than being simply glued to the wall. Characteristic of Baroque, Empire style, Neo-Renaissance.
How to combine a window sill belt with other facade decor
A polyurethane window sill belt never works alone — it is part of a system. It is within the system that it reveals its potential.
Belt + architraves
Basic combination. Side architraves + lower belt = three sides of the window frame. If you add a pediment on top — a full frame. The main rule: all elements must be from the same collection or, at least, of the same scale and style. Mixing a classic ornate architrave with a minimalist modern belt is a visual conflict.
Moldings made of polyurethane STAVROS is a unified product system where architrave and belt profiles are coordinated in height, style, and scale. This is fundamentally important when forming a window set.
Belt + pediment
The upper and lower elements of the window framing should be proportionate. If the pediment has a deep projection of 80 mm, a belt with a projection of 30 mm will look insignificant — the top is "heavier" than the bottom. Recommendation: belt projection ≈ 70–80% of pediment projection. This creates a "heavy top — light bottom" harmony, an architecturally correct proportion.
Belt + keystone
Keystone is installed in the center of the upper architrave or pediment. The belt is at the bottom. The keystone emphasizes the vertical axis, the belt creates a horizontal base. Together they hold the "cross" of symmetry — vertical and horizontal, on which the entire window composition is built.
Belt + facade moldings
If there are interfloor horizontal bands on the facade, their profile should echo the profile of the window sill belt. Not necessarily identical, but proportionate. Two horizontal elements of different scales on the same facade create a sense of randomness.
Belt + rustication
If the corners of the house are decorated with rustication, and the belts run across the entire width of the facade, they together form a "grid" — the horizontals of the belts intersect with the verticals of the rustication. This is a classic compositional technique known since the Renaissance.
Belt + base cornice
The base cornice (a horizontal profile separating the base from the main volume) and the window sill belts form the horizontal system of the entire facade. It is recommended to ensure that the scale of the base cornice is slightly larger than the scale of the window belts — the cornice is "weightier", it "carries" the facade.
Belt + entrance group
The design of the house's entrance group is a separate subject. But if the belts on the window openings are "through" (run across the entire width of the facade), they organically reach the entrance portal, go around it, or transition into the base profile — depending on the solution. It is important to plan this junction in advance so that the horizontal lines do not "break" at the entrance.
Facade decoration made of polyurethane STAVROS is precisely a system, not a set of individual products. Cornices, moldings, pilasters, rustication, architraves, sandriks, belts — all these elements are produced in a unified stylistic key, taking into account their joint work on the facade.
Moisture resistance and durability: why the window sill area requires special attention
Nowhere on the facade does water concentrate as much as in the window sill area. Rain hits the glass — water flows down it onto the lower slope. Snow sticks to the horizontal belt. In spring, melting creates prolonged contact with water. In summer, thermal expansion opens micro-gaps in the installation seams, through which water flows under the decor.
That is why the requirements for the window sill belt material are the highest of the entire window framing system. And that is why facade-grade polyurethane is indispensable here.
Differences between facade polyurethane and interior polyurethane:
-
Density 350–420 kg/m³ vs 250–300 kg/m³ for interior
-
Frost resistance 300–500 cycles (−40°C / +60°C)
-
Hydrophobicity: closed-cell structure without through pores
-
UV stabilizers in the composition — protection against photodegradation
-
Thermal stability: does not deform when heated to +60°C (direct sun in summer)
It is not recommended to store the polyurethane belt outdoors without painting: under ultraviolet light without a paint coating, the material degrades. After installation — primer + 2 coats of facade acrylic paint with UV filter — and the service life increases to 25–40 years.
molded decoration made of polyurethane STAVROS comes with a factory primer — this is an important advantage. The surface is ready for painting without additional priming, although an extra layer of primer before painting is recommended for maximum durability.
Installation of window sill belt: step-by-step technology
Installation is where good material can be ruined by careless execution. Let's break down the correct technology.
Surface preparation
The wall under the window is cleaned of dust, dirt, efflorescence, and remnants of old decor. Special attention to the lower slope: dirt often accumulates here, sometimes there are stains from spilled mounting foam. All this must be removed before installation — otherwise, the adhesion of the glue to the contaminated surface will be poor.
The surface is primed with a penetrating primer. A dry facade is a condition for installation. Working with surface humidity above 5% is not allowed: the glue will not set.
Marking
The horizontal level of the belt is strictly according to the level. A deviation of 2–3 mm per meter is the limit. Use a laser level or water level, not 'by eye'. The marking line is drawn with a pencil along the lower edge of the belt or along the axis — depending on which point is more convenient to measure from.
Important: if there are several windows in a row on the facade, marking is done for all at once — one horizontal line for the entire row. Only then will the belts align at the same level.
Fitting and trimming
The belt is trimmed to length with a miter saw with a fine-tooth blade — 80–100 teeth, low speed. Ends are finished with sanding if necessary. Fitting is done before applying glue.
Applying Adhesive and Installation
Installation glue for facade decor (polyurethane or MS-polymer) is applied to the back surface of the belt: along the perimeter and in a zigzag pattern in the center. Not in a continuous layer — excess will squeeze out when pressed and go onto the wall.
The belt is applied according to the markings, pressed with moderate force. Hold for 30–60 seconds. For elements longer than 1200 mm, an assistant or temporary supports are needed.
Dowels
Every 400–500 mm of length — plastic facade dowels. For aerated concrete walls — dowels for porous bases. For brick and concrete — standard facade dowels. The heads are recessed by 2–3 mm, the recesses are puttied.
Joint sealing
All joints — between the belt and the wall, between the belt and the trim, between adjacent sections of the belt — are filled with acrylic sealant. Acrylic, not silicone: acrylic can be painted over, silicone cannot.
The sealant is applied from a gun, smoothed with a damp spatula. Masking tape along the edges of the seam — for a clean line. After removing the tape, the joint is smooth and neat.
Painting
1–2 coats of facade acrylic paint with UV filter. The relief is painted with a brush, the flat surfaces with a roller. Between coats — 4–6 hours of drying. Work at a temperature of +5...+30°C, not in rain or direct sunlight.
How to calculate your purchase: step-by-step guide
Before placing an order, go through this checklist:
-
Recount all windows on the facade that need a belt. Not just the front facade — the ends and rear facade may also require framing.
-
Measure the width of each window in millimeters. Windows may have different widths.
-
Decide whether the belt will be "embedded" between the trims or extend beyond their edges — and by how much. Calculate the length of each belt.
-
Add up all lengths, add 10–12% margin for trimming and fitting.
-
Determine the profile: belt height, projection from the wall, presence of a drip edge, style.
-
Check whether the selected profile is consistent with already purchased or planned platbands and sandriks.
-
Select glue, dowels, acrylic sealant, primer, and facade paint.
-
Order all elements in one batch — different batches may vary slightly in shade and geometry.
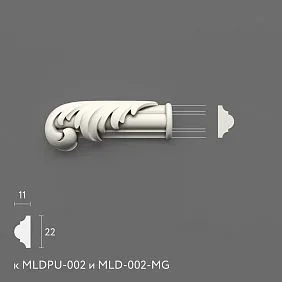
PU overlays In the STAVROS catalog, this is a large section that includes central and corner elements that can be used together with the window sill belt as additional decor in the lower framing area.
Typical Errors in Selection and Installation
Error analysis is the most practical part of any guide. Because other people's mistakes are cheaper than your own.
Making the top sandrik but leaving the bottom unfinished. The most common mistake. The facade looks incomplete, the top is 'overloaded', the bottom is empty.
Buying a belt without considering the width of the platbands. A disproportionate element destroys the entire system. Always measure the platbands before choosing the belt.
Not extending beyond the side framing. A belt exactly the width of the platbands looks 'cramped'. An extension of 30–60 mm on each side creates the feeling of a 'shelf' — a convincing horizontal support.
Do not allow the bottom part to contact water. Buying interior polyurethane for facade use is a direct path to destruction in 2–3 years.
Do not seal joints. An unsealed joint between the belt and the wall is a channel for water. In a year, stains will appear in this spot; in two years, the decor will peel off.
Choosing too small a profile for a large facade. A belt 60 mm high under a two-meter window is simply not readable from a distance of 5 meters.
Not linking belts with the horizontal lines of the facade. Arbitrary horizontals without connection to interfloor belts, cornices, or the base are chaos, not architecture.
Using different profile styles on one facade. A classic casing + a modern minimalist belt = a stylistic conflict.
Not calculating the reserve. Trimming, non-standard slope angles, chips during transport — all this consumes material. 10–12% reserve is mandatory.
Installing without level marking. "By eye" always results in a crooked horizontal line. A level is mandatory.
FAQ: answers to the most important questions
What is a window sill belt made of polyurethane?
This is a decorative horizontal profile made of facade polyurethane, which is mounted under the window opening and completes the window framing from below. It creates a horizontal rhythm on the facade, protects the lower slope from water, and is the lower element of the window portal.
How does a window sill belt differ from a casing?
Casing is a vertical element on the sides of the window. Belt is a horizontal element at the bottom. They have different cross-sections and different lengths. The belt must have a projection and a drip edge for water drainage, while the casing does not.
Is lower decor needed under the window on the facade?
Yes, if the window framing is made not only with moldings but also with a pediment on top. Without a belt at the bottom, the top of the window frame is 'heavier' than the bottom, creating a visual imbalance. The belt also protects the lower slope.
How to choose the size of the window sill belt?
Length = window width + width of both casings + overhang (30–60 mm per side). Profile height — 80–120% of the side casing width. Projection from the wall — 40–80 mm.
Should the belt extend beyond the edges of the casings?
An overhang of 30–60 mm on each side is recommended. This creates a horizontal 'shelf', a convincing and architecturally expressive support under the window.
Can a window sill belt be used without a pediment?
Yes. If the budget is limited or the facade style suggests asymmetry, the belt can be the only horizontal accent. But the best result is in a complete system: casings + pediment + belt.
How to combine a window sill belt with a keystone?
The keystone accentuates the vertical axis at the top (above the window center), while the belt creates a horizontal base at the bottom. Together, they hold the "cross" of the window composition's symmetry.
Is polyurethane decor suitable for facades?
Yes, provided that facade polyurethane with a density of 350–420 kg/m³, UV stabilizers, and frost-resistant additives is used. Interior polyurethane (density 250–300 kg/m³) is not suitable for facades.
How to install a window sill belt on a facade?
Level marking → cutting to length → applying adhesive (zigzag on the back side) → installation and pressing → dowels every 400–500 mm → sealing joints → primer → 2 coats of facade paint.
Where to buy a polyurethane window sill belt?
In the STAVROS catalog — a full range of facade polyurethane decor, including window sill belts, architraves, sandriks, and additional elements. Delivery across Russia, consultations on selection and calculation.
STAVROS: architectural decor you can trust
Choosing the right element is only part of the task. No less important is choosing the right manufacturer. Because a polyurethane window sill belt costs from a few hundred to several thousand rubles, but the difference in quality between a cheap and a professional product is the difference between 5 and 30 years of service.
STAVROS is a manufacturer of architectural polyurethane decor with its own production, full quality control, and two decades of experience in the niche of facade and interior decor. STAVROS facade elements are made of polyurethane with a density of 350–420 kg/m³, frost resistance of 300+ cycles, closed cell structure, and UV stabilizers. This is not advertising copy — these are technical parameters that ensure a real service life of 25 to 40 years with proper painting.
The STAVROS catalog offers a complete system of facade decor for window framing: window sills, architraves, sandriks, keystones, brackets, moldings, cornices, and rustications. All elements are designed as a system — they are stylistically and proportionally compatible. This means that when you buy different elements for one facade, you get not a random set, but a coordinated kit.
If you are just starting to design a facade, STAVROS managers will help you select profiles, calculate quantities, and compose a system of elements that will look like a single professional project. This is a free service that saves you time and money.
Your home is a long-term investment. Its facade is the first thing everyone sees. Do it right: with horizontals that organize the wall, with belts that complete the windows, with a system where every element is in its place. STAVROS will help.


