Article Contents:
- Short answer: for symmetry, you need a pair of L + R
- Why two identical overlays are not the same as a mirrored pair
- What exactly to compare among the three sizes
- 40 × 158 × 12 mm — the most compact option
- 50 × 197 × 15 mm — the medium option
- 60 × 237 × 18 mm — the largest and most embossed option
- Principle 1. Equal distance from the slat panels
- Principle 2. Center of each smooth strip
- Principle 3. Overall axial composition of the entire wall
- In the color of the slat panels
- A separate accent shade
- Step 1. Take a frontal photo of the wall
- Step 2. Measure the left and right fields separately
- Step 3. Mark prohibited zones
- Step 4. Check the three dimensions of NPU-315
- Step 5. Make three pairs of templates
- Step 6. Determine the marking principle
- Step 7. Choose the height of the pair
- Step 8. Confirm the L/R direction
- Step 9. Check the basket
- Step 10. Prepare the base and mounting materials
- Ordered two identical L or two identical R
- Chose the size by price, not by the wall
- Measured only one side
- Tied the left and right trim to different reference points
- Rotated the identical trim 180° instead of buying a mirrored one
- Did not account for the thickness
- Glued to a weak finish layer
- Too late noticed the furniture
- Can I take NPU-315L of one size and NPU-315R of another if the strips are different?
- If one pad is damaged, is it mandatory to replace both?
- Can I first buy one pad for fitting and then the second one?
- Is it necessary to place L strictly on the left and R strictly on the right?
- Will NPU-315L/R fit if the slat panels do not reach the ceiling?
- Can the pads be placed above the slat insert rather than on its sides?
- What is more important when choosing the size: the width of the strip or the height of the pad?
- Do I need to buy special glue specifically together with the overlays?
- Can I make one overlay contrasting and the other matching the wall color?
- What to do if after trying on, none of the three sizes looks good?
- Can the NPU-315L/R be installed after the slat panels have already been fully mounted?
- How to tell if the overlays are too far from the slats?
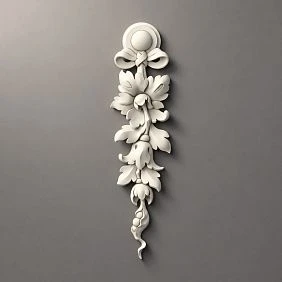
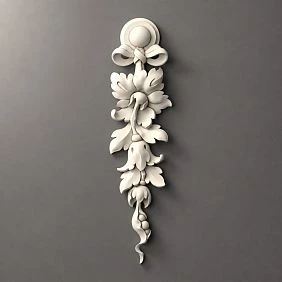
Short answer: for symmetry, you need a pair of L + R
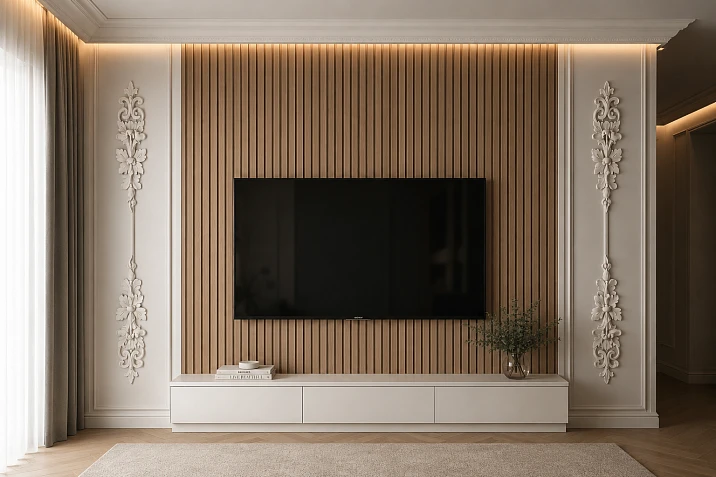
If slat panels are already installed in the center of the wall, and two identical smooth vertical strips remain on the left and right of them, then for mirror decoration of these fields, it is more logical to buy not two identical overlays, but one NPU-315L and one NPU-315R of the same size.
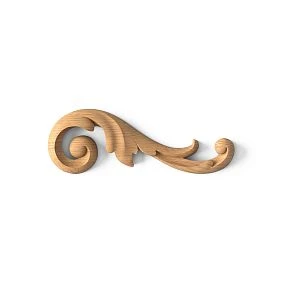
The reason is not the price or dimensions. The left and right models have the same size range and the same cost, but the pattern is oriented mirror-wise. The manufacturer directly describes the NPU-315L as a mirror reflection of the NPU-315R and suggests using them together for paired decorative accents. Therefore, the combination of 1 × NPU-315L + 1 × NPU-315R creates exactly a mirror composition, while 2 × NPU-315L or 2 × NPU-315R will repeat the same rotation of the ornament on both sides.
For the wall in question, this is fundamental. The central field of slats is already built on a repeating vertical rhythm. The two side smooth strips work as visual "rest fields." If carved elements are placed on them, they become a pair and begin to be perceived relative to the central axis of the entire wall. In such a scenario, the direction of the pattern becomes as important as the same installation height or the same distance from the slats.
The NPU-315L and NPU-315R have three identical sizes:
| Set | Size of each pad, A × B × C | Price per unit | Price per pair L + R |
|---|---|---|---|
| NPU-315L + NPU-315R | 40 × 158 × 12 mm | 990 ₽ | 1 980 ₽ |
| NPU-315L + NPU-315R | 50 × 197 × 15 mm | 1 290 ₽ | 2 580 ₽ |
| NPU-315L + NPU-315R | 60 × 237 × 18 mm | 1 690 ₽ | 3 380 ₽ |
In the STAVROS catalog, size designations are decoded as follows: A — width, B — height, C — thickness. This allows comparing options not "by eye," but by the actual space on the side strip. The smallest element occupies 40 mm in width and has a height of 158 mm, the medium one — 50 and 197 mm, the largest — 60 and 237 mm. The thickness of the relief also increases simultaneously: 12, 15, and 18 mm.
Before ordering, it is useful to solve not only the "L or R" question, but also three other tasks: whether the selected size will fit on each strip, where exactly the center of the pad will be, and whether the large relief will conflict with the already active pattern of the slat panels.




Why two identical pads are not the same as a mirrored pair
On the product card, it's easy to see two nearly identical items. The article numbers differ by one letter, the sizes match, and so do the prices. This naturally leads to the thought: if the strips are the same, you can put two pieces of one model in the cart and simply turn one of them to the other side of the wall.
But here it's important to distinguish between rotation and mirror reflection.
If the same pattern is rotated 180°, the top and bottom swap places. This won't turn the right piece into the left one if the design initially has directional asymmetry. And if both identical pieces are kept in their standard vertical orientation, their curls and leaves will go in the same direction. You'll get a repeat, not a mirror pair.
With NPU-315L and NPU-315R, the task is already solved at the product level: L is made as a mirror of R. So on two side fields, you can keep the same "top," the same height, and simultaneously direct the pattern symmetrically relative to the slat center.
A conditional wall layout can be represented as follows:
outer edge of the wall → NPU-315L → smooth strip → slat panels → smooth strip → NPU-315R → outer edge of the wall
This doesn't mean that the letter L must always physically end up on the left in any conceivable composition. In a real project, it's important to look at the pattern and how exactly the mirror elements should be oriented. But for a typical task with two sides of a central zone, it's more convenient to immediately consider L and R as a pair, apply them to the wall, and confirm the direction before applying glue.
If the project is deliberately asymmetrical, the rule changes. For example, on one side there's only one free vertical, and the other is occupied by a door or a tall cabinet. Then you can buy one overlay—left or right—depending on which direction of the pattern better supports the composition. That is, a separate NPU-315L or NPU-315R is not an "incomplete set" by itself. The error only appears when a person wants a mirror pair but orders two identical pieces.
Our factory also produces:

What exactly to compare among the three sizes
The size range here is conveniently arranged: width, height, and thickness all change at once. So the choice affects not only whether the overlay fits on the smooth strip, but also the visual strength of the relief.
Get Consultation
40 × 158 × 12 mm — the most compact option
A width of 40 mm allows the element to be placed on a relatively narrow smooth field. A height of 158 mm makes it a small vertical accent, while a thickness of 12 mm provides the most moderate relief among the three options.
This size is especially useful to try first in situations where the slatted part of the wall itself is very active: the slats are contrasting, have a pronounced wood texture, backlighting, or noticeable depth. Against such a background, a too-large stucco detail may draw attention to the edges. The compact pair works more delicately: it anchors symmetry but does not turn the side strips into two independent panels.
The price of two elements is 1,980 ₽. This is the minimum budget for a mirrored pair, not just one side.
50 × 197 × 15 mm — the medium option
An element 50 mm wide and 197 mm high is more noticeable on the wall but still does not require a large decorative area. A thickness of 15 mm enhances the chiaroscuro. If the smooth strips are wide enough and the empty space around a small size looks excessive, the medium pair often becomes more convincing in scale.
It is useful to compare it not only with the width of the strip but also with the height of the entire decorative zone. On a wall with a height close to the ceiling, a 158-mm detail may be perceived as a small sign, while a 197-mm one is already a full-fledged vertical overlay. However, there is no universal rule like "for this wall height, take this size." The decision depends on the width of the strips, the contrast of the finish, furniture, viewing distance, and the position of the overlays relative to the center of the wall. That is why a paper template is more reliable than abstract recommendations.
The price of a pair is 2,580 ₽.
60 × 237 × 18 mm — the largest and most relief option
A width of 60 mm, a height of 237 mm, and a thickness of 18 mm make this model the most noticeable accent in the lineup. It requires more free space around it, and with side lighting, it will cast a more pronounced shadow.
This size is appropriate to consider when the side smooth strips are truly independent vertical zones, rather than narrow technical remnants next to the slats. If the field allows the element to "breathe," a large pair can complete the composition. If the overlay almost touches the slats on one side and a corner, trim, or wall edge on the other, it may formally fit, but visually it will look cramped.
The price of the pair is 3,380 ₽.
The main difference between the three options can be summarized as follows: 40 mm solves the task of minimal intervention, 50 mm enhances the decorative accent, 60 mm makes the side elements an independent part of the composition. This is not a "worse-better" rating, but three different scales of the same pattern.
First, measure not the overlay, but both smooth strips
A buyer often starts with the product card: chooses the most beautiful size, then tries to find a place for it. For an already finished slat wall, it is safer to go in the reverse order. First, the actual geometry of the two side fields is fixed, then the size is chosen to fit it.
You need to measure at least four values:
-
the width of the left smooth strip;
-
the width of the right smooth strip;
-
the free height in the intended installation area;
-
distances to objects that cannot be covered: switch, socket, trim, furniture, thermostat, sconce, panel edge, or other decor.
Even if both strips are intended to be identical, still measure them separately. On the finished object, a difference of a few millimeters may appear due to panel joints, uneven corners, finish thickness, or the actual position of adjacent elements. Externally, the zones look the same, but the usable width may differ.
Let's denote the widths as W_left и W_right. For the geometric placement of a specific pair, two simple conditions must be met:
W_left ≥ A
W_right ≥ A
where A — width of the selected overlay: 40, 50, or 60 mm.
This is only a check of physical fit within the dimension. It does not answer whether the composition will look good. If the strip is 61 mm wide, then a 60 mm element technically fits into it, but only 1 mm of total free space remains around it in width. For a decorative wall, such a result almost certainly needs to be seen on a template first, rather than accepted by formula.
If the overlay is placed centered on a smooth strip, the remainder on the sides can be calculated as follows:
side offset = (strip width − overlay width) / 2
For example, with a strip of 110 mm:
-
for NPU-315 with a width of 40 mm, 35 mm remains on each side;
-
for a width of 50 mm — 30 mm on each side;
-
for a width of 60 mm — 25 mm each.
All three options physically fit, but they look different. The small one leaves more calm background, the large one fills the strip more strongly. This is exactly what needs to be assessed with a paper mock-up.
If the strip is 70 mm, the picture is different:
-
with a width of 40 mm, 15 mm remains on each side;
-
with a width of 50 mm — 10 mm each;
-
with a width of 60 mm — 5 mm each.
The formula still says everything fits. But it does not give the right to automatically recommend the largest size: the compositional margin becomes small. Here the decision depends on the actual pattern of the overlay, the relief of adjacent slats, and how cleanly the edges of the strip are finished.
The same logic applies to height. For variants B, it equals 158, 197, and 237 mm. You need to check that there are no intersections with other objects in the selected area. If the overlay is installed between two horizontal limiters — for example, between a switch and a cornice — the free height must be at least B, and the position of the center needs to be checked separately.
Why equal strip widths do not guarantee symmetry
A symmetrical wall is not just two identical numbers on the edges. The eye simultaneously reads several axes:
-
left and right edge of the slat zone;
-
vertical axis of the entire composition;
-
height of the center of both overlays;
-
distance from the overlay to the slats;
-
distance to the outer edge of the wall;
-
direction of the ornament L/R.
You can perfectly match a pair by size and still lose symmetry if you place one overlay 30 mm higher than the other. Or if you measure from the outer corner on the left and from the edge of the door casing on the right, even though visually the main reference points are the slats.
For this wall, it makes sense to choose one primary marking basis. Most often, it becomes the edge of the central slat field, because it is the main object of the composition. Then, on both sides, the same distance is measured from the nearest edge of the slats to the selected reference point of the overlay—for example, to its vertical axis.
The second basis is a horizontal line. A laser level or ordinary precise marking helps to set the centers of NPU-315L and NPU-315R at the same height. As a result, even with a slight difference in the total width of the left and right strips, the mirror pair will be assembled relative to the central slat zone, rather than relative to random construction deviations.
There is also the opposite situation. If the slat field is intentionally offset, and the side smooth zones of different widths are part of the design concept, mechanical centering of the overlays relative to each strip may be more convincing than the same distance from the slats. That is, first you need to determine what exactly in the room should read as symmetrical: the entire wall, the slat rectangle, or two independent side fields.
Make two mirrored templates before purchasing
For NPU-315L/R, a paper mock-up is especially useful because the task involves both scale and pattern direction at once.
The simplest way is to cut out rectangles according to the dimensions of the three options:
-
40 × 158 mm;
-
50 × 197 mm;
-
60 × 237 mm.
This gives an idea of the occupied area. But for choosing L/R, it's better to make a more precise pair: print or schematically draw the silhouette of the ornament and mirror the second template. Then on the wall you see not only the size, but also the direction of the decorative mass.
Work in pairs. Don't first apply one size on the left, then another on the right. For each version, make two identical mirrored templates at the same scale and look at the wall from the room's usual viewpoint.
Useful order:
-
Secure the 40 × 158 mm pair with painter's tape.
-
Step back to the main viewing spot of the wall.
-
Evaluate not just the overlay itself, but the entire ensemble: smooth field — slats — smooth field.
-
Take a photo strictly from the front.
-
Repeat with the medium pair.
-
Repeat with the large one.
-
Compare photos side by side, not from memory.
At this stage, it often turns out that a size that seemed too small in your hand looks right on the wall because the slats already add a lot of texture. Or vice versa: large smooth fields require a more noticeable pair, and the small option gets lost.
The template solves another task — it helps to see conflicts with switches, outlets, lighting, furniture, and the door leaf before paying for the order. This is especially important after a completed renovation, when moving engineering points for a decorative overlay makes no sense.
How to choose the size relative to the slat center
Slat panels create a repeating vertical pattern. Their visual density depends on the width of the lamellas, spacing, base color, wood texture, relief depth, and lighting. NPU-315L/R, on the contrary, provide a local botanical accent. Therefore, the size of the pair should be chosen not in isolation, but in comparison with the strength of the central zone.
If the slats are contrasting — for example, dark on a light background — the central field already dominates. In this case, a small pair of 40 × 158 × 12 mm can work as neat punctuation at the edges. It doesn't try to compete with the rhythm of the slats.
If the slats and smooth fields are painted close in tone, the boundary between zones is softer. Then a medium or large overlay may be needed so the side strips don't just look like leftover empty space.
If the slatted field is narrow and the smooth strips are wide, the wall's weight shifts toward the empty edges. Here, a larger pair helps pull the composition back to the center. But if the slatted part takes up almost the entire wall and only small strips remain at the edges, the task is reversed: the decor should neatly finish the edge, not fill it at any cost.
There's a useful visual test. In a photo of the wall, temporarily cover the templates with your hand or a sheet of paper. If the edges seem logical and complete without them, the decor isn't necessary, and you should choose the calmest option or leave the strips empty altogether. If the smooth verticals are clearly perceived as unfilled "pockets," a pair of overlays has a stronger compositional basis.
40 × 158 × 12 mm: when a small pair turns out to be the most precise
The compact size is often underestimated because it looks less impressive in the product card next to larger versions. But on a finished slatted wall, a smaller scale can be an advantage.
The first scenario is narrow side strips. Even if a 50- or 60-millimeter overlay physically fits there, a 40-millimeter one leaves more visible smooth surface. This way, the ornament doesn't visually touch either the slats or the outer edge of the wall.
The second scenario is a small room and a short viewing distance. When the wall is viewed from a short distance, the large relief is seen in particular detail. Two large overlays on the side fields can become too active, especially if there are doors, sconces, paintings, or furniture with panels nearby. A small pair leaves priority to the slatted center.
The third scenario is painting in the wall color. With minimal color contrast, the relief is read through light and shadow. A thickness of 12 mm creates a more restrained shadow than 18 mm. This doesn't make the small version "flat," but it helps integrate it into a modern interior where classical ornament is used sparingly.
The fourth scenario is a trial addition of a molding motif to an already assembled interior. If the room has almost no other ornamental decor, a large element can look stylistically lonely. A compact pair connects more easily with neutral walls and modern panels.
The price for a pair is 1,980 ₽. But you shouldn't choose it solely for savings. If on wide strips, 158 mm in height looks too small, the savings will lead to a weak visual result. The right criterion is scale, and the price follows the chosen size.
50 × 197 × 15 mm: a universal intermediate scale
The medium option is not dramatically enlarged, but the difference is immediately noticeable across all three axes. It is 10 mm wider than the small one, 39 mm taller, and 3 mm thicker. As a result, the ornament occupies more area and the play of light and shadow is stronger.
It is convenient to consider it as a starting point if the smooth strips are neither narrow nor very wide. On the template, the medium pair usually already reads as a full-fledged decorative motif, but it does not yet require the visual space that is desirable for 60 × 237 × 18 mm.
The medium size is especially logical when the slat wall is an accent, but the room is not built in minimalism. For example, there are classic doors, brass lighting fixtures, profiled baseboards, moldings, or furniture with soft decorative shapes nearby. Then the NPU-315L/R does not look like the only historical motif in the room, and the medium scale helps connect the central slats with the more decorative surroundings.
At a price of 1,290 ₽ per piece, the mirrored pair costs 2,580 ₽. The difference from the small pair is 600 ₽. If the template shows that the medium size noticeably holds the side fields better, saving those 600 ₽ by switching to a smaller scale makes no compositional sense. Conversely, if the difference is barely visible on the actual wall, there is no need to overpay just because the number in the card is larger.
60 × 237 × 18 mm: when a large relief is truly needed
The largest version adds another 10 mm in width, 40 mm in height, and 3 mm in thickness compared to the medium one. In percentage terms, the growth seems moderate, but on the wall it is already a more substantial detail. Two elements at 237 mm in height create noticeable vertical accents and can compete with other objects in the field of view.
The large pair should be tried first if the smooth side areas are wide and tall, and the slat insert is perceived as a central panel within a large wall. Then small overlays may "dissolve" against the empty background.
Another suitable scenario is when the decorative composition is viewed from a distance: for example, from the opposite end of the living room or from a combined kitchen-living room. From a great distance, fine relief loses its graphic power, and the larger version reads more confidently.
A thickness of 18 mm matters with side lighting. The relief will produce a more noticeable light-and-shadow contrast. This can be an advantage if you want to emphasize volume, and a disadvantage if the surface should remain visually almost flat. Therefore, next to a wall lamp or linear lighting, a template made from a single piece of cardboard does not show everything. It is useful to additionally present the real depth: glue a small spacer layer of approximate thickness to the template, or view the 3D model of the product in the product card.
The price of a mirrored pair is 3,380 ₽. This is the maximum budget for the pair itself in this size range, but it is still only part of the project: glue, surface preparation, and painting if necessary are accounted for separately.
If the strips are only identical in appearance: how to work with a slight discrepancy
After installing slat panels, it often turns out that the left and right smooth zones differ by a few millimeters. The reasons can be quite mundane: the wall deviates from a right angle, the starting line of the panels was adjusted on site, the plaster layer is uneven, or the door opening is shifted. This is not a reason to automatically reject a mirrored pair.
First, you need to understand whether the difference is noticeable in the finished interior. If the left strip is, say, 112 mm and the right one is 108 mm, when using overlays 40 or 50 mm wide, both pieces physically fit with room to spare. In this case, you can align the pair along the common axis of the slat field, and the slight difference in edge offsets remains secondary.
If one side is significantly narrower than the other, the narrower field determines the choice. For a mirrored pair of the same size, both pieces must fit. You cannot choose 60 mm just because there is 120 mm of free width on the right if only 55 mm actually remains on the left.
In this situation, there are four honest options:
-
switch to a smaller pair size;
-
change the position of the overlays, if this does not disrupt the composition;
-
abandon the mirrored pair and make a deliberately asymmetric solution;
-
leave smooth strips without additional decor.
The fifth way — placing NPU-315 of different sizes on the left and right — is technically possible as placing two independent parts, but it destroys the main meaning of a mirror pair. The pattern will be related, the direction will be mirrored, and the scale will be different. On a central symmetrical wall, this is usually read as a mistake, not as an intention. If asymmetry is required, it is better to make it obvious by other means than to mask the size difference under a "almost pair."
What to mark from: from the slats, from the edge of the wall, or from the center of the strip
For a finished wall, there is no single universal basis. The error occurs when different rules are used on two sides: on the left, the element is centered along the strip, on the right, the distance from the slats is measured. As a result, the numbers may seem neat individually, but the pair visually diverges.
Before marking, choose one of three principles.
Principle 1. Equal distance from the slat panels
It is suitable when the central slat zone is an unconditional main accent. The same distance is measured from the edge of the slats to the vertical axis of NPU-315L and NPU-315R. Then the overlays seem to "frame" the central field.
The plus of the method is a stable connection with the slat composition. The minus is that if the outer boundaries of the wall are strongly asymmetric, the free space outside the overlays will differ.
Principle 2. Center of each smooth strip
It is suitable when the side fields themselves are perceived as separate panels. The vertical axis of each overlay coincides with the middle of its strip.
If the widths of the strips are equal, this method automatically gives the same distance both to the battens and to the outer edge. If the widths differ, the elements will be symmetrical within their local fields, but their distance from the center of the wall will become different.
Principle 3. Overall axial composition of the entire wall
Sometimes what matters more is not the edges of the battens or the local strips, but the center of the room: the TV, console, bed, dining table, or fireplace axis. Then the position of the overlays is set relative to this center, and the panels and smooth fields are considered as background.
This approach requires a frontal view of the wall. It is useful to mark real dimensions, furniture, and lighting fixtures on it. It is especially important when the slat insert itself is offset relative to the architectural center.
Whichever principle is chosen, the same horizontal line for the pair remains mandatory. The upper or central control points L and R should be set with a level, not measured separately from the floor, if the floor or ceiling has a slight deviation.
Why the installation height cannot be chosen just "in the middle of the wall"
The vertical overlay NPU-315 has a small height relative to the full wall: 158, 197, or 237 mm. Therefore, the vertical position greatly affects perception.
The mathematical center of the wall is just one of the possible points. In a residential interior, the eye reads the composition together with the furniture. If there is a cabinet, console, or sofa under the slat area, the optical center of the free part of the wall will be higher than the geometric one. If there is a cornice or an expressive ceiling profile above, the decorative area may, on the contrary, be perceived as lower.
Therefore, it is useful to check the layout in a real frame. First, temporarily attach the templates at the intended height. Then photograph the wall at eye level. Move the pair 50–100 mm higher or lower and compare. This is faster and more reliable than trying to derive a universal formula for the aesthetic center.
At the same time, there is no need to make separate "left" and "right" heights for the sake of adjacent furniture. If the task is a mirror pair, the common level must be maintained. If a tall dresser on one side does not allow placing the overlay on that line, the problem is no longer in the layout, but in the very possibility of a symmetrical solution.
What to do if there is an outlet, switch, or thermostat on one strip
An engineering point on one side turns simple symmetry into a constrained problem. Moving a working switch after renovation for the sake of a trim is usually impractical, so first evaluate options without structural rework.
The first solution is to change the height of both trims simultaneously. If the NPU-315L and NPU-315R can be raised or lowered so that the problematic object stays outside the footprint, symmetry is preserved.
The second is to switch to a smaller size. For example, a height of 158 mm may fit in the free zone where 237 mm already intersects with the switch. It is important to reduce both sides, not just the problematic one.
The third is to abandon the pair. If the engineering point is exactly where the trim should be per the composition, and moving the pair ruins the overall pattern, it is better to leave the fields empty or use different decor. Cutting part of the ornament around the switch without confirmed technology and without understanding how it will affect the pattern is a bad path for a finished product.
The fourth is to use only one trim as a deliberate single accent if the wall architecture is already asymmetrical. But in this case, the article about the mirror pair ceases to be an instruction for action: the entire composition needs to be reassessed, not just remove the second piece.
What to do if furniture covers one side strip
Furniture creates not only physical but also visual overlap. Even if a dresser or cabinet does not touch the trim, tall furniture can block it from the usual viewpoint. Then buying a mirror pair loses its meaning: formally two pieces are installed, but in reality the viewer sees one and a half.
Before ordering, place the furniture in its final position. If it has not arrived yet, mark its future outline with painter's tape on the wall or temporarily assemble a rectangle to size. Only then try on the NPU-315L/R.
For a low console, the problem is usually solved by installation height. For a tall cabinet, it is not. If the cabinet comes close to the slat zone, a decorative trim between it and the panels may look random. Then it is better to keep a clean junction and not try to use both sides at any cost.
Wall corner near the overlay: why "fits" doesn't mean "easy to install"
A smooth strip may end with an internal or external corner. When choosing the size, consider not only dimension A, but also access to the product during installation and painting.
If a large NPU-315, 60 mm wide, leaves a few millimeters to the corner, applying glue, precisely aligning the markings, removing excess, and then painting the end will be more difficult. Too tight a fit also amplifies any wall deviations: the corner is rarely a perfect geometric line along its entire height.
In such an area, it's useful to leave not a mathematical, but a working margin. The manufacturer does not specify a universal number for this offset for this specific composition, so inventing "mandatory 10 or 20 mm" is wrong. The check is done with a template and actual access of hand and tool.
Can you buy two NPU-315L or two NPU-315R and still get a beautiful result
Yes, if you're not trying to achieve a mirror composition.
Two identical pieces can be used as a repeating motif. For example, if along a long wall there are several vertical zones going in the same direction and the designer deliberately builds a rhythm, repeating one article makes sense. The same is possible on furniture or in a series of panels.
But in our original situation, there is a central slatted field and two side strips. This geometry itself creates an expectation of mirror symmetry. Repeating one direction on both sides of the center is perceived differently: the patterns seem to "look" in one direction. This is not a structural error, but it is a different artistic technique.
Therefore, the question should be formulated before adding the product to the cart: are we building a pair around the center or repeating one motif? If a pair — L + R. If repetition — two identical ones are acceptable, but the result should be seen in advance on a mockup.
Cart error: why it's better to catch it before payment
The NPU-315L and NPU-315R have the same dimensions and prices. This is exactly what makes the error especially unnoticeable. In the cart, two lines of "NPU-315L" at 990 ₽ or two "NPU-315R" at first glance look logical: the quantity is two, the total is correct, and the size is correct.
For a mirrored wall, the structure before payment should be different:
-
NPU-315L — 1 pc.;
-
NPU-315R — 1 pc.;
-
both have the same size selected.
Check specifically the article number and size, not just the total amount. If purchasing the 50 × 197 × 15 mm version, both lines should be in that size. A random combination of 40 × 158 × 12 on the left and 50 × 197 × 15 on the right will preserve the mirrored direction of the pattern but disrupt the scale.
If the order is placed by someone other than the person who did the layout, it is useful to pass along a short specification: NPU-315L 1 pc. + NPU-315R 1 pc., size …. A photo of the wall with L and R labeled is even more reliable.
Budget: you need to calculate exactly the pair, not the "from" price
On the product card, the item is shown with a price from 990 ₽. For our task, this is the price of only one element of the minimum size. The buyer needs a budget for two mirror parts.
| Size | NPU-315L, 1 pc. | NPU-315R, 1 pc. | pair |
| 40 × 158 × 12 mm | 990 ₽ | 990 ₽ | 1 980 ₽ |
| 50 × 197 × 15 mm | 1 290 ₽ | 1 290 ₽ | 2 580 ₽ |
| 60 × 237 × 18 mm | 1 690 ₽ | 1 690 ₽ | 3 380 ₽ |
If one tube of KUDO HIGH TACK 280 ml is additionally added to the order at the current price of 990 ₽, the arithmetic subtotal of items will be 2,970, 3,570, or 4,370 ₽ respectively. This does not mean that exactly one tube is the standard consumption for a specific pair: actual consumption depends on the application pattern and surface. The adhesive card indicates a guideline of up to 16 linear meters when applied in a single line, but converting this indicator into a guaranteed number of overlays without an application pattern is incorrect.
Additionally, costs for primer, finish paint, painting materials, and wall preparation may appear separately. They cannot be honestly included in a universal cost without knowing the surface condition and the chosen finish.
What surface to glue to: the strength of the base is more important than the word "smooth"
In the original task, the side strips are called smooth. This is good for visual contrast with the slats, but "smooth" does not automatically mean "ready for installation."
Before installation, check the base. If paint is peeling, putty is crumbling, there is dust, grease, or weak old finish on the surface, the adhesive will hold onto this fragile layer. Then the problem will arise not between the adhesive and polyurethane, but deeper — between the finish and the wall.
If the surface is freshly painted, the requirements of the applied paint for full drying and strength gain must be considered. If it is decorative plaster, the texture may reduce the actual contact area. If the wall is covered with wallpaper, the paper or vinyl layer cannot automatically be considered a suitable load-bearing base for any mounting adhesive: the compatibility of the specific system and the adhesion strength of the wallpaper itself must be checked.
The safest logic: the base must be stable, clean, and suitable for the chosen adhesive composition. If in doubt, it is better to do a test on an inconspicuous area or clarify the technology with the manufacturer of the wall material and adhesive.
Why is it better to install overlays on a smooth field rather than on top of slats
NPU-315L/R are considered here specifically as accents on two free side strips. This is not accidental. A smooth plane gives the ornament an even background, while the slatted panels nearby retain their own rhythm.
If you transfer the overlay directly onto the slatted surface, several conditions change at once. Uneven contact area appears, differences between the slats and the base, a different shadow pattern. The carved ornament begins to overlap with the rhythmic geometry of the slats, and the two textures compete.
This does not mean that any installation of a decorative element on top of any slats is impossible. But such a scheme requires a separate check of the specific panel, its profile, and mounting method. In our task, the smooth side strips allow us to avoid this uncertainty and create a clear composition: texture in the center, relief accents on the edges.
How to prepare the layout before gluing
After choosing the size and height, do not proceed directly to installation. First, mark the control lines.
For each side, it is convenient to mark:
-
the vertical axis of the overlay;
-
the upper or lower control point;
-
the overall rectangle by A × B;
-
Direction L/R;
-
Nearest reference point — edge of the slats or center of the strip.
The bounding rectangle is useful because it shows the error before even applying the product. If one frame is higher, it is immediately noticeable. At the same time, the ornament itself does not necessarily fill the entire rectangle evenly, so the final check is still done with the actual part.
Place the NPU-315L and NPU-315R on the floor face up in the order they will be on the wall. Take a photo. Then move one part to the corresponding side. This simple technique reduces the risk of mixing up the direction during installation, especially if the elements are already painted in one color and the installer was not involved in the selection.
Pair installation: order matters more than speed
Symmetrical elements have one feature: an error in the first part automatically sets the error for the second. Therefore, the first overlay cannot be considered a "rough" one.
The practical order is as follows:
-
Prepare and clean both areas.
-
Check both parts simultaneously with a dry fit.
-
Make sure L and R are placed mirror-symmetrically.
-
Fix the common horizontal control line.
-
Mark the vertical axes.
-
Check the selected size again against the product labeling.
-
Apply compatible mounting adhesive according to the adhesive instructions.
-
Install the first panel exactly according to the markings.
-
Install the second one, checking not only its lines but also the already installed
In the color of the slat panels
This way, you can visually connect the side panels with the central field. If the slats are dark and the wall is light, two dark NPU-315 panels become graphic brackets around the center. The effect is strong, so it is especially important to check the size on a mockup: a large contrasting pair can make the wall visually heavier at the edges.
A separate accent shade
A metallic, deep color, or a shade that matches the lighting and furniture hardware turns the panels into standalone decor. This is no longer a neutral finish for a slat wall. Such a choice is justified if there are other elements of the same language in the interior. A lone "golden" pair on a minimalist wall without support can look random.
How lighting changes the choice between 12, 15, and 18 mm thickness
The difference in thickness seems small — only 3 mm between adjacent sizes. But light falls not on the number, but on the relief. With frontal soft lighting, the difference will be calmer. With side lighting, shadows become longer and more contrasting.
You need to look at the wall especially carefully in the evening if there are sconces, track lighting, or hidden backlighting of the slats nearby. During the day, a large pattern may seem moderate, but in the evening the relief will sharply appear.
Therefore, it is useful to conduct the final template test twice: in daylight and under the main artificial lighting. To assess depth, plain paper is limited, but it shows the scale. If the size raises doubts, a 3D model of the product and a real sample of an object of similar depth next to the template will help imagine the shadow more accurately.
When a mirror pair truly improves a slat wall
There are several signs that L + R solves a real compositional task, rather than being added "because there was space left."
First — the side strips are identical or close in scale and are clearly perceived as paired fields.
Second — the central slat zone has a pronounced axis: a TV, mirror, console, bed, or other furniture is centered.
Third — the interior already has plastic or classical details with which the floral ornament can connect.
Fourth — there is enough free space on the strips so that a calm background remains around the overlays.
Fifth — engineering points and furniture do not disrupt one of the sides.
If at least the basic geometric conditions match, a mirror pair becomes a logical way to complete the wall. But if each side lives by its own rules, forced symmetry can be worse than deliberate asymmetry.
When it's better not to buy either NPU-315L or NPU-315R
A commercially useful recommendation must also include advice against making a purchase.
Do not add overlays if the smooth strips are so narrow that even a 40-millimeter element looks visually squeezed between the slats and the edge of the wall.
Do not add them if there are already several competing accents in the central area: a TV, lighting, rich texture, shelves, paintings, large lamps. Another pair of ornaments may not complete the wall but overload it.
Do not buy a mirror pair if one side is almost completely covered by furniture or a door. Two pieces for the sake of formal symmetry are pointless if one of them is not perceived.
Do not choose a large size just because it is more expensive and looks more impressive in the product card. On a narrow wall, it may be worse than a small one.
Do not try to "fix" two architecturally different sides with mirror overlays. If there is a window on the left and a blank wall on the right, first solve the overall composition, and only then the specific SKU.
And finally, leave the strips empty if they already serve an important function as a pause between active slatted panels and neighboring elements. Empty space is also part of the design.
When you can buy only one NPU-315L or NPU-315R
A single overlay is appropriate if the task itself is asymmetrical. For example:
-
slat panels adjoin the corner, and a smooth vertical line exists only on one side;
-
the other side is occupied by a door portal;
-
the overlay is used on a separate furniture panel;
-
the decor is placed to the side of a mirror or niche;
-
the project is specifically built around a shifted accent.
In this case, choosing L or R should be based on the direction of the pattern in the specific location. You cannot claim that "L is always on the left" without the context of the entire composition. It is safer to open both cards, look at the images or 3D models, and choose the option that directs the ornament in the desired direction.
For our original wall with two identical fields, a single element is justified only if you consciously abandon symmetry.
What alternatives exist if NPU-315L/R are not suitable
Rejecting this pair does not mean that the side strips will remain unresolved.
The first alternative is to leave them smooth. This is the strongest option if the slat center is already saturated.
The second is to use thin moldings. They will create a graphic frame without a floral ornament. This solution fits more easily into a strict modern interior.
The third is to choose other vertical decorative polyurethane overlays. The catalog has products of different widths, heights, and pattern styles. This is useful if NPU-315 is too small, too large, or stylistically mismatched with the room.
The fourth is to make a color accent without relief. Smooth strips can be painted in the shade of the slats or adjacent furniture. Then the wall is connected by color, not by an additional object.
The fifth is to extend the slat material to the edges, if the structure and project allow it. But this already changes the original idea of "slat center + smooth fields" and requires a separate calculation of panels.
To compare other products, it is convenient to open the section polyurethane decorative overlays and select options by actual width, height, and shape, not just by picture.
What to check after receiving NPU-315L/R while the glue is still unopened
Even a properly completed cart does not cancel the inspection before installation. The pair will be glued to an already finished wall, so it is cheaper and easier to detect any mismatch on the table than after fixing the first piece.
First, lay out NPU-315L and NPU-315R face up next to each other. Check three things at once: the article numbers differ by L and R, the size of both pieces matches, and the pattern indeed forms the expected mirror direction. Do not rely only on the external dimension — all versions of one pair look similar, and the difference between adjacent sizes may not be obvious without a tape measure.
Then re-measure A, B, and C, or verify the markings against the order. For the selected pair, the values must be identical: 40 × 158 × 12, 50 × 197 × 15, or 60 × 237 × 18 mm. After that, apply both overlays to the wall without adhesive according to the finished markings. It is the actual dry fitting that should confirm the decision made based on the paper templates. The template shows the scale, but the real piece shows the relief, edges, shadow, and actual interaction with paint and lighting.
Check the wall not only up close. Step back to where the composition will usually be seen: the sofa, room entrance, dining table, or another main viewpoint. If one overlay visually appears higher, first re-check the markings rather than trying to compensate by rotating or shifting the second one.
Before gluing, it is also useful to decide how painting will be done. If the elements are planned to be painted separately, you need to ensure that the chosen coating is compatible with the material and further installation. If they will be painted together with the wall after installation, protect the slat panels and adjacent surfaces in advance.
Finally, do not throw away the packaging and do not mix the two pieces with other project elements until the check is complete. For a mirrored pair, it is important to maintain an unambiguous correspondence: "this piece is L, this one is R." After confirming the article number, size, direction, and position, you can proceed to the adhesive.
How to connect the overlays with slat panels rather than turning the wall into a set of separate pieces
The connection of elements is built not only through the same color. More importantly, the central field and side accents should have a clear hierarchy.
If the slats are the main elements, the overlays should complete the composition. Then a moderate size, painting in the wall color, and sufficient free space around help.
If the entire wall is conceived as a decorative panel, the NPU-315L/R can be more noticeable. Then a medium or large size, a more pronounced color, and symmetrical placement enhance the solemnity.
If the central field is narrow and the side strips are wide, the pair can become an equal participant in the composition. In this case, it is especially important not to place it too close to the slats: otherwise, the elements will visually "stick" to the central part and lose their own space.
A good check is to describe the wall in one sentence. If you get "a slat panel with two carved accents," and that is exactly how you want to see it, the hierarchy is clear. If the description turns into "slats, two overlays, sconces, molding, mirror, shelves, and also lighting," then there may already be too many additional accents.
Cross-linking by selection logic: where to go after measuring
Once dimensions are verified, the purchase path should be short.
If you need a mirror pair specifically, open two product cards:
If you first want to compare this ornament with other shapes, it makes sense to go to the section polyurethane decorative overlays.
If the task is broader and you are selecting all wall decor, the section is useful . Clear lines, created using modern technologies, emphasize the strict aesthetics of the room. Each decorative element harmoniously fits into the overall concept, creating a sense of order and thoughtfulness.. For the general material collection — Polyurethane moldings.
And if the central part of the wall is still being designed and you need to compare finishing options, you can look at slatted panels for walls.
For installation, the NPU-315L/R cards offer KUDO HIGH TACK adhesiveBefore application, you still need to check the glue instructions and the condition of the specific base.
Step-by-step route from a finished wall to the correct basket
If you reduce the entire choice to a practical algorithm, you get this order.
Step 1. Take a frontal photo of the wall
The photo helps to see the real symmetry and objects that the eye perceives as familiar in the room and stops noticing. The frame should show the edges of the slat zone, both smooth strips, furniture, and nearby openings.
Step 2. Measure the left and right fields separately
Write down the width of each strip. Do not transfer the measurement from one side to the other "because they were designed the same."
Step 3. Mark prohibited zones
Sockets, switches, wall lamps, trims, furniture, door leaves, ventilation grilles, and other elements must be marked on the diagram before choosing the size.
Step 4. Check the three dimensions of NPU-315
Compare 40 × 158 × 12, 50 × 197 × 15, and 60 × 237 × 18 mm with both strips. For physical fit, width A and height B are crucial; thickness C affects relief and shadow.
Step 5. Make three pairs of templates
Do not choose based on the product photo. Try on each size simultaneously on the left and right.
Step 6. Determine the marking principle
Decide what matters more: equal distance from the rails, the center of each strip, or the overall axis of the wall.
Step 7. Choose the height of the pair
Check it against furniture, lighting, and your usual viewpoint.
Step 8. Confirm the L/R direction
On the template and then on the actual parts, the patterns should be mirrored in your composition.
Step 9. Check the cart
For a symmetrical pair: NPU-315L — 1 pc., NPU-315R — 1 pc., same size.
Step 10. Prepare the base and mounting materials
Check the strength of the finish, adhesive compatibility, and the order of final painting.
Such a route takes less time than fixing a mistake after purchase or installation.
Selection table: which option to check first
Situation on the wall What to try first What to check especially carefully Narrow smooth strips next to active slats 40 × 158 × 12 mm Free space on the sides and visual lightness Medium-width strips, moderately decorative interior 50 × 197 × 15 mm Scale relative to furniture and wall height Wide empty side margins 60 × 237 × 18 mm Does the pair become a standalone dominant accent One stripe is narrower than the other Size that fits on the narrower side Same scale for L and R Switch on one side Largest size that doesn't conflict after overall height adjustment Can the pair's level be kept the same Side lighting nearby All three on the template, taking into account the thickness of 12/15/18 mm Light and shadow in the evening The slats are very contrasting First the small pair Does the large ornament overload the edges The slat insert is small, and the smooth fields are wide Medium and large Is the small version not lost The table does not replace fitting. It only reduces the number of meaningless options and helps to start with the most likely scale.
Common mistakes and how to detect them before installation
Ordered two identical L or two identical R
Why it happens: the article numbers are almost the same, prices and sizes match.
What will happen: on a symmetrical wall, the patterns will repeat in one direction instead of mirroring each other.
How to check: the cart should have two different lines — NPU-315L and NPU-315R — one of each.
Chose the size by price, not by the wall
Why it happens: the price "from 990 ₽" attracts attention to the minimum version.
What will happen: on wide fields, a small pair may get lost; the opposite situation is possible with a large model on narrow strips.
How to check: three pairs of paper templates.
Measured only one side
Why it happens: the strips visually seem identical.
What will happen: the selected width may be too large for the second side or result in uneven margins.
How to check: individual values
W_leftиW_right.Attached the left and right overlay to different reference points
Why it occurs: on one side it's more convenient to measure from the corner, on the other — from the rail.
What will happen: the pair will be at different distances from the central field.
How to check: choose one layout principle in advance.
Rotated an identical overlay by 180° instead of buying a mirrored one
Why it occurs: it seems that rotation will replace reflection.
What will happen: the top and bottom will swap, not just the direction of the ornament.
How to check: compare L and R side by side in the same vertical orientation.
Thickness was not taken into account
Why it occurs: the plan shows only width and height.
What will happen: the large 18-millimeter version will be visually more noticeable than expected under side lighting.
How to check: take C into account and evaluate the wall under evening lighting.
Glued to a weak finishing layer
Why it occurs: the surface looks smooth and clean, so its strength is not checked.
What will happen: it may not be the adhesive that peels off from the polyurethane, but the paint or putty from the wall.
How to check: ensure the stability of the base and follow the installation system instructions.
Furniture was noticed too late
Why it occurs: the fitting was done on an empty wall before installing the cabinet or wardrobe.
What will happen: one overlay will be partially covered or visually squeezed.
How to check: apply the outline of future furniture to the wall before ordering decor.
How to place an order to avoid confusing the size and direction
For a small pair, the specification should look like this:
NPU-315L, 40 × 158 × 12 mm — 1 pc.
NPU-315R, 40 × 158 × 12 mm — 1 pc.
Total for the pair — 1,980 RUB.For the medium one:
NPU-315L, 50 × 197 × 15 mm — 1 pc.
NPU-315R, 50 × 197 × 15 mm — 1 pc.
Total for the pair — 2,580 ₽.For the large one:
NPU-315L, 60 × 237 × 18 mm — 1 pc.
NPU-315R, 60 × 237 × 18 mm — 1 pc.
Total for the pair — 3,380 ₽.If the order is passed to the manager as text, this form is better than a message like “need two NPU-315” because it immediately records the mirroring, quantity, and size.
Control checklist before payment
-
The left smooth strip was measured.
-
The right smooth strip was measured.
-
The free height in the mounting area was checked.
-
Switches, sockets, sconces, furniture, and trim were marked.
-
One pair positioning principle has been selected.
-
Two mirror templates have been tried on the wall simultaneously.
-
Compared 40 × 158 × 12, 50 × 197 × 15, and 60 × 237 × 18 mm.
-
The wall appearance under main artificial lighting has been checked.
-
It has been decided whether the overlays should match the wall color, the slats, or be a separate accent.
-
In cart: NPU-315L — 1 pc.
-
In cart: NPU-315R — 1 pc.
-
Sizes L and R are the same.
-
The condition of the base has been checked.
-
A compatible mounting adhesive has been selected.
-
The painting and finishing process is clear.
If all points are covered, the purchase stops being a choice of "which picture is prettier" and becomes a specification for a specific wall.
FAQ: additional questions about NPU-315L and NPU-315R
Can I take an NPU-315L of one size and an NPU-315R of another if the strips are different?
Physically, two parts of different sizes can be installed, but for a mirror composition this is a weak solution. L and R will reflect the same motif, but different scales will disrupt the sense of a pair. If one strip does not accommodate the chosen size, first check a smaller identical size for both sides. If that does not work either, it is better to reconsider the symmetry principle itself.
If one trim piece is damaged, do I have to replace both?
No, if the second one is intact and the same model in the required size is available. The point of separate L and R SKUs is precisely to allow replacing a specific side. Before ordering, you need to check which specific piece is damaged and not mix up the direction. If the pair was painted after installation, the new piece may require color adjustment to match the existing finish.
Can I first buy one trim piece for a trial fit and then the second one?
You can, but for choosing the size this is less reliable than two mirror templates. One real piece will show the relief and scale, but will not give the full sense of the pair. If you do buy one element first, keep the exact SKU and size before ordering the second.
Do I need to place L strictly on the left and R strictly on the right?
In a typical mirror layout, this is natural logic, but the direction of the ornament relative to the center remains decisive. Before applying glue, place both pieces on the wall without fixing them and look at the pattern. Do not rely only on the article letter without visually checking the specific composition.
Will NPU-315L/R work if the slat panels do not reach the ceiling?
Yes, the height of the slat zone itself does not prohibit using the pair. But the vertical composition changes. If the slats end, for example, at the level of the top line of the furniture, the overlays need to be tied to that zone, not automatically centered on the full wall height. The template should show the actual geometry of the slats, not just the side strips.
Can the overlays be placed above the slat insert rather than on its sides?
It is possible as a separate design solution, but that is a different composition. L/R stop framing the two side verticals and start working in the upper zone of the wall. In that case, the axis, the distance between elements, and the connection to the central field need to be redefined.
What is more important when choosing the size: the width of the strip or the height of the overlay?
For physical fitting, both dimensions matter. Width A determines whether the element fits on the side field, height B determines whether it crosses neighboring objects and how noticeable it is vertically. Thickness C affects volume and shadow. Therefore, choosing based on only one number is insufficient.
Do I need to buy special glue specifically with the overlays?
You need an adhesive compatible with polyurethane and the specific substrate. In the NPU-315L/R cards, KUDO HIGH TACK is listed among related products. But the wall condition and installation conditions still need to be considered. If the surface is non-standard, it is better to check the glue instructions and the substrate manufacturer's recommendations.
Can one overlay be made contrasting and the other in the wall color?
Technically yes, but it will break the mirror logic of the pair more than a slight difference in indentation. Such a technique only makes sense in a deliberately asymmetric interior. For a central slat wall, identical finishing of both pieces is usually more convincing.
What to do if after trying on, none of the three sizes looks good?
Don't buy NPU-315L/R just because a wall theme has already been designed for them. This is a normal result of trying on. You can leave the strips empty, switch to a thinner molding, choose a different vertical trim, or finish the edges with color. The goal is a finished wall, not the mandatory use of a specific item.
Can NPU-315L/R be installed after the slat panels are already fully mounted?
Yes, if the smooth side fields are ready for installation and access to them is not blocked. This is the advantage of the original scenario: the slat part does not need to be disassembled. But the surface of the strips should be checked, and the layout should be done relative to the actually installed slat field, not the old project.
How to understand if the trims are too far from the slats?
There is no universal standard distance for this composition. Compare two factors: the connection with the central zone and a sufficiently calm field around the ornament itself. Make several positions of one template, photograph it frontally, and choose the one where the pair reads as part of the wall, not as two random objects.
Summary: for two symmetrical strips, first choose not the size, but the logic of the pair
In the original situation, the main answer is clear: if there are two paired smooth verticals on the edges of the central slat wall and you want mirror design, you should order one left NPU-315L and one right NPU-315R of the same size. The manufacturer directly defines NPU-315L as a mirror reflection of NPU-315R, so two different letters in the article number make practical sense here.
Then the choice becomes about size.
40 × 158 × 12 mm — a compact pair for 1,980 ₽. It leaves more calm background and suits a more delicate accent.
50 × 197 × 15 mm — a medium pair for 2,580 ₽. It is more noticeable and often convenient as an intermediate scale.
60 × 237 × 18 mm — a large pair for 3,380 ₽. It requires more free space and gives the most pronounced relief.
But choosing based on these descriptions without a wall is still not worth it. The correct order is different: measure both strips, mark obstacles, make three pairs of mirrored templates, determine the marking axis, check height and lighting, and then place an order as NPU-315L 1 pc. + NPU-315R 1 pc. in one size.
If after such a fitting it turns out that the smooth strips are better left empty, that is also the right decision. A good decorative scheme does not have to use the maximum number of elements. And if the pair really brings the wall together and supports the central rhythm of the slats, you can order it in the product cards NPU-315L и NPU-315R, after double-checking the selected size and quantity.
-