Article Contents:
- What is a DWG skirting board and why does a designer need it
- Height
- Thickness
- Why photos and a “100 mm” dimension are not enough
- Height
- Thickness
- Maximum projection
- Cross-section
- Product length
- First a specific SKU — then the DWG
- Skirting board and casing in the same plane
- Skirting board projects
- The casing protrudes
- The profiles have different geometry
- How to show the joint between the skirting board and the casing in DWG
- The skirting board runs behind the cabinet
- The skirting board ends at the cabinet
- Furniture cutout
- The panel protrudes more than the skirting board
- The skirting board protrudes more than the panel
- One plane
- Skirting board and molding on the wall
- Small room
- Spacious living room
- Hallway
- Oak
- Oak
- Finish
- Repeat order
- Oak or beech in the skirting board project
- Finish
- How to show an internal corner
- What to do with a curved wall
- Why you shouldn't scale a profile in AutoCAD
- Which layers to use
- Skirting board on the floor plan
- Skirting board cutting map
- Finish
- What to check before handing over to the assembler
- Thickness
- Height
- When a detailed skirting board DWG is not needed
- Hidden door without a standard casing
- Tall baseboard next to low furniture
- Kitchen unit with a furniture plinth
- Wall with a thick decorative panel
- Radius with a very large curvature radius
- One profile in several materials
- How to link DWG, 3D, and professional specification
- How to use the general catalog before choosing a SKU
- What is a DWG baseboard?
- Where to use a DWG baseboard?
- Do I need to insert the full profile on each wall?
- How to check the file scale?
- Can I enlarge the baseboard in AutoCAD?
- Which is more important: height or thickness?
- How to match the baseboard with the trim?
- What to do if the baseboard is thicker than the door casing?
- How do I coordinate the baseboard with the cabinet?
- How do I calculate skirting?
- Do I need to subtract doors?
- How to calculate the allowance?
- Oak or beech — which to choose?
- Can one profile be used as both a skirting board and a door casing?
- When is DWG especially needed?
- What should I hand over to the procurement specialist?
- What should be stored after the project is completed?

In a working project, a skirting board cannot be reduced to a single line along the floor and a “100 mm” label. Two profiles of the same height can differ in thickness, top geometry, relief, maximum projection, and the way they join to the door casing. These differences become critical where the skirting board meets a door, a built-in wardrobe, a wall panel, or a vertical moulding.
Therefore DWG skirting boards are useful not as a standalone CAD library, but as part of a professional workflow:
choose a profile → determine the SKU → get the DWG → check the section and units → resolve the joints → place the profile on the elevation and plan → calculate the linear meterage and cutting → add to the specification → order.
The main principle of the article:
a skirting board in a working project is a real profile of a specific SKU, not a conventional line at the floor.
It is especially useful to design the lower junction as a single system:
floor → skirting board → wall → door casing → door → wall panel → built-in furniture.
If one of these elements is designed separately, the conflict is usually discovered only after purchase or during installation.
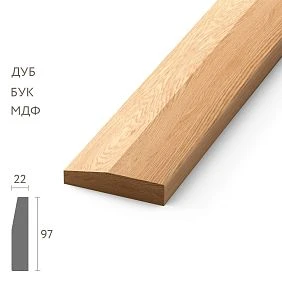
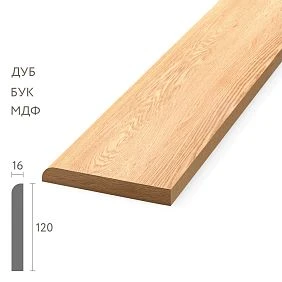
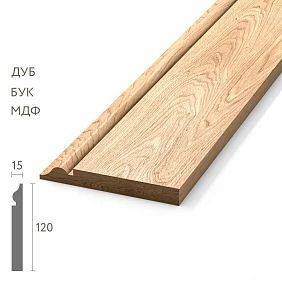
What is a DWG skirting board and why does a designer need it
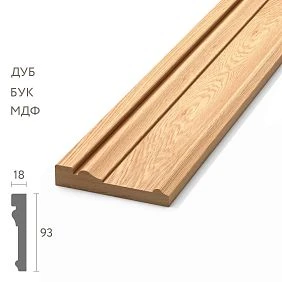
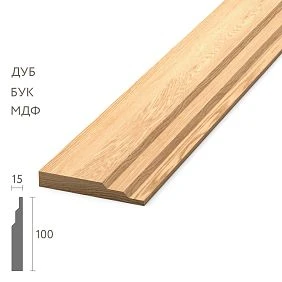
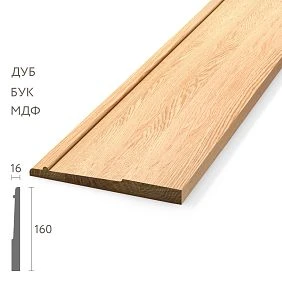
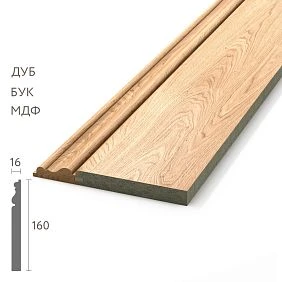
DWG is needed to transfer the actual geometry of the product into the project. It shows what cannot be seen from a single photograph:
- cross-section;
- height;
- thickness;
- the shape of the upper part;
- maximum projection;
- the mounting plane;
- the position of the profile relative to the wall and floor.
DWG drawings of skirting boards are especially useful for junctions where several finishing elements must meet at a single point.
Section instead of a conventional line
If only a horizontal line is shown on the drawing, the contractor cannot see the profile thickness. But it is the thickness that determines whether the skirting board will protrude beyond the door casing or, conversely, recede deeper than it.




Height
Height affects the visual scale of the lower part of the wall.
It should be connected to:
- room height;
- doors;
- wall panels;
- furniture;
- the character of the interior.
Our factory also produces:


Thickness
Thickness is especially important at doors and furniture. If the skirting board is thicker than the door casing, a step appears. If it is thinner, the door casing protrudes forward.
Both options can be intentional, but they must not be left to chance.
Profile shape
A profiled skirting board creates light and shadow and visually interacts with the door casing, moulding and cornice.
This is not visible on a flat drawing.
Get Consultation
Why photographs and a size of “100 mm” are not enough
Height is only one parameter.
Two skirting boards 100 mm high can have completely different cross-sections.
For example, one profile can be almost flat, while another has a pronounced upper section and a noticeable overhang. In a frontal photo, both look like a "100 mm skirting board," but in cross-section they occupy different amounts of space.
Need to check:
- height;
- thickness;
- maximum projection;
- relief;
- upper bevel;
- an installation surface;
- commercial length.
Why this matters near a door
The door casing also has thickness and a profile.
If the skirting board and door casing meet at the floor, even a difference of a few millimeters is clearly visible in side lighting.
Why this matters near a wardrobe
Built-in furniture is often designed flush against the wall.
A thick skirting board can push the cabinet body away and create a gap if the furniture plinth is not designed for the profile.
Why this matters next to a wall panel
The panel has its own thickness.
You need to decide in advance what is in front:
- panel;
- plinth;
- a single plane.
Which dimensions to check against the DWG
A professional check is not built around a single number.
Height
Determines the visual scale.
A tall skirting board shapes the lower line of the wall more strongly and works better next to large architraves and tall furniture.
A low profile looks lighter and fits more easily into small rooms.
Our factory also produces:
Thickness
Critical for joints.
It must be compared with at least:
- with the casing;
- furniture plinth;
- a wall panel;
- adjacent profile.
Maximum protrusion
Sometimes the profile has a complex shape, and the maximum protrusion exceeds the thickness of the lower part.
It is this dimension that affects furniture and narrow passages.
Section
Shows the character of the profile.
This is the main working parameter for the architect and designer.
Product length
It is needed not for visualization, but for actual purchasing and cutting.
A project may require 18 m of skirting, but this does not mean that you can order exactly 18 linear meters without checking the length of individual planks.
First the specific SKU — then the DWG
You cannot take an arbitrary attractive profile from a CAD library, build the entire project on it, and then look for "something similar."
Correct sequence:
catalog → SKU → dimensions → DWG → working documentation.
Why a random DWG is dangerous
A conventional profile may have:
- a different thickness;
- a different height;
- a different projection;
- a different commercial length;
- a different material.
After the interior is approved, you either have to change the drawings or look for a nonexistent equivalent.
Project identity
The same SKU must be retained:
- in DWG;
- in 3D;
- on the drawing;
- in the specification;
- in the order.
Baseboard and door casing: the main working junction
The most important lower junction:
floor → baseboard → casing → door.
On the section, compare:
baseboard thickness vs casing thickness.
Four main scenarios are possible.
Baseboard and casing in the same plane
The calmest transition.
If the profiles match in thickness and character, the joint can look almost continuous.
The skirting board protrudes
This option can be intentional, but the end and the transition need to be resolved.
A random protrusion of a few millimeters usually looks like a mistake.
The door casing protrudes
This is also acceptable if the transition reads as part of the door system.
Profiles have different geometries
Even with the same thickness, the top bevels or relief may not match.
Therefore, not only the numerical dimension is needed, but also the actual cross-section.
Current STAVROS materials separately show that for specific wooden profiles, the thickness may depend on the material of execution. This is another reason to check the specific selected SKU, and not an abstract "100 mm skirting board".
How to show the joint between the skirting board and the door casing in DWG
For a simple detail, an enlarged fragment of the section or elevation is sufficient.
Need to show:
- wall;
- finish trim;
- platband;
- plinth;
- thicknesses;
- finished floor line;
- end face;
- profile direction.
Detail size
If the section is complex, it is better to provide an enlarged scale.
For example, the general sheet may be 1:50, and the detail — 1:5 or 1:2.
What the contractor should understand
The drawing should make it obvious:
- where the baseboard ends;
- where the casing begins;
- is there a step;
- is trimming needed;
- which end remains visible.
Baseboard and built-in wardrobe
This is one of the most common design conflicts, because the furniture maker and the designer may be working from different initial data.
Before releasing the furniture, you need to decide:
- whether the baseboard runs behind the wardrobe or not;
- butts against the side panel;
- the side panel is trimmed;
- a decorative furniture plinth is used;
- how the end face is finished;
- is the shadow gap preserved;
- does the cabinet body need to be moved away from the wall.
The baseboard runs behind the wardrobe
This scenario is acceptable if the wardrobe depth and installation allow the profile to remain continuous.
But the cabinet body will be moved away from the wall by at least the protrusion of the baseboard.
The baseboard ends at the wardrobe
The end face needs to be resolved.
If the end remains visible, it cannot be left as a random straight cut.
Possible options:
- profile return;
- decorative end cap;
- adjacency to the furniture plinth;
- hidden end face inside the side panel.
Furniture trimming
If the furniture is designed specifically, the side panel or plinth can be adapted to the profile.
But the furniture maker must receive an exact DWG section and dimension.
Why the wording "resolve on site" is bad
On site, such an issue is almost always resolved by compromise, because both the skirting board and the furniture have already been manufactured.
It is better to resolve the joint before the furniture goes into production.
Skirting board and wall panel
The wall panel adds another thickness.
Working node:
wall → panel → skirting board → floor.
You need to determine:
- panel thickness;
- skirting board thickness;
- which one protrudes forward;
- panel termination line;
- mounting substrate;
- end face finish.
The panel protrudes more than the skirting board
Then the skirting board may appear visually recessed.
This is not necessarily bad, but it should be planned.
The skirting board protrudes more than the panel
The bottom line becomes more noticeable.
For a classic interior, this may be appropriate.
One plane
The cleanest option requires precise calculation of thicknesses.
If the panel is mounted on a substrate, you need to account not only for the face material but for the entire system.
The panel ends above the baseboard
Then you need to show the vertical gap and understand how the bottom edge of the panel is finished.
Baseboard and molding on the wall
If the vertical molding descends to the floor, it cannot simply be brought down to the baseboard without checking.
You need to determine:
- where the vertical profile ends;
- whether its width matches the geometry of the baseboard;
- whether there is a joint;
- which one comes forward;
- whether a decorative transition is needed.
The vertical ends above the baseboard
A gap remains between the profiles.
It must be intentional and consistent throughout the room.
The molding meets the baseboard
Requires a precise junction.
If the sections differ, a random intersection looks sloppy.
The molding and baseboard form a single frame
In a classic wall system this is possible, but the profiles must be selected as a set.
Skirting board height in the design project
There is no universal “correct” size.
The height should be assessed relative to:
- ceiling height;
- door heights;
- width of architraves;
- wall panels;
- furniture;
- the scale of the room;
- style.
Small room
A very tall profile can visually “raised” the lower boundary of the wall and reduce the free surface.
Spacious living room
A taller skirting board better supports:
- tall doors;
- large furniture;
- classic panels;
- a well-developed woodworking shop.
Corridor
In a narrow space, not only height matters, but also thickness. A profile that protrudes too much interacts more with doors and built-in furniture.
It is better to compare at full scale
A 100 mm and 120 mm strip looks only slightly different on screen. On a real wall, the difference is clearly visible.
Solid wood skirting: what needs to be reflected in the project
solid wood skirting boards require fixing not only the geometry, but also the material.
In the specification, it is advisable to indicate:
- breed;
- SKU;
- profile;
- size;
- length;
- finish;
- room;
- quantity.
Oak
If a clear finish is used, the oak grain becomes part of the project.
Beech
It is perceived as calmer in pattern, but also requires a real test stain when tinting.
Finish
Options:
- oil;
- varnish;
- stain;
- enamel;
- patina.
The finish affects the final color and must be agreed upon before a large order.
Repeat order
For solid wood, it is especially useful to preserve:
- article number;
- breed;
- finish;
- sample;
- date of approval.
Oak or beech in the skirting board project
The section should remain project-specific rather than turning into a general article about wood.
Adjacent flooring
If the floor is oak, an oak skirting board is easier to match in texture.
But the match is not automatic: the shade and grain direction may differ.
Doors
Skirting board and door casing are often perceived as one system.
If the door and its frame are already made from a specific species, the new profile is best checked next to them.
Furniture
A built-in wardrobe with natural veneer may clash in tone with another wooden profile.
Finish
Under enamel, the grain becomes less noticeable.
Under clear oil, on the contrary, it is essential.
Design takeaway
The species is chosen not for abstract "premium" status, but for how the specific material works with the floor, doors, and trim.
Corners and non-standard skirting geometry
The outer corner is where the profile reads especially well.
In the DWG, it is useful to show:
- two wall lines;
- actual cross-section;
- the miter cut location;
- the direction of the parts;
- external corner.
Why directions matter
A profiled skirting board has different geometry at the top and bottom.
If one piece is rotated incorrectly, the pattern does not align.
Miter cut
A miter cut of about 45° is often used for a right angle, but the actual wall geometry may differ from a perfect 90°.
The contractor must fit the joint on site, while the design should show the principle.
External corner protection
If the corner is in a passage area, it receives more mechanical impact.
This must be taken into account in the material and finish.
How to handle an inside corner
An inside corner also requires checking the profile direction.
Need to show:
- the actual geometry;
- crosscut;
- joint;
- the direction of the pattern;
- the continuation of the skirting board along the second wall.
Why DWG is useful
For a complex profile, it is difficult to explain the joint with a single text note.
The cross-section shows how the two strips meet.
Uneven corner
If the walls do not form a 90° angle, the installation cut is adjusted on site.
But the profile direction and the joining method must be clear in advance.
What to do with a curved wall
A rigid straight skirting board cannot be "bent" in AutoCAD and then treated as if such a product exists.
If the surface is curved, a realistic technical solution must be chosen.
Options:
- another flexible profile;
- segmentation;
- custom fabrication;
- a break in the skirting board;
- a change in the wall geometry.
Segmentation
Short straight segments can approximately follow a curve.
But on a small radius, the joints will be clearly visible.
Custom element
It makes sense if the radius is important to the architecture and the budget allows it.
Main rule
The DWG must not create a nonexistent product modification.
Why you shouldn't scale a profile in AutoCAD
If a real skirting board has a specific cross-section, the SCALE command does not turn it into another real size.
After non-uniform scaling, geometry appears that is not in the catalog.
What can be scaled
The entire imported file as a whole — only for correcting incorrect units.
What you shouldn't do
- increase the height separately;
- change the thickness separately;
- stretch X;
- stretch Y;
- "fit" the profile to the door casing.
Correct response
If the profile doesn't fit:
- choose another SKU;
- change the node;
- adjust the furniture;
- choose a different casing.
How to organize baseboards in AutoCAD
The block name should make it clear what exactly is in the project.
A good format:
STAVROS_SKU_SECTION
Or:
STAVROS_SKU_SIZE
Why SKU is needed in the name
A few months later, the name "baseboard_final" no longer explains anything.
Project code
A short code can be used on the sheets:
PL-01
and in the legend:
PL-01 — STAVROS / SKU / size / material.
Source file and working copy
It is better to store the manufacturer's original DWG separately.
The working copy may contain:
- corporate layers;
- its own insertion point;
- project code;
- additional text information.
Which layers to use
Example:
A-FIN-BASEBOARD
A-FIN-BASEBOARD-DIMS
A-FIN-BASEBOARD-TEXT
The point is not the specific name, but separating geometry, dimensions, and text.
Why
This simplifies:
- turning on/off;
- printing;
- verification;
- handover to the contractor;
- SKU replacement.
Baseboard in the working documentation
On the elevation drawing, the baseboard must not be an unnamed horizontal line.
It is necessary to specify:
- code;
- SKU;
- height;
- start;
- end;
- doorway gaps;
- Furniture;
- material transitions;
- special end caps.
Code
For example:
PL-01
It is used on all walls with the same profile.
Start and end
If the skirting board is interrupted:
- a door;
- cabinet;
- fireplace;
- with a panel,
this should be visible on the elevation drawing.
Material transition
If a wooden profile changes to a painted or MDF one within the same room, the transition point is marked.
Doorway breaks
The door casing should not be perceived as a random “hole” in the skirting board.
The detail is shown separately.
Skirting board on the floor plan
The plan is especially useful for checking the skirting board route.
It shows:
- Doors;
- cabinets;
- columns;
- niches;
- kitchens;
- complex angles;
- areas without profile.
Why a plan is needed even with good elevations
A single elevation does not show how the profile turns a corner and what happens on the adjacent wall.
The plan allows you to check continuity.
Built-in kitchen
You need to decide in advance whether the skirting board runs:
- behind the lower cabinets;
- only along visible areas;
- up to the furniture plinth.
Column
If a column stands against the wall, you need to decide whether to run the skirting board around it or end the profile before it.
Niche
A niche increases the square footage and the number of corners. The simple length of the room's walls is no longer sufficient.
How to create a project skirting board map
If a project has more than one profile type, it is useful to create a map.
For example:
PL-01 — main wooden
PL-02 — painted
PL-03 — special profile
PL-04 — moisture-resistant
A code is indicated on each wall.
Why a map is needed
It helps:
- do not mix SKUs;
- count by zones;
- distribute material;
- supervise installation;
- place reorders.
Map table
| Code | SKU | Material | Size | Rooms | Status |
|---|---|---|---|---|---|
| PL-01 | ___ | Oak | ___ | living room, hallway | APPROVED |
| PL-02 | ___ | MDF | ___ | Bedroom | APPROVED |
| PL-03 | ___ | Beech | ___ | Office | SAMPLE |
Status
Until approved, the profile must not be included in the final purchase.
How to calculate skirting from DWG
Basic formula:
sum of the lengths of all sections − excluded openings.
But this is only the geometric length.
The following are then taken into account:
- product length;
- Cutting;
- external and internal corners;
- short offcuts;
- areas with a special end;
- reserve.
Example
The room has visible areas:
- 3150 mm;
- 2780 mm;
- 2780 mm;
- 1250 mm;
- 1250 mm;
- 1250 mm;
- 1250 mm.
Net total:
3150 + 2780 × 2 + 1250 × 4 = 13,710 mm
Or:
13.71 m.
But you cannot buy "13.71 m" directly if the product is supplied in whole planks.
Why the practical calculation differs from arithmetic
If the product length is 2400 mm, a 3150 mm section will require at least two planks and will have a joint.
If another section is 2780 mm, a combination of several segments is again needed.
Short offcuts can only be used where the length and position of the joint allow it.
Skirting board cutting map
For long walls and expensive solid wood, a cutting map is especially useful.
Example:
| Section | Length | Quantity |
|---|---|---|
| PL-01-A | 3150 мм | 1 |
| PL-01-B | 2780 мм | 2 |
| PL-01-C | 1250 мм | 4 |
Next, each required length is matched with the product planks.
What the cutting map takes into account
- length;
- possible offcuts;
- joint location;
- profile direction;
- quality of the visible part;
- corners.
Where is the best place to place the joint
If a long section cannot be covered with a single plank, it is better to place the joint:
- off the central axis;
- not in an area of bright side light;
- not right next to the door casing;
- not in the most visible area.
When the leftover piece cannot be used
A short piece may be sufficient in length but unsuitable:
- in direction;
- in wood grain pattern;
- in quality;
- at the future joint location.
For natural wood, this is especially important.
Skirting board and specification
A specification line must describe an actual product, not a general category.
| Field | What to specify |
|---|---|
| Manufacturer | STAVROS |
| SKU | specific |
| Material | oak / beech / MDF |
| Size | actual |
| Length | product |
| Footage | estimated |
| Quantity | Planks |
| Room | Zone |
| URL | Product |
| Finish | specific |
| Status | APPROVED |
Calculated linear meters and purchase quantity are not the same thing
For example:
CALCULATED: 13,71 m
PURCHASE: 7 pcs × 2,4 m
These are different fields and both are useful.
Material
If a single item is available in several materials, the specification cannot contain only the SKU without the specific finish.
Finish
For solid wood, specify:
- oil;
- stain;
- varnish;
- enamel;
- another agreed finish.
URL
The link helps you quickly open the current product page or category.
What to check before handing off to the kit assembler
Final check:
SKU = DWG = size = material = specification.
Check:
- profile;
- thickness;
- height;
- commercial length;
- platband;
- Panels;
- Furniture;
- linear footage;
- Cutting;
- finish;
- the status.
Profile
Is the correct drawing in the blueprint?
Our factory also produces:
Thickness
Does it match the door and furniture joints?
Height
Does it match the approved visualization?
Material
Are oak, beech, or MDF mixed up?
Quantity
Has it been calculated based on the latest revision?
Cutting list
Are long sections verified?
Status
Candidates and old variants must not be included in the procurement.
Professional STAVROS files and catalogs
For the project library, it is convenient to use STAVROS catalogs and drawings.
Several levels are useful in this system at once:
drawings of wooden moulding — for working geometry;
3D models of moulding — for visual verification;
catalogs — for quick SKU selection.
Why the local archive needs to be rechecked
The studio may store DWG and PDF files for years.
Before a new project, key items are best verified against the current catalog.
LAST VERIFIED
The internal table may contain a field:
LAST VERIFIED: 2026-09-26
This makes it clear when the SKU was last checked.
How to buy a skirting board after preparing a working project
The commercial stage begins only after the technical selection.
The correct sequence is:
SKU → DWG → assemblies → cutting → specification → order.
Buy a wooden skirting board
Request Buying a wooden baseboard makes practical sense when the following are already known:
- SKU;
- height;
- thickness;
- the material;
- product length;
- quantity.
Wooden skirting board
Wooden baseboard should be chosen as part of the lower assembly, not separately from the casing and furniture.
Solid wood skirting boards
For natural material wooden moulding made of oak and beech requires additionally specifying the species and finish.
Wooden mouldings and skirting boards
Wooden moldings and baseboards it is useful to consider them together if the wall composition uses a single material in the lower and framing system.
Commercial wording
After the design review, requests naturally arise:
- buy wooden floor skirting board;
- buy wooden floor skirting board;
- buy wooden skirting board;
- buy solid wood skirting board;
- buy tall wooden skirting board;
- buy oak skirting board;
- buy beech skirting board;
- wooden skirting board price;
- buy wooden skirting board price;
- order wooden skirting board for a project.
But none of them replaces a technical inspection of the assembly.
When a detailed DWG of the skirting board is not needed
A professional workflow should match the complexity of the task.
Simple well-known profile
If the SKU has already been used, the junctions have been verified, and the project is fully repeated, ready-made documentation can be used.
One short section without joints
For a small simple room with a known casing, a separate enlarged DWG junction may be excessive.
Concept stage
At an early concept stage, a schematic line is acceptable if it is clearly not considered a final product.
When DWG is almost mandatory
- complex casings;
- built-in furniture;
- Panels;
- several types of skirting board;
- solid wood;
- complex angles;
- a large number of repetitive rooms.
Edge cases: where the standard rule is not enough
A technical article is useful precisely where the standard "wall + skirting board" junction stops working.
A hidden door without a conventional casing
If the door leaf and frame form almost a single plane with the wall, the traditional junction with a casing is absent. Then you need to decide in advance where the skirting board ends:
- before the doorway;
- along the line of the hidden frame;
- through a special end element;
- through a profile return.
The usual advice to “check the thickness against the door casing” does not apply here. The main parameter is the geometry of the concealed frame and the finished wall plane.
Tall skirting next to low furniture
A tall profile can visually support a classic interior, but next to a low console or cabinet it sometimes takes up almost the entire free area under the carcass.
It is necessary to check not only the height of the skirting, but also:
- the gap from the floor to the furniture;
- the depth of the carcass;
- leg position;
- the rear setback.
If the furniture must stand flush against the wall, the profile may require a cutout in the plinth or a different installation scenario.
Kitchen unit with a furniture plinth
The room skirting and the kitchen plinth are different elements.
The working drawing must show where the wall profile ends and where the kitchen begins. If the skirting runs behind the cabinets, it may prevent the carcasses from sitting flush against the wall. If it ends at the side panel, the end face needs to be finished.
For an island or peninsula, the wall skirting is not involved in the junction at all.
Wall with a thick decorative panel
If the panel protrudes by 20–30 mm or more, a standard skirting may end up almost completely recessed. In that case, there are three options:
- choose a more protruding profile;
- bring the skirting flush with the panel plane using a backing;
- deliberately leave the lower band recessed.
All three solutions are acceptable, but they look different and must be verified in section.
Radius with a very large curvature radius
Even a visually gentle radius does not mean that a straight wooden profile can be safely bent. CAD easily draws a smooth arc, but the physical product remains rigid.
The designer must separately obtain confirmation of the actual manufacturing method or proceed to segmentation.
One profile in multiple materials
If a single SKU is available, for example, in MDF and solid wood, the geometry may differ in thickness or length. One cannot automatically assume that the DWG of one version accurately describes another.
Before issuing the specification, it is necessary to verify the specific selected material.
Typical mistakes when working with skirting in DWG
Mistake 1. Selecting only by height
Why it occurs: in the catalog, height is perceived as the main parameter.
Consequence: the profile does not match the architrave or panel in thickness.
How to prevent it: check the full cross-section.
Mistake 2. Using a conditional rectangle
Why it happens: on the plan, the skirting board appears to be a simple strip.
Consequence: the actual protrusion is lost, and conflicts with furniture arise.
How to prevent: for critical junctions, use the actual profile.
Mistake 3. Not coordinating the skirting board with the furniture maker
Why it happens: the furniture is designed by a separate contractor.
Consequence: the wardrobe does not sit flush against the wall or requires on-site trimming.
How to prevent: provide the furniture maker with the height and maximum profile thickness before production.
Mistake 4. Not resolving the end of the wardrobe
Why it happens: on the elevation drawing, the profile simply breaks off.
Consequence: after installation, a visible unfinished end remains.
How to prevent: show the end face as a separate detail.
Mistake 5. Scaling the profile
Why it happens: the selected SKU almost fits.
Consequence: the project specifies a product that does not exist.
How to prevent: choose a different article or rework the detail.
Mistake 6. Counting only the total linear footage
Why it happens: an arithmetic calculation seems sufficient.
Consequence: there are not enough whole planks for long sections.
How to prevent: cutting map.
Mistake 7. Forgetting door gaps
Why it happens: the linear footage is measured along the room's total perimeter.
Consequence: extra material is purchased or the joints are calculated incorrectly.
How to prevent: count by actual sections on the plan.
Error 8. Not accounting for the thickness of the wall panel
Why it occurs: the panel appears in a different part of the project.
Consequence: the baseboard ends up recessed or protrudes excessively.
How to prevent: a general section "wall — panel — skirting board".
Mistake 9. Using an old DWG after replacing the SKU
Why it occurs: the new profile looks similar.
Consequence: the specification and the working drawing diverge.
How to prevent: replacing a SKU always requires a new revision.
Mistake 10. Assuming that one material has the same thickness in all versions
Why it happens: the item code is perceived as a single geometry without checking the variant.
Consequence: the joint with the architrave is designed using the wrong dimension.
How to prevent: double-check the specific material and dimension in the product card.
How to carry out a test installation before doing the whole apartment
If the skirting board is repeated in many rooms, it is useful to first assemble one test unit.
The optimal test fragment includes:
- a section of wall;
- door casing;
- internal or external corner;
- a fragment of furniture or panel, if present;
- the actual finish.
What is being checked
- height;
- thickness;
- joint;
- profile pattern;
- quality of the cut;
- end face;
- painting or tinting;
- visual scale.
Why this is especially useful for solid wood
Natural wood after finishing may be perceived differently than in its unfinished form.
The test sample shows both geometry and material at the same time.
What to record after approval
- SKU;
- the material;
- color;
- joint method;
- photo;
- working DWG;
- revision.
After that, the remaining rooms follow the proven system.
How to link DWG, 3D, and professional specification
For a studio, simple logic is convenient:
3D — shows the result.
DWG — checks the nodes.
SKU — links the project to procurement.
On the professional page STAVROS for designers and architects you can use tools for project work and go to the manufacturer's current materials.
What the visualizer should see
- actual height;
- thickness;
- profile;
- the material;
- color.
What the designer should see
- cross-section;
- nodes;
- codes;
- dimensions;
- transitions.
What the kit assembler should receive
- SKU;
- the material;
- commercial length;
- quantity;
- URL;
- finish.
What the contractor should receive
- PDF;
- DWG;
- map of sections;
- nodes;
- final revision.
How to use the general catalog before selecting an SKU
the STAVROS catalog useful at the first stage, when the designer determines the profile family.
Next, you need to move on to a specific category and a specific item number.
What to compare within a category
- height;
- thickness;
- shape;
- the material;
- length;
- available options.
Do not save just a screenshot
A screenshot quickly loses its connection to the product.
It is better to keep:
SKU + URL + size + material.
When to use a sample
If the choice depends on scale, texture, or finish, a physical sample matters more than an extra render.
FAQ
What is a DWG skirting board?
This is a CAD drawing or profile that helps you use the real geometry of the skirting board in a working project: height, thickness, cross-section, and junctions.
Where to use a skirting board DWG?
In elevations, plans, sections, and enlarged details at doors, furniture, panels, and corners.
Do you need to insert the full profile on every wall?
No. For the general sheet, the code and line are sufficient, while the actual cross-section can be placed in a typical detail.
How do I check the file scale?
Measure one known dimension from the product card after import.
Can the baseboard be enlarged in AutoCAD?
A real SKU cannot be scaled non-uniformly. This creates nonexistent geometry.
Which is more important: height or thickness?
Both parameters. Height affects the visual scale, thickness affects the joints with the casing, panel, and furniture.
How to match the baseboard with the trim?
Compare the cross-sections and show the lower door detail. Ideally, check a real sample or a control fragment.
What should I do if the baseboard is thicker than the casing?
Either make a deliberate step, or choose a different profile, or change the door trim. It is better not to leave a random protrusion.
How to match the skirting board with the wardrobe?
Give the furniture maker the exact height and maximum thickness of the profile, and decide in advance whether it runs behind the wardrobe or ends at the side panel.
How do you calculate skirting?
By the actual visible sections, then by the commercial lengths and the cutting plan.
Should doors be subtracted?
Yes, if the skirting board really does not pass through the doorway. But you need to take into account the short sections on the sides and the end faces.
How to calculate the allowance?
After cutting. The more corners, short sections and complex joints, the higher the practical allowance.
Oak or beech — which to choose?
It depends on the adjacent wood and the finish. With a clear finish, the difference in species is more noticeable; with enamel, less so.
Can one profile be used as both skirting board and architrave?
If a specific model allows such an application and the geometry suits the project — yes. But you need to check the orientation and joints.
When is DWG especially needed?
When there are complex casings, panels, built-in furniture, several types of profiles, non-standard angles, or expensive solid wood.
What should be passed to the order assembler?
SKU, material, size, product length, calculated linear meters, number of planks, URL, and finish.
What should be stored after the project is completed?
Final DWG, SKU, cutting map, photos of joints, actual consumption, and finish data.
Bottom line: skirting in a project begins with the cross-section and ends with cutting and specification
Professional work with skirting is not built around a single height or a beautiful photograph.
Workflow:
specific SKU → DWG → cross-section → casing → panel → furniture → angles → elevation → plan → cutting → specification → order.
If the designer uses a schematic line, technical problems shift to the construction site.
If the actual profile is checked in advance, it becomes clear:
- how far it protrudes;
- how it meets the door;
- whether the furniture plinth needs to be changed;
- what happens at the panel;
- where to place the joints;
- how many actual strips to buy.
It is this level of detail that separates a professional article about DWG skirting boards from general material about stucco or wooden decor.