Article Contents:
- Why the lower light contour changed the modern interior
- Where a light baseboard is appropriate: space by space
- Bedroom
- Hallway and entrance hall
- Kitchen-living room
- TV Area
- Staircase zone
- Children's room, study, dressing room
- What to consider before installation: MDF baseboard with lighting
- Power source: where it will be
- How to run wiring for lighting
- Motion sensor or switch
- Recess for LED strip: needed or not
- Tape maintenance and replacement
- MDF skirting board with cable channel: a neat solution for concealed wiring
- Important nuances when laying wiring in a skirting board
- Concealed skirting board, shadow gap, or classic MDF profile: what to choose for backlighting
- Concealed (shadow) skirting board with a gap
- Regular MDF skirting board with tape at the bottom or back
- MDF skirting board for painting for a light contour
- Wooden skirting board with backlighting
- Skirting board height for backlighting: the effect depends on the choice
- Low skirting board (40–60 mm): limitations
- Medium baseboard (70–100 mm): optimal
- High baseboard (120–150 mm and above): expressiveness
- Matching with doors and architraves
- Baseboard color and light color: how they work together
- White MDF baseboard with lighting
- Dark and black MDF baseboard
- Baseboard in wall color + lighting = minimalism
- Light temperature and brightness: how to choose
- Corners, joints, and ends with lighting: where mistakes become obvious
- How to avoid light 'gaps' at corners
- Skirting board joint along the length with backlighting
- End at the doorway
- Gaps and crevices with backlighting
- How to install LED strip behind MDF skirting board: practical sequence
- Stage one: wiring preparation
- Step Two: Marking
- Stage three: laying the strip
- Stage four: connection
- Stage five: final finishing
- Mistakes when creating a lower light contour: honest analysis
- Comparison of lower backlighting options at the skirting board
- What to buy for a lower light contour: complete set
- FAQ: Answers to Popular Questions
- About the Company STAVROS

There are things in an interior that cannot be explained in words — they need to be seen in the evening, when the overhead light is off and a soft strip of light spreads along the walls. No picture fully conveys this feeling: the space becomes different — deeper, calmer, almost weightless. The walls seem to lift above the floor, and the room breathes differently.
An MDF baseboard with lighting is not an expensive designer whim. It is a solution that, with the right approach, can be implemented in any renovation: both in the finishing stages and in an already completed one. An MDF light baseboard does not require complex construction interventions if everything is planned in advance. And it requires rework if the wiring is remembered after the final finish. That is why the topic needs to be approached systematically — with an understanding of what works and how.


Why the lower light contour changed the modern interior
Ten years ago, floor-level lighting was found mainly in restaurants, hotels, and expensive private homes. Today, it has become an accessible tool for residential interiors — and one of the most sought-after requests during renovations.
Why? There are several reasons, and each is significant.
Night navigation without overhead light. A hallway, bedroom, or staircase at night — dark areas where you need to navigate without turning on bright overhead light. The lower light contour provides exactly as much light as needed: it doesn't blind, doesn't interfere, but marks the path. For families with children and elderly people, this is also a safety issue.
The visual effect of a "floating wall." When light comes from below, between the baseboard and the floor, the wall appears lifted above the base. The space is perceived as more voluminous and expensive. This effect is achieved without any architectural changes — only by the placement of the light source.
Emphasis on the geometry of the room. The light contour highlights lines: the rectangularity of the room, the rhythm of the walls, the length of the corridor. In rooms with proper geometry, this works like an invisible architectural drawing — pleasant, precise, confident.
Soft background lighting. Evening lighting without the main overhead light is one of the keys to a cozy atmosphere. The lower light contour works perfectly as a "third level" of lighting: main + functional + background.


Where a light baseboard is appropriate: space by space
The lower light contour works almost everywhere, but in different spaces it solves different tasks.
Our factory also produces:


Bedroom
The bedroom is the main "platform" for lower lighting. Here, the light contour performs three functions simultaneously: nighttime navigation to the bathroom without turning on the overhead light, background lighting for reading or conversation, and a decorative "floating bed" effect when the strip is placed behind the bedside table.
For the bedroom — warm light (2700–3000 K), low brightness, smooth dimming.
Get Consultation
Corridor and hallway
The hallway is the second most important zone. A narrow space, often lacking natural light, where navigation is needed at night, but you cannot blind anyone. The lower light contour in the hallway makes this place less "transit" and more lively.
For the hallway — neutral or slightly warm light (3000–3500 K), moderate brightness.
Kitchen-living room
Open kitchen-living room space — here the light contour works as zoning: marks the boundary of the "sofa zone," highlights the island or kitchen row from below, creates a sense of separate "islands" in a single space.
TV area
Lighting behind and under the TV cabinet, the lower contour of the TV wall — a classic of modern interior design. Reduces eye strain when watching in the dark, adds a cinematic atmosphere.
Staircase zone
On the stairs, the lower light contour is not about aesthetics, but safety. Lighting the steps or the lower wall near the stairs helps to see the edges of the steps in the dark. A motion sensor here is the most logical solution.
Children's room, study, dressing room
In the children's room — a nightlight-navigator by the floor instead of a separate nightlight. In the study — a soft background contour without glare on the monitor. In the dressing room — floor-level lighting helps to see lower shelves and shoes without spot lighting.
What to consider before installation: MDF baseboard with lighting
MDF baseboard with lighting is not just "glue a strip under the baseboard." It is a small but complete engineering task that is solved at the planning stage, not after.
If the renovation is not yet finished — you are in a winning position. If the finishing is already done — read carefully: there are solutions for both cases.
Power supply: where it will be
The LED strip operates from a power supply (12V or 24V transformer). The power supply needs to be placed somewhere: in a junction box, in a niche, behind a cover panel, in an adjacent room. It cannot be hidden behind the baseboard — it simply does not fit there.
Before installation, you need to determine: where the power point will be, how the wiring will be routed to it, and how the wire will go from it to the strip.
How to run wiring for the lighting
The ideal option is an embedded conduit: during the preparation of the floor or walls, a corrugated tube (or simply a hole) is laid from the power supply location to the baseboard area. The wire runs along the floor in the screed or along the wall behind the plaster.
If the renovation is completed — the wire is laid in the MDF baseboard with a cable channel: a special cavity in the body of the profile allows you to hide the wire inside without chiseling the walls. This is the cleanest solution for "post-factum" installation.
Motion sensor or switch
Switch — a simple and reliable solution. Pressed — turned on, pressed — turned off.
Motion sensor — a more convenient solution for a corridor, staircase, and bathroom: the light turns on automatically when a person appears and turns off after a set time. No need to press anything half-asleep at night.
Dimmer — brightness regulator — is appropriate in the bedroom and living room: one brightness in the morning, another in the evening.
Recess for LED strip: needed or not
When installing the strip directly behind the baseboard (from below or behind) — a recess is not needed. The strip is attached with a self-adhesive base to the lower shelf of the baseboard or to the floor in front of the baseboard.
When installing in the shadow gap of a hidden baseboard — the recess is formed by the design itself: the baseboard does not touch the floor, leaving a gap from which light comes out.
More about the design of the hidden MDF baseboard — in a separate analysis.
Maintenance and replacement of the tape
LED strip is a consumable item. The service life of a quality strip is 30,000–50,000 hours, but connectors, power supply, and controller may fail earlier. Before installation, ensure that connections are accessible — at least at the connection point to the power supply.
If the strip is mounted behind the baseboard with adhesive — its removal will require removing the baseboard. This is not critical for adhesive mounting, but it should be known in advance.
MDF baseboard with cable channel: a neat solution for concealed wiring
The wire from the power supply to the LED strip is a pain point when installing under-cabinet lighting. It must not be visible. It must not run over the baseboard. And it must not disrupt the even line of the lower wall contour.
MDF baseboard with cable channel solves this elegantly: inside the profile there is a special cavity where the wire is laid. Outside — a perfectly smooth surface with no hint that something is hidden inside.
Important nuances when laying wiring in the baseboard
The wire cannot be laid haphazardly. If the cable dangles loosely in the channel, it may be pinched during baseboard installation. Lay it carefully, without loops or twists.
Connections — outside the baseboard. The connection of the LED strip to the power wire — at a point accessible for inspection: at the starting point behind furniture, in a corner block, behind a decorative element. Connection inside the baseboard — technically permissible, but undesirable for maintenance.
The baseboard must fit tightly against the wall. During installation with wiring, it is especially important that the baseboard does not pull away from the wall or "bubble" — the wire should not bulge the profile.
Corners — the most vulnerable points. At corner cuts, the wire must be carefully transferred from one section to another. The wire must not be allowed to protrude from the corner cut.
About choosing the right method for attaching the baseboard — on the page glue, clips, or mounting plate for MDF baseboard.
Hidden baseboard, shadow gap, or classic MDF profile: what to choose for backlighting
Three different structural solutions for the lower light contour — and each has its own character, its own aesthetics, its own installation complexity.
Hidden (shadow) baseboard with gap
Hidden MDF skirting board is installed so that a shadow gap — a 10–20 mm slit — remains between the bottom edge of the baseboard and the floor. The LED strip is placed in this gap or behind the baseboard. Light comes out of the gap downward, creating a "floating wall" effect in its purest form.
This is the most expressive and modern option. But it requires:
-
Precise planning during the renovation stage
-
A level floor — if the floor is uneven, the gap will be uneven, and the light will be patchy
-
Proper wiring installation before mounting the baseboard
Standard MDF baseboard with tape on the bottom or back
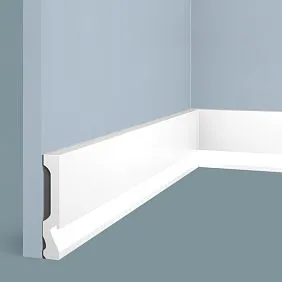
Classic profile MDF Skirting Boards with an LED strip attached to the bottom shelf of the profile or on the floor in front of the baseboard. The strip shines along the floor, creating a horizontal light band at the base of the wall.
This option is easier to install, works in any room, and does not require a special structure. Important: the strip should be directed at an angle to the floor (not strictly downward) so that the light 'spreads' across the floor rather than 'hitting' vertically.
MDF baseboard for painting for a light contour
— is a horizontal element that frames the room at the bottom of the walls where the wall meets the floor. Skirting boards perform several functions: they hide the technological gap between the wall and floor covering (necessary for thermal expansion), protect the lower part of the wall from mechanical damage, create visual completion, and may conceal wiring. — an ideal option for minimalist interiors with bottom lighting. Painted to match the wall color, it 'disappears' as a separate element, leaving only the light contour. Wall → baseboard (matching the wall) → light strip → floor. No extra lines, no distracting elements.
More details on how to choose the color of the baseboard for a specific interior — in the article MDF baseboard matching the color of the wall, floor, or doors.
Wooden baseboard with lighting
Wooden baseboard — for warm, natural interiors. Warm white light (2700 K) at the base of a wooden baseboard creates an intimate atmosphere — cozy, almost Scandinavian. Here, the lighting is not a 'design trick' but a natural extension of the space's character.
Baseboard height for lighting: the effect depends on the choice
It would seem, what does the profile height have to do with it? The fact is that it determines how 'expensive' the light contour will look and how well the light interacts with the floor and wall.
Low baseboard (40–60 mm): limitations
A narrow profile with bottom lighting often produces a too sharp, 'pressed' light contour. The strip is almost at floor level, and the light looks like a narrow band without depth. The 'floating wall' effect does not occur — there is too little distance between the strip and the floor.
Medium baseboard (70–100 mm): optimal
A height of 70–100 mm is the sweet spot for most interiors. Sufficient height so that the light band looks voluminous and soft. The cable is easily laid behind the profile. At the same time, the baseboard does not draw attention to itself — it remains an auxiliary element.
High baseboard (120–150 mm and above): expressiveness
High MDF baseboard sizes 120–150 mm — for rooms with high ceilings and expressive design. At this height, the light contour becomes a full-fledged architectural accent. The shadow under the baseboard with a shadow gap is deep and refined.
Important: a high baseboard requires perfectly level walls and careful installation. More about the nuances installation of MDF baseboard on different surfaces — in the complete guide.
Coordination with doors and architraves
The height of the baseboard should be coordinated with the height of the door architrave. If the baseboard is 120 mm and the architrave is 60 mm, the disproportion is noticeable at every doorway. Either the architraves are higher than the baseboard, or equal to it — this is a visual rule.
The color of the baseboard and the color of the light: how they work together
The question of baseboard color with lighting is a question of what exactly you want to highlight: the baseboard itself or the light contour.
White MDF baseboard with lighting
White MDF Skirting Board reflects light more actively than a dark one. When the lighting is on, a white profile creates a brighter and more uniform light contour. This is good for a hallway and kitchen where visibility is needed. But for a bedroom, where soft diffused light is desirable, a white baseboard can give too pronounced a reflection.
Solution: with a white baseboard, reduce brightness with a dimmer or choose warm light (2700 K), which softly "dims" the cold whiteness.
Dark and black MDF baseboard
A dark baseboard absorbs more light, preventing harsh reflections. The light contour with a dark baseboard looks softer and "deeper" — this is a more cinematic, theatrical effect. For modern interiors in a dark palette, it is very expressive.
Important: a dark baseboard on a dark floor with dark walls + lighting is already an "art installation" requiring a confident designer's hand. In an ordinary residential interior, it is not always appropriate.
Baseboard in wall color + lighting = minimalism
This is the purest solution. The baseboard is painted the same shade as the wall. When the lighting is on, the wall appears monolithic, and only at the very base does a soft glow appear — as if the wall itself emits light. The effect is exceptional.
Light temperature and brightness: how to choose
| Room | Recommended temperature | Brightness |
|---|---|---|
| Bedroom | 2700–3000 K (warm) | Low, with dimmer |
| Corridor | 3000–3500 K (neutral-warm) | Medium |
| Kitchen-living room | 3500–4000 K (neutral) | Medium |
| TV zone | 2700–3000 K (warm) | Low |
| Children's room | 3000 K (warm neutral) | Low (night navigation) |
| Stairs | 3000–3500 K | Medium, motion sensor |
Cold light (5000 K and above) near the floor is almost always a mistake. It creates a "hospital" or "industrial" effect, destroys coziness, and cheapens the interior regardless of the cost of finishing.
Corners, joints, and edges in lighting: where mistakes become obvious
When the light is off, a small gap in a corner joint of the baseboard is almost invisible. When the backlight is on, it glows like a "beacon." That is why installing baseboards with lighting places high demands on the quality of all components.
How to avoid light "gaps" at corners
A light gap in a corner is where the strip is interrupted or bent, and the light does not reach the corner's apex. The result: a dark spot on the light line — very noticeable.
Solutions:
-
Corner connectors for LED strips that allow you to neatly "wrap" the strip around a corner without a break
-
Dividing the strip into sections, connecting each corner section with a separate short cable from a common bus
-
In a hidden baseboard with a shadow gap, the light contour at the corner is created by the gap itself, and the strip runs continuously along the wall, without literally going around the corner
Baseboard joint along the length with backlighting
The joint of two planks along the length of the wall — a point where the gap between the ends becomes visible when the light is on. Light "leaks" through the joint if it is not glued and puttied.
Rule: all joints on walls with backlighting are puttied and sanded before installing the strip. For a paintable baseboard, this is done anyway; for a white baseboard — thin white acrylic sealant in the joint line.
End at the doorway
У дверного проёма LED-лента заканчивается вместе с плинтусом. Важно: торец плинтуса должен быть подкрашен, а точка окончания ленты — аккуратно закрыта. Если лента видна в торцевом срезе — это некрасиво. Решение: подрезать ленту точно по линии торца плинтуса, подкрасить торец, при необходимости — установить Wooden angle vertically at the opening.
Gaps and crevices when backlighting
Any gap between the baseboard and the wall or the baseboard and the floor "glows" when the backlight is on. This works both in favor (shadow gap of a hidden baseboard) and against (random gaps in places of loose fit).
Before installing the tape, all random gaps along the top edge of the baseboard are sealed with acrylic sealant. The exception is the intentional shadow gap of a hidden baseboard.
How to install LED tape behind an MDF baseboard: practical sequence
Let's break down a specific sequence for the case when the baseboard is already installed and you need to add a lower light contour.
Stage one: wiring preparation
Determine the connection point for the power supply. Run the wire from the power supply to the starting point of the tape as discreetly as possible. If the baseboard has a cable channel, the wire goes inside. If not, the wire is laid along or under the baseboard and covered with a decorative trim or box.
Stage two: marking
Mark where the tape will go: on the bottom shelf of the baseboard, on the floor along the baseboard, or in the shadow gap. Check for obstacles — door thresholds, decorative elements, furniture flush against the baseboard.
Stage three: laying the tape
Remove the protective film from the adhesive backing of the tape. Glue it continuously, without bends, at a single angle. In corners, use corner connectors or cut the tape along the cut line (every 3–5 cm, depending on the tape type). On straight walls, the tape runs continuously.
Stage four: connection
Connect the strip to the power supply. Check polarity (+/-). Turn it on and check the uniformity of glow along the entire contour. Inspect corners, joints, ends — check for light gaps and "beacons" in the slots.
Stage five: final finishing
Hide the wires as much as possible. Cover the ends of the strip at doorways. Hide the power supply in the designated place. Install a switch, dimmer, or motion sensor.
Mistakes when creating a lower light contour: an honest analysis
1. Making lighting without a wiring plan. This is the main and most costly mistake. If the renovation is complete and wiring is not provided, you will either have to chisel or put up with a visible cable.
2. Placing the strip too close to the floor without diffusion. An open LED strip without a diffuser gives point light — individual crystals are visible. For a beautiful uniform glow, you need a diffuser (matte profile for the strip) or sufficient distance from the strip to the floor.
3. Not thinking through the power supply. The power supply cannot be hidden "anywhere." It has requirements for ventilation, temperature conditions, and access for replacement. Placing it in a tightly closed cabinet is a mistake.
4. Forgetting about access to connections. The connection of the strip to the power supply may require inspection or replacement after a few years. If it is permanently hidden, you will have to dismantle the baseboard.
5. Choosing too bright light. The lower light contour is not the main lighting. A too bright strip "hits" the eyes when looking from below, irritates, and destroys the atmosphere. Brightness should be checked in the evening, in the dark, in a sitting or lying position.
6. Do not ignore the floor color. White flooring under warm light creates one feel, dark parquet — a completely different one. Test the tape color with the actual flooring under real lighting.
7. Leave crooked joints. With the lights off — forgivable. With the lights on — light gaps and "beacons" in the cracks will ruin the entire effect.
8. Do not check how the lighting looks in the evening. All decisions are made in daylight, but the effect is checked in the evening. Do an "evening test" before final installation.
9. Light contour where it gets in the way. Floor lighting in a small bedroom with a low bed — the tape at eye level of a lying person. Or lighting in the bathroom at the base of the bathtub, where splashes and moisture will destroy the tape within a few months.
Comparison of lower lighting options at the baseboard
| Option | Effect | Installation Difficulty | When appropriate |
|---|---|---|---|
| Hidden baseboard with shadow gap | "Floating wall", maximum | High (needs to be planned in advance) | Minimalism, expensive renovation |
| Regular baseboard + tape underneath | Light strip near the floor | Low | Any type of renovation |
| MDF baseboard + strip behind profile | Soft reflected light | Medium | Modern interiors |
| Baseboard with cable channel + strip | Neat outline, wires hidden | Medium | Completed renovation |
| Wooden baseboard + warm strip | Intimate coziness, warm light | Medium | Natural interiors |
What to buy for the lower light contour: complete set
MDF Skirting Board — basic element. Choose a profile with a height of 70 mm or more for lower lighting — this is the optimal height for a beautiful light contour.
— is a horizontal element that frames the room at the bottom of the walls where the wall meets the floor. Skirting boards perform several functions: they hide the technological gap between the wall and floor covering (necessary for thermal expansion), protect the lower part of the wall from mechanical damage, create visual completion, and may conceal wiring. — for creating the effect of an "invisible" baseboard, where only the light contour remains. Painted exactly to match the wall color.
White MDF Skirting Board — a universal option for light interiors. Enhances the brightness of the light contour.
Wooden baseboard — for natural interiors with warm lighting. Creates a cozy atmosphere.
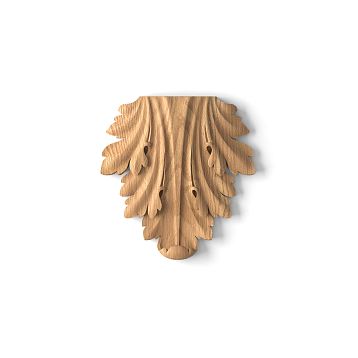
Wooden corner bracket — for neat finishing of external corners and ends at doorways with lighting. Hides the ends and termination points of the LED strip.
wooden molding — for additional decorative framing in classic and mixed interiors.
Trimming Items — a complete system of wooden linear elements. Slats, corners, moldings, and baseboards in a unified system of quality and dimensions.
FAQ: Answers to popular questions
Can lighting be installed in an MDF baseboard?
Yes. The LED strip is mounted behind the baseboard or under it — on the lower shelf of the profile or on the floor along the baseboard. For hiding wires, an MDF baseboard with a cable channel is optimal. For the "floating wall" effect, a hidden baseboard with a shadow gap is used.
How to hide the backlight wire behind the baseboard?
The best option is a baseboard with a built-in cable channel: the wire is laid in the cavity of the profile and is not visible from the outside. If the renovation is completed without embedded wiring, the wire can be run along the floor in a decorative cable channel under the baseboard or a baseboard with a cable cavity can be installed over the existing one.
Which baseboard to choose for LED backlighting?
Depends on the style. For a minimalist interior — a baseboard for painting in the color of the wall. For a modern one — a white or black MDF baseboard. For a natural interior — a wooden baseboard. The profile height is from 70 mm for a beautiful lighting effect.
What is better: a hidden baseboard or a baseboard with backlighting?
A hidden baseboard with a shadow gap gives the most expressive "floating wall" effect, but requires planning at the renovation stage. A regular MDF baseboard with an LED strip is a simpler and more versatile solution that can be implemented in a finished renovation.
Is a white MDF baseboard suitable for backlighting?
Yes. A white baseboard enhances the brightness of the light contour — the reflected light becomes more uniform. For a soft atmosphere in the bedroom, use warm light (2700 K) and a dimmer.
How to design the corners of a baseboard with backlighting?
45° corner cuts are adjusted for a tight fit. LED strip connectors are used at the corners. Sealant or putty is applied at the joints to prevent light from "leaking" through gaps. For external corners, a wooden corner piece covers the ends and the transition point of the strip.
Can lighting be installed after renovation?
Yes, but with limitations. Without embedded wiring, the cable is laid in the cable channel of the baseboard or a decorative box. Chasing after finishing is not recommended, but possible if necessary. It is better to use an MDF baseboard with a cable channel during installation.
Where is it best to use a baseboard with lighting?
Maximum effect is achieved in the hallway (night navigation), bedroom (atmosphere and navigation), kitchen-living room (zoning), and TV area (cinematic atmosphere). On stairs, it is also suitable with a motion sensor.
About the company STAVROS
The light contour at the floor is the effect that makes an interior special. But its quality starts with the quality of the baseboard: even profile geometry, uniform surface, stable dimensions—all of this determines whether the light contour will look flawless or "amateurish."
STAVROS manufactures MDF skirting boards with constant control of geometry and surface quality. Strips with straight edges, stable dimensions, and a decorative coating for full envelopment. The range includes white baseboards with factory enamel, baseboards for painting, wood decors, solid wood baseboards, corner pieces, moldings, and trim products for any finishing tasks.
Clarify the range, current MDF baseboard price per linear meter and place an order with delivery — on the STAVROS website.