Article Contents:
- Wooden skirting board PLT‑001‑1 120×15/16 mm: what the product card confirms
- Parquet gap of 14 mm: why you can't simply compare it with the skirting board thickness of 15 mm
- What to measure before buying a wooden skirting board for parquet
- Why an average gap of 10 mm guarantees nothing
- What "flush" means
- Conditional matrix of 14 mm versus 15/16 mm: where arithmetic ends and fitting begins
- How to get P on site
- PLT-001-1 in the tone of the floor
- PLT-001-1 in the color of the wall
- Contrast PLT-001-1
- Local area 14–16 mm behind furniture: is it mandatory to replace the skirting board in the entire room
- Why a hidden area still needs to be documented
- When local wall preparation is better than changing the profile
- When a local extension strip is justified
- How to make a control overlap template without buying the entire batch
- Acceptance of PLT-001-1 after delivery: re-check before cutting
- How to estimate the cost of a mistake before ordering for the entire room
- Three boundary scenarios for a 14 mm gap: why the result may differ on the same model
- Scenario A. Flat wall and stable 14 mm over a short section
- Scenario B. Same 14 mm, but the wall has a 2 mm protrusion
- Scenario C. Measurement shows 14 mm, but nearby it's 15.5–16 mm
- What to record in the final specification before payment
- Short conclusion
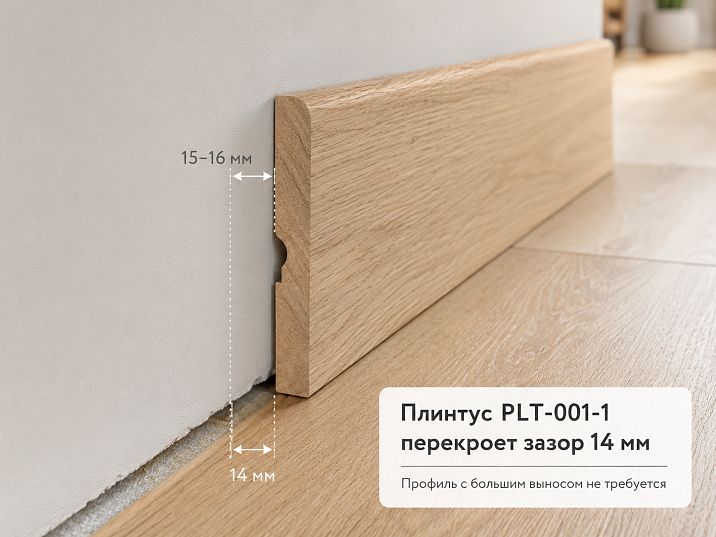
The parquet is already laid, the finished floor is ready, and a compensation gap is left around the perimeter. In most of the room it is about 9–12 mm, but near one wall it reaches 14 mm. PLT-001-1 is chosen for finishing: for beech and oak, the card specifies a size of 120 × 15 × 2400 mm, for MDF and moisture-resistant MDF — 120 × 16 × 2600 mm.
At first glance, you want to solve the problem with simple arithmetic:
15 mm > 14 mm
or
16 mm > 14 mm.
But based on this figure, one cannot honestly promise that the gap will disappear. The 15/16 mm parameter in the card is the profile thickness C, i.e., the maximum cross-section size from the wall at the most protruding part of the profile. It is not automatically a guaranteed width of overlap of the expansion gap specifically at the floor.
Why? Because the actual result depends on:
-
the geometry of the lower part of the profile;
-
how tightly PLT‑001‑1 fits against the wall;
-
the curvature of the plaster;
-
the widest point of the parquet gap;
-
the angle between the wall and the floor;
-
local "deviation" of the wall from the parquet;
-
the mounting layer;
-
of the actual line of the bottom edge of the plinth.
Therefore, for a 14 mm gap, the correct conclusion is this: PLT-001-1 cannot be purchased solely based on the number 15 or 16 mm. First, you need to check the actual horizontal overlap of the lower part of the selected version on the worst section of the wall.
If the actual lower projection of a specific profile turns out to be 15 mm, the nominal remainder above the 14 mm gap will be only:
15 − 14 = 1 mm.
If the effective overlap turns out to be 16 mm:
16 − 14 = 2 mm.
And even these 1–2 mm are not automatically a sufficient installation margin. The manufacturer does not set a universal standard for how many millimeters "should remain" after covering the gap. With a wavy wall or a local increase in the gap to 15–16 mm, such a reserve disappears.
The main commercial scenario of the article is therefore built not around the question "beech or oak," but around the sequence:
-
find the maximum actual gap;
-
check the wall geometry;
-
obtain a drawing or real sample of PLT-001-1;
-
measure the effective lower overhang of the profile;
-
apply it to the 14 mm section;
-
only after that choose the material, length, and quantity.
If the profile reliably covers the gap across the entire room, you can to buy wooden baseboard in the selected configuration. If it covers 14 mm only "on paper" and with almost no real margin, it is better to first compare another cross-section rather than try to mask the problem with glue or putty.

Wooden skirting board PLT-001-1 120×15/16 mm: what the product card confirms
The current PLT-001-1 card shows four main versions:
| Material | Size A × C × L | What matters for the article |
|---|---|---|
| Moisture-resistant MDF | 120 × 16 × 2600 mm | thickness C 16 mm |
| MDF | 120 × 16 × 2600 mm | thickness C 16 mm |
| Beech | 120 × 15 × 2400 mm | thickness C 15 mm |
| Oak | 120 × 15 × 2400 mm | thickness C 15 mm |
Here:
-
120 mm — profile height;
-
15/16 mm — section thickness/depth;
-
PLT‑001‑1 is described as a wide classic profile for floor finishing. For this topic, the parameter is important
, but only as initial geometry, not as a ready-made guarantee of covering the gap. CWhy C = 15/16 mm cannot be automatically equated to covering the parquet
Let's imagine an ideal rectangular block 15 mm thick, which with its entire lower plane extends from the wall exactly 15 mm. Then a 14 mm gap would indeed be nominally covered by 1 mm.
But PLT‑001‑1 is a profiled skirting board, not a mathematical rectangle. Its lower working geometry must be confirmed by:
a drawing;
-
a drawing;
-
physical sample;
-
actual application to the wall.
If the maximum thickness of 15 mm is above the floor, and the bottom edge has a step or bevel, the actual overhang of the parquet may be less.
Conversely, if the bottom part actually matches the maximum thickness, this needs to be seen in the drawing, not assumed from the dimension line.
The upper limit that can still be derived from C
If the profile is installed flush against a perfectly vertical wall, the actual bottom overlap cannot exceed the maximum cross-section thickness C, unless there is a separate protruding part.
That is, for the 15 mm option, an 18 mm gap definitely cannot be covered by this profile alone in the standard plane:
18 > 15.
For 16 mm MDF:
18 > 16.
But for 14 mm, the situation is borderline and requires checking the bottom shape.
What the current price shows
At the time of checking, the card displayed:
-
MDF — 2,290 RUB;
-
moisture-resistant MDF — 2,790 RUB;
-
beech — 5,140 RUB;
-
oak — 7,730 RUB.
Prices change, so in the article they are only needed to understand the cost of a trial plank and the risk of error, and before payment they should be checked again.
Why one trial plank is not a cheap formality
If you buy one plank only to check the geometry, you need to take into account the packaging frame that the card adds to the order. For solid wood, it is applied when the quantity is small; for MDF, it is mandatory due to transportation in a lying position.
That is, physical verification has a cost. But with expensive parquet and a borderline gap of 14 mm, it may be cheaper than purchasing the entire batch of an unsuitable profile.
After confirming the geometry, you can open the card wooden skirting board PLT-001-1 120×15/16 mm and choose the exact material.




Parquet gap 14 mm: why you can't simply compare it to the skirting board thickness of 15 mm
The main technical mistake is to assume that the two numbers refer to the same geometry.
14 mm is the horizontal distance from the edge of the parquet to the wall at a specific point.
15 mm is the maximum thickness of the beech or oak PLT-001-1.
For the profile to actually hide the gap, a parameter is needed that can be called the effective lower overlap.
Let us denote:
-
Z— maximum gap width; -
P— actual horizontal projection of the lower working part of the skirting board from the wall plane; -
R— nominal remaining overlap.
Then:
R = P − Z.
if:
P = 15 mm,
Z = 14 mm,
that:
R = 1 mm.
if:
P = 14 mm,
that:
R = 0 mm.
if:
P = 13 mm,
that:
R = −1 mm, meaning the gap remains open.
Why P needs to be measured, not taken from the table
The card reports C = 15/16 mm.
But P depends on the lower shape of the profile.
Therefore, without a drawing, one cannot automatically write:
P = C.
This is one of the most important conclusions of the article.
The second variable is the wall itself
Even if the drawing shows a 15 mm bottom overhang, the actual wall may:
-
protrude outward by 2 mm;
-
recede inward by 2–3 mm;
-
be wavy;
-
have a plaster bump above the baseboard.
If the profile is pressed against a protruding point of the wall, the lower part may not reach the ideal calculated plane.
Example: a wall bump "eats up" the overlap
Let the baseboard nominally have a 15 mm bottom overhang.
The top part rests against a local bump, causing the bottom to remain 2 mm away from the wall.
The effective overlap relative to the edge of the parquet may decrease to approximately:
15 − 2 = 13 mm
in conditional geometry.
A gap of 14 mm is no longer covered.
This is not an exact calculation for a specific wall, but an illustration of why the profile needs to be physically applied.
Example: the wall slopes away from the parquet
If the edge of the parquet is measured to the lowest point of the wall, but the wall deviates higher up, the baseboard may be attached along a different plane.
Then a gap visually appears at the bottom.
Therefore, you need to measure not only the gap, but also the verticality of the wall.
Our factory also produces:


What to measure before buying a wooden baseboard for parquet
A single measurement of 14 mm is insufficient.
1. Compensation gap every 300–500 mm
Along the entire wall.
Especially:
-
at corners;
-
near doors;
-
in niches;
-
near radiators;
-
behind furniture, if the baseboard will still be installed there.
2. Maximum value
The specification records not the average 10 mm, but the maximum controlled 14, 15, or 16 mm.
3. Wall unevenness
Check with a long straightedge or rule:
-
protrusions;
-
depressions;
-
local bumps.
4. The most protruding point of the plaster
It may prevent the profile from pressing down at the bottom.
5. The most recessed lower zone
The visual gap may be more pronounced there.
6. Wall-to-floor angle
If the wall is not vertical, the upper part of PLT-001-1 may shift the position of the lower edge.
7. Parquet level differences
Parquet is usually level, but local differences or a raised edge change the visual line.
8. External corners
At the corner, the baseboard should not only cover the gap but also join with the adjacent plank.
9. Doorways
Need to check the joint of PLT-001-1 with the trim.
10. Radiator zones
The baseboard may pass behind pipes and brackets; this is a separate unit.
Measurement map
| Wall section | Minimum gap | Maximum gap | Wall unevenness | Solution |
| Wall A | ___ | ___ | ___ | PLT-001-1 / check |
| Wall B | ___ | ___ | ___ | ___ |
| Angle 1 | ___ | ___ | ___ | ___ |
| Door | ___ | ___ | ___ | ___ |
This way the buyer sees that the 14 mm gap is not a “room characteristic” but a specific worst point.
Get Consultation
Why an average gap of 10 mm guarantees nothing
The average value is convenient for a report, but poorly suited for buying a skirting board.
Let's imagine a room where:
-
80% of the perimeter is 9–10 mm;
-
one wall is 12 mm;
-
near the external corner is 14 mm;
-
in one local spot is 16 mm.
The average value may remain around 10–11 mm. But it is the 16 mm point that determines whether the same PLT‑001‑1 can cover the entire perimeter without an additional solution.
Why “fits almost everywhere” is a bad specification
If 95% of the room is covered, but a black gap of 300 mm remains in one section, the result still looks like a defect.
The baseboard is chosen based on the worst controlled section if a single profile is planned for the entire room.
When a local section can be resolved separately
Sometimes the 16–18 mm problem occurs only:
-
behind the cabinet;
-
under built-in furniture;
-
in the niche;
-
near the technical duct.
Then you can:
-
leave this section hidden;
-
apply a local filler strip;
-
modify the joint separately.
But this should be anticipated before ordering, not discovered after installation.
Why the maximum gap also needs to be rechecked
A single measurement of 16 mm could be an error:
-
the tape measure is at an angle;
-
the measurement was taken from the parket bevel;
-
the edge of the parket has a chip;
-
the wall has a local recess.
Before changing the entire specification, the maximum value is rechecked.
What to write in the drawing
Useful to note:
Zmax = 14 mm
or
Zmax = 16 mm
and nearby:
section: wall B, 420 mm from the inner corner.
This way the craftsman can return to the point after the sample is delivered.
Full-size sample PLT-001-1: the best test before buying the entire batch
With a borderline gap, a physical fitting is more valuable than a photo and even a simple catalog size.
What exactly the sample should show
Need to check:
-
actual lower geometry;
-
real offset at the floor;
-
fit to the wall;
-
visual gap under side light;
-
behavior on uneven surface;
-
joint with door trim;
-
future tinting or painting.
Why a paper template is insufficient
A strip of 15 or 16 mm shows only the maximum thickness.
It does not reproduce:
-
profile;
-
chamfer;
-
step;
-
position of the front part;
-
contact of the upper zone with the wall.
For a preliminary test, paper is useful, but the decision to purchase should be made based on a real fragment.
If there is no separate sample PLT-001-1
You can use:
-
exact drawing;
-
short segment of the plank;
-
one trial full-size plank.
The product card shows a separate set of OMLD-005 samples among related products, but the presence of PLT-001-1 specifically in the current composition of the set needs to be confirmed separately. It cannot be promised that this particular item is included.
How to conduct a fitting
-
Find the maximum gap.
-
Clean the edge of the parquet from dust.
-
Apply the profile to the wall without glue.
-
Press it the way it will stand during installation.
-
Look from below and under side light.
-
Run the profile 500–1000 mm along the wall.
-
Repeat at the outer corner and near the door.
Why you need to look from floor level
Standing, a person may not notice a narrow gap.
From floor level, a dark gap is more visible.
If after installation furniture or a carpet completely covers this area, the visual significance is lower, but the technical solution should still be made consciously.
If PLT-001-1 covers 14 mm only "just barely," is it worth buying?
The most difficult scenario is when the profile formally covers the gap, but there is almost no margin.
What does "just barely" mean?
Suppose a physical sample shows a lower overlap of about 15 mm.
Gap:
14 mm.
Nominal remainder:
1 mm.
This is not automatically bad, but any of the conditions can remove that millimeter:
-
the wall protrudes;
-
the gap is locally 14.5–15 mm;
-
the profile is not pressed tight;
-
the edge of the parquet is uneven;
-
The assembly line is shifted.
Why can't a universal reserve be invented
It is impossible to honestly write:
"2 mm is enough"
or
"a minimum of 5 mm is needed."
Manufacturer PLT-001-1 does not publish such a universal standard.
A real test is needed.
When a borderline overlap can be accepted
if:
-
the wall is very even;
-
the gap is stable;
-
the sample confidently covers the gap;
-
The installer confirms the fixation;
-
The area has no external corners and no strong side light.
When it's better to choose a different profile
if:
-
14 mm is not the maximum, but a typical value;
-
in places 15–16 mm;
-
the wall is wavy;
-
the profile covers the gap only at the edge;
-
after fitting, a dark line is visible.
Why expensive parquet increases requirements
With expensive flooring, saving on an unsuitable baseboard is pointless.
An incorrect profile creates:
-
a visual defect;
-
a repeat purchase;
-
a repeat tinting;
-
a repeat installation.
PLT-001-1 made of 16 mm MDF: does the extra millimeter mean a real advantage
MDF and moisture-resistant MDF have C = 16 mm.
Beech and oak — C = 15 mm.
The difference:
1 mm.
What can be said honestly
With the same lower geometry, the 16 mm option has a potentially greater maximum overhang from the wall.
But the card does not automatically allow asserting that the real lower MDF overlap is greater by exactly 1 mm.
Need to compare the drawing or actual profiles.
Why is the extra millimeter important specifically with a 14 mm gap
If the effective overhang really matches C:
-
15 mm → remainder 1 mm;
-
16 mm → remainder 2 mm.
That is, the relative difference is noticeable.
But if the lower part of the profile has a ledge, the advantage may be different.
When MDF is more logical for finishing
If the plinth is painted to match the wall color:
-
MDF is easier to integrate into a monochromatic system;
-
moisture-resistant MDF can be useful in areas with a higher risk of wet cleaning;
-
a length of 2600 mm reduces the number of joints on long walls.
If the project leans toward such a solution, it is possible buy MDF skirting board after checking the geometry.
Why the material cannot be chosen based only on 1 mm
If the parquet is oak and the interior is built around natural wood, switching to MDF just for a conditional extra millimeter may be stylistically incorrect.
First, confirm whether this millimeter is needed at all.
Baseboard made of natural wood PLT‑001‑1: beech or oak near the parquet
Beech and oak have the same nominal size:
120 × 15 × 2400 mm.
Therefore, the problem of the 14 mm gap is the same for them in terms of card geometry.
Oak next to oak parquet
A logical option if a natural visual transition is needed.
But 'oak to oak' does not guarantee a match:
-
shade;
-
of the pattern;
-
saw cuts;
-
reaction to oil or stain.
A test stain is needed.
Beech next to parquet
Beech can be more neutral in pattern.
If the baseboard is painted with an opaque enamel, the wood species may play a lesser visual role.
Why the bottom edge is especially noticeable on a contrasting floor
Light baseboard over dark parquet:
-
highlights any dark gap;
-
makes insufficient overlap more noticeable.
A dark baseboard over a light floor also creates a strong graphic line.
With contrast, the overlap requirements are visually higher.
Tinting should be done after confirming the profile
You don't need to first buy the entire batch of oak, tint it, and only then find out whether it covers 14 mm.
Procedure:
geometry → cutting → trial tinting → main finish.
When a wide gap is a problem with the floor installation, not the baseboard.
The baseboard is meant to hide the technical gap, but not to fix any mistake.
When to stop
If around the room:
-
usually 9–10 mm;
-
locally 18–20 mm;
-
the edge of the parquet clearly curves in an arc;
-
the gap changes sharply over a short section,
you need to find out the cause.
Possible causes
-
the wall is very crooked;
-
the edge of the parquet is cut imprecisely;
-
the geometry of the room differs from the project;
-
the technological gap was made unevenly.
Why can't you just look for an increasingly thicker profile
The thicker the baseboard:
-
the more it protrudes into the room;
-
the joint with trim is more difficult;
-
the higher the risk of conflict with furniture.
The baseboard should not become a way to hide a systemic installation problem without assessing it.
What to check with the parquet manufacturer
The expansion gap is determined by the technology of the specific flooring.
If there is doubt whether 14–18 mm meets the requirements, you need to check:
-
the parquet manufacturer's instructions;
-
the board format;
-
the installation method;
-
the room area;
-
the presence of underfloor heating;
-
the humidity conditions.
The article does not prescribe a universal gap standard instead of the flooring manufacturer.
Why you shouldn't fill the expansion gap with glue or putty for PLT‑001‑1
The expansion gap serves a technical function.
The baseboard should cover it from above, not turn it into a rigidly filled joint.
Why rigid filling is risky
Parquet and other wooden flooring change dimensions with changes in humidity.
If the technological gap is rigidly filled:
-
the flooring loses part of its ability to move;
-
stresses may transfer to the edge of the floor;
-
the finish filling may crack.
Can sealant be used
This depends on the floor system and the manufacturer's instructions.
You cannot give universal advice like "fill it with acrylic."
For a 14 mm gap, the article's task is to select an overlapping profile, not to invent a filling.
The baseboard is attached to the wall, not to the movable floor.
This is the basic logic of a compensation joint.
The profile finishes the edge and should not fix the parquet to the wall.
For a general choice, you can look at the existing material. how to choose a wooden baseboard for parquet, but here only the specific PLT-001-1 and a 14 mm gap are considered.
Conditional matrix of 14 mm vs 15/16 mm: where arithmetic ends and fitting begins
To see the scale of the problem, it is useful to make a conditional calculation assuming that the effective lower overhang P is actually equal to the maximum thickness C.
This is not a manufacturer's specification, but a diagnostic table.
| Actual gap Z | If P = 15 mm | If P = 16 mm | What to do |
| 9 мм | margin of 6 mm | margin of 7 mm | the geometry looks calmer |
| 10 мм | 5 мм | 6 мм | still check the wall |
| 12 мм | 3 мм | 4 мм | fitting is recommended |
| 14 мм | 1 мм | 2 мм | edge case |
| 15 мм | 0 мм | 1 мм | tree flush with conditional model; MDF on the edge |
| 16 мм | −1 mm | 0 мм | wood does not overlap; MDF conditionally flush |
| 18 мм | −3 mm | −2 mm | standard profile does not solve the problem |
This table is useful precisely because it shows that at 14 mm the buyer has no large margin even in the most favorable assumption P = C.
Why 14 mm cannot be called "definitely safe" for 15 mm
The difference is only 1 mm.
Any measurement error of ±1 mm already changes the conclusion.
Why 16 mm does not turn MDF into a guaranteed solution
Nominally, 2 mm appears.
But if the lower geometry provides an actual overlap of 14.5–15 mm, the advantage disappears.
How to get P on site
The best way:
-
place the profile against a flat plane;
-
draw a vertical line of the wall;
-
measure the horizontal distance from this plane to the lower outer edge that actually overlaps the parquet;
-
repeat for the selected material if the execution geometry differs;
-
check the same thing when applied to a real wall.
Why a drawing is better than a catalog photo
The photo shows the external relief.
The drawing shows:
-
the base plane;
-
the bottom edge;
-
maximum thickness;
-
possible ledges.
If the drawing does not have a separate dimension for the bottom overhang, the physical test remains the most reliable.
The parquet is already tinted: which wooden baseboard to order
After geometry, a second task appears — color.
PLT-001-1 in floor tone
If the parquet is oak, oak PLT-001-1 can be tinted to a close color.
Pros:
-
the floor and baseboard form one lower system;
-
small irregularities are visually less noticeable with a close tone.
But matching the wood is not guaranteed by the word "oak" alone.
PLT-001-1 in wall color
MDF or wood under enamel can be made in the wall color.
A height of 120 mm turns the profile into an architectural strip.
At the same time, the gap near the floor becomes especially noticeable if the wall and baseboard are light and the parquet is dark.
Therefore, the geometric overlap must be checked before painting.
Contrast PLT-001-1
For example:
-
dark oak;
-
light parquet;
-
white wall.
The contrast emphasizes the bottom edge.
Even a 1-millimeter dark line between the baseboard and the floor can be more noticeable than in a tone-matched variant.
Why color affects the acceptability of boundary overlap
Technically, the gap is either closed or not.
Visually, different combinations make a microscopic shadow more or less noticeable.
Therefore, with a remaining 1-2 mm, you need to look at the sample in the future color.
Test tinting
For oak or beech:
-
take a short fragment;
-
apply the chosen composition;
-
place it next to the parquet;
-
check in the morning, afternoon, and evening.
For MDF:
-
use a primer;
-
the same enamel;
-
the same gloss.
Do I need to buy one test plank PLT-001-1
For a regular even gap of 7–10 mm, a full test plank may be excessive.
For a 14 mm scenario, it makes more sense.
When one trial plank is rational
-
expensive parquet is already finished;
-
border gap;
-
walls are uneven;
-
no exact size of the lower overhang;
-
individual tinting is needed;
-
there are complex external corners;
-
many door junctions.
Cost of the trial plank as of the check date
Product price:
-
MDF — 2,290 RUB;
-
moisture-resistant MDF — 2,790 RUB;
-
beech — 5,140 RUB;
-
oak — 7,730 RUB
The card also indicates a rigid packaging frame of 390 RUB.
For one strip, the approximate subtotal before delivery:
| Finish | Plank | Frame | Subtotal before delivery |
| MDF | 2 290 | 390 | 2,680 RUB. |
| Moisture-resistant MDF | 2 790 | 390 | 3,180 RUB |
| Beech | 5 140 | 390 | 5,530 RUB. |
| Oak | 7 730 | 390 | 8,120 RUB. |
Prices are valid only at the time of checking the card and require re-verification before payment.
Why a trial strip does not necessarily become waste
If the profile fits:
-
it goes into the main installation;
-
from it you can get a wall section;
-
use the remainder for painting and corners.
That is, it is not necessarily a "test fee."
When you can skip buying a test strip
if:
-
the designer already has a real fragment of PLT-001-1;
-
the drawing clearly confirms the lower overlap;
-
the wall is even;
-
the gap is significantly smaller than the available overhang;
-
the installer has already worked with this model.
How many PLT-001-1 to order after checking the gap
The quantity is calculated only after confirming that the profile is technically suitable.
MDF
Length:
2600 mm.
Beech and oak
Length:
2400 mm.
Why the total perimeter does not give the final quantity
For example, perimeter without doors:
10,000 mm.
By length:
MDF:
10,000 / 2600 = 3.85 → minimum 4 planks.
Wood:
10,000 / 2400 = 4.17 → minimum 5 planks.
But the actual cutting may change the result.
Example of walls 3200 + 2800 + 2200 + 1800 mm
Sum:
10,000 mm.
For MDF 2600:
-
wall 3200 requires a joint;
-
2800 too;
-
Short leftovers need to be distributed.
Four planks give 10,400 mm of clean material, but this does not guarantee a convenient layout.
If long walls require full-length pieces and the leftovers don't add up, a fifth may be needed.
Why the 14 mm gap also affects cutting
On the problematic section, the installer may want to:
-
choose the straightest plank;
-
avoid a joint;
-
not place a short leftover;
-
run one full profile across the entire wall.
This increases the requirements for the board.
External corners
Miter cuts require extra allowance.
You cannot consider the wall length equal to the clean part length without accounting for the joint type.
Doors
The baseboard ends at the door trim.
Each new segment changes the cutting layout.
Correct order
compatibility → wall map → part map → number of planks → order.
Mistakes when buying baseboard after parquet installation
Mistake 1: Assuming 15 mm is the automatic overlap width
Reason: the line 120 × 15 × 2400 is perceived as “the baseboard overlaps 15 mm”.
Consequence: a 14 mm gap remains visible.
Prevention: measure the lower overhang P.
Mistake 2. Measure the gap in one place
In the center of the wall 10 mm, near the corner 14 mm.
Prevention: step 300–500 mm and control corners.
Mistake 3. Look at the average value
Average 10 mm does not cover local 16 mm.
Mistake 4. Do not check the wall
The baseboard hits a bump and comes off from the bottom.
Mistake 5. Buy the whole batch without trying it out
Especially risky for oak with subsequent tinting.
Mistake 6. Mixing MDF 16 mm and wood 15 mm
The estimate says "PLT-001-1 16 mm", but then they order oak 15 mm.
Mistake 7. Filling the expansion gap with rigid putty
The baseboard should cover, not block, the floor's movement.
Mistake 8. Tinting first, then checking geometry
If the profile is replaced, the money spent on finishing is lost.
Mistake 9. Seeing local 18 mm and simply looking for "even thicker"
First, you need to understand why the parquet moved away from the wall.
Mistake 10. Forgetting the door casing
A thicker profile solves the gap at the floor but creates a step at the door.
Mistake 11. Not checking external corners
The boundary overlap can diverge precisely in the corner area.
Mistake 12. Installing the baseboard so that it presses the parquet
The expansion gap must retain its function.
Mistake 13. Buying based on a photo of the profile
The photo does not show the millimeter geometry of the bottom edge.
Mistake 14. Considering 1 mm of allowance sufficient without the object
There is no confirmed standard for such an allowance.
Mistake 15. Considering one successful wall as proof for the entire room
The entire perimeter needs to be checked.
When it's better not to buy PLT-001-1 for already laid parquet
The expert article should allow rejecting a specific product if the geometry is not confirmed.
The maximum gap is already 16–18 mm
For option C = 15 mm, such a section by maximum geometry already exceeds the profile thickness limits.
For C = 16 mm, a gap of 16 mm leaves zero nominal margin even under the most favorable assumption P = C.
In such a situation, you need to:
-
check the cause of the wide gap;
-
look at another profile;
-
use an additional solution;
-
Do not buy PLT-001-1 "on a whim."
The wall is too wavy
If the profile is pressed against the wall at two protruding points, and a gap forms between them, the bottom overlap becomes unpredictable.
Sometimes it is better to first level the wall locally.
A noticeably larger technological allowance is needed
If the client wants even seasonal visual changes and small wall imperfections not to show a gap, the borderline PLT-001-1 may be too risky.
The new profile creates a conflict with the door trims
A thicker plank hides the parquet but protrudes 5–8 mm further than the door casing.
Then one problem is replaced by another.
The room has several types of flooring
If PLT-001-1 fits near the parquet but conflicts with tiles, stairs, or built-in furniture, a single profile throughout the apartment may be inconvenient.
The flooring requires a different transition system
Some flooring systems have their own brand recommendations for baseboards and gaps.
They cannot be ignored in favor of the chosen decorative profile.
Local area of 14–16 mm behind furniture: is it mandatory to replace the baseboard in the entire room
Not always.
Let's imagine that the entire open perimeter has a gap of 9–12 mm, PLT-001-1 physically covers it confidently, and the only area of 15–16 mm is completely behind a built-in wardrobe.
In this case, there are several questions:
-
will the baseboard even be installed behind the wardrobe;
-
will this area remain visible after furniture installation;
-
is it technically required to maintain the continuity of the baseboard;
-
Is it possible to locally fix the wall or floor edge before installing the cabinet?
If the baseboard behind the built-in cabinet is not needed, there is no point in changing the profile of the entire room for a hidden area.
But if the furniture is not built-in and can be moved, the problem remains real.
Why the hidden area still needs to be documented
Even if it is not visible now, it is useful to note:
"Behind the cabinet Zmax = 16 mm, PLT-001-1 not checked/not installed."
In a few years, the furniture may be removed.
Without this information, a new owner will see the gap and think the baseboard was installed incorrectly.
When local wall preparation is better than changing the profile
If the overlap issue is caused by a single plaster bump, and the parquet gap itself is normal, sometimes it is easier to fix the wall.
For example:
-
Z = 14 mm; -
Sample PLT-001-1 confidently covers 14 mm on a flat wall;
-
A local plaster protrusion pushes the profile outward by 3 mm.
After professional local wall preparation, the profile can return to its design position.
But you cannot automatically sand or chip the wall without checking the finishing layer, wiring, and finish.
When a local additional strip is justified
If the gap is wider only on a short section, and another profile throughout the room is not needed, the furniture maker can design an additional extension element under or behind the baseboard.
This is not a standard characteristic of PLT-001-1 and not a universal recommendation.
Need to check:
-
material;
-
wall plane;
-
height of 120 mm;
-
maximum thickness of 15 or 16 mm;
-
lower ledge/bevel, if present;
-
actual point of the lower outer edge.
-
MDF;
-
thick cardboard;
-
plastic;
-
plywood.
How to make a control overlap template without buying the entire batch
If there is no separate factory sample, but the PLT-001-1 drawing is available, you can make a simple rigid template based on the lower cross-section of the profile. Its task is not to imitate the entire 120 mm relief, but to show the actual lower horizontal geometry that covers the gap.
What needs to be transferred from the drawing
The template can be cut from:
Why the template must be rigid
Soft paper will follow the gap and create a false impression that the profile "covers everything."
A rigid template shows how a real plank will behave.
How to check 14 mm
At the problem area:
-
measure the gap again;
-
place the template in the design position;
-
press against the wall without deformation;
-
check how much the bottom edge overlaps the edge of the parquet;
-
run the template along the wall;
-
mark the spots where a visual gap appears.
Marking 14 / 15 / 16 mm
It is useful to draw control lines on the template:
-
14 mm;
-
15 mm;
-
16 мм
from the wall plane.
This makes it immediately visible where the actual lower edge of PLT‑001‑1 is relative to the gap.
Why the template does not fully replace the actual plank
It does not show:
-
the rigidity of a long plank;
-
the actual fit over 2.4–2.6 m;
-
finishing;
-
behavior at corners;
-
the joint with the trim.
But it allows excluding clearly unsuitable geometry before expensive procurement.
Acceptance of PLT-001-1 after delivery: re-check before cutting
Even if the drawing and sample passed inspection, after delivery of the main batch you should not immediately cut all the strips.
Verify the execution
Check:
-
PLT‑001‑1;
-
material;
-
120 × 15 or 120 × 16;
-
length;
-
quality;
-
Quantity.
Select a control strip
From the batch, take one of the straightest strips and apply it to the area with Zmax = 14 mm.
If the actual product behaves the same as the sample, the map is confirmed.
Check several meters, not just one point
A long plank can:
-
not repeat the wall's waviness;
-
press against a protrusion;
-
pull away at the bottom.
This is exactly what cannot be seen from a short sample.
Only after a trial installation is the cutting marked.
For each wall:
-
plank number;
-
length;
-
direction;
-
angle;
-
the joint location.
Why this is especially important for oak
If the oak has already been sorted by grain and tone, a mistake after cutting is more costly.
First geometry, then final sorting and finishing.
How to estimate the cost of a mistake before ordering the entire room
The borderline choice of PLT‑001‑1 can be assessed not only by the price of one plank, but also by the cost of rework.
Suppose the room conditionally needs 5 beech planks.
Product cost at the price at the time of check:
5 × 5,140 = 25,700 RUB.
For oak:
5 × 7,730 = 38,650 RUB.
This is only an example quantity, not a calculation for a specific room.
If after tinting it turns out that the profile does not cover 14 mm, the losses will add:
-
delivery;
-
finish;
-
cutting;
-
installation work.
Therefore, one control plank for 5,140 or 7,730 rubles plus packaging may be economically justified in an expensive project.
For MDF, a similar example of 5 planks:
5 × 2,290 = 11,450 RUB.
Moisture-resistant MDF:
5 × 2,790 = 13,950 RUB.
The main takeaway is not that you should always buy a trial strip. It is that the cost of verification should be compared with the cost of an error in the entire batch, especially in borderline overlap cases.
What to send to the manager before ordering PLT-001-1
A good request should allow the manager to understand the product configuration, and the installer to understand the geometry of the problem.
In the request, specify
-
PLT‑001‑1;
-
material;
-
chosen size;
-
maximum gap 14 mm;
-
photo of the problem area;
-
total perimeter;
-
number of doors;
-
number of external corners;
-
desired finish;
-
need for a trial strip.
Useful wording
The parquet is already laid. The maximum measured expansion gap to the wall is 14 mm, with 9–12 mm in the main part of the room. We are considering PLT‑001‑1: beech/oak 120 × 15 × 2400 mm or MDF 120 × 16 × 2600 mm. Please confirm the current drawing of the selected configuration and the geometry of the lower part of the profile; we want to verify the actual coverage of the 14 mm gap before ordering the full batch.
This is much more useful than the question:
Will 15 mm cover 14 mm?
What to ask additionally
-
Is there a physical sample;
-
Can one plank be purchased;
-
Which finish option matches the project;
-
Current availability;
-
packaging;
-
production time;
-
delivery.
After confirmation, you can Order wooden skirting board PLT-001-1.
Where to buy wooden skirting board PLT‑001‑1 after checking the parquet
The customer has two routes.
PLT-001-1 confirmed physically
Then:
-
select the material;
-
calculate the planks;
-
order the entire volume;
-
save one short fragment as a control sample of the finish.
PLT-001-1 covers the gap only flush or does not cover
Then it is better to return to the category and buy a wooden baseboard with a different geometry of the lower overhang.
Do not choose the next product just by a larger thickness number. The lower profile is checked again.
Order conditions
Before payment, it is worth checking payment and delivery terms, especially for long planks 2400/2600 mm.
Three boundary scenarios of a 14 mm gap: why the result may differ on the same model
The same number Z = 14 mm can mean three completely different installation situations.
Scenario A. Flat wall and stable 14 mm on a short section
The profile sample shows an actual bottom overhang of 15.5 mm.
Nominal remainder:
15.5 − 14 = 1.5 mm.
The wall is flat, the gap nearby is 13–14 mm, no door junctions.
Such a joint can be considered potentially workable after checking with a long plank.
Scenario B. The same 14 mm, but the wall has a 2 mm protrusion
The baseboard cannot press its lower part against the wall the same way as in the drawing.
The actual overlap visually decreases.
Here, a model that seemed suitable on a flat wall may leave a gap.
Scenario C. The measurement is 14 mm, but nearby it's 15.5–16 mm.
The 14 mm point ceases to be the reference point altogether.
You need to focus on the actual maximum.
If the beech/oak option C = 15 mm is chosen, the maximum profile size itself is already smaller than the local gap of 16 mm.
This is a direct signal to look for another joint.
Why these three scenarios matter more than the words "14 mm gap"
The buyer should convey to the installer not just one number, but the context:
-
how long is the problem area;
-
how does the gap change nearby;
-
is the wall level;
-
where are the doors and corners.
This way you can avoid a situation where the manager responds to one size, but on site the problem turns out to be different.
What to include in the final specification before payment
After checking the geometry, it is useful to place the order in one line.
For example:
PLT-001-1 / oak / 120 × 15 × 2400 mm / Zmax parquet 14 mm / actual bottom overlap per sample ___ mm / profile checked on wall A / quantity ___ pcs. / finish ___ / visible corners ___ / joint with trim checked.
For MDF:
PLT-001-1 / MDF / 120 × 16 × 2600 mm / Zmax 14 mm / bottom overlap confirmed / color RAL ___ / quantity ___ pcs.
If instead of the bottom overlap number, the specification contains the phrase:
should be enough, because the profile is 15 mm,
the work is not finished yet.
Why the specification is useful
It connects:
-
the product;
-
the real object;
-
the verified gap;
-
material;
-
quantity;
-
finishing.
Thus, procurement is not separated from installation geometry.
What to do if the profile does not fit
Do not change Zmax in documents and not rely on glue.
You need to:
-
choose a different skirting board;
-
agree on an additional profile;
-
fix the local wall if the problem is specifically with it;
-
separately assess the edge error of the parquet.
This is a normal inspection result, not a failure.
Final check before finishing
After the geometry of PLT-001-1 is confirmed on the wall, it is useful to once again apply the already cut but unpainted parts to the areas with maximum gap. This allows checking whether the fit has changed after miter cuts, whether a new separation has appeared near the outer corner, and whether one segment requires a different plank. Only after this test assembly does it make sense to perform final tinting or enamel. With a borderline overlap of 14 mm, any late adjustment of the end or length can change the visual line at the floor, so the final finish should come after a confirmed dry assembly of the entire perimeter.
Final decision tree for a 14 mm gap
Step 1. Is 14 mm really the maximum gap?
-
no → re-measure the entire perimeter;
-
Yes → continue.
Step 2. Are there sections of 15–16 mm?
-
yes → consider them the real Zmax;
-
No → continue.
Step 3. Is a drawing or physical sample of PLT‑001‑1 obtained?
-
no → do not consider 15/16 mm a guaranteed overlap;
-
yes → measure P.
Step 4. Is the effective lower overhang P greater than the maximum gap?
-
no → the profile is not suitable;
-
Yes → continue.
Step 5. Is the remainder R = P − Z stable on an uneven wall?
-
no → choose another profile/fix the wall;
-
Yes → continue.
Step 6. Are the corners and door junctions checked?
-
no → check;
-
Yes → continue.
Step 7. Does the baseboard not press the parquet and not block the technological gap?
-
not confirmed → coordinate installation;
-
confirmed → proceed.
Step 8. Are the material and finish approved?
-
no → make a test paint-out;
-
yes → count the quantity.
Step 9. Only now is the order placed.
For the initial scenario of 14 mm, the main conclusion remains deliberately cautious:
PLT-001-1 could potentially cover such a gap, but size C = 15/16 mm itself does not guarantee this. A drawing or actual fitting of the bottom edge is needed.
FAQ
What is the size of PLT‑001‑1?
MDF and moisture-resistant MDF — 120 × 16 × 2600 mm. Beech and oak — 120 × 15 × 2400 mm.
Why does MDF have 16 mm, while beech and oak have 15 mm?
These are different product variants of the same model. You should purchase based on the specific material line, not the averaged name PLT‑001‑1.
Will PLT‑001‑1 cover a parquet gap of 14 mm?
Possibly, but it cannot be guaranteed based only on the 15/16 mm thickness. You need to check the actual lower profile overhang and the wall.
Can the overlap be determined only by thickness C?
No. C indicates the maximum cross-section thickness, but the lower part of the profile may have a different shape.
If the lower overhang is 15 mm, what margin remains above the 14 mm gap?
Nominally 1 mm.
If the lower overhang is 16 mm?
Nominally 2 mm.
Is a 1–2 mm allowance enough?
There is no universally confirmed standard for this model. At the boundary joint, a physical fitting is required.
How to correctly measure the expansion gap?
Around the entire perimeter at intervals of approximately 300–500 mm, and definitely in corners and near doors. For the solution, use the maximum verified value.
Do I need to measure the entire room?
Yes, if a single profile is planned around the entire perimeter.
What to do if there is a 16–18 mm gap in one place?
First, find out the cause. The standard PLT‑001‑1 with C 15/16 mm cannot be considered a reliable solution for such an area without an additional profile or modifying the joint.
Can the gap be filled with putty?
Do not rigidly fill the expansion gap without permission from the parquet manufacturer. Its purpose is to ensure the movement of the flooring.
Can sealant be used?
Only if the floor system allows it. This article does not replace the parquet manufacturer's instructions.
What is the length of the MDF PLT-001-1?
2600 mm.
What is the length of the oak and beech PLT-001-1?
2400 mm.
Should I buy one test plank first?
With expensive parquet, a 14 mm gap, and no exact lower size — yes, this is a rational option.
How much does one test plank cost?
At the time of checking: MDF 2,290 RUB, moisture-resistant MDF 2,790 RUB, beech 5,140 RUB, oak 7,730 RUB. Plus a packaging frame of 390 RUB and delivery apply.
Do I need to choose MDF only because it is 1 mm thicker?
No. First compare the actual lower geometry. One millimeter of maximum thickness does not guarantee one millimeter of additional overlap.
Will the oak PLT-001-1 fit with oak parquet?
Stylistically, it's a logical candidate, but the color and pattern need to be checked with a test stain.
What to do with an uneven wall?
Check the physical fit of the profile. If bumps reduce the overlap, wall preparation or a different profile may be required.
Can the baseboard be mounted directly on the parquet?
The baseboard is usually fixed to the wall and should not block the technological operation of the flooring.
Where to buy PLT-001-1?
In the STAVROS product card after geometry confirmation.
Where to compare other baseboards if PLT-001-1 doesn't fit?
In the STAVROS category of wooden baseboards and moldings.
Brief conclusion
The parquet gap is 14 mm and the thickness of PLT-001-1 is 15/16 mm — a borderline pair.
Mathematically, the difference looks promising:
-
15 − 14 = 1 mm;
-
16 − 14 = 2 mm.
But this is only a conditional calculation, if the effective lower overhang of the profile really equals the maximum thickness C.
The product card does not guarantee this automatically. Therefore, before purchasing the entire batch, you need to get a drawing or a physical sample, measure the lower overlap, apply the profile to the widest gap, and check the wall unevenness.
If PLT-001-1 confidently covers 14 mm on the worst section, does not conflict with architraves, and does not press the parquet, it can be ordered in the selected material.
If the gap is 15–18 mm in places or the profile covers 14 mm literally at the edge, it is better to choose a section with a larger real lower overhang than to try to fix the finished parquet with glue, putty, or a random additional strip after installation.