Article Contents:
- One upper overlay, a full molded casing, or no molding at all
- What NPU-270 is and how the four sizes differ in practice
- First measure the finished window area, not the glass or the rough opening
- 1. Visible width of the finished window opening
- 2. Width of the smooth field between the nearest slat zones
- 3. Height from the upper slope to the nearest constraint
- 4. Central axis of the window
- 5. Curtain trajectory and cornice placement
- NPU-270 356 × 70 × 11 mm — local accent
- NPU-270 432 × 85 × 13 mm — medium scale without sharp dominance
- NPU-270 560 × 110 × 16 mm — already a standalone finial
- NPU-270 611 × 120 × 18 mm — maximum visual weight
- What to do with slat asymmetry
- One overlay is enough if
- Full framing is better if
- It is better to leave the window without stucco if
- Check the flatness
- Clean the base
- Do a dry fit
- Check the axis and level
- Choose a compatible mounting compound
- Plan painting before final installation
- Wall-mounted curtain rod
- Hidden ceiling curtain rod
- Roman or roller blind
- Lighting
- Ventilation and sensors
- Choosing by the width of the double-glazed window
- Buying the largest one 'with a reserve'
- Choose only by price
- Considering NPU-270 a full-fledged trim
- Centering by the rails, not by the window
- Do not account for the height of the ornament
- Not considering the depth
- How many pieces to order
- Can non-standard 500 mm be ordered
- In the color of the wall
- In the color of the window frame
- In the color of the slat panels
- Contrasting light overlay on a dark wall
- Check the size option
- Attach to the previously made template
- Inspect the relief under side lighting
- Check the mounting side
- Do not start trimming without necessity
- Can two small NPU-270s be placed side by side instead of one large one?
- What to do if the window is noticeably offset relative to the entire slat wall?
- Can NPU-270 be used above two windows placed side by side?
- Do I need to buy 611 mm if the window is wider than 1.5 meters?
- Can NPU-270 be installed on the wall if the slopes are already completely finished and painted?
- What to do if there is hidden wiring for a curtain rod or lighting running above the window?
- Can NPU-270 be turned vertically?
- Does it make sense to buy 560 mm if 432 mm fits with a large margin?
- Can I first buy the overlay and then adjust the slat panels later?
- How long to wait for NPU-270 to be made to order?
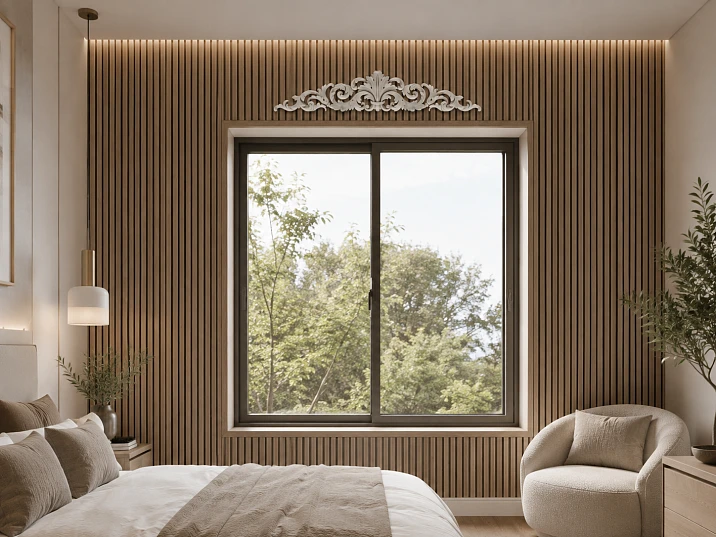
When a window falls inside a wall finished with vertical slats, the opening inevitably interrupts their rhythm. The most obvious solution is to frame the window with moldings or assemble a full decorative casing on all four sides. But next to an active slat texture, such a technique does not always make the wall better. Sometimes it adds another system of lines competing with both the slopes and the slats.
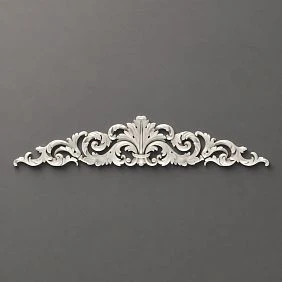
There is a lighter scenario: finish the slopes as a regular finished part of the window, leave the side and bottom sides without a stucco contour, and place one carved NPU-270 overlay made of polyurethane above the top slope. The result is not a technical casing, but a separate upper decorative accent. It marks the center of the window, does not duplicate the verticals of the slat panels, and does not force you to buy linear molding just to "close the frame".
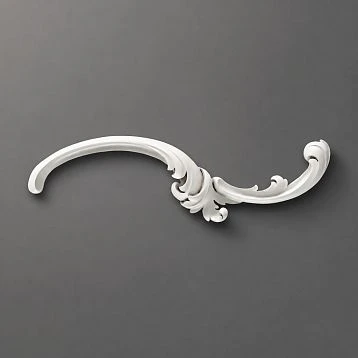
The NPU-270 has four standard sizes: 356 × 70 × 11, 432 × 85 × 13, 560 × 110 × 16, and 611 × 120 × 18 mm. According to the STAVROS technical drawing, size A runs horizontally, B vertically, and C indicates the depth of the relief. This is important: here you can actually compare the four options by length, height, and protrusion from the wall, rather than guessing which side the first digit refers to.
At the time of preparing the material, prices are 1,790, 2,520, 4,980, and 5,880 ₽ per piece, respectively. The average production time for custom orders, as stated in the NPU-270 product card, is 3–7 days. You can order from a single piece, so for one window you don't need to buy a set of several identical overlays.
The main question of the article is not "which NPU-270 is the largest." It's different: what scale does a specific window need, and is an overlay needed at all if the slat finish already creates its own architectural frame.
One top overlay, a full molded casing, or no molding at all
The window area in a slat wall has three fundamentally different solutions. They differ not in the amount of decor, but in the very logic of the composition.
The first option is to leave the window without molding. The slopes are neatly finished, the joint with the slat panels is cleanly resolved, and the only decorative technique remains the texture of the lamellas. This is a strong option for a minimalist interior, a hidden cornice, minimalist furniture, and cases where there are already noticeable functional elements around the window: curtains, a wide radiator, a windowsill, a ventilation grille, or wall sconces.
The second option is full framing. Moldings or other profile elements run along the top, sides, and sometimes the bottom. This solution is appropriate if the window should be perceived as an independent architectural portal, and the slat area itself plays a secondary role. Full framing is especially logical when similar frames are already used on other walls, doors, or panels, and the interior is built on repeating classical geometry.
The third option is a single NPU-270 above the top slope. It falls between the first two. The window gets a pronounced center, but no additional verticals appear on the sides. This is exactly what makes the top overlay interesting next to slat panels: the vertical rhythm remains with the slats, while the molding adds one horizontally oriented focal point.
This scenario does not mean that the NPU-270 replaces a construction casing. It should not cover mounting foam, an unfinished slope edge, or a technical seam. First, the window unit is brought to a finished state, then the decorative task is addressed.
If after renovation you need exactly a light top accent, you can buy carved overlay NPU-270 separately, without assembling a frame around its entire perimeter for it.




What NPU-270 is and how the four sizes differ in practice
NPU-270 is a horizontal carved decorative overlay made of polyurethane. In the official product card, among the application options, wall panels, framing of openings, and window casings are listed. For our task, this is important not as permission to consider it a technical casing, but as confirmation that the manufacturer views the product as part of window compositions as well.
The four versions scale along three axes at once:
| Size NPU-270 | Horizontal A | Height B | Depth C | Price per 1 pc. |
|---|---|---|---|---|
| Compact | 356 мм | 70 мм | 11 мм | 1 790 ₽ |
| Medium | 432 мм | 85 мм | 13 мм | 2 520 ₽ |
| Large | 560 мм | 110 мм | 16 мм | 4 980 ₽ |
| Maximum | 611 мм | 120 мм | 18 мм | 5 880 ₽ |
The difference between the extreme versions is 255 mm horizontally, 50 mm in height, and 7 mm in depth. Therefore, the transition from 356 to 611 mm changes not only how much space the ornament occupies. Its visual weight changes as well. The shortest version reads as a local detail. The longest one reads as an independent top piece capable of noticeably influencing the composition of the entire window area.
There is another nuance. On the frontal plane, 16 or 18 mm of depth seem like small numbers. But next to a smooth slope and with side lighting, the deeper version gives a more noticeable shadow. If neighboring slats also have a pronounced relief, it is the depth that helps understand whether the stucco will support the volume of the wall or, on the contrary, become excessively active.
Therefore, the choice of size cannot be reduced to the rule "the window is wide — we take 611 mm." A window can have a large width but a small wall section above the slope. There can be a wide slat wall but a thin frame profile. There can be a large opening that already dominates the room even without molding. The scale is chosen based on the entire composition, not on a single number of the glazing unit.
Our factory also produces:
First, measure the finished window area, not the glass and not the rough opening.
The most common mistake when choosing upper decor is taking the window size from the glazing unit contract and trying to "match" an overlay to it. This is not enough for the interior.
After window installation, slopes, a windowsill, finish layers, sometimes extensions, curtains, or a hidden cornice appear. Slat panels also have their own boundaries. As a result, the visual window area can be wider or narrower than the number a person remembers as the window size.
For NPU-270, it is useful to take five separate parameters.
Get Consultation
1. Visible width of the finished window opening
Measure the distance between the outer finished edges of the side slopes. If there are already extensions or other decorative contours along the edges, record those as well. It is this line that a person perceives as the real width of the window on the wall.
Let's denote it as Wwindow.
2. Width of the smooth field between the nearest slat zones
If the slats approach the window from the left and right, measure the distance between their actual visible edges at the level of the future overlay. This value may not coincide with Wwindow. For example, there may be 40–80 mm of painted wall remaining between the slope and the first slat.
Let's denote this width as Wfield.
It is Wfield that answers the question of how freely the NPU-270 will exist within the smooth part of the wall.
3. Height from the upper slope to the nearest constraint
From above, the constraint can be a ceiling, cornice, shadow profile, ventilation grille, top line of a built-in wardrobe, or another architectural element. The overlay needs not only horizontal space. The height B for different versions ranges from 70 to 120 mm, so a large model requires noticeably more vertical space.
Let's denote the free height as Hfield.
4. Central axis of the window
The axis is determined by the finished opening, not by the pattern of the slats. With a symmetrical wall, this is obvious. With an asymmetrical one, it is especially important: the first slat on the left may be closer to the slope than the first slat on the right, and the eye will start pushing the decor to one side.
The base point for fitting is the geometric center of the finished window. Only after this can you check whether the entire composition requires a slight visual shift.
5. Trajectory of curtains and placement of the cornice
If there is a wall-mounted cornice, Roman shade, cassette of a roller system, or other hardware above the window, it must be taken into account before ordering. The overlay may physically fit on the wall but still interfere with the mountings or visually conflict with the textiles.
After these five measurements, you get the real geometry of the task. Before that, the choice of size remains almost random.
A full-size template is the best way to choose between 356, 432, 560, and 611 mm
All four NPU-270 share a common ornamental logic, but the scale differs so much that a product card cannot show which version will look more convincing specifically above your window. The most reliable test is to make 1:1 templates.
You don't need to print the entire ornament. For the first stage, it's enough to cut out four rectangles from paper, construction cardboard, or masking film:
-
356 × 70 mm;
-
432 × 85 mm;
-
560 × 110 mm;
-
611 × 120 mm.
Mark the vertical axis on each one and attach the template above the window in the center. First, look at it frontally, then move to the main points from which the window is seen in real life: to the room entrance, to the sofa, to the dining table, to the opposite wall.
Such a test has several tasks.
The first is to check the scale. A small overlay may formally fit, but get lost over a wide opening. A large one may look impressive in a close-up photo, but on the wall it may draw attention away from the slat panels to itself.
The second is to check the side margins. How much smooth wall remains between the ends of the template and the start of the slats? Is there a feeling that the ornament lies freely on the plane, or is it almost pressing against the texture?
The third is to check the vertical field. The largest version has a height of 120 mm. If from the top slope to the ceiling cornice there is only 150–170 mm, a large template may end up cramped even with sufficient width.
The fourth is to check the axis. On a slat wall, vertical stripes can create an optical shift. Sometimes a geometrically correct center appears shifted due to uneven spacing of the outer lamellas. The template allows you to see this before gluing.
After such a fitting, it often turns out that the choice changes. A person who was going to take 611 mm "because the window is large" sees that 560 mm leaves more air and works better with the slats. Or vice versa: 432 mm seems like a random small detail, and it is 560 mm that brings the whole composition together.
How to read the four sizes: who suits each version
There is no factory table here like "window width → NPU-270 size." The manufacturer does not set such a standard. But each option has a clear compositional role that can be checked on the template.
NPU-270 356 × 70 × 11 mm — local accent
This is the most compact and most affordable version. It suits when you want to mark a center above the window, but not create the impression of a full-fledged stucco top piece.
356 mm is especially reasonable to try in small rooms, in narrow window areas, and where the slat panels themselves are contrasting: dark wood, deep profile, active lighting. In such surroundings, large stucco can add too much secondary decor, while the small one works as a point.
The price of 1,790 ₽ makes this version convenient for a cautious scenario: you want to check whether the classic motif is needed at all, but you are not ready to turn the entire opening into a stucco composition.
The weak point of 356 mm manifests above a wide window. If the opening visually takes up most of the wall, a small overlay may look like a furniture detail accidentally moved upward. That is why it should not be chosen solely out of a desire to save money.
NPU-270 432 × 85 × 13 mm — a medium scale without sharp dominance
432 mm is noticeably larger than the first version, but it does not yet turn into a heavy upper accent. For many standard interior windows, this is a good candidate for the first full fitting.
It already has a greater height — 85 mm, so the ornament is easier to read from a distance. The depth of 13 mm enhances the chiaroscuro, but does not create such a protrusion as the 16–18 mm of the older versions.
The price is 2,520 ₽. The difference from 356 mm is 730 ₽, and the horizontal size increases by 76 mm. If both versions visually fit, the choice between them should be made not by cost, but by whether the wall needs a noticeable crown above the window or only a small center marker.
432 mm often wins in interiors where slats occupy a significant area, but the window zone itself should not become the main decorative object.
NPU-270 560 × 110 × 16 mm — already an independent finial
The transition from 432 to 560 mm is the most important in the line. Horizontally, 128 mm is added, vertically — 25 mm, in depth — 3 mm. But the price increases from 2,520 to 4,980 ₽, that is, by 2,460 ₽.
This is exactly where you cannot reason, "I'll take the next one, it's just slightly larger." 560 mm changes the role of the product. The overlay begins to be perceived not as a small accent, but as a full-fledged central detail of the window composition.
It is appropriate above a wide opening, on a large smooth lintel between slatted panels, and in a room where the decor is readable from several meters away. But if the window is low or the ceiling is close, a height of 110 mm can make the top too busy.
It is better to check 560 mm not only with a paper rectangle. After determining the scale, it is useful to look at a photo or visualization taking into account the actual pattern: the central part of the ornament in the larger version is more noticeable and requires sufficient background.
NPU-270 611 × 120 × 18 mm — maximum visual weight
This is the largest option: 611 mm horizontally, 120 mm in height, and 18 mm in depth. Price — 5,880 ₽.
It is suitable not because it is "better" than the smaller ones, but when the window and wall truly support such a scale. This could be a wide window in the living room, a high wall section above the slope, a large viewing distance, calm coloring, and relatively restrained slats.
For 611 mm, it is especially important to look at the composition from the side. The 18 mm depth creates a more pronounced shadow. With top lighting or side daylight, the relief will be more noticeable than in the frontal photo on the card.
If there is already a wide ceiling cornice nearby, an active curtain, carved window sill decor, or a bright wood grain pattern, 611 mm may become a fourth competing accent. Then the smaller version often looks more expensive precisely because of the air around it.
The calculation does not choose the size for you, but shows how much wall will remain around the overlay
There is one useful piece of arithmetic here: determining the side margins with symmetrical placement.
If Wmargin is the width of the smooth part of the wall between the nearest slatted zones, and A is the horizontal length of the selected NPU-270, then when centered:
side field = (Wfield − A) / 2
This is not a design standard. The number only shows the actual remaining wall space on the right and left. Based on the template, you decide whether it is visually sufficient.
Suppose there is 1,200 mm of smooth surface left between the inner edges of two slat zones.
| NPU-270 | Length A | Total free space on the sides | When centering on each side |
| 356 × 70 × 11 | 356 мм | 844 мм | 422 мм |
| 432 × 85 × 13 | 432 мм | 768 мм | 384 мм |
| 560 × 110 × 16 | 560 мм | 640 мм | 320 мм |
| 611 × 120 × 18 | 611 мм | 589 мм | 294.5 mm |
This table shows something important: on a wide field, all four models fit very freely physically. This means arithmetic does not give the answer "which one to buy." It only removes the risk of tightness. Then the window scale decides.
If the Wfield is, for example, 650 mm, the situation is different. The 611 mm version will leave only 39 mm in total, that is, about 19.5 mm on each side. Formally, the product fits, but it almost touches the visual boundaries of the field. In this case, the template will most likely show a cramped composition.
There is also a vertical check:
vertical free field = Hfield − B
If there is 180 mm from the slope to the nearest constraint, the 70 mm version leaves 110 mm of free height, while the 120 mm version leaves only 60 mm. Where exactly to distribute this remainder above and below depends on the window and cornice architecture. But the figure itself shows in advance which option will provide more air.
Thus, calculations help filter out clearly cramped options, but they do not replace a fitting.
Why the transition from 432 to 560 mm should be evaluated especially carefully
In the NPU-270 line, there are two different types of price increases.
From 356 to 432 mm, the cost increases from 1,790 to 2,520 ₽. The buyer pays an additional 730 ₽ for a larger pattern.
From 432 to 560 mm, the price changes from 2,520 to 4,980 ₽. The additional payment is already 2,460 ₽. The horizontal length increases by 128 mm in this case.
From 560 to 611 mm, the increase is 51 mm horizontally and 10 mm in height, and the price rises by another 900 ₽ — to 5,880 ₽.
From this, one cannot conclude that "432 is more profitable" or "560 is unprofitable." For decorative elements, the price does not have to grow linearly with millimeters. But this step forces the right commercial question:
does 560 mm give your specific interior new value that is visible after installation?
If on the template 432 mm looks expressive enough, and 560 mm only takes up more wall space, there is no point in overpaying for a larger scale.
If 432 mm is lost above a wide window, and 560 mm finally brings the composition together, the surcharge becomes justified: you are not buying "128 extra millimeters of polyurethane," but the correct scale.
The same logic works between 560 and 611 mm. The largest model is needed not because it is the maximum in the catalog. It is needed when that particular size gives the correct relationship to the opening, slats, and wall height.
A slat wall changes the rules: the overlay should argue with the window, not with the slats.
Vertical slats already serve as a decorative frame. They set an upward direction, create a regular rhythm, and form deep shadow. If you add a full classic contour around the window, especially with pronounced side elements, two vertical systems begin to work simultaneously on one wall.
One NPU-270 solves the problem differently. It does not try to continue the slat pattern. Instead, it creates a transverse pause above the window.
This works especially well when small smooth wall sections are preserved between the slope and the slats. Then the composition can be read as a sequence:
slats → calm window opening → upper carved accent → slats.
At the same time, it is not at all necessary to make the overlay contrasting in color. If you paint it in the color of the smooth wall, the pattern will be revealed through light and shadow. This approach reduces visual competition with wood or painted slats.
Contrast painting is a stronger technique. It can be justified if the NPU-270 is deliberately meant to connect with a dark window frame, furniture hardware, or other stucco decor. But on a slat wall, contrast increases the visual weight of the product, so the size should be chosen more carefully.
If the panels themselves have not been purchased yet, it is useful to first determine the composition of the entire wall, and then Buy slatted panels for wall finishing already with a clear boundary of the window zone. Then you won't have to squeeze the overlay into a randomly remaining gap at the last moment.
What to do with asymmetry of the slats
Let's imagine that to the left of the window the first slat is 60 mm from the slope, and to the right — 110 mm. If you simply focus on the edges of the slat zones, the central overlay may shift relative to the window.
The basic option is to place the template along the axis of the finished opening. Then look at the wall as a whole. If the asymmetry of the panels is so noticeable that the center seems wrong, you can test a slight visual shift. But this should be a deliberate compositional decision, not an attempt to "fit between the two nearest slats."
For a single top piece, the connection to the window is usually more important than the connection to the slat spacing.
When one NPU-270 is enough, when a full casing is better, and when molding is unnecessary
A commercially useful choice is not a choice in favor of the product at any cost. Each of the three scenarios has its own conditions.
| Situation | One NPU-270 on top | Full stucco framing | Without molding |
| Slats come close to the window | Often successful: does not add new verticals | May overload the wall | Good for minimalism |
| There are already classic frames on the wall | May look too separate | Often it is more logical to support the overall system | Possible if the window is secondary |
| Small upper spandrel | Only compact sizes after the template | Often too cramped | Often the best option |
| Wide window and large viewing distance | 560 or 611 mm can work as a finial | Suitable if an architectural portal is needed | May look too empty |
| Active curtains or a large cornice | Check especially carefully | High risk of overload | Often rational |
| The window should be the main accent of the wall | Suitable as a light accent | Suitable for pronounced classic style | May lack completeness |
| Slat wall — the main decorative object | A small or medium NPU-270 is good | Usually requires caution | Completely acceptable |
One overlay is enough if
The slopes are already finished and look neat; the side lines of the window do not require additional masking; the vertical rhythm is created by the panels themselves; there is a free smooth field above; the interior needs a center, but not a full portal.
Then one NPU-270 performs a clear job and does not force buying extra elements.
Full framing is better if
The room already has molding frames, classic doors with casings, cornices, and other repeating architectural profiles. In such an interior, a single top piece sometimes looks like an unfinished fragment of a large system.
If after the template you come to exactly this solution, it is easier to first choose the overall geometry, and then buy polyurethane moldings and choose a trim as part of the whole, rather than trying to build a frame around an already purchased NPU-270.
It is better to leave the window without molding if
There is little height above the opening; the curtain system occupies the upper zone; slatted panels have a very active pattern; the window is already highlighted with a contrasting color; nearby there is a TV, decorative lighting, stone, or other strong accents.
Empty space is also part of the composition. If the trim does not add function or a clear visual effect, it can be omitted.
NPU-270 is a decorative trim, not a replacement for a technical casing
The product description mentions use in window casings, but in real renovation it is important to distinguish between two levels of finishing.
The technical window unit must resolve joints, slopes, the junction of finishing materials, and all construction gaps. This is the job of the window itself, the slope system, plaster, extensions, profiles, and other materials provided by the design.
NPU-270 works after this as a decorative relief.
If the upper slope still has a visible mounting seam, uneven edge, or an uncovered transition to the wall, the trim cannot be used as a random masking strip. First, its shape is not designed to cover a long straight seam. Second, the central carved composition will only draw more attention to the problem area.
The correct sequence is as follows:
-
finish window installation;
-
draw out the geometry of the slopes;
-
perform final finishing;
-
install or finally mark out the slat panels;
-
determine the center of the window and the available field;
-
select the size of NPU-270 according to the template;
-
only after this proceed to decorative installation.
Thus, the overlay truly becomes a decoration, not a way to hide unfinished renovation.
Installation on a finished wall: what to check before glue
The official card for NPU-270 indicates installation with glue and the possibility of painting. In the related products block, KUDO HIGH TACK 280 ml is also offered. This does not mean that any compound is equally suitable for any wall: the base may be painted, plastered, tiled, or have another finish.
Before installation, it is useful to go through several stages.
Check the flatness
The carved overlay should fit against the wall with its mounting part without wobbling. If the upper lintel above the window has a noticeable wave, the decorative piece may emphasize it with shadows and get uneven contact with the adhesive.
Clean the base
Dust, weak paint, chalky surfaces, and unstable old layers reduce adhesion. The base is prepared according to its material and the instructions of the chosen adhesive.
Do a dry fit
Before applying the compound, hold the actual overlay against the markings and look at it not only up close. Even after a paper template, the real relief may be perceived differently.
Check the axis and level
The central vertical of the ornament should align with the chosen window axis. For a horizontal position, it is more convenient to use a level rather than rely on the top line of the slope: it may have a slight construction deviation.
Choose a compatible mounting compound
If you want to use a product from the related materials block, you can buy glue for installing moldings. Before working, still check the adhesive instructions against the overlay material and the specific wall base.
Plan painting before final installation
If the NPU-270 will match the wall color, decide in advance whether it is more convenient to paint it separately and then do local touch-ups, or to paint after installation. The choice depends on the project and the type of coating. The main thing is not to start painting until the installation scheme and surface preparation are clear.
Curtains, cornice, lighting, and other constraints that are easy to forget
The overlay is located in the most functionally saturated intersection zone of the window—above the upper slope. Therefore, its selection cannot be limited to the width of the opening.
Wall-mounted cornice
If the cornice is mounted above the window, the NPU-270 may fall exactly into the strip where the brackets need to go. Moving the cornice mounting just for the molding is often unreasonable. First mark the fasteners and the curtain trajectory, then the decorative element.
Hidden ceiling cornice
There may be no direct conflict on the wall here, but a dense curtain can partially cover the overlay when gathered. Check whether the carved accent will be visible in everyday use at all.
Roman or roller blind
The cassette and top mounts may occupy space above the slope. Besides the physical gap, the visual aspect matters: a technical box and a classic ornament placed close together rarely look like a unified composition.
Lighting
Side or top lighting enhances the relief. For a version with a depth of 18 mm, the effect will be stronger than for 11 mm. If there is a directional spotlight nearby in the ceiling, look at the template and sample with the light turned on.
Ventilation and sensors
A grille, climate sensor, wiring for curtains, alarm, or other technical element may unexpectedly end up on the central axis. First, preserve access and function of the equipment, then select the decor.
Mistakes that make the correct NPU-270 look wrong
Choose by the width of the double-glazed unit
Why it happens: the window size is easy to find in the documents.
Consequence: the overlay is matched not to the actual wall, but to a number that, after finishing, no longer describes the visible composition.
How to check: measure the finished slopes and the field between the battens.
How to avoid: choose after final finishing, or at least according to the exact design of these layers.
Buying the largest one "with a margin"
Why it happens: a large part seems more prestigious.
Consequence: 611 × 120 × 18 mm draws too much attention and crowds the gap between the slats.
How to check: a 611 mm template next to 560 and 432 mm.
How to avoid: compare not products on a screen, but four sizes on one wall.
Choosing only by price
The cheapest 356 mm may get lost, and switching to 560 mm indeed almost doubles the cost relative to 432 mm. But price alone does not determine the right scale.
Solution: first determine two visually suitable versions, and only then compare the budget between them.
Treating NPU-270 as a full-fledged trim
Consequence: a decorative part is used to cover a technical joint.
Solution: first finish the slopes and junctions, then install the stucco accent.
Center on the rails, not on the window
If the side panels are arranged asymmetrically, trying to "stand exactly between the nearest slats" can shift the overlay away from the opening's axis.
Solution: start from the center of the window and only then visually check the entire wall.
Do not account for the height of the ornament
A person compares 356 and 611 mm only by length, forgetting that the height simultaneously grows from 70 to 120 mm.
Solution: the template must have both real planar dimensions, not just be a horizontal strip of the required length.
Not considering depth
In a frontal view, 11 and 18 mm are almost impossible to compare. With side lighting, the difference is more noticeable.
Solution: for large options, look at the actual product or a visualization at an angle and check the lighting.
What to buy together with NPU-270, and what should not be added automatically
For one upper accent, the basic configuration is very short:
-
one NPU-270 of the selected size;
-
compatible mounting compound;
-
materials for finishing, if the overlay will be painted after installation.
The list may end here.
There is no need to automatically add moldings, corner elements, and a second overlay just because they exist in the catalog. If the project implies one central piece, the purchase should remain just as simple.
If after trying it on it becomes clear that one NPU-270 is not enough and the window really asks for a full composition, it is worth first looking at Polyurethane decorative appliques и Polyurethane wall decor, and only then assembling the overall system.
For projects where the molding should be repeated not only at the window, but also on doors, panels, or the ceiling, it is more convenient to evaluate the entire section and You can buy ready-made stucco matching the Baroque style. Calculate the quantity: linear meters of cornices and moldings, number of rosettes, pilasters, consoles, corner elements. Add a ten to fifteen percent allowance for trimming. as a single stylistic group, rather than picking unrelated elements one by one.
How many pieces to order
For one window and one upper center, one NPU-270 is needed.
If a room has two identical windows and the design should repeat, two overlays of the same size will be needed. If the windows differ noticeably in width, automatically assigning different sizes to them is not always good: adjacent elements are better compared first in a common frontal layout. Sometimes identical 432 mm creates a calmer rhythm than 432 mm on one window and 560 mm on the other.
Can I order a non-standard 500 mm
In the general STAVROS information, the possibility of changing product sizes for batch orders is indicated. For a single window, it is more practical to base on the four standard sizes of NPU-270 and not plan an individual length as a guaranteed piece option. If a non-standard size is required, the conditions need to be agreed separately before design.
Viewing distance changes the perception of size more than it seems from the catalog
The same overlay can look large from a distance of 80 cm and almost disappear when the window is viewed from across the living room. Therefore, the size of NPU-270 is useful to evaluate not only relative to the opening itself, but also relative to the main viewing distance.
In a small bedroom, the window is often seen from two to three meters. The details of the ornament are read well, and the 356 or 432 mm version can work quite confidently. In a living room with an open plan, the same decor is sometimes viewed from five to six meters. At such a distance, the fine relief merges into a general silhouette, and what matters is not individual curls, but the entire horizontal mass of the product.
This does not mean that a large room always needs 611 mm. The balance of three variables is important:
-
width of the window itself;
-
amount of free wall around the overlay;
-
distance from which the composition is most often viewed.
If the window is wide but located in a narrow wall section, a large overlay may feel cramped even in a spacious room. If the window is medium-sized, but surrounded by a large calm field and viewed from afar, 560 mm may be more convincing than 432 mm.
There is a simple test. After installing a paper template, photograph the wall not in close-up, but from the actual viewpoint. Then take four shots from the same position, changing only the templates. Comparing such images is more useful than comparing four product photos: the background, window, slats, and room scale remain unchanged.
The shot from the room entrance is especially revealing. It is often the first impression that determines whether the NPU-270 becomes an architectural part of the wall or looks like a small appliqué.
Color and contrast can visually "enlarge" the same NPU-270
The product dimensions are fixed, but the perceived scale depends on the paint color. This factor is especially important when two versions fit the template and it is hard to decide, for example, between 432 and 560 mm.
Matching the wall color
If the overlay is painted in the same tone as the smooth surface above the window, its outline does not form a separate color patch. The ornament is read mainly through light and shadow. This solution is visually calmer and allows using a larger size without the feeling of a heavy "crown."
For a slatted wall, this is one of the safest options. The slats can remain the main material, while the molding becomes the secondary layer. The technique works especially well when the panels have a natural wood texture: the color contrast is already provided by the slats themselves, so adding a third active paint color is not necessary.
In the color of the window frame
If the frame is dark and NPU-270 is painted in a close tone, the upper overlay visually connects with the window and becomes more noticeable. Even the 432 mm version can be perceived as stronger than a larger one painted in the wall color.
This solution has a risk: a classic plant relief in a very dark color can become a heavy visual spot. Before painting, it is useful to simulate the color on a paper template or in a simple visualization.
In the color of the slat panels
If the slats are painted and have a calm solid shade, NPU-270 can be matched to them by color. Then two different types of relief are united by a single palette. But with a natural wood grain, trying to literally "fake" polyurethane as wood is usually more difficult: the result depends on the finishing technique and must be planned in the project in advance.
Contrasting light overlay on a dark wall
This option sharply enhances the silhouette. A white or very light NPU-270 on a dark background will appear larger than the same part on a light wall. Therefore, if the contrast is already high, the large 560 and 611 mm sizes should be checked especially carefully.
This is where a useful principle emerges: first choose the geometry, then check it in the intended color. Otherwise, you might decide that 611 mm fits in size, but after contrasting painting, get a much heavier accent than expected.
How to check the product after receipt and before installation
Even the correct size in the cart needs to be checked upon receipt. For carved decor, this takes a few minutes and allows you to detect a problem before the product is glued and painted.
Verify the size option
One article number NPU-270 has four versions available. Therefore, seeing only the name is not enough NPU-270. Check the full combination A × B × C against the order:
-
356 × 70 × 11 mm;
-
432 × 85 × 13 mm;
-
560 × 110 × 16 mm;
-
611 × 120 × 18 mm.
If you chose 560 mm, but the documents or packaging indicate the 432 × 85 × 13 mm variant, this is not "the same product slightly smaller," but a different size of your design part.
Attach it to the previously made template
Do not discard the paper mock-up used during selection until installation. You can place the received overlay on top of it. This check simultaneously confirms the dimensions and shows whether the actual silhouette matches the scale you agreed on the wall.
Inspect the relief under side lighting
Frontal lighting hides minor damage and irregularities. Turn the product to side light and inspect the protruding parts of the ornament. Pay special attention to thin edges, the central top of the pattern, and the most prominent curls.
Check the mounting side
Before applying glue, the overlay should fit normally on a flat surface. A dry fit will show if there is any unexpected rocking and whether the wall matches the installation location.
Do not start trimming without necessity
For the scenario in question, the NPU-270 has four ready-made sizes. If, after receiving it, you suddenly want to shorten the product, this is a sign that the design size was chosen incorrectly. Carved ornament is not the same as smooth molding: random trimming of the edge can disrupt the symmetry and the finished pattern.
If the standard size really does not fit, it is safer to go back to choosing another version or agree on a separate solution than to fix the finished decor "on site" without a confirmed scheme.
How to choose between two suitable sizes without the subjective "I kind of like this one more"
After a full-size dry fit, two candidates often remain. For example, 432 and 560 mm both fit and both look acceptable. At this point, it is useful to compare them against the same set of criteria.
| Criterion | What to compare between the two candidates |
| Free field | Which option has a better readable smooth wall around the ornament |
| Connection with the window | What size is perceived as part of the opening rather than a separate appliqué |
| Competition with the slats | Doesn't the large version start to conflict with the vertical texture |
| Height above the reveal | Doesn't the upper zone become cramped due to the increase in B |
| Depth | How does the shadow change under actual lighting |
| Viewing distance | What silhouette is readable from the main point of the room |
| Color | Won't the chosen version become overly noticeable after painting |
| Price | Does the more expensive version provide a truly visible improvement? |
Such a comparison eliminates a typical mistake: choosing based on a single criterion. If 560 mm looks prettier in a close-up photo but lets less air through, conflicts with the cornice, and offers almost no advantage from the sofa, its larger size brings no useful result to the interior.
Conversely, if 432 mm gets lost from a distance, while 560 mm preserves the center of the window without crowding the slats, the larger version solves a specific problem and justifies the extra cost.
Why a single top accent can be more economical than full framing, but counting only the price of the trim piece is incorrect
Comparing "one NPU-270 versus full casing" can easily be reduced to the price of a single item, but that would be an incomplete picture.
One top trim requires a minimum of items: the NPU-270 itself and suitable mounting material. If necessary, materials for painting and local finishing are added.
Full decorative framing typically requires molding, cutting, additional joints, corner treatment, and a larger volume of installation work. The exact cost depends on the chosen moldings, opening dimensions, and layout, so inventing a single sum for "full casing" is not possible.
However, before purchasing, you can compare the complexity of the solution.
If the goal is only to mark the top of the window and reconcile the opening with the slatted wall, a single NPU-270 achieves the result with fewer parts. If the goal is to turn the window into a classic portal, saving on side elements will ruin the very concept, and a single trim would be false economy.
In other words, the more advantageous option is not the one with fewer rubles in the cart, but the one that solves your specific task without subsequent rework.
Step-by-step selection of NPU-270 before ordering
To avoid returning to the same measurements, it is more convenient to go through the solution once in the correct sequence.
Step 1. Finish the geometry of the window area. If renovation is still ongoing, mark future slopes, batten boundaries, cornice, and finishing layers on the drawing.
Step 2. Measure Wwindow. The visible finished width of the opening is needed.
Step 3. Measure Wfield. This is the distance between the nearest visible boundaries of the batten zones at the height of the future overlay.
Step 4. Measure Hfield. Record the actual height from the upper slope to the ceiling, cornice, or other constraint.
Step 5. Mark the central axis of the window. Do not automatically tie it to the lamella pitch.
Step 6. Make four templates. 356 × 70, 432 × 85, 560 × 110, and 611 × 120 mm.
Step 7. Remove clearly weak options. One may get lost, another may be cramped. Usually, after a real fitting, two candidates remain.
Step 8. Compare the remaining ones by depth and price. For example, if choosing between 432 and 560 mm, consider not only the 128 mm difference in length, but also the height of 85 vs 110 mm, the depth of 13 vs 16 mm, and the price of 2,520 vs 4,980 ₽.
Step 9. Check the curtains, lighting, and technical elements. The overlay should not interfere with the operation of the window.
Step 10. Decide whether a frame is needed at all. If a single piece looks unfinished after trying it on, it's better to reconsider the concept before purchasing.
Step 11. Check the exact size in the product card. Do not order NPU-270 based only on a general photo: the item has four variants.
Step 12. After checking, you can order the selected NPU-270. For one window, one piece of the appropriate size.
As of the time of writing this article, the summary for the four variants looks like this:
| What we choose | Size, mm | Price | What to check first |
| NPU-270 compact | 356 × 70 × 11 | 1 790 ₽ | Does it get lost above the window |
| NPU-270 medium | 432 × 85 × 13 | 2 520 ₽ | Is the center sufficiently expressed |
| NPU-270 large | 560 × 110 × 16 | 4 980 ₽ | Is a stronger scale justified |
| NPU-270 maximum | 611 × 120 × 18 | 5 880 ₽ | Does it not overload the window and the batten wall |
If after this check a specific scale is selected, you can order NPU-270 made of polyurethane in the required size, without turning the purchase of one part into an unnecessary set.
FAQ
Can two small NPU-270s be placed side by side instead of one large one?
Technically, two separate overlays can be placed on one plane, but that is already a different composition. NPU-270 is symmetrical and designed for an independent central pattern; two identical parts will create two centers. For one window, it is better to first check a single 560 or 611 mm. The paired scheme is justified when the architecture itself has two independent centers, for example, two closely spaced openings.
What to do if the window is noticeably shifted relative to the entire slat wall?
Do not move the overlay to the geometric center of the wall just for symmetry. First, align it with the finished window opening. Then evaluate the wall from the main viewing point. If visual correction is required, it is done according to the mockup, but the connection to the specific window should remain readable.
Can NPU-270 be used above two windows standing next to each other?
Yes, but first decide whether the windows are perceived as two separate openings or as a single block. For two independent windows, two identical overlays are logical. For a single wide composition, two separate pieces may fragment the center; then another design option for the entire upper zone needs to be checked.
Do I need to buy 611 mm if the window is wider than 1.5 meters?
No. The window width does not create an automatic selection rule. On a wide opening, 560 mm may look better due to more free space, and in an active slat wall even 432 mm is sometimes enough. The choice is confirmed by the template and viewing distance.
Can NPU-270 be installed on a wall if the slopes are already fully finished and painted?
This is exactly the scenario convenient for a separate decorative overlay: the technical finishing of the window is already complete, and the molding is added as a final accent. Before adhesive installation, check the strength and compatibility of the existing coating with the selected mounting compound.
What to do if hidden wiring for a curtain rod or lighting runs above the window?
First, determine safe mounting zones and maintain access to the electrical system. NPU-270 is mounted with adhesive, but any additional operations with the base must account for the actual cable route. If the wiring occupies the central zone, the scheme should be clarified before final marking of the decor.
Can the NPU-270 be rotated vertically?
The technical drawing and product category show the item as a horizontal composition: A runs horizontally, B runs vertically. Rotating it would change the nature of the ornament and would no longer match the intended upper window accent scenario. For a vertical application, it's better to choose decor designed in the corresponding orientation.
Is there any point in buying the 560 mm if the 432 mm fits with plenty of room to spare?
Only if the 560 mm works better in terms of scale. Physical clearance around the 432 mm doesn't necessarily mean it's expressive enough. Compare both templates from the distance you most often view the window from. If there's no difference in composition quality, the larger version isn't necessary.
Can I buy the overlay first and fit the slat panels later?
Yes, if the entire wall is still being designed and the panel boundaries will be deliberately built around the chosen decor. But it's not worth randomly cutting the already selected slat layout just to gain a few centimeters of free space. It's better to first create an overall frontal wall plan.
How long does it take to wait for an NPU-270 made to order?
The specific product page shows an average production time of 3–7 days for made-to-order items. Before paying, always check the current status of the selected size: availability and lead times may change.
In summary: for a slat wall, first choose the level of decor, and only then the size of the NPU-270.
A window within a slat wall doesn't necessarily need a full molded casing. The vertical panels already create a strong architectural rhythm, so a single horizontal carved overlay above the upper slope can yield a more precise result: the window gets a focal point, while the side sections remain free of additional profiles.
But even one NPU-270 should not be bought automatically. First, you need to understand whether a stucco accent is needed at all. Then measure the finished opening, the smooth field between the slats, and the free height. After that, make four templates and compare the real scales:
-
356 × 70 × 11 mm — 1,790 ₽;
-
432 × 85 × 13 mm — 2,520 ₽;
-
560 × 110 × 16 mm — 4,980 ₽;
-
611 × 120 × 18 mm — 5,880 ₽.
The most expensive option is not automatically the best. The most compact one is not always the most rational. The right NPU-270 is the one that leaves enough smooth background, reads from a real distance, does not argue with the cornice and curtains, and supports the window rather than turning it into an overloaded portal.
The final sequence is simple:
finished slopes → boundaries of the slat panels → width and height of the free field → window axis → four templates → check of curtains and light → choice of 356/432/560/611 mm → check of price and size in the cart → one overlay per window → adhesive mounting on a prepared base.
Thus, NPU-270 becomes exactly what it should be in this project: not a random piece of stucco and not a replacement for a construction trim, but a controlled upper decorative accent within an already formed slat wall.