Article Contents:
- What NPU-363.1R is and what you shouldn't make up about it
- Three proper ways to finish a molding before slat panels
- How to tell if the straight end is already good enough
- What the NPU-363.1R 1:1 mockup checks
- How much free painted wall to leave between the decor and the slats
- Why it's better not to run NPU-363.1R onto the relief of slat panels
- The scale of NPU-363.1R should be compared with the specific molding
- Color: matching the wall, matching the molding, or contrasting
- Lighting: 17 mm relief at the edge of the slats
- Where exactly to end the molding: at the very edge of the slats or earlier
- NPU-363.1L: when you need to check the mirrored article
- How many NPU-363.1R to order: you need to count the ends, not the meters of molding
- How to connect NPU-363.1R with MLDPU-002 without unconfirmed promises
- Installation after renovation: what to check on an already painted wall
- A straight end also requires professional finishing
- What changes if the edge of the slat zone already has its own finishing
- How the transition looks from different distances
- When NPU-363.1R really costs 990 ₽ in this composition
- When it's better not to buy NPU-363.1R
- Mistakes that most often ruin the transition of the molding to the slats
- The fourth option without NPU: making an end return from the molding itself
- The horizontal and vertical lines of the molding end at the slats differently
- Plane difference: the painted wall and the slat zone can be at different depths
- Control measurement chart before purchase
- If the slat panels can still be changed, don't adapt the entire assembly to the NPU
- Practical algorithm before ordering NPU-363.1R
- Decision matrix: NPU-363.1R or a straight end
- Bottom line: NPU-363.1R is needed not because the molding ends, but because the end of the line requires a separate accent
- FAQ
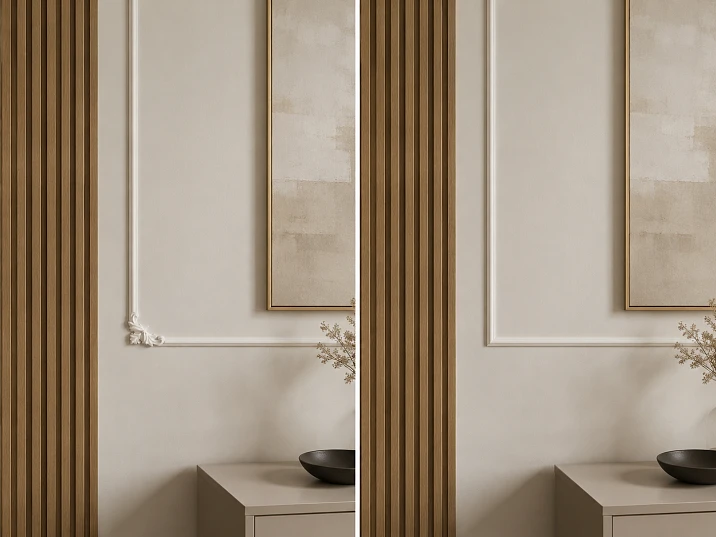
The painted wall and slat panels already form two zones with different characters. A molding runs along the smooth part of the wall, but I don't want to continue it onto the slatted section: there's already enough vertical rhythm and volume there. One last detail remains—how to finish the horizontal or vertical line of the molding at the boundary of the slats.
The simplest option is to cut the molding flush, treat the end, and leave it without additional decoration. The second is to end the line a bit earlier, keeping a calm section of painted wall between the molding and the slatted zone. The third is to add a decorative element for moldings, NPU-363.1R, made of polyurethane, and turn the end of the linear profile into a standalone decorative point.
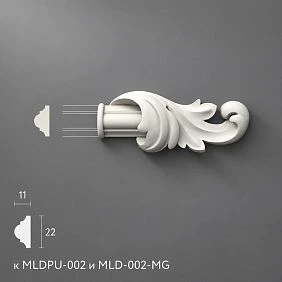
The NPU-363.1R has confirmed dimensions of 106 × 43 × 17 mm, material—polyurethane, current price—990 ₽ per piece. Its card is in the "Decor for Moldings" catalog and shows NPU-363.1L and molding MLDPU-002 among related products. But the card itself does not call NPU-363.1R an "end cap" and does not fix in text the only permissible position relative to the end of the molding. Therefore, the right question is not "is an end cap mandatory," but whether a specific composition needs an additional decorative element and whether its actual shape fits your molding.
The direct answer: NPU-363.1R is not needed automatically. If the transition from the smooth wall to the slat panels looks clean even without it, and the molding itself is expressive enough, a straight treated end can be stronger and more modern. NPU-363.1R is worth adding when the end of the linear profile looks accidentally cut off, there is enough space on the painted surface for an element of 106 × 43 × 17 mm, and the carved accent truly ties the classic molding line to the more active slatted wall.
The most rational check before purchasing is one full-size mock-up of the joint: the actual molding, the actual boundary of the slat panels, and the silhouette of NPU-363.1R at a 1:1 scale. For one ending, the cost of the experiment is 990 ₽, but if identical joints repeat four times, the order already grows to 3,960 ₽, and with mirrored endings, you additionally need to check whether some elements will be required in the NPU-363.1L version.
What NPU-363.1R is and what you shouldn't make up about it
NPU-363.1R is in a separate STAVROS product group, "Decor for Moldings." Therefore, the most accurate working name for the article is decorative element for moldings NPU-363.1R made of polyurethane.
For the sake of text convenience, you shouldn't rename it to:
-
an end cap;
-
a molding tip;
-
overlay for slats;
-
corner element;
-
mandatory completion of MLDPU-002.
Such names already contain an unconfirmed function.
| Parameter | NPU-363.1R |
|---|---|
| Category | Decor for moldings |
| Material | Polyurethane |
| Size A × B × C | 106 × 43 × 17 mm |
| Price | 990 ₽/pcs. |
| Related mirror article | NPU-363.1L |
| Related molding in the card | MLDPU-002 |
Buy decorative element for moldings NPU-363.1R makes sense only after fitting to a specific profile and edge of the slat zone.
Why the presence of MLDPU-002 among related products is not yet equal to a technical guarantee of the joint
The NPU-363.1R card shows MLDPU-002 in the related products block. This is a useful hint for selection, but not a basis to automatically assert that any end of MLDPU-002 must be assembled with NPU-363.1R in one fixed position.
For a precise connection, the following are important:
-
the cross-section of the specific molding;
-
the height of its decorative part;
-
the shape of the NPU-363.1R end;
-
ornament direction;
-
the actual plane of the wall;
-
the distance to the slats.
Therefore, before installation, a dry joint of two real parts or a technical drawing showing their mutual position is needed.
The size 106 × 43 × 17 mm is estimated from the drawing, not from guessing about axes.
The card confirms the size A × B × C, but from one order of numbers one cannot automatically conclude that 106 mm always goes strictly along the molding line and 43 mm across. The ornament has its own orientation.
For a paper mock-up, you can start with an overall rectangle of 106 × 43 mm, but the final layout is better cut out according to the real silhouette of NPU-363.1R and positioned as shown on the card or drawing.
The thickness of 17 mm is also important: the element works not only as a pattern on a flat surface, but also as a relief that will be noticeable next to the volumetric battens.




Three proper ways to finish a molding before batten panels
The buyer does not need to choose NPU-363.1R in advance just because the product exists. First, three different architectural logics are compared.
| Option | What the joint looks like | When it is especially appropriate | Main risk |
| Straight end | the molding ends with a clean, machined cut | a modern, minimalist wall | the end may seem randomly cut off |
| Indent from the battens | the molding ends earlier, leaving a painted field between it and the panels | need to visually separate two finishes | too small or random gap |
| NPU-363.1R | the end of the molding gets a separate carved accent | a classic molding needs to be compositionally completed | decor can overload the transition |
A straight end is not a "cheap option" if it is done intentionally
A clean straight end can be the most professional solution.
It is especially good when:
-
the molding is narrow and graphic;
-
the slat wall is modern;
-
The transition of materials already has a clear vertical boundary;
-
there is little other stucco decoration on the wall;
-
the painted surface should remain calm;
-
the end of the molding is not the center of attention.
But a "straight end" does not simply mean sawing off the profile and leaving the cut section exposed. You need to make a perpendicular clean cut, remove irregularities, finish the end with a finishing compound where required, prime and paint it as carefully as the front part.
If after this the joint is perceived as complete, purchasing NPU-363.1R is not required.
The indentation to the slat panels creates a "pause"
Sometimes the molding should not be brought all the way to the edge of the slat area, nor to the decorative element.
A small clean field between two finishing systems can be more useful than an additional carved accent. It separates the classic profile from the vertical rhythm of the slats, reduces the density of details, allows each finish to be read independently, and simplifies subsequent replacement or repair of the panels.
The main mistake is leaving a random remnant of the wall "because it just happened that way with the molding length." The pause should be equally meaningful in all repeating joints.
NPU-363.1R turns the end of the line into an accent
This scenario is not needed to mask a bad cut.
NPU-363.1R is appropriate when you want the end of the molding to be a visible decorative event. For example, a long horizontal line on a painted wall approaches an active slat zone, and without an additional accent, it seems that the classical composition simply broke off.
Then the carved element works as a transition between two visual languages:
linear molding → local ornament → calm field → slat rhythm.
Our factory also produces:






How to understand that a straight end is already good enough
Before purchasing NPU-363.1R, it is useful to conduct a test without decor.
Place the molding in its real position or use its offcut and look at the wall from the main points of the room.
A straight end usually wins if the edge of the slat panels is very graphic by itself, there is already a vertical profile or shadow line between the molding and the slats, the molding is low, the interior is modern, and the decorative element looks larger than the line itself.
A straight end looks weaker if a long line ends in the middle of a large empty wall, the molding has a complex classical pattern, the end falls into a well-visible area, there is no other architectural boundary nearby, and the processed cut is still perceived as a break.
In that case, NPU-363.1R deserves a full-size fitting.
Get Consultation
What the 1:1 mockup of NPU-363.1R checks
A flat product image in the catalog does not show its scale relative to a specific wall. For the first check, a silhouette based on the actual dimensions of 106 × 43 mm is needed. For the second, it is advisable to add an approximate thickness of 17 mm.
Test 1. Compare the size with the molding
Place the mockup directly against the end of the profile. Check whether the element continues the molding's scale or becomes noticeably more massive, whether the ornament emphasizes the line or draws attention to itself.
If the decorative point becomes the main object of the wall, and the molding nearby looks secondary, NPU-363.1R may be too active for this particular composition.
Test 2. Check the distance to the slat panels
The mockup should not accidentally overlap the first slat or visually touch it without a clear reason.
If after installing NPU-363.1R there is practically no painted surface left between its ornament and the slat area, the two textures may blend together.
Test 3. Look at the relief from the side
17 mm gives a shadow. On a painted wall next to volumetric slat panels, this can be a plus: the transition becomes more plastic. But with side lighting, the element may appear significantly more massive than in the frontal view.
Test 4. Take two frames
Take a photo of the molding with a straight end and the same assembly with the NPU-363.1R mock-up. It is better to shoot from the actual entry point into the room, not 30 cm from the wall.
If the difference is almost imperceptible during normal viewing, the additional element may be redundant.
How much free painted wall to leave between the decor and the slats
There is no universal number here.
The reason is simple: the edge of the slat panels can be flat, highly embossed, dark, light, with a wide or narrow pitch, with side lighting, or with a special end profile.
Therefore, "leave 20 mm" or "minimum 50 mm" without a specific system would be a fabricated standard.
It is more correct to measure the clean zone.
Let us denote:
-
S is the distance from the actual end of the molding to the beginning of the slat panel;
-
E is the dimension of NPU-363.1R in the direction in which it is positioned along the transition;
-
G is the desired free space between the decorative element and the slat zone.
For installation, the principle is needed:
S ≥ E + G.
The value of E is taken based on the actual orientation of the element in the drawing. G is determined by full-size fitting.
If the actual S is not enough even for the element itself without comfortable air, a straight end or an earlier termination of the molding usually looks cleaner.
Why free space is not wasted space
On a slat wall, there is already a strong repetition of verticals. The molding creates its own line, NPU-363.1R adds ornament and relief. If all three languages are placed almost flush, the transition becomes harder to read.
A small painted pause performs the work of a full-fledged compositional element:
-
separates the NPU relief from the rhythm of the slats;
-
makes the shape of the decorative element readable;
-
reduces visual density;
-
allows the direct end of the molding or NPU to be perceived as a deliberate ending;
-
simplifies future repair of the slat zone.
That is why one should not evaluate the assembly only by the question “does 106 × 43 mm fit.” You need to check whether a normal air zone remains after installation.
Why it is better not to run NPU-363.1R onto the relief of slat panels
The idea seems tempting: if the decorative element slightly overlaps the boundary, it will seem to “connect” the two surfaces.
But this solution has several risks.
Different mounting planes
Slat panels protrude relative to the painted wall. NPU-363.1R is designed for a specific support plane. If part of the piece lies on paint and part on a slat or on the gap between slats, the fit becomes unpredictable.
The ornament conflicts with the vertical rhythm
The carved silhouette and slats begin to layer on top of each other. Instead of a neat transition, you get two different reliefs in one small area.
Maintainability decreases
If you ever need to remove the outermost panel, the decorative element glued to both systems at once will have to be dismantled along with it or damaged.
A random shadow appears
A 17-millimeter relief against even more voluminous slats can cast a complex shadow under side lighting.
For the original scenario, it is safer to keep NPU-363.1R entirely on a smooth painted wall and use it as a finishing touch to the molding composition, rather than as an overlay on the joint of two materials.
General options for joining finishes are detailed in the STAVROS article "How to join slatted panels and use moldings for polyurethane walls". There the task is systemic; here, it is specifically about ending one line.
The scale of NPU-363.1R should be compared with the specific molding
The size of a decorative element by itself says nothing about harmony.
If a very thin linear molding runs along the wall, an element of 106 × 43 × 17 mm may seem like a large finishing touch.
If the molding is wide, carved, or part of a classic frame system, NPU-363.1R may look more natural.
What to measure
Before purchasing, write down:
-
the face width of the molding;
-
the projection of the molding from the wall;
-
the height of the line;
-
the size of the free area up to the slats;
-
the size of NPU-363.1R according to the actual drawing;
-
the viewing distance.
How to make a comparison without 'percentages of beauty'
No need for invented norms like "the element should be 1.5 times wider than the molding."
Place three options side by side:
-
a clean straight end;
-
NPU-363.1R;
-
another more compact decor from the same category, if the first one seems large.
They compare not only size but also hierarchy: whether the end of the molding should be a noticeable point or remain a secondary detail.
If a choice across the entire category is needed, you can buying polyurethane molding decor after comparing several elements on one layout.
Color: matching the wall, matching the molding, or contrasting
Color can completely change the weight of NPU-363.1R.
NPU-363.1R in the color of the molding
The most logical option if the element truly completes the molding line.
The profile and decor read as one architectural object. This option is especially useful if the molding already has a noticeable color contrast with the wall.
Molding and NPU-363.1R in the color of the painted wall
The relief remains, but the contrast is reduced.
This is a good scheme next to active slat panels: the stucco does not argue with the wood or colored texture of the slats, but works with light and shadow.
Contrasting decorative element
This is already a separate accent.
It can be justified if the room has brass, dark handles, a contrasting baseboard, or other repeating elements.
But a single NPU-363.1R in a different color at the end of one molding risks looking like a random appliqué.
Color of the slat panels
Painting polyurethane decor in the color of the slats is only possible as a deliberate composition. If the slats imitate wood, a simple brown paint on polyurethane does not automatically make it look like natural wood.
Lighting: 17 mm of relief at the boundary of the slats
Light is especially important in the transition of two relief systems.
Side light along the wall
The most demanding scenario.
NPU-363.1R casts its own shadow, and the slats create a series of vertical shadows. If there is little smooth field between them, the pattern becomes dense.
Frontal diffused light
The transition is perceived as calmer. The element can almost dissolve into the wall color.
Backlighting of slatted panels
If the slats are backlit, NPU-363.1R should not accidentally fall into the light pattern. First, check the light on with a mockup.
Spots on top
They enhance the lower shadow of the ornament. On a light wall, the element can become visually larger.
Therefore, the final decision is better made not only during the day, but also under the main evening lighting of the room.
Where exactly to end the molding: at the very border of the slats or earlier
Even if NPU-363.1R is not used, the question of the position of the end of the line remains.
Option "exactly at the border"
Suitable when the edge of the slat zone itself sets a strong architectural vertical.
The molding visually "bumps" into this border.
Risk — too tight contact between two materials. If the molding has a complex profile, its end may conflict with the first slat.
Option "earlier"
A clean painted area remains between the molding and the slats.
This is often better if the edge of the slats is voluminous, the molding has a complex profile, the interior should not look overloaded, or the wall is viewed at an angle.
NPU-363.1R and a pause after it
For a decorative element, its own air zone is often useful. The NPU does not have to physically touch the panels.
If its shape is read separately, the transition becomes sequential:
molding → decorative accent → pause → slats.
NPU-363.1L: when you need to check the mirrored article
The NPU-363.1R card shows NPU-363.1L among related products. NPU-363.1L has the same confirmed dimensions of 106 × 43 × 17 mm, the same material, and the current price of 990 ₽.
This is important information for rooms where the ends of moldings are mirrored.
But you cannot automatically write:
-
R is always on the right;
-
L is always on the left;
-
On the opposite wall, L is necessarily placed;
-
R and L always form one mandatory pair.
Such functional interpretation must be confirmed by the drawing and the orientation of the ornament.
Practical procedure for mirror finishing
-
Photograph the approved node with NPU-363.1R.
-
Determine whether the opposite end is geometrically mirrored.
-
Open the drawing NPU-363.1L.
-
Compare the direction of the pattern.
-
Only after this, form the R/L order.
If the ends are oriented identically, there is no need to mechanically replace every second R with L.
How many NPU-363.1R to order: count the endings, not the meters of molding
Unlike the molding itself, the decorative element is counted per piece.
One ending point — one candidate for a separate element.
| Number of identical approved endings | NPU-363.1R | Cost at 990 ₽ |
| 1 | 1 | 990 ₽ |
| 2 | 2 | 1 980 ₽ |
| 4 | 4 | 3 960 ₽ |
| 6 | 6 | 5 940 ₽ |
This table works only if all endings truly require the same R-element.
If some nodes are mirrored, the correct specification will be different:
R + L according to the actual orientation of each ending.
Why you can't order "four R because there are four ends"
Four ends can be equally directed, two pairs of mirrored ones, located on different walls, approach the rails from different sides, and have different lighting.
Therefore, first, a node map is compiled.
For each end, the following is recorded:
-
photo or sketch;
-
molding direction;
-
position of the slats;
-
selected option: straight end / pause / NPU;
-
if NPU — R or L after checking the drawing.
Only after this is the cart calculated.
How to link NPU-363.1R with MLDPU-002 without unconfirmed promises
Since MLDPU-002 is present among related products on the NPU-363.1R card, it is logical to consider it in the test node if this molding is used in the project.
But before purchasing, you need to check a few things.
Scale match
Does the decorative element look too large relative to the profile?
Physical abutment
Is there a step, gap, or mismatch in the relief?
Pattern direction
Does the composition continue correctly?
Thickness
Does the NPU create a too noticeable protrusion at the end of a flatter molding?
Color
After painting, the parts should be perceived as one system, if that is the project's goal.
If a dry fit does not yield a clean joint, the mere fact of an accompanying product does not obligate the use of NPU-363.1R.
For other profiles, you can Buy polyurethane wall moldings and select decor already according to the actual cross-section of the chosen molding.
Installation after renovation: what to check on an already painted wall
The scenario assumes a ready painted surface and ready slat panels.
So, you need to work carefully.
Paint durability
The adhesive holds the decorative element through the coating layer. If the paint is peeling, the mounting strength is limited by it.
Slat boundary
If the panels are already installed, their edge cannot be used as a "ruler" if it itself deviates from vertical. First, check the level.
Marking
The end of the molding and NPU-363.1R must have their own axis.
Dry fitting
Before gluing, assemble the molding, NPU, panel edge, and external free field.
Final painting
If the molding is already painted, it is better to prepare the NPU so that after installation you do not have to actively work with a brush close to the slat panels.
Do not bond two finishing systems with glue unnecessarily
If NPU-363.1R is used, it is more rational to attach it to the painted wall as a separate part of the molding composition. Gluing it simultaneously to the wall and the first slat just for "rigidity" is not required: this complicates future dismantling and creates a non-uniform base.
A straight end also requires professional finishing
If the choice is made to "buy nothing," it does not mean "do nothing."
The end must be finished.
For a smooth profile
A smooth perpendicular cut, sanding, priming, and painting usually give a clean result.
For a complex shaped cross-section
The profile pattern is visible on the end. Sometimes it is this that creates a feeling of incompleteness.
Here it is useful to do two tests:
-
leave the cross-section open;
-
step back slightly from the battens so that the end is not in tight contact with another relief.
If the second option looks calm, the NPU may be unnecessary.
Do not use the NPU as a "repair" for a bad cut
If the end is crooked, first correct the geometry.
A decorative element should add an architectural function, not mask poor installation.
What changes if the edge of the slat zone already has its own finishing
Slat panels sometimes end not with an open last slat, but with a separate vertical profile, an extension strip, a smooth edge, or a shadow gap.
This completely changes the role of NPU-363.1R.
There is an end profile
The boundary of the slats is already finished. An additional carved element may turn out to be a third piece between two zones.
In such a scenario, a straight molding end often looks more logical.
There is a shadow line
The dark vertical gap itself creates a strong architectural pause. NPU-363.1R should only be installed if the molding truly requires a separate finish.
There is a smooth extension panel
It can become an ideal buffer zone: the molding ends on a painted wall, then comes a decorative element or a clean pause, then the extension and slats.
Panel edge is exposed
Here, you first need to finish the end of the slat system properly. NPU-363.1R should not be used as a way to hide an unprepared panel edge.
How the transition looks from different distances
The joint at the slats is often judged too closely.
At 20–30 cm, all edges, seams, and texture are visible. But in a real interior, a person perceives the transition from several meters away.
Close distance
Check the quality of installation, the end, the paint, and the gaps.
Medium distance
Check whether NPU-363.1R reads as a deliberate part of the molding.
Distant view from the entrance
They check the overall hierarchy: whether a small decorative element becomes unnecessary "noise" between large wall zones.
If the NPU seems appropriate only in close-up, but is lost at a normal distance, its practical value is low.
When the NPU-363.1R really costs 990 ₽ in this composition
The price of one element is small compared to the full wall finishing, but usefulness is assessed not by cost, but by the result.
The NPU-363.1R is justified when:
-
the end of the molding is visible from the main point of the room;
-
the straight end looks like a break;
-
there is enough free surface on the wall;
-
the ornament is proportionate to the molding;
-
the element does not overlap the slat panel;
-
Color and light support the transition;
-
The same principle is repeated in other nodes.
A particularly strong scenario is when one painted wall has a classic molding line, and the adjacent field of slats serves as a modern accent. The NPU-363.1R becomes a small "transition point" that does not try to extend the molding onto the slats, but also does not leave it randomly cut off.
Then 990 ₽ is not a fee for an "extra detail," but for a deliberate end to the composition.
When it's better not to buy the NPU-363.1R
The straight end already looks clean
The most obvious case.
The slat panels start too close
If there is no calm painted field left for the NPU, the element will be squeezed.
The molding is too thin or minimalist
Carved decor can change the line style more than necessary.
There are already many accents on the wall.
Cornice, baseboard, sconce, frames, battens, and another carved element can create overload.
The transition should be modern.
A clean straight end sometimes better emphasizes the contrast of 'classic line / modern panel'.
The node repeats many times
Four to six decorative endings can turn a local accent into an overly frequent ornamental rhythm.
The NPU makes no noticeable difference from the main viewing point
If the layout only looks good up close, and from across the room the straight end and the decorative ending look almost the same, the additional purchase is not necessary.
In these scenarios, it is worth keeping the straight end or view other decor for polyurethane moldings, more compact in scale.
Mistakes that most often ruin the transition of molding to slats
Mistake 1. Calling NPU-363.1R a cap and considering it mandatory
Why it happens: the decorative element is at the end of the line and visually resembles an end piece.
Consequence: it is bought even where a straight end is better.
Check: compare two full-size options.
How to avoid: treat NPU as optional decor.
Mistake 2. Gluing NPU partially onto the slat panel
Why it happens: there is not enough smooth surface.
Consequence: poor fit, difficult repair, mixing of reliefs.
Check: outline the full contour of the element on the wall.
How to avoid: keep it on the same mounting plane.
Error 3. Choose R/L by name without a drawing
Why it occurs: it seems obvious that R means "install on the right."
Consequence: the ornament unfolds not as intended.
Check: compare the actual images of R and L.
How to avoid: order the sides after confirming the orientation.
Error 4. Select an element only by size A × B × C
Why it occurs: three numbers seem sufficient.
Consequence: the element physically fits, but visually does not align with the molding.
Check: dry fit of real profiles.
How to avoid: compare both the cross-section and the pattern.
Mistake 5. Leave too short a random pause before the slats
Why it occurs: the molding was trimmed "in place."
Consequence: the transition looks cramped.
Check: a mockup of three options — direct contact, pause, NPU.
How to avoid: choose the composition in advance.
Mistake 6. Repeat NPU at every ending without an overall scheme
Why it occurs: one node was liked.
Consequence: the room receives too many identical accents.
Check: mark all endings on the room layout.
How to avoid: count not only money, but also visual rhythm.
Mistake 7. Considering the accompanying MLDPU-002 as a guarantee of a perfect fit
Why it occurs: the product is shown in the card nearby.
Consequence: the joint is ordered without a trial fit and a mismatch in relief or scale is received.
Check: dry fit or technical drawing.
How to avoid: consider the accompanying product as a hint, not an automatic guarantee.
Fourth option without NPU: make an end return from the molding itself
Between a simple straight cut and a separate decorative element, there is another installation technique — an end return of the profile. It can be considered if the geometry of a specific molding allows for neatly assembling a small response fragment that turns the profile back to the wall and closes the open section.
This option is especially useful for shaped moldings, where a flat straight end shows all the steps of the profile and therefore looks unfinished.
The principle does not mean that any polyurethane molding can necessarily be finished with a return. First, the technique is tested on offcuts.
What to check:
-
whether an accurate cut can be made without damaging the thin details of the profile;
-
whether there is enough length and geometry for a small mating piece;
-
whether the end 'cube' turns out too thick;
-
whether the small piece can be reliably glued;
-
how the seam looks after priming and painting;
-
whether the return turns out to be visually more complex than the NPU-363.1R itself.
This solution has its own architectural logic. A straight end shows an honest end of the linear profile. NPU-363.1R adds a new ornament. A return, on the contrary, completes the molding with its own cross-section, without introducing an additional decorative motif.
Therefore, for a calm interior, it makes sense to compare four layouts already:
| Ending option | What is added | Visual character |
| Straight end | Nothing | the most laconic |
| Pause before the slats | Free field | the calmest transition |
| End return of the molding | a small fragment of the same profile | a neat technical finish |
| NPU-363.1R | Individual carved element | the most decorative finish |
If the return on the trim looks clean, buying an NPU just to hide the molding cross-section may not be necessary.
If the task itself is to get an expressive carved point before the slat zone, the return does not replace the NPU-363.1R: it solves a different task.
The horizontal and vertical lines of the molding end at the slats differently.
The article title refers to the molding as a line on a painted wall, but in practice it can approach the slat zone in different ways.
Horizontal molding. When the profile runs from left to right and ends before the vertical slats, the endpoint is especially noticeable: the eye continues the horizontal line and literally expects an explanation for why it ended. In this scheme, the NPU-363.1R more often makes sense as a decorative "point" if the straight cut looks harsh.
However, the horizontal line emphasizes any height mismatch more strongly. If the same molding on an adjacent wall ends at a different mark or the NPU is glued higher/lower, the error is immediately noticeable.
Vertical molding. When the line goes from bottom to top and ends at the horizontal boundary of the slat insert or near its top, the NPU ornament is perceived differently. The rotation of the element itself cannot be assigned automatically: first you need to see whether its pattern is designed for such an orientation.
For the vertical scenario, the following are especially important:
-
the direction of the plant ornament;
-
the position of the visually "heavy" part of the NPU;
-
attitude to the ceiling cornice;
-
distance to the upper or lower edge of the slat zone;
-
light that can cast a long side shadow.
If the orientation of NPU-363.1R according to the drawing does not suit the vertical ending, it is better not to rotate it arbitrarily just to use the already selected product.
The molding fits the slats at an angle. Such a joint is even more complex. If the line is neither horizontal nor vertical, the decorative element must be physically checked. For a non-standard angle, a straight end or profile return is often cleaner than trying to adapt a carved NPU without a confirmed composition.
Plane difference: the painted wall and the slat zone may be at different depths
The visual transition depends not only on the distance along the wall plane. You need to look at the wall from the side.
Slat panels almost always create additional volume. Their front surface may protrude relative to the painted wall. Sometimes there is a backing, acoustic layer, mounting base, or a separate edge slat between the two zones.
NPU-363.1R has its own thickness of 17 mm. Therefore, three depths occur simultaneously in one joint:
-
the plane of the painted wall;
-
NPU relief;
-
Front plane of the slat panel.
They cannot be assessed only by a frontal sketch.
If the slats protrude strongly forward, the NPU may appear almost flat against their background. Then the decorative element works primarily through pattern, not volume.
If the slats are shallow, a 17-mm NPU can be comparable in projection to them. The endpoint becomes more massive.
If the outermost slat is very close, the side shadows of the NPU and the slat overlap. Here it is more useful to increase the pause than to try to connect the two parts tightly.
To check, take a side photo or a short video along the wall. It often reveals depth conflicts better than a frontal shot.
It is especially important not to use the decorative element as a means to “cover a step” between two poorly matched planes. If the painted
Control measurement chart before purchase
To keep the decision from remaining subjective “like / dislike,” it is useful to record the parameters of one node in a short table.
| What to measure or check | What to record | What decision it affects |
| Molding type and article number | actual model | NPU compatibility |
| Molding face width | mm | Visual scale |
| Molding protrusion | mm | side joint and shadow |
| Distance to the start of the slats | mm | Does NPU fit and pause |
| Plane difference | mm | Side view |
| Line direction | horizontal / vertical / other | Pattern orientation |
| Number of identical endings | pcs. | Number of R |
| Number of mirror endings | pcs. | Need to check L |
| Main viewing point | where they look from | Is a decorative point needed |
| Main light | daylight / sconce / spots / backlight | strength of relief and shadow |
| Selected option | end / pause / return / NPU | Final specification |
Such a map is especially useful if the renovation is done by a designer or a team, but the owner buys the material. Instead of the phrase "decor needed on the right," a specific node with a photo and dimensions appears.
For four endings, four rows can be made. It may turn out that only two are actually visible and require NPU, one is better finished with a straight end, and the fourth is mirrored and requires a separate check of NPU-363.1L.
Then the basket is determined by the actual composition, not by the number of molding ends.
If slat panels can still be changed, do not adjust the entire node to fit NPU
Sometimes the article is read before the final installation of the slats. In this case, there is a temptation to change the width of the slat insert or the position of its edge specifically for NPU-363.1R.
This should only be done if the decorative finish is truly an important part of the project.
First, you need to set priorities:
-
where the slat zone should be located according to the room's architecture;
-
how it relates to furniture, the door, the TV, the headboard, or another function;
-
where the molding logically ends;
-
whether an NPU is needed between them.
Moving the slat panel by tens of millimeters just to "fit the chosen decor" is not always rational. The NPU is an additional element, and the boundaries of large finishing zones are usually more important.
If the panels are still being selected, it's useful to first look at slat panels for walls and determine their actual thickness, edge, and rhythm. After that, it becomes clearer whether a separate decorative transition is needed.
Practical algorithm before ordering NPU-363.1R
-
Fix the actual edge of the slat panels. Not according to the project, but according to the finished surface.
-
Determine the end of the molding without decor. Make the first option with a clean processed end.
-
Check the pause. Move the end of the molding further from the panels and compare.
-
Make a mockup of NPU-363.1R. Use the real silhouette and the confirmed dimension of 106 × 43 × 17 mm.
-
Assemble a dry joint. Molding + NPU + smooth wall + edge of slats.
-
Look under working lighting. Especially if the slats are backlit or side light falls on the wall.
-
Check the color. Matching the wall, matching the molding, and, if the project requires, a contrasting option.
-
Take a photo from the main point of the room. Not a close-up, but the entire transition.
-
If there are several joints, mark them on the layout. Separately note identical and mirrored endings.
-
For mirror nodes, compare NPU-363.1L. Not by the article letter, but by the image and drawing.
-
Compile the specification. How many R, how many L, where is the straight end, where is the pause.
-
Only after that place the order.
If NPU really improves the node, order NPU-363.1R 106 × 43 × 17 mm can already be in exact quantity.
Decision matrix: NPU-363.1R or straight end
| Condition | Solution |
| The molding is laconic, the slats are modern, the end is clean | leave the straight end |
| The end of the line seems accidentally cut off | check NPU-363.1R |
| Between the molding and the battens there is little smooth wall | do not place large decor flush against |
| NPU extends onto the panel relief | omit or change the end of the line |
| The ornament is proportionate to the molding and there is a calm field | NPU can be a successful ending |
| The transition repeats 4 times identically | after the test you can order 4 R |
| The endings are mirrored | check the R/L combination |
| The NPU is visually heavier than the entire molding line | a straight end or another element |
| A smooth transition between classic and slats is needed | a pause or a straight end is often better |
| A clear decorative accent is needed | NPU-363.1R makes sense after the mockup |
For a broader comparison, you can Buy polyurethane wall moldings и choose slat panels for interior wall finishing already as an agreed composition.
Bottom line: NPU-363.1R is needed not because the molding ends, but because the end of the line requires a separate accent
NPU-363.1R — decorative element for polyurethane moldings, size 106 × 43 × 17 mm, current price 990 ₽. It is in the specialized category of molding decor, and the card nearby shows NPU-363.1L and MLDPU-002.
But this does not mean that any molding on slat panels must end with this element.
For one line, there are three full architectural schemes:
-
clean processed straight end;
-
straight end with a deliberate pause before the slats;
-
decorative finish with NPU-363.1R.
If the straight end looks calm and matches the modern character of the slat wall — not buying an additional element is fine.
If the molding looks cut off, and there is enough space on the painted wall for a relief accent, a full-size trial of NPU-363.1R may provide a more finished transition.
For one approved ending, the purchase is 990 ₽.
For four identical ones — 3,960 ₽.
But if part of the endings are mirrored, you cannot mechanically put four R's into the basket. First you need to check NPU-363.1R and NPU-363.1L according to the drawings and the actual direction of the ornament.
General procedure:
straight end → pause → NPU-363.1R mockup → dry fit → light → color → map of all endings → R/L check → order.
If the result requires a decorative node specifically, you can buy NPU-363.1R to complete the molding composition.
If not, leaving a straight end will not be a saving but a correct design decision.
For further selection, available Decor for polyurethane moldings, the general catalog of polyurethane moldings, slatted panels for walls and a wider STAVROS material "Wall moldings and slat wall panels".
FAQ
Can NPU-363.1R be installed if the molding ends not at the battens but at the door casing?
It can be considered, but that's a different assembly. Need to check whether the carved element competes with the casing profile and whether the wall between them is smooth enough.
Will NPU-363.1R suit a vertical molding?
The possibility is determined by the orientation of the specific ornament and the drawing. You cannot automatically rotate the element 90 degrees just because the dimensions physically allow it.
Can one NPU-363.1R be used without a molding as a standalone decor?
The card classifies the product as decor for moldings. If you want to use it separately, that's already a non-standard compositional task and it's better to evaluate it separately without changing the official product type.
What to do if NPU-363.1R covers too much painted wall?
Do not reduce the free margins around it to a random minimum. Better to choose another element from the category or leave a straight end.
Is it necessary to repeat NPU-363.1R on another wall for symmetry?
Only if the other wall has a similar molding assembly. Room symmetry does not automatically require duplicating the decorative element where the molding ends differently.
Can NPU-363.1R be painted after installation if the slats are already ready?
Yes, if the edge of the panels is well protected and there is access to the element. On a finished slat wall, it is often more convenient to prepare and paint the decor in advance, and after installation, perform local final touch-ups.
What is more important when choosing — 106 × 43 mm or a thickness of 17 mm?
All three dimensions are important for installation. The face dimensions determine whether the ornament fits on the smooth field, and the thickness affects the side shadow and visual mass next to volumetric slats.
Do I need to buy NPU-363.1L together with NPU-363.1R as a spare?
No. L is a separate mirrored article, not a universal spare for R. It is ordered when the drawing of a specific ending shows the need for a different orientation.
What to do if NPU-363.1R is liked, but the molding does not match its profile?
Do not adapt the joint with random cutting without understanding the geometry. Better to open catalog of polyurethane moldings and select a compatible system by scale, or leave the chosen molding without a carved ending.
Where to look for other decorative endings?
In the category Decor for polyurethane moldingsFor systematic work on transitioning to slats, the article is useful "How to join slatted panels and use moldings for polyurethane walls".