Article Contents:
- What is an interfloor polyurethane belt: architectural function and material
- When you cannot do without an interfloor belt: ten signals
- Where to place the interfloor facade profile: five positions
- How an interfloor belt differs from a molding, cornice, and base belt
- How to choose the size and profile of an interfloor belt: eight parameters
- Profile height (vertical dimension)
- Projection from the wall plane
- Profile relief
- Relationship with windows
- Relation to rustication
- Floor height
- Number of spans and facade length
- Color solution
- How to combine an interfloor belt with other facade decor: seven pairs
- Interfloor belt + rustication
- Interfloor belt + window casings
- Interfloor belt + window sill bands
- Interfloor belt + keystones
- Interfloor belt + base cornice
- Interfloor belt + entrance group
- Interfloor belt + polyurethane moldings
- Technology of installing an interfloor belt: from marking to painting
- Tools and Materials
- Marking
- Wall preparation
- Applying adhesive and installation
- Mechanical Fastening
- Corner joints
- Joint sealing
- Painting
- How to calculate the purchase of an interfloor belt: a checklist
- Mistakes when choosing and installing an interfloor belt
- FAQ: Questions and Answers
- STAVROS: the architectural horizontal that holds everything
Look at any classic European house — and you will immediately see horizontal lines. They divide the wall into levels: plinth, first floor, second floor, cornice. Each line is not just decor. It is an architectural statement that the building is organized, designed, that each part has its place and its own logic.
Now look at a typical country house without horizontals — just a plastered box with cutouts for windows. There is height, but no scale. There is a wall, but no facade. The difference between the first and second house is in one detail: a horizontal belt between floors.
Interfloor belt made of polyurethane — this is a horizontal facade profile that runs along the entire perimeter of the house at the level of the interfloor ceiling. It divides the facade into tiers, creates visual scale, connects window frames, corner rustications, sandriks, window sill belts and plinth decor into a single architectural system. One profile — and the house from a "box with windows" turns into an architectural object.
How to choose the right profile, what size, with what relief, how to join it with other facade elements and what to never do — about this in detail, systematically and practically in this article.


What is a polyurethane interfloor belt: architectural function and material
In architectural theory, horizontal division of the facade is one of the basic techniques. Even Vitruvius described the three-part division of the wall: base, body, completion. In classical architecture, this is the plinth — pilasters or niches — cornice. The interfloor belt is an element of the second tier of this system: it marks the boundary between the first and second body, between the lower and upper level.
In modern private house construction, an interfloor belt is a horizontal profile installed at the floor level. Typically, this is at a height of 2.8–3.2 m from the zero level of the facade (from the top of the plinth). The profile protrudes from the wall plane by 40–120 mm — depending on the scale of the house and the chosen style — and creates a horizontal shadow that visually divides the facade into two independent tiers.
A polyurethane interfloor belt is a facade version of a molding profile: density 350–420 kg/m³ (facade formulation, higher than interior), closed cell structure with no water absorption, frost resistance of 300+ freeze-thaw cycles. The material is certified for use in open facade conditions: temperature fluctuations from −45 to +60°C, exposure to precipitation, ultraviolet radiation, snow and wind loads.
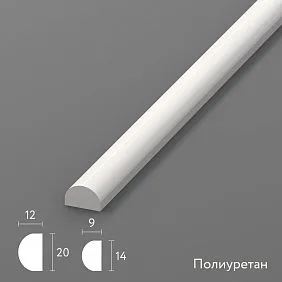
The profile is supplied in strips 2000–2500 mm long, 60–250 mm high (depending on the position), and with a projection from 40 to 120 mm. The surface is white matte primed, ready for painting with facade acrylic paints without additional preparation.
Polyurethane molding for house facades — this is a systematic view of decor, where the interfloor belt occupies a central place as an "architectural horizontal" that organizes the entire facade.


When you cannot do without an interfloor belt: ten signals
There are situations where an interfloor belt is a desirable decorative element. But there are cases where it is an actual necessity. How to understand which one you are in?
Two floors and above. If the house is two-story, the facade has a significant height — 6–8 m or more. Without horizontal division, the wall is perceived as a monolith that "presses" from above.
The facade looks flat. A plastered wall without relief is a tactically dead surface. An interfloor belt adds volume and depth.
Windows are arranged in even rows. The horizontal line of the belt picks up the rhythm of the window row and organizes it into an architectural frieze.
Need to emphasize the constructive logic. The floor is a real boundary in the house structure. The belt visually manifests it. This is honest architecture.
There are corners polyurethane rustications for the facade. Vertical rustications require a horizontal "rhyme". Without it, rustications look unfinished, and the decor appears disjointed.
Sandriks and window sill belts are used. When a window frame has upper and lower horizontal elements, it is logical to combine these horizontals at the floor level.
A classical or neoclassical style is being designed. In both styles, horizontal division is a mandatory architectural technique.
The house has a large width. A wide facade without horizontals appears shapeless. The belt "gathers" it horizontally.
There is a desire to make it "like a project". If you want a facade that looks designed rather than homemade, horizontal belts are inevitable.
It is necessary to visually reduce the height. If the house is tall and seems heavy, horizontals "lower" it, making it more grounded and proportionate to a person.
Our factory also produces:


Where to place the interfloor facade profile: five positions
The position of the belt is an architectural decision that must be made before installation begins. One thing is the function (to separate floors), another is the specific height and logic within the facade system.
| Position on the facade | Architectural task |
|---|---|
| At the level of the interfloor overlap | Separate the first and second floors |
| Above the first floor windows | Create a strong horizontal line |
| Below the second floor windows | Link the second floor windows in a row |
| Between the plinth and the main wall | Strengthen the lower part, separate the plinth |
| Around the entire perimeter of the house | Assemble the entire facade into a single system |
The most common position is strictly at the floor level mark. But this is not always the most advantageous solution in terms of proportions. STAVROS architectural practice shows: sometimes the belt is shifted 150–300 mm above or below the structural mark — so that it either passes above the first floor window row (creating a horizontal "above-window cornice") or below the second floor window row (creating a "window sill belt" for the second tier).
Both options work — but require a preliminary facade plan with marked axes of windows, rustications, and belts.
Facade decoration made of polyurethane — this is a systematic material that helps correctly place all horizontal and vertical elements even at the facade design stage.
Get Consultation
How an interfloor belt differs from a molding, cornice, and base belt
Confusion in terms is the source of most errors when ordering. Let's break down what is what.
| Element | Position | Architectural function |
|---|---|---|
| Interfloor belt | Floor level | Divides the facade into floors |
| Facade molding | Any horizontal line | Creates a line, framing, belt |
| Crowning cornice | Top of the facade under the roof | Completes the facade, protects from water |
| Base belt | Boundary of the base and wall | Separates the base of the house |
| Window sill belt | Under windows | Completes the window from below |
| Pediment | Above windows | Completes the window from above |
An interfloor belt is a larger-scale facade molding. Essentially, it is a horizontal cornice at an intermediate level. But unlike a crowning cornice, it does not complete the facade — it divides it. Unlike a base belt, it is located high, at the floor level, not near the ground.
The key difference between an interfloor belt and a regular decorative molding is the scale and projection. A molding can be narrow (30–60 mm) and decorative. An interfloor belt is a functional horizontal line, so its height is usually 80–200 mm, and its projection is 50–120 mm. These parameters create a readable shadow that makes the line visible from a great distance.
How to choose the size and profile of an interfloor belt: eight parameters
This is the most multifactorial choice in facade decor. The size of the belt determines the proportions of the entire facade — you cannot make a mistake.
Profile height (vertical size)
This is the main "weight" characteristic. The height determines how noticeable the belt will be, what shadow it will cast, and how it will be perceived from a distance.
Guidelines:
-
House width 8–10 m, two floors, modest classical style: height 80–100 mm
-
House width 10–14 m, two floors, developed neoclassicism: height 100–140 mm
-
House width 14–18 m, two floors and above, representative facade: height 140–200 mm
The wider the facade, the larger the horizontal line should be — otherwise, a thin profile will be "lost" on a large wall.
Projection from the wall plane
Projection is the distance the profile protrudes forward. It is the projection that determines the depth of the shadow: more projection — deeper, more contrasting shadow — more expressive horizontal line.
For the interfloor belt:
-
Minimum working projection: 50 mm
-
Optimal for a standard house: 60–80 mm
-
For a formal facade with rich decor: 80–120 mm
If the projection exceeds 100 mm, hidden reinforcement or additional mechanical fastening is recommended — so the profile can withstand snow and wind loads.
Profile relief
The profile can be:
-
Simple: one or two horizontal steps. Strictness, conciseness, modern classic.
-
Classic cornice: several steps with breaks (ogee, shelf, cyma, fillet). Developed classic, neoclassical.
-
With frieze: between two cornice shelves — a horizontal area with ornament or smooth. Ceremonial facades.
The choice of relief is determined by the facade style. A strict house with concise decor — a simple single-step profile. A classic cottage with rustication and architraves — a developed cornice profile.
Ratio with windows
The lower overhang of the belt should be above the upper edge of the first floor windows — at least 100–150 mm. This ensures "breathing" between the belt and the window frame and does not overload the transition area.
If the windows have Polyurethane entablatures, the distance from the top point of the sandrik to the lower edge of the belt is at least 120–200 mm. Less — and the two horizontal elements will merge.
Proportion with rustication
Rustications on the facade — vertical elements. The interfloor belt is horizontal. At corners and on straight sections they intersect — and it is here that size consistency is important.
The height of the rustication block and the height of the interfloor belt should be comparable: either equal, or the belt is 20–30% larger. A rustication block that is larger than the interfloor belt visually "overwhelms" the horizontal. A block that is significantly smaller than the belt gets lost.
Floor height
The standard height of a residential floor is 2.7–3.2 m. A belt located at 2.8–3.0 m from zero divides the facade into a lower (wider) and upper (slightly smaller) zone. This is a classic proportion. Deviation from it is possible — but must be justified.
Number of spans and facade length
For a long facade (over 12 m), profile joints are unavoidable. Plan joints in advance — preferably in "neutral" places: not above the center of a window, not in the rustication area. Best at a point where the profile is slightly less visually noticeable, for example above a pier.
Color solution
Three options:
-
Matching the facade (same color): a thin, elegant effect. The belt is read by relief, not color.
-
White on a colored facade: classic contrast, makes the horizontal very noticeable.
-
Slightly lighter than the main facade tone: a soft nuance, the most architectural solution.
How to combine an interfloor belt with other facade decor: seven pairs
Interfloor belt + rustications
The most organic combination in classical and neoclassical facades. Verticals of rustications + horizontal of the belt = a facade "grid" that organizes the entire wall. At the corners of the house, the rustication block and belt intersect — precise trimming is important here: the belt profile should "enter" the rustication or pass above it, forming a clean corner.
In practice: the belt usually passes over the rustication license, and the rustications are glued before and after the belt level, leaving a gap equal to the profile height. This creates the impression that the belt "ties together" the vertical rustications.
Interfloor belt + architraves
Vertical architraves on first-floor windows end at the bottom — at the plinth or ground — and at the top — at the pediment. The interfloor belt passes above this zone. The lower edge of the belt should be 100–200 mm above the top point of the architrave or pediment. If both elements are from the same STAVROS system, their profiles are coordinated in height and relief.
Interfloor belt + Window sill bands
Window sill belt — horizontal line under the window. Interfloor belt — horizontal line above the first floor. If they are present on the same facade, their reliefs should echo each other. Ideal case: belts of the same family but different scales. The interfloor belt is larger, the window sill belt is slimmer. This is a "main — secondary" hierarchy.
Interfloor belt + keystones
Keystones are installed in the center of the window arch or above the architraves. The interfloor belt runs above them as a horizontal line. If the keystone touches the lower edge of the belt in height, it is acceptable: it creates the impression that the stone is "supporting" the horizontal line. If there is a gap of 80–150 mm between them, the belt and the stone work as independent but connected elements.
Interfloor belt + plinth cornice
The plinth belt runs along the lower boundary of the facade, above the plinth. The interfloor belt runs along the floor line. The crowning cornice runs along the upper edge under the roof. Three horizontals create a three-part division: plinth — main body — attic/cornice. This is a classic architectural scheme applied to a private house.
Important: all three elements must be of the same system. Different relief, different scale, different projection — and the facade breaks into independent horizontals.
Interfloor belt + entrance group
The entrance area is the most decoratively saturated part of the facade. Here, the belt either runs continuously, "piercing" the entrance group, or makes a "break" above the portal, yielding to a larger element (arched sandrik, triangular pediment). Both solutions work — the choice depends on the scale of the entrance group.
Interfloor belt + Moldings made of polyurethane
Moldings can duplicate the interfloor belt — with a thinner line above or below the main profile. This doubles the horizontal line, making the belt more "weighty" and saturated. Distance between the main belt and the accompanying molding: 30–80 mm. Less — elements merge. More — connection is lost.
Technology for installing an interfloor belt: from marking to painting
Installation of the interfloor belt is a critical operation. The profile runs along the entire perimeter of the building at a significant height. The slightest deviation from the horizontal will be noticeable and correcting it after painting is practically impossible without dismantling.
Tools and materials
Before starting work, prepare:
-
Laser level (not optical, not a construction level — laser)
-
Miter saw with a fine-tooth blade for cutting polyurethane
-
Installation adhesive for facade polyurethane
-
Facade dowels (plastic with metal nail, length 80–120 mm)
-
Acrylic sealant and gun
-
Painter's tape
-
Facade acrylic paint with UV filter
Marking
Marking is the first and most important step. The laser level is set in horizontal mode at the required height. The laser line provides an accurate horizon along the entire perimeter.
Along the laser line, mark the lower edge of the profile with chalk or pencil. Before installing each strip, the line is checked. Permissible deviation: ±2 mm per 3 m. More — re-marking.
Pay special attention to corners. There, the profile is joined at 45° (external corner) or at 45° with a reverse cut (internal corner). Cuts are made before installation and checked with a dry fit.
Wall preparation
The facade plaster must be dry, dust-free, and free of grease stains. Areas with cracks or peeling coating must be repaired and dried before installing the decor.
Apply a penetrating primer to the profile attachment area. After the primer dries (4–6 hours), proceed with installation.
Applying Adhesive and Installation
Apply adhesive in a zigzag pattern to the back surface of the profile: along the perimeter + crosswise in the center. Not as a continuous layer. For profiles wider than 100 mm, use three parallel zigzag lines: along the edges and in the center.
Place the strip against the wall, align it along the bottom edge (according to the marked line). Press with even pressure along the entire length. Hold for 30–60 seconds.
Large profiles (length >2 m, height >120 mm) must be installed with an assistant.
Mechanical fastening
Dowels every 400–500 mm along the profile length. For profiles with a large projection (80–120 mm), use two horizontal rows: top and bottom rows 200 mm from the edge.
Countersink the dowel heads, fill the recesses with putty. After drying, sand to a smooth surface.
Corner Joints
External corner: both profiles are cut at 45°. Apply adhesive to the joint before pressing. After setting, apply sealant along the seam.
Internal corner: similar, but the angle is reversed. The joint is more noticeable on the internal corner, so apply sealant more carefully here.
Alternative for corners: ready-made corner elements (corner trims). They eliminate complex miter cuts and guarantee a perfectly even corner without gaps.
Joint sealing
All horizontal joints (top overhang of profile / wall) are sealed first. This is where water flows most actively during slanting rain.
Vertical joints between planks are secondary. All joints: acrylic sealant (not silicone — acrylic can be painted, silicone cannot). Masking tape along edges, filling from a gun, smoothing with a wet spatula.
Painting
Two coats of facade paint with UV filter. First coat — 24 hours after installation and sealing. Second coat — 4–6 hours after the first.
Relief parts of the profile — brush. Horizontal planes — paint roller with short nap. Top overhang (horizontal plane facing upward) — especially carefully: this is where water accumulates and unprotected surface deteriorates fastest.
How to calculate the purchase of an interfloor belt: checklist
Step 1. Draw a facade diagram (all sides of the house, including end walls). Mark the axes of windows, doors, and corners.
Step 2. Determine the installation height of the belt. Measure the distance from the base to the floor level with a tape measure.
Step 3. Measure the length of each facade. Add up the lengths of all sides along which the belt will run.
Step 4. Decide: belt around the entire perimeter or only on the main facade. The second option is cheaper but less architecturally convincing.
Step 5. Select the height and relief of the profile (see the section on dimensions).
Step 6. Calculate the number of planks: total length / plank length + 10–15% for trimming and joints.
Step 7. Count the corner joints — external and internal. If there are complex bypasses of bay windows or pylons, add extra allowance.
Step 8. Ensure the selected profile is compatible with other facade elements: rustications, sandriks, architraves, base belt.
Step 9. Select glue, dowels, sealant, primer, paint.
Step 10. Order everything in one batch — interfloor belt, moldings, cornices, architraves, belts. Different batches may differ in white shade.
Mistakes when choosing and installing an interfloor belt
They buy without a facade diagram. Without a diagram, it is impossible to accurately calculate the quantity and length. The result is either a shortage or excess.
They install "by eye", without a level. A misalignment of 5–7 mm is visible to the naked eye from ten meters. A laser level is mandatory.
They take a profile that is too thin. A profile 40–50 mm high on a two-story house is almost invisible. The minimum scale for an interfloor belt is 80 mm.
They use too heavy relief on a modern facade. A rich baroque profile on a minimalist cottage is a stylistic mistake.
They do not connect the belt with windows and rustications. A belt "by itself", without reference to the window rhythm, is a decorative element without meaning.
They do not account for corner joints. A 45° miter cut is a separate operation. Without it, corners look rough.
They do not add a reserve for trimming. A 10% reserve is mandatory. One bad cut = one lost plank.
They do not seal the upper horizontal seams. This is the main point of water ingress during rain. Without sealant, water gets under the profile, causing wetting and delamination.
They mix profiles from different series. Different relief, different step sizes — and the horizontal line turns into a "collage" without logic.
They buy the belt separately from the cornice and the base belt. The three horizontals should be a unified system.
FAQ: Questions and Answers
What is an interfloor belt made of polyurethane?
A horizontal facade profile that is mounted at the level of the floor between stories. It visually divides the facade into tiers, creates scale, and connects decorative elements into a unified system.
Where does the interfloor belt run on the facade?
Usually at a height of 2.8–3.2 m from zero — at the level of the interfloor ceiling. It may be shifted higher or lower for architectural reasons: above first-floor windows or below second-floor windows.
How is an interfloor belt different from a facade molding?
By scale and function. Molding is a general name for a horizontal profile. An interfloor belt is a specific element with a clear architectural purpose: to divide the facade into levels. Belt height — 80–200 mm, projection — 50–120 mm.
Does a single-story house need an interfloor belt?
For a single-story house, an interfloor belt in the classical sense is not needed. However, a horizontal profile above windows or at the windowsill level can be used as a decorative frieze — to organize the facade horizontally.
How to choose the size of a facade profile?
Focus on the facade width: up to 10 m — height 80–100 mm, up to 14 m — 100–140 mm, up to 18 m and more — 140–200 mm. Projection — 60–80 mm for most houses.
How to calculate the length of an interfloor belt?
Sum the lengths of all sides of the house where the profile will run. Add 10–15% for trimming, joints, and corner connections.
Can polyurethane facade profile be painted?
Mandatory. Facade acrylic paint with UV filter — 2 coats. Without painting, ultraviolet destroys the surface in 2–3 years.
How to combine an interfloor belt with rustication and windows?
The height of the rustication block should be comparable to the height of the belt. The lower edge of the belt is 120–200 mm above the top point of the sandrik. The rhythm of the belt should "respond" to the rhythm of the window row.
How to install a facade molding between floors?
Using mounting adhesive + dowels every 400–500 mm. Marking — with a laser level. Corner joints — 45° miter cut. All horizontal seams — acrylic sealant. Painting — after installation and sealing.
Where to buy an interfloor belt made of polyurethane?
In the STAVROS catalog — a full range of facade horizontal profiles, cornices, moldings, belts, and related elements. Delivery across Russia.
STAVROS: the architectural horizontal that holds everything
A horizontal line is not just a strip on the wall. It is an architectural law. It is horizontals that create a sense of stability, proportionality, and completeness of a building. When the facade of a two-story house has an interfloor belt, a base profile, and a crowning cornice — it reads as an architectural object, as a project, as a house with character.
STAVROS produces a complete system of facade horizontals: interfloor belts, molding profiles, base cornices, crowning cornices, window sill belts — all on the same material base, in unified size ranges, with coordinated reliefs. This means you can order the entire facade horizontal set from one manufacturer and get a guaranteed compatible result — without selection "by analogy," without the risk of scale mismatch.
molded decoration made of polyurethane STAVROS is not a set of individual parts. It is an architectural language that can be used to talk about any house: from a modest country cottage to a representative estate complex.
Your facade deserves the right horizontals. STAVROS helps to place them precisely.