Article Contents:
- The problem of selecting ceiling decor on your own
- What is included in a ready-made ceiling stucco decor kit
- Why element proportions are important
- How a ready-made kit saves time for the designer and the client
- When to choose CPU-P1, CPU-P3, or CPU-P5: concise solutions
- CPU-P1 — neat classic without unnecessary accents
- CPU-P3 — expressive center with a restrained perimeter
- CPU-P5 — an intimate system with character
- When to choose CPU-P2, CPU-P4 or CPU-P6: rich and formal systems
- CPU-P2 — a notable classic ceiling with character
- CPU-P4 — a multi-level system for spacious rooms
- CPU-P6 — a formal ceiling for exceptional spaces
- How to calculate the placement area of the kit on the ceiling
- How to connect ceiling decor with walls and furniture
- Mistakes when choosing a stucco decor kit
- Mistake 1. Only look at the price
- Mistake 2. Not considering the ceiling height
- Mistake 3. Not considering the chandelier
- Error 4. Mixing elements from different styles
- Mistake 5. Not connecting the ceiling with the walls
- Where to view and buy ready-made STAVROS kits
- FAQ: Answers to Popular Questions
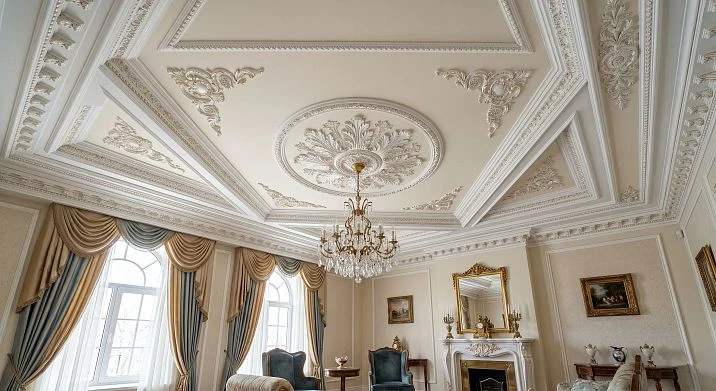
Ready-made ceiling decor kit — this is the answer to all these questions at once. In the STAVROS catalog, the CPU-P line offers six ready-made ceiling systems: from the laconic classic CPU-P1 to the monumental ceremonial CPU-P6. Eacha set of stucco decor for the ceiling — this is a designed, balanced, proven system where every element knows its place. You are not buying a set of SKUs — you are buying a ready-made architectural solution.
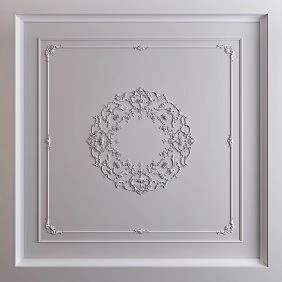
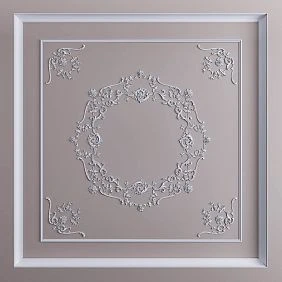
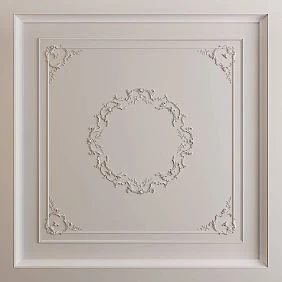
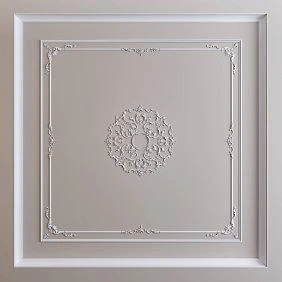
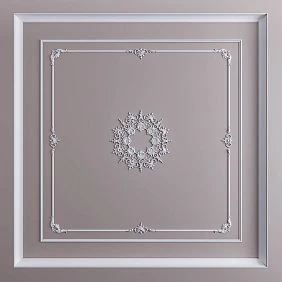
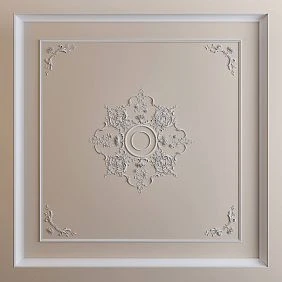
The problem of self-selection of ceiling decor
The task seems simple: choose a cornice, molding, rosette, and several ornamental overlays. But this is where the trap lies, into which both experienced designers and independent customers fall. Piece-by-piece selection of ceiling stucco is a process where every decision raises the next question, and the risk of mismatches grows with each added element.
The first trap is scale mismatch. A 100 mm cornice is a serious, substantial profile. A 20 mm molding is a delicate line, almost a thread. Together in a large room, they do not create an architectural dialogue: the heavy cornice overwhelms the thin molding, the system loses its internal hierarchy and is perceived as a random set of elements. How to choose stucco for the ceiling so that the scales of all components work together? Without experience — practically impossible.
The second trap is stylistic inconsistency. Classic ornamentation is diverse: acanthus leaf, egg-and-dart, meander, weaving, baroque curl, strict geometry of Empire — these are all different languages within one large genre of 'classic'. An overlay with a baroque curl + a corner element with a Greek meander + a cornice with an acanthus frieze — three 'classic' elements, each correct on its own, but together they create ornamental cacophony. How to avoid mistakes with ceiling stucco when selecting independently: practically impossible without special education or many years of experience working with decorative systems.
The third trap is the wrong center. The ceiling rosette for the chandelier is the central accent of the entire system. Its size should be proportional to both the diameter of the chandelier and the scale of the molding contours. A rosette that is too small for a large chandelier — decor that is not visible. A rosette that is too large for a delicate lamp — a heavy spot that kills the balance. How to choose a rosette and moldings for the ceiling without design experience? Calculating proportions requires either precise knowledge or a ready-made balanced solution.
The fourth trap is the inability to see the result in advance. Individual elements in a product card always look beautiful. But how they look together, in your specific room, with your ceiling height and your chandelier — you won't know until installation. The craftsman on site often has to improvise, rearrange, compensate for mismatches — sometimes at the cost of an extra workday and ruined moods. A ready-made ceiling stucco scheme, already tested in completed projects, completely eliminates this uncertainty.
The fifth trap is additional purchases and delays. You compiled a list, ordered, received — and discovered that corner elements are missing, or that you need another pair of overlays for symmetry, or that the cornice needs a slightly different profile. A repeat order, repeat delivery, installation delay.Ceiling decor sethow a ready-made system eliminates this scenario: everything needed is included in the set from the first order.




What is included in a ready-made stucco decor kit for the ceiling
A good question that everyone asks when encountering ceiling decor for the first time. "Kit" is a word that can hide anything: from two moldings and a rosette to a complex multi-level architectural system with fifteen types of products. What exactly is included in the STAVROS ceiling decor kit of the CPU-P series — let's break it down by components and their architectural role.
Perimeter cornice — the outer boundary of the ceiling zone. In CPU-P kits, this is the A130V1 cornice: a profile of 100 × 83 mm made of dense HIWOOD polystyrene with a slot for an LED strip. It forms the boundary of the decorative zone and simultaneously creates a transition between the wall plane and the ceiling plane. The cornice is not just a decorative detail; it is an architectural threshold through which the space is "closed" from above.Polyurethane Crown Moldingfor independent selection — in a separate section of the catalog, where you can find lighter profiles for the perimeter of the entire room outside the decorative zone.
Molding contours — the internal geometry of the ceiling field. These are concentric rectangular or square frames that create movement from the perimeter to the center. Depending on the kit number — one contour (CPU-P1) or several contours of different widths and reliefs (CPU-P4, CPU-P6). It is the molding contours that set the rhythm of the ceiling system: the hierarchy of levels, the feeling of depth and architectural structure.Moldings made of polyurethane— full range for additional use outside the main kit.
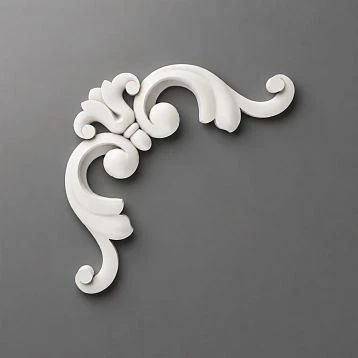
Corner accent elements are ornamental pairs in the corners of the decorative zone. Left and right mirror-symmetrical elements that form the "power points" of the system — visual anchors to which molding lines gravitate. The number of corner pairs ranges from one (CPU-P1) to four independent levels (CPU-P6). Corner elements determine the ornamental character of the system: the more there are and the larger the pattern, the richer and more solemn the ceiling looks.
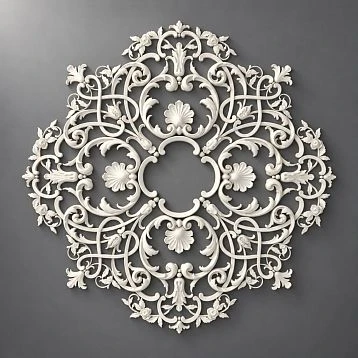
Ornamental field overlays are decorative elements inside molding contours that fill the ceiling field between corner accents. Sizes range from small punctuation inserts of 66 × 45 mm (CPU-P1) to monumental dominants of 300 × 420 mm (CPU-P6). It is the overlays that create the ornamental "flesh" of the system — the visual pattern visible from several meters away.Polyurethane moldings — overlays and ornamental accents for expanding the system.
Central accent is an element or group of elements under the chandelier. This is the final point of the concentric system: cornice → molding contours → corner accents → ornamental inserts → center. In CPU-P1 — central element MLDPU-2U-1.1 (210 × 210 mm). In CPU-P6 — original molding system MLDPU-027 with its own corner pairs and central accent. In combination with the correctpolyurethane ceiling rosette the central group creates an accent under the chandelier that unites the lighting and architectural parts of the interior.
This entire system — a set of ceiling moldings, cornices, corner elements, overlays, central accent — is sold as a single ready-made kit. Nothing extra. Nothing missing. Ready-made architectural logic in one product card.
Our factory also produces:

Why element proportions matter
Proportions in ceiling decor are something rarely discussed openly, but they determine the difference between "beautiful" and "something is off." You can buy the most exquisite ornaments, the most precise castings, the most expensive cornice — and end up with a ceiling that looks awkward. The issue is not the quality of the elements, but their mutual proportions.
How to choose a set of stucco decor for a ceiling with correct proportions? Here are five factors that must be considered simultaneously.
Ceiling area. The CPU-P zone is fixed: 3200 × 3200 mm. For a room area of 15 m², this zone occupies most of the ceiling — meaning the system should not be overloaded. For an area of 40 m², the same zone is only the central third of the ceiling surface, and here a rich system looks proportionate.
Ceiling height. Ceiling decor is viewed from a distance equal to the room's height. At a height of 2.5 m, ornamental details are clearly visible even if small; at a height of 3.5 m, small elements "fade" with distance. The finished ceiling composition in each CPU-P kit is designed with readability in mind for the typical height of that room class.
Size and design of the chandelier. The central accent of the system is the element around which the chandelier is mounted. The diameter of the chandelier base should fit into the central group without completely covering it. As a rule, the central element should be visible around the chandelier base — this creates the feeling of a "setting" into which a "stone" is inserted. If the chandelier is large, the central group of the kit should be proportionally larger.
Indentation from walls. The 3200 × 3200 mm zone should be positioned with equal indentations from all walls — this creates symmetry that the eye perceives as order and completeness. For a room size of 4 × 4 m, the indentation will be about 400 mm on each side. For a size of 6 × 5 m, it will be significantly larger, allowing the use of an additional perimeter cornice throughout the room.
Ratio of cornice, molding, and overlays. Cornice A130V1 (100 mm) is the dominant perimeter profile. The molding contours of the field are subordinate lines. Ornamental overlays are point accents. This "heavy — medium — light" hierarchy is built into each kit of the CPU-P series and works automatically. When selecting independently, building this hierarchy without experience is extremely difficult. That is why a ready-made stucco composition for the ceiling is not just convenience, but a guarantee of the correct result.
Get Consultation
How a ready-made kit saves time for the designer and client
This aspect is rarely discussed in the context of ceiling decor, but it is fundamentally important for all project participants — the designer, the client, and the craftsman. Let's consider each.
For the designer. Showing the client one render with a ready-made CPU-P4 kit is much easier than explaining how cornice article A, molding article B, corner elements articles C and D, overlays articles E, F, G, and rosette article H will look together. A ready-made set of stucco for turnkey renovation is a single object for design, approval, and visualization. The designer does not need to spend time selecting compatible elements: the system is already assembled, tested, and has a specific visual embodiment. A stucco kit for an interior designer is also an argument in conversation with the client: "Here is a ready-made solution, here is what it looks like, here is its cost."
For the client. Understanding the project budget is much easier when there is one article with a fixed price than when you need to sum up 12 items from different sections of the catalog. A ceiling decor kit for the designer and client is also predictability: one price, one order, one delivery, a clear result. The client sees exactly what they are buying and is not afraid of "additional expenses" that so often arise when selecting items individually.
For the craftsman. Installing a system according to a ready-made scheme is fundamentally different work than "figuring out on the spot" what goes where. A ceiling decor kit for builders is a step-by-step installation logic: first the cornice along the perimeter of the zone, then the molding contours, then the corner accents, then the field overlays, then the central element. A ready-made sequence without improvisation.installation of polyurethane moldingdetailed in a separate guide — steps, adhesives, markings, joints. A ready-made solution for a ceiling with stucco molding — this is also ready-made logic for the craftsman.
Why is it better to buy ceiling decor as a set? Because it saves resources for all project participants: the designer's time for selection, the client's nerves for approval, the craftsman's working time for interpretation. A set is not just convenience. It is risk reduction at every stage.
When to choose CPU-P1, CPU-P3 or CPU-P5: laconic solutions
Three sets out of six — CPU-P1, CPU-P3 and CPU-P5 — are aimed at spaces where architectural expressiveness is important but should not become monumental. Let's break down each one.
CPU-P1 — neat classics without unnecessary accents
Stucco decor set CPU-P1— a basic system for those who want a true classic ceiling without turning it into an ornamental "carpet". Cornice A130V1 around the perimeter of the zone, one molding contour LD32, corner accents of one pair, small inserts in the field, central element MLDPU-2U-1.1 (210 × 210 mm) — a system where each element works strictly for its role, without ornamental excess.
CPU-P1 for a classic ceiling is a choice for a bedroom, children's room, small study, or compact living room. With a ceiling height of 2.5–2.7 m, the system does not feel overloaded: the cornice is serious enough to "set the frame", the molding contour is delicate enough not to "eat up" the space. CPU-P1 is the answer to the question: "I want classics, but I'm afraid of overdoing it." This set definitely won't overdo it.
CPU-P3 — expressive center with restrained perimeter
Molding decor set CPU-P3— a system of the next decorative level, where architectural expressiveness is already noticeable, but ornamental saturation remains manageable. Several molding contours, an expanded corner group, larger field overlays — a system that reads as a full-fledged classic composition at first glance.
CPU-P3 for a living room is a set that turns an ordinary living room into an "interior with a ceiling". Suitable for rooms of 20–30 m², for a bedroom with a ceiling height of 2.7 m or more, for a study where you want to create an atmosphere of intellectual solidity. Expressive but not monumental. Decorative but not flashy. CPU-P3 is that "golden balance" for most city apartments with classic or neoclassical interiors.
CPU-P5 — камерная система с характером
Molding decor set CPU-P5 — система из восьми видов изделий коллекции «Классика» для потолочной зоны 3200 × 3200 × 83 мм. CPU-P5 строится не на орнаментальной плотности, а на точечной выразительности: несколько акцентных элементов в правильных местах вместо равномерного заполнения всего поля. Это система для тех, кто ценит сдержанность как художественный приём — когда каждый декоративный жест весом, а пустота между элементами работает не меньше, чем орнамент.
CPU-P5 для спальни — идеальный выбор. Для спальни важна атмосфера, а не демонстрация: потолок должен создавать ощущение уюта и архитектурной завершённости, не доминируя над пространством. CPU-P5 решает эту задачу с деликатностью, которой нет у более насыщенных комплектов. Также подходит для детской, небольшой гостиной, кабинета или холла в компактной квартире.
Когда выбирать CPU-P2, CPU-P4 или CPU-P6: насыщенные и парадные системы
Три комплекта — CPU-P2, CPU-P4 и CPU-P6 — ориентированы на большие пространства, высокие потолки и парадные форматы. Здесь архитектурная выразительность — не исключение, а основа замысла.
CPU-P2 — заметный классический потолок с характером
Molding decor set CPU-P2 — система с расширенным составом угловой группы, более насыщенными накладками поля и дополнительной детализацией в молдинговом рисунке. Это не просто «CPU-P1 с добавками» — это принципиально другой декоративный язык, в котором орнамент уже говорит в полный голос, а не только обозначает присутствие классики.
CPU-P2 для классического интерьера — оптимальный выбор для городской квартиры с высотой потолка от 2,7 м и площадью гостиной или столовой от 20 м². Подходит для спальни с классической мебелью, где потолок должен поддерживать декоративный уровень интерьера, а не уступать ему по выразительности. CPU-P2 — для тех, кто выбрал классику без компромиссов.
CPU-P4 — многоуровневая система для просторных помещений
Molding decor set CPU-P4 — система с 21 видом изделий, несколькими уровнями угловых акцентов, развитой орнаментальной системой поля и насыщенными молдинговыми контурами. Это уже не «украшение потолка», а полноценная архитектурная программа для большого пространства.
CPU-P4 for a large room — the hall of a country house, a spacious living room from 35 m², a formal dining room, a hall in a classic home. With a ceiling height of 2.9–3.2 m, the system unfolds to its full potential: the scale of the space embraces the scale of the decor, and the ceiling begins to "live" — depth, movement, and architectural narrative appear in it. A more complex composition of ceiling decor with several levels of ornamental accents is what a large classic hall needs.
CPU-P6 — a formal ceiling for exceptional spaces
Molding decor set CPU-P6 — the most saturated and architecturally complex system in the lineup. Zone 3200 × 3200 × 83 mm, 15 product types, four independent levels of corner pairs (NPU-461L/R, NPU-430L/R, NPU-431L/R, NPU-470L/R), monumental field dominants NPU-464 (300 × 420 mm) and NPU-475 (350 × 180 mm), original central molding system MLDPU-027 with two types of corner elements.
CPU-P6 for a formal living room — when the ceiling must become the main element. Not a background, not a context, but the first thing a person notices when entering the room. For a country house with ceilings of 3+ meters, for a representative area, for a hall where classical architecture is not a decorative solution but an ideological one. CPU-P6 is not for those who doubt. For those who are sure: maximum is correct.
How to calculate the placement zone of the kit on the ceiling
A ceiling decor kit of 3200 by 3200 is a specific size that needs to be correctly placed in a specific room. How to do this without mistakes?
Step 1. Measure the room. The actual dimensions of the room often differ from the design ones by 20–50 mm. Measure the length and width with an accuracy of a centimeter — on the floor and on the ceiling (they may differ).
Step 2. Find the center of the zone. The ceiling decor of 3200 × 3200 mm should be positioned symmetrically. The center of the zone does not always coincide with the geometric center of the ceiling: the center relative to the furniture arrangement or the center relative to the chandelier is more important. If the chandelier is already installed, it determines the center. If not, plan the center of the decorative zone based on the furniture group.
Step 3. Check the minimum distance from the walls. With a room size of 4 × 4 m, the 3200 × 3200 mm zone will leave a distance of about 400 mm — this is the minimum acceptable. For smaller rooms, the zone may exceed optimal proportions; in this case, it is recommended to reduce the zone by adapting the layout scheme. For sizes from 5 × 5 m and larger — complete freedom of choice.
Step 4. Check conflicts with engineering systems. Recessed lights, ventilation grilles, fire detectors, beams — all of this must be accounted for before installation begins. The ceiling decor of 3200 × 3200 mm is a zone without engineering communications: no lights or grilles should be inside the decorative contour.
Step 5. Marking with a laser level. Perfect symmetry of the ceiling system requires perfect marking. A laser level is a mandatory tool. How to position a set of decor on the ceiling without a laser level: the result will differ from the design by a few millimeters, which is noticeable in the final look.installing polyurethane moldingwith analysis of corner joints, seams, and painting techniques — in a separate STAVROS guide.
How to connect ceiling decor with walls and furniture
The ceiling system does not work in a vacuum. It works in context — and how well the connection between the ceiling and the rest of the space is built determines whether the interior will be cohesive or fall apart into unrelated beautiful fragments.
How to combine ceiling decor with walls is a question with a specific answer: through a unified ornamental language and a coordinated hierarchy of profiles. If the ceiling is designed with the CPU-P system from the "Classic" collection, wall molding frames should use the same ornamental vocabulary — acanthus, geometric, or mixed motifs from the same era.Polyurethane wall decorin the STAVROS catalog — molding frames, wall overlays, corner and intermediate elements, executed in a unified style with ceiling sets.
Ceiling stucco and wall moldings are a classic interior duo. Wall "panels" — rectangular frame fields bounded by moldings — create a vertical rhythm that rhymes with the horizontal rhythm of ceiling molding contours. A transitional cornice unites these two rhythms: it simultaneously belongs to both the ceiling and the wall, linking the planes into a single architectural whole.Moldings made of polyurethanefor wall frames — in the catalog section where you can select profiles of different widths and reliefs to create the correct decorative hierarchy.
The color of the decor is another connecting element. In a classic interior, ceiling and wall decor is traditionally painted in a single color: white, ivory, light gray, cream. Polyurethane and dense polystyrene accept acrylic and alkyd paint well — without priming, in an even layer.polyurethane interior itemsfrom the entire STAVROS catalog — a unified system for creating a decorative space where the ceiling, walls, cornices, and moldings form a coordinated architectural context.
A ceiling decor set for a classic interior is most effective when it does not exist on its own, but rather serves as the pinnacle of a decorative pyramid: from bottom to top — floor skirting boards, wall moldings, door casings, a transitional cornice, and finally, the CPU-P ceiling system as the architectural crown of the space.
Mistakes when choosing a stucco decor set
A ready-made set reduces risks but does not eliminate them completely. Several typical mistakes that occur even when working with ready-made systems.
Mistake 1. Only looking at the price
The price of a set is an important parameter, but not the first. If you choose a cheaper option that does not match the scale of the room, the result will be worse than if you had spent more. A ceiling decor set is an investment in the final look of the interior, and a wrong choice made "to save money" ends up costing more in the literal sense: dismantling, reordering, reinstallation. Choose the right set, not the cheap one.
Mistake 2. Not considering the ceiling height
The same set looks fundamentally different at a height of 2.6 m and at a height of 3.2 m. At a height of 2.6 m, ornamental details of 300+ mm will literally "loom" over the space — the ceiling will become heavy and squat. At a height of 3.2 m, the same elements will read correctly, with the right architectural weight. Which stucco set to choose for a low ceiling: CPU-P1 or CPU-P5 for heights up to 2.7 m. Which stucco set to choose for a high ceiling: CPU-P4 or CPU-P6 for heights from 3 m.
Mistake 3. Not considering the chandelier
The central part of the ceiling system and the chandelier form a single ensemble. A chandelier with a diameter of 60 cm under a central element of 210 × 210 mm is organic. A chandelier with a diameter of 100 cm under the same element — the chandelier base will completely cover the accent. The central accent in the CPU-P system should be visible around the chandelier base: it is the "setting" into which the "stone" is inserted. Check compatibility before purchasing.
Mistake 4. Mixing elements from different styles
A ready-made kit prevents this error inside the system, but not outside. If you add cornices or moldings from a completely different stylistic series to the CPU-P kit — from other manufacturers or from other collections — the unity of the system will be disrupted. How to avoid mistakes when selecting ceiling stucco: use only STAVROS products from the "Classic" collection for all ceiling and wall decor in the room.
Error 5. Not connecting the ceiling with the walls
A rich classic ceiling over empty walls is not classic, it's an anomaly. A ceiling with stucco works in context. The minimal context is a perimeter cornice around the entire room and at least one wall with molding frames. If the walls are completely "empty," even the most beautiful set of ceiling decor will look like a foreign object that accidentally ended up in the interior.
Where to view and buy ready-made STAVROS kits
If you've read this far — you already understand whya ready-made ceiling stucco kitis fundamentally different from piece-by-piece selection. All that's left is to choose your option from six.
In the STAVROS catalog, the "Ceiling Decor" section is structured precisely as a line of ready-made solutions: six cards, six systems of different decorative levels. Each card contains the kit composition, element photos, technical dimensions, and article numbers — everything a designer needs for approval, a client for understanding, and a craftsman for installation. Buying a ceiling decor kit means going to the section, choosing an option based on room area, ceiling height, and decorative scenario, and placing an order.
Buy a stucco ceiling kitwith Contact us to confirm shipping to your destination. or with pickup at STAVROS showrooms in St. Petersburg and Moscow. Polyurethane and polystyrene elements are packed in protective packaging and withstand transportation without damage.
Choose a ready-made solution — don't compile something random. Six kits, six architectural scenarios, one goal: make your ceiling complete.
Ready-made sets of stucco decor for the ceiling— in the STAVROS catalog.
FAQ: Answers to popular questions
What is included in a stucco decor set for the ceiling?
The set includes: perimeter cornice A130V1, molding contours, corner accent pairs, ornamental field overlays, and a central element for the chandelier. In rich systems (CPU-P4, CPU-P6) — several levels of corner groups and a central molding system. Full composition — in the card of each set in the sectionceiling decor.
How is a ready-made set better than individual elements?
A ready-made set is an architecturally balanced system: scales are coordinated, the ornamental language is unified, and the geometry is tested in completed projects. Independent selection requires experience and time; without the former, the risk of error is very high.Ceiling stucco set as a ready-made solution — it also saves time for the designer, client, and craftsman.
Which set should I choose for a small room?
For rooms up to 20 m² —CPU-P1orCPU-P5: laconic systems that create a classic accent without visual overload. With a ceiling height of up to 2.7 m — CPU-P1 or CPU-P5 is also preferable.
Which set to choose for a formal living room?
For spacious rooms from 35 m² and ceiling heights from 3 m —CPU-P4orCPU-P6. CPU-P6 — the most saturated system for exceptional spaces: grand hall, country house lobby, representative area.
Can the ceiling decor set be used in an apartment?
Yes. CPU-P1, CPU-P2, CPU-P3, and CPU-P5 are systems optimal for city apartments. With standard ceiling height of 2.5–2.7 m and room area from 15 to 35 m², these sets work at full capacity. The main thing is to correctly match the system scale with the room area and ceiling height.
Is professional help needed for installation?
CPU-P1 and CPU-P5 are available for self-installation with basic skills and a laser level. CPU-P4 and CPU-P6 are recommended to be installed with an experienced craftsman: four levels of corner pairs and a central molding system require precise marking and experience with decorative systems.
How to calculate the number of sets for a large room?
A standard set is designed for one decorative zone 3200 × 3200 mm. For one room, as a rule, one set is used above the central furniture group. In very large rooms (hall, lobby from 60 m²), it is possible to create several zones — in this case, consultation with a STAVROS manager is recommended.
STAVROS is a Russian manufacturerpolyurethane products for classic and neoclassical interiors. Own production, "Classic" collection, full range of architectural decor:Crown Molding, Moldings, ceiling rosettes, Wall Decorready-made ceiling kits CPU-P1–CPU-P6. STAVROS — when a "kit" means not just a set of elements, but a ready-made architectural solution proven in completed projects.