Article Contents:
- Short answer: one NPU.VRS-006 is enough for such a panel if you need a central ornament without a frame
- What the 66.5 and 124 mm margins actually mean
- Why one large overlay and a molding frame are not interchangeable solutions
- How much molding would a frame around a 1200 × 600 mm field require
- Why slat panels already do part of the molding frame's job
- Don't order based on the design 1200 × 600 mm until you've measured the finished field
- How to make a full-size template and see the result before purchasing
- Where to find the center: the panel has a geometric and a visual axis
- Why the side 66.5 mm should be measured from the actual edge, not from the pattern on the slats
- A height of 600 mm gives more freedom than a width of 1200 mm
- Relief depth of 23 mm: why it cannot be ignored
- What surface to glue a large overlay on
- Why NPU.VRS-006 cannot be trimmed like a regular slat
- What happens if you add a frame to NPU.VRS-006 as well
- When a single NPU.VRS-006 looks more convincing than a frame
- When a field may look unfinished without a frame
- How color changes the perception of the dimensions 1067 × 352 mm
- How to tie a floral ornament to the vertical rhythm of the slats
- What to consider when viewing from different distances
- What to do if the panel has an outlet, switch, or wall lamp outlet
- Furniture under the panel: when it helps and when it breaks the composition
- Lighting: large relief can look completely different in the evening
- Receiving the product: what to check before applying glue
- Mistakes before ordering that really change the result
- When it's better not to buy NPU.VRS-006 for this panel
- What alternatives exist if one NPU.VRS-006 is not enough
- How to make a decision without design guesses: selection table
- Practical route from measurement to order
- What to buy for the solution in question
- The panel may have the correct width and height, but not be rectangular: check the diagonals
- FAQ: additional questions before purchase
- Does size C = 23 mm mean that after installation the overlay will protrude from the wall exactly 23 mm?
- What will change if the smooth panel is recessed relative to the slat panels?
- What if the slats themselves protrude from the wall more than the relief of NPU.VRS-006?
- Do the rounded corners of the panel itself interfere with the installation of a straight horizontal overlay?
- What width of the smooth field should be set if the wall is not yet built and you want to get the specified side margins?
- How to calculate the panel height in advance for different top and bottom offsets?
- Can a painting, mirror, or other central object be placed next to NPU.VRS-006?
- If the wall is still being designed, should NPU.VRS-006 or slat panels be chosen first?
- Do I need to account for the thickness of the future paint when calculating 1200 × 600 mm?
Short answer: one NPU.VRS-006 is enough for such a panel if you need a central ornament without a frame
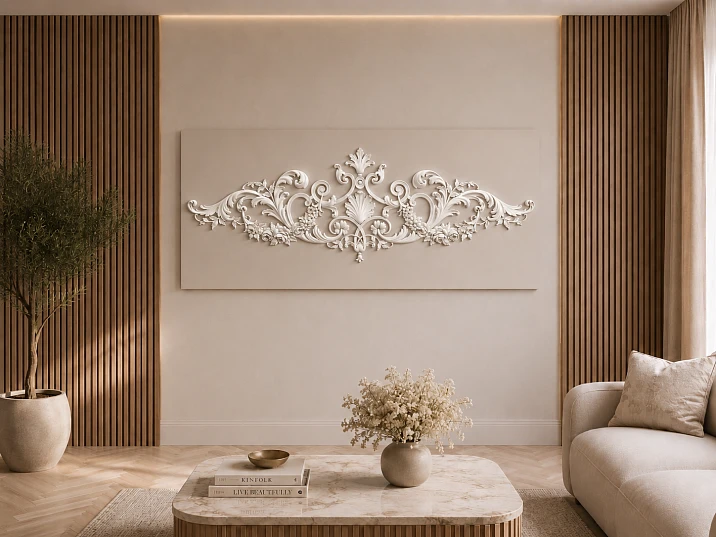
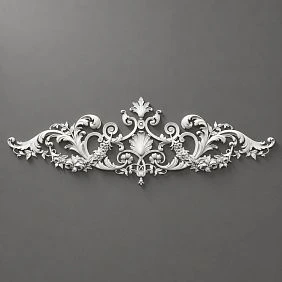
On a smooth rectangular panel measuring 1200 × 600 mm, one large carved decorative overlay NPU.VRS-006, sized 1067 × 352 × 23 mm, physically fits without trimming. When placed horizontally, matching the shape of the product, 133 mm of free space remains in width, and with precise centering — 66.5 mm on the left and right. In height, 248 mm remains, i.e., 124 mm at the top and bottom.
This already provides a practical answer to the main question: buying four sides of a molding frame just because the panel seems "too empty" is not necessary. NPU.VRS-006 itself occupies almost the entire working width of the field and creates an independent horizontal composition. At the same time, it does not fill the panel to the edges: noticeable background remains at the top and bottom, thanks to which the relief does not turn into a continuous strip of decor.
But the word "fits" is not equal to the word "suits." Before ordering, you need to check not only the arithmetic but also the actual geometry of the already finished wall: whether the visible smooth field really measures 1200 × 600 mm, and whether trim, furniture, socket, switch, sconce, shadow line, or protrusion of adjacent slat panels encroach on it. And another question — whether the interior actually needs a large central ornament. A molding frame and a single overlay solve different compositional tasks: the frame emphasizes the boundaries of the panel, while NPU.VRS-006 makes its center the main object.
For the described scenario, the initial configuration is simple: 1 carved decorative overlay NPU.VRS-006 made of polyurethane. At the time of checking, the STAVROS card indicates a size of 1067 × 352 × 23 mm and a price of 29,320 ₽ per piece. After a control measurement of the panel, you can buy the carved overlay NPU.VRS-006 made of polyurethane specifically as one central decorative element.
| Parameter | Value |
|---|---|
| Smooth panel | 1200 × 600 mm |
| NPU.VRS-006 | 1067 × 352 × 23 mm |
| Material | Polyurethane |
| Quantity for the composition under consideration | 1 pc. |
| Price per unit at the time of check | 29 320 ₽ |
| Total remaining width | 133 мм |
| Left margin when centered | 66.5 mm |
| Right margin when centered | 66.5 mm |
| Total remaining height | 248 мм |
| Top margin when centered | 124 мм |
| Bottom margin when centered | 124 мм |




What the 66.5 and 124 mm margins actually mean
Dry arithmetic shows that the product fits into the panel, but for a purchase decision it is more useful to understand the proportions. The overlay occupies 1067 of 1200 mm horizontally — about 88.9% of the panel width. Therefore, the composition will be perceived as a wide central band of ornament, not as a small medallion in the middle of a large empty surface. The total free space on the sides is only about 11.1% of the field width.
Vertically, the situation is different. The height of NPU.VRS-006 is 352 mm with a panel height of 600 mm, i.e., about 58.7%. About 41.3% of the height remains for the background: 124 mm at the top and bottom. It is this difference that makes the fit interesting. Horizontally, the overlay almost "stretches" the composition from one slatted section to another, while vertically it has space for air and shadow from the relief.
One can also look at the aspect ratio. The panel itself has a proportion of 1200:600, i.e., 2:1. The dimensions of NPU.VRS-006 are approximately 3.03:1. The overlay is noticeably more elongated than the base. Therefore, equal margins on all four sides should not be expected here. If one tries to evaluate such a composition by the principle "there must be an equal frame of air around the decor," it will seem wrong. For a horizontal ornament, it is natural to have narrower end margins and wider top and bottom margins.
There is another important clarification. The size 1067 × 352 mm describes the bounding rectangle of the product, not the area of solid polyurethane filling. The carved ornament has its own silhouette, gaps, and relief variations. Therefore, the calculation of the bounding rectangle area can be used to understand the scale, but it cannot be interpreted as "the overlay covers 52% of the wall with material." It occupies about 52.2% of the panel area only with its outer bounding contour. Visually, there will be more free background than simple multiplication of 1067 × 352 suggests.
That is why a paper or cardboard rectangle of 1067 × 352 mm is useful only as a first template. If it is possible to print a photo of the silhouette or at least schematically cut out the main gaps of the ornament, the fitting will be more accurate. On a large panel, the difference between "a rectangle of this size" and the actual openwork shape is more noticeable than on a small overlay.
Our factory also produces:
Why one large overlay and a molding frame are not interchangeable solutions
When a smooth field is located between active slatted panels, the first idea is often obvious: outline it with molding to get a traditional decorative panel. But a frame works primarily with the boundary. It tells the eye: here begins a separate rectangle, here are its top, bottom, and sides. The center may remain empty or receive additional decor.
NPU.VRS-006 works the opposite way. It does not outline an existing rectangle but gathers attention in the middle. The boundary of the smooth field is already read due to the transition from the smooth surface to the slats. If this transition is clear enough, an additional molding line may turn out to be a second contour next to the first: first the slatted plane ends, then a smooth strip follows, then another frame appears. In a small gap, such levels can compete with each other.
A single overlay removes one of the contours. The scheme becomes simpler: slatted surface → smooth background → large central relief → smooth background → slatted surface. This does not mean the composition is automatically better. It is simply built on a different principle.
A frame wins when it is important to emphasize the architecture of the wall: repeat the rectangles of door panels, support other molding panels, build a series of identical fields, or connect the panel with the classic layout of the entire room. NPU.VRS-006 wins when the smooth field itself is already clearly separated by slats and one wants to avoid another rectangular contour.
There is also an installation difference. For a frame, you need to choose a molding profile, determine the inner and outer dimensions, decide at what distance from the slats the line will run, make corner joints, and achieve identical geometry on all four sides. For a single overlay, the key task is different: find the center, maintain the horizontal, check the free margins, and securely glue one large element. Both methods have their own requirements, so comparing them only by the number of parts is incorrect.
Get Consultation
How much molding would a frame around a 1200 × 600 mm field require?
Even if the final choice is made in favor of NPU.VRS-006, it is useful to evaluate the alternative quantitatively. The perimeter of the rectangle itself, 1200 × 600 mm, is 3600 mm. But a real molding frame almost never has to run exactly along the outer boundary of the panel. Usually, its axis or outer edge is set inward so that a margin remains between the molding and adjacent trim.
If we conditionally set the same offset d from each side and calculate the frame dimensions along the chosen line, we get:
frame width = 1200 − 2d;
frame height = 600 − 2d;
perimeter = 2 × (1200 − 2d + 600 − 2d) = 3600 − 8d.
For example, with a calculated line 50 mm from the edges, you get a rectangle of 1100 × 500 mm with a perimeter of 3200 mm. This is not a ready-made specification for ordering: the actual consumption depends on the length of the chosen profile, the width of the molding itself, the cutting scheme, the pattern, the joints, and the necessary allowance. But the formula shows why the comparison “one overlay versus four moldings” cannot be reduced to four product items. For a frame, you buy a certain length of linear material, not four abstract sides.
The cost of a frame without choosing a specific profile also cannot be honestly compared with the price of NPU.VRS-006. The price of one overlay is known — 29,320 ₽ at the time of checking. For molding, you first need an article number and its price per strip or per linear meter, then cutting and quantity. Therefore, the conclusion “the overlay is cheaper than the frame” or “the frame is cheaper than the overlay” without this data would be a fabrication.
If after trying it on it becomes clear that the central ornament does not solve the task and a contour is needed, you can Buy polyurethane wall moldings and then make a separate calculation for the specific profile. This is a logical alternative, not a mandatory addition to NPU.VRS-006.
Why slat panels already do part of the work of a molding frame
In the wall under consideration, the smooth panel is not in the middle of a uniform painted surface. On both sides of it there are slat panels. Their vertical rhythm itself creates a strong boundary: the eye sees a change in texture, depth, light, and repeating lines. Therefore, the central field already has side framing, even if it is not made in the form of a thin profile.
This fundamentally changes the task. On a completely smooth wall, a single overlay of 1067 × 352 mm might need an additional architectural system around it—especially if there are no other elements nearby that explain its position. Between the slat sections, its coordinates are set by the wall itself. On the left and right there are clear vertical arrays, and between them there is a calm area intended for an accent.
However, slat panels cannot be considered a literal replacement for a frame. They do not define the top and bottom boundaries of the panel. If a smooth field 600 mm high is built, for example, into a taller wall and the same smooth surface continues above/below without a visible transition, you need to separately check whether the eye actually reads a rectangle of 1200 × 600 mm. The size recorded in the project may be for installation, but visually the field may appear taller or shorter.
Therefore, before purchasing, stand at the main viewing point and cover the future overlay with a simple template. If it is already clear without molding where the panel ends, an additional contour is not necessary. If the smooth area "spreads" upward and downward, a frame or another way to mark boundaries may be more useful.
Another nuance is the density of the slats. The more active and contrasting the side planes, the more valuable the calm gap between them. If you outline it with a massive molding and at the same time add a large ornament, you get three competing systems: the rhythm of the slats, the rectangular geometry of the frame, and the plant plasticity of NPU.VRS-006. A single overlay leaves only two languages—the geometry of the slats and the ornament. For many modern interiors, this is precisely the reason to abandon the frame, not savings on trim.
Do not order based on the project's 1200 × 600 mm until you have measured the finished field
The size from the design project and the size of the already finished surface may differ. Plastering, leveling, painting, end strips, installation of slat panels, and joints can take several millimeters from each side. For small decor, this is often insignificant. For NPU.VRS-006, the width allowance is only 133 mm in total, so the actual geometry matters.
Measure not just once in the center. Take the width of the panel at least at the top, middle, and bottom of the intended overlay area. Then measure the height on the left, in the center, and on the right. If the values differ, rely not on the "nice" 1200 × 600 mm from the project, but on the actual minimum clearance in the area where the product will pass.
Pay special attention to the side joints with the slats. It happens that the end strip or the outermost lamella protrudes toward the smooth field. Then the nominal width between the bases may be 1200 mm, but the visually free plane is smaller. For calculating the side margins, you need exactly the visible and accessible surface for installation.
After taking measurements, recalculating the fit is simple:
left + right free margin = actual panel width − 1067 mm.
If the overlay is placed strictly in the center, the result is divided by two. The same logic applies to the height with the size of 352 mm.
For example, if after finishing the actual width turned out to be not 1200 but 1180 mm, the total side remainder will already be 113 mm, and when centered — 56.5 mm on each side. This is a different scale of the edge. Such an example is useful not because 1180 mm will necessarily be encountered on site, but because it shows the sensitivity of the composition to the actual measurement. The closer the overlay dimension is to the width of the field, the less room there is for the "approximately fits" decision.
If the actual width turns out to be less than 1067 mm, the described horizontal installation without modifying the product no longer fits geometrically. Trimming a complex carved ornament to squeeze it into a too-narrow field is not the scenario on which to base the purchase. In this case, it is better Choose decorative polyurethane overlays to choose a smaller format or switch to a different composition.
How to make a full-size template and see the result before purchasing
For a product longer than a meter, a small picture on the screen is almost useless for assessing scale. The cheapest way to test the idea is to make a template of 1067 × 352 mm. It can be assembled from several sheets of paper, thin cardboard, or painter's film. At first, a rectangle is enough: it will show the extreme dimensions, margins, and position relative to the slats.
Mark horizontal and vertical axes on the template. On the wall, only apply removable control marks with painter's tape if the finish is already done. Align the centers and secure the template without damaging the coating. After that, be sure to step back to the usual viewing distance. A composition that seems cramped from 40 cm may look perfectly normal from three meters.
The next level of checking is to bring the template closer to the real silhouette. Photo NPU.VRS-006 shows that this is not a rectangular panel, but a carved horizontal composition. If you have a printout or image, transfer at least the large cutouts along the top and bottom contours. Then it becomes visible that the background "extends" inside the overall rectangle, and the edges are perceived as lighter.
Conduct two viewings. The first — in daylight, when the relief reads softer. The second — with evening lighting on, especially if there are side sconces or directional lights nearby. The product thickness of up to 23 mm means that the relief physically extends from the plane and can create noticeable light and shadow. The same size is perceived differently under diffused and side lighting.
Finally, photograph the wall with the template strictly from the main viewing point. The photo is useful not as a final design judge, but as a way to see the overall mass. On site, attention often jumps between finishing details, but in the frame it's easier to notice whether the overlay seems pressed against the slats, whether it "sags" too low, or whether it conflicts with the furniture.
Where to find the center: the panel has a geometric and visual axis
If the smooth field is truly symmetrically located between two identical slatted sections, the solution is obvious: the center of the overlay is aligned with the center of the panel. For 1200 mm, the geometric vertical axis runs at 600 mm from any side edge. For a height of 600 mm, the horizontal axis is at 300 mm from the top or bottom edge. With this placement, NPU.VRS-006 gets calculated margins of 66.5 and 124 mm.
But in a finished interior, the geometric center does not always coincide with the visual one. On one side, there might be a tall cabinet nearby, on the other — an open passage; one slatted section may be wider than the other; a TV, console, or light fixture might be in the center of the panel. Then mechanical alignment of two lines does not yet guarantee a calm composition.
You need to decide what is the main reference. If the panel is intended as a standalone insert between the slats, it's usually more reasonable to maintain the connection with it. If NPU.VRS-006 works above furniture, the central axis of the furniture may be more noticeable. Shifting a large overlay by a few centimeters without reason is risky: with side margins around 66.5 mm, the difference quickly becomes visible.
The "almost center" looks especially bad. For example, a shift of 15 mm turns the side margins of 66.5/66.5 mm into 51.5 and 81.5 mm. The difference between them is already 30 mm. Against the background of strict vertical slats, such asymmetry reads stronger than on a free painted wall.
If the interior requires a deliberate shift, it should be part of the composition, not a result of marking errors. Then check the distance to furniture, light fixtures, doorways, and other dominant objects. For a typical 1200 × 600 mm panel between symmetrical slats, a safe starting point is the exact center.
Why the side 66.5 mm should be measured from the actual edge, not from the pattern on the slats
A slat panel may have its own complex edge. The last lamella ends with one line, the backing with another, and the shadow gap with a third. If you simply place a tape measure "roughly from the slat," the measurement will not be repeated on the second side. For a symmetrical composition, first choose one physical reference line and use it on both the left and right.
It is best when this line is the actual boundary of the smooth mounting base. It is onto this that the overlay is glued, and it is this that forms the accessible clearance. If the decorative slat protrudes above the base, separately assess its shadow and thickness: NPU.VRS-006 has a relief of up to 23 mm, so the proximity of two protruding textures changes the perception of the end gap.
There is no need to strive for 66.5 mm to look like a technical standard. This is the result of specific geometry, not a mandatory minimum distance from the polyurethane overlay to the slat panels. The product card does not contain a rule "leave at least 66.5 mm." In the article, this figure only means what will result from centering a 1067 mm product on a 1200 mm field.
Therefore, if the actual edge of the slats extends inward by 10 mm on each side, the visual gap will already be different, even if the base formally retains its previous width. Conversely, a dark shadow line can make the field appear visually wider. The template should be applied to the already finished texture, not to an abstract scheme.
The height of 600 mm gives more freedom than the width of 1200 mm
Vertically, the composition has noticeably more margin: 248 mm total versus 133 mm horizontally. This means that a slight adjustment in height is possible without an immediate feeling of tightness. But "can be shifted" does not mean "should be shifted."
With precise centering, 124 mm remains at the top and bottom. If there is a console under the panel and there is an additional zone between its tabletop and the lower boundary of the decorative field, sometimes you may want to raise the overlay slightly above the geometric center. Such a decision is permissible only after viewing the entire wall. A shift of 20 mm will give margins of 144 and 104 mm — the difference is noticeable, but not as critical as a similar shift horizontally.
There is also the reverse scenario: above the panel there is a sconce, shelf, or TV. Then more free top margin may be needed, and the overlay is lowered. However, the distance cannot be assessed only by the plane. The relief protrudes up to 23 mm, so any object that passes in front of the wall must have sufficient actual clearance in depth.
The height should also be checked relative to the horizontal lines of furniture. If NPU.VRS-006 is above a long console, its central axis and mass may be better perceived when the ornament is connected to the furniture, rather than to the abstract middle of a 600-mm rectangle. But if the panel is enclosed between slats and has clearly readable upper and lower boundaries, the geometric center remains the most predictable solution.
Practical takeaway: the side margins in this task are a stricter constraint, while the vertical ones are a zone of moderate compositional adjustment. First make sure that 1067 mm fits comfortably in width, and only then experiment with the vertical position.
Relief depth of 23 mm: why it cannot be ignored
The NPU.VRS-006 has a third dimension of 23 mm. For a 1200 × 600 mm calculation, it does not affect whether the product fits into a rectangle, but it does affect how the decor lives on an already finished wall. The relief protrudes from the plane, catches side light, casts shadows, and becomes a physical object rather than a printed pattern.
Before ordering, look at what is nearby in depth. Does a cabinet door open near the panel? Does a curtain pass by? Is tall furniture placed flush against it? Does the edge of the slat panels protrude so much that the overlay ends up in the same plane as their front surface, or, conversely, noticeably sinks between them? These questions do not change the size of the product itself, but they change the final perception.
If the slat panels have pronounced volume, the NPU.VRS-006 relief helps the central smooth zone not look completely flat against their background. This is a strong point of such a combination. At the same time, two different reliefs should not physically collide. The calculated 66.5 mm side margin creates a gap between them, but the actual clearance should still be checked against the actual edge and protrusion of the adjacent finish.
Light is especially important. Frontal diffused lighting reduces shadows and visually calms the ornament. Side light emphasizes depth and makes the pattern more contrasting. Therefore, the decision "the overlay is too large" is sometimes related not to the 1067 mm length, but to harsh chiaroscuro on the 23 mm relief. A full-size template will not show this; after purchase, before final painting, it is useful to evaluate the actual element in the room's conditions.
What surface to glue a large overlay to
The word "smooth panel" describes the appearance but says nothing about the strength of the substrate. Before installation, you need to understand what the central area is made of and how stable its finish layer is. The adhesive holds not an abstract wall, but a specific chain of materials: the back side of the polyurethane overlay → adhesive compound → paint or primer → putty or another base. If a weak link peels off, the strength of the adhesive itself does not save the composition.
Therefore, a finished painted panel is checked for chalking, peeling, bubbles, weak putty, and contamination. If the surface was coated with a compound that impairs adhesion, the decision is made according to the instructions of the chosen adhesive and finishing material. You should not mechanically consider any smooth painted wall ready for gluing a large relief.
On STAVROS cards next to stucco decor, KUDO HIGH TACK mounting adhesive is offered. This is a useful hint about the assortment, but the article should not turn it into a universal command "apply any adhesive and press." Compatibility is always checked against the actual substrate and the recommendations of the specific compound. This is especially important if the panel is made not of an ordinary plastered wall, but of MDF, a painted panel, a board material, or another cladding.
Wallpaper is a separate risk. Even if the adhesive holds well to the decorative layer, the wallpaper strip itself can pull away from the wall under load. For a large item, it is safer to design mounting to a solid substrate rather than rely on the strength of a decorative covering that was never intended to serve as a mounting base.
Before gluing, perform a dry fit. One person holds the overlay, the other checks the axes, margins, and position relative to the battens. For an element 1067 mm long, this is more convenient and accurate than trying to simultaneously hold the part, look at the tape measure, and adjust the horizontal level. Once the adhesive is applied, the time for a calm compositional decision is already limited by the technology of the compound.
Why NPU.VRS-006 cannot be trimmed like a regular batten
If the chosen molding turns out to be longer, trimming it is a normal part of installation. With a carved decorative overlay, the logic is different. NPU.VRS-006 is a complete, symmetrical ornamental composition. Its length of 1067 mm is not just a blank from which the desired size is meant to be obtained. Removing part from the edge changes the silhouette, disrupts the balance of the pattern, and can make the left and right sides unequal.
Therefore, for a field of 1067 mm, the question should not be "how much to cut off," but "which other element to choose." If the actual panel after measuring has, for example, 1050 mm of free width, trying to gain the missing millimeters at the expense of the carved edge is a poor starting point. The catalog of decorative overlays exists precisely to select a different scale, not to adapt a large ornament through forced trimming.
The same applies to attempts to hide one end behind battens. At first glance, it seems possible to tuck the ornament a few millimeters under the edge of adjacent trim and preserve the central part. But then the equal side margins are disrupted, gluing becomes more complicated, a hard-to-reach joint appears, and the point of a separate smooth panel is lost. If the project was originally designed for inset mounting, that is a different structural task. For a finished wall, it is better not to mask a size mismatch this way.
The overlay fits well precisely because on a 1200 mm field it already fits entirely. The 133 mm allowance allows both edges of the ornament to be preserved and visible background to remain. This is the correct scenario for using the specified size.
What happens if you add a frame to NPU.VRS-006
Formally, on a 1200 × 600 mm panel, one could try to combine a large central ornament and a thin frame. But such a solution must first be drawn at actual scale. The side margins between the overlay's overall dimensions and the panel edges are only 66.5 mm. Any molding installed within these margins will take away some of the breathing room and create another line very close to the ornament.
Suppose the frame runs along a line 30 mm from the panel edge. Then its inner vertical side would end up only about 36.5 mm from the overall boundary of NPU.VRS-006, if measured along the same conditional line. The width of the profile itself will further reduce the visual gap. This does not automatically mean a prohibition: a thin frame can be part of a classic composition. But it is clear how quickly the free side margin shrinks.
There is more space vertically. With 124 mm at the top and bottom, the molding is easier to place so that it does not press against the ornament. Another problem arises: the frame becomes very elongated, and the central decor almost touches its sides and is significantly farther from the top and bottom. Sometimes this looks expressive, sometimes like an element that lacked width.
In STAVROS NPU.VRS-006, it is also used as a central element of a larger frame composition. This shows that the idea of combining with framing is acceptable. But there, the overall dimensions and proportions of the entire system are designed as a separate product. On your already specified panel of 1200 × 600 mm, you cannot automatically transfer someone else's frame scheme: first, you need to check the remaining space.
Therefore, the choice of "instead of a frame" in this article is fundamental. If the goal is to more concisely design the field between the slats, one overlay is installed. If a classic architectural rectangle with central carving is needed, it is better to design the frame as a full composition rather than adding it after the large element has already taken up almost the entire width.
When one NPU.VRS-006 looks more convincing than a frame
A single large ornament is especially logical when the slatted panels on the sides already provide enough graphics. The verticals of the slats repeat dozens of times, and the central field benefits from a change in rhythm. NPU.VRS-006 does this without an additional grid: instead of many straight lines, one horizontal plant motif appears.
The second successful scenario is when the panel itself has a well-readable border. For example, it is made in a different color, material, or slightly recessed relative to the slats. Then the molding will literally duplicate the existing framing. One overlay keeps the wall architecture clear and adds only a semantic center.
The third case is an interior where a classic detail is used sparingly. If all other furniture and finishes are modern enough, a full molding frame may too sharply change the stylistic language. One large relief allows introducing the ornament as a single accent. This is especially interesting against the background of strict slatted panels: the contrast is built not on the amount of decor, but on the difference in plasticity.
The fourth case is related to installation on an already finished wall. A frame requires several long lines, corner cuts, checking squareness, and careful finishing of joints. One overlay does not make installation "automatically easy," but it reduces the number of connections. When the renovation is complete and you want to minimally interfere with the surrounding surface, this can be a decisive argument.
The fifth scenario is a panel about 1200 mm wide precisely because the size of NPU.VRS-006 fits it well. Not every large decor gives such a balance: here, horizontally, a visible but not excessive edge remains, and vertically, a full background. If the template confirms that these proportions are pleasing in a specific room, complicating the composition for tradition's sake is not required.
When without a frame, the field may look unfinished
There are situations where a single overlay does not solve the architectural task. The first is when a smooth panel is not actually separated at the top and bottom. The slats end on the sides, but the central painted surface continues to the ceiling and floor. Then the stated 1200 × 600 mm can only exist as a mental rectangle. The ornament will be on the wall, but the viewer will not read it as a "panel."
The second situation is when the room already has a series of molding frames. For example, adjacent walls, doors, or furniture are decorated with repeating rectangles. If the central field between the slats remains the only one without a contour, the single decor may fall out of the overall system. Here, the frame is needed not for the NPU.VRS-006 itself, but for the interior as a repeating architectural motif.
The third situation is when the dimensions of the smooth area are significantly larger than 1200 × 600 mm. If the actual field, for example, stretches two meters in width, the NPU.VRS-006 almost stops filling it and becomes a separate object on a large background. This can be beautiful, but it is already a different scenario. A frame can organize the extra space and set the scale.
The fourth case is a background that is too complex. If the smooth panel has a bright pattern, seams, inserts, or multiple colors, it is difficult for a single carving to pull the composition together. A calm frame sometimes helps to separate the working area. However, the opposite conclusion is also possible here: an ornament on a complex background may not be needed at all.
The fifth case is the desire to achieve exactly a classic paneled wall. Then the central overlay without a molding will be stylistically incomplete, not because it "lacks beauty," but because a different type of architectural finish has been chosen. It is better to design the panel layout and calculate the linear footage right away than to force a single NPU.VRS-006 to imitate a frame that it is not.
How color changes the perception of dimensions 1067 × 352 mm
The same relief can be perceived as larger or calmer depending on the paint. The most restrained option is to paint the overlay in the color of the smooth panel. Then the main expressive tool becomes chiaroscuro. The contour does not split the field with an additional color, and the 23-millimeter relief emerges as the lighting changes. For a wall with active slats, this is often the calmest scheme.
The second option is to tie the NPU.VRS-006 to the color of the slatted panels. If the slats are dark or have a pronounced wood tone, repeating that tone on the ornament visually connects the left and right parts of the wall through the center. But the color contrast makes the 1067 × 352 mm footprint much more obvious. The side fields of 66.5 mm will no longer be perceived as a neutral background, but as a clear light gap between two active materials.
The third option is a separate accent color. It is justified if that shade is already supported by furniture, metal, textiles, or other details. Otherwise, a large overlay risks turning into a separate sign unrelated to the interior. The higher the contrast, the more carefully you need to check the scale with a template.
There are intermediate techniques—soft tinting, depth highlighting, patination. Their choice depends on the specific finishing system and the desired effect. But the main rule remains: first evaluate the form itself at full size, then choose the color. Paint does not fix incorrect geometry. If 1067 mm feels tight between the slats on a paper template, contrasting paint will make that feeling even stronger.
For a finished interior, it is useful to do a color test not on the overlay itself, but on a small sample or printout. The phone screen and real paint differ, especially next to wood panels and warm artificial light.
How to connect a floral ornament with the vertical rhythm of slats
Slat panels and NPU.VRS-006 are built on almost opposite principles. Slats are repetition, uniform spacing, verticality, geometry. The overlay is a symmetrical floral ornament, curves, variable thickness, and horizontal development. If placed next to each other without a pause, they can conflict. A smooth field becomes a buffer between the two systems.
Therefore, the free 66.5 mm on the sides are valuable not only as a mathematical remainder. They separate the edge of the carved pattern from the first active vertical element. This gap allows the eye to finish one motif before the next begins.
At the top and bottom, 124 mm serve a different function: they give the ornament its own background. Without it, the horizontal composition could be perceived as a decorative strip glued between two textures. The vertical space turns it into an independent center of the panel.
If the slats are narrow, frequent, and contrasting, do not add many small decorative elements near the overlay. Small decor will increase the frequency of visual noise and destroy the useful contrast of scales. If the slat panels are wide and calm, the central ornament can withstand additional details, but that is already a separate composition that needs to be designed as a whole.
It is precisely the difference in direction that helps the wall. The horizontal NPU.VRS-006 visually connects the left and right sides, while the vertical slats stretch the height of the room. The result is a cross structure that can be more expressive than another rectangular frame with vertical and horizontal lines.
What to consider when viewing from different distances
Measurements on a tape measure do not tell how the object will be perceived from the room. At a distance of half a meter, the viewer sees the depth of the carving, small details, edges, and the quality of the joint with the wall. From two to three meters, NPU.VRS-006 begins to read as a single silhouette just over a meter long. From a distant pass, the overall contrast between the ornament and the slats matters more.
Therefore, the template should be viewed from at least three points: from the closest approach, from the main living area, and from the far entrance to the room. If the panel is located behind the sofa, the view from the opposite side of the room will be the main one. If it is a hallway, the perspective along the path of movement matters. If the panel is near a door, the diagonal angle is important.
In a diagonal view, the side fields visually become uneven due to perspective. This is normal and not a reason to shift the overlay. Geometrically correct centering usually handles different viewing points better than trying to "fix" one perspective with a physical shift.
From a distance, color is especially noticeable. An overlay matching the wall color can almost
What to do if the panel has an outlet, switch, or wiring for a wall lamp
Engineering elements cannot be treated as a minor detail to "deal with later." NPU.VRS-006 has a large, complex silhouette, and it is unknown in advance whether a specific outlet will fall into a gap in the ornament or under a massive part of the relief without applying an exact template. A simple rectangle of 1067 × 352 mm is no longer sufficient for this.
If the outlet is inside the overall rectangle of the future overlay, do not order the product expecting to "cut something out on site." First, obtain an accurate drawing or use a scaled image and match it with the coordinates of the engineering element. Cutting into the carved pattern for an outlet can ruin the composition and create an awkward edge.
If the switch is in the side field, calculate the remainder. With standard centering, only 66.5 mm separates the overlay's outline from the panel's edge. Even a small mechanism can make this area cramped. Sometimes it is better to abandon NPU.VRS-006 in favor of a smaller overlay than to shift the large ornament and break the symmetry.
With a wall lamp wiring point, the situation is even more complex because depth comes into play. The lamp's base may protrude, and its light will sharply model the 23-mm relief. Even if there is no geometric intersection, visual competition and shadows need to be checked.
If engineering points already exist, they become part of the initial data. The size 1200 × 600 mm by itself no longer fully describes the free field. Before ordering, the specification must include the coordinates of all obstacles relative to the center of the panel.
Furniture under the panel: when it helps and when it breaks the composition
A console, cabinet, or sofa under the central insert can enhance the effect of NPU.VRS-006 if their axes are aligned. A wide horizontal piece of furniture repeats the direction of the overlay, while vertical slats create a background. This results in a clear hierarchy: furniture forms the lower base, the ornament is the central accent, and the slats are the side planes.
The problem arises when the furniture is much narrower or noticeably offset. Imagine a 700 mm console under a 1067 mm ornament: the overlay extends beyond it on both sides by almost 184 mm if the axes align. This is not necessarily bad, but visually the decor ceases to be "above the console" and starts to belong to the wall as a whole. You need to decide in advance what effect is needed.
If the furniture is wider than 1200 mm and extends into the slat zones, conversely, the central panel becomes just part of a longer horizontal line. Then NPU.VRS-006 may seem less large than on an empty wall. Such a context often helps it look calmer.
Tall furniture is more dangerous. If a countertop, TV, or sofa back rises close to the bottom edge of the panel, the lower 124 mm of free space does not equal real visual breathing room. Part of the background is covered by the object, and the ornament may end up squeezed between it and the top boundary.
Therefore, the template should be checked with the furniture already in place, or at least with its dimensions marked with painter's tape. Do not evaluate the panel in an empty room if a large object will appear nearby after installation and change all proportions.
Lighting: a large relief can look completely different in the evening
A depth of up to 23 mm makes NPU.VRS-006 sensitive to the direction of light. With even ceiling lighting, the relief reads softly, and the whole composition seems closer to a graphic drawing. With side light, longer shadows appear, small curls become contrasty, and the visual mass increases.
If there are sconces on both sides of the panel, check the symmetry of their light. Two identical sources can beautifully highlight the ornament, but if one is closer or more powerful, the carving will be perceived asymmetrically even with perfect geometric centering.
Directional lighting from above creates shadows in the lower part of the relief. This is a way to enhance the plasticity, but if the distance is too small, the fixture can highlight every unevenness of the surface and installation. For an already finished wall, it is reasonable to first install the template, then turn on the existing light, and only then decide whether additional lighting is needed.
You should not design lighting just to "show off the molding." The central panel should work even without a theatrical effect. If the ornament seems too cramped between the slats during the day, evening accent lighting will not fix the proportions. It will only draw more attention to them.
Receiving the product: what to check before applying glue
The large decorative element should be inspected before installation, while there is an opportunity to calmly check the completeness and condition. Verify the article number NPU.VRS-006, the quantity — one piece is needed for this item — and the dimensions. Do not start with painting or fitting until you are sure that exactly the ordered product has been received.
Place the overlay on a flat, protected surface and inspect the edges, the thinnest areas of the ornament, and the front relief. The shipping packaging protects the product, but large complex decor should still be checked immediately upon receipt in accordance with the seller's and carrier's rules.
After inspection, do a dry fitting on the wall. This is the last moment when you can abandon an incorrect compositional idea without consequences. The actual NPU.VRS-006 may appear lighter than a paper rectangle due to the openwork contour, or, conversely, more active due to the depth of the relief.
Check three things separately: geometry, light, and surroundings. Geometry — equal margins and levelness. Light — shadows in daytime and evening modes. Surroundings — slats, furniture, outlets, sconces, and doorways. Only after this check do you proceed to surface preparation and installation using the chosen adhesive technology.
Mistakes before ordering that actually change the result
The first mistake is ordering by size name without measuring the finished field. The design dimensions of 1200 × 600 mm seem sufficient, but actual abutments may reduce the width. The consequence is that the side margins will not be as expected, or the product will not fit at all. The way to avoid this is simple: at least three measurements along each axis and control of the visible mounting surface specifically.
The second mistake is considering 66.5 mm as a standard gap. This is only half of the remainder of 1200 − 1067. If the panel has a different width, the number changes. It does not indicate the manufacturer's requirements for the minimum distance from the slats.
The third mistake is comparing the overlay and the frame only by the price of one product item. For NPU.VRS-006, the price per piece is known, but for a frame without a selected profile, there is neither an exact consumption nor a cost. First, choose the design, then calculate the specification.
The fourth mistake is drawing the overlay as a solid rectangle and, based on that, considering it too massive. The overall template is needed to check the extreme points, but the actual silhouette contains cutouts and relief. After a rough fitting, a visual check of the shape is needed.
The fifth mistake is trying to solve tightness by trimming the ornament. NPU.VRS-006 is a complete carved composition, so for a smaller field, it is better to look for a different size or a different product.
The sixth mistake is forgetting about the 23 mm depth. The relief can conflict with the door, furniture, curtain, or lamp and work differently under side lighting.
The seventh mistake is shifting the overlay to bypass an outlet without recalculating the side margins. On a 1200 mm field, even a 10–20 mm shift already changes the visible symmetry.
The eighth mistake is adding a molding frame "just in case" after a large overlay has already been chosen. With only 66.5 mm in the side margins, an additional profile can quickly overload the composition. The frame needs to be designed in advance.
When it's better not to buy NPU.VRS-006 for this panel
Declining the purchase is a normal result of a proper fitting. The first obvious case: the actual free width is less than 1067 mm. If the product doesn't fit entirely, it's unreasonable to look for a way to trim a complex ornament for the sake of a few millimeters.
The second case: after a full-size template, the side margins seem too tight relative to massive slat panels. The arithmetic may be correct, but the specific interior may not be. This is especially noticeable with very wide, dark, or strongly protruding slats.
The third case: the panel already has engineering elements that fall within the silhouette and cannot be relocated. It's better to choose a different overlay than to disrupt the pattern or build a composition around a random shift.
The fourth case: the interior is already saturated with ornament. Carved furniture, active wallpaper, a complex ceiling, decorative doors, and large light fixtures can make another baroque detail redundant. An empty smooth panel between slats sometimes works better than any decor precisely as a pause.
The fifth case: the design task is to create a system of classic panels, not a single accent. Then a molding frame is closer to the original goal. NPU.VRS-006 can be used inside it only after a separate calculation of the larger composition.
The sixth case: the central field visually does not have a size of 1200 × 600 mm because there are no boundaries at the top and bottom. Then you first need to solve the architecture of the surface itself, and only then choose the ornament.
Finally, you shouldn't buy NPU.VRS-006 just because its dimensions "fit perfectly." Matching numbers is a necessary but not sufficient condition. If after the template you want to add a few more details, a frame, corners, and additional overlays just to make the composition "work," perhaps the original central element doesn't suit this particular interior.
What alternatives are there if one NPU.VRS-006 isn't enough
The first alternative is a full molding frame without a central overlay. It's suitable if you need to emphasize a rectangle rather than create an ornamental center. Inside the frame, you can leave a painted field, decorative plaster, wallpaper, or another calm material.
The second is to choose a smaller decorative polyurethane overlay. Then the side fields become wider, giving the opportunity to add a thin frame or leave more breathing room near the slats. Category polyurethane decorative overlays is needed specifically for comparing scale and shape, not just the article number.
The third is to leave the panel without stucco molding. This is a complete solution if the slatted panels are already active enough. In the center, you can keep a smooth monochrome surface, hang a painting, mirror, or simply leave a visual pause. Not every empty space needs to be filled.
The fourth is to design a larger combined composition where NPU.VRS-006 becomes the central part, and moldings and additional elements are calculated together. This is no longer "one overlay instead of a frame," but a standalone project. For a field of 1200 × 600 mm, it needs to be checked especially carefully due to small side remnants.
The fifth is to reconsider the slatted sections themselves if the renovation hasn't been done yet. If the wall is only being designed, the width of the central smooth field can be adjusted to fit the chosen decor in advance. In that case buy wall slat panels it's worth doing after fixing the overall layout, so the central field doesn't end up as a random leftover between two sets of slats.
How to make a decision without design guesswork: selection table
| Condition on the object | What is more logical to consider | Why |
| The panel is actually about 1200 × 600 mm, the edges are readable, one center is needed | 1 × NPU.VRS-006 | The overlay fits entirely and almost fills the width |
| Need to emphasize the rectangular border specifically | Molding frame | The frame works with the outline, not the center |
| The interior already contains many rectangular molding panels | frame or overall system | Repeating the architectural motif is more important than a single accent |
| There are very active slats on the sides, want to reduce the number of lines | 1 × NPU.VRS-006 | Omitting the additional frame simplifies the geometry |
| Actual width is less than 1067 mm | Another decor | NPU.VRS-006 does not fit entirely in the given orientation |
| A socket or wall lamp falls into the field | first, the exact scheme | Cannot make a decision based only on the outer rectangle |
| The overlay on the template seems too large | smaller overlay or empty field | Geometric compatibility does not obligate purchasing the product |
| A classic paneled wall is needed | molding system | The task is initially architectural, not just decorative |
| The panel already has a pronounced own border | Single overlay | An additional contour can duplicate the existing one |
| The renovation is still being designed | first, the overall layout | The width of the panel and slats can be coordinated before purchase |
Practical route from measurement to order
Start not with the cart, but with the finished wall. Measure the actual width and height of the smooth panel at several points. Record the minimum free size and make sure there are no protruding parts, sockets, switches, sconces, or furniture doors in the area of the future product.
Then mark the center of the panel and make a full-size template 1067 × 352 mm. First rectangular, then — if possible — with an approximate silhouette of the ornament. Install it in the center and check the calculated margins. For exactly 1200 × 600 mm, this is 66.5 mm on the left and right and 124 mm on the top and bottom.
After that, look at the composition from the main points of the room. Do not decide the issue close to the wall. Turn on evening lighting, put furniture in place or mark its dimensions with tape. If there will be sconces nearby, assess their position and direction of light.
Next, compare the two logics. If you need a center, leave NPU.VRS-006 without a frame. If you need a border, draw a molding rectangle and count it separately. If you want both a center and a frame, do not mechanically combine the solutions: place both elements on one scaled sketch and check the side margins.
Once the composition is confirmed, determine the finish: in the background color, matching the slats, or a separate shade. At the same time, check the base and the compatibility of the mounting adhesive with it. For the option under consideration, the cart should contain one NPU.VRS-006; additional materials are selected based on the actual surface and installation technology.
After these steps, you can order NPU.VRS-006 1067 × 352 mm. If the check shows that a different scale or a different composition is needed, the correct result is not to "force" this item, but to change the choice before payment.
What to buy for the solution under consideration
The basic decorative order consists of one item: NPU.VRS-006 in quantity 1 pc. The product has one size under consideration — 1067 × 352 × 23 mm. At the time of checking, the price is 29,320 ₽ per piece. Two identical overlays for one 1200 × 600 mm panel are not needed: they physically do not match the selected scheme and will turn the unified center into a different composition.
For the overlay, you will need mounting material compatible with polyurethane and the actual base. The specific adhesive consumption cannot be honestly stated without the composition instructions, application method, and surface condition. The same applies to primer, paint, and preparatory materials: their quantity depends on the chosen finish and base.
If after a trial fitting you decide to abandon the central decor in favor of a frame, the shopping list changes completely. You need to choose a specific molding, find out the length of one strip, calculate cutting, angles, and allowance. Therefore, do not add molding "just in case" until the scheme is determined.
For a wider selection, you can go to the section You can buy ready-made stucco matching the Baroque style. Calculate the quantity: linear meters of cornices and moldings, number of rosettes, pilasters, consoles, corner elements. Add a ten to fifteen percent allowance for trimming. and compare product types by the task. This is more useful than looking for a replacement only by similar price: for a panel, the shape, dimensions, orientation, and the element's role in the composition remain decisive.
The panel may have the correct width and height, but not be rectangular: check the diagonals
There is another geometric check that is easy to miss. Suppose the tape measure shows 1200 mm at the top and bottom, and the height on the left and right is close to 600 mm. This does not yet mean that all four corners form a perfect rectangle. One side may be slightly shifted relative to the other, and the field will turn out to be a parallelogram. On a regular painted wall, a slight skew is sometimes almost invisible. Next to vertical slats and a long horizontal NPU.VRS-006, it reads more strongly because several precise directions for comparison appear at once.
For a control check, measure both diagonals of the visible panel from corner to opposite corner. In a perfect rectangle, they are equal. If the values differ noticeably, first you need to understand the reason: whether the base itself is skewed, or the measurement points are chosen along different decorative edges. You should not automatically compensate for the wall skew by rotating the overlay. Then the ornament will no longer be horizontal relative to the slats and floor, and an attempt to hide one error will create another.
This check has practical meaning specifically for a large element 1067 mm long. On a short part, a slight tilt is hard to see. On an ornament longer than a meter, the height difference between the left and right edges becomes noticeable even at a small angle. Therefore, the horizontal level of NPU.VRS-006 is better set with a level or laser line, rather than the top edge of the panel, until the rectangularity of the latter is confirmed.
If the panel is slightly skewed, you need to choose the main coordinate system. In most cases, it will be the verticals of the slat panels and the real horizontal of the room. The overlay is set exactly according to this system, rather than repeating the defect of the border. After a dry fit, assess how much the margins at the top and bottom differ. If the deviation is small and visually lost, installation is possible without additional interventions. If the difference is striking, the problem already relates to the preparation of the panel itself: the decorative overlay should not mask significantly disturbed base geometry.
It is also useful to check whether the surface "leads" in the plane. A long overlay requires contact with the base along the intended mounting surface. If the central field has a bump, depression, or noticeable wave, it cannot be considered suitable just because the perimeter turned out to be a correct 1200 × 600 mm. Apply a long straight slat or another control tool and assess the surface before applying glue. The method of acceptable leveling depends on the base and finish, so here it is not a universal recipe that matters, but the very fact of checking.
This procedure separates the decorative task from the construction one. NPU.VRS-006 should decorate an already prepared panel, not correct its skews, unevenness, or weak finish layer. The more accurate the central background, the calmer the calculated margins of 66.5 and 124 mm are perceived, and the more convincing the refusal of an additional frame looks.
FAQ: additional questions before purchase
Does the size C = 23 mm mean that after installation the overlay will protrude from the wall exactly 23 mm?
No, 23 mm is the declared third dimension of the product itself. The actual plane of the front relief relative to the finished wall also depends on the condition of the base and the mounting layer. Therefore, to check for collision with a door, sliding panel, or another moving part, you cannot set exactly 23 mm as the final mounting protrusion without allowance and a dry fit.
What will change if the smooth panel is recessed relative to the slat panels?
Then you need to compare the depth of the niche with the relief of the overlay. If the smooth base is deeper than the front plane of the slats, part of the 23-millimeter volume will be visually "absorbed" by this difference. The ornament may remain inside the niche, come out roughly flush with the slats, or protrude in front of them. All three effects look different, although the calculation of 1067 × 352 mm along the front plane remains the same. For such a wall, it is useful to attach a temporary mock-up to the panel not only of the required length and height, but also of approximate thickness.
And what if the slats themselves protrude from the wall more than the relief of NPU.VRS-006?
This does not automatically make the installation incorrect. The central ornament will simply be perceived as a more recessed layer between two voluminous side planes. You need to check whether the edges of the slats create too deep a shadow and whether the readability of the overlay is preserved from the main viewing point. In this situation, evening light is especially important: with frontal lighting, the composition can be calm, but with side lighting, the edges of the slat sections can more strongly shade the smooth insert.
Do the rounded corners of the panel itself interfere with the installation of a straight horizontal overlay?
If the central available area retains the required 1067 × 352 mm, the rounding of the outer corners does not create a geometric conflict with NPU.VRS-006, because the ornament does not reach the corners of the panel. But visually, such an insert is no longer a strict rectangle, so a rectangular molding frame and a single overlay will be perceived differently. A rounded field more often requires a shape fitting rather than just a calculation by width and height.
What width of the smooth field should be planned if the wall is not yet built and you want to achieve the specified side margins?
Use a simple formula: panel width = 1067 mm + 2 × desired side margin. If you like the original option with a gap of 66.5 mm, you get exactly 1200 mm. If you want 80 mm of free background on each side, the central field needs to be planned with a width of 1227 mm. For margins of 100 mm, 1267 mm will be required. This is already a design task: the width of the slat sections and the central insert can be coordinated before installation, rather than adjusted after finishing.
How to calculate the panel height in advance for different top and bottom offsets?
The same logic is used: panel height = 352 mm + 2 × desired vertical margin, if the overlay is centered. For example, if you want to leave 150 mm at the top and bottom, the height of the smooth area will be 652 mm. Such a calculation is only useful at the design stage; in a finished 600 mm panel, the actual margins will be 124 mm.
Can a painting, mirror, or another central object be placed next to NPU.VRS-006?
Only after the overall layout, because NPU.VRS-006 itself occupies a large part of the panel's width and claims the role of the main center. A second object within the same 1200 × 600 mm will almost inevitably start competing with the ornament or overlapping its visual field. If the painting or mirror is placed above, below, or on an adjacent plane, evaluate the axes and distance between them on the overall sketch. In a small panel, one clear main element is better than two independent centers.
If the wall is still being designed, should NPU.VRS-006 or slat panels be chosen first?
If this overlay is a mandatory element of the project, it is more rational to fix its dimensions and desired free margins before laying out the slats. Then the central insert becomes calculated, and the side slat sections adapt to the overall wall width. If a specific spacing and number of slats are more important, the opposite is done: first, their layout is built, the remainder for the smooth field is obtained, and it is checked whether NPU.VRS-006 fits there without compromises.
Should the thickness of the future paint be taken into account when calculating 1200 × 600 mm?
For the compositional calculation, tens and hundreds of millimeters of free margins are determined by the geometry of the base and the product's dimensions; the layer of finish paint does not turn a 1200 mm panel into a fundamentally different size. But with very tight structural junctions, any coating refers to the actual finished surface, so the final measurement is taken after those finishing layers that form the actual boundary of the installation zone. In this article, the margin on the sides is measured in tens of millimeters, but the principle of "measuring the finished product" remains correct.
Result: on a 1200 × 600 mm panel, one NPU.VRS-006 is a complete solution, not a "half frame"
The main result of the calculation is simple: the carved decorative overlay NPU.VRS-006, measuring 1067 × 352 × 23 mm, fits entirely on a smooth 1200 × 600 mm panel. With precise centering, 66.5 mm remains on the left and right, and 124 mm on the top and bottom. In width, the product occupies about 88.9% of the field, so it is perceived as a large, almost full-width accent, not as a small detail in an empty center.
This is enough to abandon a mandatory molding frame if the panel's boundaries are already well readable thanks to the slat panels and the task is precisely to create a central ornament. The frame is needed in another case—when the interior requires emphasizing the rectangular architecture of the field, repeating the paneling system, or assembling a more complex classical composition.
Before purchasing, five checks remain: the actual size of the finished panel, the real edge of adjacent slats, the absence of engineering obstacles, a full-size template, and the condition of the mounting base. After this, the decision becomes not a taste-based assumption, but a verified specification.
For the original scenario, it looks like this: 1 × NPU.VRS-006. At the time of checking, the price of one overlay is 29,320 ₽. If the template shows that the scale fits, you can buy a specific element and not assemble a frame just to fill an empty field. If the panel requires an architectural contour, it is better to move on to moldings and calculate a new composition from scratch, rather than trying to combine two solutions without spare space.