Article Contents:
- What is flexible polyurethane molding: material and physics of bending
- Where flexible molding is used: five scenarios
- On the arch
- On a radius wall
- In a bay window
- On a column
- On a ceiling curved composition
- How flexible molding is better than cutting a regular profile: an honest comparison
- How to calculate the length of flexible molding for an arch
- Formula for a semi-circular arch
- Formula for a segmental arch
- For a curved wall and bay window
- How to choose a flexible molding by bend radius: the main parameter
- How to select a profile for a specific object
- What to pair flexible molding with: a decor system for arches and curved surfaces
- Flexible molding + keystone
- Flexible molding + pilasters
- Flexible molding + brackets
- Flexible molding + molding decor
- Flexible molding + PU overlays
- Flexible molding + straight moldings
- Flexible molding + ceiling rosettes
- Installing flexible molding: technology, nuances, practical tips
- Marking
- Dry fitting
- Adhesive
- Pressing and fixing
- Joints between flexible and straight molding
- Sealing and final painting
- How to assemble a complete decor set before purchasing
- Mistakes in choosing and installing flexible molding
- FAQ: Most Frequently Asked Questions
- STAVROS: flexibility as an architectural principle
There are tasks in decorative finishing that seem simple at first glance — but only until you take a regular molding and try to lay it along a curve. The profile doesn't bend. If you press harder — it cracks. If you cut it into short segments — you get a staircase of pieces with dozens of joints that then need to be puttied, sanded, and still be visible in the finished work.
It is for such tasks that flexible polyurethane molding — an elastic profile that follows the arch of an arc, the radius of a bay window, the curvature of a column, or the bend of a radius wall without cutting, without kinking, without cracks. One continuous line — instead of forty joined pieces.
This is a different type of material, a different logic of operation, a different result. And before buying — you need to understand exactly what you are buying, for what radius, what width of profile, and with which adjacent elements it will be combined. This is exactly what this article will discuss — in detail, practically, with numbers.


What is flexible polyurethane molding: material and physics of bending
Regular polyurethane molding is rigid. The density of an interior product is 250–320 kg/m³, the structure is closed, cellular, elastic, but not flexible. If you try to bend such a profile along an arc, it breaks — like brittle plastic, not like rubber.
Flexible molding is made from a different polyurethane formulation. Plasticizers are added — components that give the material elasticity without loss of strength and paintability. The profile can be bent along an arc by hand, without heating, without special tools, and it will remain in the given shape after installation with glue.
Technical characteristics of STAVROS flexible polyurethane molding:
-
Density: 180–250 kg/m³ (lower than rigid, higher than foam plastic)
-
Elasticity: the profile withstands bending without cracks when the minimum radius is observed
-
Minimum bending radius: depends on the profile width (more details in a separate section)
-
Section length: standard 200–240 cm
-
Width: from 30 to 120 mm (depending on catalog position)
-
Surface: white matte, ready for painting with acrylic and water-dispersion paints
-
Painting capability: without priming, one coat of primer-paint or two coats of paint is sufficient
Important clarification: flexible molding is not "any molding made of soft foam." It is a specialized product with a precisely calibrated balance between elasticity and rigidity. Too soft material does not hold the relief — the profile "floats" and loses shape. Too rigid — breaks at the bend. The correct formulation ensures a relief that is readable after painting and allows the strip to be bent along a radius without effort.
Flexible polyurethane molding — this is a separate category in the STAVROS assortment, which includes not only moldings but also other flexible profiles for curved surfaces: cornices, baseboards, decorative rods. All — on the same formulation base, with a unified standard of flexibility and painting.


Where flexible molding is used: five scenarios
Our factory also produces:


On the arch
This is the main and most obvious scenario. An arched opening — semicircular, pointed, segmental, horseshoe — has a curved arch that needs to be framed with molding. It is theoretically possible to do this with a rigid profile: cut into segments, join, putty. But on a semicircular arch 100 cm wide, such cutting yields 30–40 short fragments. Each joint is a potential crack, darkening, or visual seam.
Flexible molding for an arch provides a continuous line along the entire curve — without a single joint on the arch. A 2–2.4 m strip covers the arch of an opening up to 120–130 cm wide in one continuous piece. This is a fundamentally different quality — and a fundamentally different installation speed.
Polyurethane Arch Molding — this is a separate topic in which flexible molding takes center stage as a way to obtain a clean framing of the arch without complex cutting.
Get Consultation
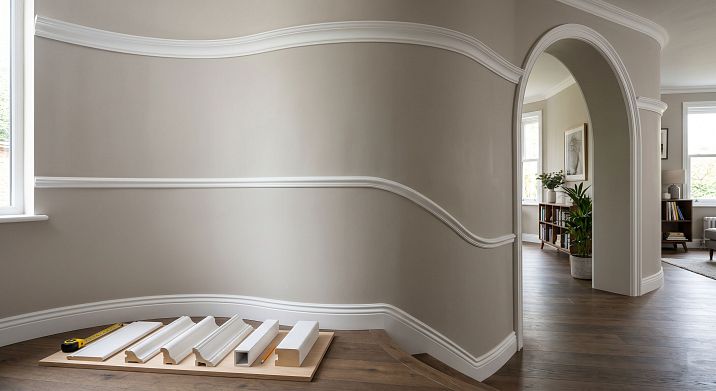
On a radius wall
Radius walls are not uncommon in modern interiors. Semi-circular partitions, rounded corners, smooth transitions between rooms, decorative niches with a radius contour. For all these surfaces, a straight molding is not an option. A flexible profile is needed that will follow the curvature of the surface with a given radius.
Molding for a radius wall can be used as a horizontal decorative belt, as a panel frame, as a frame for decorative plaster, or as a dividing strip between zones. The principle is the same — the profile is bent to the required radius and mounted with glue.
In the bay window
A bay window is a protruding volume of the facade with a curved or broken contour. In the interior, the bay window area has smooth transitions of planes, and sometimes a semi-circular or trapezoidal plan. Stucco decor for arches and radius walls for bay windows — this includes horizontal molding belts that wrap around the protrusion along the entire perimeter.
The flexible profile here works as a "connecting thread": it wraps around the internal and external corners of the bay window protrusion, creating a continuous horizontal line without breaks.
On a column
A round or semi-circular column is a task that rigid molding cannot handle in principle. Flexible molding for a column is a horizontal belt, an entasis marker, or a decorative frieze that wraps around the shaft along the entire circumference.
For a round column with a diameter of 300–400 mm, a profile capable of bending to a radius of 150–200 mm is required — this is a small radius, and it is important to choose the width correctly: narrow profiles (30–50 mm) bend more easily to small radii, wide ones (90–120 mm) require a larger diameter.
On a ceiling curvilinear composition
Oval, round, and wave-shaped ceiling frames are a popular element of classic and neoclassical interiors. Flexible molding is used here as a contour pull, outlining the shape. These can be concentric ovals, complex cartouches, or curved ceiling panels.
Why flexible molding is better than cutting regular profile: an honest comparison
This is the question most often asked — and the answer requires honesty, not advertising 'flexible is always better.'
| Option | Pros | Cons | When to choose |
|---|---|---|---|
| Flexible molding | Continuous line, fewer joints, faster installation | More expensive than regular, not for any radius | Arches, columns, bay windows, smooth curves |
| Rigid molding in pieces | Cheaper material | Lots of cutting, joints, putty, time | Large radius (>2 m), budget renovation |
| Plaster stucco | Classic material, high density | Heavy, complex installation, fragility | Restoration of historical objects |
| Custom bending to order | Precise shape | Longer, more expensive | Non-standard objects |
Key question: what is your radius and how many joints are you willing to see?
For a semicircular arch 100 cm wide, a rigid molding will have to be cut into 30–40 segments. Each joint means puttying, sanding, and the risk of cracks when the structure moves. Total work time with cutting and joining is 4–6 hours. A flexible molding for the same arch is installed in 15–20 minutes: one bend, one continuous piece, one joint at the base.
But: if you have a large radius — for example, a slightly rounded niche with a radius of 3–4 meters — cutting rigid molding into large segments yields quite acceptable results, and paying extra for a flexible profile is not necessary.
How to calculate the length of flexible molding for an arch
This is the most practical section — and the most often ignored. Buyers either take 'extra stock at random' or underestimate and face a shortage of material.
Formula for a semicircular arch
A semicircular (half-round) arch is the most common type. Its vault is exactly half a circle. The formula for the arc length is:
L=π×R=π×W2≈1,57×WL=π×R=π×2W
≈1,57×W
where W is the width of the opening (distance between side posts), R is the radius of the arc.
Calculation examples:
| Opening width | Radius of the arc | Arc length | What to buy |
|---|---|---|---|
| 80 см | 40 см | ≈ 126 cm | 1 plank 2 m with margin |
| 90 см | 45 см | ≈ 141 cm | 1 plank 2 m with margin |
| 100 см | 50 см | ≈ 157 cm | 1 plank 2 m |
| 110 см | 55 см | ≈ 173 cm | 1 plank 2 m with margin |
| 120 см | 60 см | ≈ 188 cm | 1 plank 2–2.4 m |
| 130 см | 65 см | ≈ 204 cm | 1 plank 2.4 m or 2 with minimal joint |
| 150 см | 75 см | ≈ 235 cm | 1 plank 2.4 m with allowance |
Add 10–15% allowance to the calculated length for trimming. The end of the molding at the junction with the vertical section must be precisely cut at 45° or at an angle corresponding to the curvature transition point.
Formula for segmental arch
A segmental arch is shallow, low, with a radius significantly larger than that of a semicircular arch. Its arc length can be calculated using the central angle:
L=θ360×2πRL=360θ
×2πR
where θ is the central angle of the arc. If you do not know the angle, simply measure the rise h (height of the arc) and half-width w/2. Then the radius:
R=(w/2)2+h22hR=2h(w/2)2
+h2
Example: segmental arch width 150 cm, rise 25 cm. Radius = (75² + 25²) / (2 × 25) = (5625 + 625) / 50 = 125 cm. Central angle ≈ 74°. Arc length ≈ 163 cm.
If math is not your strong suit, use online arc length calculators or contact STAVROS consultants with the opening dimensions.
For radius wall and bay window
For a horizontal belt wrapping a radius wall, the molding length = arc length of the wall to be decorated. For a semicircular wall with a diameter of 2 m: semicircle length = π × 1 m ≈ 3.14 m. For a bay window with a broken contour, sum the lengths of each curved section.
How to choose a flexible molding by bending radius: the main parameter
The minimum bending radius is the smallest radius of the arc along which a given profile can be bent without deforming the relief and without cracks. This is not just a number in a catalog — it is a physical limitation determined by the profile width, relief height, and material formulation.
General rule: the wider the profile, the larger the minimum allowable bending radius. A narrow profile bends more easily.
| Profile width | Approximate minimum bending radius |
|---|---|
| 30–40 mm | 150–200 mm |
| 50–60 mm | 200–300 mm |
| 70–80 mm | 300–450 mm |
| 90–100 mm | 450–600 mm |
| 110–120 mm | 600–800 mm |
These are approximate values — exact minimum radii for specific items are always listed in the STAVROS catalog or from consultants.
Practical check: Before installation, slowly bend the strip along the intended radius. If the relief remains clear, the profile does not turn white at the bend, and does not wave — the radius is acceptable. If white spots or waviness appear — the radius is too small for this profile, and a narrower one should be chosen.
How to select a profile for a specific object
Arch width 80–120 cm (arc radius 40–60 cm): profiles up to 60–70 mm wide are suitable. A narrow profile (30–40 mm) on such an arch will give an elegant, light framing. A wider one (60 mm) will give an expressive, substantial look.
Arch width 120–180 cm (arc radius 60–90 cm): profiles up to 80–90 mm wide. Here, a richer relief can be used.
Bay window with wall radius 80–150 cm: profiles up to 60–80 mm, depending on the radius.
Round column with a diameter of 300–400 mm (radius 150–200 mm): only narrow profiles 30–50 mm.
Ceiling oval frame with a minor axis of 100 cm (radius in the sharp part 40–50 cm): profiles up to 40–50 mm.
What to pair flexible molding with: a decor system for arches and curved surfaces
Flexible molding is a line. Expressive, precise, following the shape of the surface. But the architectural result is achieved not by a line alone, but by a system where each element complements the others.
Flexible molding + keystone
a polyurethane keystone installed at the apex of the arch — where the molding passes through the highest point of the arch. The keystone covers the central axis, creates a convergence point for the entire composition, and visually 'closes' the vault. The flexible molding forms the line, the keystone sets the point. This pair works flawlessly in any classic or neoclassical interior.
The size of the keystone should be proportional to the width of the molding: if the profile is 50 mm, the width of the keystone should be about 150–200 mm (3–4 times wider). This allows the stone to 'overlap' the molding from above and become the main accent.
Flexible molding + pilasters
If there are pilasters — vertical decorative elements imitating columns — the flexible molding 'rests' on them from below. The transition from the vertical pilaster to the molding arch is a key junction point. It must be precise: the end of the molding is cut at the angle of the arch's tangency to the vertical of the pilaster.
Pilasters with capitals add complete classical logic to the arch system: the pilaster is a vertical, the capital is a transitional element, the flexible molding is an arch, and the keystone is the apex.
Flexible molding + brackets
Polyurethane brackets can be installed at the springing points of the arch — where the arch transitions into vertical side sections. Here, the bracket acts as an impost or a corbel — it "supports" the arch and creates the impression that the vault rests on decorative supports rather than being simply applied to the wall.
Flexible molding + molding decor
Decor for Molding are point decorative elements that are mounted on an already installed profile: corner blocks, central overlays, rosettes. On an arch with flexible molding, such overlays can be rhythmically placed along the arch — creating an imitation of a coffered vault or a decorated archivolt.
Flexible molding + PU overlays
PU overlays in combination with flexible molding is a way to turn an ordinary arch into a rich architectural composition. The overlays are placed symmetrically along the arch of the molding; the central axis is fixed with a keystone. The result is a meticulously detailed archivolt, not inferior in expressiveness to plaster solutions.
Flexible molding + straight moldings
An arch is not just a vault. The side vertical sections (pilons, jambs) also require framing. For them, a regular straight Polyurethane moldingmolding is used, which continues the line of the flexible profile down the vertical. It is important that the profiles of the flexible and straight moldings match in height and pattern — only then will the framing line be continuous.
Flexible molding + ceiling rosettes
In curved ceiling frames, flexible molding outlines the contour, and a ceiling rosette is installed in the center of the frame. The rosette fixes the central axis of the ceiling composition, while the flexible molding defines its contour. This is a classic ceiling medallion in a modern lightweight execution.
Installation of flexible molding: technology, nuances, practical tips
Installing flexible molding is no more difficult than installing regular molding, but it has several specific nuances that are important to know in advance.
Marking
Before installation — marking. For an arch: find the vertical central axis of the opening, mark it with a pencil on the arch. This is the starting point for laying the molding — from here the bend begins in both directions. Symmetrical laying from the center to the heels guarantees the correct shape.
For a radius wall, marking is a horizontal line by level at a given height. A laser level greatly simplifies the task.
Dry fitting
Before applying glue, do a dry fit: press the strip to the surface and slowly bend it to the desired radius. Check:
-
whether the profile follows the shape of the surface without deforming the relief;
-
whether there are any bubbles in the middle part;
-
whether the ends are precisely cut at the required angles.
If there is a mismatch, trim it. Cutting flexible molding: a miter saw with a fine-tooth blade, angle — according to a template or protractor. Do not use a coarse-tooth hacksaw — it tears the relief.
Adhesive
Assembly adhesive — specialized for polyurethane: good adhesion to plaster, drywall, concrete, wood. Apply in a zigzag pattern on the back surface of the profile. Not in a continuous layer — excess adhesive will squeeze out and ruin the surface.
For flexible molding, it is especially important to apply adhesive at the ends — they tend to peel off from the surface in the first minutes after pressing.
Pressing and Fixation
Start from the center to the edges. Press the profile against the surface, maintaining pressure along the entire length. For an arched vault — hold the profile by hand or support it with soft spacers for 2–3 minutes until the adhesive sets.
On steep arcs of small radius, the adhesive sets slower than the profile "straightens" back — you need to hold it longer or use temporary supports (wooden wedges, tape on the surface next to the molding). Remove supports 30 minutes after installation.
Joints between flexible and straight molding
This is the most delicate joint. The transition point from the curve to the straight section must be perfectly trimmed. In practice: cut the flexible molding at the point where the arc touches the vertical — where the central axis of the arc transitions to a strictly vertical direction. Cut the straight molding at a mirror angle. Fill the seam with acrylic sealant.
Sealing and final painting
All joints — acrylic sealant, not silicone. Acrylic can be painted, silicone cannot. Apply sealant from a gun, smooth with a wet spatula with painter's tape along the edges.
Painting: 1–2 coats of acrylic matte paint. Relief — brush, flat surfaces — soft paint roller. No point in painting before installation: paint on ends and back side worsens adhesive adhesion.
How to assemble a complete set of decor before purchase
Here is a step-by-step logic that ensures no element is missed.
Step 1. Define the object: arch, bay window, column, radius wall, ceiling frame, niche.
Step 2. Measure the width of the opening or the radius of the surface. For an arch — the width and rise height.
Step 3. Calculate the arc length. Formulas are in the previous section. Add 15% allowance.
Step 4. Determine the required profile width. Check the minimum bending radius — it must be less than or equal to the actual radius of your arc.
Step 5. Select straight moldings for vertical sections: the profile must match the flexible one in height and pattern.
Step 6. Decide whether a keystone is needed at the top of the arch. If it's an arch — yes, it is needed.
Step 7. Decide whether pilasters are needed on the sides and brackets at the springing points.
Step 8. Add decorative overlays along the arc if an archivolt is required.
Step 9. Plan the painting: monochrome matching the wall color, contrast, imitation of stucco.
Step 10. Order everything from one system. Different batches may vary slightly in shade — it's better to order extra right away.
Mistakes when choosing and installing flexible molding
They try to bend regular rigid molding. It breaks. Standard polyurethane profile is not designed for bending. Buy specialized flexible molding.
They don't calculate the arch's arc length. They take "about three meters, should be enough" — and either it's not enough, or there's one and a half extra strips left. Calculate using the formula.
They don't check the minimum bending radius. They buy a wide profile — and it doesn't bend to the required radius of a small arch. Always check the opening's radius against the profile's specifications.
They choose a profile that's too wide for a small arch. A 100 mm profile on an 80 cm wide arch looks overloaded. Select the width proportionally to the opening.
They buy without extra for trimming. 10–15% extra is a must. Otherwise, one bad cut leaves you without material.
They don't select straight elements for vertical parts. A beautiful arch curve + bare vertical pilasters = unfinished work. Side sections also need to be decorated in the same system.
They don't plan the joints. The transition from flexible to straight molding requires precise trimming. This moment cannot be "left for later" — plan ahead.
They install without marking the central axis. Without marking, the arch molding shifts from the center, symmetry is broken. Always start from the central axis.
Paint before installation. Paint on the back surface reduces adhesive adhesion. Paint after installation and sealing.
Do not add a keystone. An arch without a keystone is an unfinished architectural phrase. The keystone puts the final touch.
FAQ: most frequently asked questions
What is flexible polyurethane molding?
This is an elastic decorative profile made of plasticized polyurethane that can be bent along an arc without heating and without risk of breaking. It is used for framing arches, radius walls, columns, bay windows, and curved ceiling compositions.
How is flexible molding different from regular molding?
Regular polyurethane molding is rigid and does not bend. Flexible molding is elastic due to special plasticizers in its composition. It is softer to bend but retains the clarity of the relief and is painted the same way as rigid molding.
Can regular polyurethane molding be bent?
No. Rigid polyurethane molding cracks when you try to bend it. For curved surfaces, a special flexible profile is needed.
Which molding to choose for an arch?
Flexible — definitely. Profile width 30–80 mm depending on the arch size. Length — calculated as 1.57 × opening width + 15% reserve.
How to calculate the length of molding for an arch?
For a semicircular arch: L ≈ 1.57 × opening width. For a segmental arch — through radius and central angle. Always add 15% margin for trimming.
Is flexible molding suitable for a bay window?
Yes. For a horizontal decorative belt wrapping around a bay window projection, a flexible profile is the optimal choice: it follows the curvature without joints.
Can flexible molding be used on a column?
Yes, for horizontal belts. Important: for a column with a diameter of 300–400 mm, a narrow profile of 30–50 mm is needed — only it bends to a radius of 150–200 mm.
What is the minimum bending radius of flexible molding?
Depends on the profile width. Narrow (30–40 mm) — from 150–200 mm. Wide (90–120 mm) — from 600–800 mm. Exact values are in the STAVROS catalog for specific items.
Can flexible molding be painted?
Yes, it must be. Acrylic matte paint, 1–2 coats. Paint after installation and sealing of joints.
Where to buy flexible polyurethane molding?
The STAVROS catalog offers a full range of flexible profiles in various widths and reliefs, as well as all related components for arched and radius compositions. Delivery across Russia.
STAVROS: flexibility as an architectural principle
The arch is one of the oldest architectural elements in human history. From Ancient Rome through the Middle Ages, Renaissance, Baroque, and Neoclassicism, the arch has remained the main symbol of architectural mastery. And today, when a well-designed arch with a clean molding line, a keystone at the apex, and coordinated side elements appears in a private home or interior, it creates the same impression it always has: a sense of space, craftsmanship, and completeness.
STAVROS produces flexible polyurethane moldings as part of a complete architectural decor system — from flexible profiles for arches to straight moldings for walls and ceilings, from keystones to pilasters and brackets. All elements are designed as a compatible system: a single material, uniform relief standards, and consistent size ranges.
This is fundamentally important for your project. Buying a flexible STAVROS molding means you can add a straight molding, keystone, pilasters, and decorative overlays from the same manufacturer, in the same style, without the risk of mismatched scales or relief patterns.
Your arch deserves a clean line without joints. STAVROS makes it possible.