Article Contents:
- What exactly the two overlays replace and what they do not replace
- Verified characteristics of NPU-472L and NPU-472R before ordering
- First, check the phytopanel itself, not the free wall around it
- How to position the left and right branch relative to the panel
- Horizontal calculation: how much space the entire composition will take up
- Height 75 mm: why the vertical position cannot be chosen by a single center
- Why leave a smooth wall between the moss and the stucco
- Three active textures: how to avoid decorative overload
- How to account for adjacent slat panels
- Color NPU-472L/R: tone-on-tone or separate contrast
- What a 7 mm relief gives under side lighting
- Overlays cannot be considered decor for the moss surface itself
- If the phytopanel protrudes forward more than the molding
- Symmetry of a pair and asymmetry of the whole wall are not the same thing
- When a full molding frame is better than two overlays
- When it is better to choose other overlays with a floral ornament
- When molding is not needed at all
- Viewing distance: the same pair can be noticeable or almost disappear
- Furniture, doors, and passages can change the meaning of a symmetrical pair
- Why an organic moss edge may require unequal visual but equal logical indents
- Access to the edge of the phytopanel after installation must also be preserved
- NPU-472L and NPU-472R should be checked as two different SKUs, not as one universal part
- The type of smooth wall changes not only installation but also the visual role of the overlays
- Installation after finished renovation: what to check before glue
- Five mistakes that change the purchase decision
- Mistake 1: Treating the pair as a full frame
- Mistake 2: Bringing the molding flush to the moss
- Mistake 3: Ignoring the slat zone in a symmetrical layout
- Error 4. Choosing color before checking light
- Error 5. Buying and gluing two parts immediately without templates
- Can I install only NPU-472L without the right overlay?
- What to do if slat panels fit the phytopanel only on one side?
- Can NPU-472L/R be placed above the phytopanel instead of on the sides?
- Do I need to leave the same gap on the left and right?
- Will the overlays fit if the phytopanel has a round or oval contour?
- Can NPU-472L and NPU-472R be painted in different colors?
- Do I need to buy a spare third overlay?
- What to do if, after installing the slats, the smooth wall has a slight difference in level?
- Can NPU-472L/R be combined with phytopanel backlighting?
- What to choose if you want a natural motif, but NPU-472L/R seem too detailed?
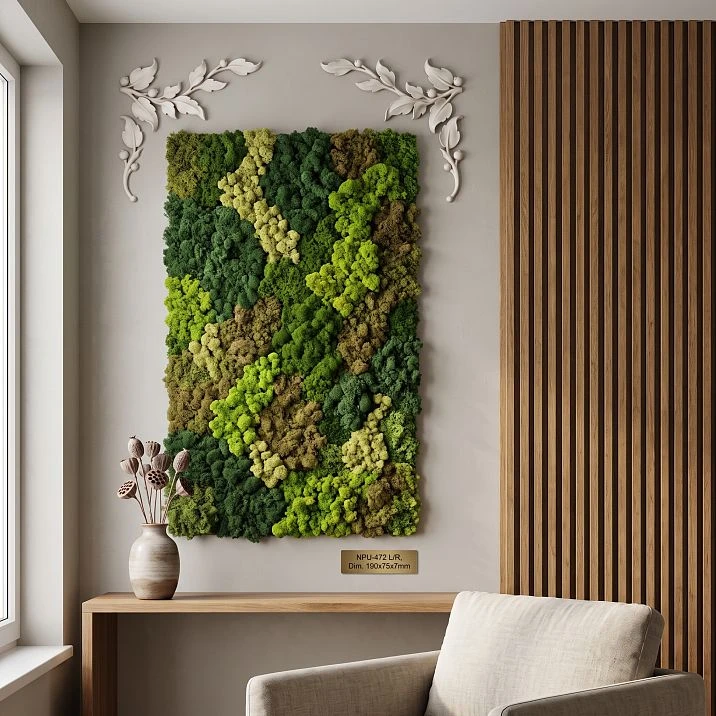
A phytopanel made of stabilized moss already takes up a noticeable place on the wall by itself. If slat panels are mounted nearby, a second strong textural element appears in the composition — the vertical rhythm of the slats. Therefore, automatically trying to outline the phytopanel with an additional rectangular frame of moldings often complicates the wall more than necessary. In such a situation, it is more logical to first check a lighter scenario: two local carved details on the sides — left NPU-472L and right NPU-472R.
Both overlays have the same dimensions: 190 × 75 × 7 mm. On STAVROS, size A is interpreted as width, B as height, and C as thickness, so for the selected standard position, you can confidently consider 190 mm as the horizontal dimension, 75 mm as the vertical dimension, and 7 mm as the depth of the relief. The material of both models is polyurethane. At the time of checking the product cards, each overlay costs 980 ₽, so the basic paired cart totals 1,960 ₽ excluding glue and finishing materials.
The main question here is not whether stucco molding suits moss at all. You need to understand whether two small plant overlays solve the task of a side accent without turning the wall into a conflict of three active textures. Before ordering, it is reasonable to make two full-size templates of 190 × 75 mm, place them in the intended spots, and evaluate the composition not up close, but from the points where the wall is usually viewed. If the phytopanel remains the main object, the slats form the background and rhythm, and NPU-472L/R only neatly tie the composition together, the pair is sufficient. If the stucco starts to look like another independent theme, it is better to abandon it or switch to a calmer solution.
The first product step can be taken through individual product cards: buy carved decorative overlay NPU-472L и buy carved decorative overlay NPU-472RThese are two different SKUs, so when ordering a pair, it is important to check that the cart actually contains one left and one right piece.
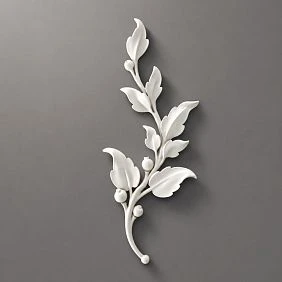
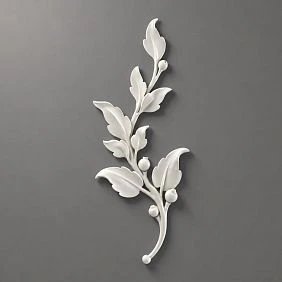
What exactly the two overlays replace and what they do not replace
In this scenario, NPU-472L/R do not act as a technical edging or as a full frame. They do not cover the joint between the phytopanel and the wall around the entire perimeter, do not mask an uneven edge of the base, and do not create a rigid rectangular outline. Their function is different: to provide two local side accents and visually connect the natural center of the composition with the smooth part of the wall.
This difference defines the entire project. A molding frame structures the object on four sides. Even a thin profile sets a rigid geometry: top, bottom, left, and right boundaries. Paired overlays act more softly. Free wall remains between them, so the phytopanel does not turn into a "picture in a frame." The carved plant motif can support the moss theme, but it does not have to repeat its outline.
This technique is especially appropriate when slats are already present nearby. The slatted surface itself provides architectural discipline: vertical lines, repeating pitch, and a pronounced material boundary. If you add a full molding rectangle on top of that, the wall has to simultaneously hold the natural texture of moss, the strict geometry of the slats, and the additional geometry of the frame. Two overlays allow the third layer to remain more local.
But the pair has a limit to its capabilities. If the edge of the phytopanel is technically untidy, the base noticeably protrudes, mounting gaps are visible, or a finished perimeter is specifically needed, two overlays will not solve this task. In such a case, the panel itself must first be put in order, or a full frame system should be considered. A decorative element should not be used as an attempt to hide a technical problem for which it is not intended.




Verified characteristics of NPU-472L and NPU-472R before ordering
Both STAVROS product cards currently show the same specification: 190 × 75 × 7 mm, polyurethane, price 980 ₽ per piece. On the profile filters of catalog A is marked as width, B as height, C as thickness. For this pair, this means:
| Parameter | NPU-472L | NPU-472R |
|---|---|---|
| Width A | 190 мм | 190 мм |
| Height B | 75 мм | 75 мм |
| Thickness C | 7 мм | 7 мм |
| Material | Polyurethane | Polyurethane |
| Price at time of check | 980 ₽ | 980 ₽ |
| Quantity for the paired scenario | 1 pc. | 1 pc. |
The base budget for two overlays is calculated once: 980 + 980 = 1,960 ₽. This is the cost of exactly a pair of elements. You cannot automatically add a conditional price for glue or painting to it until a specific installation method, base, and finish are selected. This approach is important for a commercial article: the reader should understand the cost of the selected items, but not receive a fabricated "full budget" from unconfirmed figures.
A width of 190 mm does not make the overlays large frame elements. Even two pieces together give 380 mm of own horizontal material, but visually they are read not as a solid strip, but as two spaced branches. The 7 mm thickness is also fundamental: it is a real relief, but relatively shallow. Under frontal diffused light, it may look calm, while under side light, it can get a more readable shadow.
For the project, it is useful not to limit yourself to the number in the product card. Cut out two templates exactly 190 × 75 mm and label them L and R. If painting to match the wall color is planned, it is better to make the templates from paper of a similar tone. For a contrasting scenario, colored paper can be used. Such a test does not reproduce the 7 mm relief, but immediately shows the scale and mutual position of the pair.
Our factory also produces:

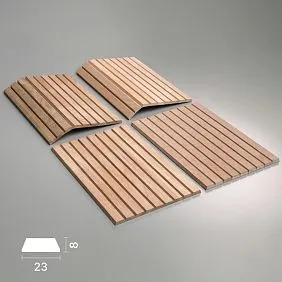
First, check the phyto-panel itself, not the free wall around it
A common mistake is to start the layout from the entire width of the wall. For the scenario in question, the main object remains the phyto-panel, so the initial coordinate system should be its visible contour.
Four things need to be fixed: the actual width of the panel, its height, the position of the center, and the nature of the edge. A rectangular panel with a smooth frame and a free composition of moss of irregular shape require different logic. In the first case, the geometric center is usually easy to read. In the second, the visual center may be shifted due to uneven density of the green mass, protruding fragments, or an asymmetric contour.
NPU-472L/R does not necessarily have to be placed along the outer edges of an imaginary rectangle. If the phyto-panel is organic in shape, it is more logical to look at visual balance. The left and right branches may be at the same height but perceived differently due to uneven moss mass. Then the templates need to be moved until the pair begins to "hold" the central object, rather than mechanically repeat the dimensions of the mounting base.
Also check how much the panel is already separated from the smooth wall by its own backing. If it has a noticeable rigid edge, a shadow gap, or a protruding box, it already has a framing function. In that case, additional overlays should be especially restrained. If the moss visually transitions into a smooth plane without a noticeable structural boundary, paired accents can give the composition the needed completeness.
The decision here is made not by the size of the wall, but by the status of the phyto-panel itself: whether it is already a finished object or whether it really needs additional lateral rigidity.
Get Consultation
How to place the left and right branches relative to the panel
The clearest source layout is NPU-472L on the left, NPU-472R on the right, both at the same height and oriented as shown in the product cards. This creates a readable pairing and allows comparison of the composition before any complications.
However, "symmetrical" does not mean "flush against the edges of the panel." Between the moss and the molding, it is desirable to maintain an independent smooth field. Its size is not set by a universal number: it depends on the dimensions of the phytopanel, the scale of the entire wall, the background color, and the position of adjacent slats. Therefore, there is no point in assigning mandatory 80, 120, or 150 mm just because such a number is convenient to print in the instructions.
A working method is simpler. Attach both templates to painter's tape, first placing them relatively close to the panel. Step back to the main viewing point. Then move both templates outward in equal steps and photograph each option from the same position. At some point, the branches will stop looking like part of the panel and begin to "float" on the wall separately. The previous position is usually closer to the working range.
Then check the vertical alignment. If the pair stands strictly at the middle of the phytopanel's height, the composition may be too static. A slight shift up or down can better connect the branches with the moss pattern, but this is only evaluated with templates. This is especially noticeable on panels with an asymmetrical top edge.
The paired NPU-472L/R works convincingly when the eye reads three levels: first the phytopanel, then two related side details, and only then the surrounding wall. If the left and right overlays become equal centers of attention, their role is already too large.
Horizontal calculation: how much space the entire composition will occupy
After confirming the orientation of the dimensions, one useful geometric calculation can be made. Let us denote:
-
M— the visible width of the phytopanel; -
Gₗ— the smooth gap from the left edge of the panel to the nearest point of NPU-472L; -
Gᵣ— the analogous gap on the right; -
190— the width of each overlay.
Then the approximate total width of the composition from the outer edge of the left overlay to the outer edge of the right overlay will be:
W = 190 + Gₗ + M + Gᵣ + 190.
With a symmetrical solution, when Gₗ = Gᵣ = G, the formula simplifies:
W = M + 380 + 2G.
This formula is not meant to derive an “ideal” offset. It helps to check whether the concept fits on the actual smooth part of the wall and whether any of the branches intrudes into the slat zone, door trim, switch, light fixture, or corner.
For example, if after substituting the actual width of the panel and the gaps chosen from the template, the outer edge of the right overlay lands on the slats, the problem is not solved by reducing the offset at any cost. You need to compare other options: shift the entire composition, reduce the role of the molding, choose a different ornament, or abandon the right branch—but the latter option already changes the original idea of the paired solution.
The main result of the calculation is not a number in millimeters, but the answer to the question of whether the entire composition retains its own smooth plane. The paired overlays are intended as local elements around the panel, not as details that have to be squeezed between the moss and the first slat.
Height 75 mm: why the vertical position cannot be chosen by a single center
The horizontal format of NPU-472L/R easily tempts you to place both pieces exactly at the middle of the phytopanel. Sometimes this works, but the 75 mm height itself does not dictate such an alignment.
The panel may have an elongated vertical silhouette, and then the central position of the small branches will give a sense of random side “ears.” With a low, wide panel, the same pair may work better slightly above the middle, supporting the top line. If the moss forms a pronounced rise on one side, the visual center also changes.
Check three levels: lower, middle, and upper. There is no need to create separate numerical standards for each. One set of templates and the same shooting point are enough. In photos, it is faster to see in which position the branches continue the shape of the panel, and in which they become a separate horizontal line.
Also consider objects below or above the composition. A console, cabinet, sofa, or table can set their own horizontal line. A ceiling cornice, sconce, or pendant light — another. If the NPU-472L/R falls exactly on an already existing strong line, it can either pull the wall together or, on the contrary, make it overly "drawn out."
Vertical placement is better calculated not from the floor or ceiling, but from the central object and surrounding architecture. This is especially important near slat panels: their verticals are already strong enough, so an additional horizontal line should be deliberate, not accidental.
Why leave a smooth wall between moss and molding
The smooth field here does not serve as "empty space," but as a separator of textures. Moss has a complex, uneven surface. Overlays have carved relief. Slat panels have a repeating linear structure. If all three materials are brought together without a pause, their boundaries begin to blend.
A small section of painted wall between the phytopanel and NPU-472L/R does two things. First, it allows the moss contour to complete on its own. Second, it gives the carved ornament a readable background. This is especially useful if the overlays are painted in the same tone as the wall: the relief is then read through light and shadow, not through color contrast.
But too large a field is also problematic. The branches cease to be perceived as part of one ensemble and become two independent decorative objects. Therefore, the gap is checked not with a tape measure "by the standard," but by gradually moving the template.
For a real fitting, you can take four photos: a minimally visually safe gap, a slightly larger one, an even larger one, and a variant without overlays. You should compare not only the branches themselves, but also the distance from their outer edges to the adjacent slats. A good composition usually has a clear hierarchy of voids: one pause separates the moss from the molding, another separates the molding from the slat surface.
If such pauses cannot be physically achieved, this is a signal that the paired solution does not suit the specific wall. There is no need to compensate for the lack of space by having one overlay partially overlap the slat surface or almost touch the moss.
Three active textures: how to avoid decorative overload
The combination of "moss + slats + carved molding" can look expressive precisely because each material speaks its own language. But for the same reason, it easily becomes overloaded.
A phytopanel attracts with its uneven natural texture and green mass. Slat panels work through rhythm and direction. NPU-472L/R add ornament and shadow. If all three layers are equally contrasting in color and equally noticeable in scale, the wall loses its main focal point.
Before ordering, it is useful to define the hierarchy in literally one sentence: "The main focal point is the phytopanel; the slats form the architectural background; the two overlays are a secondary accent." If after a trial fitting this sentence ceases to be true, the composition requires simplification.
The simplest way to reduce the activity of the molding is to paint it in the color of the smooth wall. Then the relief remains, but the color contrast is reduced. The second way is to increase the free gap to the slats, if the wall allows. The third is to abandon the frame geometry and leave only a pair of branches, which is the original logic of this scenario.
If the phytopanel is small and there is a wide dark slat area nearby, two white branches on a contrasting wall may unexpectedly become the most noticeable element. The size of 190 × 75 mm by itself does not guarantee delicacy. Visual strength depends on color, light, background, and the number of neighboring textures.
A broader analysis of the principles of combining different surfaces can be moved to a separate STAVROS material about how to combine different textures on one wall. In this article, we stay within the narrow purchasing scenario of NPU-472L/R.
How to account for adjacent slat panels
Slats are not just "another finish nearby." They set a strong direction, so the position of the NPU-472L/R pair needs to be checked relative to the boundary of the slat area.
If the slats are only on one side, the wall is already asymmetrical. You shouldn't automatically compensate for this with different left and right trim offsets from the phytopanel: such a solution can look like a layout error. First, keep the pair itself symmetrical relative to the panel, and then assess the overall balance of the entire wall.
If the slat panels are on both sides, the situation is closer to a framed one, but this doesn't mean the trims should be squeezed between the moss and the slats. On the contrary, it's especially important to maintain smooth gaps so that the vertical panels and carved branches don't merge into a single decorative band.
If the first slat has noticeable depth or a side edge, look at the wall at an angle. The thickness of NPU-472L/R is 7 mm, so under side lighting they cast their own shadow. A deeper slat surface creates a different shadow. These two reliefs can either work well together or fragment the plane.
When new finishing is only planned next to the phytopanel, a commercially logical transition would be a section buy slat panels for walls for interior finishing. But if the panels are already installed, they don't need to be changed for NPU-472L/R: the article's task is to check the compatibility of the pair with the existing wall, not to rebuild the interior around two trims.
Color of NPU-472L/R: tone-on-tone or separate contrast
Paint changes not the size of the trim, but its visual weight. For a pair of 190 × 75 × 7 mm, this is especially noticeable because the elements themselves are compact but have a carved pattern.
Tone-on-tone with the wall is the safest starting scenario when the moss and slats are already active. Light highlights the relief, and color doesn't add a fourth dominant note. This option is useful to check under both daylight and evening lighting: on a matte wall, the same branch can almost disappear frontally and strongly appear under side light.
Contrast color is justified when the phytopanel is large, there's enough smooth wall, and the trims should read as an independent pair. However, contrast can't be chosen only by the moss shade. For example, a green trim next to a green panel might not unify the composition but create a literal repetition of the nature theme. Sometimes a calm wall color looks more convincing.
Separately assess the connection with the slat panels. If the slats are dark and the wall is light, painting NPU-472L/R in the slat color sharply increases horizontal contrast. This can be beautiful, but then the branches are no longer secondary. If the task is to replace a molding frame with a lighter solution, it's more logical to start with a less contrasting version.
The decision is made based on a full-size mockup. For color checking, it is enough to cut out a second set of paper templates in the intended color. This is faster and more reliable than imagining the future finish from a small sample in a catalog.
What a 7 mm relief gives under side lighting
The thickness C of both models is 7 mm. This is not flat graphics or a sticker: the overlay protrudes from the wall plane, so light becomes part of the composition.
Under frontal diffused lighting, the branch may be perceived almost as a tonal drawing, especially if painted in the wall color. Under side lighting, the relief becomes more noticeable due to its own shadow. The closer the light source is to the wall and the more grazing the angle of light, the stronger the plasticity works visually.
This feature needs to be checked together with the phytopanel. The uneven surface of moss also has its own light-and-shadow structure. If slats are nearby, they add vertical shadows. As a result, in the evening the wall may look much more active than during the day.
Before final installation, leave the templates on the wall for at least one evening and look at the composition under standard lighting. To simulate depth, you can place strips of cardboard under the paper templates to lift them off the wall. This will not reproduce the shape of the carving, but it will show how sensitive the area is to the appearance of additional shadows.
If there is a directional spotlight, wall sconce, or linear lighting of the slats nearby, do not position the overlays permanently until all the light is turned on. In such an interior, a small shift can change the character of the shadow more strongly than changing the color by one tone.
Overlays cannot be considered decor for the moss surface itself
In the scheme under consideration, NPU-472L/R are placed on the prepared wall plane next to the phytopanel. They should not be automatically glued onto the moss itself or onto an uneven plant surface.
The reason is not only aesthetic. Adhesive mounting of a decorative overlay requires a clear base. The STAVROS cards indicate that the products are mounted using an adhesive method, and the manufacturer's recommendations assume applying glue to the decor and pressing it against the surface. An uneven, soft, or heterogeneous layer of the phytopanel should not be considered the same base as a painted wall, unless this is confirmed by the design of the specific panel.
Therefore, before purchasing, you need to find out where exactly the solid mounting plane runs. If the phytopanel is installed on a separate substrate and there is a painted wall around it, the task is simple: the overlays are mounted on the wall. If the green surface extends far beyond the base and overlaps the intended location of the branches, it is better to adjust the composition rather than try to hide the fastening inside the moss.
A separate issue is dismantling. The phytopanel may need to be removed or replaced at some point. NPU-472L/R should be installed so that they do not block access to the fastenings of the central object and do not require destroying the stucco molding when servicing the panel.
To select adhesive and finishing compounds, there is a section on the website buy materials for installing moldings. The specific compound is selected after checking the base and the final wall covering.
If the phytopanel protrudes forward more than the stucco molding
The thickness of NPU-472L/R is known — 7 mm. The depth of a specific phytopanel is not specified in the original task, so it cannot be invented. But this difference must be measured on site.
If the panel noticeably protrudes from the wall, the side branches will be in a deeper plane. Frontally, this may look normal, but from the side, the stucco molding will almost disappear behind the protruding green volume. This scenario is especially likely when looking along the wall from a corridor or from the entrance.
Do a simple check: measure the distance from the finished wall to the most protruding rigid element of the phytopanel, then compare it with the 7 mm relief of the overlay. There is no need to derive a universal ratio like "the panel should not be thicker than X." What matters is understanding whether the pair will be visible from real viewpoints.
If the central object is highly voluminous, the overlays can be moved further from the edge so that they get their own field and stop visually hiding behind the panel. But this increases the overall width of the composition and may bring the branches closer to the slat panels. Here, two variables immediately connect — the depth and the horizontal wall allowance.
If the phytopanel is almost flat, the 7-millimeter stucco molding may turn out to be more noticeable than expected. Therefore, the final test is always carried out not only frontally, but also at angles.
Pair symmetry and whole-wall asymmetry are not the same thing
NPU-472L and NPU-472R form a natural left and right pair. This does not mean that the entire wall must be mirror-symmetrical.
Slat panels may be located only on the right. On the left, there may be a doorway. The phytopanel may be shifted relative to the center of the room. Under such conditions, attempting to make the entire wall a perfectly symmetrical scheme around the central axis often looks artificial.
Preserve the local logic of the pair: the left and right overlays should be perceived as connected to the phytopanel. And check the global balance separately. Sometimes an overall asymmetrical interior looks convincing precisely because it contains a small symmetrical node inside.
The opposite situation is when, for the sake of the overall wall, L and R are strongly separated in height or distance from the panel. Then the meaning of paired SKUs is lost. If the project requires such different positioning, it is useful to ask whether a mirror pair is really needed, or whether it is better to choose two independent overlays from the catalog.
For comparison, you can open the section buy polyurethane overlays with a branch ornament and check alternatives. This is commercially more honest than forcing a specific pair into a composition for which it is not suitable.
When a full molding frame is better than two overlays
Paired NPU-472L/R are not a universal replacement for moldings. Sometimes a rectangular frame solves the task better.
The first case is when a phytopanel is built into the architectural grid of a wall. For example, there are already several identical framed fields nearby, moldings continue on adjacent sections, and the panel should become one module of the overall system. Two branches would break the language of this architecture, while a frame would continue it.
The second case is when a clear outline is needed due to the complex edge of the panel. If a straight frame should visually gather a non-uniform border, local overlays will not do that.
The third is a large free wall where two pieces of 190 × 75 mm are objectively lost. You can increase the distance between them, but then they will no longer be perceived as framing. At such a scale, a full profile may hold the object better.
The fourth is an interior built on geometry rather than organic forms. Strict rectangles, repeating molding fields, and linear slats may conflict with a plant branch more strongly than with a simple profile.
Finally, a frame is better when it is technically required to cover a flat structural perimeter. NPU-472L/R do not perform this function.
That is, the choice of "two overlays instead of a frame" should be a deliberate lightening of the composition, not a way to save on four sides of molding at any cost.
When it is better to choose other overlays with a plant ornament
Even if the idea of two local branches itself fits, the specific NPU-472L/R may fail the scale or plasticity check.
The width of 190 mm is convenient for a relatively compact accent. On a very large phytopanel, the branches may look like random small details. On a small one, on the contrary, they may be too noticeable. In both cases, the problem is not solved by changing the offset: the scale of the product itself changes relative to the central object.
The second criterion is the nature of the ornament. NPU-472L/R have a developed plant pattern. If the moss already forms a very complex free edge, an additional branch may literally repeat the natural theme and make the composition too "narrative." Then it is worth looking for a more geometric or less detailed overlay.
The third criterion is the height of the available smooth strip. 75 mm is a bit, but switches, backlighting, a shelf, or an edge of another material may run nearby. If the overlay has to be rotated or trimmed against the pattern, it's better not to force it into place.
For a wider selection, you can order decorative polyurethane overlays or look at horizontal decorative polyurethane overlaysThe meaning of the alternative is to preserve the function of the local accent, but change the scale or language of the ornament.
When stucco molding is not needed at all
The most useful commercial conclusion sometimes is to refuse the product.
If the phytopanel is large, has a beautiful independent edge, and is already well balanced by slat panels, two additional branches may not improve anything. They will just add another material, another relief, and two more points that need to be supported with color and light.
Refusal is also justified when there is too little smooth field. If a narrow strip remains between the moss and the slats, where the template fits only formally, the composition will look cramped. Don't buy a pair just because the physical 190 × 75 mm "fits."
The third case is when there is already an active light fixture, logo, mirror, inscription, or piece of furniture with a pronounced line nearby. NPU-472L/R don't have to be present in every free zone.
The fourth is when the interior is deliberately minimalist. The phytopanel and wooden slats already provide a natural theme without literal repetition of leaves. A carved branch can make the idea too straightforward.
Fifth — the mounting base raises doubts. If there is no suitable smooth surface and you will have to interfere with the structure of the phytopanel itself, it is better to resolve the technical issue first.
Zero basket — a full-fledged solution option. The article should help order what is needed, not justify the purchase at any cost.
Viewing distance: the same pair can be noticeable or almost disappear
The size of 190 × 75 mm should be evaluated not only next to the wall. A small carved detail is perceived completely differently from arm's length and from the opposite end of the room. This is especially important for phytopanels in the living room, hall, restaurant, office, or waiting area, where the main view of the wall often starts not a meter away from it.
Make at least three control points. The first is close, where the relief itself is visible. The second is the main household or work point: sofa, entrance, counter, passage. The third is far, if space allows. At each point, something different is checked. Up close, the quality of the edge, texture, and shadow are visible. At medium distance, the connection of the pair with the phytopanel is read. At far distance, only the general silhouette and contrast remain.
If from the main point the NPU-472L/R disappear completely, this is not necessarily bad. Their role may be designed precisely for a delicate background. The problem arises if the composition requires noticeable framing, but the pair is only readable when approaching the wall. Then the two overlays do not fulfill their function, and you need to compare larger decor or a frame.
The opposite situation — contrasting coloring makes small branches more noticeable than the phytopanel itself even from afar. Then the physical size remains the same, but the visual scale becomes too large. It can be reduced with color, light, or by abandoning additional stucco.
A smartphone photo is useful, but should not be the only criterion. The wide-angle camera at the edge of the frame distorts proportions, so shoot the wall from approximately the central point and compare images taken from the same distance and with the same focus mode. The goal is not to get a beautiful photo, but to see whether the correct hierarchy of objects is preserved.
Furniture, doors, and passages can change the meaning of a symmetrical pair
A phytopanel rarely exists in an absolutely empty plane. Below it there may be a console, sofa, bench, cabinet, or table. To the side there may be a door, an open passage, or a tall wardrobe. These objects affect the perception of NPU-472L/R no less than slatted panels.
If there is furniture under the phytopanel, first compare the center of the panel with the center of the object. They may not coincide. If the overlays are aligned with one object, but the viewer perceives another, a sense of error arises. In this case, you need to decide what is the main compositional module: the phytopanel as an independent object or the entire "furniture + panel" zone.
A door nearby creates another strong vertical. The right or left branch may end up too close to the trim and begin to be perceived as door decor, although by design it belongs to the moss. Therefore, the outer edge of the pair is checked not only relative to the slats, but also relative to the nearest architectural boundary.
The passage also changes the point of view. If a person enters from the side, they first see one of the overlays, then the phytopanel, and only then the second. With such a route, an overly contrasting branch can become an accidental first accent. Side checking is especially important when the wall is along a corridor.
If there are switches, sockets, a thermostat, an intercom, or other wall-mounted equipment nearby, do not try to "fit" it between the branch and the phytopanel without checking. The technical element has its own geometry and can destroy the expected pairing. Sometimes it is more correct to shift the entire decorative system, and sometimes to abandon the two overlays on this wall altogether.
Why the organic edge of moss may require unequal visual but equal logical indents
For a rectangular painting, it is easy to measure the same indent from two vertical edges. For a moss phytopanel, the contour can be free: on the left the green mass protrudes further, on the right it forms a recess, on top the line goes in a wave. In this case, the ruler and the eye give different answers.
Start with geometrically equal distances from the conditional mounting contour. This creates a neutral control version. Then look at the nearest actual edge of the green mass. If the left branch seems closer to the moss, although the measurement is the same, the reason may not be a marking error, but the asymmetry of the panel itself.
Such an imbalance should be corrected carefully. Too strong a change in one indent will destroy the mirror connection of NPU-472L and NPU-472R. Therefore, it is useful to separate two concepts: the technical indent and the visual pause. The technical one is measured from a stable base. The visual pause is assessed from the actually visible contour of the moss.
If the difference between them is small, the composition usually withstands a slight correction. If the organic form is so asymmetric that one overlay has to be moved much further away, the very idea of a mirror pair becomes questionable. Then it is better to choose single independent elements or leave the phytopanel without molding.
This test adds an important limitation: identical L/R articles do not guarantee visually identical surroundings around them. Pairing is created not only by the details, but also by the context.
Access to the edge of the phytopanel after installation must also be left.
Even if the central panel is already installed and regular intervention is not expected, its edge must remain accessible for inspection and possible work. Paired overlays should not be placed so that they cover the fasteners, removable edge, technical gap, or the area through which the panel is removed.
Before gluing, find out how the phytopanel is secured. If it hangs on a separate base and can be removed as a whole, check the removal path. Sometimes the panel needs to be lifted up first, sometimes pulled away from the wall. An overlay placed too close can physically obstruct this movement.
Also think about cleaning. The carved relief and uneven green surface are nearby, so too narrow a gap between them is inconvenient for carefully removing dust from the smooth wall and the molding itself. There is no need to assign a universal sanitary gap, but during template fitting, you should literally check whether a hand with a soft cloth or brush passes without touching the moss.
If the phytopanel has backlighting, a power supply, hidden wiring, or a removable profile, access to these elements is more important than decorative symmetry. NPU-472L/R must not be placed over the service area just for a nice photo.
Such an operational test often changes the decision before purchase. Visually, the branch may fit perfectly near the edge, but technically interfere with maintenance. In this case, the correct outcome is to increase the gap, change the height, or abandon the pair, rather than complicate future removal.
NPU-472L and NPU-472R must be checked as two different SKUs, not as one universal part.
The pair has the same dimensions and price, but the L/R marking is not accidental. Before ordering and especially before installation, you cannot assume that one part can simply be flipped to get the other side without checking the shape. The cart must contain two specific SKUs: one NPU-472L and one NPU-472R.
Practically, this means a few simple steps. Label the sides on paper templates. When receiving the order, verify the marking of each item separately. Before applying glue, lay out both overlays on the floor or table in the orientation they will be on the wall, and compare with the approved layout.
This check is especially useful if installation is done by another person. The designer may approve the L/R composition, and the installer may only receive a photo of the wall without SKUs. A label on the diagram prevents a situation where parts are swapped or an error is compensated by rotation.
If after a physical fitting it turns out that one of the sides is compositionally unnecessary, this is no longer a "paired solution with one detail," but a new scenario of a single accent. It should be re-evaluated because the axis, the balance with the slats, and the logic of the entire phytopanel change.
The commercial conclusion here is simple: for the solution in question, you order not "two NPU-472," but 1 × NPU-472L + 1 × NPU-472R. This formulation should be included in the specification, the request, and the installation diagram.
The type of smooth wall changes not only the installation but also the visual role of the overlays
In the original scheme, NPU-472L/R are on a "smooth wall," but smoothness does not mean the same base. A painted putty surface, smooth wallpaper, microcement, decorative plaster with fine grain, or sheet material may look similar from afar and interact completely differently with the carved relief.
On a solid matte paint, a branch painted in the same color is read primarily through its shadow. This is the most neutral background for checking the form. On wallpaper, even a calm pattern adds graphics, so a thin plant overlay may get lost or, conversely, start to conflict with the print. On microcement and other non-uniform finishes, the background already has its own texture, and the third fine plastic element requires a stricter check from a distance.
The technical side also differs. You cannot transfer a glue recommendation from one coating to another without testing. Even if the wall itself is strong, the finish layer may have different adhesion. For a completed renovation, it is critical that the joint holds not only on the strength of the glue but also on the strength of the coating itself to which it is glued.
Therefore, before ordering, it is useful to do two separate checks. The first is visual: apply the templates to the existing finish, not to a white sheet on the table. The second is installation-related: determine the base material under the finish and clarify the compatibility of the chosen compound.
If the wall has a pronounced pattern, you can temporarily cover the area around the template with plain paper and compare the two options. This will make it clear whether the problem is in the scale of NPU-472L/R or in competition with the background. Sometimes the pair itself is suitable, but the specific wall finish makes it redundant. In such a case, changing the two overlays to larger ones is the wrong path; it is better to first decide whether a third decorative layer is needed at all.
Installation after a completed renovation: what to check before gluing
If the phytopanel and slat panels are already installed, the installation of NPU-472L/R is carried out in a finished interior. This increases the requirements for marking: an error is harder to compensate with a new finish layer.
First, mark the position of the templates with painter's tape and check them with a level. Then photograph the wall from the front and from two corners. After that, transfer the outlines with light marks that can be removed without damaging the coating.
The base must be suitable for adhesive mounting. The manufacturer describes the general procedure for gluing decor: adhesive is applied to the product, the element is pressed against the surface, then held and pressed firmly again. But the choice of a specific adhesive depends on the wall and the finish coating. Painted plaster, wallpaper, decorative plaster, panels, or laminated surfaces cannot be considered identical without testing.
KUDO HIGH TACK is available at STAVROS as a mounting product, and it is found among related products for polyurethane decor. If a specific compound is needed, you can buy KUDO HIGH TACK adhesive for molded decor, but before use, you still need to check compatibility with the actual base and finish.
It is more convenient to plan the painting before installation, especially if a contrasting color is planned. For tone-on-tone, some finishing operations can be done on the wall, but this depends on the quality of the joint and the chosen painting system.
Five mistakes that change the purchase decision
Mistake 1. Considering a pair a full frame
The reason is the desire to simplify the molding scheme to two parts. The consequence is the expectation of a clear border around the perimeter, which NPU-472L/R do not create. The check is simple: mentally remove both branches and evaluate the edge of the phytopanel. If without them it looks technically unfinished, you need a solution for the perimeter itself, not a decorative pair.
Mistake 2. Bringing the molding close to the moss
The reason is the fear of leaving "too much empty wall." The consequence is mixing two complex textures. A series of full-size mock-ups with different smooth gaps helps avoid this.
Mistake 3. Ignoring the slat zone in a symmetrical layout
The reason is designing only around the phytopanel. The consequence is that one branch ends up almost on the slats, while the other has a large free field. You need to check both the local pair and the entire wall as a whole.
Mistake 4. Choosing a color before checking the light
The reason is deciding based on a small swatch. The consequence is that the 7-millimeter relief reads much stronger in the evening than expected. A test in standard lighting is needed.
Mistake 5. Buying and gluing two pieces right away without templates
The reason is that the small size of the items creates a sense of low risk. The consequence is that after installation, it turns out that the pair either gets lost or overloads the composition. Two paper rectangles of 190 × 75 mm allow you to check the main thing before ordering.
Solution table: pair, frame, or empty wall
| Situation | NPU-472L + NPU-472R | Full frame | Without molding |
| The phytopanel already has an expressive outline, only a light accent is needed | suitable after fitting | often redundant | also possible |
| Need to strictly structure the rectangular field | may be too loose | logical option | depends on the wall |
| The edge of the panel needs to be visually gathered around the entire perimeter | does not fully solve | better matches the task | usually doesn't solve the edge |
| Active slat panels nearby | helps avoid adding another geometry | May overload | the calmest option |
| A smooth field is not enough | the pair may not fit compositionally | the frame is also problematic | Often better |
| The panel and slats already look finished | may become redundant | even more redundant | preferred option |
| Need a plant motif related to moss | direct hit on the idea | depends on the selected molding | the natural theme remains only in the moss |
| Budget only for two NPU-472 at the time of check | 1 960 ₽ | Requires separate calculation | 0 ₽ for stucco molding |
The table does not replace fitting. It is needed to avoid mixing different tasks. If you need an architectural boundary — look at the frame. If you need only a local plant accent — check the pair. If the wall is already finished — leave it without additional decor.
Practical algorithm before ordering NPU-472L/R
-
Measure the actual visible dimensions of the phytopanel, not just its mounting substrate.
-
Mark the boundaries of the smooth wall and the distance to the first batten on each side.
-
Record the positions of switches, sconces, shelves, door trims, and other obstructions.
-
Make two templates 190 × 75 mm and label them L and R.
-
Place them to the left and right of the panel in the standard horizontal orientation.
-
Evaluate the position from the main viewpoint, then from two side viewpoints.
-
Move the templates, changing the smooth gap to the panel, but without pre-assigning a "correct" number.
-
Check the total width using the formula
W = 190 + Gₗ + M + Gᵣ + 190. -
Compare the outer edge of each overlay with the boundary of the slat zone.
-
Check three vertical levels: below the middle, at the middle, and above the middle of the phytopanel.
-
Look at the layout in daylight and evening lighting.
-
Compare tone-on-tone and contrasting colors of the templates.
-
Clarify the depth of the phytopanel and assess whether the 7 mm relief will be hidden at a side view.
-
Check the solid mounting base: the overlays should be attached to a suitable surface, not automatically to moss.
-
Compare three final photos: the NPU-472L/R pair, the proposed molding frame, and the wall without stucco.
-
If the pair wins, create a cart with 1 × NPU-472L and 1 × NPU-472R.
-
Before gluing, check again that the left and right article numbers are not swapped.
-
Select compatible adhesive and finishing materials for the actual base.
This order turns the purchase into a verifiable decision. A person does not order two branches "based on a pretty picture," but first proves on their own wall that the pair specifically improves the composition.
What to buy in the end
For the original scenario, the base specification is extremely simple: 1 × NPU-472L + 1 × NPU-472R. The size of each is 190 × 75 × 7 mm, and the material is polyurethane. At the time of verification, the price of each card is 980 ₽, so two pads cost 1,960 ₽.
This pair should be ordered when four conditions are met simultaneously. First, the phytopanel is already technically finished and does not require perimeter masking. Second, there is sufficient smooth space on the sides for two full-size templates. Third, adjacent slats do not conflict with the outer edges of the branches. Fourth, after checking with light and color, the phytopanel still remains the main object.
If at least one of the conditions is not met, there is no need to save the idea by reducing each indentation. More reasonable alternatives are another pair of pads, a full molding system, or the absence of additional stucco.
For a wide selection, you can You can buy ready-made stucco matching the Baroque style. Calculate the quantity: linear meters of cornices and moldings, number of rosettes, pilasters, consoles, corner elements. Add a ten to fifteen percent allowance for trimming. and then choose the shape based on the function. But specifically in the task under consideration, the advantage of NPU-472L/R is that two separate plant details allow you to design the phytopanel without another rigid rectangle around it.
FAQ
Can you install only NPU-472L without the right pad?
Physically, the separate item is sold independently, but this is already a different compositional scenario. One left branch is justified only with deliberate asymmetry—for example, if on the right the phytopanel almost reaches the slat zone, and on the left there is a large free field. You cannot simply remove the R due to lack of space and assume that the paired idea is preserved. Such a variant needs to be re-checked with a template as a single accent.
What to do if the slat panels approach the phytopanel only from one side?
Do not automatically shift both pads to the opposite side. First, keep the pair around the phytopanel and assess the external balance. If the right or left branch conflicts with the slats, compare three scenarios: reducing the decorative role, another model of a smaller scale, or completely abandoning the pair. Wall asymmetry does not obligate making the pair itself asymmetric.
Can NPU-472L/R be placed above the phytopanel instead of on the sides?
This is only possible after a new fitting, because the function changes. The two branches on the sides work as a lightweight framing. The two parts on top become more of a crown or an upper ornamental accent. The conclusions of this article cannot be transferred to the upper composition without a separate check of distance, orientation, and light.
Should the same gap be left on the left and right?
For a symmetrical pair, it is a good starting point, but not an absolute rule for the entire wall. If the moss contour is asymmetrical, equal linear offsets may be perceived as visually unequal. Therefore, first set equal values, then evaluate the composition by eye and from photos taken from a fixed point.
Will the overlays work if the phytopanel has a round or oval contour?
The shape itself does not prohibit the use of the pair. But the horizontal branch will interact with the curved edge differently than with a rectangular one. Here it is especially important to maintain a smooth pause: if the overlay touches the arc almost closely, it may look like a random fragment of an unfinished frame.
Can NPU-472L and NPU-472R be painted in different colors?
The manufacturer confirms the technical possibility of painting the product, but different colors for a mirror pair will sharply weaken their connection. This technique only makes sense in a deliberately asymmetrical concept. For the original task of "two branches instead of a frame," it is more logical to first test a single color.
Do I need to buy a spare third overlay?
The composition requires one left and one right element. There is no universal rule to buy a third element "in reserve." If the project is commercial or installation is carried out in difficult conditions, a reserve may be discussed separately, but it cannot be included in the mandatory specification without a reason.
What to do if the smooth wall has a slight difference in level after installing the slats?
The decorative overlay cannot be considered a means of leveling the base. If the bonding area has a difference in level, it should first be assessed as an installation problem. The carved element must fit on a suitable surface. Attempting to compensate for unevenness with a thick layer of adhesive without manufacturer recommendations creates unnecessary risk.
Can NPU-472L/R be combined with phytopanel backlighting?
Yes, but the position needs to be checked with the light on. The backlight can enhance the 7-millimeter relief or, conversely, make it visually secondary. Pay special attention to shadows if the light source is between the panel and the overlay: then each branch can get a separate strong silhouette.
What to choose if you want a natural motif, but NPU-472L/R seem too detailed?
Look at other items in the category of overlays with a "branch" ornament or in the general catalog of decorative overlays. Keep the same principle of two local accents, but change the scale and detail. This is better than forcing a specific model to work in a composition where its pattern is too active.