

















Article Contents:
- Wooden furniture handle Eclipse HL-072.1: what is confirmed by the product card
- Half-ring handle and two old holes: why coincidence cannot be assumed
- Bracket handle Eclipse HL-072.1: how to check DWG before ordering
- How to overlay old two holes on the new Eclipse HL‑072.1 diagram
- Scenario 1. Old holes match two extreme new points
- Scenario 2. Only one old hole matches
- Scenario 3. No old hole matches, but both are covered by the new handle
- Scenario 4. Old holes extend beyond the contour of the new handle
- Scenario 5. The outer holes fit, but the center point lands in a weak spot
- How to make an Eclipse HL‑072.1 mounting template at 1:1 scale
- Step 1. Obtain the drawing specifically for HL‑072.1
- Step 2. Export to PDF or print at 1:1
- Step 3. Check the control dimension
- Frame front
- How to tell if Eclipse HL‑072.1 will cover the mark from an old handle
- Eclipse HL‑072.1 on a dresser and nightstand: how to check the 182 × 92 × 45 mm dimension
- How to close old holes if wooden hardware doesn't match
- Painted MDF
- How much does an Eclipse HL‑072.1 set cost and how much does a mistake cost
- How to order six Eclipse HL‑072.1 with one technical specification
- What to send to the manager and furniture maker before ordering Eclipse HL‑072.1
- Commercial stop-list before paying for Eclipse HL‑072.1
- Conclusion: buy the half-ring handle after verification, not by a single size
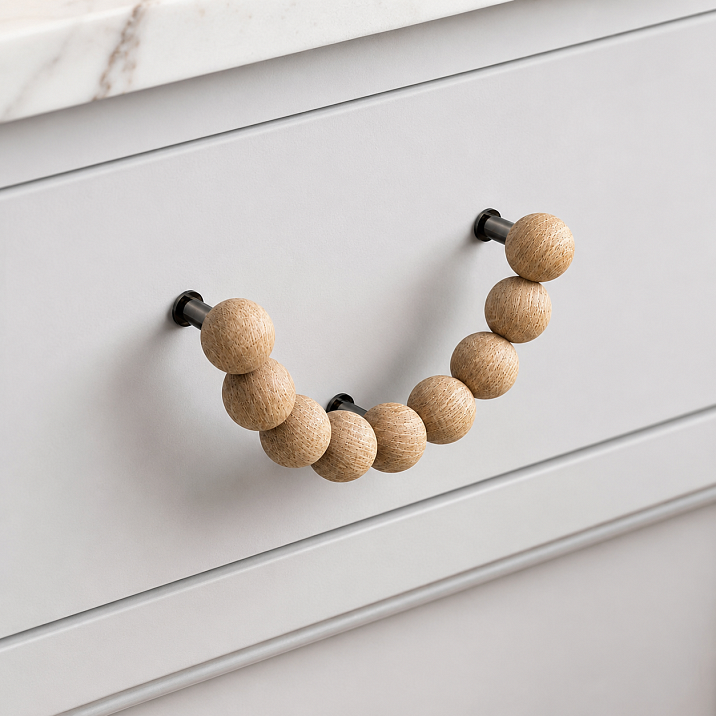
The old handle was removed from the dresser, and two neat holes remained on each facade. I want to replace the ordinary metal bracket with an expressive wooden model in the shape of a half-ring, preserve the door color, and finish updating the furniture without carpentry rework. In the photo, Eclipse HL-072.1 looks suitable: length 182 mm, a soft arc of wooden elements, beech or oak. But the product shows not two, but three support points — left, center, and right. This is where a beautiful choice turns into a technical question.
Short answer: buy Eclipse HL-072.1 as a direct replacement for a two-point handle only after checking the mounting drawing against the facade. Two old holes by themselves do not confirm compatibility. It is necessary to know the coordinates of all fasteners, check the position of the center support, facade thickness, fastener length, and the mark from the previous handle. If at least one parameter is unknown, first order or request the data, rather than drilling the finished door based on the overall dimension.

Wooden furniture handle Eclipse HL-072.1: what is confirmed by the product card
Eclipse HL-072.1 is a specific product, not a conditional example of a bracket handle. On the STAVROS page, the size A × B × C × D × E is indicated: 182 × 92 × 45 × 154 × 64 mm. Beech and oak are available, with "Prestige" sanding quality. In the shown beech configuration, the card notes the preparation "Under enamel". The product is made to order; the average lead time is stated as 5–10 days.
As of August 28, 2026, the price was 4,210 RUB for beech and 4,790 RUB for oak. These figures are needed for the preliminary estimate, but they should be re-checked before payment. If six identical handles are required for three dresser drawers and two cabinet doors, the approximate cost without delivery and finishing will be:
-
beech: 6 × 4,210 = 25,260 RUB;
-
oak: 6 × 4,790 = 28,740 RUB;
-
set difference: 3,480 RUB.
If the project allows a trial order, one handle helps check the scale and grip before purchasing the entire set. But even a sample cannot be installed "by eye": it is first applied using a template and checked against the drawing. You can place an order for a specific model via the link buy wooden furniture handle Eclipse HL-072.1.




Half-ring handle and two old holes: why coincidence cannot be assumed
For most replacements, there is a temptation to measure the distance between two old holes, see the number 154 mm in the product card, and decide the issue is closed. This is risky logic. In the card, dimensions are marked with letters A, B, C, D, and E, but the text block does not state that D is the distance between the axes of the outer screws. Moreover, the coordinate of the third, central point is not provided there.
Even if the outer holes happen to match, three possible problems remain. First: the central support will require a new hole in a place where a panel, frame, groove, or internal hardware runs. Second: the old handle might have covered a wider area, and after replacement, a faded or pressed-in mark will appear around the new part. Third: the new supports may not cover the old holes if their axes are shifted by even a few millimeters.
Therefore, the original two holes are only one of the measurements. To make a decision, at least five values are needed:
-
distance between the centers of the old holes;
-
diameter of each hole;
-
distance from the holes to the edges of the facade;
-
facade thickness at the mounting points;
-
free space on the reverse side for screws, washers, and tools.
Added to this is the three-point diagram of HL-072.1. Only overlaying the two diagrams shows whether replacement is possible without noticeable rework.
Our factory also produces:


Eclipse HL-072.1 pull handle: how to check the DWG before ordering
A technical file is available on the card. It should be downloaded as a DWG drawing of Eclipse HL-072.1 and opened in a CAD program or passed to the cabinetmaker. The task is not just to see a nice outline. You need dimensions from the facade baseline to the center of each mounting hole, hole diameters, protruding parts, and the side where the fasteners are installed.
Before drilling, the craftsman must get clear answers:
-
how many mounting holes are actually required;
-
are the extreme points symmetrical relative to the center;
-
does the central support coincide with the geometric center of the handle;
-
do 154 and 64 mm refer to the mounting axes or to other elements;
-
what drilling diameter is needed;
-
what fasteners are provided for the selected door thickness;
-
should the support metal go into the facade or only adjoin it.
If CAD is unavailable, the manager is asked to send a dimensional drawing in PDF and confirm the center distances in writing. A 1:1 mounting template is also useful. It is printed without the "fit to page" function, the control size is checked with a ruler, and only then applied to the furniture.
The paper template allows you to see whether the old holes are covered by the support body, whether the central mounting falls on the edge of the panel, and whether the handle is positioned identically on all drawers. However, the template does not replace checking the fasteners and the facade thickness.
Get Consultation
How to overlay the old two holes on the new Eclipse HL‑072.1 scheme
Before purchasing the full batch, it is useful to turn the task into a simple coordinate scheme. The old facade already has two points, and the Eclipse HL‑072.1 shows three supports in the photos. You cannot compare only one distance number — you need to overlay the entire old drilling pattern onto the entire new one.
Let's denote the old centers:
-
S1— left old hole; -
S2— right old hole.
New points after reading the DWG:
-
N1— left mounting/support point; -
N2— central; -
N3— right.
The zero baseline is the visual center of the new handle or another base directly specified in the drawing.
Scenario 1. Old holes match two extreme new points
This is the most convenient option if DWG indeed confirms three through fastenings.
Then:
-
S1 = N1; -
S2 = N3; -
only need to add
N2.
But even here, there are checks:
-
the center point falls into solid material;
-
on the reverse side, there is no guide rail, hinge, or inner drawer;
-
the old handle did not leave a mark wider than the new one;
-
the outer holes are not broken and hold the fastener;
-
the screw length matches the thickness of the facade.
Matching two holes does not mean the handle can already be ordered without a template.
Scenario 2. Only one old hole matches
For example:
S1 = N1,
а S2 does not match N3.
Then the new product requires at least one more new extreme point and possibly a central one.
An important question arises: what will happen to the old S2?
If it is completely covered by the metal or wooden part of the handle, the channel may visually disappear. But structurally, the old hole remains in the material, and its position relative to the new N3 needs to be assessed by the cabinetmaker.
If the holes are located too close together, a thin bridge remains between them. A universal minimum size for this bridge cannot be assigned without knowing the material, diameter, and fastener.
Scenario 3. No old hole matches, but both are covered by the new handle
Externally, this option may be acceptable.
Technically:
-
old holes are repaired;
-
new points are marked strictly according to the template;
-
drilling a new set;
-
checking the strength of zones around repaired channels.
On painted MDF, this is no longer a "handle replacement in an evening," but a local facade restoration.
If the project allows repainting the entire facade, the task is simpler. If the finish cannot be replicated, the risk of noticeable repair is higher.
Scenario 4. Old holes extend beyond the outline of the new handle
This is a commercial stop signal.
Even if the Eclipse HL‑072.1 can technically be secured with new holes, the old channels will remain visible.
Then you need to decide before purchasing:
-
whether the facade is repaired;
-
whether the entire surface is repainted;
-
Are decorative plugs acceptable?
-
Wouldn't it be easier to choose a different handle with a larger overlap area?
For expensive factory enamel, another model is often cheaper than quality restoration.
Scenario 5. The outer holes fit, but the center point lands in a weak spot
For example:
-
thin panel;
-
edge of the frame front;
-
groove;
-
adhesive joint;
-
recess on the back side;
-
internal fastening.
This is an example where 'two old holes perfectly matched' still doesn't make the model compatible.
If the center support requires a separate through-fastening and cannot be installed in a solid area, it's better not to order the handle for this front without modifying the design.
Decision matrix
| Old holes | Close with new handle | Center point is acceptable | Preliminary decision |
|---|---|---|---|
| Both match | Yes | Yes | Best scenario, check DWG and fasteners |
| One matches | Yes | Yes | Repair one old channel + new points |
| None match | Yes | Yes | full new drilling and repair of old ones |
| do not match | No | Yes | visual repair or another model |
| outer ones match | Yes | No | HL‑072.1 do not order without changing the facade |
This table is intentionally not a substitute for the drawing: it shows the decision-making order after the coordinates from the DWG are already known.
How to make an Eclipse HL‑072.1 mounting template at 1:1 scale
DWG is useful for the cabinetmaker, but for the furniture owner it is easier to work with a physical template.
Step 1. Get the drawing specifically for HL‑072.1
Not HL‑072.
Not a picture from the catalog.
Not a screenshot from the phone.
Need a file of a specific article.
Step 2. Export to PDF or print at 1:1
In the program, disable:
-
"fit to page";
-
"shrink large pages";
-
automatic scaling.
Scale must be 100%.
Step 3. Check the control size
After printing, any clearly labeled dimension on the drawing is measured with a ruler.
If the printout contains a line A = 182 mm, it should measure as 182 mm. If another dimension line is more convenient, it is used.
Only after this can the template be considered to scale.
Step 4. Transfer three points
Holes or punctures are made on the template strictly at the centers of the mounts confirmed by the DWG.
Not at the center of the metal circles in the photo.
Step 5. Overlay on the facade
Align:
-
old holes;
-
the visual axis of the facade;
-
the handle contour;
-
new mounts.
Step 6. Trace the outer contour of the supports
This shows whether the new model covers the old holes.
Very often the installer checks only the drilling axes but forgets about the visual trace.
Step 7. Turn the facade over and check the reverse side
The same new axes are transferred relative to:
-
frames;
-
the guide;
-
the drawer;
-
hinges;
-
Shelves.
Why a template is needed even when the outer holes fully match
Because it shows four more things:
-
real scale 182 × 92 mm on a specific box;
-
position of the central support;
-
overlap of the old trace;
-
distance to adjacent facades and countertop.
Why you cannot drill directly through paper without confirmation
Paper template is a diagnostic tool.
The furniture maker must perform final marking using a method that ensures accuracy and does not damage the coating.
On expensive finished furniture, the cost of a mistake is much higher than the cost of re-checking.
Wooden furniture handle: algorithm for measuring a finished facade
First, the door or drawer is freed and access to the back side is ensured. The old handle is removed without jerking to avoid tearing the coating around the screws. The surface is cleaned gently, without rubbing unknown solvent into the lacquer or enamel.
Next, using a caliper or precise ruler, measure the distance between the centers of the holes. Measuring "from edge to edge" easily leads to errors. If both holes are of the same diameter, you can measure the distance between the same outer edges — it equals the distance between centers. The result is written down, not kept in memory.
After this, the facade axis is determined. For a symmetrical box, it passes through the middle of the width and height of the installation zone. Old holes may have been drilled asymmetrically; a new large handle will make the misalignment more noticeable. The HL-072.1 template is aligned not only with the old holes but also with the actual visual axis.
From the reverse side, check the frame, inner box, hinges, guides, and shelves. The screw must not press against the mechanism or obstruct movement. If the facade is framed, the three points must not fall on areas with different thicknesses without a confirmed solution from the craftsman.
Finally, the handle or a full-size mockup is applied to the closed facade. It is necessary to ensure that the arc does not collide with the adjacent door, countertop, wall, or protruding decor. Size C = 45 mm should be considered as the declared product dimension, but the direction of this dimension is confirmed by the drawing, not by guesswork.
Old and new drilling side by side: when the facade becomes the weak point of the project
After applying the templates, it may turn out that the new point is located just a few millimeters from the old hole. This is more dangerous than a simple mismatch.
Why close holes require separate verification
A material bridge remains between the two channels.
It must withstand:
-
tightening of the fastener;
-
a jerk when opening;
-
repeating cycles;
-
load when the box is heavy.
If the bridge is too thin, the edge of the new hole may:
-
crumble;
-
connect with the old channel;
-
produce an oval recess;
-
weaken the handle's fixation.
Why can't universal 5 or 10 mm be named
The permissible distance depends on:
-
the facade material;
-
of the old hole diameter;
-
of the new hole diameter;
-
of the fastener type;
-
depth;
-
of the grain direction;
-
of the presence of veneer;
-
of the frame edge position.
Therefore, the article does not assign a random rule.
The furniture maker evaluates the specific geometry after receiving the DWG.
Solid wood
In the array, the following are important:
-
direction of fibers;
-
knots;
-
old broken channel;
-
distance to the end face.
A new point near the old one can split the section along the fibers.
MDF
MDF is more uniform in direction, but is locally weakened by two close holes.
If the old channel is already broken by a screw, new drilling nearby becomes even riskier.
Veneered MDF
In addition to mechanics, there is a risk of face veneer chipping.
Repairing the old hole can be structurally reliable, but visually noticeable.
Frame facade
The most complex option.
Three HL‑072.1 points can fall:
-
two in a frame;
-
central one in a thin panel groove.
Then identical fastening at all three points may be impossible.
What to send to the furniture maker
It is useful to provide a photo with a ruler and caption:
-
diameter of the old hole;
-
coordinates of the new one;
-
distance between nearest edges;
-
facade material;
-
Thickness.
This way the specialist assesses the actual joint, not the phrase "holes are almost next to each other."
Facade thickness and Eclipse HL‑072.1 fastening: what needs to be checked separately
Even a perfect drilling match does not complete the check.
The handle must be securely attached to a facade of a specific thickness.
Card HL-072.1 in the open text block does not specify:
-
screw type;
-
length;
-
the number of screws;
-
the depth of the threaded part;
-
the range of facade thickness.
Therefore, these parameters need to be confirmed before ordering.
Why the screw length depends on the facade
The facade can have a thickness of:
-
16 mm;
-
18 mm;
-
20 mm;
-
22 mm;
-
another.
The same screw does not have to fit everyone.
Too short:
-
will give insufficient engagement;
-
may strip.
Too long:
-
will hit the handle body;
-
will not allow tightening;
-
may damage the decorative part.
A formula that can only be used after obtaining the fastener parameters
If a through screw is used, the total required length depends on:
thickness of the front panel + washers/spacers + required engagement depth in the handle thread.
But specific millimeters cannot be assigned without manufacturer data.
The central support may have different fasteners
This is especially important.
The photo shows three metal points, but they do not have to be identical inside.
The central support can:
-
have its own screw;
-
be decorative;
-
to be a fixator;
-
to have a different seating method.
Until DWG or the manufacturer confirms this, the article does not consider all three points to be identical through fastenings.
Back side of the facade
Before drilling, check:
-
whether the screw head will protrude into the drawer;
-
whether it will hit the guide;
-
whether it will fall under the shelf;
-
whether a screwdriver can be brought in.
On a chest of drawers, the top drawer sometimes has a very small gap to the inner crosspiece.
If the fastener needs to be shortened
Self-trimming of the screw is only possible as a regular workshop operation with a confirmed fastener type.
But it cannot be guaranteed that the standard screw necessarily allows shortening.
It is better to order the appropriate length right away.
How to tell if the Eclipse HL‑072.1 will cover the mark from the old handle
Old holes are not the only trace.
After years of use, around the previous hardware there may remain:
-
a dented area;
-
a color difference;
-
fading;
-
dark outline;
-
trace from the metal base;
-
scratches.
A new handle may cover the holes but still leave the old trace visible.
The full-size outline is more important than the mounting points
On the template, you need to trace not only the three points but also the entire visible contact area of the new handle.
After removing the old handle:
-
clean the surface;
-
place the template;
-
see what remains outside;
-
assess under side light.
Why the size 182 × 92 mm by itself does not solve the issue
This is the overall dimension.
It does not indicate the area that actually covers the facade.
The arc can have a lot of open space inside.
Therefore, a large handle does not necessarily cover the wide footprint of the old staple.
Painted facade
If the color under the old handle has remained brighter, a "halo" may remain around the new Eclipse.
Local touch-up is often noticeable by the gloss.
Natural veneer
Under the metal, the wood may have changed shade more slowly than the exposed surface.
The transparent finish makes the transition noticeable.
Solid wood
The trace can sometimes be treated deeper, but any sanding changes the surface and finish.
Practical stop signal
If the old trace extends beyond the new contour on the front of an expensive facade and repainting is not planned, it is better to choose a model that covers it, or refuse the replacement.
Eclipse HL‑072.1 on a dresser and nightstand: how to check the dimension 182 × 92 × 45 mm
Drilling compatibility is only the first part.
The handle must physically fit and be comfortable.
Width/length 182 mm
On a narrow drawer, the handle can take up a significant part of the facade.
For example, a facade 300 mm wide.
If 182 mm are positioned horizontally, the free margin with ideal centering along this axis:
(300 − 182) / 2 = 59 mm
on each side.
This is a geometric example, not a decoding of direction A. The direction of the 182 mm dimension is confirmed by the drawing.
Facade 400 mm
Conditional field:
(400 − 182) / 2 = 109 mm.
Facade 600 mm
(600 − 182) / 2 = 209 mm.
Such a simple table helps to understand the scale before ordering.
Size 45 mm
In the existing STAVROS article for HL‑072, the value C = 45 mm is considered a parameter that must be confirmed against the drawing before using it as a protrusion.
For HL‑072.1, the same rule applies: do not assign a letter size as a function without its own DWG.
If the drawing confirms 45 mm as a protrusion from the front, then you need to check:
-
person passage;
-
the adjacent drawer;
-
a wall;
-
tabletop;
-
the adjacent handle.
Paired handles
If two Eclipse handles are installed on adjacent hinged fronts, the arcs must not:
-
collide;
-
overlap the grip;
-
visually merge accidentally.
Bottom drawer
A large handle may protrude into the passage.
Especially for a cabinet next to a bed or a narrow hallway.
Top drawer
Check the overhang of the countertop.
If the arc is positioned high, fingers should fit freely underneath it.
Three mounting points for a wooden handle: is a third new hole needed
From the photos of HL-072.1, three metal supports are visible. This is a good reason not to consider the model an ordinary two-point bracket. However, the photo does not show the internal structure of the screw. The central part may have its own fastening, a lock, or a different design. The drawing and the manufacturer should provide the answer.
If three through fastenings are confirmed, three scenarios are possible for a facade with two old holes.
First: the outer axes coincide, the central hole can be safely added, and all old marks are covered. This is the most favorable option, but it still requires a template.
Second: the outer holes do not align, but the body of the new handle covers the old holes. Then the old channels are repaired using a technique appropriate to the material and finish, and three new ones are drilled using a template. On already painted furniture, such a repair may remain visible after removing the handle and must be agreed with the owner.
Third: the old holes remain exposed, or the new mounting falls into a weak area. In this case, it is better to cancel the purchase for this facade or replace the facade itself. A decorative plug sometimes saves a technical surface, but on the face of premium furniture, extra circles usually look worse than a different handle model.
How to cover old holes if wooden hardware does not match
The repair method depends on the substrate. Solid wood allows gluing in a matched wooden plug followed by finishing, but the grain direction and shade must match. On a veneered part, a rough plug can damage the thin face layer. On painted MDF, restoration of primer and enamel will be required, and local touch-up is often visible under side light.
You cannot simply fill the hole with random putty, immediately screw a new screw nearby, and expect the same strength. There must be a sufficient material bridge between the old and new channels. Its size is determined by the cabinetmaker based on the diameter, substrate, and load on the handle.
If the furniture set is expensive, the correct sequence is: remove one old handle, make a hole map, apply template HL-072.1, agree on coating repair on an inconspicuous sample, and only then purchase six or more items. The cost of one trial operation is usually lower than the price of repainting all facades.
How to repair two old holes depending on the facade material
If the new drilling does not match, the quality of the result is determined not only by the Eclipse HL‑072.1, but also by the facade substrate. One repair method cannot be applied to all materials.
Solid wood
In solid wood, gluing in a wooden plug matched by species and grain direction is possible.
After drying, the area:
-
cut flush;
-
sand;
-
restore the finish.
But if the old hole turns out to be just a few millimeters from the new one, the plug itself does not automatically make the area equal to untouched solid material. The load must be assessed by a furniture maker.
Painted MDF
The main difficulty is not filling the channel, but restoring the face enamel.
Local repair may differ:
-
shade;
-
in orange peel;
-
gloss;
-
thickness.
This is especially noticeable under glossy or side lighting.
For a premium facade, it is sometimes better to repaint the entire surface rather than do spot touch-ups.
Veneered MDF
Here, there is an added risk of damaging the thin face veneer.
If the old hole remains open, the repair must account for the grain pattern.
A round plug of a different shade may be more noticeable than the hole itself.
Laminated board
Locally restoring the decorative layer to look factory-made is difficult.
If the old spot remains visible, choosing a different handle that covers the holes is often more rational.
Frame-and-panel front
One must distinguish:
-
a solid/thick frame;
-
a thinner central part.
Three Eclipse holes may fall into zones of different thickness.
In this case, the mounting diagram should be evaluated specifically by the facade section.
When old holes can be left hidden under the new handle
Only if:
-
they are completely covered;
-
do not weaken the new fastening zones;
-
do not extend beyond the contour;
-
do not create a dented area;
-
do not structurally interfere with the new fasteners.
When it is better to fully repair them even if they are hidden
If the new hole passes nearby and the old channel affects strength.
A hidden external defect is not the same as a healthy structure.
One trial Eclipse HL‑072.1 or a set of six at once
For finished furniture with already drilled holes, buying one handle as a trial makes much more sense than when making new facades.
What one physical handle checks
-
scale;
-
grip;
-
real contour of the supports;
-
material;
-
surface quality;
-
location of old holes;
-
the back side;
-
adjacent facades.
What one handle does not eliminate
DWG is still needed before new drilling.
A physical pen without a size chart should not be used as a "template by eye."
Cost of a trial step
As of August 28, 2026:
-
beech — 4,210 RUB;
-
oak — 4,790 RUB.
If the test pen fits, it becomes the first working part of the set.
Then for six:
1 trial + 5 more = 6 working.
When a trial order is especially rational
-
expensive facade enamel;
-
old holes need to be preserved;
-
actual grip comfort is unknown;
-
facades of different widths;
-
handles are large;
-
the project uses Eclipse for the first time.
When can you order six at once
if:
-
the furniture maker has already received the DWG;
-
the 1:1 template has been verified;
-
old holes are compatible;
-
the center point has been confirmed;
-
material and finish have been agreed upon;
-
All facade sizes are identical or checked separately.
How much does the Eclipse HL‑072.1 set cost and how much does the error cost
For example, the original project considers six handles.
Beech
6 × 4 210 = 25 260 rub.
Oak
6 × 4 790 = 28 740 rub.
Difference
28 740 − 25 260 = 3 480 rub.
This is only the product cost as of the check date.
Not included:
-
painting/tinting;
-
fasteners, if they are paid separately;
-
repair of old holes;
-
repainting of the facade;
-
installation;
-
Delivery.
Why one mistake can cost more than the difference between beech and oak
If after drilling it turns out that:
-
the central support hit a weak zone;
-
the old hole is visible;
-
the handle is not aligned with the axis,
repairing one painted facade may require a full repaint.
Therefore, discussing the savings of 580 rubles on one handle is pointless until the drilling is confirmed.
If you need a spare seventh
The seventh handle should not be purchased automatically.
It makes sense if:
-
the furniture is commercial;
-
future replacement is critical;
-
natural oak needs to be kept from one purchase;
-
reordering would be inconvenient.
The cost of the reserve equals the price of one handle at the time of ordering.
Why it's better to order all six together
For wood, one batch is more convenient for:
-
overall tone;
-
preparation;
-
deadlines;
-
to the finish.
Especially with transparent or semi-transparent finishes.
How to order six Eclipse HL‑072.1 with one technical specification
The order must contain more than just the model name.
Minimum line
Eclipse HL‑072.1 / 6 pcs. / beech or oak / "Prestige" / preparation ___ / facade thickness ___ mm / please confirm the mounting diagram for all supports and the fastener kit.
If the facades are already drilled
Add:
old holes: center distance ___ mm, diameter ___ mm; please confirm compatibility per DWG, we do not accept D = 154 mm as center distance without a drawing.
If enamel is needed
Specify color/finish system separately.
Card "Under enamel" means preparation of the blank, not a finished painted handle.
What to ask to confirm in writing
-
number of actual mounting channels;
-
coordinates of the central point;
-
drilling diameter;
-
type and length of fasteners;
-
allowable facade thickness;
-
whether fasteners are included;
-
readiness of the specific execution for the selected finish.
Why written confirmation is more useful than a phone phrase
The dimensions are then passed on to the furniture maker.
One misheard digit turns into a hole in an expensive facade.
Commercial route
After a full check, you can place an order for a specific Eclipse HL-072.1 in the already verified product card.
If the three-support scheme itself is not suitable, it is better to return to the general section of wooden furniture handles and choose a different mounting geometry.
Beech or oak: which wooden furniture handle to order
The choice of wood species is not only about price. Beech has a calmer texture and is often chosen for opaque enamel. In the card, the shown beech version is marked as "Under enamel": the lamellas may differ in color and pattern, since the finish should cover them. If a white, black, graphite, or colored opaque layer is needed, this option is logical.
Oak is valued for its pronounced grain. It is appropriate when the finish should preserve the feel of natural wood, but the specific sorting of the lamination and suitability for tinting should be selected in the card or confirmed when ordering. The word "oak" is not enough to guarantee the same shade of six parts: natural wood varies.
Before ordering a set, it is worth to check the quality of the wood under enamel or tintingAll handles for one piece of furniture are ordered simultaneously, in the same wood species and the same preparation category. For transparent or semi-transparent coatings, it is useful to coordinate tone matching and make a preliminary test coat.
Finishing is done before installation, protecting seating surfaces and metal elements according to the chosen technology. A thick layer of enamel at joint areas can change the fit density. The sequence of primer, intercoat sanding, and finish is checked against the coating manufacturer's recommendations; general materials are collected on the page study tips on finishing and installing wooden handles.
How to transfer confirmed drilling from one facade to the remaining five
If the project uses six identical Eclipse HL‑072.1 handles, the first successfully installed handle should become the reference, not a reason to mark each door "centered" again.
First create a master template
After checking the DWG, a rigid jig or precise template is made, where the following are fixed:
-
base horizontal line;
-
vertical axis;
-
all confirmed mounting points;
-
outer contour of the handle;
-
Control size.
Why you can't measure each door separately with a tape measure
Even an error of 1–2 mm in height becomes noticeable if six large semi-circular handles are in one row.
On a dresser, it's especially noticeable:
-
"floating" line;
-
different tilt;
-
different offset from the edge.
If the facades are of different sizes
The same handle can be installed:
-
by a common base height;
-
in the center of each facade;
-
along the designer's axis.
This needs to be decided before drilling.
For example, wide dresser drawers and narrow cabinet doors do not have to share the same vertical coordinate if the furniture is in different zones. But within a single piece, the logic should be consistent.
Number the handles before finishing
If oak is used under a clear finish, the six pieces can be pre-sorted by grain pattern.
Marking:
-
H1–H6;
-
facades F1–F6.
After toning, the handles are returned to their assigned places.
Trial installation without final tightening
On the first cycle, I tighten the fasteners
When can you buy the Eclipse HL-072.1 handle bracket
Before making a final decision, it is useful to check not only the holes, but also the grip. The overall height and reach of the handle affect whether it is comfortable to open a heavy drawer with the whole palm and whether fingers touch the surface of the facade. For a trial fit, make a contour from thick cardboard according to the drawing, add spacers of the stated height, and open the furniture several times in its normal position. Check both an adult's and a child's hand if the chest of drawers is in a family room.
On a pair of hinged doors, the two arcs should not meet when closing. On the top drawer, the handle should not press against the overhang of the countertop, and on the bottom one, it should not create an inconvenient protrusion in the passage. Evaluate not only the frontal view: from the side, a large handle may end up closer to the wall, curtain, or neighboring furniture than expected from the photo.
If there are six handles, mark them from a single baseline, not separately "centered" on each already installed door. A small difference in height between facades is especially noticeable on rounded geometry. After a trial assembly, open one drawer twenty to thirty times and check that the fasteners have not loosened, the metal does not touch the coating, and no fingerprints remain on the chosen finish.
The model is suitable for the project if all conditions are met:
-
the owner consciously chooses a large decorative shape with a length of 182 mm;
-
the drawing for exactly HL-072.1 has been received and verified;
-
the purpose of all three support points has been confirmed;
-
the mounting axes are compatible with the facade, or a professional repair of old holes has been agreed upon;
-
the central point falls into a solid area;
-
there is access for fastening from the reverse side;
-
the facade thickness is known and the screw length is selected;
-
the handle does not collide with adjacent elements;
-
beech under enamel or suitable oak finish is chosen;
-
the cost of the full set and finishing fits within the budget.
A buyer who is still comparing shapes and sizes can first open the section Buy wooden furniture handles. If the coating will be done in a workshop to match the furniture color, filtering in the category is useful order unpainted wooden furniture handles.
When it is better not to order a wooden half-ring handle
The purchase should be postponed if only general dimensions from the card are known, but there is no mounting diagram. The same applies to a situation where two old holes must be preserved at all costs, and a third drilling is prohibited. The model should not be ordered blindly for rental furniture, a historical facade, or expensive factory finish that cannot be locally restored.
The stop signal will be the central support hitting the glass, a thin panel, the edge of a groove, or the area of internal fittings. The handle cannot be installed if the screws have to be tightened at an angle, the outer support hangs over the relief, and the base only partially contacts the surface.
Finally, HL-072.1 should be avoided if the large arch obstructs passage, catches on clothing, or visually overloads a small drawer. Technical compatibility does not negate ergonomics.
Mistakes when ordering the wooden Eclipse HL-072.1 handle
-
Accepting the 154 mm size as the center-to-center distance without checking the DWG.
-
Not noticing the central support in the photo.
-
Measuring old holes from different edges and getting an error.
-
Ordering six handles before testing one model or template.
-
Mixing up the article numbers HL-072 and HL-072.1.
-
Choosing beech "Under enamel" for a transparent finish without agreeing on the appearance.
-
Not checking the facade thickness and screw length.
-
Drilling a new hole too close to the old one.
-
Not accounting for the inner drawer, hinge, or guide.
-
Over-tightening the fastener and pressing through the wood or finish.
-
Trying to hide old holes after final installation without proper repair.
-
Considering the price of one handle as the total project cost, forgetting finishing, fasteners, and delivery.
How to order six wooden handles without redoing the entire set
They start not with the basket, but with one reference facade. They remove the old hardware, photograph the front and back sides with a ruler, record the center distance and thickness. Then they obtain DWG HL-072.1 and mark three axes on a transparent or paper template.
The template is applied to each type of facade. The dresser has wide drawers, and the cabinet has narrow doors; the same handle can look and attach differently. For each type, they check the center, edges, internal obstacles, and the opening of adjacent parts.
After the technical fitting, they choose the wood species and finish. For enamel, beech can be considered; for emphasized wood texture, oak with agreed preparation. They make one sample and approve it under the lighting where the furniture will be placed.
In the request, specify: Eclipse HL-072.1, 6 pieces, selected breed, "Prestige" quality, preparation for the desired finish, and a request to confirm the completeness of the fasteners for the specific facade thickness. Measurements are attached to the request, and a direct question is asked about the three mounting points.
Before payment, the price and production time are re-checked. Then follows check payment and delivery terms, especially if the finish and installation are planned for a specific date. The schedule allows time for production, transportation, kit inspection, color sample, and installation.
What to send to the manager and cabinetmaker before ordering Eclipse HL‑072.1
For such a project, the seller and the craftsman need different information. It's better to gather it into one package to avoid passing dimensions verbally multiple times.
Photos
Required:
-
the entire facade;
-
old holes close-up with a ruler;
-
the back side;
-
the old handle;
-
adjacent fronts;
-
internal guides/hinges, if they are close.
Dimensions of the old facade
Record:
-
width;
-
height;
-
thickness;
-
diameter of old holes;
-
center-to-center distance;
-
distance of the handle axis from the top/bottom edge;
-
distance from holes to side edges.
Information about the old handle
If the article number is known — attach it.
This helps to understand the area of the old trace and the previous scheme.
What to request from STAVROS
-
DWG specifically HL‑072.1;
-
mounting coordinates;
-
assignment of three visible supports;
-
type of fastener;
-
completeness;
-
requirements for facade thickness;
-
current price;
-
term.
For initial verification, the official DWG HL-072.1 is used, but before drilling, the craftsman must actually open the file and read the dimension lines.
Ready-made wording
"We need to install Eclipse HL‑072.1 on ready painted facades where two holes from the previous handle remain. The center distance of the old holes is ___ mm, diameter ___ mm, facade thickness ___ mm. Please confirm from the drawing the number of mounting points for HL‑072.1, coordinates of the extreme and central points, drilling diameter, and suitable fasteners. We do not consider the value D = 154 mm as the center distance on our own."
Such a request immediately eliminates the main mistake of the topic.
What to pass to the cabinetmaker after the response
Do not retell dimensions in words.
Pass:
-
the file itself;
-
written response;
-
photographs;
-
map of old holes;
-
selected wood species;
-
finish.
Final decision tree: can HL-072.1 be placed into two ready-made holes
Step 1. Received own drawing of HL-072.1?
-
no → do not drill;
-
Yes → continue.
Step 2. Confirmed actual number of fasteners?
-
no → request it;
-
Yes → continue.
Step 3. Do the two old holes match at least the required new points?
-
both → check the central one;
-
one → assess repair of the second;
-
none → assess full repair and new drilling.
Step 4. Are all old holes covered by the new product?
-
no → the repair will be visible, compare another handle;
-
Yes → continue.
Step 5. Does the central point hit a solid part of the facade?
-
no → do not use the model without structural modification;
-
Yes → continue.
Step 6. Are the new channels at a safe distance from the old ones?
-
unknown → the cabinetmaker assesses the material and diameters;
-
Yes → continue.
Step 7. Are the facade thickness and fasteners compatible?
-
not confirmed → request screws;
-
confirmed → proceed.
Step 8. Is there free access from the back side?
-
no → change the node or choose a different model;
-
Yes → continue.
Step 9. Does the full-size template cover the old trace?
-
no → repair/use a different handle;
-
Yes → continue.
Step 10. Is the handle comfortable in scale and does it not conflict with neighboring elements?
-
no → choose a different geometry;
-
Yes → continue.
Step 11. Did the trial installation of one handle go without damage?
-
no → stop the production run;
-
yes → you can proceed to assemble the set.
When the direct answer is "yes"
Only after the sequence:
DWG → coordinates → template → facade → fasteners → trial installation.
When the direct answer is "no"
if:
-
new points do not fit into the solid material;
-
old holes remain visible and repair is impossible;
-
the central support conflicts with the structure;
-
new drilling weakens the facade;
-
the handle physically does not fit.
When the answer is "possible, but with rework"
if:
-
old holes are repaired;
-
new ones can be drilled safely;
-
the facade can be repainted/restored;
-
the owner accepts this scope of work.
This is no longer a handle replacement "without reworking the facade," but a full restoration operation.
Commercial stop-list before payment for Eclipse HL‑072.1
Do not pay for the entire set if at least one item remains unanswered:
-
DWG is not opened and not checked;
-
D = 154 mm is still taken as the center distance "out of habit";
-
the purpose of the central support is unknown;
-
the facade thickness is not measured;
-
old holes are not marked on the template;
-
it is unclear whether the new handle covers the old mark;
-
the new hole ends up next to the old one without the furniture maker's assessment;
-
the type and length of the fastener are unknown;
-
one handle has not been tried at actual scale;
-
proximity to the countertop, wall, or another door has not been checked;
-
the material and preparation category do not match the future finish;
-
six items are planned to be ordered in different batches without necessity.
If all points are addressed, the purchase becomes technically justified rather than an emotional replacement of beautiful hardware.
The safest order
DWG → map of old holes → 1:1 template → check front and back sides → one trial handle → confirmation of fastener → installation test → finish → full set.
This sequence is especially important precisely because the facade is already finished. On new furniture, an error can be accounted for at the production stage. Here, every extra hole, chip, or mismatch remains on the finished surface.
Inspection before final payment
If all geometric checks have already been completed, it is useful to double-check the order specifically by article number .1, wood species, quantity, and preparation for the finish. For a set of several handles, one specimen should remain the reference until all facades are drilled: it is used to compare the fit, outer contour, and finish quality. If during installation a discrepancy is found on even one facade, replication is stopped and they return to the template, rather than adjusting the holes "on site."
Frequently asked questions about the wooden furniture handle Eclipse HL-072.1
What are the dimensions of Eclipse HL-072.1?
The card indicates A × B × C × D × E = 182 × 92 × 45 × 154 × 64 mm. The value of each letter should be read according to the product drawing.
How many support points are visible on the handle?
The published photos show three metal supports: two outer ones and one central. The purpose and mounting method of each point are confirmed by the DWG and by the manufacturer.
Will it fit two pre-drilled holes?
It is impossible to answer based on overall dimensions alone. You need to match the mounting coordinates of HL-072.1 with the centers of the old holes and check the central point.
Is 154 mm the center-to-center distance?
The product card text does not confirm this. Drilling cannot be based on such an assumption; a dimensional diagram is required.
Where can I get the drawing?
The DWG link is provided in the product card. If you do not have CAD software, you can request a PDF or a dimensional mounting template from the manager.
What type of wood is the handle made from?
The card offers beech and oak. As of the check date, beech cost 4,210 RUB, and oak cost 4,790 RUB.
What does "Under enamel" mean?
This is preparation of the workpiece for an opaque coating. The slats do not need to be matched by color or texture because the enamel hides the differences.
Can the handle be left without a coating?
The operating mode and permissible finish must be coordinated with the manufacturer. For furniture that is regularly touched by hands, a protective coating is essential for care and appearance.
Is fastening hardware included in the set?
The specific card does not indicate the type, quantity, and length of the screws. They should be confirmed when ordering, taking into account the thickness of the facade.
Can old holes be covered by the handle itself?
Only if the template shows full coverage. Even hidden holes should not weaken the places of new fastenings.
Is it worth ordering one piece first?
For expensive ready-made facades, this is reasonable if the timeline allows. But technical compatibility is still checked against the drawing before purchase and drilling.
How much do six handles cost?
As of 28.08.2026, six beech handles cost 25,260 RUB, six oak handles cost 28,740 RUB. Finishing, fasteners, and delivery are not included in the calculation.
How is HL-072.1 different from HL-072?
These are separate SKUs with separate cards, images, and prices. Despite the same published overall dimensions, they cannot be considered interchangeable without comparing their own drawings.
How not to ruin a painted facade when drilling?
The work is entrusted to a cabinetmaker, using a proven template, suitable tools and a backing pad, with prior assessment of the coating and location of old channels. There is no universal safe mode for all facades.
Conclusion: buy a half-ring handle after verification, not by a single size
Eclipse HL-072.1 — expressive wooden hardware, but a finished facade with two holes requires particularly careful inspection. The card confirms overall dimensions, materials, price and lead time, and photos show three supports. It does not give the right to automatically call 154 mm the center distance and drill the door by guesswork.
A rational solution consists of four steps: download the drawing, obtain coordinates of all fasteners, overlay the template on a reference facade, and only then place the order. If the outer holes match and the center one can be added in a strong zone, the replacement can go smoothly. If old channels remain visible or new ones fall into a weak spot, it is better to choose a different handle than to mask the mistake after payment.