Article Contents:
- Wooden molding MLD-058: buying a profile, not a ready-made frame
- Repeat the slope or keep rectangles — comparing two layouts
- How to mark a frame on a slanted door and keep clear margins
- Slanted strip is longer than the frame width: calculating before purchase
- Top corners are not equal to bottom corners
- Can a trapezoid be made on the tall door and a rectangle on the low one?
- What to do if, after measuring, the frame widths differ by a few millimeters?
- Can the slope angle be taken from the house construction project?
- How to account for a handle that falls on the frame strip?
- Can the finished angled plank be kept after changing the frame height?
- What to do if the frame stile is longer than the 2400 mm wooden blank?
- Can the sample set be used to check the two top joints?
- What to keep after installing frames?
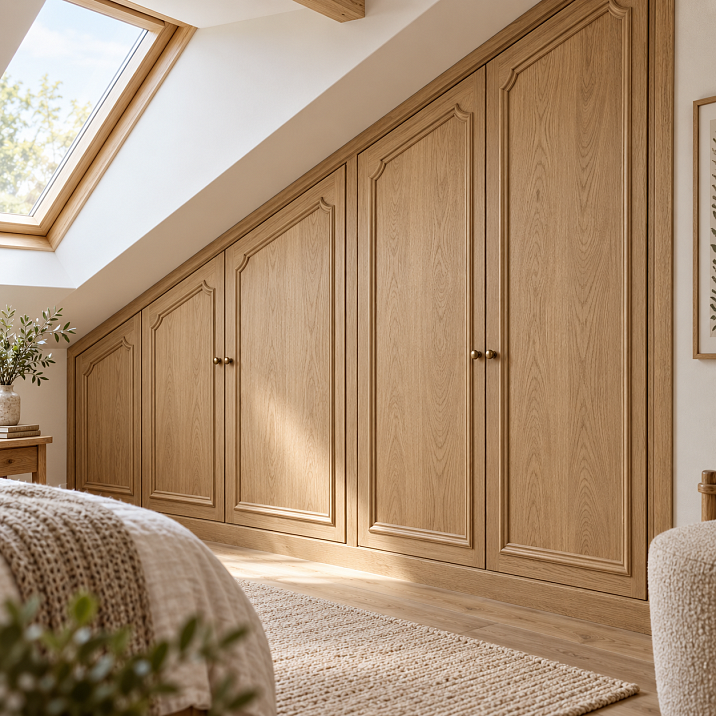
On slanted swing cabinet doors, you can make frames that follow the slope of the top edge, or leave rectangular contours below the slant. The first solution continues the geometry of the facades; the second sets an independent horizontal line. The choice should be based on the full layout of the cabinet, and the molding should be purchased after compiling a parts list: for a trapezoidal frame, the slanted top is longer than its width, and the two side pieces have different sizes.
Let's consider a hypothetical project with two doors of different heights. Their top edges are indeed slanted: these are not rectangular panels with an angled filler above them. For the overlay design, a wooden molding MLD-058 has been chosen. Below, we'll break down the contour selection, calculation of eight parts, and preliminary distribution across four whole strips. The educational dimensions show the order of work but do not replace measuring specific facades.

Wooden molding MLD-058: we buy the profile, not a ready-made frame
MLD-058 is purchased as a linear product. It forms a decorative contour on the door surface but does not replace its structural framing and is not intended to correct a skewed facade. Cutting, fitting joints, and installing frames remain a separate task for the furniture workshop.
For the main example, beech is used, size A × C × L — 36 × 22 × 2400 mm, with 'Prestige' sanding. In the card where you can buy wooden molding MLD-058, the following versions are presented. Prices per piece were verified on September 6, 2026.
| Material | Size A × C × L, mm | Sanding | Price of one plank |
|---|---|---|---|
| Beech | 36 × 22 × 2400 | «Prestige» | 2 670 ₽ |
| Oak | 36 × 22 × 2400 | «Prestige» | 4 040 ₽ |
| MDF | 36 × 22 × 2600 | «Prestige» | 1 150 ₽ |
MDF is a separate alternative, not a version made from solid wood. Different lengths of blanks also require separate cutting: you cannot replace the material in the estimate without rechecking the calculation. Here, the quantity is calculated for wooden strips 2400 mm long.
The external profile dimension does not reveal the structure of each joint. For workshop work, the cross-section of the chosen version and an agreed orientation on the facade are needed. Based on a single size of 36 × 22 mm, you cannot assign the part's position on the saw or the technology for its fixation.




Repeat the bevel or keep rectangles — comparing two layouts
Start with two images of the same cabinet at the same scale. In the first, the upper sections of the frames are parallel to the beveled door edges. In the second, all frames are rectangular, and their top sides are at a common chosen mark. Leave the bottom margins and handle positions the same initially: this way, only the shape is compared, not multiple changes at once.
The trapezoidal option is worth considering when you want to highlight the unusual geometry of the furniture. However, on a short door, the frame may feel cramped, and on a tall one, overly elongated. You should evaluate the inner field between the rails, not just the thin line drawn by the designer.
The rectangular option allows for a calm horizontal row. Its cost in compositional terms is the uneven empty areas above the frames. If the common top mark is limited by the lowest part of the cabinet, noticeably more empty space will remain above the tall door. This can be an intentional design choice, not a flaw that must be filled with additional decor.
| What to compare | Frames follow the bevel | Frames end below the bevel |
|---|---|---|
| Top line | Follows the direction of the doors | Creates a separate horizontal line |
| Low door | Requires checking the short side and the inner field | Limits the possible total height of frames |
| High sash | Gets a taller outline | Keeps an increased margin at the top |
| Joints | Top corners differ from bottom corners | With a rectangular outline, corners are right angles |
Look at both spreads from the assumed entry point of the room. Then enlarge a small section to natural scale. The overall view checks rhythm, the close-up checks the relationship of frame, handle, and free surface. One successful corner does not prove that the whole composition looks convincing.
If the profile is not yet approved, you can buy wooden moldings for furniture of a different cross-section after comparing options. The decision does not have to keep MLD-058 if its scale does not suit short doors.
For preliminary selection, you can also order samples of moldings OMLD-005. Before payment, check availability of MLD-058 specifically in the set. The sample helps examine the profile; the full pattern of two frames is still checked on the layout.
Further calculation applies to the selected trapezoidal solution. When switching to rectangles, side lengths and distribution of parts across blanks will change.
Our factory also produces:





How to mark a frame on a beveled door and keep clear margins
The working sketch must show three contours: the door edge, the outer edge of the applied frame, and the edge of its inner field. Between the first and second is the free facade; between the second and third is the molding strip. If only the centerline of the profile is shown, the buyer and carpenter may interpret dimensions differently.
First, take the door width, both side heights, and the position of the bevel relative to the chosen bottom line. Then assign the margins. Only after that measure the resulting outer contour of the frame. A door size of 500 mm in width does not mean its bottom decorative strip should also be 500 mm long.
The top margin requires special attention. An equal offset from the slanted edge is measured perpendicular to that edge. The vertical distance between parallel slanted lines will be different. If you set the chosen margin across the edge on the sides and strictly downward on top, equal numbers will not give equal distances between contours.
For explanation, take a slope with a rise of 300 mm over a width of 500 mm. The ratio of rise to width is 0.6. With a conditional perpendicular margin of 50 mm, the vertical distance between parallel lines is:
50 × √(1 + 0.6²) ≈ 58.3 mm.
This is a geometric example, not a recommended offset for MLD-058. It shows why the note "50 mm everywhere" requires clarification of the measurement direction. On the drawing, it is enough to label an arrow perpendicular to the bevel and separately mark the side and bottom margins.
Next, draw the inner boundary of the profile in the accepted position. Check whether the pattern narrows near the short side so much that a random small area remains between the top and bottom strips. Here, it is better to reconsider the entire frame rather than reduce one field to preserve the original picture.
For adjacent doors, align the bottom mark of the frames and the character of the top line. If the facades have different slopes, copying one inclined part no longer works. With the same slope but different widths, its length will change. The phrase "make it like the left one, only higher" is insufficient for the specification.
Do not transfer the frame slope "by eye" from a photo of the room. On the elevation, mark the start and end of the top side and connect them with a straight line. When measuring the finished facade, also check whether its side edges are truly vertical and the bottom edge is horizontal. If the original shape differs, the diagram below with the difference of two side heights will require recalculation based on actual coordinates.
For a complex composition, you can order furniture decor layout, providing dimensions of all doors. Artistic selection and specification help coordinate the pattern; the door construction, hinges, and frame manufacturing technology are checked by the furniture contractor.
Get Consultation
Inclined strip is longer than the frame width: calculate before purchasing
In the training outer contour, the width is 500 mm, and the right side is 300 mm higher than the left. The bottom side is horizontal, the sides are vertical. The top piece connects two points with differences in both horizontal and vertical directions, so its length is determined by the Pythagorean theorem:
Length of the top side = √(width² + height difference²).
√(500² + 300²) = √340,000 ≈ 583.1 mm.
A 500 mm long segment will turn out to be about 83 mm shorter than the geometric side. The height of one side cannot be increased to fit such a segment: this would change the agreed contour.
Calculations must be based on the dimensions of the frame itself. Substituting the width of the entire door leaf along with the difference in frame heights mixes two geometric shapes. The result may look plausible, but it is useless for manufacturing.
It is equally important to determine where the part length was measured. In this example, 583.1 mm refers to the outer side between the contour vertices. The dimension along the inner edge or along the centerline of the profile will differ. The list must be accompanied by a drawing with marked points, not just a single "length" column without explanations.
The top corners are not equal to the bottom corners
With the chosen geometry, the bevel rises from left to right. The angle of the top line to the horizontal is approximately 31°. The inner top angle on the left is about 121°, on the right — about 59°. The two bottom corners remain right angles. These values describe a training figure, not miter saw settings.
Therefore, the instruction "cut everything at 45°" does not describe such a frame. For the top joints, separate joint lines are needed. Their position is determined by the cross-section drawing and the chosen joining method, and the equipment settings are checked by the craftsman on test pieces. The inner angle of the frame cannot be mechanically transferred to the machine scale.
First assemble a test pair for the top left corner, then for the top right. Consider not only the absence of a gap along the outer edge, but also the continuation of the profile through the joint. A joint that looks closed on one side may open up near the inner field.
The calculated length also does not eliminate machining allowances. The number 583.1 mm defines the geometry, while the length of the initial segment for processing is determined by the craftsman. Rounding to 584 mm is convenient for preliminary material allocation, but by itself is not a sufficient allowance for fitting.
Two different frames — eight marked parts
Let's label the frames A and B. Both have an outer contour width of 500 mm, horizontal bottom sides, and a rise of the top side of 300 mm. The side heights differ:
| Frame | Width | Left side | Right side | Top side |
|---|---|---|---|---|
| А | 500 мм | 1100 мм | 1400 мм | ≈ 583.1 mm |
| Б | 500 мм | 1400 мм | 1700 мм | ≈ 583.1 mm |
These are frame dimensions, not door dimensions. The position of each outline on its facade is set by the previous marking. The equal length of the slanted sides here results from the same width and rise, not from the frames being intended for the same cabinet.
The dimensions in the table do not yet determine the distance between frames on a common facade. The equality of A-P and B-L does not mean that the top lines will be on the same straight line: between the outlines there are door margins and inter-facade space. The training example shows two separate shapes with the same slope.
If the design intent is for the top lines to continue each other across the gap, check them in a common coordinate system. For example, with the same rise of 0.6 mm per millimeter of width, a horizontal gap of 100 mm would require a height difference of 60 mm between adjacent ends. This is an additional hypothetical example, not a correction that should be automatically added to the table. The actual distance is taken from the cabinet layout. You can also leave parallel but offset lines — as long as such placement is deliberate.
Assign a code to each part: A-L and A-P — left and right stiles, A-N — bottom, A-V — top. For the second frame, use B-L, B-P, B-N, and B-V. That makes eight positions total, even if some dimensions match.
The most telling case is two stiles of 1400 mm each. A-P stands on the right in frame A, and B-L on the left in frame B. With the adopted bevel direction, they fit different top corners. After end processing, they cannot be swapped based only on matching length.
Supplement the marking with an indication of the face side and the edge facing inward of the frame. This is especially useful after moving parts from the workbench to painting: the set must return to the assembler with clear orientation. Coordinate the method of applying temporary markings with the finisher to avoid leaving traces on visible surfaces.
In the work sheet, next to each code, include the dimension between the specified points and images of both ends. A note of "top cut" is not enough: a slanted plank has two different joints. For a mirrored arrangement of the adjacent frame, a separate diagram is needed, not an arbitrary flip of an already manufactured set.
Before cutting, check the closure of the shape: the right stile is 300 mm higher than the left, the top connects their vertices, and the bottom part corresponds to the distance between the outer sides. Such a check will catch a swapped height before eight expensive but mismatched pieces appear.
How many whole planks to order according to this list
First, let's add up the geometric lengths of the sides:
Frame A: 1100 + 1400 + 500 + 583.1 ≈ 3583.1 mm.
Frame B: 1400 + 1700 + 500 + 583.1 ≈ 4183.1 mm.
Total: about 7766.2 mm.
Three wooden planks of 2400 mm each give only 7200 mm — less than the sum of the sides even without losses. Four give 9600 mm. But simply dividing the total length by the product length is not enough: the parts must fit entirely into individual pieces.
For a preliminary distribution, let's round both slanted sides up to 584 mm. Additionally, we'll assume a conditional 20 mm for end trimming of each plank and 8 mm total for two dividing cuts. These are calculation assumptions, not a manufacturer's technological standard or an approved allowance for all miter cuts.
| Plank 2400 mm | Parts according to the list | Lengths in the preliminary calculation | Conditional losses | Remainder |
|---|---|---|---|---|
| 1 | B-P + A-V | 1700 + 584 mm | 28 мм | 88 мм |
| 2 | A-P + B-V | 1400 + 584 mm | 28 мм | 388 мм |
| 3 | B-L + A-N | 1400 + 500 mm | 28 мм | 472 мм |
| 4 | A-L + B-N | 1100 + 500 mm | 28 мм | 772 мм |
Under these assumptions, all positions are distributed across four planks. The tightest is the first: after accounted losses, 88 mm remain. Before purchasing, the craftsman must check whether this remainder is sufficient for the accepted processing sequence, actual cuts, and fitting. Angular cutting and changing the end direction may require additional material that such a simplified table does not describe.
The total remainder is 1720 mm, but it consists of four separate pieces. It does not allow making a spare post 1700 mm long: the longest remainder in the table is 772 mm. Therefore, the remaining footage cannot be considered a full reserve for any error.
Some remnants can be considered for test joints and color samples. The suitability of a specific piece is determined by its actual length, condition, and the necessary allowance for safe handling. The same remnant should not be simultaneously counted on as both a coating sample and a spare finishing part.
The cutting order does not have to match the numbering of the strips in the table. Before starting work, lay out all eight positions on the material and assign areas for samples. When finishing with a visible texture, it is useful to simultaneously coordinate which blanks will go to adjacent sides of the frames. Otherwise, after the first cut, it may turn out that the desired distribution by wood grain is already impossible without an additional strip.
The final order is placed after refining the map: four strips according to the confirmed cutting layout, or more if a separate reserve is needed or technological samples do not fit. For other door sizes, the calculation is performed anew.
STAVROS indicates that cutting to size is not provided. Therefore, the seller is sent the number of whole strips, and the workshop is sent eight positions with joint drawings. The price of the product does not include the manufacturing of these segments.
Test assembly of frames and finishing of wooden molding
Before final fixation, assemble both frames according to the markings and compare them with the facade layout. Check the closure of contours, the direction of bevels, margins, and the appearance of all joints. First evaluate each frame separately, then both side by side: a slight mismatch in bottom marks is easier to notice in the overall composition.
The fitting should account for the actual profile, not just the paper line. In the order agreed with the furniture maker, check the opening of the doors, the placement of handles, and nearby surfaces. Additional decor must also be considered when checking the applied hinges. The mass of finished parts cannot be reliably obtained by simply multiplying the catalog rectangular cross-section by the length: the profile has its own shape.
Then coordinate the coating. Wood species, blank quality, sanding, and finish are different parameters. Section quality of wood and sanding explains the difference in preparation: "Prestige" refers to surface treatment and does not denote a ready-made enamel. For finishing with visible wood, a suitable option for re-gluing is separately clarified.
Examine the coating sample next to the door, including the joint area. Record the color and gloss, and coordinate the sequence of fitting, painting, and gluing with the contractor. It must account for the treatment of fresh ends and the requirements of the chosen material system.
Materials for installing furniture decor are selected based on the actual substrate and its coating. There is no universal recommendation to "glue with any mounting adhesive" for painted, laminated, or wooden surfaces. A test joint allows evaluating the chosen technology before working with finished facades.
Price of molding for two beveled frames
For a preliminary order of four wooden slats, the calculation looks like this. Prices as of September 6, 2026, are used; the packaging frame for 390 ₽ is added once.
| Purchase composition | Beech | Oak |
|---|---|---|
| Four slats MLD-058 | 10 680 ₽ | 16 160 ₽ |
| One packaging frame | 390 ₽ | 390 ₽ |
| Subtotal | 11 070 ₽ | 16 550 ₽ |
The difference is 5480 ₽. This is a comparison of blanks of the same length and sanding, not of two finished cabinets. The final package contents and current price are confirmed when placing the order.
The full estimate additionally includes an agreed reserve, cutting, trial assembly, preparation of a coating sample, finishing materials and labor, installation, and delivery. If some operations are already included in the workshop's proposal, they are not added a second time. The set of samples is also accounted for separately only if it is actually purchased.
Do not choose a cheaper material to preserve an unsuitable frame shape. First, approve the design and its feasibility, then compare the cost of the selected options. If the required finishing or volume of joinery work exceeds the budget, it is more useful to revise the contour before ordering than to save on unaccounted joints.
Order MLD-058 and provide the workshop with the correct diagram
Before placing the order, check the payment and delivery terms for the molding and coordinate the pickup location for long pieces. The product request must include the article number, material, size, quality, and quantity. A note like "two sets for the attic" does not define any of these items precisely enough.
Example for the project under consideration:
MLD-058 / beech / 36 × 22 × 2400 mm / "Prestige" sanding / confirm blank quality for the chosen finish / 4 pcs. after layout approval. Reserve, packaging, and delivery to be coordinated separately. Supply in full strips.
Provide the workshop with unfolded views of both doors with actual dimensions, outer frame contours, codes for eight parts, joint images, and a finish sample. The drawing must clearly show the bottom reference, bevel direction, and length measurement points. The training dimensions of 500, 1100, 1400, and 1700 mm should not be transferred to the work order without measuring.
Stop the purchase if the profile does not fit the agreed composition, joints are not yet defined, or overlay frames are expected to fix the door itself. Once these issues are resolved, you can order MLD-058 for furniture facades according to a specific list, rather than buying footage at random.
Questions before purchase
Is it possible to make a trapezoid on the tall door and a rectangle on the low one?
Such a mixed composition can be considered, but it needs to be shown in full. Agree on what unites the frames: the bottom mark, side margins, or handle positions. If the shape transition looks random, compare it with two uniform options. The material calculation for a mixed solution will be separate.
What to do if, after measuring, the frame widths differ by a few millimeters?
First, find out where the difference came from: from the facade dimensions, margin positions, or marking errors. Do not round both frames to one size for the sake of a convenient list. If the difference is accepted by the project, each bottom and sloped part gets its own length, even with the same bevel direction.
Can the roof slope angle be taken from the building construction project?
It is suitable for a preliminary sketch, but does not replace the geometry of the finished doors. The cabinet may have its own fillers, installation gaps, and slight differences from the ceiling line. The frame is marked according to the specific facade; agreed furniture dimensions are used for production.
How to account for a handle that falls on the frame strip?
The handle position and contour need to be agreed upon before manufacturing. Moving the handle, changing the frame width, or another design scheme is possible—within the facade construction limits. After cutting, you should not cut a random section of molding around the mounting: such a solution changes both the pattern and the parts list.
Can a finished sloped plank be kept after changing the frame height?
This depends on the change. With an equal increase in both side edges, the width and rise of the top line are preserved. If only one side changes, the slope, top length, and joints change. The suitability of an already processed part is checked against the new drawing, not by one external dimension.
What to do if the frame stile is longer than the 2400 mm wooden blank?
Do not plan an inconspicuous extension by default. You need to agree on a visible joint and its technology, or change the decorative scheme. The possibility of a different supply should be clarified with the seller; the availability of a longer wooden version cannot be inferred from the length of the MDF option.
Can the sample set be used to test the two top joints?
Only if it contains the required profile and the corresponding work with samples is allowed. A short demonstration piece primarily shows the cross-section. It does not guarantee sufficient material for two test corners; the method of obtaining technical samples is better coordinated with the workshop.
What should be kept after installing the frames?
Keep the final list, the profile orientation diagram, the material designation, and the coating information. Label any usable offcuts by order. To replace a damaged section, you will need to reproduce not only the length but also both joints; the possibility of the new finish matching the old one is assessed separately.