Article Contents:
- What is wooden trim: precise definition and essence of the profile
- Profile shape: what influences the visual result
- Where wooden trim is used: all application scenarios
- Furniture fronts
- Cabinets, sideboards, display cases
- Doors
- Decorative Wall Panels
- Frames and inserts
- Furniture Restoration
- Wooden interior finishing
- How trim differs from batten, glazing bead, and molding: key differences
- Trim and batten
- Layout and glazing bead
- Layout and molding
- Final difference table
- Layout for furniture facades: how to turn a plane into a masterpiece
- Frame facade effect
- Dividing the facade into sections
- Framing inserts
- Updating Old Furniture
- Layout for doors and display cases: precise tasks
- Designing a glass insert in a door
- Decorative division of the door leaf
- Showcases and sideboards with glazed fronts
- Layout for wall panels: order on large surfaces
- Closing joints between panels
- Decorative "frame" wall
- Transition between materials
- How to choose the shape of a wooden layout profile
- Flat veneer
- Figurative layout
- Narrow layout (up to 20 mm)
- Wide layout (from 25 mm)
- Layout for painting
- Layout for varnish or tinting
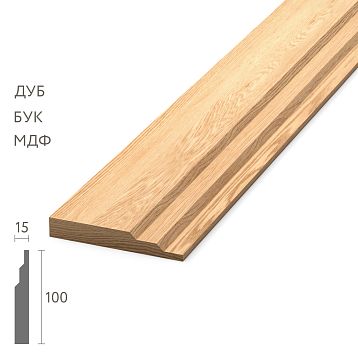
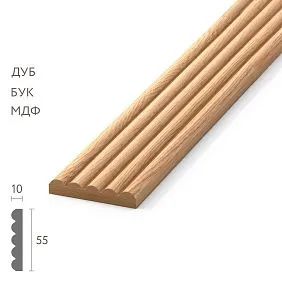
- How to choose the size of wooden trim: width, thickness, and proportions
- Profile width
- Profile thickness
- Joint width
- Material and coating of wooden trim: choosing the wood species and finish
- Oak
- Oak
- Spruce
- Ash
- Coating: the final choice
- Mistakes when choosing wooden trim: how not to overpay and redo
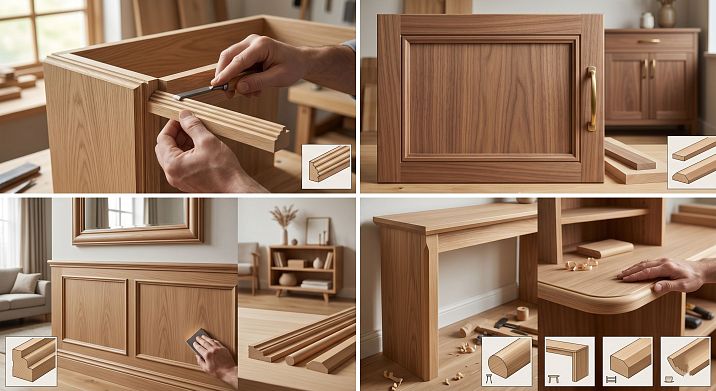
- Installation of wooden trim: basic techniques
- Miter joint
- Adhesive mounting
- Nail installation
- Combined mounting
- Calculating the amount of wooden trim: a formula without errors
- Where to buy wooden trim: catalog and related items
- FAQ: Answers to Popular Questions
- About the manufacturer
There are details that don't catch the eye — but they determine whether the finish looks complete or not. The joint of two panels, the border between an insert and a facade, the transition between planes — all of this is either neatly covered or left as is. This is exactly where wooden trim works: a narrow profile that makes the finish clean, the furniture expressive, and the interior well-thought-out.
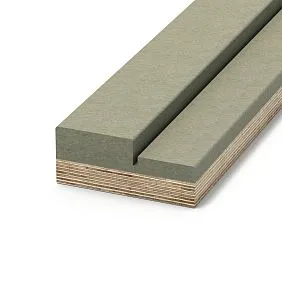
Wooden molding — is a finishing profile made of solid wood, designed to cover joints, decoratively divide planes, and frame inserts, frames, facades, panels, and doors. Unlike a glazing bead, molding, or batten, trim has its own specialization: it works where a neat overlay strip with a decorative or technical function is needed.
This article is written for those who want to buy wooden trim and understand which profile to choose for a specific task: furniture facades, doors, wall panels, frames, display cases, or restoration. We'll break down everything: shape, size, material, coating, differences from related profiles, and typical mistakes that lead to rework.


What is wooden trim: precise definition and essence of the profile
The word "trim" is used widely in construction and furniture practice, but not always accurately. Let's establish a clear definition so as not to confuse this profile with others.
Wooden trim for finishing — is a long, narrow profile made of solid wood with a constant cross-section. It is installed on top of a surface or in the joint of two elements. The task is to close a gap, mark a boundary, create a decorative line, hold an insert, frame an edge, or add structure to a plane.
In its logic, trim works differently than other linear profiles:
-
It is overlay, meaning it is mounted on top, not instead of.
-
It is decorative: it is visible and participates in the decor.
-
It is functional: often covers a technical joint or holds an element.
It is this combination — decorative and technical — that makes wooden trim an indispensable profile in finishing furniture, doors, panels, and interiors.


Profile shape: what influences the visual result
Trim can be flat — rectangular in cross-section without relief. This is the most versatile form: a straight strip of wood visible as a clean line. Suitable for minimalist interiors, modern furniture, and joints between panels.
Shaped trim has a profiled front surface: bevel, chamfer, rounding, step, or ornamental relief. This is a more expressive profile that creates a play of light and shadow on the surface. Shaped wooden trim works well on classic furniture fronts, doors, and frame structures.
Our factory also produces:


Where wooden trim is used: all application scenarios
Understanding where wooden trim is applied means understanding its value. There are more scenarios than it seems.
Get Consultation
Furniture facades
The most common application. A flat cabinet, sideboard, or dresser front with glued or nailed trim turns into a framed one: inside the 'frame' is the panel surface, around the perimeter is the wooden profile. This is an imitation of a framed front without complex milling.
Using several strips of trim, one large front can be divided into several visual sections — for example, three vertical 'panels' on one cabinet door. This is a simple and inexpensive way to make furniture more expressive.
Cabinets, sideboards, display cases
On cabinets, the layout covers the joints between body panels, decorates transitions between sections, and creates decorative frames around glass inserts. On sideboards and display cases, it frames the glass, separates wooden elements, and creates an ornamental pattern along the perimeter.
Doors
On doors, wooden layout is used to frame glass inserts (in combination with a wooden glazing bead), for decorative division of the panel into sections, and for creating a frame pattern on a flat door panel. It is especially popular for interior doors in a classic style.
Decorative wall panels
On walls, wooden layout is used as a divider between panels, as an overlay decor creating a "framed" wall structure, and as a transition element between a panel and another material (tile, paint, wallpaper). This is one of the techniques for designing a "panel wall": large surfaces are divided by layout into decorative cells, creating architectural depth.
Frames and inserts
Layout is used to create decorative wooden frames—for example, for mirrors, paintings, and photographs. Four strips of layout around the perimeter plus a miter joint—and you have a ready-made solid wood frame of the desired size.
Furniture Restoration
When restoring old furniture, layout helps recreate lost profiles, cover damaged joints, and refresh the appearance of facades without complete disassembly. This is where the ability to buy profiles individually, rather than in a pack, is important: restoration often requires small quantities of a specific profile.
Wooden interior finishing
In interiors with wooden walls, paneling, or clapboard, layout covers the joints of boards, the corners where surfaces meet, and transitions between planes. Together with wooden corner piece and with trim profiles, the layout forms a system of neat wooden finishing.
How layout differs from batten, glazing bead, and molding: key differences
This is a key question that almost all buyers ask. We will answer honestly and accurately — without simplifications.
Layout and batten
Wooden plank — is a rectangular profile with a constant cross-section. It is widely used: for wall finishing, slatted partitions, frames, decorative structures. Batten is a "building material" in the literal sense: it is used to build and clad.
Layout is a thinner, more "decorative" profile. It is not used as a load-bearing element. It does not create a surface — it decorates an existing one. Batten builds, layout finishes.
— is a narrow profile with a triangular or rectangular cross-section, whose main task is to hold glass, a thin panel, or an insert in a groove. The glazing bead presses and secures.
Wooden trim — a narrow profile with a triangular or rectangular cross-section, whose main task is to hold glass, a thin panel, or an insert in a groove. The glazing bead presses and secures it.
Layout is overlay. It is not inserted into a groove but is attached on top. It does not have to hold anything — it decorates. It is a more "free" profile with a wider range of cross-sections and shapes.
The boundary between glazing bead and layout is thin but fundamental: if the profile presses an insert from inside the groove — it is a glazing bead. If it is applied on top — it is a layout.
Layout and molding
Wooden moldings — these are decorative profiles that create ornamental lines in the interior: along the ceiling, along the walls, between surfaces. Molding is an "ornament." It is seen and examined — it carries a primarily decorative load.
Layout is more functional. Yes, it decorates, but its main task is to technically correctly close a joint, create a border, or frame an insert. Molding can be removed — the interior will not lose functionality. Remove the layout — and the joint will be exposed.
Final comparison table
| Profile | Main task | Where it is used | Installation |
|---|---|---|---|
| Rail | Building element, plane | Walls, frames, partitions | Independently or in a system |
| Glazing bead | Fixing glass or insert | Frames, doors, windows | Into a groove |
| Molding | Decorative line | Walls, ceilings, interior | Surface-mounted |
| Layout | Joint closure, insert design | Furniture, doors, panels, frames | Surface-mounted overlay |
Layout for furniture facades: how to turn a plane into a masterpiece
This is the most commercially significant application scenario for wooden layout. Let's break it down in detail.
Frame facade effect
A frame furniture facade is a classic: a wooden frame around the perimeter of the door and an insert in the center (glass, panel, fabric, mirror). Traditionally, such facades are made by milling from solid wood — this is expensive and requires special equipment.
Using wooden layout, the frame facade effect is achieved much easier: four strips of layout are glued or nailed onto a flat facade around the perimeter — and visually a 'frame' is obtained. This is not imitation in a bad sense — it is a rational technological technique used by professional carpenters and furniture makers.
Dividing the facade into sections
Another technique is dividing one large facade into several visual zones. A horizontal or vertical layout crossing the facade creates the impression of a composite, multi-section door panel. This is a technique from classic furniture that is easy to implement even at home.
A vertical layout divides the facade into 'columns' — this is closer to the classic style. A horizontal layout creates a 'tiered' effect, which is appropriate in modern and Scandinavian furniture.
Framing of inserts
Furniture often features inserts: a mirror in the center of a door, glass in a sideboard, decorative fabric in a frame. The layout is used as a perimeter frame for the insert — it simultaneously holds the insert (if installed with a slight overlap) and creates a visual boundary between the insert and the main facade.
Updating old furniture
Flat facades of Soviet or IKEA-like cabinets can be updated without replacement: glue on layout in the form of frames, paint everything in a single color — and the furniture will acquire a classic or neoclassical look. This is the most accessible way to transform furniture, which has become especially popular in recent years.
in combination with wood furniture decor — with wooden overlay elements — the layout forms a full-fledged system of furniture decor: frames from the layout + central overlay ornaments = classic facade.
Layout for doors and display cases: specific tasks
Doors are a different, more specific scenario. Here, the layout works under harsh conditions: the door opens and closes hundreds of times a year, it is affected by humidity and temperature changes, and it is visible in a passageway.
Design of a glass insert in a door
A classic interior door with glass is glass inserted into a groove of the door leaf and held by profiles. On the inner side of the groove is a glazing bead (fixes it). On the outer, visible side is a decorative molding (frames it).
This is precisely where the difference between the glazing bead and the decorative molding matters: they work as a pair, performing different tasks. The glazing bead holds the glass from the inside, the decorative molding creates a decorative perimeter on the outside.
Decorative division of the door leaf
On solid doors, the decorative molding creates a frame pattern on the flat surface — an imitation of a paneled door. This is a classic technique: four to six decorative rectangles made of molding on the door surface. The door becomes "classic" without manufacturing a complex frame panel.
For this, a shaped wooden molding with a profiled front edge is used: a bevel or rounding creates a play of light and shadow that emphasizes the "framed" nature of each section.
Showcases and sideboards with glazed fronts
On sideboard doors with glass, the decorative molding acts as a frame for the glass insert on the front side. In classic sideboards — with a shaped profile, in modern ones — a flat molding with a chamfer. In both cases, it creates a clear visual boundary between the glass and the wooden front.
Molding for wall panels: order on large surfaces
Wall panels are one of the key trends in modern interiors. Wood paneling, MDF panels, clapboard, decorative boards — all of this requires proper finishing of joints and transitions.
Closing joints between panels
When joining two panels edge-to-edge, a gap inevitably appears — either technical, to compensate for material expansion, or aesthetic, if the material is not laid perfectly flat. The trim covers this joint: it overlaps it from above, creating a smooth decorative strip.
This is preferable to trying to join panels perfectly edge-to-edge — with trim, the gap tolerance is much larger, and the result looks neater.
Decorative "framed" wall
One of the most popular interior techniques right now is a panel wall with decorative frames made of trim. Rectangles of wooden trim are attached to a painted wall, creating a rhythmic ornamental grid. This technique comes from classical architecture (paneled walls of palace interiors) and is now actively used in neoclassical, Provence style, and modern interiors.
For this technique, flat or shaped trim with a width of 15–30 mm is used. The rectangles are glued to the wall according to markings — symmetrically, with equal indentations. Then the entire surface — both the wall and the trim — is painted in a single color. The relief of the trim creates chiaroscuro, which makes a flat wall appear three-dimensional.
together with wooden moldings along the perimeter and wooden molding — with baseboards, cornices — the trim frames form a complete system of classical panel wall finishing.
Transition between materials
The boundary between a wooden panel and another finishing material (tile, plaster, wallpaper) is always a technically complex joint. The trim here works as an overlay adapter: it covers the seam and creates a neat wooden transition strip.
This is especially relevant in kitchens and bathrooms, where wooden elements border tiles: the trim closes the expansion gap while decoratively framing the material boundary.
How to choose the profile shape of a wooden trim
The shape of the trim is the first thing to determine. A mistake here leads either to a style mismatch or improper function at the joint.
Flat veneer
Rectangular cross-section without relief. A clean, strict strip. Suitable for:
-
Minimalist and Scandinavian styles.
-
Modern furniture fronts without ornamentation.
-
Joints between panels where discretion is needed.
-
Technical tasks (closing a gap) without decorative emphasis.
Flat trim is versatile and simple. If you are unsure about the shape choice — start with this one.
Shaped trim
Profiled face surface: bevel, chamfer, step, rounding, fillet. This is an active decorative line that creates shadow and relief. Suitable for:
-
Classic and neoclassical interiors.
-
Furniture fronts with a frame pattern.
-
Doors in a classic style.
-
Decorative frames on walls.
The shaped wooden molding "works" when there is lighting: side light emphasizes the profile, creating volume. In dark or poorly lit spaces, the shaped profile loses some of its expressiveness.
Narrow molding (up to 20 mm)
Used for thin joints, small inserts, delicate frame patterns. On compact fronts and doors, it is the preferred choice: a wide molding would look heavy.
Wide molding (from 25 mm)
For large fronts, big display cases, large-scale wall panels. A wide strip provides a "weighty" line — it reads well on large surfaces and does not get lost.
Layout for painting
For those who want to paint the entire surface (facade + layout) in a single color. The profile is taken from sanded solid wood without coating. Before painting — primer. After — enamel in the desired RAL. Beech for painting is the optimal choice: even structure, minimal pores, paint lays evenly.
Layout for varnish or tinting
If the layout should preserve the natural look of wood — choose with a clean, expressive texture: oak, ash, beech. Tinting + varnish is the standard coating for furniture wooden layout.
How to choose the size of a wooden layout: width, thickness, and proportions
Size is a technical aspect of selection that cannot be ignored.
Profile width
The width of the layout is chosen according to the scale of the object:
| Object | Recommended layout width |
|---|---|
| Small facade (40–60 cm) | 12–20 mm |
| Standard facade (60–90 cm) | 18–28 mm |
| Large facade / door | 25–40 mm |
| Wall panel | 20–35 mm |
| Decorative frame on the wall | 15–25 mm |
General rule: the width of the layout should not exceed 1/8 of the width of the element being framed. A layout that is too wide "eats up" the plane, while one that is too narrow gets lost.
Profile Thickness
The thickness of the layout determines how much it "protrudes" above the surface. Standard thickness is 6–15 mm. A thin layout (6–8 mm) is a delicate accent that creates almost no shadow. A thick layout (12–15 mm) is a pronounced relief with a noticeable shadow.
For decorative frames on the wall: the thicker the layout, the more "architectural" the pattern looks. For covering joints: the thickness must overlap the gap with a margin of at least 3–4 mm on each side.
Joint width
If the layout covers a technical joint, its width must overlap the gap with a margin of at least 5–8 mm on each side. A joint 4 mm wide requires a layout width of at least 14–20 mm.
Material and coating of wooden layout: choice of wood species and finish
The material of the layout determines its durability, workability, and visual character.
Oak
Oak — expressive texture, hard wood, high resistance to mechanical impact. Wooden layout made of oak is a choice for quality furniture and finishes that should last for decades. It tones well in a wide range of shades.
Nuance: oak contains tannins that can cause yellowing under light paint. For white and light enamels — use a special insulating primer.
Beech
Dense, uniform structure, fine pores. Beech is an ideal material for thin shaped profiles: the relief turns out clear and neat. It accepts paint very well — without insulating primer under the enamel.
For furniture fronts to be painted — beech is preferable to oak.
Spruce
An affordable species, soft, easy to work with. Pine wooden layout is a budget choice for non-critical applications: covering joints in non-residential premises, temporary structures, garden furniture. For quality furniture and finishing in residential premises — pine is less preferable: it is soft, scratches easily.
Ash
Light wood with expressive fibers. Stronger than pine, less rich texture than oak. A good choice for layout under light natural varnish or tinting in light tones.
Coating: final choice
Without coating — for self-painting. Buy sanded wooden layout without finish coating, prime, paint in the desired color. Standard for "frame" wall decorations that are painted the color of the wall.
Stain + varnish — preserves natural color and texture. Matte or semi-matte varnish. For furniture fronts where the wood should remain "wood."
Enamel — opaque coating of any color. White, gray, black, green. For furniture in Provence, neoclassical, Scandinavian design styles.
Oil/wax — for a rustic, natural look. Maximum naturalness of the material. Requires periodic renewal.
Mistakes when choosing wooden layout: how not to overpay and not redo
These errors occur regularly — and each one leads either to a repeat purchase or to a poor-quality result.
Confusing layout with glazing bead. These are different profiles with different tasks. If you need to hold the glass in the groove — that's a glazing bead. If you need to decorate a surface or a joint on top — that's a layout. Do not substitute one for the other.
Buying a profile without measuring the joint. Before buying a layout, measure the width of the joint, the thickness of the insert, and the height of the surface being covered. Only with this data can you choose the exact dimensions.
Taking a layout that is too wide for a small facade. A 40 mm layout on a 30 cm wide facade is a "frame" that takes up a third of the surface. Maintain proportions.
Not considering the thickness of the insert. If the layout must overlap the insert (glass, panel) — make sure the overlap is sufficient: at least 3–4 mm on each side of the insert.
Mixing different wood shades from different batches. Buy the entire volume of layout for one project from one batch — the shade and texture will be identical.
Not planning painting before installation. Painting the layout after installation means painting the surface underneath and next to it, with the risk of drips. Optimal: painting before installation + final touch-up of joints after.
Not counting linear meters. Wooden layout is sold in linear meters. Calculate the perimeter of each element, multiply by the number of elements — and add 10–15% as a reserve for trimming.
Forgetting about the reserve for trimming. Each corner is a miter cut (45°). Each corner loses 5–10 cm. In a frame pattern of 10 rectangles — that's 40 corners, meaning 2–4 meters just for cutting losses.
Installation of wooden layout: basic techniques
Proper installation is half the battle. A well-chosen layout that is nailed crookedly or without allowance looks bad. Let's break down the key techniques.
Miter joint
The corners of a frame pattern are joined with a miter: each strip of molding is cut at 45°. This is the standard for all frame and corner joints. Cut on a miter saw or by hand using a protractor. Angle accuracy is critical: a deviation of 1–2° will create a gap in the joint.
Adhesive mounting
For decorative frames on walls — construction adhesive (liquid nails) or double-sided tape for preliminary fixation + adhesive. Before gluing, degrease the surface and sand it (if glossy).
Nail installation
For furniture facades and doors — thin finishing nails (brad nails) without heads. They are driven in flush, and the head is filled with putty. For oak, pre-drill for the nail, otherwise the molding will split along the grain.
Combined mounting
Glue + finishing nails is the most reliable method. Glue provides even bonding of the surface, nails press the molding until the glue polymerizes and provide additional mechanical fixation.
Calculating the amount of wooden molding: a foolproof formula
Calculating the linear meters of molding is a simple task, but with nuances.
Step 1. Determine the perimeter of each element being framed: add up the lengths of all sides.
Step 2. Multiply by the number of identical elements.
Step 3. Add all perimeters — you get the base linear footage.
Step 4. Add 15% for allowance (trimming, waste, tolerances).
Example: 6 door fronts 60×90 cm, frame pattern along the perimeter.
-
Perimeter of one: (60 + 90) × 2 = 300 cm = 3 m.
-
Six fronts: 3 × 6 = 18 m.
-
15% allowance: 18 × 1.15 = 20.7 m — round up to 21 m.
Where to buy wooden trim: catalog and related items
Buy wooden trim correctly means choosing a manufacturer or supplier with a full range of linear profiles, where you can immediately select related elements: glazing beads, corners, moldings, strips.
In the Stavros catalog — Wooden trim wide range: layouts, battens, moldings, corners, glazing beads, and decorative profiles. Nearby — Wooden plank for wall finishing and frameworks, Wooden moldings for decorative lines, Wooden angle for external and internal corners, Furniture Decoration from Wood и Wooden products for interior — a complete system of wooden finishing in one catalog.
FAQ: Answers to popular questions
What is a wooden layout?
It is a narrow profile made of solid wood, mounted on the surface to cover joints, decorative division of planes, design of inserts, frames, facades, and panels.
Where is wooden layout used?
On furniture facades, cabinets, sideboards, display cases, glass doors, wall panels, decorative frames, during furniture restoration and wooden interior finishing.
How does a layout differ from a glazing bead?
The glazing bead is inserted into the groove and secures the glass from the inside. The layout is attached to the surface — it decorates, not holds.
How does molding differ from molding?
Molding is a decorative line in the interior without a technical function. The layout is functional: it covers a joint or frames an insert — and simultaneously decorates.
Is the layout suitable for furniture facades?
Yes. With it, flat facades get a frame pattern, are divided into sections, and inserts are framed. This is one of the main application scenarios.
Can the layout be used on doors?
Yes. On doors, the layout frames the perimeter of glass inserts on the front side and creates a decorative frame pattern on solid door panels.
How to choose the size of a wooden layout?
Width — no more than 1/8 of the width of the element being framed. Thickness — 6–15 mm depending on the desired relief. Overlap on the insert or through the joint — at least 3–4 mm on each side.
Can you paint a wooden layout?
Yes. An uncoated layout is primed and painted in any color. Beech particularly accepts enamel well.
How to calculate the amount of layout?
Calculate the perimeter of each element, multiply by the number of elements, add 15% for waste and trimming.
Where to buy wooden layout?
In the STAVROS catalog: Wooden trim with delivery across all of Russia.
About the manufacturer
STAVROS is a Russian manufacturer of wooden products for furniture, finishing, and interiors. The catalog includes Wooden trim for all tasks: layouts, slats, moldings, corners, glazing beads. Next to it is Wooden moldings, Wooden angle и Furniture Decoration from Wood a complete system of wooden finishing. If you want to buy a wooden layout with the right profile, the required cross-section, and high-quality solid wood — STAVROS offers an assortment with delivery throughout Russia.