Article Contents:
- Wooden leg MN-243 for a trestle table: a direct answer about the protruding vertical
- How a modern furniture support MN-243 is designed
- Vertical post
- Horizontal mounting element
- Diagonal brace
- Why you cannot consider 764 mm as the height without checking the drawing
- Scheme 1. Verticals completely under the tabletop
- Scheme 2. Verticals in the same plane as the ends
- Scheme 3. Verticals deliberately extended beyond the ends
- How to check clearance around the table after adding the offset
- How to calculate the free opening with symmetrical offset
- Step 1. Determine the front side of each support
- Step 2. Make a full-size template
- Step 3. Mark the tabletop axis
- Step 4. Position both supports mirror-symmetrically
- Step 5. Transfer the centers of the three holes
- Step 6. Check the drilling depth
- Step 7. Only after this select the fasteners
- Why you cannot drill the first leg before the second
- Long tabletop and two MN-243: what to check besides the overhang
- How to compare MN-243 with the already selected ST-026-1 tabletop
- How to compare MN-243 with the ST-030 tabletop
- 'Prestige' sanding and preparation for enamel: what this changes in the project
- The table should be flush with the wall at its end
- The protrusion blocks the passage
- Swing furniture is located nearby
- A fully hidden bottom contour is needed
- The mounting diagram has not been confirmed
- Mistake 1. Assuming 764 mm is the height without checking the drawing
- Mistake 2. Marking one support and immediately drilling
- Mistake 3. Not accounting for the overall dimension after the overhang
- Mistake 4. Ordering fasteners only by the number of holes
- Mistake 5. Not checking the clear opening for chairs
- Mistake 6. Painting joint areas before the trial assembly
- Mistake 7. Assuming any STAVROS tabletop is compatible
- Mistake 8. Using the same overhang on different tables without checking the room
- Mistake 9. Not accounting for the actual tabletop thickness at the drilling point
- Error 10. Trying to compensate for inaccurate marking by tightening screws
- How to check the mirror symmetry of two MN-243 units
- How to calculate the offset if the countertop is already purchased
- How to check the marking without drilling
- Thin countertop: when three holes require special caution
- Thick countertop: why a long screw is not automatically chosen either
- Solid wood, MDF, plywood, and composite countertop: why fasteners differ
- How to choose the distance from the end to the mounting part
- How to check the distance to the edge of the hole
- Wooden table legs in one set: why it's better to order as a pair
- Practical scenario: tabletop 1800 mm and overhang of 40 mm each side
- Practical scenario: tabletop already pre-drilled
- What to check after assembly but before putting the table into use
- First, the tabletop is confirmed
- Then both supports are positioned without fasteners
- After that, the six mounting points are checked
- Only then are the fasteners approved
- Final assembly is performed according to the saved markings
- Can the MN-243 be extended beyond the tabletop edge?
- How many millimeters can the leg be extended?
- How much MN-243 is needed for a regular table?
- What is the size of MN-243?
- Is 764 mm the height?
- What is MN-243 made of?
- What is the quality of the sanding?
- How many mounting holes are there?
- What screws are needed?
- Can I attach one leg first?
- Do both supports need to be extended equally?
- How do I calculate the total table size?
- Does MN-243 fit ST-026-1?
- Does MN-243 fit ST-030?
- Can MN-243 be used for a table against a wall?
- When is it better to choose a different leg?
- Do I need to order beech and oak at the same time?
- Can it be painted before fitting?
- Where can I check finishing recommendations?
- Checklist before paying for MN-243

A legless table has no familiar frame under the tabletop that itself sets the position of the legs. Therefore, deciding exactly where to place the supports becomes part of the design. With MN-243 this issue is especially important: the manufacturer explicitly allows its vertical part to extend beyond the tabletop footprint. This means that an overhang beyond the edge is not automatically an installation error. The error arises elsewhere — when the overhang size is chosen "by eye," two supports are placed asymmetrically, the overall table size is calculated only by the tabletop, and the three hidden mounting holes are transferred to the bottom surface without a full-size template.
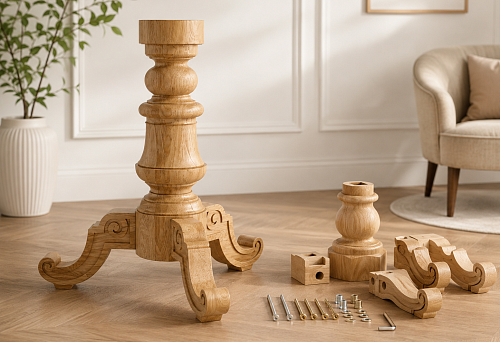
The modern furniture support MN-243 has confirmed dimensions A × B × C × D — 764 × 240 × 45 × 740 mm. It is made of beech or oak, has a "Prestige" sanding quality, and the selected configuration is prepared for enamel. The design is intended specifically for legless tables and consists of a vertical post, a horizontal mounting element, and a diagonal brace. These three parts form a structural triangle; the joints are made using the "tenon-and-groove" technology and reinforced with glue.
If the project requires exactly this geometry, it is possible to buy a wooden support MN-243, but before payment, not only the material issue needs to be resolved. For a pair of supports, you should determine in advance the orientation, the distance between the vertical posts, the amount of overhang beyond the ends, the position relative to the longitudinal axis of the tabletop, and the area of the three hidden holes of each leg.
The main practical principle of the article: first, build the full outline of the finished table with two supports, then mark the fasteners, and only after that drill the tabletop. You cannot start with the first hole of one leg, hoping to "align the second one later." For a paired frameless base, the geometry of both supports must be coordinated before irreversible operations.

Wooden leg MN-243 for a frameless table: a direct answer about the protruding vertical
Yes, the vertical part of MN-243 can extend beyond the edge of the tabletop. This is directly provided for by the product's design. Therefore, a situation where the post is visible beyond the end from above or from the side does not mean that the leg was installed incorrectly. In a specific project, such an overhang can be a deliberate design technique: the table's silhouette becomes more graphic, and the vertical posts read as separate architectural elements.
But the very possibility of overhang does not set its size. There is no universal rule in the card like "overhang by 20, 40, or 60 mm." These values are determined by the tabletop and the space around the finished furniture. For example, one table may stand freely in the center of a room, another near a passage, and a third with its end against a wall. The same overhang in three cases will give different results.
Three concepts need to be distinguished:
- permissibility of overhang — a confirmed structural property of MN-243;
- chosen overhang size — a design decision for a specific table;
- Safety and convenience — checking the final dimensions, aisles, chairs, and fastening.
If the vertical extends beyond the end by 40 mm, this is not a characteristic of MN-243, but a parameter of a specific assembly. It needs to be recorded in the working drawing next to the tabletop length and the distance between supports.
The overhang can be symmetrical — the same on the left and right — or intentionally asymmetrical. For a regular dining table, a symmetrical layout is simpler for production and visual inspection. Asymmetry is only acceptable as a deliberate design choice: for example, if the tabletop has an offset cantilever section or the structure is integrated into a furniture ensemble. An accidental difference of a few centimeters between the two sides usually looks like a marking error.




How the modern furniture support MN-243 is designed
MN-243 differs from a simple turned leg in that it itself forms a spatially rigid side support. Three confirmed elements can be distinguished in the design.
Our factory also produces:





Vertical post
This is the part that is perceived as the external "leg" of the table and transfers the load to the floor. It is this part that the manufacturer allows to extend beyond the tabletop dimensions. When designing, it is necessary to consider not only the point of contact with the floor, but also the visual line relative to the edge of the tabletop.
Get Consultation
Horizontal fastening element
It is located in the connection area with the tabletop and carries three hidden holes with countersinks. Through this part, the support is fixed to the lower surface. For marking, it is not the decorative middle of the leg that matters, but the exact contour of the mounting part and the position of the three holes according to the drawing.
Diagonal brace
It connects the horizontal and vertical parts and acts as a stiffening rib. Geometrically, these elements form a triangular support structure. Therefore, when designing, MN‑243 cannot be considered an ordinary vertical strip whose position is determined only by a single offset from the end. The diagonal also occupies space under the tabletop and affects the clear opening for legs and chairs.
All parts are joined using the tongue-and-groove technique and reinforced with glue. For the customer, this means the finished support should be treated as a single structural element. There is no need to plan its disassembly to change the overhang or to "trim" the horizontal part on site without manufacturer approval.
If the project requires a different base configuration—for example, classic four separate legs, a central underframe, or a full frame—it is more logical to check the section buy a table frame and underframe, rather than trying to adapt MN‑243 to an unsuitable scheme.
Dimensions of the wooden support MN‑243: 764 × 240 × 45 × 740 mm: what to mark on the template
In the product card, the size is given as A × B × C × D = 764 × 240 × 45 × 740 mm. For the installation template, these numbers are insufficient without a drawing, because the letter parameters cannot be arbitrarily renamed to "length," "width," "thickness," and "height" just out of habit. The correct sequence is to open the MN‑243 drawing, see which line A, B, C, and D refer to, and only then transfer the outline into the table design.
On the full-size template, at minimum, the following must be marked:
- outer contour of the support;
- position of the vertical post;
- contour of the horizontal mounting element;
- diagonal brace;
- three centers of hidden mounting holes;
- line of the intended end of the tabletop;
- longitudinal axis of the tabletop;
- direction "outward" and "toward the center of the table";
- selected overhang size.
Such a template can be made from cardboard, thick paper, thin sheet material, or you can print the drawing at 1:1 scale. The main thing is to check the scale with a ruler after printing: the printer should not automatically "fit to page," changing the dimensions by a few percent.
If a cardboard contour is used, it is better not to punch the holes immediately. First, label them as points No. 1, No. 2, and No. 3, then compare with the actual support. Such a check reduces the risk of transferring holes from an inverted or mirrored template.
Why 764 mm cannot be considered the height without checking the drawing
In the dimension line, the first value is 764 mm, and the fourth is 740 mm. A customer accustomed to the notation "height × width × depth" may automatically take 764 mm as the height. For a product drawing, this is an incorrect approach: the A/B/C/D order is set by the manufacturer itself.
When designing, it is important to preserve the letter designation until the drawing shows the direction of each value. This is especially important for calculating the final table dimension: if the wrong size along the tabletop is used by mistake, the overhang and the free opening will be calculated incorrectly.
Working documentation should contain not only the number but also a label: "A per drawing MN‑243", "D per drawing MN‑243". After verification, a direction understandable to the designer can be added.
How to position two wooden legs MN‑243 relative to the tabletop
For a paired base, three basic schemes can be distinguished. None of them is the only correct one for all tables. The decision depends on the tabletop shape, installation location, and desired silhouette.
Scheme 1. Verticals completely under the tabletop
In this option, the outer vertical part of MN‑243 does not extend beyond the end dimension. Visually, the tabletop "covers" the legs. This scheme is useful when the table stands with its end close to a wall, a person passes nearby, or the outer contour of the furniture should be determined only by the tabletop.
The advantage is that the actual table length does not increase due to the legs. The disadvantage is that the distance between the vertical supports decreases, thus potentially reducing the useful seating area between them.
Scheme 2. Verticals in the same plane as the ends
The outer line of the post is aligned with the end of the tabletop. The silhouette appears assembled: the leg visually continues the vertical plane of the edge. It is important to determine which specific control line of the post to align with the end — the outer edge, the axis, or another line per the drawing. This cannot be decided from a photograph.
Diagram 3. The verticals are intentionally extended beyond the ends
This is a scenario for which MN-243 is particularly interesting. The vertical post extends outward, and the overall size of the finished table becomes larger than the length of the tabletop itself. This technique highlights the structure but requires checking clearances and symmetry.
If the overhang is 40 mm on the left and 40 mm on the right, the supports must be aligned along a common axis so that the mounting parts under the tabletop are also in a mirror-consistent position. You cannot first "nicely extend" one leg, secure it, and then adjust the second one.
How to calculate the final table dimensions with protruding MN-243 supports
When the vertical posts are extended, the external table size is no longer equal to the tabletop length. For a straight symmetrical layout, a simple formula is used:
total structure length = tabletop length + left overhang + right overhang.
For example, the tabletop has a length of 1800 mm. The vertical MN-243 parts extend 40 mm beyond each end. Then:
1800 + 40 + 40 = 1880 mm.
The final dimension along this axis is 1880 mm. This is not a product specification, but a design calculation for a specific table.
| Tabletop length | Left overhang | Right overhang | Overall dimension |
|---|---|---|---|
| 1400 мм | 0 | 0 | 1400 мм |
| 1400 мм | 30 мм | 30 мм | 1460 мм |
| 1600 мм | 40 мм | 40 мм | 1680 мм |
| 1800 мм | 40 мм | 40 мм | 1880 мм |
| 2000 мм | 50 мм | 50 мм | 2100 мм |
If the overhangs are different, the formula does not change. For example, 1800 + 20 + 60 = 1880 mm. But visually, such a table will be asymmetrical. Therefore, different values are allowed only with a deliberate composition.
The overall dimension should be checked not only on the room plan. Consider the chair trajectory, a nearby hinged door, drawer pulls of the cabinet, the radiator, and the distance to the wall. A leg protruding by 40–50 mm may be exactly the element that blocks a comfortable passage.
How to check the passage around the table after adding an overhang
First, draw the rectangle of the tabletop on the plan. Then add the actual protrusions of the supports. It is the second outline that is the actual furniture dimension in the lower part.
If the table is in a passage, measure the free distance to the wall or adjacent furniture not from the edge of the tabletop, but from the farthest point of MN‑243. For example, the distance from the tabletop to the cabinet was 900 mm. After the leg overhang of 50 mm, the free passage decreases to 850 mm. Mathematically, the change is small, but in a narrow interior it can be noticeable.
The same rule applies to the door. Open it along its full trajectory and check whether the panel intersects the protruding support. This test is especially important for tables in the kitchen, office, and meeting room.
How to buy wooden table legs and keep space for chairs
In a table without a stretcher, the absence of the stretcher frees up space under the tabletop, but the geometry of the MN-243 itself still affects seating. The vertical posts define the outer boundaries, and the diagonal braces occupy part of the area closer to the ends. Therefore, when calculating the number of chairs, you need to know not only the length of the tabletop, but also the clear opening between the inner sides of the two supports.
Working formula for a preliminary check:
clear opening between supports = distance between the control inner lines of the vertical posts.
Do not substitute this value with the tabletop length minus two arbitrary leg sizes. Use the actual drawing and the selected orientation of the MN-243. If the verticals are offset outward, the clear opening may increase. If the posts are completely hidden under the tabletop, the opening will become smaller.
Next, compare the clear opening with the seating spaces. For two chairs side by side, space is needed not only for the chair bodies, but also for elbows, knees, and movement. If a person is to sit at the end of the table, separately check the diagonal brace and the position of the vertical post: an outward offset may improve lateral freedom, but the protruding element should not interfere with the legs when approaching.
Before Buy wooden table legs, make a full-size layout on the floor. Use painter's tape to mark the tabletop, the outer lines of the supports, and the intended position of the chairs. Such a simple diagram immediately shows whether there is enough space for seating and whether the attractive offset has turned out to be too large for the room.
How to calculate the clear opening with a symmetrical offset
If both MN-243s are installed mirror-symmetrically and the outer posts are offset by the same distance, the useful opening between them can be estimated from the drawing after the control lines of each support have been determined. Suppose the inner line of the left post is 100 mm further from the end of the tabletop, and the right one is symmetrically on the other side. Then the distance between the posts will be greater than the tabletop length. But the specific value depends on the geometry of the MN-243 itself, so it cannot be derived only from the offset size.
Correct sequence: first place the template of the left support, mark the inner edge of the vertical; then mirror-place the right one; measure the distance between these lines. This is the value used when planning the chairs.
Hidden mounting of a wooden support: how to transfer three holes to the tabletop
MN‑243 is attached hidden through three holes with countersinks in the mounting part. The number "three" is important only as the number of points. It does not indicate what diameter, length, and type of fasteners are needed. Accurate marking is required before selecting hardware.
Step 1. Determine the front side of each support
Before marking, you need to understand how MN‑243 will be oriented relative to the center of the table. On two supports, the direction must be coordinated. If one is turned differently, the diagonals may face different directions and the composition will lose symmetry.
Step 2. Make a full-size template
The template must replicate the mounting contour and the three hole centers. It is best to use drawing data and verify it against the actual part after receipt. If the template is printed, measure the control dimension with a ruler.
Step 3. Mark the tabletop axis
On the underside, a longitudinal axis is drawn. For a rectangular tabletop, it passes through the middle of the width. Additionally, the ends and projection lines are marked. On an expensive finished surface, marking is done on protective tape or by another safe method.
Step 4. Position both supports mirror-symmetrically
The templates are placed simultaneously. The overhang on the left and right, the distance to the longitudinal axis, the free opening, and the overall dimension are checked. Do not proceed to drilling until both supports are verified as a single system.
Step 5. Transfer the centers of the three holes
Points are transferred only after final approval. Each support's three centers must remain within the allowable zone of the tabletop. If one center falls too close to the edge, glue joint, internal cavity, or another insert, the layout must be revised.
Step 6. Check drilling depth
The tabletop thickness is measured in the area of each hole. For a shaped or milled slab, the thickness at the center and at the edge may differ. The drill is depth-limited if the material technology allows pre-drilling.
Step 7. Only after this, select the fasteners
The diameter and length of the fastener are determined by the tabletop material, thickness, MN-243 holes, and required engagement depth. Without this data, no specific screw can be called safe.
Why you cannot drill the first leg before the second
The main danger of "sequential" installation is error accumulation. The first support was secured with a 40 mm offset, but the axis was not checked. When installing the second, it turned out that 35 mm is needed for symmetry. A choice arises: leave different offsets or re-drill the first side.
Worse, if the first leg is shifted across the tabletop. The second may be aligned along a different line, and the distance between supports will be uneven. Therefore, first a dry layout of two templates is needed, then diagonal control, and only then drilling.
For a rectangular table, you can measure the distances from identical reference points of both supports to the corners of the tabletop. If the layout is mirrored, the corresponding dimensions must match within the project's accuracy.
Which fasteners to order for support MN-243
The product card does not specify a specific article number, diameter, and length of the fastener. This limitation must be preserved in the project. Three countersunk holes do not mean "three screws of any suitable type."
The choice depends on the tabletop construction. Solid wood has one scenario, MDF another, and veneered board a third. If the tabletop has metal inserts, screws may be required. If the bottom is reinforced with an additional rail, the working depth changes.
Before purchasing fasteners, inform the installer:
- tabletop material;
- thickness in each fastening zone;
- presence of veneer, MDF, plywood, or solid wood;
- whether there are inserts;
- diameter and shape of holes in MN-243 per drawing/actual;
- required countersunk head;
- expected operational load.
If the tabletop is thin, a long screw is dangerous because it may come out on the front side. If it is too thick and heavy, a short grip may be insufficient. It is impossible to state a universal length without this data.
How to check the tabletop before ordering a pair of MN-243
Not every tabletop automatically fits MN-243 just because it is wooden. Before ordering, measure the length, width, and thickness, determine the weight and material, and check the bottom surface.
Four zones are especially important: the locations of the three holes of the left support, the three points of the right one, the space of the diagonal braces, and the area between the supports. If the tabletop has milling, a hidden metal profile, or technological channels, they may conflict with the mounting part.
For a thin tabletop, the safe mounting depth may be insufficient. For a very heavy one, an additional calculation may be required. For a long slab, the deflection of the tabletop itself between the supports needs to be checked.
Long tabletop and two MN-243: what to check besides the overhang
MN-243 is designed for tables without aprons and is built as a rigid triangular support, but the table length affects the operation of the entire system. The farther the two supports are spaced apart, the larger the free span of the tabletop between them. If the top slab is not rigid enough, it may sag even with stable legs.
Therefore, for a long table, the calculation should be divided into two questions:
- whether the supports themselves and their fastening are stable;
- whether the tabletop is rigid enough over the resulting span.
Extending the verticals outward can increase the distance between supports, but does not always increase the length of the actual support zone under the tabletop to the same degree. Use the position of the horizontal mounting part according to the drawing, not just the position of the vertical post.
How to compare MN-243 with the already selected tabletop ST-026-1
Buy square tabletop ST-026-1 can be used as a separate item for a standalone project. Its card shows dimensions of 800 × 800 × 25 mm and options in MDF or combined versions with beech or oak.
This link cannot be interpreted as ready compatibility with MN-243. For a square of 800 × 800 mm, you need to separately understand how a pair of elongated supports will be positioned relative to the four sides, whether there is enough space for horizontal mounting elements, and whether such a silhouette makes sense. Perhaps, for a compact square table, a different support system would be more logical.
Therefore, ST-026-1 is used as an example of a separate tabletop, the dimensions and material of which can be compared with the project. The solution "MN-243 + ST-026-1" requires a separate drawing.
How to compare MN-243 with tabletop ST-030
Buy wooden tabletop ST-030 can be used as a round top measuring 1148 × 1148 × 24 mm in versions with beech or oak in a combined construction.
The round shape creates a separate challenge: it has no ends over which the posts can be "extended" in the same sense as with a rectangular tabletop. To use MN-243, you will need to determine two opposite tangents or design axes and check how the vertical posts extend beyond the circle. This is already a design-engineering scheme, not a ready-made kit.
Therefore, neither ST-026-1 nor ST-030 can be called a recommended pair for MN-243 without additional verification. Their purpose in the article is to show which tabletop parameters need to be known before ordering legs.
How to buy furniture legs and supports if MN-243 is not suitable
Sometimes the check ends with the conclusion "this model is not needed." For example, the table must stand flush with its end against the wall, but a protruding vertical element interferes. Or the tabletop is too small for two massive side supports. In such a situation, it is better to look at a broader section buy furniture legs and supports and choose a different geometry.
This is more rational than changing an already purchased tabletop for the sake of a specific leg. The commercially correct choice is the one that fits the project, not the one that has to be adapted after ordering.
Beech or oak: which wood to order the modern leg MN-243 from
MN-243 is available in beech and oak. Both options have "Prestige" sanding quality and the selected preparation for enamel. The material should be chosen together with the finish of the tabletop and the overall furniture system.
If the supports will be painted with opaque enamel, the visual difference in wood texture becomes less significant. The quality of preparation, surface stability, and the chosen finishing technology come to the forefront. If the project involves preserving the wood grain, you need to separately clarify the available preparation for transparent finish, because the card of the selected configuration shows the option for enamel.
Oak has a more pronounced porous texture, beech is more subdued. But you should not automatically choose oak for an oak tabletop just based on the name of the species. Different batches and finishing methods can noticeably differ in tone.
Before finishing work, it is useful to check quality of wooden products and sanding, especially if the tabletop and legs will be painted in the same workshop.
Sanding "Prestige" and preparation for enamel: what it changes in the project
"Prestige" quality means detailed surface preparation with manual finishing of hard-to-reach areas. For MN-243, this is important due to the transitions between the post, diagonal, and mounting part. But even a well-sanded workpiece does not eliminate the need for a trial assembly before finishing.
If the attachment and contact points are painted with too thick a layer before fitting, the actual fit may change. Therefore, it is useful to first perform a dry assembly, confirm the contours, markings, and fasteners, and then proceed to final finishing according to the technology.
Section tips for finishing wooden supports should be used as a general technical reference, but the specific enamel, primer, and varnish must be applied according to their manufacturer's instructions.
When you don't need to buy the protruding wooden support MN-243
The ability to extend the post beyond the edge is a design freedom, not a mandatory installation method. There are situations where this feature becomes a disadvantage.
The table must be flush with the wall at its end
If the end of the tabletop needs to fit almost flush against the wall, an outward leg offset will increase the gap or require abandoning the intended position. In such a design, it is better to keep the vertical support within the footprint or choose a different support.
The protrusion blocks the passage
In a compact kitchen or office, an extra 40–60 mm on each end can noticeably narrow the passage. This is especially critical if a door opens or a drawer extends nearby.
Swing-door furniture is located nearby
The tabletop end may not visually interfere with the adjacent cabinet, but the protruding leg could fall into the door's swing path. Check the movement, not just the closed position.
A fully hidden lower profile is required
Some interiors are built around a clean rectangular tabletop with no protruding elements underneath. In such cases, the structurally permissible offset simply does not match the project's aesthetics.
The mounting scheme is not confirmed
If the tabletop material is unknown, the fasteners are not selected, and the three holes have to be transferred "approximately" on site, it is better to postpone the purchase. The leg's design feature does not compensate for unprepared installation.
Mistakes when ordering wooden legs for a trestleless table
Error 1. Assuming 764 mm is the height without checking the drawing
In the line A × B × C × D, the first number is perceived as the height out of habit. This can distort the entire project. The correct approach is to keep the manufacturer's designations and verify directions against the drawing.
Error 2. Marking one support and immediately drilling
The second leg then does not match in overhang or axis. Prevention — two full-size templates and simultaneous dry layout.
Error 3. Not accounting for the overall dimension after the overhang
A 1800 mm tabletop seems suitable for the room, but two 50 mm overhangs increase the actual size to 1900 mm.
Error 4. Ordering fasteners only by the number of holes
Three holes do not determine the diameter and length of the screws. Fasteners depend on the material and thickness of the tabletop.
Error 5. Not checking the clear opening for chairs
The legs look nice in the render, but diagonal braces conflict with knees or chairs.
Error 6. Paint the connection zones before the trial assembly
A thick finish layer complicates precise fitting and hides risks of marking misalignment. First dry assembly, then finishing.
Error 7. Consider any STAVROS countertop compatible
ST‑026‑1 and ST‑030 are separate items. Compatibility with MN‑243 requires its own drawing.
Error 8. Use the same overhang on different tables without checking the room
40 mm, convenient in a spacious dining room, can interfere in a narrow kitchen. Overhang is a project parameter.
Error 9. Not account for the actual countertop thickness at the drilling point
Milling or undercutting from below reduces the safe depth. You need to measure exactly the zone of each hole.
Error 10. Try to compensate for inaccurate marking by tightening screws
Fasteners should not pull the support into the desired position. If holes are misaligned, the scheme must be corrected before installation.
Marking of paired MN-243: symmetry, overhang, and safe mounting zones
How to check the mirror symmetry of two MN-243
Paired supports can be visually mirror-symmetric relative to the center of the table. To verify this, identical overhangs are not enough. You need to compare the direction of the diagonals, the position of the mounting parts, and the distance to the longitudinal axis.
It is convenient to label the supports L and R only as mounting positions, not as factory "left" and "right" versions, if the card does not declare such versions. On the template, an arrow "outward" is placed. Then both templates are laid out under the tabletop. If the arrows point to different ends, and the diagonals form a symmetrical composition, the scheme is read correctly.
After that, four control dimensions are measured: left overhang, right overhang, distance of the left mounting part to the axis, distance of the right mounting part to the axis. For a symmetrical table, the pairs should match according to the chosen logic.
How to calculate the overhang if the tabletop has already been purchased
When the top plate is already available, the overhang is calculated from its actual dimensions. First, the desired overall table size is determined considering the room. Then the length of the tabletop is subtracted from it.
For a symmetric scheme:
overhang of one side = (desired overall size − tabletop length) ÷ 2.
Example: tabletop 1800 mm, and the maximum allowable furniture size for the passage is 1880 mm. The difference is 80 mm, so with symmetry, the maximum overhang is 40 mm on each side.
If according to the room plan the overall size can only be increased to 1840 mm, the safe symmetrical overhang decreases to 20 mm. Such a calculation is more useful than choosing the protrusion based on a photo of a finished table.
How to check the layout without drilling
Before using a drill, you can perform a full assembly simulation. Apply masking tape to the underside of the tabletop in the mounting area, and mark the axis and hole centers. Attach the MN-243 templates and secure them temporarily without damaging the surface.
Then place the tabletop on safe temporary supports at the design height and evaluate the composition from the side. This mock-up shows whether the verticals protrude too much, whether chairs fit comfortably, and whether the table matches the room's scale.
If the overhang raises doubts, the markings on the tape can be easily changed. After drilling, such freedom is no longer available.
Thin tabletop: when three holes require special care
The thinner the top panel, the less depth margin there is for fasteners. If the tabletop has, for example, a thin MDF layer or a complex composite structure, you cannot simply choose a short screw "to avoid going through." You need to assess the material's holding capacity.
Sometimes the right solution is a reinforcing insert, an additional internal plate, or a different type of fastening. The specific scheme must be confirmed by a furniture designer. The article cannot prescribe a universal fastener because the MN-243 card does not specify one.
Thick tabletop: why a long screw is not automatically chosen either
A thickness of 40–50 mm provides more depth, but it does not mean you should drive in the longest possible fastener. It matters where the tabletop's structure runs, whether there are voids, glue joints, or technological inserts. Requirements differ for solid wood and composite panels.
Additionally, an overly long fastener may reach a weak material zone or create excessive stress during tightening. The length is chosen based on working engagement, not on the principle "the more, the stronger."
Solid wood, MDF, plywood, and combined tabletop: why fasteners differ
Solid wood holds threaded fasteners with wood fibers, but requires proper pre-drilling to avoid splitting at the edge. MDF has a homogeneous structure, but is sensitive to excessive load on the hole and repeated re-tightening. Plywood works differently due to cross-laminated layers. A combined tabletop may include several materials at once.
Therefore, the phrase "wooden tabletop" is not precise enough for choosing fasteners. The specification should indicate the actual base material.
How to choose the distance from the end to the mounting part
The overhang of the vertical post beyond the edge does not mean that the entire horizontal fastener element also extends outward. You need to look at drawing MN-243 and determine the position of the mounting part relative to the vertical.
On the template, mark the tabletop end line and the contour of the horizontal element. All three holes must be in the safe zone of the tabletop with sufficient material around them. If the selected overhang causes the outermost hole to be too close to the end, the overhang value should be reduced, even if the vertical composition looks better.
How to check the distance to the edge of the hole
A universal minimum distance cannot be specified without knowing the material. But the designer must see the actual margin from the center and edge of the hole to the tabletop end. The closer the hole is to the edge, the higher the risk of local failure, especially in MDF or solid wood across the grain.
Therefore, on the mounting template, it is useful to separately label the distance from each center to the nearest edge. These dimensions are passed to the specialist who selects the fasteners.
Wooden table legs in one set: why it is better to order as a pair
For a table without a tsarg, usually two identical MN-243 legs are needed. Ordering as a pair simplifies matching the wood species, sanding quality, and surface preparation. This is especially important if the supports will be tinted or coated with a clear finish.
If one leg is purchased much later, natural wood may differ in tone and texture. This is less critical for enamel, but the same batch is still more convenient for the technological process.
In this section you can order unpainted wooden furniture legs and immediately specify the quantity, material, and preparation.
What to specify in the order for MN-243 furniture supports
A good specification should allow the manager and installer to understand the project without verbal guesswork. For MN-243, it is useful to specify:
| Parameter | What to record |
|---|---|
| Article number | MN‑243 |
| Quantity | Usually 2 pcs. for a paired scheme |
| Size | A × B × C × D = 764 × 240 × 45 × 740 mm |
| Material | Beech or oak |
| Sanding | Prestige |
| Preparation | For enamel or another confirmed configuration |
| Tabletop | Length × width × thickness, material, weight |
| Orientation | Diagram of left and right mounting positions |
| Overhang | Left and right in millimeters |
| Fastening | Agreed type, diameter, and length |
| Finishing | Color/coating system |
If the 'fasteners' line is not filled in, it is not a reason to invent hardware at the time of assembly. It is better to agree on them separately after receiving the drawing and checking the tabletop.
Practical installation scenarios for MN-243
Practical scenario: 1800 mm tabletop with 40 mm overhang on each side
Suppose a table without aprons is being designed with a tabletop of 1800 × 900 mm. The designer wants to highlight MN-243 and extend the vertical posts beyond the ends by 40 mm.
First calculation: total dimension 1800 + 40 + 40 = 1880 mm. This size is marked on the room plan.
Second step: two MN-243 templates are placed mirror-symmetrically. Check where the horizontal fastening parts and the three holes of each leg are located. If all points remain in the safe zone of the tabletop, proceed further.
Third step: measure the free opening between the vertical posts and diagonals, place chairs on the plan. If the seating is comfortable, the layout is kept.
Fourth step: choose the fasteners based on the material and thickness of the tabletop. Only p
Practical scenario: the tabletop is already drilled
If holes remain from the old legs, they cannot be automatically used for MN‑243. First, apply the template of the new support and compare the coordinates of the three countersunk points. If the old holes do not match, the new leg cannot be shifted just to use them if it breaks symmetry and overhang.
Restoring old holes and new marking depend on the tabletop material. On enameled MDF, veneer, and solid wood, repair technologies differ.
How to prepare the tabletop and supports for a trial assembly
Place the tabletop face down on a clean, soft surface. Pre-inspect the supports, check their identical orientation, and apply templates. The marking area must be free of dust, shavings, and random objects that could scratch the finish.
If the supports are not yet painted, the trial assembly is easier. After confirming all dimensions, mark the parts: "left mounting position," "right mounting position," top/outside. These marks are made on a hidden area or on temporary tape.
What to check after assembly but before putting the table into service
After installation, place the table on a level floor and check for the absence of wobbling, symmetry of overhangs, and identical positions of the supports relative to the tabletop. Then load the table alternately in the normal operational manner, without extreme tests.
They check the chairs: they should fit freely between the posts, and diagonal elements should not interfere with the legs. They inspect the fastener heads in the countersinks—they should not protrude and catch on clothing or adjacent elements.
If after assembly it is found that one support is visually misaligned, you should not simply tighten the fastener more. You need to sort out the marking.
How to choose the overhang based on the actual room, not a photo
A photo of the finished table shows the proportion in a specific interior, but it does not provide a universal overhang size. To make a decision on site, it is useful to go through three sequential constraints: the maximum allowable furniture dimension, the minimum clear passage, and the minimum internal opening between supports.
First, measure the area of the room where the table will stand. Suppose there is 2300 mm between the wall and the adjacent cabinet. A tabletop 1800 mm long is placed along this direction. If the project requires maintaining at least 400 mm of free space at one end and 0 mm at the wall on the other, the overhang of the outer support on the passage side is already limited. It cannot be chosen solely by aesthetics.
Then the seating is checked. If the outer overhang increases the distance between the supports and improves chair placement, that is an argument in its favor. But if the diagonal brace falls into the knee zone of the outermost seated person, increasing the overhang does not provide a real benefit. Therefore, not only the vertical support but also the full MN‑243 contour is drawn on the plan.
The third filter is the mounting zone. The vertical may extend outward nicely, but the horizontal mounting part must remain in a position where all three holes are in safe material of the tabletop. If, for the sake of a large overhang, the outermost hole approaches the end, the design solution needs to be reduced.
This results in a useful priority order: mounting → passages → seating → outer silhouette. This order does not cancel the design but makes it feasible.
How to check the project on paper before buying a pair of legs
For a home project, you do not have to start with a complex CAD model. A plan at a scale of 1:10 or 1:5 is sufficient. For example, a tabletop of 1800 × 900 mm at a scale of 1:10 becomes a rectangle of 180 × 90 mm. The MN‑243 contour is built according to the drawing at the same scale.
On one sheet it is useful to make three variants: without offset, stand in the plane of the end, and offset, for example, 40 mm. Then compare the overall dimension, the opening between supports, and the position of the chairs. Such a sheet immediately shows that a change of 40 mm on each side increases the total length by 80 mm, but may simultaneously provide more space between the vertical parts.
If the project is complex, make another view — from the side. It shows the diagonal brace and where it passes relative to the knees. The top view does not show this conflict.
After choosing a variant, the scale drawing does not replace full-size marking before drilling. Its task is to filter out unsuccessful variants before purchase and to coordinate the idea with the client or furniture maker.
How to check the repeatability of two supports after marking
Before drilling, it is useful to measure not only the left and right offsets, but also the diagonals between control points. For example, mark the center of the outermost hole of the left support and the corresponding center of the right one. Then measure the distances to the opposite corners of the tabletop. With a symmetrical scheme, paired dimensions should be consistent.
If one support is shifted longitudinally by 5–10 mm, visually it may be almost imperceptible from below, but the outer posts will no longer stand on the same line relative to the ends. After assembly, the error will manifest more strongly.
For serial furniture, it is worth making a rigid template for both supports at once. It fixes the distance between mounting parts and the position of all six holes. Such a template is more valuable than two separate ones, because it does not allow each leg to "wander" independently.
Procedure for control assembly of pair MN‑243 in the workshop
When both supports and the tabletop are already on site, it is useful not to proceed immediately to final installation. Control assembly should confirm what was calculated on paper. For this, the tabletop is placed face down on a flat protected base and the design marking is repeated directly on the part.
First, confirm the tabletop
Measure the actual length, width, and thickness again. Even if the order specified 1800 × 900 mm, the finished product may have received slight trimming, chamfering, or additional processing. The actual part is used for marking, not the original sketch.
The bottom surface is checked separately. It may contain technological holes, repair inserts, metal reinforcements, cable channels, or production markings. These elements are marked on the diagram as zones where MN‑243 fasteners cannot be transferred without additional approval.
Then both supports are positioned without fasteners
MN‑243 is placed in the design position and temporarily secured so that parts do not shift, but the surface is not damaged. The left and right overhang, overall dimensions, distance between vertical posts, and position relative to the longitudinal axis are measured. If the project is symmetrical, the corresponding dimensions of the two sides are compared in pairs.
At this stage, it is useful to look at the table not only from below. If it is safe to lift the tabletop onto temporary supports, the composition is evaluated from the side and end: the actual overhang of the verticals, the angle of the diagonals, and the free space for chairs are visible. This is often where it becomes clear that the 50 mm chosen on the drawing are visually too large or, conversely, 20 mm are barely noticeable.
After this, the six mounting points are checked
The three holes of the left and three of the right support are transferred to protective tape or a template. For each point, the distance to the nearest edge of the tabletop is measured, and the material thickness directly under the hole is checked. If one point falls into a weakened zone, it cannot simply be shifted alone: the holes are defined by the support design. The position of the entire MN‑243 must be changed, or the mounting scheme must be revised.
Only then is the fastener approved
The installer receives the actual tabletop thickness, base material, and hole geometry. Based on this data, the fastener is selected. If pre-drilling is required, its depth is limited. If the design requires a threaded insert or reinforcement, this is done before final finishing.
Final assembly is performed according to the saved markings
After painting or other finishing, it is important not to lose the coordinates. Therefore, working templates, support numbers, and control dimensions are kept until final assembly. You cannot re-adjust the legs "approximately the same way," because the finished surface no longer forgives extra holes.
This order turns assembly into a repeatable process: first geometry is confirmed, then fasteners, then finishing, and only after that final fixation.
Beveled, radius, or shaped tabletop: from which line to measure the overhang
The formula "tabletop length + left overhang + right overhang" is obvious only for a rectangular top with straight ends. If the end is beveled, rounded, or has a radius, you need to choose a control line in advance.
For a rounded rectangle, it is usually convenient to use the extreme tangent — an imaginary line that touches the most protruding point of the end radius. The overhang of the vertical post is then measured from this line. If you measure from the start of the rounding, the same project will get a different value.
For a beveled end, you can choose the geometric boundary of the central straight part or the extreme outer point. The working drawing must show where the dimension is taken from. The notation "overhang 40 mm" without a baseline for a shaped tabletop is insufficient.
For a live edge made of solid wood, the situation is even more complex: the end may be uneven across the entire width. Then the overhang is better tied to the design axis or to a conditional control plane, rather than to each wave of the natural edge. Otherwise, two legs cannot be positioned symmetrically.
FAQ about MN‑243 and overhang beyond the tabletop edge
Can MN‑243 be extended beyond the tabletop edge?
Yes. The manufacturer's card directly allows the vertical part of the support to extend beyond the tabletop dimension without loss of load-bearing capacity. The specific amount of overhang is determined by the project.
How many millimeters can the leg be extended?
The universal value is not specified in the card. The extension is calculated based on the tabletop, position of the mounting part, fastening holes, passages, and design.
How much MN‑243 is needed for a regular table?
For a paired side configuration, two supports are usually considered, but the specific table structure must be confirmed by the project.
What is the size of MN‑243?
The card specifies A × B × C × D = 764 × 240 × 45 × 740 mm. The directions of the parameters should be checked on the drawing.
Is 764 mm the height?
You should not make such a conclusion just from the order of the numbers. You need to compare A/B/C/D with the product drawing.
What is MN‑243 made of?
The support is available in beech or oak.
What is the quality of the sanding?
For card MN-243, "Prestige" is indicated.
How many mounting holes?
Three hidden holes with countersinks in the mounting part.
What screws are needed?
The card does not specify a universal diameter and length. Fasteners are selected based on the material and thickness of the tabletop.
Can I first screw on one leg?
It is better to first mark both supports on a full-size template and check mirror symmetry. Otherwise, an error on the first side is transferred to the entire table.
Do both supports need to be offset equally?
For a symmetrical table, usually yes. Asymmetric offset is possible as a separate design solution.
How to calculate the overall table size?
Tabletop length + left offset + right offset. For example, 1800 + 40 + 40 = 1880 mm.
Does MN-243 fit ST-026-1?
Automatic compatibility cannot be confirmed. ST-026-1 is used as a separate tabletop and requires its own placement and mounting scheme.
Does MN-243 fit ST-030?
Also only after a separate calculation. The round shape of ST-030 requires a specially designed orientation of the pair of supports.
Can MN-243 be used for a table against a wall?
Yes, if the chosen position does not create a conflict. Overhang beyond the edge may be undesirable in this scenario.
When is it better to choose a different leg?
If the protrusion obstructs passage, the tabletop design does not allow safe mounting of three points, a different geometry or a full under-table frame is needed.
Do I need to order beech and oak at the same time?
For one pair, it is better to choose a single wood species. Mixing beech and oak is justified only by intentional design.
Can it be painted before fitting?
It is better to plan the final finishing after a control dry assembly to ensure the geometry and fastening.
Where can I check recommendations for finishing?
Use official STAVROS advice and the manufacturer's instructions for the specific paint and varnish composition.
Where to buy wooden supports MN-243 and what to add to the order
If the overhang scheme, tabletop, and fasteners are verified, the order becomes specific: two MN-243 of the required wood type, selected finishing, agreed fasteners, and, if necessary, the tabletop as a separate item.
For a wider selection, you can go to the furniture legs and supports section. If a different design without an overhang or another type of base is required, it is better to change the model before purchasing.
Before placing an order, it is worth checking payment and delivery of wooden legs, especially if the tabletop and supports are shipped in different cargo units.
Pre-payment checklist MN-243
- Drawing MN-243 is open and parameters A/B/C/D are understood.
- Number of supports determined.
- Tabletop measured for length, width, and thickness.
- Tabletop material and weight are known.
- Left and right overhangs recorded in millimeters.
- Overall external table dimension calculated.
- Passages and adjacent doors checked.
- Clear space for chairs checked.
- Both supports laid out mirrored on the template.
- The three holes of each support are in the safe zone.
- The type, diameter, and length of the fasteners are agreed upon.
- The material of the supports—beech or oak—has been selected.
- The finish is coordinated with the tabletop.
- A test assembly is scheduled before the final finish.
Conclusion: the MN-243 overhang is acceptable, but it must be designed together with the fastening.
MN-243 is not a regular leg that is placed at a fixed distance from the edge. Its design specifically allows the vertical post to extend beyond the tabletop dimensions. This provides design freedom, but at the same time makes marking more important.
For a correct order, you first need to build a pair of supports on a drawing or full-size template, determine the left and right overhang, calculate the overall dimension using the formula "tabletop length + two overhangs," check passages and mounting locations. Then transfer the three hidden holes of each support, and only after that select fasteners based on the material and thickness of the tabletop.
You cannot consider any tabletop automatically compatible, you cannot invent self-tapping screws based on the number of holes, and you cannot drill the first leg before checking the second. If these restrictions are observed, MN-243 allows you to create an expressive table without aprons, where protruding verticals are a deliberate part of the design, not a result of inaccurate assembly.