


Article Contents:
- Why you need corners for moldings
- The problem of precise cutting
- Ornamented molding does not tolerate inaccuracy
- Many frames — many risks
- Speed and material savings
- Decorative effect
- When it's better to buy ready-made corner elements
- What can be decorated with corners and moldings
- Wall frames
- Decor of the TV Zone
- Wall behind the sofa
- Bed headboard
- Door panels and furniture fronts
- How to choose corners for moldings
- By Profile Width
- By thickness (relief height)
- By relief and pattern
- By style
- By frame size
- How many corners to buy: calculation by frames
- How to calculate moldings and corner elements for a wall: example
- What can be decorated — extended scenarios
- TV wall with multiple frames
- Hallway and entrance hall
- Accent area above the fireplace
- Wall niche
- What to buy together with corner elements for moldings
- What is better: ready-made corners or cutting at 45°
- Installing frames with ready-made corner elements: how it works in practice
- Step 1: Marking on the wall
- Step 2: Cutting moldings
- Step 3: Installing corner blocks
- Step 4: Installing molding strips
- Step 5: Sealing joints
- Step 6: Priming and painting
- Mistakes when buying corners for moldings
- Additional elements for reinforcing the frame system
- Central overlays
- Horizontal lines between frames
- Vertical moldings between frames
- Baseboard and cornice line
- Where to buy corner elements and polyurethane moldings
- FAQ: answers to popular questions about molding corners
- Can frames be made from moldings without a 45° cut?
- How to choose a corner element for a molding?
- How many corners are needed for one frame?
- What to buy together with molding corners?
- What is better: a 45° cut or ready-made corners?
- Can I use corners for moldings on furniture?
- Where to buy polyurethane molding corners?
- How to avoid gaps in the corners of a molding frame?
- About the Company STAVROS
Here is a scene familiar to anyone who has ever taken on moldings with their own hands. You buy strips, mark the wall, everything is planned — and then the question of the corner arises. Sawing at 45°. It seems simple: a miter box, a hacksaw, a precise cut. But the first corner turns out a bit crooked. The second — with a thin gap. The third — the strip cracked at the end. By the fourth, the frame is already skewed, and half the material has gone into shavings.
This is not a story about ineptitude. It is a story about a tool that is not designed for 45° precision without professional equipment. And it is precisely for such situations that ready-made polyurethane molding corners exist — decorative corner elements that completely cover the joint of the strips and eliminate the need for precise cutting.
If you want to make decorative frames from moldings on the wall — in the living room, bedroom, hallway, around the TV area or above the headboard — this article will give you a complete understanding: what to buy, how to calculate, how not to make mistakes, which corner elements fit which moldings, and where to get it all in one place.


Why are molding corners needed?
Before answering the question 'what to buy', it is important to honestly answer the question 'why'. After all, a molding corner can be made without a ready-made corner — by cutting at 45°. So why do corner elements even exist and are in demand?


The problem of precise miter cut
Cutting at 45° is an operation that requires either a good power tool (a miter saw with a precise stop) or very accurate work with a miter box and a hacksaw. Without experience and the right tool, even a slight angle deviation of 1–2° results in a visible gap at the joint. After painting, this gap becomes even more noticeable.
Our factory also produces:


Ornamented molding does not tolerate inaccuracy
If the molding is smooth, a small gap in the corner can still be masked with sealant. If the molding is ornamented, with a relief pattern, any inaccuracy in the end cut interrupts the pattern at the corner, and the joint looks rough. A ready-made corner element completely covers this area, and the molding pattern smoothly transitions into the corner decor.
Get Consultation
Many frames — many risks
With one or two frames, a corner error can still be corrected. With eight to ten frames on a large wall, there are eight or more critical points, each of which could be uneven. Ready-made corners move installation from a risk zone to a zone of predictable results.
Speed and material savings
Without miter cutting, frame installation is at least twice as fast. There is no need to measure, mark the angle, cut, test fit, or adjust. The strips are simply cut to the required size with a straight cut, and the corner element covers the joint. Additionally, fewer strips are used: when miter cutting, some material is lost on the end cut on each side.
Decorative effect
This is a distinct value that cannot be achieved with a clean miter cut: a ready-made corner element creates an accent point at the frame corner. It gives the system a finished look, adding an ornamental motif exactly where the molding lines intersect. It works as a decoration, not just a technical joint.
When it's better to buy ready-made corner elements
Ready-made corner elements for moldings are not a compromise for "those who don't know how to cut." They are a full-fledged design solution. Let's break down specific scenarios where their use is justified and professional.
No experience with precise cutting. If you are installing for the first time or have not worked with moldings before, ready-made corners remove the most technically challenging issue and allow you to focus on marking accuracy and installation neatness.
Many frames. A project with six, eight, or twelve frames means 24, 32, or 48 corner joints. Achieving 48 precise cuts without specialized equipment is nearly impossible. Ready-made corner elements make all these points uniform and neat.
Ornamented molding selected. A relief profile with ornamentation does not allow visible gaps at the joint. Here, a ready-made corner is not a simplification but a technically correct solution.
Symmetry of layout is important. Ready-made corner elements allow for more precise control of the external dimensions of frames: moldings are cut straight, and the length of the plank is measured from the outer edges of the corner blocks. This is more convenient than calculating length considering the cut.
A decorative accent at corner points is needed. If the interior style calls for rich detailing, an ornamental corner element adds a system of point accents exactly where the frame lines intersect.
Want to reduce waste. Straight cutting of molding means no loss at the ends. Cutting at 45° from each plank "eats" several centimeters at least twice on each plank. For a large project, this is significant savings.
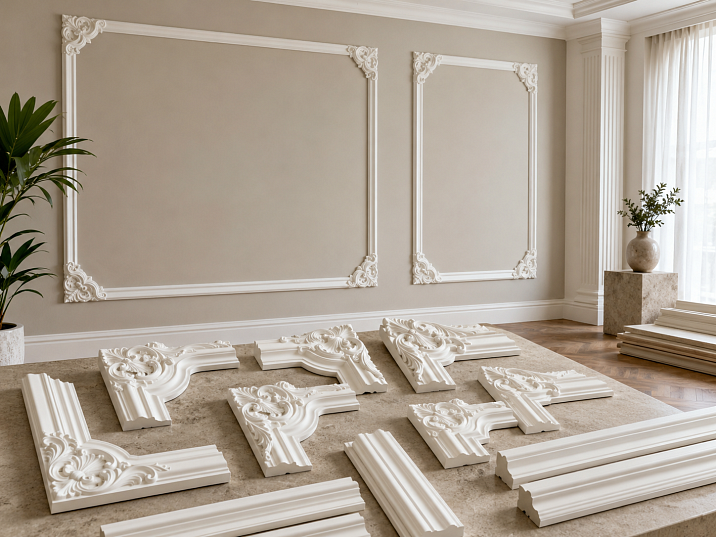
What can be decorated with corners and moldings
Frames on the wall
The most common and striking scenario. Polyurethane wall decor — these are primarily molding frames that turn an ordinary painted or wallpapered wall into an architectural surface with volume and structure.
Molding frames are used in:
-
Living room — on an accent wall, around the fireplace, or behind the sofa group
-
Bedroom — above the headboard, along the entire perimeter of the walls, in the form of vertical panels
-
Hallway — on side walls, around the mirror, along the perimeter of a niche
-
Study — in a classic or neoclassical style with rich detailing
-
Children's room — in the form of playful frame accents or symmetrical panels
Ready-made corner elements simplify installation precisely for this scenario: a wall with several frames turns into a predictable task with clear results.
Decor of the TV zone
One large frame around the TV and console is a popular modern technique that "integrates" the equipment into the interior and creates an architectural accent. Ready-made corner blocks are especially convenient here: the frame is large, and the precision of the corners is clearly visible.
An important nuance for the TV zone: the frame should be noticeably larger than the TV screen — usually with an indentation of 15–25 cm on each side. This creates the right proportions and does not overload the area.
Wall behind the sofa
This is an area that is always in view in the living room. A system of several symmetrically arranged frames on the wall behind the sofa is one of the most popular decorative solutions in classic and neoclassical interiors. Ready-made corner elements make such a composition technically accessible for DIY installation.
The wall behind the sofa is usually 2.5–3.5 meters wide. On such a wall, you can place three frames in a row or two larger symmetrical frames.
Bed headboard
One large vertical frame the width of the bed, or two narrow frames on either side, or a horizontal frame spanning the entire width of the headboard — all these solutions create an accent area above the bed and give the bedroom a finished look.
Door panels and furniture facades
Small corner elements are compatible with thin moldings for furniture facades. On flat doors, cabinets, and dressers, ready-made corner blocks create a frame system without complex miter cuts in small areas.
How to choose corners for moldings
This is a key practical question. The corner element and the molding are a system. They should look like a single decor, not like randomly combined parts from different sources. Here are the criteria for proper selection.
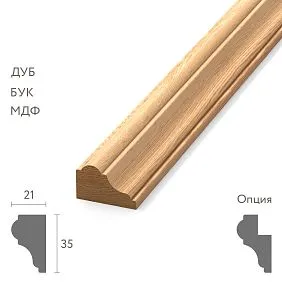
By profile width
The width of the corner element should match the width of the molding or be slightly larger. If the corner is too narrow, it will 'drown' at the joint and look like a small patch. If the corner is significantly larger than the molding, it will begin to visually dominate the frame lines, and the proportions will be disrupted.
Practical rule: corner width = molding width ± 10–20%. For a molding 50 mm wide, a corner width of 45–60 mm will look organic.
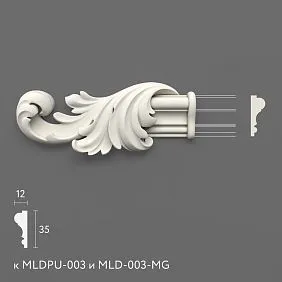
By thickness (relief height)
The corner element should have a comparable relief height to the molding. If the molding has a projection of 12 mm and the corner block has 5 mm, or vice versa, there will be a noticeable surface difference at the joint. The relief of the corner element should continue or harmoniously complete the relief of the molding.
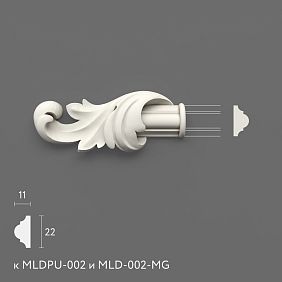
By relief and ornament
This is the most subtle parameter. Moldings made of polyurethane They can be smooth, with a simple stepped profile, or with ornamental relief. For each type, there is its own principle for selecting the corner:
-
A smooth molding allows for both a smooth corner block (pure geometry) and a corner with a laconic ornament (point accent)
-
A molding with a stepped profile — the corner should continue the stepped geometry, without unnecessary ornamental additions
-
An ornamented molding requires a corner with an ornament in the same style: a plant motif to a plant motif, a geometric one to a geometric one
By style
Stylistic mismatch between the molding and the corner element is one of the most common mistakes. Each style has its own logic:
Neoclassicism. Calm, restrained corner blocks with minimal ornament or pure geometry. No Baroque overload. The corner should be read as a structural element, not as a separate decorative object.
Classic. More expressive relief, acanthus or floral ornament. The corner is noticeable and is part of the decorative system.
Art Deco. Geometric shapes, clear rhythm, no ornamental curls. Square or diamond-shaped corner blocks with geometric relief.
Modern classic. Minimal ornament, emphasis on purity of form. The corner works as a structural point, not as decoration.
Baroque and Empire style. Rich decorative corner with developed ornament, floral motifs or garlands. The corner is an independent decorative accent in the system.
By frame size
For small frames (up to 60 × 80 cm) — compact corner blocks that do not overload a small area. For large frames (from 80 × 120 cm) — more expressive corner elements with developed ornament can be used.
The logic is simple: if the frame is small and the corner is large — the corner starts to dominate the molding lines and the frame loses proportion. If the frame is large and the corner is too small — the junction point looks inexpressive.
How many corners to buy: calculation by frames
This is a simple calculation, but it needs to be done before purchase.
Each rectangular or square frame has four corners. Therefore:
| Number of frames | Number of corner elements |
|---|---|
| 1 frame | 4 corners |
| 2 frames | 8 corners |
| 3 frames | 12 corners |
| 4 frames | 16 corners |
| 5 frames | 20 corners |
| 6 frames | 24 corners |
| 8 frames | 32 corners |
| 10 frames | 40 corners |
For non-standard shaped frames (with additional corners, L-shaped panels, frames around niches with internal corners), the number of corner elements is calculated based on the actual number of corners.
Spare corner elements. Unlike moldings, corner elements are piece goods without trimming. A spare is only needed as insurance against damage during installation: it is recommended to take 1–2 additional elements for the entire project.
Spare moldings. Moldings for frames need a 10–15% spare because each strip is cut to size and a small part goes into scraps. For projects with many frames of different sizes — 15%.
How to calculate moldings and corner elements for a wall: example
Let's break down a specific calculation example to avoid abstractions.
Initial data. Wall 3.6 × 2.7 m. Task: create three vertical frames. Selected size of each frame: 0.9 m × 1.8 m. Molding: width 40 mm. Corner elements: square 50 × 50 mm.
Calculation of molding for one frame:
-
Two vertical moldings of 1.8 m each = 3.6 m
-
Two horizontal moldings of 0.9 m each = 1.8 m
-
Total for one frame: 5.4 linear meters
Calculation for three frames:
-
Three frames × 5.4 m = 16.2 linear meters
-
15% margin: 16.2 × 1.15 = 18.6 linear meters — round up to 19 linear meters
-
With a plank length of 2 m: 19 / 2 = 9.5 → 10 planks
Calculation of corner elements:
-
Three frames × 4 corners = 12 corner elements + 2 spare = 14 pieces
Final list for this example:
-
Moldings: 10 planks of 2 m
-
Corner elements: 14 pieces
-
Glue: 2–3 tubes (1 tube per 5–6 linear meters)
-
Acrylic sealant: 1 tube
-
Primer: a small amount
-
Paint: 0.5–1 liter
-
Painter's tape, level, tape measure, pencil
This calculation takes 15 minutes and completely eliminates the situation where installation stops due to a shortage of one or two planks.
What can be arranged — extended scenarios
TV wall with multiple frames
Increasingly, designers create a TV wall not with a single frame around the screen, but with a system of frames: a large central frame surrounds the TV, with narrower vertical frames on the sides creating an architectural rhythm. For such a system Decor for Molding with identical corner blocks ensures the visual unity of the entire composition.
Corridor and hallway
Hallway walls are a very rewarding area for frames. A narrow corridor with molding frames on both walls acquires an architectural character and a sense of a well-designed interior. It is convenient to use vertical frames here that repeat the proportions of doorways.
Accent area above the fireplace
If there is a fireplace in the living room, the wall area above it almost always requires accent decoration. A large frame made of moldings with corner blocks framing this area creates an architectural focus above the fireplace. You can add a decorative overlay made of polyurethane decorative overlays into the center of the frame for an additional ornamental accent.
Niche in the wall
A built-in niche with a molding frame around the perimeter is a simple way to "activate" an architectural detail of the wall. Corner elements here solve the problem of internal corners, which would require precise calculation for a different angle when cutting.
What to buy together with corner elements for moldings
A good purchase is a system, not a set of random items. Here is a complete list of what you need for corner elements when installing frames:
Main decor:
-
polyurethane wall moldings — linear molding with 15% spare
-
Corner elements — 4 pieces per frame plus 1–2 spare
-
Polyurethane decorative appliques — for central accents within frames (optional)
Consumables:
-
Installation adhesive compatible with polyurethane — without aggressive solvents
-
Acrylic sealant — for joints between molding and corner element, between molding and wall
-
Primer — for preparing polyurethane for painting
-
Paint — acrylic, water-based
Tool and auxiliary materials:
-
Spirit level — for precise horizontal and vertical marking
-
Tape measure — for calculating frame dimensions
-
Pencil or fine marker — for marking on the wall
-
Painter's tape — to protect the wall surface when applying glue and sealant
-
Square or T-square — for checking right angles in markings
-
Rag — for immediate removal of excess glue
If this is your first molding project, it is recommended to review the practical details in the article installing polyurethane molding, which covers the nuances of working with joints, markings, and painting.
What is better: ready-made corners or a 45° miter cut
This question arises for everyone who encounters moldings for the first time. There is no definitive answer — it depends on the situation.
| Option | When it fits | Pros | Cons |
|---|---|---|---|
| 45° miter cut | You have a miter saw with a precise stop, smooth molding, a few frames, and some experience | The joint is clean, the corner decor is uninterrupted | Requires tools and experience, risk of error, material waste |
| Ready-made corner pieces | DIY installation, ornate molding, many frames, need a decorative accent at the corner | Accuracy does not depend on the tool, the corner is always neat, additional decor | The corner is slightly more visually pronounced, need to select a compatible element |
| Combined option | Some frames are simple (can be cut), some have ornament or accent corners | Flexibility to choose based on the situation | Harder to maintain style consistency |
For most DIY projects, ready-made corner pieces are preferable. They eliminate technical risk and add decorative value. For professional installation with the right tools, miter cutting is justified for smooth moldings and minimalist systems.
Installing frames with ready-made corner pieces: how it works in practice
Understanding the installation process helps calculate materials more accurately and avoid mistakes. Let's briefly describe the workflow.
Step 1: Marking on the wall
Mark with a pencil using a level and tape measure. For each frame, mark the outer corners. Check the horizontal and vertical alignment of each line with a level. Check symmetry of frames relative to each other with a tape measure from walls and floor.
Step 2: Cutting the moldings
Moldings are cut straight to the required size. The length of each strip is determined from the inner edge of one corner block to the inner edge of the next. This is the main convenience of ready-made corner pieces: you don't need to think about miter cuts—only about the length of the strip.
Step 3: Installing corner blocks
Corner elements are installed first. Apply glue to the back of the block, attach it to the marked corner, align with the marks, and secure. Hold for 30–60 seconds for initial bonding. Remove excess glue immediately with a cloth.
Step 4: Installing molding strips
Apply glue to the back of the strip in a zigzag pattern. Attach to the wall, aligning the ends of the strip with the inner edges of the corner blocks. Align with the markings, press, and secure with painter's tape until set.
Step 5: Sealing joints
After the glue has set, apply a thin line of acrylic sealant to the joint between the molding and the corner block, and between the molding and the wall. Smooth with a wet finger. Allow to dry.
Step 6: Priming and painting
Prime the surface of the decor and apply paint in two thin coats with intermediate drying. After painting, the joints become invisible, and the frame is perceived as a single architectural form.
Detailed practical instructions for working with stucco molding — in the article installation of polyurethane molding.
Mistakes when buying corners for moldings
Here is pure practice: what goes wrong and how to avoid it.
Buying corner pieces without checking the width of the molding. The width of the corner element must match the width of the molding. Buying "similar" ones blindly means getting elements that don't visually align.
Choosing a different style ornament. A baroque corner with an art deco molding is not eclecticism, it's a conflict. The style of the corner and the style of the molding must be from the same decorative system.
Not counting the number of frames. "I'll buy four for now, add more later" is a classic problem scenario. Reordering corner elements means risking that the needed item is out of stock. Count everything before purchasing.
Forgetting about a molding reserve. It's easy to buy corner blocks exactly for the number of frames. But molding without a 10–15% reserve guarantees a shortage at the project's end.
Buying corner pieces and moldings in different styles. Even if the sizes match, the stylistic mismatch is immediately visible. It's better to choose everything from one manufacturer's catalog and one series.
Placing large corners on small frames. An 80 × 80 mm corner block on a 50 × 70 cm frame is a corner larger than the frame itself. Maintain proportions.
Gluing without marking. A frame glued "by eye" is almost never straight. Marking with a pencil and level is a mandatory step that cannot be skipped.
Painting before sealing joints. The joints between the molding and the corner block must be filled with sealant and primed before painting. Otherwise, gaps become more noticeable after paint application.
Not considering the location of sockets and switches. A frame crossing a socket or switch is a layout error. Plan the frame layout considering the electrical placement on the wall.
Do not account for furniture. Frames that will be partially covered by a sofa, cabinet, or bed result in a loss of both material and decorative effect. Plan the layout considering the furniture arrangement.
Additional elements to enhance the frame system
Frames made from moldings with corner blocks are a complete solution in themselves. However, there are a number of additional elements that can enhance the decorative system.
Central overlays
An ornamental element in the center of the frame—a medallion or rosette of small diameter—adds decorative richness to the frame. It works especially well in large frames from 80 × 100 cm and above. Polyurethane decorative appliques in the STAVROS catalog are suitable for this task.
Horizontal lines between frames
A thin horizontal molding running at the same level through several frames ties them into a horizontal tier. This is a technique used in classic wall design when you need to create the feel of architectural bands.
Vertical moldings between frames
Vertical molding strips between frames in a single row create a pilaster effect. This solution works well in tall rooms, emphasizing the verticality of the space.
Baseboard and cornice line
If the frame system takes up most of the wall, it can be finished with a baseboard profile at the bottom and a cornice profile at the top. This turns the frame panel into a full-fledged architectural wall cladding. More about wall decoration in the category Polyurethane wall decor.
Where to buy corner elements and polyurethane moldings
Before placing an order, draw a wall diagram with dimensions, number of frames, and location of each. Count the number of corner elements (4 × number of frames + 2 spare pieces) and the length of molding (with a 15% margin). Only go to the catalog with a ready diagram and calculation — otherwise, you'll have to come back twice.
To create a neat frame system, it is important that You can buy ready-made stucco matching the Baroque style. Calculate the quantity: linear meters of cornices and moldings, number of rosettes, pilasters, consoles, corner elements. Add a ten to fifteen percent allowance for trimming. — moldings and corner elements are from the same system. This ensures matching width, relief, thickness, and style.
The STAVROS catalog features all categories for frame decor:
-
polyurethane wall moldings — different profiles, sizes, styles
-
Decor for Molding — corner elements, inserts, and decorative blocks
-
Polyurethane decorative appliques — for central accents within frames
-
Polyurethane wall decor — system solutions for wall surfaces
Assemble the full set, add consumables — and the frame system on your wall will look exactly as intended: straight, symmetrical, professional.
FAQ: answers to popular questions about molding corners
Can frames be made from moldings without a 45° cut?
Yes, that's exactly what ready-made corner elements are for. The moldings are cut straight to the required size, and the corner block covers the joint. No 45° cut is needed.
How to choose a corner element for a molding?
Compare the width, relief thickness, and ornament style. The corner should match the molding in width (±10–20%), have a similar relief height, and correspond to the same style — neoclassical to neoclassical, classic to classic. It's best to take the molding and molding decor from the same collection.
How many corners are needed for one frame?
For one rectangular or square frame — 4 corner elements. For three frames — 12. For five frames — 20. Add 1–2 pieces as a spare in case of damage during installation.
What to buy together with molding corners?
Moldings (with 15% extra), mounting glue, acrylic sealant, primer, paint, painter's tape, a level, and a tape measure. Optionally — decorative overlays for central accents.
What is better: a 45° miter cut or ready-made corner blocks?
If you have a miter saw with a precise stop and experience working with moldings, a miter cut is suitable for smooth profiles. For ornate moldings, DIY installation, and projects with many frames, ready-made corner elements are preferable.
Can corner blocks for moldings be used on furniture?
Yes, small corner blocks are compatible with thin furniture moldings. They can be used on cabinet doors, dressers, and built-in furniture, provided they match in width and style.
Where to buy corner blocks for polyurethane moldings?
In the STAVROS catalog in the category Decor for Molding corner elements and decorative inserts for wall frames and furniture facades are presented. Moldings and decor for them are best chosen from the same system — this guarantees matching size, relief, and style.
How to avoid gaps in the corners of a molding frame?
Even with ready-made corner elements, a thin gap may remain between the molding and the block. It is closed with acrylic sealant, which after drying is primed and painted together with the entire surface. After painting, the joint becomes visually invisible.
About the company STAVROS
Decorative frames on the wall are not a complex architectural project or the prerogative of design studios with large budgets. It is a solution accessible to anyone who wants to change the space thoughtfully and neatly. And ready-made corner elements for moldings are exactly the tool that makes such a solution truly feasible with your own hands.
STAVROS — catalog of decorative stucco, moldings, corner elements, overlays, and architectural polyurethane decor for interiors and facades. The assortment includes everything needed to create a frame system on the wall: moldings of various profiles, corner blocks and inserts, decorative overlays for accents, wall decor, and all consumables for installation.
Select moldings and decor from one collection, calculate the quantity according to the scheme, add consumables — and proceed with installation for a predictable, professional result. The STAVROS catalog is open for your project.


