
























































Article Contents:
- When the molding frame is already in place, the problem moves inside it
- An empty frame looks calmer
- A frame with a central overlay gets a decorative center
- Monochrome painting makes the system calmer
- Confirmed dimensions of NPU-133
- Which size to record
- Why height also matters
- Try from small to large
- Photograph the entire wall
- Look from the main point of the room
- For small internal margins
- For repeating frames
- For side margins next to a large central frame
- For medium frames
- For a monochrome wall
- If there are many frames
- Why such a step in the size range is convenient
- For a medium-width frame
- In the same color as the wall, 12 mm depth is already well read by light
- On a field 400 mm wide
- On a 500 mm field
- Depth 14 mm
- On a 350 mm wide frame
- On a 500 mm field
- On a 650 mm field
- Depth 20 mm enhances the scale
- The key is to leave enough space at the top and bottom
- You don't have to place NPU-133 in the mathematical center of the wall
- If there is a console under the frame
- If there is a sconce above
- If a painting hangs inside the frame
- All frames are the same — overlays are the same
- Central frame is decorated, side frames are empty
- Central NPU-133 is larger, side ones are smaller
- Overlays only in the top row
- First try on the middle frame
- Check the repeat in the photo
- Small NPU-133 works thinner
- Large sizes work more relief-like
- Side Lighting
- Even frontal light
- Evening local lighting
- Five identical fields
- One central and four side ones
- Two symmetrical frames
- Do not add quantity 'just in case' automatically
- One large NPU-133
- Several small ones
- Large central plus small side ones
- Wall, molding, and NPU-133 completely identical
- Wall of one tone, stucco slightly different
- Moldings match the wall, NPU-133 contrasts
- How many sizes does NPU-133 have?
- What material is NPU-133 made of?
- What to measure before ordering — the wall or the frame?
- Why can't you choose a size based on the total wall width?
- What size would fit a small frame?
- What size is considered medium?
- What is the NPU-133 230 mm used for?
- Can the NPU-133 230 mm be used in a frame that is 350 mm wide?
- How do I make an NPU-133 template?
- Do I need to draw an ornament on the template?
- Where should the NPU-133 be placed inside the frame?
- Can the overlay be shifted upward?
- Do I need to install the NPU-133 in every frame?
- Can different sizes be used on the same wall?
- When is it better to use the same sizes?
- Can the NPU-133 be painted the same color as the wall?
- Will the ornament disappear if the color is the same?
- Which option has the most delicate relief?
- Which option is the most voluminous?
- Does the depth affect the choice of color?
- Should the molding and NPU-133 be painted the same?
- Can the NPU-133 be highlighted with a different color?
- What to do if the moldings are already painted?
- What size should be chosen for a frame of 400 × 700 mm?
- And for a field of 650 × 1000 mm?
- Can the NPU-133 be placed inside a square frame?
- Can the NPU-133 be used together with a painting?
- Can the NPU-133 be placed next to a wall sconce?
- Do I need to buy spare overlays?
- How do I calculate an order for five identical frames?
- What should I do if the central frame is larger than the side ones?
- Where can I see other overlays if the NPU-133 doesn't fit?
- Where can I select moldings for a new frame?
- Where can I buy the NPU-133?
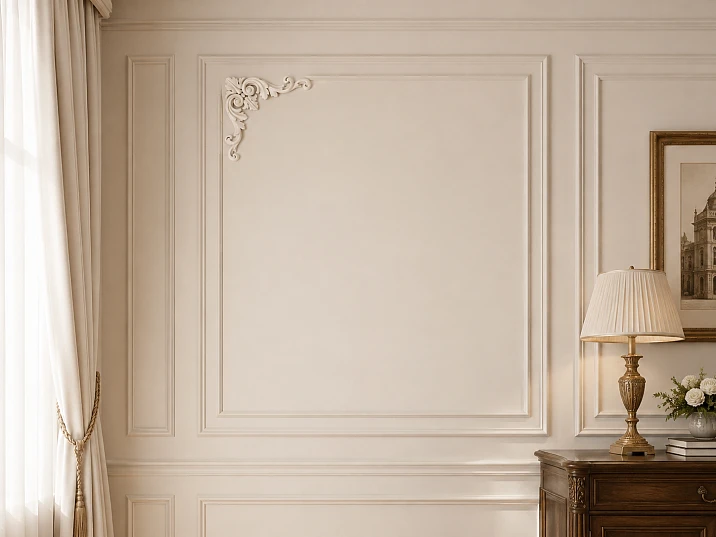
The moldings are already installed, the rectangles on the wall are aligned, and the proportions turned out neat — yet inside the frames, something is still missing. Leaving the fields empty is possible, but sometimes such a wall looks too graphic: there is a contour, but no decorative center. Adding a few more strips of molding inside is not desirable. This is where another scenario emerges: stucco on the wall for painting in the form of a single central carved overlay that fits inside the finished field and is painted together with the moldings and the wall in one color.
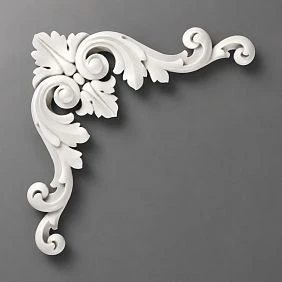
For such a task, the NPU-133 is interesting — a carved polyurethane overlay available in five sizes: 80 × 80 × 7 mm, 120 × 120 × 10 mm, 140 × 140 × 12 mm, 160 × 160 × 14 mm, and 230 × 230 × 20 mm. The pattern remains the same, but the scale changes quite noticeably. Therefore, NPU-133 can be selected not on the principle of "like it — take it," but for a specific inner field of an already assembled molding frame.
There is an important detail here. You need to measure not the entire wall, and not even the outer width of the frame. The buyer is interested in the clear field inside the molding: the rectangle in the center of which the carved overlay will be located. It is its width and height that determine whether NPU-133 will be a neat center or turn into a too-large spot that visually presses on the edges of the frame.
The second task is color. If the moldings, wall, and carved overlay are finished in the same color plane, the relief does not disappear. It starts to work differently: instead of a sharp color contrast, light and shadow appear. The deeper the NPU-133 variant, the more noticeable this plasticity is. The most compact model has a depth of 7 mm, the largest — 20 mm. Therefore, choosing the size simultaneously changes both the area of the decor and the degree of its relief.
If the wall system is still being formed and you need to select not one central piece, but all the polyurethane molding, you can first You can buy ready-made stucco matching the Baroque style. Calculate the quantity: linear meters of cornices and moldings, number of rosettes, pilasters, consoles, corner elements. Add a ten to fifteen percent allowance for trimming. and assemble a unified set for the room. If the moldings already exist, the task becomes more precise: determine the dimensions of the inner fields, make five paper templates of NPU-133, compare them in each frame, and only then buy the carved overlay NPU-133 of the required scale.
When the molding frame already exists, the problem moves inside it
An empty wall and a wall already divided by moldings require different solutions.
On an empty surface, first decide where the decor will be in general. Determine the width of the fields, height, axes, distances between frames.
After installing the moldings, most of these issues are already resolved. The geometry is set.
What remains is another question: whether something needs to be placed inside each field and what size that element should be.
At first glance, the central overlay seems like a minor addition. In practice, it can noticeably change the character of the wall.
Without it, the eye primarily reads rectangles.
With it, a second level appears: the outline and the inner ornament.




An empty frame looks calmer.
This is not a drawback.
In an interior with a lot of furniture, paintings, lighting fixtures, or expressive textiles, empty fields may be exactly what is needed.
Therefore, NPU-133 should not be automatically added to every frame just because the free space allows it.
Our factory also produces:
A frame with a central overlay gains a decorative center.
The carved detail gathers the empty plane.
The effect is especially noticeable on large solid-color fields, where a geometric frame already exists, but its middle seems unjustifiably empty.
Get Consultation
Monochrome coloring makes the system calmer
When the molding, overlay, and background differ in color, the wall becomes multi-layered not only in form but also in tone.
When painted in one color, the composition is read through the relief.
This is especially useful when you want to add stucco decor but not make the wall colorful.
NPU-133 is not five different overlays, but five scales of one solution
The main advantage of the NPU-133 size range for such a wall is not the number of options in itself.
The buyer does not need to change the pattern if one frame is larger than another. You can keep one motif but change its scale.
Confirmed sizes of NPU-133
| Option | Size, mm | Relief depth, mm | Which task should be checked |
|---|---|---|---|
| NPU-133 | 80 × 80 × 7 | 7 | Small frames and secondary fields |
| NPU-133 | 120 × 120 × 10 | 10 | Compact and medium wall panels |
| NPU-133 | 140 × 140 × 12 | 12 | Medium scale without excessive filling |
| NPU-133 | 160 × 160 × 14 | 14 | More prominent center of a large frame |
| NPU-133 | 230 × 230 × 20 | 20 | Large inner fields and pronounced relief |
All five options are carved polyurethane overlays.
For the buyer, this means a simple thing: you have to choose based on two parameters at once.
The first is how much of the inner field the square will occupy.
The second is how voluminous its relief will read after monochrome painting.
An increase from 80 to 230 mm is not a small difference within one category. In width, the largest version is almost three times larger than the smallest, and the depth increases from 7 to 20 mm.
Therefore, a photograph of the ornament by itself decides almost nothing.
Measure not the wall, but the light field inside the molding
This is the main rule of the entire article.
Suppose the total width of the wall panel with the molding is 600 mm.
But the profile itself takes up part of this width.
If you measure from the outer edge of one molding to the outer edge of another, you will get an overestimated space.
NPU-133 is installed not on the molding, but in the free field between its inner boundaries.
Consequently, it is this that should be used in the calculations.
What size to record
You need to get two values:
-
W — clean width inside the frame;
-
H — clean height inside the frame.
For example:
W = 420 mm; H = 680 mm.
Now you can compare square NPU-133 with this rectangle:
80, 120, 140, 160, and 230 mm.
Why height also matters
You might think: the plate is square, so width is enough.
This is a mistake.
In a very elongated field, a small square can get lost vertically, even if it looks fine horizontally.
Conversely, in an almost square frame, a large version can convincingly fill the center.
Therefore, you need to look at the entire rectangle.
A simple scale indicator: how much of the short side is occupied by NPU-133
There is no strict standard here. But for comparing options, it is convenient to use the ratio of the overlay size to the short side of the inner field.
If the field is 400 × 700 mm, the short side is 400 mm.
Then:
-
80 mm occupies 20% of the short side;
-
120 mm — 30%;
-
140 mm — 35%;
-
160 mm — 40%;
-
230 mm — 57.5%.
These numbers do not mean that 35% is "correct" and 57.5% is "incorrect."
They help understand the difference.
On the same NPU-133 field, 80 mm will be a small ornamental sign.
160 mm — already a noticeable center.
230 mm — a large part of the entire panel.
This is exactly what the buyer should see before ordering.
Paper squares solve more than a dozen photographs
For NPU-133, it is very easy to make full-size templates.
Five squares will be needed:
-
80 × 80 mm;
-
120 × 120 mm;
-
140 × 140 mm;
-
160 × 160 mm;
-
230 × 230 mm.
Cut them out of paper or cardboard.
Do not draw the ornament. At the first stage, the area is important.
Try from small to large
Start with 80 mm.
Then move on to 120, 140, 160, and 230 mm.
This way, the eye gradually sees at what point the decorative center becomes expressive enough, and at what point it starts to take up too much of the inner plane.
Photograph the entire wall
Not just one frame.
On a separate field, a 160-millimeter overlay may seem successful.
But if there are six such frames on the wall, six identical large elements create a completely different density.
Look from the main point of the room
In the living room — from the sofa or from the entrance.
In the bedroom — from the door and the bed.
In the hallway — from the beginning of the passage.
Small decor, perfectly distinguishable from half a meter away, can almost disappear from three to four meters.
NPU-133 80 × 80 × 7 mm: a small detail does not mean a small role
The most compact option is especially interesting where the frame itself is small or there are many decorative fields.
It has two important features:
-
width 80 mm;
-
depth 7 mm.
When painted in the wall color, such a relief will work much softer than large options.
For small internal fields
Let's imagine a frame with a clear field of 280 × 450 mm.
The 80-millimeter overlay takes up less than a third of the width.
It remains a small central sign, around which there is enough free background.
120 mm also physically fits, but already noticeably fills the area more strongly.
It is here that the layout shows whether the wall needs delicacy or a more pronounced center.
For repeating frames
If there are five or six identical narrow panels on the wall, large decor in each can make the surface too dense.
NPU-133 80 mm allows you to repeat the pattern without turning it into the main theme of the wall.
For side fields next to a large central frame
A very strong scenario is a hierarchy of sizes.
The large central field gets NPU-133 160 or 230 mm.
Side ones — 80 mm.
The pattern remains the same, but the composition gets a main center and secondary elements.
NPU-133 120 × 120 × 10 mm: when 80 mm is already too modest
The difference between 80 and 120 mm is 40 mm in width, but in terms of area the effect is significantly greater.
A square of 120 × 120 mm has an area more than twice that of 80 × 80 mm.
The eye perceives this immediately.
For medium frames
If the inner field is about 350–450 mm wide, the 120 mm version is often one of the first to compare.
It is already noticeable enough, but does not yet occupy a large part of the plane.
For a monochrome wall
A depth of 10 mm creates more pronounced light and shadow than 7 mm.
If everything is painted one color, this is important.
The difference in sizes is visible not only in the outer contour, but also in the work of the relief.
If there are many frames
120 mm is already a size that needs to be viewed not just on one panel, but across the entire wall.
Six identical 120 mm squares are visually significantly more active than six 80 mm ones.
NPU-133 140 × 140 × 12 mm: an intermediate scale that often settles the debate
Sometimes 120 mm looks too cautious, while 160 mm is already heavy.
This is where the 140 × 140 × 12 mm size comes in handy.
There are only 20 mm between adjacent options, but on a neatly assembled wall, this difference is noticeable.
Why this step in the size range is convenient
If 160 mm came right after 120 mm, the buyer would have to choose between two quite different scales.
140 mm allows for a more precise match to the proportion of the inner field.
For a medium-width frame
Suppose the clear field is 420 × 700 mm.
140 mm make up a third of the width.
Visually, this creates a confident center with a noticeable amount of free surface around it.
160 mm will take up about 38% of the width.
Both options are possible, but the character of the wall will change.
In the same color as the wall, 12 mm of depth is already well read by light.
There is no need to introduce a contrasting shade just to make the ornament noticeable.
Before choosing a color, look at the actual relief in daylight and artificial lighting.
NPU-133 160 × 160 × 14 mm: a size for a frame that should have a true center.
160 mm is no longer a small additional sign.
Such an NPU-133 forms a noticeable center of the panel.
This is especially important in large rooms where the wall is visible from a great distance.
On a 400 mm field in width
160 mm takes up 40%.
There is enough free background, but the overlay clearly makes itself known.
On a 500 mm field
The share drops to 32%.
Here, 160 mm looks calmer and may be a good intermediate solution between 140 and 230 mm.
Depth 14 mm
Monochrome painting does not turn such an overlay into a flat spot.
The relief gets noticeable chiaroscuro.
Therefore, when choosing 160 mm, it is important to assess the wall lighting: side light can make the ornament significantly more expressive than frontal light.
NPU-133 230 × 230 × 20 mm: for a large field, not just for a large room
The largest option is easy to choose incorrectly.
A person sees a large living room and thinks: "Since the room is large, the largest overlay is needed."
But the size of the room does not equal the size of the inner frame.
The panel can be narrow even in a spacious hall.
Therefore, for NPU-133 230 mm, the geometry of the specific field is critical.
On a frame 350 mm wide
230 mm takes up about two-thirds of the width.
Little free background remains.
This option will almost certainly be very active.
On a 500 mm field
230 mm makes up 46%.
The solution is still large, but it gets more space now.
On the field 650 mm
That's about 35%.
Now the large NPU-133 can look much calmer.
A depth of 20 mm enhances the scale
With monochrome painting, the large version works not with color, but with more pronounced plasticity.
Therefore, it should be considered where a large central relief is really needed, not just because it's the maximum model size.
Five sizes of NPU-133 in one selection table
| NPU-133 size | Character within the frame | When to try on first | When to check the adjacent size |
|---|---|---|---|
| 80 × 80 × 7 mm | Delicate center | Small frames, frequent repetition | If the decor gets lost |
| 120 × 120 × 10 mm | Moderate scale | Medium and compact fields | Compare with 140 mm |
| 140 × 140 × 12 mm | Pronounced but not large center | Medium panels | If 120 is too little, and 160 is too much |
| 160 × 160 × 14 mm | Noticeable central relief | Large frames | Compare with 140 or 230 mm |
| 230 × 230 × 20 mm | Large architectural accent | Large free margins | If the side margins become tight |
This table does not replace the layout.
It reduces the number of candidates.
For a small frame, you can start with 80 and 120 mm.
For a medium one, start with 120, 140, and 160 mm.
For a large one, start with 160 and 230 mm.
Square NPU-133 inside a tall rectangular frame: why it works
Molding panels are often vertically elongated.
NPU-133 square.
At first glance, the shapes are different.
In fact, it is precisely this contrast that can be useful.
The tall frame sets the vertical.
The square carved overlay stops the eye at its center.
If you place another elongated vertical element inside, the whole composition may become overly directed upward.
The main thing is to leave enough space at the top and bottom.
On a tall frame, the square should not seem randomly glued in a huge void.
The vertical position is selected according to the layout.
It is not necessary to place NPU-133 in the mathematical center of the wall.
Centering should be relative to the inner field of the frame, not to the entire wall.
If the frame itself is offset due to furniture or architecture, the overlay follows its geometry.
Square frame and square NPU-133: here the scale error is more noticeable
When shapes are similar, boundaries are especially easy to compare.
For example, the inner field is 400 × 400 mm.
NPU-133 80 mm looks like a small center.
160 mm takes up 40% of the side.
230 mm is already 57.5%.
In a square panel, a too-large option can create a feeling of "frame around the overlay" rather than "overlay inside the frame."
This is acceptable only if that exact effect is needed.
Where to place the overlay inside a tall panel
The most understandable first option is the geometric center of the inner field.
But the interior sometimes requires adjustments.
If there is a console under the frame
The furniture already sets the lower visual weight.
An overlay placed too low may merge with the object.
If there is a sconce above
The light fixture changes the free composition of the frame.
The center between the moldings remains mathematically correct, but the field is already visually divided.
If a painting hangs inside the frame
NPU-133 should not compete with the image.
More often, you need to choose one: a central cover plate or a separate wall-mounted object.
One cover plate in each frame is not a mandatory rule
The wall can be divided into five panels.
This does not mean you need to buy five identical NPU-133 units.
There are several schemes.
All frames are the same — the cover plates are the same
The strictest option.
Suitable if the panels have the same dimensions and equal roles.
The central frame is decorated, the side ones are empty
This is how one accent appears.
Especially appropriate on the wall behind a sofa, console, or bed.
The central NPU-133 is larger, the side ones are smaller
One pattern, two scales.
This is one of the most interesting scenarios specifically for NPU-133, because the size range allows changing the scale without changing the motif.
Overlays only in the top row
If the wall layout is complex and has multiple levels, carved decor can be used selectively.
The main thing is that the choice looks intentional.
A large central frame and two narrow side ones: a ready-made task for multiple sizes
Let's imagine a wall:
-
central inner field — 700 × 1000 mm;
-
two side ones — 320 × 900 mm each.
Installing NPU-133 230 mm in all three fields is physically possible only after checking, but on the side panels it will take up too large a share of the width.
A more logical layout:
-
central — 230 mm;
-
side ones — 80 or 120 mm.
Or:
-
central — 160 mm;
-
Side ones — 80 mm.
This way the wall remains cohesive through the common pattern, but does not become monotonous.
Same size in all frames: when it is better
Hierarchy is not always needed.
If all panels are the same width and height, different NPU-133 sizes can create unjustified inconsistency.
In such a situation, it is wiser to choose one size and repeat it.
First, try the middle frame.
If the walls are symmetrical, it is convenient to start with a panel that is clearly visible from the main point of the room.
The chosen scale is then applied to the rest.
Check the repetition in the photo.
One NPU-133 160 mm may seem calm.
Five such details in a row is already a rich decorative rhythm.
Therefore, duplicate the paper template across all fields.
Why you cannot choose the NPU-133 size based on the external width of the moldings.
Let's imagine two frames.
Both have an external width of 500 mm.
But the first one uses a thin profile.
The second one uses a wider one.
The internal field turns out to be different.
If you select the same NPU-133 by external size, in the second frame it will occupy a larger share of the free area.
Hence the practical conclusion:
each specification must include the internal width and internal height of the panel.
Not "a frame about 50 cm".
But specifically:
field 412 × 680 mm.
If the moldings have not been purchased yet, first design them, then the central decor.
The article scenario assumes that the frames are already available.
But sometimes the reader is at the previous stage.
In this case, you should not first choose the NPU-133 and then build the entire wall pattern around it if the main task is panel layout.
First, the grid is determined.
If profiles are needed, you can Buy polyurethane wall moldings after checking the wall dimensions and future margins.
Then the inner rectangles receive precise dimensions.
And only then is the NPU-133 selected.
If the moldings are already installed, do not try to change the frames for the sake of an overlay.
This is the reverse error.
I liked the NPU-133 230 mm.
But in the existing frame, it looks large.
There is a desire to expand the molding field.
If the frames are already arranged across the entire wall, such a change can disrupt the entire rhythm.
It is easier to take NPU-133 160, 140, or 120 mm.
It is precisely the availability of five sizes that allows adapting the product to the existing geometry, rather than redoing a finished wall.
Monochrome stucco: why one color does not make the wall flat
Relief has two tools of expressiveness:
-
color;
-
chiaroscuro.
If you give up the first, the second remains.
The molding protrudes above the surface.
The carved NPU-133 also has depth.
Light falls on the protruding parts, while the recesses darken.
As a result, even with the same color, a pattern appears.
The small NPU-133 works more subtly
A depth of 7–10 mm creates a more delicate chiaroscuro.
Large sizes work more relief-like
14 and 20 mm give a more noticeable volume.
Therefore, the question "will the overlay be visible if painted in the wall color?" cannot be separated from the chosen size type.
Why monochrome works especially well on a wall with many frames
If five molding fields are highlighted with a contrasting color, and contrasting carved overlays are added inside, you get several levels of pattern at once.
This can be a deliberate decorative solution, but for a calm interior this approach is often too active.
One color unifies:
-
background;
-
moldings;
-
NPU-133.
The eye first sees the wall architecture as a whole, and then notices the relief.
This is a different character than contrasting molding.
The wall color is more important than the fashion for a specific shade
You don't need to choose a tone just because it is often found in interior photos.
Monochrome molding enhances the wall color itself, because one shade extends across different planes.
In a light tone, the relief may read as softer.
In a saturated one, shadows look deeper.
But there is no universal "best color for polyurethane molding."
The main thing is to test the specific combination in the room.
How to test the color before painting the entire wall
If possible, make a test area.
You don't have to finish the whole wall at once.
The goal is to see:
-
how the color looks on a flat surface;
-
how it behaves on a protruding molding;
-
how readable is the relief of the overlay;
-
what happens in the morning and in the evening;
-
how artificial light affects it.
The specific composition of paint, primer, and preparatory materials should be chosen based on the substrate and the polyurethane decor.
Unconfirmed universal recipes only get in the way here.
When the moldings are already painted, and NPU-133 is added later
This is a common situation.
The wall is completely ready.
After a few weeks, it becomes clear that the frames lack a center.
In this case, the task becomes more complicated not by the choice of the overlay, but by matching the finish.
You need to decide:
-
will the entire panel be repainted;
-
only NPU-133;
-
molding and overlay;
-
the entire wall as a whole.
If precise color uniformity is required, local touch-up may differ from the existing surface due to material batch, application method, or coating condition.
Therefore, it is better to plan the finishing strategy before installing the overlay.
When all the decor is not yet painted
This is the most convenient scenario for the "one color" idea.
Moldings already set the geometry, but the finish is still ahead.
You can first select NPU-133, do a dry fit, check all axes, and after surface preparation proceed to a unified finishing system.
At the same time, the specific sequence of priming and painting should be chosen based on the actual materials, not according to a universal scheme from the internet.
Contrasting color overlay: when this is already a different interior technique
Can NPU-133 be highlighted with a different shade?
Compositionally — yes, but the effect changes dramatically.
In monochrome, the relief becomes the main element.
In contrast, it's the square shape itself and the ornament.
Especially the large 230 mm version can turn into an independent color accent.
If the article's goal is calm molding in the wall color, it's better to first test the contrast on a paper mockup or visualization rather than making a decision automatically.
Molding and NPU-133 in the same color, wall in another
This is another option.
Then all the molded elements are assembled into a separate graphic system.
But it already emphasizes the boundaries more strongly.
If the initial goal is to hide the boundary between decor and background, it is better to leave all three levels in the same tone.
Light can change the size choice after painting
The same relief looks different on a wall with a side window and in a corridor with frontal ceiling light.
Side lighting
Emphasizes depth more strongly.
Even an NPU-133 80 or 120 mm can look quite expressive.
Even frontal light
Softens shadows.
A small overlay can read more calmly.
Evening local lighting
If there is a sconce nearby, part of the relief can get a very strong chiaroscuro pattern.
Therefore, it is better to check the size mockup not only during the day.
The size and depth of NPU-133 should be considered together
Often the buyer compares only 80, 120, 140, 160, and 230 mm.
But the full size includes a third dimension.
| Width and height | Depth | How the monochrome effect changes |
|---|---|---|
| 80 × 80 mm | 7 мм | The most delicate plasticity |
| 120 × 120 mm | 10 мм | The relief becomes more noticeable |
| 140 × 140 mm | 12 мм | Medium volume |
| 160 × 160 mm | 14 мм | Pronounced chiaroscuro |
| 230 × 230 mm | 20 мм | The most voluminous option in the lineup |
Thus, choosing the large NPU-133 means not only increasing the ornament area.
The wall becomes more relief.
That is why monochrome does not make the five sizes visually identical.
Small frame: which size to look at first
Suppose the inner field is 280 × 450 mm.
Candidates:
-
80 mm;
-
120 mm;
-
possibly, 140 mm.
160 mm already takes up more than half the width.
230 mm leaves very little free space.
Start with 80 and 120 mm.
If 80 looks too small, move to 120.
Check 140 mm only after that.
Field 350 × 600 mm: a choice of three scales appears
Here:
80 mm — about 23% of the width;
120 mm — about 34%;
140 mm — 40%;
160 mm — about 46%;
230 mm — about 66%.
The 120 and 140 mm options look like natural candidates for the first fitting.
160 mm already forms a very noticeable center.
Field 420 × 700 mm: average frame without an obvious answer
Here it is interesting to compare at once:
120, 140, and 160 mm.
120 — a calmer ornament.
140 — intermediate.
160 — expressive.
If there are many frames on the wall, a smaller option may be better.
If there is one large frame, a larger one is better.
Field 500 × 800 mm: NPU-133 160 mm becomes especially interesting
160 mm takes up 32% of the width.
Significant space remains around it.
230 mm takes up 46%.
Here, two large options really compete.
Which one to choose depends on the panel's role.
For the main central field, 230 mm may be appropriate.
For the repeating side ones, 160 mm is calmer.
Field 650 × 1000 mm: small overlays may get lost
80 mm is only about 12% of the width.
Even 120 mm is less than 19%.
If the wall is visible from a distance, such options may turn out to be too small.
Here it makes sense to start with 160 and 230 mm.
But again — only after a full-size fitting.
Field 900 × 1200 mm: it is not necessary to take the maximum version
230 mm takes up about a quarter of the width.
This no longer looks huge.
But if there are several such frames nearby, the repetition of a large ornament can become rich.
Therefore, compare 160 and 230 mm across the entire wall.
Main panel above the sofa
In the living room, the central frame is often larger than the neighboring ones.
NPU-133 can emphasize its status.
But consider the furniture.
If the sofa back overlaps the lower part of the panel, the free field is not perceived as a whole.
It is better to evaluate the overlay together with the sofa, rather than on an empty wall before arranging.
Wall behind the bed
Here, moldings often form symmetrical fields around the headboard.
If the central frame is partially covered by the bed, the NPU-133 can be positioned higher than the visible area.
However, the geometric center of the full field may already be an incorrect reference point.
You need to look at the visible part after the furniture is installed.
Entryway and hallway: a small size can work better than a large one
In passage areas, a person is closer to the wall.
The relief is visible almost point-blank.
The NPU-133 at 80 or 120 mm can be much more pronounced than in a large living room.
In addition, panels in the hallway are usually narrower.
Therefore, the large 230-millimeter version needs to be tried on especially carefully.
Study: frames are adjacent to furniture
Bookcases, a table, and paintings already create visual load.
NPU-133 can support a classic or decorative wall structure, but it does not have to become the main focal point.
If the furniture is active, start with a smaller size.
Commercial space: repetition is first tested on one section
In a salon, showroom, hotel, or other space, there may be ten or more identical frames.
The scale error is then repeated many times.
First, design a mockup of one section.
Then photograph a long perspective.
Only after this calculate the entire set.
How many NPU-133 to order for the wall
Unlike molding, the overlay is not calculated in linear meters.
You need to count the number of specific frames in which it will be installed.
Five identical fields
If it is decided to install the same NPU-133 in each, five pieces of the selected size are required.
One central and four side ones
For example:
-
center — 1 pc. 230 mm;
-
side ones — 4 pcs. 120 mm.
Two symmetrical frames
If NPU-133 is used only on the sides, a paired set of the selected size is needed.
Do not add quantity "just in case" automatically
For ready-made overlays, the logic differs from linear decor, where there is cutting.
The quantity is determined by the actual decorative zones.
What is more compositionally advantageous: one large or several small ones
Here, it's not the cost that matters, but the result.
One large NPU-133
Emphasizes the main panel.
Suitable for a wall with a pronounced center.
Several small ones
create rhythm.
Suitable for a row of identical frames.
Large central plus small side ones
Makes the hierarchy most explicit.
It is precisely the presence of five sizes that allows building such a system without changing the pattern.
When NPU-133 is not needed at all
Sometimes after all the mockups, the best option is to leave the frame empty.
This is a normal result.
Skip the overlay if:
-
there will already be a picture inside;
-
a wall lamp is mounted;
-
furniture blocks the center;
-
the frame itself is quite complex;
-
the relief overloads the wall;
-
even 80 mm look excessive;
-
The interior is built on maximally calm geometry.
Good decor is not measured by the number of details.
NPU-133 and decor for moldings are different tasks.
NPU-133 fits into the center of the field as an independent carved overlay.
Other decor can work directly with the corners or lines of the frame.
If you need to develop the contour itself rather than fill the middle, it is useful buying polyurethane molding decor to choose elements for a different compositional task.
You should not add everything at once.
A central overlay plus corner decor plus a complex molding on a small panel can create excessive density.
NPU-133 and a regular decorative overlay of a different pattern
If one of the five sizes doesn't fit, it doesn't mean that central decor is impossible in principle.
You can go to the category and Buy decorative polyurethane overlays of a different scale.
But first, make sure the problem is really about the size.
Sometimes a suitable NPU-133 is already in the lineup, it's just that the buyer initially only looked at the largest option.
NPU-133 and molding rosette: don't confuse shape and role
The carved overlay is used as a separate ornamental element.
Its square dimensions don't automatically make it a "rosette."
When ordering, rely on the exact article NPU-133 and dimensions, not on the general impression of the shape.
NPU-133 and wall panel are also not the same thing
The molding panel in our topic is a visual field created by molding lines.
NPU-133 does not replace it and does not cover the entire area.
It works inside.
This is a fundamental difference.
What to buy together with NPU-133
If the frames are already ready, the kit can be minimal.
But for an extended project, it is useful to understand adjacent categories.
| What are we considering | Why | When it is really needed | Link | |||||||||||||||||||||
|---|---|---|---|---|---|---|---|---|---|---|---|---|---|---|---|---|---|---|---|---|---|---|---|---|
| NPU-133 | Central carved decor | When the appropriate size is selected | buy the carved overlay NPU-133 | |||||||||||||||||||||
| Decorative overlays | Compare other sizes and patterns | If NPU-133 does not fit in scale | Buy decorative polyurethane overlays | |||||||||||||||||||||
| Moldings | Form or complement the frames | If the wall grid is not yet completed | Buy polyurethane wall moldings | |||||||||||||||||||||
Decor for moldingMistake #11: buy first, then draw the wall diagramWhen frames already exist, first mark their internal dimensions on the diagram. Then distribute the five standard sizes. Mistake #12: consider depth insignificantIt varies from 7 to 20 mm. For monochrome design, this is one of the main factors of light and shadow. Mistake #13: not checking the view from a distanceA carved pattern that seems large in hand may look calm on the wall. And vice versa. Mistake #14: trying to fit 230 mm into a frame just because it physically fitsThere is a big difference between "fits" and "proportionate." Mistake #15: using the leftover principle"Let's put what's left from another frame into this one" is a bad approach for finished overlays. Each field should get a deliberate size. How to build an NPU-133 map for the entire wallIf there are more than three panels, make a simple table.
After this, you can physically cut out paper squares and rearrange them. So the choice of five sizes ceases to be abstract. Do you need to use all five sizes on one wall?Almost never is there such a need. The five sizes exist to select the appropriate scale, not to necessarily showcase the entire range. In one project, usually enough:
Three or more require a very complex grid and careful design. When only NPU-133 140 mm is enoughSuppose all internal frames have a similar width — 400–450 mm. 140 mm works equally well in each one. There's no need to artificially complicate the wall with large and small versions. Repeating one scale can look much more cohesive. When it's worth using 230 mm only in the centerIf the central field is noticeably larger than the others, the largest NPU-133 can emphasize its role. The sides, meanwhile, get 120 or 140 mm. The result is a unified pattern with a clear hierarchy. When 80 mm is better left for secondary framesThe small version works well where the field is part of the overall rhythm but shouldn't attract attention first. For example, narrow side sections of the wall. What to do if none of the five sizes looks rightYou don't need to choose the "least bad" one. Go back to the section where you can Buy decorative polyurethane overlays, and compare a different format. The NPU-133 has a strong size range, but it doesn't have to fit every frame. How to prepare for installation without unnecessary risksThe specific method of fixation depends on the base, existing finish, and the chosen mounting system. But a few actions are universal as project preparation:
Do not assign a specific adhesive or primer based only on the article type. Compatibility must be checked against the actual wall and the polyurethane product. Painting in one color: first decide what exactly counts as "one color"In practice, there are several options. The wall, molding, and NPU-133 are completely identicalThe most cohesive monochrome scheme. A wall of one tone, the molding is slightly differentThe difference is barely noticeable, but the relief becomes more active. The moldings match the wall, NPU-133 contrastsThe central overlay becomes an independent accent. For the topic of this article, the first thing to check is full monochrome. It best shows whether the relief itself is enough. Why a depth of 20 mm does not require a contrasting colorThe large NPU-133 already has a pronounced volume. If the lighting is normal, the protruding and recessed parts create their own graphics. Adding contrast can make it too active. Therefore, for 230 × 230 × 20 mm, it is especially interesting to first look at a variant in the wall color. And won't 80 × 80 × 7 mm get lost?Maybe. Especially on a large field and with soft frontal lighting. But the answer doesn't necessarily have to be a contrasting color. First compare 120 mm. That is, increase the physical scale, and only then change the color system. Practical scenario: five identical frames in the living roomThe inner field of each is 420 × 750 mm. Make templates of 120, 140, and 160 mm. Place them sequentially. If 160 mm looks too frequent, switch to 140. If 120 almost disappears from the sofa, 140 might be the exact intermediate size. Practical scenario: one large frame behind the sofaThe field is 700 × 1000 mm. First, 160 and 230 mm are compared. With monochrome painting, 230 mm will give stronger plasticity, but will not necessarily overload the wall due to the large background around it. Practical scenario: central and two side panelsThe center is 650 mm wide. The sides are 330 mm. You can compare:
Then a calmer option:
A photo of the entire wall will quickly show which hierarchy is better. Practical scenario: frames in a narrow corridorInner field 300–350 mm. Start with 80 and 120 mm. Check 140 mm as a more active option. 160 and 230 mm here already require special caution. Practical scenario: frame above the consoleIf furniture is placed within the visual projection of the panel, measure not only the full rectangle. See which part remains free above the console. The overlay should be centered relative to the perceived field, not hidden behind decor on the tabletop. Practical scenario: frame with a wall sconceIf the light fixture is already installed within the field, do not automatically place NPU-133 in the same center. First determine whether the two objects can coexist. In a small field, it is better to keep only one center. Practical scenario: a wall with a painting in a central frameThe center is occupied by art. Then NPU-133 can only be used in the side fields. For example, 80 or 120 mm each. Thus, carved molding will support the decor without competing with the painting. Practical scenario: the entire wall in one deep colorIn a rich monochrome, relief can look especially expressive due to shadows. Compare sizes under real lighting. Do not assume that a dark color automatically requires a large NPU-133. When such a solution is truly appropriateNPU-133 is worth considering if:
When it is better to leave panels without central decorDo not add NPU-133 if:
How to place an order for NPU-133 without confusionFor multiple sizes, it is better to prepare a specification in advance. For example: NPU-133 230 × 230 × 20 mm — central frame, 1 pc. NPU-133 120 × 120 × 10 mm — side frames, 2 pcs. NPU-133 80 × 80 × 7 mm — lower fields, 2 pcs. After that, you can order NPU-133 of the required size without the risk of mixing up sizes. If one size is selected, the specification is even simpler: the quantity equals the number of frames that actually need the overlay. How to buy molding on STAVROS if the wall is not yet finishedIf NPU-133 is only one stage of decoration, the purchasing route can be built from general to specific. First, determine whether additional Polyurethane moldings. Then check if the molding grid is finished. If not, you can Buy polyurethane wall moldings. After measuring the internal fields — Buy decorative polyurethane overlays or go directly to the specific NPU-133. If you want to develop specifically the contours of the frames, rather than their center, it is considered separately. Decor for polyurethane moldings. Thus, each product solves its own task, and the wall is not assembled from random parts. FAQ: choosing NPU-133 for molding frames and painting in the wall colorHow many sizes does NPU-133 have?NPU-133 has five confirmed sizes: 80 × 80 × 7 mm, 120 × 120 × 10 mm, 140 × 140 × 12 mm, 160 × 160 × 14 mm, and 230 × 230 × 20 mm. What material is NPU-133 made of?NPU-133 is made of polyurethane. What should be measured before ordering — the wall or the frame?You need to measure the clean inner field of the molding frame, that is, the distance between the inner edges of the moldings in width and height. Why can't you choose the size based on the total width of the wall?Because the NPU-133 is installed inside a specific field. On a large wall there may be very narrow frames, and on a small one — one wide frame. What size would fit a small frame?First, you should compare the 80 and 120 mm templates. The exact choice depends on the inner width and height of the field. What size is considered medium?Conditionally, the medium range includes 120, 140, and 160 mm, but the final perception depends on the frame itself. What is the NPU-133 230 mm for?It should be considered for truly large inner fields, where smaller options visually get lost. Can the NPU-133 230 mm be used in a frame that is 350 mm wide?Physically, it can fit, but it will take up a significant portion of the width. This option must be checked with a full-size template. How to make an NPU-133 template?Cut out a square of the required size from paper — 80, 120, 140, 160, or 230 mm — and attach it to the center of the frame with painter's tape. Do I need to draw an ornament on the template?No. To check the scale, the outer square is sufficient. Where to place the NPU-133 inside the frame?The first option should be the geometric center of the clean inner field. After that, the position can be evaluated together with furniture, lighting fixtures, and other objects. Can the overlay be shifted upward?Such a position can be considered if the visual center of the field changes due to furniture or other elements. It is better to verify the solution with a mockup. Is it necessary to place the NPU-133 in every frame?No. Sometimes it is better to design only the central panel or a few selected fields. Can different sizes be used on one wall?Yes. For example, a large NPU-133 in the central frame and smaller variants in the side frames allow maintaining a single pattern while creating a hierarchy. When is it better to use the same sizes?When all frames have the same proportions and play an equal role. Can the NPU-133 be painted the same color as the wall?Such a designer scenario is possible and fits the theme of monochrome molding. Before work, it is necessary to check the compatibility of the specific preparation and painting system with polyurethane and the existing substrate. Will the ornament disappear if the color is the same?No, the relief continues to be readable thanks to light and shadow. How strongly depends on the size, depth of the NPU-133, and lighting. Which option has the most delicate relief?The most compact NPU-133 has dimensions of 80 × 80 × 7 mm, meaning the minimum depth in the considered line. Which option is the most voluminous?The NPU-133 230 × 230 × 20 mm has the greatest depth among the five sizes. Does depth affect the choice of color?It affects the intensity of light and shadow. The greater the volume, the stronger the relief can be read even without color contrast. Do the molding and NPU-133 need to be painted the same way?Not necessarily, but if the goal is a unified monochrome wall, identical or maximally consistent finishing helps to combine the background, frame, and central overlay. Can NPU-133 be highlighted in a different color?Yes, but then it becomes a more independent accent. This is a different decorative scenario that should be tested separately. What to do if the moldings are already painted?First, attach NPU-133 and determine the size. Then decide whether only the overlay, the entire frame, or the entire wall surface will be repainted to achieve the desired tone match. What size should be chosen for a frame of 400 × 700 mm?It is useful to compare 120, 140, and 160 mm. They will give three different levels of field filling. And for a field of 650 × 1000 mm?First of all, it's worth comparing 160 and 230 mm, since smaller options may look too modest. Can the NPU-133 be placed inside a square frame?Yes. But in a square field, the size ratio is especially noticeable, so the larger option needs to be checked more carefully. Can the NPU-133 be used together with a painting?In one small frame, this can create two competing focal points. It's often better to choose either a painting or a carved overlay. Can the NPU-133 be placed next to a wall sconce?Yes, if the field size and the lamp's position allow for a clear composition. For a small panel, two central objects may be redundant. Do I need to buy spare overlays?The quantity is determined by the number of frames and the chosen layout. Unlike linear moldings, there is no cutting to length here. How do I calculate an order for five identical frames?If all five use one size NPU-133, five identical overlays will be required. What to do if the central frame is larger than the side ones?You can choose two sizes: a large one for the center and a smaller one for the side fields. Where can I see other overlays if NPU-133 is not suitable?You can Buy decorative polyurethane overlays after comparing other models in the category. Where can I find moldings for the new frame?If the wall grid is not yet finished, you can Buy polyurethane wall moldings and first form the correct fields. Where can I buy NPU-133?After measuring the frames and checking the paper templates, you can buy the carved overlay NPU-133 in the selected size and required quantity. Five sizes are needed not to complicate the choice, but so that the overlay truly fits the frame.When the wall is already divided by moldings, most of the architectural work is done. Therefore, there is no need to reinvent its composition for the sake of central decor. It is much more accurate to base it on the existing fields. Measure the inner width and height of each frame. Not the outer contour. Not the entire wall. Not an approximate size by eye. Then make five square templates of NPU-133: 80, 120, 140, 160, and 230 mm. First, compare them in one frame. Then transfer the selected options to the entire wall. Only after this will it become clear whether one size is needed for all panels or a larger center and smaller side elements. Don't forget about the third dimension. The depth of NPU-133 increases with size — from 7 to 20 mm. Therefore, a large overlay not only takes up more area: it creates a more pronounced chiaroscuro. This is especially important if moldings, carved decor, and the wall are planned to be painted in one color. Monochrome does not impoverish such a wall. It changes the way it is perceived. Instead of color fragmentation, contours, shadows, the depth of the carved ornament, and soft transitions of light appear. The molding sets the boundary of the panel, and NPU-133 forms the center. If frames already exist, there is no need to add another layer of decorative lines just to fill the emptiness. Sometimes one correctly scaled carved overlay is enough. If the chosen NPU-133 turns out to be too large or too small, don't redo the entire wall to fit it. In the category, you can Buy decorative polyurethane overlays of a different scale. If the problem is not in the center, but in the frames themselves, you can return to the category and Buy polyurethane wall moldings. For STAVROS NPU-133, it is especially convenient for this scenario precisely because of the size range. One pattern can be adapted to a small side field, a medium frame, or a large central panel without changing the decorative language of the entire wall. Before ordering, keep four control questions for yourself. What is the clean size inside the molding frame? What share of the field does the selected NPU-133 occupy? Doesn't the relief become too subtle or, on the contrary, excessively large at the selected depth? What does the entire system look like if the molding, overlay, and wall are combined in one color? If answers are obtained on a real mockup, rather than just a product photo, the choice becomes much more accurate. Then NPU-133 works not as random stucco added to an empty rectangle, but as a true centerpiece of an already well-thought-out wall panel. |