Article Contents:
- Three panels are needed exactly, but two cut lines still need to be found
- PAN-005 in numbers: what really affects the layout
- Where to measure 3000 mm from so that the calculation doesn't turn out beautiful only on paper
- Three horizontal measurements are a mandatory minimum
- Measure the finished surface
- The central panel as the supporting part of the composition
- What to check on the front side
- What to check on the back side
- Option 1. Symmetrical trimming of the two edge panels
- Option 2. Preserving a whole edge at the main zone
- Option 3. Trimming at both edges with molding covering
- Does the molding count toward the total width of 3000 mm
- Does the profile protrusion match the 9 mm depth?
- Does the material match?
- Is there space at the baseboard and ceiling?
- MDF with a length of 2670 mm
- Beech and oak with a length of 2400 mm
- Length 950 mm
- MDF for painting
- Beech in painted or translucent finish
- Oak with open texture
- Panels need to be numbered
- Joints are checked before trimming
- Markup is saved before installation
- Wall 2996 mm
- Wall 3008 mm
- Wall changes width along its height
- Zero point and composition axis
- Coordinate table prevents losing joints
- A full-size strip helps make a decision on site
- Inside corner
- Open end on a painted wall
- Junction with door casing
- Junction with a cabinet
- External corner or column
- Floor and ceiling horizontal
- First coordinates, then layout
- Flat platform or frame
- Safety and responsibility
- MDF edge banding
- Beech edge banding
- Oak edge banding
- Light from above
- Side lighting
- Bottom lighting
- A test finish changes the depth of the relief
- Contact adhesive does not fix geometry
- Additional fixation should remain invisible
- The fixation sequence must maintain the 3000 mm calculation
- What changes if two moldings are added
- What changes if a shadow gap is left
- Verification of documents and dimension lines
- Inspection of the fabric base
- Sorting of natural wood
- Control paint-out
- Re-measurement of the wall
- TV zone 3000 mm wide
- Bed headboard
- Entryway between the door and the wardrobe
- Reception desk or furniture front
- Oak accent wall
- Order two panels instead of three
- Cut all 30 mm on the right without analyzing the view
- Consider 15 mm as the final decision
- Leave the fabric base open
- Start gluing without dry layout
- Select molding only by photo
- Confuse primed version with finished paint
- Do not approve new edge after cutting
- Do not check the base
- Order natural panels at different times
- How many PAN-005 are needed for a wall 3000 mm wide?
- Can I cut 15 mm off on the left and right?
- Why can't I remove all 30 mm from one side?
- Where do I start the layout?
- How do I measure the wall?
- What should I do if the top is 3000 mm and the bottom is 2994 mm?
- Is it mandatory to order OPAN-005?
- What size is the OPAN-005 sample?
- What length of PAN-005 is suitable for a tall wall?
- Is there an oak PAN-005 with a length of 2670 mm?
- What does "Primed Prestige" mean?
- Do I need to account for the molding in the wall width?
- Can I leave the edge without molding?
- What do I use to attach PAN-005?
- Can I glue the panel over old paint?
- Where is the best place to position the factory seams?
- Do I need a fourth panel as a spare?
- Can I use a trimmed strip elsewhere?
- When should I perform the longitudinal cutting?
- How do I place an order without missing items?
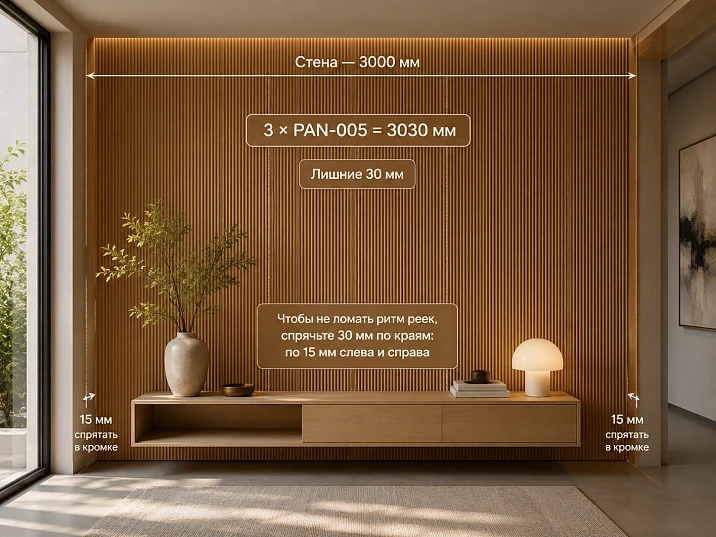
The wall is already measured: the finished width is 3000 mm. One slat panel PAN-005 covers 1010 mm, two panels give only 2020 mm, and three — 3030 mm. The arithmetic seems simple until the main question appears on site: where to hide the extra 30 mm so that one edge slat doesn't accidentally become narrow, and the entire accent wall doesn't visually shift to one side?
A buyer who is going to buy a slat panel PAN-005 with a width of 1010 mm, should order not just three product items. Before payment, it's useful to determine the material, length, preparation quality, layout scheme, places for longitudinal cutting, fixing method, and finishing of two edges. Otherwise, the correct number of panels doesn't yet guarantee a neat wall.
The short answer is: for a wall 3000 mm wide, three PAN-005 panels are needed, but you can't automatically divide the excess by 15 mm from each edge. First, make a layout of all three panels, check the actual pitch of the triangular relief and the position of the fabric base, then choose two acceptable cutting lines. Symmetry should be not only numerical but also visual.
Three panels are exactly needed, and two cutting lines are yet to be found
There is no mystery in the quantity calculation:
N = ceiling (W ÷ 1010),
where N is the number of panels, W is the finished wall width in millimeters, 1010 mm is the width of one PAN-005.
For a 3000 mm wall:
N = rounding up (3000 ÷ 1010) = 3 panels.
Next, a total surplus appears:
3 × 1010 = 3030 mm;
3030 − 3000 = 30 mm.
These 30 mm need to be removed from the overall layout. But the formula does not indicate where exactly the cut should be made. It does not see the edge of the triangular slat, the interval between adjacent elements, the inner corner, the trim, the baseboard, or the light and shadow. Therefore, the number 30 determines the volume of trimming, not its final position.
Nominally, the remainder can be divided in half:
30 ÷ 2 = 15 mm on the left and 15 mm on the right.
This solution is convenient as a starting point for marking. On the full drawing, equal halves of the composition are laid out from the wall axis, and the expected edge lines are obtained. Then they are compared with the relief. Sometimes a real symmetrical layout will require removing not exactly 15 mm, but shifting both boundaries by the same pattern module. The total width after trimming should still be 3000 mm, but the visible edge elements may differ from the initial arithmetic scheme.




PAN-005 in numbers: what really affects the layout
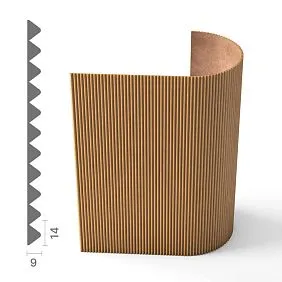
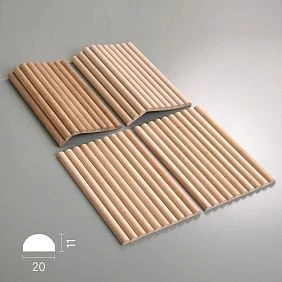
PAN-005 is a flexible slat panel with a frequent triangular relief. The elements are attached to a fabric base, allowing the sheet to be used not only on straight walls but also on individual curved surfaces after checking the permissible bending and the method of fastening. For the wall in question, three parameters are especially important: width 1010 mm, profile depth 9 mm, and length related to the chosen material.
| Parameter | Confirmed value | How to use when ordering |
|---|---|---|
| Article number | PAN-005 | Do not mix in the same layout with another profile without a separate project |
| Width A | 1010 мм | It is used to calculate the number of panels horizontally |
| Depth C | 9 мм | Taken into account at sockets, trims, baseboards, and end profile |
| MDF length | 950 or 2670 mm | Choose according to the height of the area being decorated |
| Length of beech and oak | 950 or 2400 mm | Compare with the finished wall height |
| Materials | MDF, beech, oak | The material determines the finish, cutting, and visual character |
| MDF preparation | "Prestige" or "Prestige primed" | The primed version still requires final painting |
| Array preparation | «Prestige» | The finish coating is selected separately |
| Construction | Triangular elements on a fabric base | The cut line is checked against the front pattern and the reverse side |
| Installation | Contact adhesive, additional fixation with micro-pins is recommended | The composition and fasteners are coordinated with the wall base |
The table shows why PAN-005 cannot be ordered only by area. Area helps estimate the volume of finishing, but does not answer how many whole panels will be needed in width and where the edges will run. For a 3000 mm wall, the main calculation is done specifically by the 1010 mm module.
For a buyer who is still comparing profiles, it is useful to first buy wall slat panels after viewing the entire category. But when the triangular rhythm of PAN-005 is already chosen, the article and specification should remain tied to one SKU: changing the profile changes not only the appearance, but also the allowable longitudinal trim line.
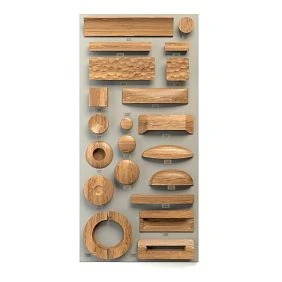
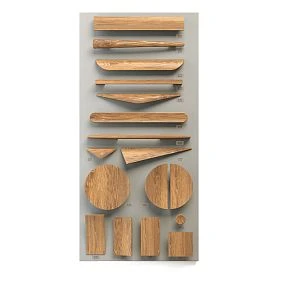
Our factory also produces:

Where to measure 3000 mm from, so that the calculation doesn't turn out beautiful only on paper
The phrase "the wall is exactly three meters" often means one measurement with a tape measure at a convenient height. For slat cladding, this is not enough. The left and right boundaries of the wall may diverge, the corner may deviate from vertical, and the baseboard may protrude beyond the finished plane. If the top width is 3000 mm, the middle is 2994 mm, and the bottom is 3006 mm, a single rectangular layout will require a solution at the edges.
Get Consultation
Three horizontal measurements are the mandatory minimum
The width is taken:
-
at the lower boundary of the future panel;
-
approximately at mid-height;
-
at the upper boundary of the cladding.
For a tall wall, it is reasonable to add two more control points between the main levels. All values are transferred to the diagram. The minimum number shows which width will exactly fit between the limits, and the difference between the maximum and minimum reveals the curvature of the junctions.
Relying only on the minimum value is also insufficient. Suppose the wall is 2992 mm at the bottom and 3004 mm at the top. If you cut the panels into a rectangle with a width of 2992 mm, a 12 mm gap will appear at the top. It can be closed with a profile, left in a shadow joint, or compensated by individual fitting of the edge strip. The choice is made before cutting, not after gluing the central panel.
Measure the finished surface
If plastering, puttying, painting, baseboard, or door casing is not yet finished, the current 3000 mm does not equal the future installation size. Every few millimeters of finish on the edges can change the cut line, especially when the excess is only 30 mm.
In the work sheet, it is useful to separate:
-
the size of the construction base;
-
the expected thickness of finish layers;
-
the final size between finished junctions;
-
the design width of the panel composition;
-
the width of profiles covering the edges.
Then the calculation does not mix the wall "before renovation" and the wall "for installation." You can order three panels in advance, but the final longitudinal cutting is done according to the control measurement of the finished base.
Why all 30 mm cannot be thoughtlessly removed from one edge
The fastest option looks tempting: leave two panels intact, reduce the third by 30 mm, and place the trimmed side into the corner. The total width will become correct. However, the visual axis of the relief will shift, and the two sides of the wall will get different finishes.
On one edge, the viewer will see the factory rhythm, on the other — a random fragment of a triangular element. When viewed from the front, the difference may be more noticeable than the seams between the panels themselves. It is especially pronounced under side lighting: a whole edge forms one shadow, a cut one forms another.
One-sided trimming is acceptable not because it is simpler, but only when there is a reason:
-
the edge goes into a deep inner corner and is barely visible;
-
a cabinet is installed nearby that covers the trimmed strip;
-
a sufficiently wide molding or end profile is provided;
-
the composition is intentionally tied to a door, TV, niche, or furniture axis, rather than to the center of the wall;
-
on the opposite side, a whole visible module needs to be preserved.
If none of these conditions apply, a balanced layout usually looks calmer. But "balanced" does not always mean mathematical 15 + 15 mm. It can be a symmetrical finish with two identical outer slats in shape, achieved after shifting the entire layout relative to the center.
Numerical symmetry and visual symmetry are not the same thing
Let's imagine that on paper, 15 mm is removed from both the left and right. The sizes are equal, but the left cut fell on the flat face of a slat, and the right cut fell into the gap between elements. Formally, the composition is centered. Visually, the edges are different.
Visual symmetry requires comparing not only the distances from the wall, but also the condition of the two extreme fragments:
-
whether the width of the front part is the same;
-
whether the side faces are read equally;
-
whether the depth of the shadow gap matches;
-
whether the fabric base approaches the junction equally;
-
whether one side looks like a whole slat and the other like a cut-off piece;
-
whether the edge is equally covered by a molding or goes into the corner.
Therefore, the designer first builds the nominal axis of the wall, then applies the real PAN-005 module to it. The panel can be shifted by a few millimeters relative to the arithmetic center if this gives identical extreme elements. But such a shift is checked across the full width of all three panels: the joints between the panels should also not end up in noticeable or inconvenient places.
Central panel as the supporting part of the composition
For a 3000 mm wall, it is convenient to start not from the left corner, but from the central axis. The middle PAN-005 is positioned symmetrically relative to this axis, and the two side panels are built out to the left and right. This approach helps preserve the whole central zone and distribute the adjustment between the outer edges.
However, even here, one cannot promise 15 mm from each panel in advance. Depending on the actual pattern, the central panel may require a slight shift. A dry layout will show which option preserves the best rhythm.
The actual relief pitch is more important than a beautiful formula
The width of the entire PAN-005 is known — 1010 mm. But for a safe longitudinal cutting line, it is necessary to see the internal structure of the specific panel: the width of the triangular elements, gaps, the position of the outer slats, and the fabric base. These values cannot be calculated from the overall size of 1010 mm.
What needs to be checked on the front side
On the front surface, note:
-
the repeating relief module;
-
the width of the visible face;
-
the position of the shadow groove;
-
the outer elements of the factory panel;
-
possible areas where cutting less disrupts the pattern.
Some lines look neutral on a sample without lighting, but become noticeable after turning on sconces or track lights. Therefore, it is useful to view the layout under both frontal and side lighting.
What to check on the reverse side
The fabric base unites elements into a flexible sheet. On the reverse side, evaluate:
-
where the fabric runs relative to the intended cut;
-
whether a reliable connection of the outermost element to the base is maintained;
-
whether a narrow unstable strip remains;
-
how the open edge will be finished;
-
whether cutting with the chosen tool can be done without damaging the adjacent profile.
The final cutting method depends on the material. MDF, beech, and oak differ in structure and edge behavior, so a universal recommendation to "cut in one motion" cannot be used. The tool, feed direction, and subsequent processing must match the selected panel.
The OPAN-005 sample is not a souvenir, but a working fragment of the layout
When the excess is only 30 mm, a card photo does not provide enough information about the edge rail. Buy a sample of the OPAN-005 slat panel useful before the main batch to check the profile, material, and the intended trim line on a real fragment.
The sample size of 197 × 9 × 310 mm allows you to see several relief elements, assess the pattern frequency, and apply the fragment to a wall, molding, baseboard, or trim. It does not replace the full layout of three panels, but helps answer practical questions:
-
how noticeable is the cut of one slat;
-
is it better to finish the edge in the groove or on the face;
-
what kind of end grain does MDF, beech, or oak produce;
-
how deep does the 9 mm profile protrude relative to adjacent trim;
-
what color and gloss of the coating emphasize the rhythm;
-
whether a separate end molding is needed.
The sample is especially valuable if the panel will be painted. It is used for a test primer, matting, and final paint application without risking the main panels. For oak, you can compare tinting, oil, or clear varnish; for MDF, check the coverage of the enamel and the behavior of the paint on the edges.
It is better to order OPAN-005 in the material planned for the wall. An MDF sample will not convey the texture of oak, and an oak fragment will not show how primed MDF looks under dense enamel.
Three layout options for a 3000 mm wall
The same 30 mm excess can be distributed in different ways. The decision depends on the room's axis, edge visibility, and adjacent structures. Below are not ready-made installation commands, but three schemes for comparison.
Option 1. Symmetrical trimming of the two outer panels
The central panel is kept whole. The left and right panels are trimmed along the outer edges. The nominal starting point is 15 mm on each side.
Advantages:
-
the central axis of the wall remains clear;
-
the joints are positioned symmetrically;
-
both edges can be made identical;
-
furniture in the center is easier to align with the panel rhythm.
There is one limitation, but it is fundamental: two actual cut lines must give the same visual finish. If strict 15 mm leads to different fragments, the layout is shifted relative to the center or the method of edge finishing is changed.
Option 2. Preserving a whole edge at the main zone
Sometimes one side of the wall is fully visible, while the other is hidden by a curtain, a tall cabinet, or a deep niche. Then the whole factory edge is left on the visible side, and 30 mm is removed at the less noticeable junction.
This option is justified when the interior has an asymmetric composition. For example, the TV is shifted, the door occupies part of the wall, and the panel background continues the furniture group rather than the geometric center of the room. The rhythm is assessed relative to the main object, not only relative to the corners.
Option 3. Trimming at both edges with covering by moldings
If the edge cannot be finished with a beautiful whole slat, the cut can be incorporated into the junction structure. Identical wooden profiles are installed on the left and right, which cover the fabric base and form a clear frame.
This is not a reason to choose any molding based on a photo. Its width, depth, and material must suit PAN-005 and the adjacent wall. In the catalog of trim products made of oak, beech, and MDF a profile is selected after the actual width of the trimmed area and the desired visible frame are known.
When a molding saves the edge, and when it only highlights the mistake
Molding can indeed cover a trimmed fabric base and make the transition to a regular wall neat. But a too-narrow strip will leave the uneven edge visible, while a too-wide one will take away part of the panel field and change the 3000 mm calculation.
Before choosing a profile, four questions are asked.
Is the molding included in the total width of 3000 mm
There are two different schemes:
-
PAN-005 takes up all 3000 mm, and the profile is applied over the edge;
-
the moldings are part of the overall composition, so the width of the panels themselves is less than 3000 mm.
In the second case, the calculation changes. If two moldings take up 20 mm each, 2960 mm remains for PAN-005. Three panels with a total width of 3030 mm will require removing 70 mm, not 30 mm. Therefore, profiles cannot be added after the finished cutting as random masking.
Does the profile protrusion match the 9 mm depth
PAN-005 has a relief depth of 9 mm. The adjacent molding may protrude less, be in the same plane as the tops of the slats, or form a more noticeable frame. Each option gives a different effect. This needs to be checked on a cross-section, not just on the facade.
Does the material match
MDF under enamel is easier to combine with a paintable profile in one color. For an oak panel, a molding from a different wood species may noticeably differ in texture after a clear finish. A beech profile next to an oak panel will not visually become oak just because of a similar stain shade.
Is there a place for the baseboard and ceiling
The vertical molding should finish neatly. At the bottom it meets the baseboard, at the top — the ceiling junction or cornice. If these nodes are not drawn, two beautiful separate profiles can form an awkward joint.
Wall height and PAN-005 length: do not mix vertical and horizontal remainder
The article topic is related to a wall width of 3000 mm. But when ordering, you need to check the height separately. Horizontal extra 30 mm will not compensate for the lack of panel length vertically.
MDF length 2670 mm
For a wall height of 2670 mm, such a panel can cover the area in height without a transverse joint, provided an accurate final measurement and the chosen junction scheme. If the height is 2700 mm, a difference of 30 mm remains vertically. This is a different size that cannot be "transferred" from the side trimming.
For a wall height of 2700 mm, different solutions are possible:
-
leave a design gap at the floor or ceiling;
-
include the lower or upper profile;
-
raise the panel above the baseboard;
-
design the panel not to full height;
-
agree on a different size or construction.
The choice depends on the project. You cannot simply stretch a 2670 mm panel to 2700 mm.
Beech and oak 2400 mm long
For a standard tall wall, 2400 mm may not be enough. Then the solid panel is used as a decorative insert of limited height, combined with a plinth, molding, or other finish, or the composition is reconsidered. A transverse joint on a frequent vertical relief requires a separate node and should not appear randomly in the middle of a visible wall.
Length 950 mm
Short panels are suitable for furniture facades, lower wall sections, posts, islands, niches, and local inserts. Three panels across the width will still give 3030 mm, but the composition will be only 950 mm in height. This is a standalone format, not a trimmed version of a tall wall.
MDF, beech, or oak: the material changes not the quantity, but the way the edge is finished
For a 3000 mm wall, the quantity remains the same: three panels of any available wood species, because the width of PAN-005 is 1010 mm. But the trimmed edge, finish, and perception of the relief will differ.
| Material | Strong point in the project | Finishing scenario | What to check at the edge |
| MDF "Prestige" | Uniform base for painting | Priming and finishing enamel or paint | Quality of the edge after cutting, insulation, and painting |
| MDF "Prestige primed" | Reduces preparation before final painting | Matting according to the chosen system's technology and applying the finish | Integrity of the primer on the new edge |
| Beech | Natural wood with a calmer texture | Enamel, tinting, or transparent system after approval | Shade matching and quality of the processed edge |
| Oak | Expressive natural texture | Tinting, varnish, or oil | Pattern direction and end grain visibility |
MDF for painting
MDF is chosen when the panel must match the color of the wall, furniture, or the brand palette of the interior. The primed version does not mean a ready white surface: it is prepared for final painting. After longitudinal cutting, the new edge may require separate sealing and priming, otherwise the edge will differ in absorption.
Beech in painted or translucent finish
Beech is suitable for natural wood projects, but its appearance depends on the coating system. If dense enamel is required, the entire set—panels, edge profiles, and adjacent trim—should be ordered with coordinated preparation. For translucent finishes, tonal differences should be assessed in advance.
Oak with open texture
Oak relief is especially expressive under side light. At the same time, a trimmed edge becomes a noticeable part of the composition. If the edge remains exposed, its treatment should look intentional. A random light wood stripe next to a tinted face surface will reveal on-site modification.
Before a large order, it is useful to find out what the quality "Prestige" means and coordinate the finishing system for the selected material. The quality name describes the surface preparation, not the final color. Then it is worth looking at the recommendations for finishing and installation of decor, comparing them with the instructions of the selected paint and adhesive system.
Dry layout: the moment when thirty millimeters become clear
Dry layout is assembling the composition without final adhesive installation. Three PAN-005 panels are placed in the design order on a clean, flat surface or temporarily fixed to the wall, checking the overall width, joints, and edges.
It is needed not to double-check the arithmetic again. Its tasks are more specific:
-
see all three panels as a single rhythm;
-
align the factory joints;
-
choose the central axis;
-
compare trimming options;
-
check the two edge elements;
-
mark the front side and the order of panels;
-
transfer the markings to the back;
-
coordinate the molding, baseboard, and ceiling finish.
Panels need to be numbered
Even identical items are better labeled: left, center, right. For natural wood, this helps preserve the chosen order by tone and texture. For paintable MDF, marking is no less useful: it prevents flipping trimmed panels and confusion with edges.
Joints are checked before trimming
First, three full panels are joined and the relief continuity across the boundaries is assessed. Only after that are the outer lines determined. If you start by trimming the edge panel and then discover an inconvenient joint between the first and second, the allowance for rearrangement will already be lost.
Markings are kept until installation
The diagram records:
-
panel number;
-
top and bottom;
-
left and right edges;
-
size of the removed strip;
-
edge treatment method;
-
position relative to the wall axis;
-
type of adhesive and mechanical fixation;
-
installation sequence.
Such a sheet becomes part of the specification and is handed over to the installer along with the product.
What happens if the actual wall is not 3000, but 2996 or 3008 mm
After final finishing, the size may differ from the original. The formula is recalculated in a minute, but the layout will have to be checked again.
Wall 2996 mm
Three panels give 3030 mm. Total excess:
3030 − 2996 = 34 mm.
Nominally, that's 17 mm on each side. But the actual lines are again tied to the pattern. You cannot use the old marking of 15 + 15 mm and hope that the remaining 4 mm will disappear in the corners.
Wall 3008 mm
Excess:
3030 − 3008 = 22 mm.
Nominally, 11 mm per edge. The smaller the trim, the higher the risk of getting a very narrow leftover piece that is inconvenient to handle or looks random. Perhaps it is visually better to remove the entire volume at the hidden edge or include a profile in the composition. The decision is made by the layout.
The wall changes width along its height
Suppose the bottom is 2996 mm, the middle is 3000 mm, and the top is 3008 mm. A straight side line of the panel will not replicate such geometry without a gap or adjustment. Possible actions:
-
level the base before installation;
-
form an even frame with moldings;
-
trim the edge panel along the actual line;
-
leave a controlled shadow gap;
-
change the boundary of the panel zone.
The chosen option must be specified in the project. The installer should not decide the geometry of the accent wall after applying the adhesive.
Calculating the quantity for other widths helps verify the logic of the order.
It is useful for the buyer to see that rounding is always upward. A remainder does not mean the last panel can be skipped.
| Finished wall width | Calculation | Need PAN-005 | Total panel width | Excess before trimming |
| 2020 мм | 2020 ÷ 1010 | 2 | 2020 мм | 0 мм |
| 2500 мм | round up 2500 ÷ 1010 | 3 | 3030 мм | 530 мм |
| 2990 мм | round up 2990 ÷ 1010 | 3 | 3030 мм | 40 мм |
| 3000 мм | round up 3000 ÷ 1010 | 3 | 3030 мм | 30 мм |
| 3010 мм | round up 3010 ÷ 1010 | 3 | 3030 мм | 20 мм |
| 3030 мм | 3030 ÷ 1010 | 3 | 3030 мм | 0 мм |
| 3500 мм | round up 3500 ÷ 1010 | 4 | 4040 мм | 540 мм |
| 4000 мм | round up 4000 ÷ 1010 | 4 | 4040 мм | 40 мм |
The table shows an interesting feature. Walls of 3000 and 4000 mm require different numbers of panels, but yield a similar small remainder: 30 and 40 mm. At the same time, the visual layout is not transferred automatically. Four panels create a different central axis and a different number of internal joints.
A large remainder, for example 530 or 540 mm, opens up more options: part of the panel can be used in another area, but this depends on the length, material, relief orientation, and edge condition. Not every offcut can be considered a full spare panel.
Spare: is a fourth piece needed for a 3000 mm wall
The formula gives three panels. Automatically adding a fourth "just in case" is not mandatory, but the decision depends on the project's risk.
An additional panel is considered if:
-
the cutting is complex and done for the first time;
-
there are several outlets, niches, or passages;
-
natural material needs to be matched by tone;
-
the site is far away, and repeat delivery is difficult;
-
the same PAN-005 is used in the adjacent area;
-
the timeline does not allow waiting for a replacement in case of damage;
-
The project provides for future repair of a fragment.
For a simple straight wall without complex cutouts, three panels may be sufficient. However, the allowance cannot be determined by a single universal percentage. PAN-005 is sold in fixed-width sheets, so "five percent" of three panels does not translate into an available stock item. Either an additional full panel is needed, or confirmed use of suitable offcuts.
Scaled layout: how to turn three sheets into an accurate wall drawing
Trimming PAN-005 becomes predictable when a scaled layout appears instead of a general sketch. It shows not only the 3000 mm wall and 3030 mm panels, but also furniture axes, electrical points, baseboard boundaries, moldings, internal corners, and all factory joints. The smaller the overall excess, the more important such detailing: with only a 30 mm allowance, an accidental shift of the first panel quickly deprives the installer of the ability to align the second edge.
For a private renovation, a drawing at a scale of 1:10 or 1:20 is suitable. For a complex commercial project, full-size marking of key nodes and a separate working sheet with coordinates are more convenient. The scale is chosen not for formality. It must allow distinguishing the edge rails, joint positions, and socket frames.
Zero point and composition axis
First, a zero point is assigned. It can be the left finished corner, but for a symmetrical wall, the central vertical axis is more convenient. From it, 1500 mm is laid out to the right and left. After that, the boundaries of the central PAN-005 and two side sheets are marked.
If the central panel is placed strictly along the axis, its edges will be at a distance of 505 mm to the left and right from the center. The next factory joints will appear another 1010 mm further. The outer edges of the entire trio will be at a distance of 1515 mm from the central axis, that is, they will extend beyond the finished wall boundary by 15 mm on each side. This scheme shows nominal symmetry without lengthy explanations:
-
left wall boundary: −1500 mm;
-
left edge of three full panels: −1515 mm;
-
left nominal trim: 15 mm;
-
central axis: 0;
-
right nominal trim: 15 mm;
-
right edge of three full panels: +1515 mm;
-
right wall boundary: +1500 mm.
Next, the arithmetic scheme is overlaid on the relief drawing. If the lines −1500 and +1500 mm pass through unfavorable areas, all three panels can be synchronously shifted by a small distance. With such a shift, the total width does not change, but the trim on the left and right becomes unequal in millimeters. This is acceptable when the two visible edges look the same after cutting. Symmetry refers to the visual result, not necessarily to two identical numbers.
The coordinate table prevents losing the joints
On the worksheet, it is convenient to record the coordinates of all vertical lines. For the base scheme, they look like this:
| Line | Coordinate from the left finished edge | What to check |
| Left finished edge | 0 мм | Angle, molding, gap, verticality |
| First factory joint | 995 мм | Continuation of relief and joint density |
| Second factory joint | 2005 мм | Relief, sockets, furniture fasteners |
| Right finished edge | 3000 мм | View of the edge slat and abutment |
The values 995 and 2005 mm refer to the nominal layout with trimming of 15 mm each. After shifting the layout, the coordinates will change. Therefore, the table is filled only after the two extreme lines are approved. Its task is to convey to the installer not the general idea, but the exact positions that need to be marked on the wall.
The table includes coordinates of sockets, cable outlets, and furniture fasteners. This makes it visible in advance whether the frame of the electrical installation product falls on the joint of the panels or on an inconvenient area of the relief. Fixing such a collision in the drawing is simple: sometimes it is enough to shift the entire layout by a few millimeters. After gluing the central panel, this becomes a rework.
A full-size strip helps make a decision on site
For a questionable edge, you can cut a paper or cardboard strip with a width equal to the intended trim and apply it to the OPAN-005 sample. Even more precisely, transfer several repeats of the relief onto a sheet at a 1:1 scale. Such a template shows what part of the outermost slat will remain after cutting and how the molding will overlap it.
A full-size check is especially useful near a door casing. On the drawing, a depth of 9 mm seems small, but in the actual joint, the panel may protrude forward relative to the casing, and the end profile may cross its shaped edge. The template allows you to see the conflict before purchasing finishing materials.
Five types of edges: the same remainder requires different solutions
The outer boundary of a panel wall can be different. Trimming 15 mm uniformly is only acceptable when the left and right abutments are truly arranged the same way. If there is an internal corner on the left and an open painted wall on the right, the two sides solve different tasks.
Inner corner
In an internal corner, the edge of the panel is usually viewed at an acute angle. A small shadow gap can make the joint calmer than tightly fitting the relief to an uneven wall. But the width of the gap is set in advance and maintained along the entire height. Spontaneous expansion from 2 to 10 mm looks like a geometry error.
If the corner is curved, there are three options: level it, trim the outermost panel to the actual contour, or form a separate straight boundary with a profile. The choice depends on the finish and visibility. Fitting a wooden edge to a wavy wall requires careful treatment; for MDF under enamel, subsequent painting may hide the technological refinement but will not fix a broken vertical line.
Open end on a painted wall
The open edge is visible from the front and side. Here, either a finished relief profile or an end cap is required. Leaving the fabric base visible is not allowed. Even a neatly cut fabric is perceived as an internal part of the structure, not as a decorative finish.
If the edge is painted in the color of PAN-005, the sample helps select a profile by depth. If the panel contrasts with the wall, the frame becomes a noticeable graphic line. Then its width must be the same at the top, bottom, and vertically, otherwise the composition looks assembled from random parts.
Adjoining the door trim
The door trim already sets a vertical line and its own relief. PAN-005 should not press against it with an unchecked vertex of the triangular profile. Between the two elements, you can leave a narrow shadow gap, install a flat divider profile, or bring the panel flush after checking depths.
With a tight fit, you need to ensure that the door and trim can be serviced without removing the panel. If the trim needs to be removed, PAN-005 glued over its edge will complicate the work. A divider gap makes the joint more maintainable.
Adjoining a cabinet
A built-in cabinet can hide the cut, but its actual position must also be fixed. You cannot calculate the edge based on the design size of the furniture if the cabinet is not yet installed. Even a slight shift of the cabinet will change the visible width of the panel.
The best order depends on the design. Sometimes the cabinet is installed first, then PAN-005 is brought up to the finished side. In another project, the panel runs behind the furniture as a continuous background, and the cabinet is installed on top. These options require different amounts of finishing and different access to fastening.
External corner or column
On an external corner, the edge is especially visible and subject to contact. The edge needs protection. For a radiused or faceted column, additionally check how the fabric base wraps around the surface and whether the triangular relief maintains an even pitch.
The direct formula 3030 − 3000 here describes only the total width. The development of an external corner must account for the length along each face or arc, the thickness of the finish, and the chosen transition method. You cannot transfer a flat wall layout to a column without recalculating.
Irregular geometry: how to distinguish panel trimming from base repairFloor and ceiling horizontal line
The vertical relief ends at horizontal boundaries. If the floor has a slope and the panel is cut to the same length, the bottom gap changes. The baseboard can cover part of the difference, but only if its height and position are known. A similar issue arises with a stretch ceiling, cornice, or shadow profile.
Therefore, the specification must include not only the length of PAN-005, but also the design elevations of the bottom and top. The panel can start from the finished floor, from the top line of the baseboard, from a furniture countertop, or from a given horizontal line. Each scheme gives its own working height.
Sockets and switches: the relief cannot be cut like a flat sheet
An electrical point on a flat wall is perceived as a small rectangle. On PAN-005, the frame falls on peaks and grooves, and the panel depth of 9 mm changes the position of the mechanism relative to the base. The recessed socket box, mounting extension, and the way the frame fits are coordinated with the electrician.
First coordinates, then layout
On the elevation, mark the center of each point, the width and height of the frame, the number of gangs, the cable direction, and the access zone. If the frame falls on a factory joint of two panels, installation becomes more complicated. The joint can be left if the detail is designed, but more often the layout is slightly shifted so that the cutout is within a single panel.
The shift cannot be done just for the socket, forgetting about the two edges. After changing the coordinates, the left and right trimming is recalculated. The total excess remains 30 mm, but the distribution may change.
Flat platform or frame
Sometimes a flat insert is formed around the socket, which covers the relief and provides a level support for the electrical frame. Its size, material, and color are included in the design. A random overlay that appears after installation usually looks foreign.
Another option is precise trimming of the relief to fit the frame. Then check whether short, weak fragments of the slats remain nearby. The cutout must not be positioned so that the narrow part of the element is held only by a small strip of the fabric base.
Safety and responsibility
Electrical work is performed by specialists. The article helps coordinate geometry but does not replace the electrical design. Before ordering PAN-005, you need to know which mechanisms will remain, whether they will be relocated, and who is responsible for refining the mounting depth.
MDF, beech, and oak are cut along the same line but behave differently
Longitudinal cutting of three PAN-005 units is related to the material. Geometrically, the same volume needs to be removed, but the edge quality depends on the structure of the base and the tool. The specification cannot be limited to the phrase "trim on site" without assigning a responsible party and requirements for the finish.
MDF edge
MDF is homogeneous, but an exposed end absorbs finishing materials differently than a primed face surface. After cutting, the edge is cleaned of dust, sanded if necessary, and prepared according to the painting system. If this is not done, the finish may appear darker, duller, or rougher.
For primed PAN-005, a new end does not automatically receive factory preparation. It must be included in the technological map. This is especially noticeable on an open edge without molding.
Beech edge
Beech has a dense, relatively even structure. Under opaque enamel, it can be combined with painted moldings, but the cut area still requires careful treatment. With semi-transparent finishes, the direction of the grain and possible shade differences become visible.
Oak edge
Oak texture is expressive, and the pores emphasize the direction of the cut. An open end grain can look decorative if it is designed and finished. An untreated cut next to a tinted face surface is perceived as unfinished.
If the edge is covered by a molding, the wood species should be coordinated. An oak profile and oak PAN-005 may differ in pattern, but after the same tinting system they form a coherent material pair. An MDF strip under enamel next to oak creates a contrasting frame; this is also a viable option if it is specified in the project.
Lighting tests the layout more strictly than a tape measure
The triangular relief of PAN-005 creates an alternation of light and shadow. Under frontal diffuse lighting, the two outer slats may appear identical, but with side light the difference becomes sharp. Therefore, the sample and dry layout are evaluated under conditions close to the future interior.
Light from above
A ceiling track or linear lighting enhances the vertical plasticity. Uneven top cuts, different gaps from the ceiling, and a wavy surface become more noticeable. The top line is checked along the entire length before installation.
Side light
Wall sconces or a side window create long shadows. A trimmed outer edge can produce a strip of different width. If one edge is near a window and the other in a dark corner, mathematical symmetry is perceived unevenly. The layout is evaluated from the main viewpoints, not just standing in front of the center of the wall.
Lighting from below
Bottom light emphasizes dust, baseboard irregularities, and mechanical fastening points. If the project includes such lighting, the method of masking micro-pins and finishing the bottom edge is specified in advance.
A test coat changes the depth of the relief
Dark matte enamel makes grooves visually deeper, light satin surface softens contrast, transparent oak coating adds a textured pattern to the geometry of the slats. Therefore, it is better to check the choice of the cut line on a sample with the real finish. A neutral unpainted fragment sometimes hides the future difference in edges.
The mounting kit is selected after checking the wall, not simultaneously with the number of panels
Three PAN-005 cover the width calculation, but do not answer the question of what and how to attach them. The card links installation to contact adhesive and additional fixation with micro pins. This information sets the direction, but the specific kit depends on the panel material, base strength, panel height, future finishing, and room conditions.
Before buy materials for installing slatted panels, the wall is checked for dust, chalking, peeling paint, weak putty layers, moisture, and local irregularities. The adhesive connects the panel to the top layer of the base. If this layer separates from the wall, a strong compound will only hold the detached fragment of the finish.
Contact adhesive does not fix geometry
The adhesive layer should not be used as a random compensation for large depressions. Irregularity is first assessed with a straightedge and corrected by an appropriate method. The more evenly the fabric base adheres, the more predictable the position of the slats and joints.
In the catalog you can buy TYTAN Classic Fix 100 ml mounting adhesive, which is listed among related products. But the mere fact of cards being adjacent does not confirm the universal suitability of the compound for any PAN-005 and any wall. Before work, check the adhesive instructions, base material, panel finish, and required fixation time.
Consumption cannot be determined only by wall area. It depends on the application pattern, base evenness, absorption, package size, and manufacturer recommendations for the compound. In the order, it is safer to specify the exact contact area and ask to calculate the number of packages according to the chosen technology.
Additional fixation should remain unnoticeable
Micro-pins help hold the panel while the adhesive joint gains strength and can increase the reliability of the structure. But each point passes through the decorative element. Its position is chosen so as not to split the edge, leave a noticeable dent, or create a series of random holes on the illuminated surface.
For MDF under enamel, points can be prepared for subsequent finishing. On oak under transparent oil or varnish, any intervention is more noticeable. Therefore, the masking method is agreed upon before installation, not after metal points appear on the finished wall.
The fixation sequence must maintain the 3000 mm calculation
Before applying adhesive to the wall, control verticals are marked: the central axis, two internal joints, and both finished edges. The installer constantly checks the panel position not only with a level but also with coordinates. If the first panel shifts by 4 mm, the nominal trimming of one edge will decrease to 11 mm, and the other will increase to 19 mm. The overall arithmetic remains, but the visual completion changes.
After installing each panel, check:
-
coincidence of top and bottom marks;
-
verticality of the relief;
-
width of the already occupied field;
-
continuation of the pattern through the joint;
-
absence of bulges and unglued areas;
-
preservation of the design line of the next panel.
Such control does not slow down the work. It prevents the accumulation of an error that cannot be compensated for at the last edge.
What to order together with PAN-005 for a finished wall
A full order is assembled according to the project. One object needs only three panels, a sample, and glue; another will require end profiles, finishing compounds, additional fixation, and a working layout. Related items are not automatically included in the price of PAN-005.
| Position | Why it is needed | When to add | What to specify in the request |
| PAN-005 — 3 pcs. | Close the 3000 mm field after trimming the total excess of 30 mm | Always for the wall in question | Material, length, quality of preparation |
| OPAN-005 | Check the relief, end face, material, and color | Before the main batch if there is doubt about edges or finish | Same material as the future panels |
| Contact adhesive | Connect the fabric base to the prepared wall | With a confirmed adhesive scheme | Base, area, panel material |
| Additional fixation | Hold the panel according to the installation project | If provided by the technology | Type, points, and method of masking |
| Primer and finish coat | Close the face surface and new ends | For MDF, beech, or oak according to the selected system | Color, gloss, number of coats, test patch |
| Molding or end cap | Finish the open trimmed edge | When the edge does not go into a hidden joint | Species, size, depth, finish |
| Baseboard or bottom profile | Coordinate the bottom termination | If the panel does not reach the floor or is placed above the baseboard | Height and mutual position |
| Design layout | Fix the axis, joints, trimming, and electrical points | For complex walls, expensive solid wood, or commercial projects | All final dimensions and photographs |
| Delivery in one batch | Receive three panels and related elements together | For long-length and natural products | City, floor, and acceptance conditions |
If a frame is required, open it before cutting Catalog of linear products made of oak, beech, and MDF and they match the profile to the cut. You cannot choose a molding only by the width of the facade: the depth of PAN-005 is 9 mm, so it is important to see how the two parts will meet at the side.
In a complex composition, it is useful to order a design project for the PAN-005 layout. The specialist is given not only the dimensions of the wall, but also the location of furniture, baseboards, doors, outlets, lighting, the future color, and photographs of both edges. The project should end with a working layout, not just an interior visualization.
Specification: one page that prevents confusion between material, length, and cutting
A good specification separates confirmed product characteristics from object dimensions and installation decisions. For a 3000 mm wall, it might look like this.
Product: slat panel PAN-005.
Quantity: 3 pcs.
Width of one panel: 1010 mm.
Profile depth: 9 mm.
Material: MDF / beech / oak — select and fix.
Length: 950 or 2670 mm for MDF; 950 or 2400 mm for beech and oak — select according to composition height.
Preparation quality: "Prestige" or "Prestige primed" available for the selected finish.
Final wall width: 3000 mm after finishing is complete.
Total width of three panels: 3030 mm.
Total excess: 30 mm.
Base layout: central panel aligned with the wall axis.
Nominal trimming: 15 mm on the left and 15 mm on the right.
Actual cut lines: approved according to PAN-005 relief and OPAN-005 sample.
Left edge: internal corner / open wall / casing / furniture / profile.
Right edge: inner corner / open wall / casing / furniture / profile.
Top mark: specify.
Bottom mark: specify.
Electrical points: attach coordinate diagram.
Panel order: left, center, right.
Finish: system, color, and gloss level.
Installation: confirmed adhesive and additional fixation.
Cutting contractor: specify.
Delivery city: specify.
The note "15 mm trim" without specification is insufficient. It may be perceived as a ready command, although in the article it is only an initial geometric value. The specification should explicitly state that the actual line is determined by the relief module and after a control measurement.
What changes if two moldings are added
Suppose two profiles are included in the total wall width and have a visible width of 20 mm each. The panel field is reduced:
3000 − 20 − 20 = 2960 mm.
The total excess of three PAN-005 becomes:
3030 − 2960 = 70 mm.
Nominal symmetrical trimming:
70 ÷ 2 = 35 mm on each edge.
This is a different project. You cannot first cut off 15 mm and then decide to install 20 mm moldings inside the composition. Profiles, shadow gaps, and frames must appear in the calculation before panels.
What changes if a shadow gap is left
If 5 mm of free gap is planned on the left and right within the 3000 mm field, the panels must occupy 2990 mm. The excess will be:
3030 − 2990 = 40 mm.
Nominally, 20 mm is removed from each edge. But here too, the lines are adjusted according to the actual pattern.
Acceptance of the batch before cutting and painting
After delivery, the three PAN-005 panels cannot be distributed randomly right away. First, the order is checked, and the items are laid out side by side.
Checking documents and dimension lines
All three panels must match in article number, material, length, and quality of preparation. Long variants are especially easy to confuse: 2670 mm refers to MDF, while 2400 mm refers to beech and oak. Dimensions are not transferred from one wood species to another.
Inspection of the fabric base
The reverse side is checked for integrity, absence of tears, and detached elements. The intended cutting lines are examined separately: the edge after cutting must remain stable, and the method of its treatment must be clear.
Sorting natural wood
Three beech or oak panels are compared by tone and pattern. Natural wood does not have to look like a printed copy. The task of the layout is to distribute differences meaningfully. The central panel can be the calmest in tone, while the side panels support transitions to furniture or adjacent surfaces.
Control cut-out
The finish is checked on OPAN-005 or a technological offcut. The test must include the face, groove, and end. Only this way can you see whether the coating is perceived the same across different areas of the relief.
Re-measuring the wall
Before cutting, the width is measured again. If it has changed from 3000 to 2997 mm, the total excess is already 33 mm. Even three millimeters matter when the project relies on identical edge fragments.
Application scenarios: where three PAN-005 read as a single composition
TV zone 3000 mm wide
The screen and the media unit are aligned with the central axis. Factory joints must not conflict with the bracket and cable outlets. If the TV is offset, the panel composition can be tied to the furniture, but both edges are recalculated from scratch.
Bed headboard
Here, the rhythm is supported by two bedside tables and lamps. Symmetrical edge slats are especially noticeable because the bedroom is often viewed frontally. Sockets and sconces are best placed inside whole panels rather than at joints.
Hallway between the door and the wardrobe
The left edge may abut the trim, the right edge may be hidden behind furniture. Strict 15 + 15 mm is not mandatory: the visible edge is made neat, and the main volume of trimming is moved toward the wardrobe. The solution remains design-driven, not random.
Reception desk or furniture front
For a short section, PAN-005 with a length of 950 mm may be suitable. The width of three panels will still be 3030 mm. The layout is tied to the logo axis, working doors, and body corners. The furniture front requires separate checking of moving parts and gaps.
Oak accent wall
With a transparent finish, the wood grain is added to the triangular relief. Panels are sorted before installation, and the end edge is either turned into a deliberate detail or covered with oak trim. Special attention is paid to light: it simultaneously shows geometry and texture.
When PAN-005 is suitable, and when it is better to stop before placing an order
Three PAN-005 panels are suitable for a 3000 mm wall if the finished size is confirmed, the available length matches the height, the relief is chosen deliberately, and trimming is considered on both edges. The buyer must be ready not only to order the product but also to perform the layout.
It is better to postpone the purchase if:
-
the walls will still be leveled or clad;
-
the exact height is unknown;
-
the customer expects a ready-made finish that is not in the selected line;
-
it is not defined who cuts the panels and processes the ends;
-
moldings are selected but not included in the width;
-
electrical points are still being moved;
-
the base has not been checked for strength;
-
the installer plans to start from a random corner;
-
the two outer slats have not been checked against the sample;
-
the curved surface is mistakenly calculated as a flat wall.
Stopping for one day to clarify the project is cheaper than replacing three long panels after an incorrect cut.
Mistakes that make 30 mm the main wall defect
Order two panels instead of three
Two PAN-005 panels cover 2020 mm. The missing 980 mm cannot be compensated by stretching the fabric backing or using an installation gap. A third panel is mandatory.
Trim all 30 mm on the right without analyzing the view
One-sided trimming shifts the pattern. It is only acceptable at a hidden or secondary junction, or with an intentional asymmetry of the composition.
Consider 15 mm as the final decision
This is an arithmetic starting point. If the cuts fall into different parts of the relief, the visible edges will differ even with equal sizes.
Leave the fabric backing exposed
The fabric performs a structural function and does not replace edge finishing. The exposed edge must be treated or covered with a profile.
Start gluing without a dry layout
After fixing the first panel, there is almost no opportunity to shift the entire composition. Joints, edge slats, and electrical work must be coordinated in advance.
Select a molding based only on a photograph
The facade drawing does not show the depth of the node. The profile is checked next to PAN-005 on the cross-section.
Confusing the primed version with the finished paint
The primer prepares the MDF for the finish. Color, gloss, and protective properties are set by the subsequent coating system.
Not approving the new edge after cutting
The trimmed end differs from the factory surface. Its treatment is included in the finishing schedule.
Not checking the substrate
Glue does not strengthen peeling putty. First, weak layers are removed, then panels are installed.
Ordering natural panels at different times
Individual batches may differ in tone. For one wall, it is better to order three panels together and lay them out before finishing.
Commercial route: from measurement to one agreed delivery
First open the card and order PAN-005 from MDF, beech, or oak only after selecting the length. Then add a sample if you need to check the edge, relief, or color. After approving the layout, select mounting materials and linear elements.
The order is assembled in the following sequence:
-
final wall dimensions;
-
three PAN-005 of the same material and length;
-
OPAN-005 sample if necessary;
-
distribution diagram of the total 30 mm allowance;
-
two edge finishing nodes;
-
moldings or shadow gaps included in the calculation;
-
adhesive and confirmed additional fixation;
-
primer and finish coating;
-
coordinates of sockets and furniture;
-
Delivery in one batch.
Conditions and method of shipping long-length elements are checked on the page where you can order slat panels with Contact us to confirm shipping to your destination.. Before payment, it is useful to specify the city, access to the site, and receiving requirements. After receipt, the packaging is inspected before signing documents, and panels are stored protected from moisture, impacts, and heating appliances.
FAQ: answers before ordering three PAN-005
How many PAN-005 are needed for a wall 3000 mm wide?
Three panels are needed. Two cover only 2020 mm, while three give 3030 mm, so the total excess is 30 mm.
Can I cut 15 mm from the left and right?
You can use 15 mm as an initial calculation. Final lines are transferred to the relief after a dry layout so that the two edges look the same.
Why can't all 30 mm be removed from one side?
It is possible if this edge is hidden or the composition is intentionally offset. On an open symmetrical wall, a one-sided cut often disrupts the rhythm.
Where to start the layout?
For a symmetrical wall, it is convenient to start from the central axis. If the composition is tied to a door, TV, or cabinet, the zero point is chosen based on the main object.
How to measure the wall?
The width is taken between finished junctions at the bottom, middle, and top. If there is a noticeable discrepancy, intermediate measurements are added and a boundary map is built.
What to do if the top is 3000 mm and the bottom is 2994 mm?
You need to decide whether the base will be leveled, the edge trimmed along the contour, or covered with a straight profile. A single trim of 15 mm does not account for such a difference.
Is it mandatory to order OPAN-005?
Not mandatory, but the sample reduces the risk of errors when choosing the material, finish, and trim line. It is especially useful for oak, beech, and complex enamel colors.
What size is the OPAN-005 sample?
Confirmed sample size is 197 × 9 × 310 mm. It is made from MDF, beech, and oak with a "Prestige" preparation.
Which length of PAN-005 is suitable for a tall wall?
For MDF, a length of 2670 mm is available; for beech and oak, it is 2400 mm. The final height and horizontal joints must be checked before ordering.
Is there an oak PAN-005 with a length of 2670 mm?
In the confirmed table, the oak long version has a length of 2400 mm. The MDF length cannot be applied to solid wood.
What does "Prestige primed" mean?
This is a primed MDF preparation for subsequent final painting. It does not mean a finished white color or a completed coating.
Should the molding be taken into account in the wall width?
Yes, if it occupies part of the 3000 mm field. Its width is subtracted before calculating panel trimming.
Can the edge be left without molding?
It is possible if the open end is processed and looks finished, or the edge goes into a designed hidden seam. The fabric base cannot be left exposed.
What to use to attach PAN-005?
The card links installation with contact adhesive and recommends additional fixation with micro-pins. Specific materials are chosen based on the wall, panel, and installer's technology.
Can the panel be glued over old paint?
Only after checking the strength and compatibility of the base. Peeling, chalky, or contaminated paint must be prepared according to installation technology.
Where is the best place to position factory joints?
Their position is determined by the layout. It is advisable not to align joints with complex cutouts, outlets, or critical furniture attachments without a separate node.
Is a fourth panel needed as a spare?
Not always. It is ordered for complex cutouts, remote locations, expensive simple, serial finishing, or the need for future repairs.
Can a trimmed strip be used elsewhere?
Only after checking its width, length, integrity of the fabric base, and suitable edge. Any offcut is not automatically considered a full panel.
When to perform longitudinal cutting?
After finishing the wall, re-measuring, approving three panels, and confirming the dry layout. Early cutting based on rough dimensions increases the risk of error.
How to place an order without missing items?
Specify three PAN-005, material, length, preparation quality, wall size 3000 mm, cutting scheme, both edges, finish, adhesive, additional fixation, and delivery city.
Three PAN-005 panels become a 3000 mm wall only after precise STAVROS layout.
For a wall width of 3000 mm, the calculation is unambiguous: three PAN-005 panels with a total width of 3030 mm are needed. The extra 30 mm is normal trimming of modular cladding, not a product defect. The error begins when the arithmetic number is taken as the finished cutting line.
Take 15 mm on the left and 15 mm on the right as the first scheme. Then overlay the two boundaries on the actual triangular relief, check the fabric base, open ends, moldings, baseboard, ceiling, sockets, and lighting. If necessary, shift the entire layout so that the edge elements look equal, even if the actual trimming millimeters differ.
In STAVROS, you can choose PAN-005 from MDF, beech, or oak, order OPAN-005 for fitting, select materials for installation and finishing, wooden moldings, and delivery in one batch. A complete order must include not only three panels but also confirmed length, final measurement, working layout, two ways to finish edges, and an assigned cutting specialist. Then 3030 mm of product truly becomes a neat composition exactly 3000 mm wide.