Article Contents:
- Why A100 cannot be judged by photo alone
- What is the profile 100 × 53 × 2000 mm
- First, determine if you really need a cornice
- Why a 100 mm high line does not replace a 3D mockup
- How to transfer the A100 drawing to 1:1 scale
- How to assemble a test inner corner
- Why they try on the corner, not a short straight segment
- From which points in the room to evaluate A100
- Ceiling height is just one factor
- A100 next to a tall cabinet
- A100 next to built-in furniture
- Check above the door and trim
- Window, slope, and curtain niche
- A100 and open curtain rod
- Ventilation grilles and technical elements
- Light fixtures and top wall line
- External corners and protrusions
- Why A100 cannot be automatically considered a lighting cornice
- How to choose a color in advance
- Ceiling color or wall color
- How to prepare a test paintout
- How to calculate A100 by perimeter
- Why the perimeter does not equal the number of planks
- Map of straight sections
- How to distribute planks 2000 mm long
- Where not to leave short inserts
- How to determine the allowance for trimming
- Calculation example for a simple room
- Calculation example for a room with a niche
- Internal corners
- External Corners
- Longitudinal joints on a straight wall
- How to use leftovers
- What to tell the installer
- What to buy together with A100
- How not to confuse A100 with a similar profile
- Comparison of A100 with a more compact profile
- Who A100 is suitable for
- When it's better to choose a different profile
- Practical scenario: living room with one main wall
- Practical scenario: bedroom with a floor-to-ceiling wardrobe
- Practical scenario: study with a library
- Practical scenario: hallway and corridor
- Practical scenario: room with a bay window
- Practical scenario: kitchen with upper cabinets
- Practical scenario: hotel room
- Practical scenario: restaurant or salon
- How to test A100 on an empty wall
- How to test A100 in an existing interior
- How to photograph a mockup
- How to compare two sizes without buying full footage
- How to tell if A100 is too large
- How to tell if A100 is chosen correctly
- Mistakes when buying A100
- Buying the full perimeter based on a photo
- Drawing only a 100 mm line
- Counting only the total wall length
- Dividing the perimeter by two meters and rounding
- Adding a universal ten percent
- Not checking cabinets and curtains
- Considering A100 as a ready-made profile for LED
- Choosing the color after installation
- Not marking external corners
- Leave a short insert on the main wall
- Order glue without checking
- Do not pass the diagram to the installer
- Does it need to be painted?
- Why can't you choose A100 just from a photo?
- How to make a 1:1 mockup?
- Why are two copies needed?
- Can I just draw a 100 mm line?
- Where to check the layout?
- Is A100 suitable for a low ceiling?
- Can I install A100 above a cabinet?
- Is A100 suitable for backlighting?
- How to calculate the quantity?
- Can I split the perimeter into two meters?
- What margin is needed?
- Where is it better not to place the joint?
- How to choose the color?
- What to buy together?
- What to pass on to the installer?
- Where can I see other sizes?
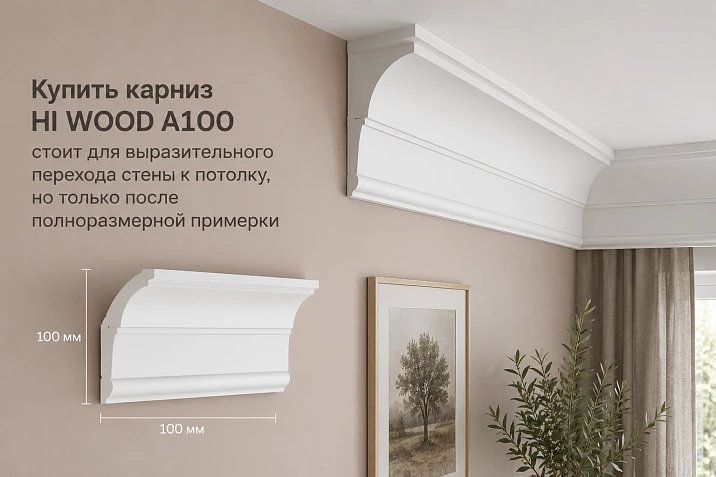
Buy HI WOOD A100 cornice It is worth it when you need an expressive transition from wall to ceiling, which after painting becomes part of the room's architecture, rather than a thin strip along the top border. The 100 × 53 mm profile helps to design a living room, study, bedroom, hall, or a room with built-in furniture, but it cannot be chosen just from a photo: after repeating around the entire perimeter, the A100 occupies a noticeable part of the upper wall zone. Therefore, you first need to check the cross-section at a 1:1 scale, assemble one test inner corner, and understand why exactly such a large profile is needed for your interior, and only then calculate the two-meter planks and place the order.
The HI WOOD A100 cornice is made of high-density polystyrene, has dimensions of 100 × 53 × 2000 mm, and is supplied with a surface ready for painting. The height of 100 mm creates a noticeable vertical strip, the depth of 53 mm forms a real volume under the ceiling, and the length of 2000 mm affects the cutting map, the number of longitudinal joints, and the possibility of using leftovers on short sections. All three dimensions work simultaneously, so a 100 mm high line drawn with a pencil on the wall does not replace a volumetric mockup.
The buyer's main task is not just to find the price of the A100. Before purchasing, it is necessary to check whether the profile conflicts with the top of a cabinet, door casing, window slope, curtain niche, ventilation grille, wall molding, and light fixtures. Then you need to choose a color, measure each straight section, mark internal and external corners, distribute the 2000 mm long planks, and determine the reserve based on actual cuts. This procedure helps to buy not an approximate footage, but a calculated set for a specific room.
The article does not turn the A100 into a universal cornice for any ceiling and does not promise that one size fits all rooms. It shows a commercially useful route: full-size fitting, decision on scale, color selection, cutting map, selection of installation and finishing materials, ordering, and transferring the scheme to the craftsman.

Why the A100 cannot be evaluated only from a photo
A product photo shows the profile in close-up, without a real ceiling, furniture, or viewing distance. On the screen, the A100 may seem moderate because there is no door opening, cabinet, or human height nearby. In a room, the profile repeats on several walls and forms a continuous 100 mm high belt. The overall impression becomes significantly stronger.
The photo also does not convey the depth of 53 mm. The buyer sees the design of the front part but does not feel how much the cornice will protrude into the room and how it will be perceived from below. Near tall furniture, a window, or a curtain niche, it is the projection that can create a conflict, even if the vertical height seems suitable.
Therefore, the product card is needed for checking specifications and purchasing, while the scale is only confirmed in the room. One evening with a cardboard mockup can prevent ordering a full perimeter of a profile that later turns out to be too large or blocks important elements.




What is the 100 × 53 × 2000 mm profile
| Parameter | Confirmed value | What does it mean in the project |
|---|---|---|
| Model | HI WOOD A100 | The article and name must be specified in the specification |
| Type | Decorative ceiling cornice | Forms the transition between wall and ceiling |
| Material | High-density polystyrene | Installation and finishing compounds are selected for this material |
| Height | 100 мм | Defines a noticeable vertical stripe on the wall |
| Depth | 53 мм | Shows the actual projection of the profile into the room |
| Length | 2000 мм | Used when calculating strips and joints |
| Surface | For subsequent painting | Color and finishing system are approved before the general order |
| Product card | Cornice A100 size 100 × 53 × 2000 mm | Current price, availability and purchase terms are being checked |
Height, depth and length cannot be considered separately. Height sets the scale, depth affects volume and junctions, and length determines the practical ordering scheme. That is why A100 should be tried by cross-section, but calculated by straight sections.
Our factory also produces:
First, determine if you really need a cornice
Before choosing a SKU, it is useful to understand what task the top profile should solve. A cornice forms an architectural transition and can make the upper part of the wall more expressive. A ceiling plinth is usually perceived as calmer, while a molding can be used as a separate line on the wall. If the type of product is not yet determined, first it is worth understanding what to choose for the wall and ceiling junction.
A100 is chosen not only to close the junction line. Its size turns the profile into a noticeable part of the decor. If the buyer only needs to neatly hide a small joint, a large A100 may be excessive. If an architectural belt is required that supports tall doors, cabinets, wall panels and a classic composition, the model deserves a full-size check.
Get Consultation
Why a 100 mm high line does not replace a volumetric mockup
A common check is to draw a horizontal line on the wall at a distance of 100 mm from the ceiling. It shows only the lower boundary of the future cornice. The buyer does not see the profile's convexity, shadows, 53 mm depth, and the transition to the ceiling.
A volumetric mockup shows how the cornice protrudes above the door, how close it comes to the cabinet, and how it is perceived from the center of the room. Two cardboard pieces joined at a right angle provide more information than a flat strip around the entire perimeter.
The line on the wall can be used as an additional check after assembling the corner. It helps visualize a continuous belt, and the layout reveals its shape.
How to transfer drawing A100 to 1:1 scale
For an accurate fitting, an official cross-section outline is needed. It is printed without automatic scaling or transferred by dimensions onto thick paper or cardboard. After printing, be sure to check the control dimensions with a ruler: the height should be 100 mm, the depth 53 mm.
If the printer changes the page scale, the outline becomes unreliable. Even a difference of a few millimeters distorts perception, especially near a cabinet or curtain niche. Therefore, the label "100 percent scale" in the print settings is not enough — the result is measured physically.
For one internal corner, two identical copies are cut out. It is better to use a material that holds its shape and does not bend under its own weight.
How to assemble a test internal corner
- Transfer the A100 cross-section onto cardboard at a 1:1 scale.
- Cut out two identical side pieces.
- Prepare two strips simulating short sections of the profile.
- Connect the copies at a right angle.
- Hold the mockup against the wall and ceiling simultaneously.
- Check the bottom line, projection, and bottom view.
- Take a photo of the corner from several points in the room.
The mockup does not have to reproduce the material and texture. Its task is to show the overall volume. To evaluate the color, you can hold a painted sample or paper of the chosen shade next to it.
Why they try it on a corner rather than a short straight section
A straight section shows the profile height but does not reveal its architectural mass. In a corner, two walls simultaneously receive the cornice, lines converge, and the shadow becomes more expressive. The buyer sees how the profile surrounds the room.
The corner also helps assess installation complexity. If the room has many internal and external corners, a large profile will require careful trimming and more attention to the cutting plan. The more complex the geometry, the less useful a calculation based only on the total perimeter.
From which points in the room to evaluate A100
| Viewing point | What to check | Why this is important |
|---|---|---|
| From the entrance | First impression and scale of the upper zone | From here, the cornice is often visible entirely |
| From the center of the room | Continuity of the line and balance with the walls | Shows the main perception of the perimeter |
| From the sofa or bed | Bottom view and depth of 53 mm | The profile may appear larger when sitting or lying down |
| Next to the wardrobe | Gap and conflict with furniture | A tall body changes proportions |
| By the window | Connection with curtains, slope and niche | This is where practical limitations most often arise |
| In the evening light | Shadows and relief expression | Artificial light changes the perception of the profile |
Evaluation only from the stairs at the ceiling is pointless: after installation, no one examines the cornice from a distance of twenty centimeters. You need to look from real life points.
Ceiling height is only one factor
It is impossible to assign a universal minimum room height for A100. Two rooms with the same ceiling can perceive the profile differently. In an empty bright room, the cornice looks lighter, and next to tall dark furniture, it looks denser.
Scale is influenced by area, wall length, doors, windows, color, lighting, and the number of vertical elements. Therefore, the rule 'such a cornice fits such a height' gives way to a full-size test.
A100 next to a tall cabinet
A ceiling-height cabinet can almost touch the lower line of the cornice. It is necessary to check whether a gap remains, whether the profile overlaps the decorative top of the furniture, and whether installation is possible. If the cabinet is already installed, the template is applied directly to its upper corner.
The cornice can pass in front of the furniture, end at the side panel, or continue above it — these are different design solutions. None of them can be chosen based on a product photo.
A100 next to built-in furniture
A built-in cabinet or bookcase often forms part of the architecture. A100 can unite the furniture with the ceiling, but only with a coordinated depth and line. The profile must not cover ventilation openings, service panels, or mechanisms.
If the furniture is still being designed, the A100 cross-section is passed to the furniture designer. This allows the gap to be planned in advance and avoids cutting the finished cornice after the cabinet is installed.
Check above the door and casing
A tall door casing can come close to the ceiling. A 100 mm high cornice may cross its upper part or leave too narrow a gap. On the template, the actual height of the casing is marked, and the lower line of the profile is drawn.
If the distance looks random, change the size of the cornice, the height of the casing, or the transition design. You cannot rely on paint to hide a proportional conflict.
Window, slope, and curtain niche
Near the window, three zones are checked: the top of the slope, the curtain attachment, and the depth of the niche. The A100 should not obstruct curtain movement, block access to the system, or create a too narrow passage.
With a hidden curtain rod, it's important to see not only the front line of the cornice but also the available space behind it. A mockup with a depth of 53 mm shows the actual projection.
A100 and open curtain rod
If the rod or track remains visible, the architectural cornice should match it in height and depth. Two large horizontal lines nearby can compete. Sometimes it's better to paint the A100 the color of the ceiling so it doesn't clash with the curtain hardware.
The distance is checked with curtains fully open and closed. The fabric should not constantly touch the decorative profile unless specified by the design.
Ventilation grilles and technical elements
A grille under the ceiling may be partially blocked by the cornice. This cannot be fixed with decorative trimming without approval, because ventilation serves a technical function.
All grilles, sensors, hatches, and cable outlets are marked on the diagram. If the A100 conflicts with them, a different profile is chosen or the location of the technical element is changed according to the design.
Light fixtures and the top line of the wall
Wall sconces and ceiling lights cast shadows on the profile. In side lighting, the A100 looks deeper than in uniform lighting. The mockup is photographed in the evening when the main lighting scenario is active.
If the light fixture is located close to the wall, the cornice should not fall into its installation zone. Distances are checked by a specialist.
External corners and protrusions
An external corner is perceived more actively than an internal one: the profile wraps around the protrusion and becomes noticeable from two sides at once. A trimming error is more visible here, and short inserts near the corner look accidental.
If the room has columns, pilasters, or protruding boxes, each section is included in the cutting map separately. The total perimeter does not show the actual number of external corners and does not indicate where additional strips will be needed.
Why A100 cannot be automatically considered a cornice for lighting
A large size by itself does not mean that the profile is designed for placing an LED strip. Lighting requires suitable geometry, distance to the ceiling, heat dissipation, access to equipment, and a safe connection scheme. These properties are not confirmed by a height of 100 mm alone.
If the project includes a light line, you need to separately study special cornices for lighting and check the design with the designer. A100 in this article is considered as a decorative ceiling cornice for painting.
How to choose a color in advance
The A100 surface is designed for subsequent painting, so the color becomes part of the design solution. There are three main scenarios: matching the ceiling color, matching the wall color, or a separate accent shade. The first visually connects the profile with the upper plane, the second makes it an extension of the wall, and the third emphasizes the architectural line.
For a large cornice, a test paint is especially important. A dark or contrasting color enhances the 100 mm height and makes the profile visually heavier. A light monochrome option looks calmer but does not disappear completely due to volume and shadows.
Ceiling color or wall color
| Scenario | Visual effect | What to Check |
|---|---|---|
| In the color of the ceiling | The cornice is perceived as part of the upper plane | Does the ceiling not visually lower |
| Wall color | The profile continues the vertical surface | Does the top of the wall not become too heavy |
| One shade lighter than the wall | Soft separation without sharp contrast | How the shade looks under artificial light |
| Contrast | Strong architectural line | Does the perimeter become overloaded |
The choice is confirmed on a sample, not by the color number on the screen. Lighting, primer, and surface texture change perception.
How to prepare a test sample
It is better to use a real short fragment of the profile or a material as close to it as possible. On the sample, they check preparation, primer, finish, gloss, and surface quality. After drying, the sample is applied to the corner mock-up.
Specific primers, paints, and adhesive compounds are selected according to the material manufacturer's instructions and the condition of the base. In the STAVROS section, you can select glue and finishing compounds, but compatibility must be confirmed by the master.
How to calculate A100 along the perimeter
The calculation begins with measuring each straight section, not with one total figure. For a simple rectangular room, four walls are recorded. For a room with a niche, ledge, or column, the list becomes longer. Each segment receives a code and length.
Then internal and external corners, locations of doors, cabinets, curtain niches, and technical elements are marked. Only after this are planks 2000 mm long distributed along the sections.
Why the perimeter does not equal the number of planks
Suppose the total perimeter of the room is 18 m. Theoretical division gives nine planks of 2 m each. But if one wall is 4.7 m long, another is 3.8 m, and the room has external corners, the actual cutting may require more material. Offcuts are not always suitable for the next section.
The quantity is determined not only by the sum of lengths, but also by how specific segments are placed within two-meter blanks. Therefore, cutting is needed, not a simple formula.
Map of straight sections
| Code | Section length | Start | End | Joint allowed | Note |
|---|---|---|---|---|---|
| А | By measurement | Internal corner | Internal corner | In a less visible area | Main wall |
| Б | By measurement | Internal corner | Curtain niche | Check | Next to the window |
| В | By measurement | External corner | Door | Undesirable | View from entrance |
| Г | By measurement | Cabinet | Internal corner | As per project | Check the gap |
This table allows you to see which walls require whole pieces, where a longitudinal joint is acceptable, and which leftovers can be used.
How to distribute planks 2000 mm long
First, cut the longest and most visible sections. If the wall is longer than 2000 mm, determine the joint location in advance. Then check leftovers for short sections above the door, in a niche, or between corners.
A short leftover is considered useful only when it matches an actual section and does not create an undesirable joint. Do not automatically include all leftovers in the calculation.
Where not to leave short inserts
- in the center of the main wall;
- above the fireplace, TV, or large mirror;
- on the axis of the doorway;
- near the external corner;
- in the most illuminated part;
- above the central section of the built-in wardrobe;
- where the joint is visible from the entrance.
If a short insert is unavoidable, it is moved to a less noticeable area and aligned with the room's pattern.
How to determine the allowance for trimming
There is no universal percentage. A simple room with four internal corners requires one approach, while a space with a bay window, columns, and external corners requires another. The reserve is calculated after distributing the planks.
Additional material may be needed due to complex angles, trial trimming, damage during installation, or the inability to use short leftovers. Each reason is recorded in the map.
Example calculation for a simple room
Suppose the walls are 4.2, 3.6, 4.2, and 3.6 m long. The total perimeter is 15.6 m. Theoretically, 7.8 planks are needed, i.e., at least eight. But two walls of 4.2 m cannot be done with two planks without a short addition: each requires 2 + 2 + 0.2 m.
If the remnants from other walls allow for two sections of 0.2 m each and their placement is acceptable, eight planks may suffice. If short inserts on the main walls are undesirable, the layout changes. The example shows why rounding up the total footage does not complete the calculation.
Example calculation for a room with a niche
Niche walls and additional corners are added to the main perimeter. Even if the total length increases by only one meter, the number of cuts increases more significantly. Some leftovers go to the short sides of the niche, while others do not fit the corners.
Therefore, the niche must be drawn as a separate node. It cannot be included as a single line "plus one meter."
Internal angles
Internal corners are found in almost every room. Their number affects cutting and installation time. Before ordering, the installer must understand the geometry of the walls: a perfect right angle is not always present.
A trial layout helps assess the scale but does not replace precise cutting of the actual profile. The angle is adjusted on site.
External angles
An external corner is more complex visually and technically. The joint is visible from two sides, and the protrusion may receive more accidental touches. In the map, it is marked with a separate symbol and a short leftover is not placed nearby unless necessary.
Longitudinal joints on a straight wall
Since the plank length is 2000 mm, joints will appear on most long walls. Their position must be determined before purchase. Joints are distributed so that they do not form a repeating vertical grid above key objects.
After installation, the joints are prepared and painted according to the chosen technology. Quality depends on the substrate, composition, and the craftsman's work.
How to use leftovers
Remnants can be directed to short sections, but only after checking corners and length. It is useful to mark each plank and record the remnant immediately after cutting. Then the craftsman sees where it can be applied.
You cannot build the entire order on the assumption that every remnant will necessarily be useful. Some offcuts may be too short or have an unsuitable trimming side.
What to pass to the installer
- name and article A100;
- size 100 × 53 × 2000 mm;
- room plan;
- codes of straight sections;
- internal and external corners;
- locations of longitudinal joints;
- nodes near the cabinet, window, curtains, and door;
- approved color;
- preparation and painting system;
- base installation method;
- cutting and reserve.
What to buy with A100
| Position | What it's for | What to Check | Route |
|---|---|---|---|
| Cornice A100 | Forms the top architectural line | Quantity, size, and condition | View A100 specifications |
| Another cornice | Needed if A100 does not fit the scale | Height, depth, and geometry | View all HI WOOD cornices |
| Mounting compound | Secures the profile to the base | Compatibility with polystyrene, wall, and ceiling | Materials for installation and painting |
| Primer and paint | Form the final color | Compatibility and test coat | Selected by technology |
| Cardboard mockup | Checks the scale before ordering | Accuracy 100 × 53 mm | Made according to the drawing |
How not to confuse A100 with a similar profile
The order specifies the full name HI WOOD A100 and size 100 × 53 × 2000 mm. One letter or a similar photo does not guarantee the cross-section match. Before payment, check the card.
If the mockup turns out to be too large, there is no need to trim the profile in height or depth. Better choose a different size of the ceiling cornice.
Comparison of A100 with a more compact profile
| Criterion | A100 | More compact profile |
|---|---|---|
| Visual role | Notable architectural line | Smooth junction finish |
| Layout requirements | Volume check is mandatory | Also desirable, but risk of overload is lower |
| Conflicts with furniture | Need to check especially carefully | Usually easier to place |
| Painting | Color greatly affects scale | Softer influence |
| Joints | More noticeable due to volume | May be less active |
Who A100 is for
- a buyer who needs a noticeable ceiling cornice;
- an interior with high doors and architectural lines;
- a living room, study, hall, or bedroom where the profile is confirmed by a mockup;
- a project for custom painting;
- a space where cabinets, curtains, grilles, and lights are accounted for;
- a customer ready to count slats according to the cutting map.
When it's better to choose a different profile
A100 may not be suitable for a cramped room, low door casing, a cabinet almost up to the ceiling, or a narrow curtain niche. It is also unnecessary if the task is simply to discreetly cover a small joint.
Another option worth considering if the cardboard corner seems heavy from the main points of the room, and the color does not help balance the scale. In this case, you can compare A100 with other profiles.
Practical scenario: living room with one main wall
In the living room, attention is usually focused on the wall with the TV, fireplace, sofa, or large panel. A100 forms a long line above it, so the longitudinal joint cannot be left on the central axis. First, assign whole or maximally long sections for the main wall, then distribute the leftovers to less noticeable areas.
The layout is checked from the sofa and from the entrance. If the profile seems large only up close, but looks proportional from the main point, this is a normal difference in perception. If the cornice presses on the wall even from a distance, it is worth comparing other sizes.
Practical scenario: bedroom with a floor-to-ceiling wardrobe
In the bedroom, a built-in wardrobe often occupies an entire wall. Before ordering A100, you need to determine whether the cornice runs in front of the wardrobe, above it, or breaks off at the side panel. Each option affects the number of slats and installation.
The layout is applied to the upper corner of the cabinet and photographed from the bed. It is important to check not only the appearance, but also access to doors, transoms, ventilation, and furniture lighting. If there is no gap, the profile cannot be forcibly built into the finished structure.
Practical scenario: study with a library
In the study, A100 can support the top line of bookshelves and give the room a sense of cohesion. The cornice is painted in the color of the ceiling, walls, or furniture depending on the concept. However, matching the color with the furniture does not mean that the profile can be attached to the cabinet without a separate solution.
The cutting map is constructed so that joints do not coincide with the central sections of the library. If the top of the cabinets has its own cornice, the two profiles need to be compared by scale.
Practical scenario: hallway and corridor
In a narrow corridor, a 100 × 53 mm profile may appear significantly larger than in a spacious living room. The layout is checked not only at the entrance but also along the long perspective. A depth of 53 mm can enhance the feeling of a low ceiling.
If A100 is confirmed, the color is usually made calm so as not to fragment the narrow space. Many door casings require special attention to the bottom line of the cornice.
Practical scenario: room with a bay window
A bay window increases the number of corners and short sections. The overall perimeter here is particularly poor at reflecting actual consumption. Each face is measured separately, and external and internal turns are marked on the diagram.
Before ordering, the craftsman must confirm the cutting method. The reserve is determined by the number of complex joints, not by a standard percentage.
Practical scenario: kitchen with upper cabinets
In the kitchen, the cornice may intersect with tall cabinets, range hood, ventilation, and decorative panels. It is necessary to decide whether A100 refers to the architecture of the room or to the furniture. If the line runs along the walls and disappears above the cabinets, the transitions must be deliberate.
Materials for installation and painting are selected considering the base and operating conditions. A universal technology for any kitchen is not confirmed by a single product card.
Practical scenario: hotel room
In repeated rooms, the layout of one corner helps establish a standard solution, but calculations are made for each type of room. You cannot multiply the consumption of one room by the number of rooms if the geometry, niches, and cabinets differ.
For a serial project, a color sample, joint scheme, and plank markings are preserved. This facilitates quality control and subsequent local repairs.
Practical scenario: restaurant or salon
In a commercial space, A100 can support a representative character, but long walls increase the number of joints. Lighting is often directed along the ceiling and emphasizes every connection, so joint locations need to be planned especially carefully.
The cutting map must account for equipment, ventilation, signs, curtains, and acoustic elements. The profile should not obstruct the maintenance of technical systems.
How to check A100 on an empty wall
If furniture is not yet installed, its dimensions are marked with painter's tape or temporary cardboard rectangles. Otherwise, an empty room creates a false sense of large free space, and the cornice seems lighter.
On the wall, the top of the cabinet, door casing, window, and curtain system are marked. Only then is the A100 corner applied.
How to check A100 in an already finished interior
In the finished room, the advantage is that all conflicts are visible immediately. The layout is applied in several corners, especially near furniture and windows. Color can be simulated with paper or a test swatch.
The disadvantage is limited ability to change adjacent elements. If the profile doesn't fit, it's better to choose a different size rather than trim furniture or block ventilation.
How to photograph the layout
- shoot from the entrance;
- shoot from the center of the room;
- shoot from the main seating point;
- shoot near the closet and window;
- take shots during the day and evening;
- hold the camera at normal height, not near the ceiling;
- do not use an excessively wide lens angle.
Photos are useful for coordinating with the designer and craftsman. They do not replace a live fitting, but they capture the decision.
How to compare two sizes without buying the full length
If there is doubt between A100 and a more compact profile, two cardboard corners are made. They are placed in the same spot and photographed from the same point. The comparison should account for the same color and lighting.
After such a test, you can proceed to the catalog of polystyrene cornices and choose the size consciously.
How to tell if A100 is too large
The profile likely overwhelms the room if the bottom line almost touches door trims, cabinets, and curtain niches, and the upper part of the walls turns into a dense band. Another sign is that the cornice becomes the main object even with a calm color.
The decision cannot be made based on a single sign. Sometimes an expressive cornice is meant to dominate. The question is whether it matches the project's goal.
How to tell if A100 is chosen correctly
The correct scale supports walls, doors, and furniture, but does not create random conflicts. The profile is read from key points, its offset does not interfere with curtains and technical elements, and the color connects the upper zone with the interior.
After a fitting, the buyer can explain why exactly A100 is needed: not just "liked it in the photo," but "supports a high door portal," "unites the library with the ceiling," or "creates an expressive belt in a large living room."
Mistakes when buying A100
Buying the full perimeter based on a photo
A photo does not show the actual volume. First, a 1:1 mockup is needed.
Drawing only a 100 mm line
The line does not convey the 53 mm depth and the view from below.
Counting only the total length of walls
Without a list of sections, it is impossible to determine the number of planks and joints.
Dividing the perimeter by two meters and rounding
This calculation does not account for leftovers, corners, and forbidden joint zones.
Add a universal ten percent
The reserve depends on the geometry and cutting layout.
Do not check cabinets and curtains
The profile may physically conflict with adjacent elements.
Treat A100 as a ready-made profile for LED
Lighting requires a separate structural check.
Choose color after installation
A contrasting shade can sharply increase the visual scale.
Do not mark external corners
They affect consumption and trimming complexity.
Leaving a short insert on the main wall
Such a joint becomes noticeable under side lighting.
Ordering glue without testing
The composition must be suitable for polystyrene and the base.
Not passing the diagram to the installer
The master will make decisions about joints on site.
Errors during fitting
A mockup loses its meaning if printed at the wrong scale, made only as a single flat strip, or checked in an empty room without furniture markings. Another mistake is looking at the corner only from close range.
The check should simulate real perception: full contour, two walls, normal eye height, real adjacent elements, and multiple lighting scenarios.
Cutting errors
The most common mistake is starting with short sections. As a result, long walls have to be assembled from several parts. It is better to first allocate the most visible and long segments, then use the leftovers.
The second mistake is not marking the planks. After cutting, the segments look similar and are easy to confuse. Each one gets a wall code and a sequence number.
Painting errors
The color is chosen without a test sample, and the gloss is evaluated from a catalog. After installation, a large profile reflects light differently than a flat wall. It is necessary to check the actual finish.
The specific preparation and painting system is selected according to the material guide. The general principles are covered in the article about joining and painting a polystyrene cornice.
Acceptance of the cornice before installation
| Check | How to perform | Why it's important |
|---|---|---|
| Model | Check A100 | Eliminates confusion with similar profiles |
| Size | Check 100 × 53 × 2000 mm | Confirms compliance with the layout |
| Material | Check high-density polystyrene | Affects installation and painting |
| Quantity | Count individually | Checked against the map |
| Length | Check 2000 mm planks | Affects cutting |
| Surface | Inspect under side light | Defects are recorded before finishing |
| Packaging | Check for damage | Protects edges and profile |
How to store planks before installation
Cornices are stored in a protected place, not mixed with trims and other profiles. Storage conditions are determined by the manufacturer's requirements and the chosen technology.
Wall markings are applied after the map is approved. Strips for the main wall are separated from material for short sections.
How to fill out a specification
| Field | What to specify | ||||||||||||||||||||||||||||||||||||||||
|---|---|---|---|---|---|---|---|---|---|---|---|---|---|---|---|---|---|---|---|---|---|---|---|---|---|---|---|---|---|---|---|---|---|---|---|---|---|---|---|---|---|
| Product | HI WOOD A100 Cornice | ||||||||||||||||||||||||||||||||||||||||
| Size | 100 × 53 × 2000 mm | ||||||||||||||||||||||||||||||||||||||||
| Material | High-density polystyrene | ||||||||||||||||||||||||||||||||||||||||
| Room | Room Name | ||||||||||||||||||||||||||||||||||||||||
| Sections | Codes and lengths of all walls | ||||||||||||||||||||||||||||||||||||||||
| Angles | Number of internal and external | ||||||||||||||||||||||||||||||||||||||||
| Joints | Allowed places | ||||||||||||||||||||||||||||||||||||||||
| Color | Per approved sample | ||||||||||||||||||||||||||||||||||||||||
| Quantity | According to the cutting map | ||||||||||||||||||||||||||||||||||||||||
| Reserve |
By actual cutsDoes it need to be painted?The surface is supplied for subsequent painting. The system is selected based on the material and project. Why can't A100 be chosen just from a photo?The photo does not show the continuous perimeter, 53 mm depth, and proximity to furniture, doors, and curtains. How to make a 1:1 mockup?Transfer the official outline to cardboard, check the dimensions with a ruler, and cut out two copies. Why are two copies needed?To assemble the inner corner and see the volume on both walls at once. Can I just draw a 100 mm line?The line shows the lower boundary but does not convey the projection and profile shape. Where to check the mockup?At the entrance, in the center of the room, near the cabinet, window, door, and curtain niche. Is A100 suitable for a low ceiling?There is no universal answer. The size is confirmed by a mock-up in the specific room. Can A100 be installed above a cabinet?Yes, if there is space, ventilation is not blocked, and the installation scheme is agreed upon. Is A100 suitable for lighting?It cannot be automatically considered a specialized LED profile. A separate structural check is needed. How to calculate the quantity?Measure each section, create a cutting map, and distribute strips 2000 mm long. Can the perimeter be divided into two meters?This only gives a theoretical minimum and does not account for corners, leftovers, and joint locations. What reserve is needed?The stock is determined by the actual number of corners, the complexity of trimming, and the suitability of remnants. Where is it better not to place a joint?On the main axis of the wall, above the fireplace, TV, door, and in a brightly lit area. How to choose the color?Compare options in ceiling color, wall color, and contrast, then make a test swatch. What to buy together?Suitable mounting and finishing materials selected for polystyrene and the base. What to pass on to the installer?Room plan, area map, corners, joints, color sample, and specification. Where can I see other sizes?In the category you can View all HI WOOD cornices. How to measure a room without losing short sectionsMeasurements are taken by moving around the room, not randomly. It is convenient to start from the entrance door, assign the first wall code A, and then move clockwise. Each turn gets its own designation, even if the section seems short and insignificant. On the plan, not only the length of the walls is recorded, but also the start and end of each segment. A note of "wall 3.8 m" is insufficient if there is an external corner on one side and a curtain niche on the other. These conditions affect trimming and the use of remnants. The measurement results are rechecked a second time after drawing up the diagram. An error in one short section can change the entire layout because a strip calculated for another wall no longer fits. Why laser measurement does not replace a paper diagramA precise instrument helps obtain dimensions but does not make decisions about joints, corners, and priority walls. All data must be transferred to a clear plan that an installer can read. On a paper or electronic diagram, the direction of movement, section codes, corner types, furniture, and technical obstacles are shown. Only after this do the numbers turn into an order. How to account for curvature of walls and ceilingThe cornice runs along the boundary of two planes, so deviations in the wall and ceiling can become noticeable. Before purchase, the craftsman evaluates the base and determines whether preliminary preparation is needed. A100 should not be used as a means to hide any unevenness without inspection. A full-size mockup shows the overall scale but does not reflect actual curvature. A technical assessment is performed separately. If the base requires leveling, this stage is included in the plan before profile installation. How to coordinate A100 with wall moldingsIf frames are already planned on the walls, the bottom line of A100 must work together with their top border. Too small a gap creates a dense strip, while too large a gap breaks the architectural system. On the mockup, the nearest frame or horizontal molding is marked. The color can be made uniform, but geometric distances are still checked. A100 should not accidentally intersect vertical layouts. How to coordinate A100 with a ceiling rosette and stucco moldingA large cornice can compete with a rosette, coffers, or other ceiling elements. If there are too many decorative lines, the upper zone becomes overloaded. The A100 layout is evaluated together with all future details, not separately. With a calm ceiling, A100 can become the main element. With rich decor, a more restrained profile is sometimes needed. The choice depends on the overall system. How to check the profile in a room with a sloped sectionMansard slopes, beams, and level transitions complicate a continuous perimeter. You cannot assume that the profile automatically follows any line. Each transition requires a separate node. The diagram shows places where the horizontal line changes direction or ends. The decision on the applicability of A100 is made by the designer and installer after inspection. Risk map before purchase
Who is responsible for what in the projectThe client approves the appearance, scale, and budget. The designer determines the role of the cornice in the interior, the color, and the connection with other elements. The measurer records the actual areas and angles. The installer checks the base, cutting, and installation method. The finisher is responsible for preparation and painting. If one person tries to make all decisions without a drawing or sample, the risk of error increases. Even a small home project benefits from a simple written specification. What the client must approve
What should the installer check before paying for the orderThe installer must see the room plan, the number of corners, and the condition of the base. He confirms that the cutting map is feasible and that the specified joints are accessible for quality processing. Special attention is paid to external corners, niches, short sections, and areas near furniture. If the installer only gets involved after delivery, some decisions can no longer be changed without additional costs. What should the finisher knowThe finisher receives information about the A100 material, color, gloss level, and sequence of work. He must understand whether the profile is painted before installation, after installation, or using a combined method. A test piece confirms the system. You cannot transfer a random recipe from another material without verification. How to organize the marking of planksEach plank gets a number, and each cut gets a wall code. For example, A-1 and A-2 refer to the first wall, B-1 to the second. Remnants are recorded with their actual length. Marking helps preserve the intended cutting layout when moving material between the workshop and the site. It is especially important when parts are pre-painted. How to pack a cut corniceSegments are grouped by walls, edges are protected, and short parts are not stacked without labeling. Corner elements and remnants intended for specific locations are stored together with the main group. If the profile is painted, the packaging material must not damage the surface. The specific method is chosen by the workshop. Control dry layoutBefore applying glue, the planks are laid out along the walls or floor in the order of installation. Lengths, numbers, and joint positions are checked. This operation detects mixed-up parts before correction becomes difficult. In a complex room, it is useful to photograph the laid-out groups. Photos supplement the map and help the installer restore the sequence. Installation order by wallsYou don't necessarily have to start from the door. The choice of the first wall depends on the composition and geometry. Often, the main wall or the most complex corner is installed first so that the remaining sections adjust to it. The order is recorded on the plan. You cannot assume that identical two-meter planks can be swapped after trimming. Final perimeter acceptance
How to evaluate the result after paintingThe finish is inspected during the day and in the evening. Some joints are almost invisible in diffused light but become apparent under a directed spotlight. If the lighting scenario is known in advance, it should be turned on during acceptance. The cornice is evaluated from a normal distance. Minor technological marks visible only from a ladder and noticeable defects from the sofa are different categories. What to keep after completion of work
Such documentation is useful for local repairs or extending the cornice to an adjacent room. Can I buy one plank firstBuying one plank for a physical sample can be useful if the order and project conditions allow. It lets you see the real material, assemble a corner, and make a test paint. But the availability and current terms should be checked in the product card or with a manager. Even a real plank does not replace the map of the entire perimeter. The sample addresses the scale and finish, while the quantity is calculated separately. When to contact a STAVROS managerConsultation is needed when you need to clarify current availability, price, terms of receipt, product card details, or related materials. The manager does not replace a measurer or installer but helps correctly process the product part of the order. It is better to come with a ready-made layout and quantity. A request like "how many are needed for a room" without dimensions does not allow accurate selection of planks. Final checklist before purchase
How to check the transition between roomsIf A100 is planned in several rooms, you need to decide whether the cornice will continue through the doorway or end in each room separately. Different ceiling heights, wall colors, and door sizes may make a continuous line impossible. Mark the end point on the plan, and check the layout from both sides of the opening. Do not automatically order the same quantity for adjacent rooms. Each receives its own cutting map, even if the profile and color match. How to account for a ceiling height differenceA multi-level ceiling changes the installation line. A100 can only run along the main level, end at the transition, or require a special node. Any vertical turn must be drawn before ordering. The cardboard layout is applied to each level. A profile that looks good on the high part may appear too large on the low part. How to check symmetry on the main wallIf the wall has a central axis, such as a fireplace, TV, or portal, the cutting layout is built relative to it. Joints should not accidentally shift the visual balance. Lengths on the left and right are checked separately. Sometimes a symmetrical arrangement of joints is better than a single connection in the center. The decision depends on the wall length and the capabilities of two-meter planks. Why a short trial piece is more useful than a color sampleA flat color card shows the shade but does not reveal the shape of A100. A short real fragment allows you to see the shadow, edge, gloss, and paint quality. It can be applied to a cardboard corner and compared under several lighting options. Before ordering a sample, you should clarify the availability of such a purchase. The article does not promise a separate configuration without card confirmation. How to avoid over-spamming with decorA100 already creates a noticeable top line. If the walls simultaneously receive large frames, pilasters, panels, and contrasting paint, the interior may become overloaded. The layout is evaluated not in a void, but next to all planned elements. Sometimes the right decision is to leave the cornice as the main decor and make the wall lines calmer. In another project, A100 is painted in the ceiling color so that it supports rather than competes. How to check the order after filling the cartBefore payment, you need to compare the quantity in the cart with the final card again, not with an early draft calculation. Check the full name of A100, size, number of slats, and related materials. If the card changed after the installer's consultation, delete the old numbers from the notes so they do not end up in the order again. Why you cannot shorten the name to "cornice 100 mm"The height of 100 mm is found in different profiles and does not describe the depth, length, or geometry. In documents, you need to write HI WOOD A100, 100 × 53 × 2000 mm. This wording reduces the risk of substitution with a similar product. The same name is used on the packaging, in the cutting map, and when transferring the material to the craftsman. How to make a final decisionAfter the layout, photos, color sample, and calculation, it is worth asking three questions. Does the interior really need this architectural scale? Is there any physical conflict with neighboring elements? Is it clear where each two-meter plank will go? If there is a clear answer to all three questions, you can proceed to purchase. If at least one remains open, it is better to clarify the project before payment. How to check A100 on site before final orderThe final check should take place in the same room where the cornice will be installed. The layout is applied to at least three different areas: a regular inner corner, the area near the tallest piece of furniture, and the place next to a window or curtain niche. If the profile is perceived consistently everywhere and does not create technical conflicts, the scale can be considered confirmed. After this, the bottom line of A100 is marked along several walls to see a continuous band. It is important not to turn the marking into a replacement for the layout: the line only complements the volumetric corner and helps to imagine the full perimeter. At the same time, check whether the cornice is too close to trims, grilles, sconces, and wall frames. Then, photos of the layout, a drawing of the areas, and a test paint sample are reviewed together. This is the last moment when you can change the profile size, color, or route without dismantling. After approval, the decision is fixed in the specification, and the number of planks is transferred from the final cutting map. Why a ready-made diagram simplifies purchasing at STAVROSThe product card answers the question of which profile is being purchased, and the diagram explains why each plank is needed. When a client arrives with wall codes, number of corners, joint locations, and a confirmed color, it's easier for the manager to check the product part of the order, and for the installer to execute the project without improvisation. This approach is especially important for A100: the large profile is noticeable, planks are 2000 mm long, and cutting errors show up on main walls. A full-size corner, map, and specification turn a commercial request "buy HI WOOD A100 cornice" into a precise order for a specific room. Check before transfer to installationBefore issuing the material, packages, wall codes, segment lengths, number of corners, and approved joint locations are rechecked. The installer should receive not only the planks but also a clear sequence of work. If part of the profile remains uncut, the map notes which area it is intended for and why the decision is postponed to the site. ConclusionThe HI WOOD A100 cornice, measuring 100 × 53 × 2000 mm, is needed not for inconspicuous joint covering, but for an expressive top line. Its polystyrene profile, suitable for painting, can tie together the ceiling, walls, doors, and built-in furniture, but only at the appropriate scale. The correct purchase starts not with dividing the perimeter by two meters, but with one trial corner. The A100 contour is transferred to a 1:1 scale, checked near the cabinet, window, curtains, door, grilles, and lights, photographed from key points, and the color is approved. After that, a map of straight sections is compiled, two-meter planks are distributed, and a reserve is determined based on actual cuts. STAVROS allows you to move from fitting to a specific order: select A100 in the product card, compare other profiles, and choose materials for installation and painting. This route helps you buy a cornice consciously, avoid accidental room overload, and provide the craftsman with an accurate diagram of the entire perimeter. |