Article Contents:
- Wall and ceiling joint: why decorate it at all
- Ceiling plinth, cornice, molding, fillet: what is what
- Ceiling Skirting
- Ceiling Cornice
- Graff
- Molding
- Ceiling stucco molding
- What to buy from this
- How to choose a profile based on ceiling height: the main parameter
- Size selection formula
- Low ceiling 2.4–2.6 m: what to choose
- Which profile to choose
- Color with a low ceiling
- What not to do with a low ceiling
- Standard ceiling 2.7–2.8 m: the golden mean
- What works with a 2.7 m ceiling
- Kit for a 2.7 m ceiling
- Painting with a standard ceiling
- High ceiling 3 m and above: room for choice
- What is appropriate with a 3 m and above ceiling
- Systematic approach with a high ceiling
- Interior styles and profile selection at the junction
- Modern interior, minimalism, Scandinavian style
- Neoclassical, modern classical
- Classical, Empire, Baroque
- Art Deco
- Provence, Country
- Profile and its parameters: what to look for when choosing
- Profile projection
- Ratio of vertical and horizontal planes
- Relief and ornament
- Length of one element
- Profile color at the joint: three working options
- Profile matching wall color
- Profile matching ceiling color
- White profile against neutral walls
- Installing a profile at the junction of wall and ceiling: what you need to know
- What you need to buy for installation
- Cutting corners: the main technical point
- Glue: which one to choose
- Installation sequence
- Common mistakes when choosing a profile at the junction
- Mistake one: the cornice is too wide for the ceiling height
- Mistake two: the ornament does not match the style
- Mistake three: different profiles in adjacent rooms
- Mistake four: joint without sealant
- Mistake five: baseboard and cornice in different colors
- Table: what to choose for the wall and ceiling joint
- FAQ: key questions before purchasing
- About the Company STAVROS
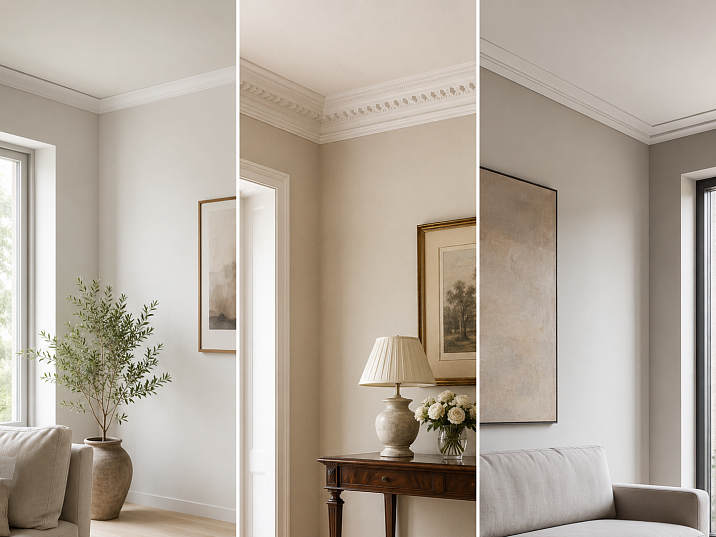
There is one detail in renovation that everyone notices — but no one can exactly explain why a room looks finished or not. It's the wall and ceiling joint. That horizontal line that runs along the perimeter of the room at ceiling height. When it's designed, the interior reads as a cohesive whole. When it's not, the eye 'hangs' on the bare transition, and a feeling of incompleteness remains, even if everything else is done perfectly.
What to put there? Ceiling baseboard? Cornice? Molding? And how are they even different? Won't a large cornice lower the ceiling? These questions are asked by everyone who first encounters choosing a ceiling profile. And this article provides specific, practical answers to them — without fluff, without theory for theory's sake.
Buy ceiling stucco molding consciously means understanding which element you need specifically, for your ceiling height, your style, and your task.


Wall and ceiling joint: why design it at all
Let's start with the main point. Why not leave the joint as is? The ceiling is whitewashed, the walls are painted — the border is even, the paint doesn't run. Why add another element?
Because even a technically even joint is visually a harsh line. Two different materials, two different planes — wall and ceiling — meet at a right angle. This angle is sharp, 'raw', without a transition.
A ceiling baseboard, cornice, or molding at this joint does several things at once:
They create a soft transition. Instead of a sharp corner, there is a smooth curve or stepped profile. The eye glides over it rather than stumbling.
They hide technical imperfections. The joint between the wall and ceiling is where gaps, cracks, and plaster irregularities most often remain. The profile covers them, and no flush putty is needed.
They structure the space vertically. A horizontal line along the ceiling perimeter visually "closes" the room from above. This creates a sense of completeness — like a frame enclosing a painting.
They add a decorative shadow. Any protruding profile, when lit from the side, casts a shadow beneath it. This shadow — a thin strip — makes the joint appear voluminous and "alive."
That is why even the most modest and narrow profile at the wall-ceiling joint changes the perception of the room. And that is why it should be chosen deliberately — not just grabbing the first thing you see at a hardware store.


Ceiling baseboard, cornice, molding, cove: what is what
Before choosing, you need to understand the terminology. Stores and catalogs use different names for similar items. And this often leads to confusion.
Our factory also produces:


Ceiling skirting board
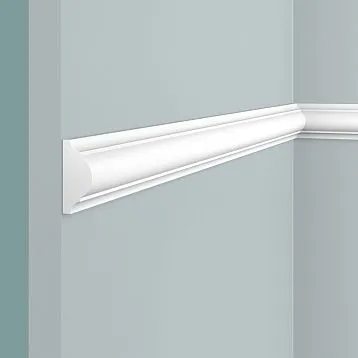
A ceiling baseboard is a profile with a triangular or curved cross-section that is installed in the corner between the wall and ceiling. One plane of the element rests on the wall, the other on the ceiling. In cross-section, it always has a three-sided shape.
A ceiling baseboard is the simplest and most affordable solution for the joint. It neatly covers the corner, creates a soft transition, and does not require complex installation. This is what is most often meant when people say "something for the wall-ceiling joint."
Width (vertical or horizontal plane size) — from 30 to 100 mm. The most common sizes: 40–60 mm for standard rooms, 25–35 mm for low ceilings.
Get Consultation
Ceiling cornice
A cornice is a more complex profile element. Unlike a baseboard, a cornice can have several horizontal ledges, ornamentation, protrusions, and recesses. It is more monumental, more noticeable, and more "architectural."
In the classical sense, a cornice is a horizontal architectural element that finishes the wall at the top. It is the cornice that creates the feeling of an "expensive ceiling" — not just a closed corner, but a well-designed upper zone of the room.
A polyurethane cornice reproduces profiles that were previously only made from plaster or stucco. At the same time, it weighs many times less and is installed using regular acrylic adhesive.
Cornice
A cove is a narrow profile with a concave curved surface (quarter circle). Essentially, it is one of the options for a ceiling baseboard with a specific cross-sectional shape. In construction, a cove is an analogue of a ceiling baseboard, but with a specific profile geometry.
Molding
Polyurethane molding — is a universal linear decorative profile. Unlike a ceiling baseboard, a molding is not necessarily triangular in cross-section. It can be flat (installed on the plane of a wall or ceiling), semi-circular, or stepped.
At the junction of the wall and ceiling, molding is used in two options:
-
As a replacement for a ceiling baseboard (installed in the corner)
-
As a horizontal strip directly under the ceiling (slightly below the corner, on the wall)
The second option is a modern technique: a molding on the wall, at a distance of 3–5 cm from the ceiling, creates a horizontal line that visually "pushes back" the ceiling. This works as a visual elevation.
Ceiling stucco
Ceiling molding — a broader concept. It encompasses all the decor that works on the ceiling and in the joint area: cornices, baseboards, rosettes, ornamental bands. Ceiling stucco is not a single element, but a system.
When the task is not just to "cover the corner," but to "assemble the entire top of the room" — that's when we're talking about ceiling stucco.
What to buy from this
One simple question helps you understand what exactly you need: what is your task?
-
Just close the joint — ceiling baseboard
-
Make the top of the room more expressive — cornice
-
Modern horizontal line — molding
-
Complete ceiling system — ceiling stucco as a set
buy polyurethane moldings — this is the answer to several tasks at once, because the range of moldings includes narrow baseboard profiles, full-fledged cornices, and decorative horizontal strips.
How to choose a profile for ceiling height: the main parameter
Ceiling height is the only parameter that almost unambiguously determines what size the joint profile should be. Everything else — style, color, relief — is secondary to height.
Why? Because a ceiling molding or cornice "lowers" the ceiling. Not literally — the physical height remains the same. But visually: the profile takes up part of the wall height and part of the ceiling width. A large cornice on a low ceiling creates a feeling of pressure and crampedness.
Size selection formula
A simple rule: the height of the vertical plane of the profile (the plane adjacent to the wall) should not exceed 4% of the ceiling height.
-
Ceiling 2.5 m — vertical profile size up to 100 mm. Optimal: 35–55 mm
-
Ceiling 2.7 m — up to 108 mm. Optimal: 50–70 mm
-
Ceiling 3 m — up to 120 mm. Optimal: 65–90 mm
-
Ceiling 3.5 m — up to 140 mm. Optimal: 80–110 mm
These are approximate figures. The actual choice also depends on style, relief richness, and color scheme. But as a basic guideline — it works.
Low ceiling 2.4–2.6 m: what to choose
A low ceiling is a limitation, but not a death sentence. With the right choice of joint profile, it remains visually where it should be — or even slightly higher.
Which profile to choose
Narrow ceiling plinth. Width 25–40 mm. Simple profile without heavy relief. It covers the joint, creates a neat line — and doesn't "eat up" the height.
Smooth molding. Installed not in the corner, but on the wall slightly below the ceiling (by 3–5 cm), a thin molding creates the illusion that the ceiling starts a little higher. This is a visual trick that really works.
Calm profile without ornament. With a low ceiling, an ornamental cornice is a bad idea. Not because it's ugly, but because the ornament draws attention precisely to the joint area and emphasizes the "lowness." A smooth profile is more delicate.
Color for a low ceiling
Same color as the wall. The molding or plinth is painted the same color as the wall. The boundary between the wall and ceiling becomes soft, the corner "disappears." The ceiling visually rises.
Same color as the ceiling. The profile is painted white (if the ceiling is white). This creates the feeling that the white ceiling "descends" slightly lower down the wall. It also visually raises the ceiling.
Contrast — avoid. A white profile on a dark wall with a low ceiling fixes attention precisely on the joint — which enhances the feeling of a pressing ceiling.
What not to do with a low ceiling
-
Do not take a wide cornice from 80 mm and above
-
Do not use double cornice profiles
-
Do not install heavy ornament
-
Do not paint the profile in a contrasting color
Buy polyurethane moldings For a low ceiling, choose narrow profiles with clean, simple geometry.
Standard ceiling 2.7–2.8 m: the sweet spot
A ceiling of 2.7–2.8 m is the standard in modern construction. Most apartments and country houses have this height. It is a pleasant height: it already allows working with medium-width cornices and moderate relief.
What works with a 2.7 m ceiling
Medium ceiling plinth 50–70 mm. The optimal choice for most rooms with a 2.7 m ceiling. It reads well and does not create pressure.
Cornice with a light profile. A cornice with a moderate stepped or coved profile is no longer just a closed joint, but an architectural line. With a 2.7 m ceiling, it is organic and expressive.
Molding around the perimeter. A medium-width molding (25–40 mm) installed on the wall under the ceiling creates a horizontal line that acts as the lower boundary of the ceiling zone.
Ceiling rosette for a chandelier. With a ceiling height of 2.7 m Ceiling rosette 50–65 cm in diameter — an organic central accent. It is clearly visible and does not create pressure.
Kit for a 2.7 m ceiling
Standard recommended kit for a room with a 2.7 m ceiling:
-
Cornice around the perimeter, height 55–70 mm
-
Ceiling rosette — if there is a chandelier
-
Wall moldings — if a frame system is needed
Buy ceiling molding with such a configuration — means getting a finished top of the room: the joint is decorated, the ceiling is structured, the chandelier is integrated into the interior.
Painting with a standard ceiling
With a 2.7 m ceiling, all three color options are available:
-
Matching the wall tone — modern and delicate
-
White on a colored wall — classic contrast
-
In an intermediate neutral tone — soft and versatile
There are no color restrictions with a 2.7 m ceiling — unlike a low ceiling, where contrast is undesirable.
High ceiling of 3 m and above: room for choice
A high ceiling is architectural luxury. But luxury that needs to be properly styled. A tall space without decor at the junction of wall and ceiling looks unfinished — like an incomplete building.
With a high ceiling, a small narrow baseboard will be lost: too thin a line against the large volume of the room. This is where monumental cornices and expressive Ceiling molding and rich ornamentation are justified.
What is appropriate for a ceiling of 3 m and above
Wide cornice 80–120 mm. With a 3 m ceiling, a cornice of this width is organic and monumental. It creates an expressive architectural boundary between the wall and the ceiling.
Double cornice. Two profiles installed one above the other with a small gap. A classic architectural technique for high spaces — palaces, grand halls, restaurants.
Ornamental cornice. Dentils, ionic, acanthus, meander — with a high ceiling, rich ornamentation on the cornice looks appropriate and luxurious.
Frieze band. Between the top line of molding frames and the cornice — a horizontal strip (frieze). This is a classic architectural technique that divides the wall into a "field" (main space) and an "entablature" (upper zone).
Combination of cornice with rosette. Buy ceiling molding For a high space — means taking a monumental cornice around the perimeter and a large rosette in the center. Rosette diameter for a 3 m ceiling — 70–90 cm.
Systematic approach for high ceilings
With a ceiling of 3 m and higher, the walls are also "large" — and if they are not decorated with molding frames, the upper part of the room will live separately from everything else. This is where the principle works: ceiling cornice + wall moldings + rosette = a unified system.
Buy moldings As a set for a high room — means ordering everything from one style family: cornice, moldings, rosette, decorative elements.
Interior styles and profile selection at the junction
Ceiling height is the main parameter. But the interior style determines the character of the profile: whether it will be smooth or ornamented, strict or soft, classic or modern.
Modern interior, minimalism, Scandinavian style
Smooth profile. Stepped or rectangular in cross-section. Without ornament. Width — moderate, matching ceiling height. Paint — matching wall or ceiling color.
It is in modern interiors that molding is most often used, installed not in the corner, but on the wall slightly below the ceiling. This creates a "floating" effect: the ceiling looks like a separate plane, and the wall has a clear horizontal finishing line.
Neoclassicism, modern classic
Cornice with moderate relief. Ionic profile, ogee cornice, stepped with light ornament. Width — 50–80 mm for standard ceiling. Paint — white or matching wall color.
Classic, Empire, Baroque
Wide ornamented cornice. Acanthus leaves, dentils, relief ionic. Width from 80 mm. For ceilings below 3 m — use carefully.
Art Deco
Stepped cornice with geometric profile. Straight lines and right angles, no organic ornaments. Color — white or contrasting.
Provence, country style
Light cornice with soft profile. Possible with small ornament in a "natural" key — leaves, volutes. Paint — warm neutral tones.
Profile and its parameters: what to look for when choosing
Once the style and ceiling height are determined, you need to evaluate the specific profile parameters.
Profile projection
Projection is the distance the profile extends from the wall or ceiling surface. A large projection creates an expressive shadow. A small projection creates a delicate line.
With a low ceiling, the projection is minimal. With a high ceiling, the projection can be significant, up to 50–70 mm.
Ratio of vertical and horizontal planes
For triangular cross-section profiles (classic ceiling molding), the ratio of vertical and horizontal planes is important. The standard ratio is approximately 1:1. Profiles with a larger vertical plane are more noticeable on the wall. Profiles with a larger horizontal plane are more noticeable on the ceiling.
For a ceiling with lighting along the wall, choose profiles with a larger horizontal plane: the light is 'hidden' behind the profile and shines onto the ceiling.
Relief and ornament
A smooth profile works in any style and with any ceiling height — it is universal.
An ornamental profile works well only in a consistent style. A classic ornament in a modern minimalist interior is a mistake.
Length of one element
The standard length of moldings and cornices is 2 m. These are the strips that need to be joined on long walls. Joints are made at a 45-degree angle for minimal visibility.
Profile color at the joint: three working options
There is a separate article about the color of stucco, but when it comes to profiles at the wall and ceiling joint, there are specific rules.
Profile in wall color
The profile is painted the same color as the wall — or a shade 5–10% lighter (so it reads through light and shadow). The joint 'disappears' into the wall, and the ceiling is perceived as a separate neutral plane.
The best option for modern interiors and low ceilings. Delicate, relevant, never goes out of style.
Profile in ceiling color
The profile is painted white (if the ceiling is white). The joint 'disappears' into the ceiling. The eye perceives the walls as ending slightly higher — the ceiling visually rises.
A classic option for colored walls. A white cornice on a blue wall is a strong architectural solution.
White profile against neutral walls
A white profile on a beige or light gray wall can create an undesirable "cold" effect — if the shade of white and the wall shade conflict. Check: warm wall — warm white profile. Cold wall — cold white.
Installing the profile at the wall-ceiling joint: what you need to know
Self-installation of a ceiling plinth or cornice is quite a feasible task. Polyurethane profiles are lightweight, easy to cut, and adhere perfectly.
What you need to buy for installation
Minimum set:
-
Moldings made of polyurethane or ceiling molding — with a 10–15% margin
-
Mounting acrylic adhesive
-
Acrylic sealant for filling joints and corners
-
Acrylic paint in the desired shade
-
Miter saw or miter box for cutting corners
-
Painter's tape
Extended kit (for a comprehensive system):
-
Decorative stucco for the accent zone
-
Moldings for wall frames
Cutting corners: the main technical point
Internal and external corners of the room require cutting the profile at 45 degrees. This is a key installation point: a poorly cut corner creates a noticeable gap or misalignment.
For precise cutting — a miter saw (best tool) or a plastic miter box with guides at 45 degrees. A miter box is cheaper, but with an inaccurate profile it introduces error.
Before marking, the profile should be applied to the joint and ensure it fits tightly along the entire length — without a gap. If the wall is uneven, the gap is filled with sealant after installation.
Glue: which one to choose
For polyurethane profiles, the following is used:
-
Acrylic mounting adhesive — standard option
-
Liquid nails on an acrylic base — for more reliable fastening on complex surfaces
-
Special adhesive for polyurethane foam — when working with lightweight decorative profiles
Silicone adhesive for polyurethane is not suitable: it does not provide the necessary adhesion and cannot be painted over.
Installation sequence
-
Mark a line on the wall (or ceiling) at the required distance from the corner
-
Cut the profile at the corners
-
Apply adhesive to both planes of the profile (in a zigzag pattern)
-
Press the profile to the corner, align with the marking
-
Secure with painter's tape until set (20–40 minutes)
-
Seal the joints with sealant
-
Final painting after the sealant has dried
Common mistakes when choosing a profile at the joint
Over the years of working with decorative stucco, you develop an understanding of where mistakes are most often made. Let's break down typical cases.
Mistake one: cornice too wide for ceiling height
The most common mistake. Saw a beautiful wide cornice in a catalog, didn't match it with the ceiling height — got a "lowered" ceiling and a feeling of crampedness. Rule: profile width no more than 4–5% of ceiling height.
Mistake two: ornament doesn't match the style
Classic ornament in a modern apartment. The wall was finished with smooth plasterboard niches, minimalist furniture was placed — and suddenly a cornice with acanthus leaves. The ornament should match the interior style.
Mistake three: different profiles in adjacent rooms
Hallway — one cornice. Living room — another. Bedroom — a third. With open doors, this is visible. It's better to use one profile throughout the apartment — with possible width variation for different rooms.
Mistake four: joint without sealant
Even a well-installed profile will eventually develop a barely noticeable gap in the corners — due to thermal expansion, minor wall deformations. Without sealant, this gap will appear in a year or two. Sealing with sealant at the installation stage is a mandatory step.
Mistake five: baseboard and cornice in different colors
White ceiling plinth, white floor plinth, white architraves — and suddenly the cornice is painted to match the wall. All the "white accents" work as a system — and if one of them breaks away, the system collapses.
Table: what to choose for the wall and ceiling junction
| Task / Situation | What to choose |
|---|---|
| Just neatly close the joint | Ceiling Skirting 35–50 mm |
| Make the top of the room more expressive | Ceiling cornice with moderate relief |
| Ceiling 2.5 m | Narrow profile 25–40 mm, matching the wall or ceiling |
| Ceiling 2.7–2.8 m | Cornice 50–70 mm, white or matching |
| Ceiling 3m+ | Wide cornice 80–120 mm, ornament possible |
| Chandelier in the center of the ceiling | Cornice + Rosette |
| Walls decorated with moldings | Cornice in the same style |
| Modern interior | Smooth molding on the wall under the ceiling |
| Classic, neoclassic | Cornice with classic profile |
| Complete ceiling system | Ceiling molding Set: cornice + rosette |
FAQ: main questions before purchase
What to use to cover the joint between the wall and ceiling?
Ceiling baseboard — for neatly closing the corner. Cornice — for a more expressive and "expensive" look. Molding — for a modern horizontal line. Buy ceiling molding a kit — if you need a complete ceiling system.
What is better: ceiling baseboard or cornice?
Baseboard — delicate, neat, for the task of "closing the corner." Cornice — more noticeable, architectural, for the task of "making the top of the room expressive." With a ceiling of 2.7 m or higher, a cornice is preferable.
Which ceiling baseboard to choose for a low ceiling?
Narrow — 25–40 mm. Smooth or with minimal relief. Paint to match the wall or the ceiling. No contrast, no ornament, no heavy profile.
Can you paint ceiling molding the color of the wall?
Yes. This is one of the best modern techniques. A profile in the color of the wall creates a relief effect without contrast — delicate, modern, relevant.
Is a ceiling rosette for a chandelier needed if there is already a cornice?
A socket and a cornice are different elements that solve different tasks. The cornice frames the perimeter of the ceiling. The socket decorates the center. Together, they create a complete ceiling system.
What to buy together with a ceiling plinth?
Acrylic mounting adhesive, acrylic sealant, paint of the desired shade, a 10–15% spare profile. For an expanded version — Ceiling rosette и Moldings made of polyurethane for walls.
Are a fillet and a ceiling plinth the same thing?
A fillet is a type of ceiling plinth with a concave quarter-round profile. They are identical in function: they cover the joint between the wall and the ceiling. The difference is only in the cross-sectional shape.
Measure the perimeter of all frames you plan to create. For example, 6 frames of 80×120 cm: perimeter of one frame (80+120)×2 = 400 cm = 4 m. Total: 6×4 = 24 m. Add 10-15% for trimming and errors: 24×1.15 = 27.6 m. Order 28 m. If the standard plank is 2.2 m, you will need 13 planks.
Room perimeter + 15% for cutting corners and waste. For example, a room 4×5 m: perimeter 18 m. You need to buy 18 × 1.15 = 21 linear meters. Molding is sold in two-meter planks — that means 11 planks.
About the company STAVROS
The joint between the wall and the ceiling is one line. But it is this line that completes the interior, making it finished or unfinished. A small detail with great significance.
STAVROS is a Russian manufacturer of decorative polyurethane products. In the STAVROS catalog: Moldings made of polyurethane of all formats — from narrow plinth profiles to monumental cornices, Ceiling molding for cornices and sockets, Decorative stucco и Relief Decoration for accent zones, full range moldings for any interior.
All STAVROS products are made of high-quality dense polyurethane with precise geometry and clear relief. Ready for painting in any color. Mounted with acrylic glue without special tools. STAVROS specialists will help you choose a profile for your ceiling height, interior style, and specific task — and calculate the exact footage for your dimensions.