Article Contents:
- Wooden plinth PLT‑007 97 × 22 mm: which dimensions are confirmed in the product card
- The cabinet leaves 18 mm, but the wooden plinth PLT‑007 is 22 mm: what is the real conflict
- The back panel of the cabinet may be recessed into the body
- The furniture base may be deeper than the body
- The wall may deviate vertically
- The 18 mm may be measured to the decorative panel, not to the body
- Why the 4 mm difference cannot be considered insignificant
- 1. Distance from the finished wall to the back plane of the cabinet
- 2. Gap directly at floor level
- 3. Gap at a height of 97 mm
- 4. Height of the furniture plinth
- 5. Position of adjustable legs and supports
- 6. Protrusion of the side panel relative to the plinth
- 7. Presence of a decorative side panel
- 8. Wall curvature in the cabinet area
- 9. Thickness of possible mounting layer
- 10. Visibility of the assembly from the side
- Rigid template 22 × 97 mm: the most useful check before ordering
- Scenario 1. Actual gap is larger than 22 mm
- Scenario 2. Gap is about 22 mm
- Scenario 3. Gap is actually 18 mm
- Built-in wardrobe
- Built-in wardrobe that may be moved
- Wardrobe with a decorative side panel
- Furniture plinth covers the bottom joint
- Side panel is clearly visible from the room
- Returning the profile to the wall
- Neat straight end finish
- Finish under a decorative side panel
- Joint with furniture plinth
- Finishing the end with the same material
- How to choose the end point near a side panel
- MDF
- Moisture-resistant MDF
- Oak
- Oak
- Why you shouldn't mix solid wood and MDF PLT-007 on one continuous wall without reason
- If the cabinet is moved: how much space is really needed
- Commodes and cabinets
- Built-in kitchen
- Radiators
- Sliding doors
- Decorative Wall Panels
- Door stops and limiters
- Example
- Why you don't need to buy the full perimeter 'just in case'
- How to create a cutting map with ends at furniture
- How to finish the visible end of PLT-007 made of MDF
- How to finish the visible end of PLT-007 in beech or oak
- Should the baseboard continue behind a freestanding cabinet
- Should the baseboard continue behind a built-in cabinet
- Cabinet with a decorative side panel: where should the PLT-007 line run
- Furniture plinth higher or lower than 97 mm: why it matters
- What to do if the 18 mm gap exists only at one end of the cabinet
- What to do if the wall near the cabinet has a local bulge
- Can the thickness of PLT-007 be reduced in a hidden area
- Can a thinner baseboard be used only behind the cabinet
- Installation trajectory of a long whip: 2400 or 2600 mm next to the cabinet
- Materials for installation and finishing: what to include in a separate estimate
- Mistake 1. Only looking at the 97 mm height
- Mistake 2. Measuring 18 mm at only one top point
- Mistake 3. Considering 18 and 22 mm as "almost the same"
- Mistake 4. Not accounting for the installation trajectory
- Mistake 5. Buying baseboard for the full perimeter
- Mistake 6. Not planning the end cap
- Mistake 7. Mixing MDF and solid wood without a design reason
- Error 8. Order first, then make the template
- Error 9. Move the built-in wardrobe for four millimeters
- Error 10. Grind the back side of PLT-007 without a drawing
- Practical scenario: built-in wardrobe takes up 2400 mm of wall
- Practical scenario: freestanding wardrobe 1600 mm wide
- Practical scenario: wardrobe planned to be replaced in a year
- Practical scenario: gap 23-25 mm, but the wall is wavy
- What is the size of PLT-007?
- Will PLT-007 fit into an 18 mm gap?
- Can the skirting board be finished at the cabinet?
- Is it mandatory to run the skirting board behind built-in furniture?
- How to finish the open end of PLT-007?
- What is the length of PLT-007 made of MDF?
- What is the length of the oak and beech PLT-007?
- What is better for furniture — MDF, beech, or oak?
- Do I need to account for the thickness of the glue?
- Can I move the cabinet exactly 4 mm?
- Can I sand down PLT-007 to 18 mm behind the cabinet?
- How do I calculate the quantity if part of the wall is covered by the cabinet?
- Do I need to check other pieces of furniture?
- When is it better to choose a different baseboard?
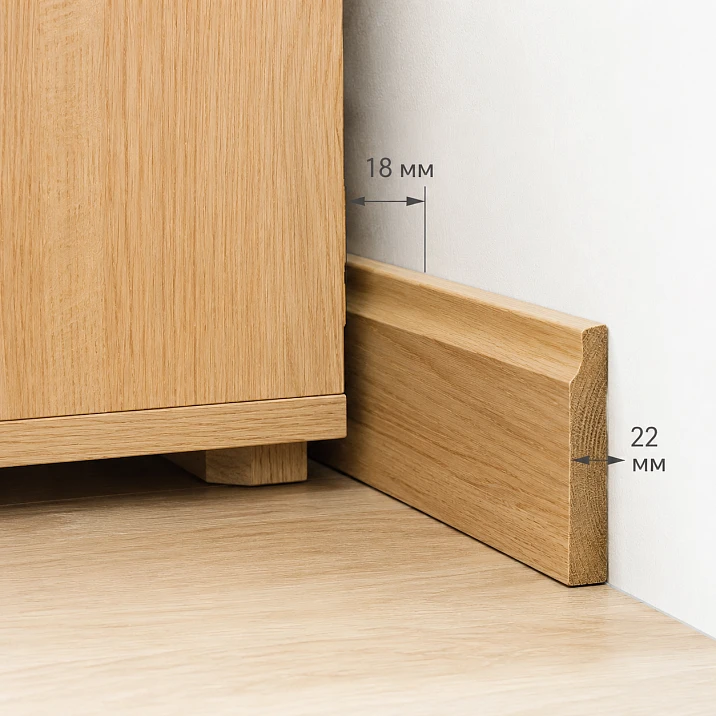
The cabinet is already installed, and I don't want to change its position, but a tall floor plinth is planned along the room. The card of the PLT-007 I like shows a profile thickness of 22 mm. The actual gap between the wall and the cabinet body is 18 mm. Simple arithmetic shows a conflict: 22 − 18 = 4 mm. But the solution cannot be reduced to the phrase "four millimeters is not enough — the plinth doesn't fit." First, you need to understand what exactly was measured as 18 mm, where the real rear plane of the body runs, whether there is a furniture base, how even the wall is, and whether the plinth should even continue behind the cabinet.
If the gap really is 18 mm exactly in the area where the profile passes at a height of up to 97 mm from the floor, and the actual thickness of PLT‑007 according to the drawing and the selected version is 22 mm, the profile cannot be routed behind the cabinet without changing the furniture position. Nominally, 4 mm is missing even before accounting for the finishing or installation layer. In this situation, there are two rational solutions: move the cabinet and ensure a confirmed installation gap, or end the baseboard at the side of the furniture with a neatly designed end cap.
This does not mean that to buy wooden baseboard PLT‑007 cannot be used for the room. The problem applies only to the specific hidden or visible section near the cabinet. On other walls, the profile can be used without conflict. Moreover, if the cabinet is built-in and the area behind it is not visible, continuing the baseboard behind the furniture is often not required at all — then the closed length should be excluded from the estimate and the finish should be decided in advance.
Below we will examine exactly this customer scenario: 18 mm between the cabinet and the wall, profile 97 × 22 mm, already finished interior, and the need to resolve the joint before ordering. We will check the dimensions of PLT‑007, measurement points, three options for passing near furniture, end finishing, material, cutting, number of planks, and the list of data to send to the manager before purchase.
Wooden baseboard PLT‑007 97 × 22 mm: which dimensions are confirmed in the product card
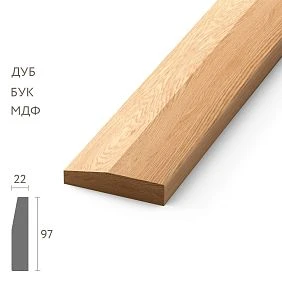
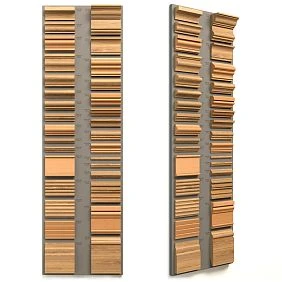
PLT‑007 in the current product card is called "wooden baseboard / trim / heel." For this article, only its floor scenario is used. The profile dimensions are the same in height and thickness for all listed materials: height A — 97 mm, thickness C — 22 mm. The standard length varies.
| PLT-007 version | Size | What matters near the cabinet |
|---|---|---|
| Moisture-resistant MDF | 97 × 22 × 2600 mm | Thickness of 22 mm determines the minimum geometry of the joint |
| MDF | 97 × 22 × 2600 mm | Same thickness; length affects cutting |
| Beech | 97 × 22 × 2400 mm | 22 mm at the wall; shorter standard stick |
| Oak | 97 × 22 × 2400 mm | 22 mm at the wall; the visible end requires careful finishing |
For a node at already installed furniture, the main thing is not 97 or 2400/2600 mm, but 22 mm. The 97 mm height indicates the vertical range within which the space between the wall and the cabinet needs to be checked. The length of the strip will be needed later, when we exclude areas closed by furniture from the total perimeter. The 22 mm thickness is directly compared with the gap.
The card shows the size as A × C × L, where A is height, C is thickness, L is length. Therefore, in the article it is correct to refer specifically to the 22-millimeter profile thickness. But even a confirmed thickness does not mean that getting exactly 22.0 mm behind the cabinet is sufficient for installation. The actual wall may have deviations, and the chosen installation method may add its own layer. Therefore, the scheme "18 mm now, 22 mm profile" is already conflicting, and the scheme "exactly 22 mm now" requires separate verification on site.
After the node is resolved, you can wooden skirting board PLT‑007 97×22 mm include it in the exact estimate. Until then, ordering the entire perimeter of the room is risky: part of the profile may turn out to be unnecessary if it does not fit behind the cabinet and is not needed.




The cabinet leaves 18 mm, but the wooden skirting board PLT‑007 has 22 mm: what the real conflict is
The nominal difference is 4 mm: 22 − 18 = 4 mm. If 18 mm is measured from the finished wall to the rigid rear plane of the cabinet body specifically in the area where the skirting board passes, a profile with a thickness of 22 mm physically requires more space. You cannot count on wood, MDF, or furniture to "compress slightly" without consequences.
Our factory also produces:

The back panel of the cabinet may be recessed into the body
In many cabinet furniture units, the thin back panel is not in the same plane as the outer rear edges of the side panels. If the tape measure shows 18 mm to the back panel, but the side panels are further from the wall, the skirting board may collide with a different part than the one measured. Or vice versa: the back panel is recessed, but the outer side panel almost touches the wall, and it is this that creates the obstacle.
Get Consultation
The furniture plinth may be deeper than the cabinet body
Sometimes the cabinet body has 18 mm to the wall at the top, but at the bottom there is a separate plinth, legs, adjustable supports, or a decorative strip. The baseboard runs at a height of 97 mm, so the top measurement does not describe the required area at all.
The wall may recede vertically
At the height of the middle of the cabinet, the distance may be 18 mm, but at floor level it may be 14 or 24 mm. For a tall profile, several horizontal levels need to be checked, especially the lower 100 mm of the wall.
18 mm may be measured to the decorative panel, not to the cabinet body
If the cabinet has a side filler panel, false side, or decorative overlay installed, it may determine the visible joint. In this case, the baseboard solution should be tied to the visible part, not to the hidden cabinet body.
Therefore, the central question is not "is 22 greater than 18?", but "what is the actual minimum gap along the entire 97 mm height at the point where the profile needs to pass?" Only after this does the comparison become installation-related, not abstract.
Why a 4 mm difference cannot be considered insignificant
In interior design, 4 mm is often perceived as a small tolerance. For a rigid profile in a confined gap, this is a full geometric conflict. If the profile is thicker than the available space, there is no option to "carefully push it through" without modifying the structure.
Attempting to forcefully wedge the baseboard between the wall and the cabinet can lead to several problems: the furniture body shifts, the profile does not press against the wall, bowing appears along the length, a gap opens along the top edge, or the finish is damaged. For MDF and solid wood, such forced tension is not a normal installation technique.
Even if the cabinet is heavy and "won't budge," that doesn't make the joint correct. The force will simply start being absorbed by the baseboard itself or the wall's finishing layer. Therefore, a commercial decision must be made before purchasing the full quantity of planks.
What to measure before buying a wooden baseboard PLT-007
For already installed furniture, a short installation audit is needed. It can be done with a regular tape measure, ruler, square, and a rigid template.
1. Distance from the finished wall to the back plane of the cabinet
Measure not at just one point, but at least at several — near the left and right sides, closer to the center, and at the floor. If the cabinet is long, the wall deviation may be noticeable.
2. Gap directly at floor level
The profile starts from the floor, so the bottom point is critical. The cabinet may be slightly tilted or standing on adjustable supports.
3. Gap at a height of 97 mm
The upper edge of PLT-007 should also have free space. Measuring only at the floor does not guarantee that the body does not approach the wall higher up.
4. Height of the furniture plinth
If the plinth is below 97 mm and recessed, the profile may partially run near the body along a different geometry. If the plinth is high and flush with the side panel, it becomes the main obstacle.
5. Position of adjustable legs and supports
A hidden leg may be directly in the path of the plinth. This is not visible in the front view.
6. Protrusion of the side panel relative to the plinth
If the cabinet side panel protrudes, the plinth may logically end at its front or rear line. You need to choose in advance which plane will be compositional.
7. Presence of a decorative side panel
The finish panel can completely cover the end of the plinth. Then a complex open ending is not needed.
8. Wall curvature in the cabinet area
For checking, it is convenient to use a long straight batten or a straightedge. If the wall is sloped, the nominal 18 mm at one point does not describe the entire section.
9. Thickness of the possible mounting layer
If the profile is mounted on adhesive, it's important not to invent its thickness, but to follow the technology of the specific material. However, the fact of an additional layer should be taken into account: 'exactly 22 mm' of space should not be considered guaranteed sufficient without a trial fit.
10. Visibility of the joint from the side
If the side of the cabinet is visible from the room, the end of the plinth becomes part of the design. If the joint is hidden by a wall or furniture, the solution can be simplified.
Rigid template 22 × 97 mm: the most useful check before ordering
A tape measure shows numbers but doesn't demonstrate the actual passage. Make a simple rectangular template that simulates the maximum profile dimension: 22 mm in thickness and 97 mm in height. The length can be 200–300 mm — enough to check the gap.
The template must be rigid. Cardboard bends easily and can 'pass' where a wooden or MDF profile won't. It's better to use a piece of plywood, MDF, or two glued slats with verified thickness.
Run the template along the entire intended area behind the cabinet. If it hits somewhere, mark the point. If it passes without contact, still compare the shape of the actual PLT‑007 against the drawing: a rectangular template checks the dimension but doesn't replace the profile shape and mounting technology.
Can a wooden floor plinth PLT‑007 be run behind a cabinet
The answer depends not on the desire to maintain a continuous line, but on the actual minimum gap and the geometry of the lower part of the furniture. For decision-making, it's convenient to divide the object into three scenarios.
Scenario 1. Actual gap greater than 22 mm
If measurements at floor level and at heights up to 97 mm show free space greater than the profile thickness, continuous passage becomes a possible candidate. But "more than 22" does not mean "you can buy right away": you need to check the profile drawing, wall flatness, installation technology, and the installation path of the long plank.
For example, if at the narrowest point you get 25 mm, nominally 3 mm remains. This may be sufficient or insufficient depending on installation and wall unevenness. Therefore, it is better to do a trial fit with an actual sample or a rigid template, rather than treating 3 mm as a guaranteed margin.
Scenario 2. Gap around 22 mm
This is the most inconvenient option. On the tape measure, the numbers match, but there is practically no installation reserve. The profile may pass at one point and hit an obstruction after 300 mm due to a wall wave. Paint on the side panel, finishing layer, or adhesive also reduce the space.
In such a situation, the baseboard should not be ordered "flush" as guaranteed to pass. First, a sample and dry fit are needed. If the cabinet moves easily, sometimes it is more rational to increase the distance to the wall in advance and fix the new position.
Scenario 3. Gap is actually 18 mm
If the minimum size is confirmed and is 18 mm, a 22 mm profile will not fit there. There is no need to grind down the finished baseboard in a hidden area without approval or press it against the cabinet body. Two main solutions are considered: increase the cabinet's offset from the wall or end the baseboard before the furniture.
For a built-in cabinet, the second solution is often more natural. For a freestanding cabinet that may be removed or moved in a few years, it is worth assessing the future visibility of the wall area.
When it is better to end a wooden baseboard at the cabinet side panel
Continuity of the baseboard is not a goal in itself. If the area behind the furniture is completely hidden and technically inconvenient, it is better to make a thoughtful ending than to spend material on an invisible line and create a complex installation conflict.
Built-in wardrobe
If the cabinet is installed from floor to ceiling, attached to the walls, and is effectively part of the room, the likelihood of the hidden section being exposed in the future is low. It makes sense to run the baseboard up to the visible side panel and finish it there.
A freestanding cabinet that can be moved
Here, the solution is more complex. Today the section is hidden, but tomorrow the furniture may be removed. If the interior is designed for the long term and the cabinet is easily movable, a continuous baseboard after increasing the gap might make sense.
Cabinet with a decorative side panel
Such a panel often forms an independent vertical plane. The end of the baseboard can be subordinated to it: either run the profile exactly up to the panel, or hide the end behind its protrusion, if the geometry allows.
Furniture plinth covers the lower joint
If the cabinet plinth protrudes forward and completely covers the end of the floor baseboard, you can finish the profile behind the visible line of the plinth. But you need to check that the joint does not interfere with removing the furniture panel.
The side panel is clearly visible from the room
If the cabinet is at an angle to the main viewpoint and the end of the baseboard is noticeable, the termination becomes a decorative detail. Here, it is better to spend time on a neat return of the profile or a finished end rather than just making a straight cut.
How to finish the PLT-007 baseboard at furniture so the end does not look cut off
For a high profile of 97 × 22 mm, an open cross-cut is noticeable. This is especially important for beech and oak under a transparent or semi-transparent finish. There are several common ways to finish, but the specific option must be checked against drawing PLT‑007 and the chosen installation technology.
Returning the profile to the wall
A short finishing fragment turns the decorative line toward the wall so that the profile visually "closes" into itself. Such a joint often looks neater than a straight end. But the dimensions of the angles and the actual feasibility of performing it depend on the cross-section shape, so a universal cut cannot be described without a working drawing.
Neat straight end termination
If the side line is barely visible, a straight perpendicular cut with quality end treatment is sufficient. For MDF, the end under an opaque enamel must be prepared according to the finishing technology. For solid wood, the exposed end must match the finish of the face surface.
Termination under a decorative side panel
If the cabinet panel protrudes from the wall further than the baseboard, the end can be hidden behind it. Then the termination point is chosen so that the profile is not visible during normal viewing.
Junction with a furniture plinth
Sometimes it is better not to try to continue the wall baseboard behind the cabinet, but to visually align it with the lower furniture panel. Here, matching heights and depths is important: the 97 mm PLT‑007 should not accidentally hit a plinth that has a different vertical mark.
Finishing the end with the same material
Even if the end is partially hidden, it is better to treat it together with the main part. This protects the material and makes the joint complete. For a specific composition, use the finishing manufacturer's technology.
General tips for finishing and installing wooden plinth useful as a starting point, but do not replace the instructions for a specific adhesive, primer, enamel, stain, or varnish.
How to choose the endpoint near the side panel
It is convenient to view the joint in three projections at once: from above, from the front, and from the side. From above, you can see where the baseboard ends relative to the cabinet. From the front, you can see whether the height matches the furniture plinth. From the side, you can see whether the open end is noticeable.
Ending too early, for example 50–100 mm before the side panel, leaves an unclear section of bare wall. Ending too late may cause the profile to press against the cabinet body. The optimal point is usually tied to a visible architectural line of the furniture: the outer side panel, decorative panel, or plinth.
Before cutting, secure painter's tape on the wall and draw the future outline of 97 mm in height and 22 mm in projection. Look at the joint from a distance of several meters. This helps evaluate the composition before irreversible cutting.
Wooden baseboard near a cabinet: does oak, beech, or MDF change the decision
The material does not change the main conflict: all standard versions of PLT‑007 have a thickness of 22 mm. Therefore, an 18-millimeter gap remains insufficient for MDF, beech, and oak alike. Differences begin after the decision is made to end the profile at the cabinet or increase the gap.
MDF (740–760 kg/m³, emission class E1/E0) provides ideal geometry, uniformity, and better base for enamel: high adhesion, smooth surface, absence of knots and cracks.
MDF with a length of 2600 mm is convenient for a painting project. If the baseboard and wall will be covered with opaque enamel, the end termination can be prepared within a single finishing system. For a room with many long straight sections, 2600 mm also affects cutting.
Moisture-resistant MDF
The moisture-resistant version has the same geometry of 97 × 22 × 2600 mm. Choosing it makes sense in rooms where the project requires exactly this material, but near a cabinet it does not provide an extra millimeter of space.
Beech
The beech PLT-007 has a length of 2400 mm. If the end is open and the surface retains a woody character, the cross-cut should be carefully processed and matched with the overall finish.
Oak
The oak version is also 2400 mm. The pronounced texture makes open joints and ends more noticeable if a transparent finish is used. Therefore, the decision about the ending at the side panel should be made before staining.
If you specifically need paintable MDF, you can separately buy MDF skirting board and compare other profiles in the category. But replacing PLT-007 with a thinner option just for the cabinet is only worth it when the new profile suits the entire room in terms of height and design.
Why you should not mix solid wood and MDF PLT-007 on one continuous wall without a reason
If the profile does not run behind the cabinet anyway, there is a temptation to use oak on visible sections and cheaper MDF in hidden ones. Such a solution only makes sense if there is a break in the decorative line and the same finish. In one continuous visible composition, materials may react differently to finish, light, and humidity.
For opaque enamel, the differences are less noticeable, but joints and base stability still require technological attention. For transparent oak, mixing with MDF is obviously impossible without changing the visual system.
Is it worth moving the cabinet for the wooden baseboard PLT-007
Sometimes four millimeters can be obtained by simply moving furniture. But the decision should be evaluated not only technically, but by the overall cost and visual result.
| Situation | Rational action |
|---|---|
| Built-in and fixed cabinet | More often design the end at the side panel |
| A freestanding cabinet is easy to move | Compare the look of a continuous plinth and the loss of space |
| The side panel completely covers the end | Do not complicate the hidden area |
| Furniture will be replaced soon | Plan for future continuity of the plinth |
| The joint is very visible | Carefully design the end or increase the gap |
| The cabinet is attached to other kitchen/wardrobe modules | Do not move without checking the entire furniture system |
If the cabinet is part of a modular line with other sections, moving it even by 5–10 mm can disrupt the fit against the wall, facades, or decorative panels. For the sake of a single baseboard, this is usually not rational.
If the cabinet is moved: how much space is actually needed
Do not calculate the new offset as 22 − 18 = exactly 4 mm and move the furniture strictly by 4 mm. These 4 mm only cover the nominal geometric difference. The real minimum gap must be confirmed by a dry fit of the profile or an accurate template, taking into account the wall and installation technique.
Therefore, the process looks like this: the cabinet is emptied, a temporary PLT‑007 template is placed, the furniture is returned to a position where the template passes without forced contact, verticality is checked, and only then is the body secured.
If the cabinet has anti-tip wall mounting, it must be restored according to the furniture instructions after moving. A tall cabinet cannot be left unsecured just for the sake of a new baseboard position.
Wooden baseboard 22 mm and already installed furniture: where else to check for conflicts
One found conflict at the cabinet is a signal to go through the entire route of the future baseboard. The 22 mm thickness may also collide with other elements.
Commodes and cabinets
If the body stands almost flush against the wall, after installing the baseboard, the furniture will move forward. This changes the depth of the passage and the position relative to outlets.
Built-in kitchen
Lower cabinets often have their own plinth system. The wall baseboard may be completely hidden and not required in this area.
Radiators
Need to check pipes, brackets, bottom connections, and minimum distance to the wall. The baseboard should not interfere with maintenance.
Sliding doors
The floor guide, cassette, or panel may run close to the wall. The 22-millimeter offset needs to be checked along the movement path.
Decorative wall panels
If the panel already adds thickness, the baseboard line may end up flush or, conversely, protrude more. The assembly is designed as a single system.
Door limiters and stops
After increasing the thickness of the floor finish, the door may open at a different angle or hit the profile.
Such an audit is best done before purchasing the strips. It helps determine the actual open length of the walls and avoid excess material.
How much PLT-007 to order if there will be no plinth behind the cabinet
If the decision is made to end the profile at the furniture, the hidden section is excluded from the calculation. But you cannot simply take the room perimeter and subtract the cabinet width: you need to account for the exact ending points and cutting according to standard lengths.
Working formula:
total open wall length − sections hidden by furniture + technological losses for corners and ends = net requirement.
Then the net requirement is distributed across 2600 mm sticks for MDF or 2400 mm for beech/oak.
Example
Suppose the room requires 14,800 mm of visible plinth, and 2200 mm are hidden behind the built-in cabinet, which were originally included in the total perimeter. After exclusion:
14,800 − 2200 = 12,600 mm of visible line before accounting for corners and technological losses.
For MDF 2600 mm, simple division gives 12,600 ÷ 2600 ≈ 4.85, meaning at least five sticks by net length. For beech/oak, 12,600 ÷ 2400 = 5.25, meaning at least six. But this is only a first estimate: the actual cutting map may require more if long sides are poorly distributed among sticks.
Therefore, savings behind the cabinet may reduce the number of planks, but this needs to be verified with a cutting map, not just by the sum of meters.
Why you don't need to buy the full perimeter "just in case"
If the cabinet is built-in and the plinth behind it will never be visible, purchasing 2–3 extra meters only for the hidden section may be unnecessary. Especially if this results in an additional whole stick.
But completely removing the reserve is also wrong. You will need cuts at corners, end pieces, possible defective areas, and fitting. The goal is not to buy as little as possible, but to account for every plank in the cutting layout.
How to create a cutting layout with ends for furniture
Break the entire perimeter into separate straight segments. For example:
- wall A — 3180 mm up to the wardrobe side;
- wall B — 2460 mm;
- wall C — 1810 mm up to the doorway;
- short section after the door — 920 mm;
- wall D — 3650 mm, but 2100 mm are covered by built-in furniture.
After that, distribute the segments among the strips, taking into account corner cuts. Hidden areas where the baseboard ends at the side are not included in the layout.
If solid wood with visible texture is used, it is sometimes useful to keep a long whole plank for the most visible wall, even if mathematically it would be possible to mix segments more tightly. For MDF under enamel, priority can often be given to efficient cutting.
How to finish the visible end of PLT-007 made of MDF
If the skirting board ends before a cabinet, the end becomes a separate surface. In MDF, it differs from the factory face plane in the absorption of the finishing material. Therefore, a simple cut and one layer of paint can result in a noticeable difference in texture.
The preparation technology should be selected according to the specific primer and enamel system. Only one thing matters: the end must be planned before the final painting, not appear after the finished painted profile is already installed. Then it can be processed simultaneously with the other parts.
How to finish the visible end of PLT-007 made of beech or oak
In solid wood, the cross-section noticeably differs from the longitudinal surface. Under a transparent coating, it absorbs the compound darker and shows wood fibers differently. If the end is located on a visible side of the cabinet, it should be included in the finishing sample.
For opaque enamel, the visual difference is reduced, but the quality of sanding and edge preparation still matter. For tinting or transparent lacquer, it is necessary to assess in advance whether the client is satisfied with the appearance of the end wood.
Is it necessary to continue the skirting board behind a freestanding cabinet
For a freestanding cabinet, there is an argument in favor of continuous finishing: the furniture may be moved. If after dismantling there is no skirting board behind the cabinet, a gap will remain on the wall.
But this does not mean that the cabinet must necessarily be moved now. One can assess the likelihood of future relocation. If the wardrobe is made for a niche, tied to electrical wiring, and visually designed for a specific place, the scenario of moving it is unlikely. If it is a regular cabinet that can be moved to another room, a continuous skirting board becomes more valuable.
A compromise is to keep a spare PLT-007 from the same batch for future repairs. But if the finish is tinted, after a few years the new section may visually differ from the already used profile.
Should the baseboard be continued behind a built-in wardrobe?
Built-in furniture is often perceived as a permanent part of the architecture. The baseboard behind it is not visible, does not participate in the composition, and sometimes even interferes with the tight installation of the cabinet body. Therefore, ending it at the side panel is usually more logical here if the wardrobe is truly fixed and the hidden section is not needed technically.
The main thing is not to leave an accidental unfinished end. It should either be hidden by the furniture or be designed as a finished detail of the interior.
Wardrobe with a decorative side panel: where the PLT‑007 line should run
A decorative side panel can protrude forward relative to the cabinet body. If it reaches the floor, the baseboard can be finished at its plane. If the panel is raised above the floor, the joint becomes more complex: both the bottom gap and the end of the profile are visible.
Before ordering, take a photo strictly from the side and draw a 97 mm line on it. This makes it easier to understand which section will be visible after installation. If the side panel is painted in the same color as the baseboard, a unified visual transition can be created. If the materials are contrasting, the end solution must be especially neat.
Furniture plinth higher or lower than 97 mm: why it matters
The height of PLT‑007 is 97 mm. If the wardrobe plinth, for example, is noticeably lower, the upper part of the baseboard will approach the side of the cabinet body rather than the plinth. If the plinth is higher than 97 mm, the profile can end entirely within its plane.
There is no need to adjust the furniture plinth to 97 mm just for the sake of matching. First, the overall composition is assessed. Sometimes different heights look natural if the baseboard ends on the side panel. Sometimes an additional furniture transition is required.
Edge cases with already installed furniture
What to do if the 18 mm gap exists only at one end of the cabinet
The wall may be uneven: on the left the gap is 18 mm, on the right 25 mm. In this case, one cannot assume that the profile "fits on average." For a continuous strip, the narrowest point along the entire path matters.
If the cabinet is not rigidly fixed, its alignment can be checked. Sometimes the body stands at a slight angle to the wall. After leveling and adjusting the legs, the gaps change. But furniture should not be moved just for the baseboard if it worsens the facade gaps or junctions.
What to do if the wall near the cabinet has a local bulge
If the main part of the gap is more than 22 mm, but the plaster locally protrudes, two options are possible: fix the wall before finishing or end the baseboard before the problem area. One cannot automatically trim the rear part of PLT‑007 if this is not provided by the manufacturer and the drawing.
Before deciding, it is necessary to understand whether the bulge is a decorative layer or part of the load-bearing wall. Local sanding of the finish and changing the profile are different operations with different risks.
Can the thickness of PLT‑007 be reduced in a hidden area
Independently planing or milling the rear part of the profile to fit into 18 mm should not be considered a standard solution. Changing the cross-section may affect the shape, rigidity, finish, and geometry of joints with the visible part.
If the project fundamentally requires a continuous PLT‑007 behind the cabinet, and the furniture cannot be moved, non-standard processing must be coordinated with the manufacturer or a joinery workshop that has the profile drawing. Without this, it is better to end the baseboard at the side panel.
Can a thinner baseboard be used only behind the cabinet
Technically, a hidden section can be made with a different material or not made at all. But installing a thinner profile only behind the cabinet makes sense only for a specific function, for example, if it covers a technical gap. For a visually invisible section, it is often simpler to not continue the decorative baseboard at all.
If part of the thin profile is visible at the edge of the cabinet, the transition between 22 mm and another thickness needs to be designed. A random stepped joint is worse than a neat PLT‑007 ending.
Installing PLT‑007 near a cabinet: why dry fitting is mandatory
Before glue and final finishing, hold a piece of the actual profile against the wall. Check:
- whether it fits into the gap without pressure;
- whether it sits flush against the wall along its entire height;
- whether it interferes with the cabinet side;
- how the end looks;
- where the top line of 97 mm runs;
- whether the profile can be physically installed if the cabinet is already in place.
The last point is often forgotten. Even if the finished profile theoretically fits behind the cabinet, a long lath may be impossible to insert into a narrow gap without dismantling the furniture. The installation trajectory must be taken into account.
Installation trajectory of a long lath: 2400 or 2600 mm next to the cabinet
PLT-007 made of beech and oak has a standard length of 2400 mm, made of MDF — 2600 mm. In a cramped room, the 200 mm difference can affect installation. To insert a long lath behind the cabinet, free space on the side or the ability to temporarily move the cabinet away is required.
If the cabinet almost touches the adjacent wall, inserting a 2600-mm strip behind it longitudinally may be impossible even with sufficient gap thickness. Therefore, a dry fit should consider not only the final position but also the path of the part to it.
Materials for installation and finishing: what to include in a separate estimate
The main item should not turn into a catalog of adhesives, but the buyer needs to remember that the baseboard itself is not the entire installation. Depending on the substrate and finish, primer, adhesive compound, materials for preparing the end, and protective agents may be needed.
They should be selected after choosing the PLT-007 material and checking the wall. In the section Mounting and finishing materials you can view the corresponding category, but the specific product must match the technical instructions and the substrate.
Mistakes when ordering a wooden baseboard after furniture installation
Mistake 1. Looking only at the 97 mm height
The buyer is convinced that the high profile looks good visually but does not check the 22 mm overhang. As a result, the cabinet interferes with installation.
Error 2. Measuring 18 mm at only one top point
At floor level, the gap may be smaller. The entire height of the profile needs to be checked.
Error 3. Considering 18 and 22 mm as "almost the same"
For a rigid cross-section, a 4 mm difference means a physical intersection.
Error 4. Not accounting for the installation trajectory
The gap is wide enough, but a long whip cannot be maneuvered behind the cabinet.
Error 5. Buying baseboard for the full perimeter
After installation, it turns out that several meters behind built-in furniture are unnecessary. The extra whip remains.
Error 6. Not planning the end cap
The baseboard runs neatly around the room and suddenly ends with a rough cross-cut near expensive furniture.
Error 7. Mixing MDF and solid wood without a design reason
Different bases behave differently during finishing, and the joint becomes noticeable.
Error 8. Ordering first, then making the template
The correct order is the reverse: measurement → template → node solution → estimate → order.
Error 9. Moving a built-in wardrobe for four millimeters
The shift can disrupt the fastening, facade geometry, and connection with other modules.
Error 10. Grinding down the back side of PLT‑007 without a drawing
The profile cross-section changes, and the result is not coordinated with the manufacturer.
Practical scenarios: four different solutions to one conflict
Practical scenario: a built-in wardrobe occupies 2400 mm of wall
Suppose the cabinet is built into a 2400 mm section and the actual gap behind the body is 18 mm. The PLT-007 baseboard, 22 mm thick, does not fit there. The cabinet side panel is decorative and reaches the floor.
A rational approach: end the baseboard at the side panel, exclude the 2400 mm hidden section from the calculation, and finish the end so that it is covered or visually completed with a panel. In this case, there is no point in buying an extra oak/beech strip of 2400 mm just for an invisible area.
Practical scenario: a freestanding cabinet 1600 mm wide
The cabinet can be moved, and the 18 mm gap exists only because it was once pushed as close to the wall as possible. If a continuous baseboard is important and the room allows for passage, the furniture can be repositioned after a dry fit of the PLT-007.
But the new setback is chosen based on the actual profile, not as "18 + 4 = 22 mm." You need to leave actual space where the baseboard can be installed without pressure and taking the wall into account.
Practical scenario: the cabinet is planned to be replaced in a year
If the cabinet is temporary, ending an expensive oak baseboard at its side panel may be short-sighted. After replacing it with narrower furniture, a gap will appear. Here, you should either run a continuous profile after increasing the gap, or keep the material for future extension.
The second option is more difficult with a transparent finish: the new section and the old baseboard may differ in color. Therefore, it is better to make a long-term decision now.
Practical scenario: gap of 23–25 mm, but the wall is uneven
By tape measure, the profile seems to fit. A rigid template shows that at one point the distance decreases to 21 mm. This means that continuous installation without wall correction is still problematic.
This example shows why a single numerical measurement is insufficient. For a long baseboard, the minimum gap along the entire path is important.
Decision table: buy PLT-007 or replace the assembly
After measurements, it is useful to consolidate the results into a single table. It helps avoid mixing technical feasibility with aesthetic desire.
| What was achieved at the site | What this means | Rational next step |
|---|---|---|
| Minimum gap less than 22 mm | Profile nominally does not fit | Finish at the side panel or change the furniture position |
| Minimum gap around 22 mm | No confirmed installation reserve | Try on a real profile/rigid template and check the mounting layer |
| The gap is consistently more than 22 mm | Continuous passage is possible as a candidate | Check the drawing, wall, and installation trajectory of the rod |
| Built-in cabinet | The hidden section has almost no decorative value | It is often rational to end the baseboard at the side panel |
| Freestanding and temporary cabinet | The gap may open after rearrangement | Assess the long-term continuity of the line |
| The end face completely hides the panel | A complex decorative finish may not be required | Attach the edge to the hiding plane |
| The end face is clearly visible | The finish becomes part of the design | Make an end face sample before finishing the entire volume |
In this logic, the buyer does not try to "sneak" PLT‑007 behind the cabinet at any cost. He first finds out whether a profile is needed in that area at all. If not, the 18-millimeter gap ceases to be a product issue and becomes just a point of beautiful finishing.
Full-size mockup of the joint: how to check the solution before cutting
For a visible end near the cabinet, it is useful to make a 1:1 scale mockup. Masking tape is applied to the wall along the top line of 97 mm. A rectangle is cut from a rigid material to simulate the 22-mm overhang. A separate strip marks the side panel or decorative panel of the cabinet.
Such a mockup answers several questions at once:
- does the tall profile look too massive next to the furniture;
- where is it visually more logical to end the line;
- is the end visible from the main walkway;
- is a return to the wall needed;
- does the side panel cover the end;
- does the top line of 97 mm conflict with the furniture baseboard.
If there is a physical sample of PLT-007, the mockup becomes even more accurate. It is worth applying it in both daylight and artificial lighting: the profile shadow of a tall baseboard noticeably affects the perception of the joint.
When it is better not to buy PLT-007 for this room at all
Sometimes the problem is not limited to one cabinet. If after walking around the room it turns out that most furniture is installed 15–20 mm from the wall, for PLT‑007 you will have to make many end cuts or rearrange almost all items. Then it is wiser to reconsider the profile for the entire room.
Another reason to refuse is if the tall 97 mm size conflicts with several furniture plinths, door trims, or engineering elements. One local compromise is acceptable, a dozen different bypasses turn the interior into a set of random joints.
You should not buy PLT‑007 either when the client wants to fully push furniture against the wall now and in the future. The 22 mm thickness will systematically limit such arrangement. A thinner profile may better match the actual usage scenario.
At the same time, the decision "not to buy PLT‑007" does not mean that the product itself is bad. It means that the specific geometry of the room and already installed furniture is more important than the card you liked.
How to check the number of strips on a specific example
Suppose, after excluding the cabinet and other hidden areas, the buyer has five straight visible segments: 3100, 2450, 1850, 1720, and 960 mm. The net sum is 10,080 mm. But you cannot buy "10.08 linear meters": you need to break down the segments into 2600- or 2400-millimeter strips and account for corner cuts.
For MDF 2600 mm, the long section of 3100 mm already requires a joint or another scheme, because one plank is not enough. So, the issue is not solved by simply dividing 10,080 ÷ 2600. You need to choose the connection point and distribute the leftovers.
For beech/oak 2400 mm, the section of 2450 mm also exceeds the standard length. This is another example of why excluding the plinth behind the cabinet affects not only the total footage but also the composition of joints on open walls.
If a non-standard length is available on the card upon order, it should be discussed separately, but the standard estimate should be built on confirmed 2400/2600 mm and not assume an individual size automatically.
What to send to the manager before ordering PLT‑007
To avoid discussing the situation with the words "the cabinet is almost against the wall," prepare a short set of data.
| What to send | Why |
|---|---|
| SKU PLT-007 | Identify specific profile |
| Material | MDF, moisture-resistant MDF, beech or oak |
| Photo of cabinet front | Understand overall composition |
| Photo of side panel | Assess end point |
| Photo of bottom plinth | See actual geometry at height 97 mm |
| Minimum gap | 18 mm with measurement location indicated |
| Cabinet section length | Calculate hidden segment |
| Wall and floor material | Discuss installation |
| Desired finish | Enamel, tinting, etc. |
| Calculation of rod quantity | Check order |
After approval, you can Order wooden plinth PLT-007 already for a clear diagram, not to buy material before solving the problem node.
Photo documentation of the joint: which shots really help coordinate the order
One photo of the cabinet from afar is not enough. To ensure the manager, designer, or installer understands the 18/22 mm issue the same way, take several shots with a ruler in the frame.
- side view of the cabinet and wall at floor level;
- close-up of the gap with an 18 mm measurement;
- the same area at a height of about 97 mm;
- bottom furniture plinth and adjustable legs;
- decorative side panel in full;
- wall area where the profile is planned to end.
If the wall is uneven, it is useful to photograph the minimum and maximum gap separately. Label the dimensions in the image or attach a simple top-view sketch. This reduces the risk that 18 mm will be perceived as the average distance, when in fact it is the minimum point.
Add a diagram of the entire wall with lengths of visible sections to the photos. Then the discussion simultaneously addresses two questions: whether PLT-007 fits near the furniture and how many strips actually need to be ordered after excluding the hidden segment.
Where to buy wooden skirting board PLT-007 97 × 22 mm
If the template confirmed passage behind the cabinet, a continuous section is included in the estimate. If 18 mm is confirmed and the cabinet remains in place, the profile ends at the side panel and the hidden length is excluded. In both cases, the material is selected first, then the open lengths are laid out across standard strips.
For MDF, standard lengths of 2600 mm are available; for beech and oak, 2400 mm. Do not choose material only by length: MDF and solid wood offer different finishing options. However, length affects the number of slats and should be considered after resolving all furniture conflicts.
Before payment, it is useful to check payment and delivery terms, especially if the order includes several long-length strips. STAVROS asks to specify the article number, material, size, quality, and quantity — these details should already be recorded in your estimate.
What to keep after installation in case the cabinet is moved
If the baseboard ends at furniture, it is useful to keep information about how the joint was resolved. In a few years, the cabinet may be replaced, and the owner will no longer remember why the line was interrupted exactly at that spot.
Take a photo of the wall before installing the cabinet or during the fitting, save the PLT‑007 article number, material, finish option, and any remaining profile if available. For tinted beech or oak, it is also useful to keep a finish sample. This simplifies future restoration or continuation of the line.
If a sufficiently long offcut remains after cutting, it does not have to be thrown away. It can serve as a reference for profile and color. However, a small leftover cannot be considered a guarantee that it will cover the entire exposed area after cabinet removal years later. The length of a potential continuation should be recorded separately.
For MDF under a covering enamel, future touch-ups are usually easier in terms of visual matching, but the color of the wall itself and the enamel may also change over time. Therefore, a saved specification is more important than hoping to "buy the same later."
Standard profile has a height of 97 mm and a thickness of 22 mm. MDF length is 2600 mm, beech and oak are 2400 mm.
What is the size of PLT‑007?
The standard profile has a height of 97 mm and a thickness of 22 mm. The length of MDF is 2600 mm, beech and oak — 2400 mm.
Will PLT‑007 fit into a 18 mm gap?
If 18 mm is the real minimum gap across the entire profile passage zone, no: the thickness of 22 mm is 4 mm larger.
Can the skirting board be finished at the cabinet?
Yes. For built-in or stationary furniture, this is often more rational than running a decorative profile along an invisible section.
Is it mandatory to run the skirting board behind built-in furniture?
No. If the section is completely hidden and has no separate functional purpose, the baseboard can be ended at the side panel with a neat end cap.
How to finish the open end of PLT‑007?
The option depends on the profile and material: possible options include a neat straight end, a return to the wall, or hiding it behind a decorative panel. The specific cut must be checked against the drawing.
What is the length of PLT‑007 made of MDF?
2600 mm for standard and moisture-resistant MDF in the current dimension table.
What is the length of oak and beech PLT‑007?
2400 mm.
What is better for furniture — MDF, beech, or oak?
In terms of geometry, the cabinet is the same: 22 mm thickness. The choice of material is primarily related to the finish, the overall interior system, and the cutting layout.
Do I need to account for the thickness of the adhesive?
You need to consider the actual installation technology, but a universal adhesive layer thickness cannot be assigned. Use the instructions for the specific compound and a dry fit.
Can the cabinet be moved exactly 4 mm?
4 mm is only the nominal difference between the profile and the current gap. The new position is determined by the actual profile, wall, and mounting layer, not by tight arithmetic.
Can PLT-007 be sanded down to 18 mm behind the cabinet?
You should not change the cross-section yourself without a drawing and approval. It is better to finish the profile at the furniture or change the cabinet position.
How to calculate the quantity if part of the wall is covered by a wardrobe?
From the total route, subtract the sections where the baseboard is decided not to be installed, then add technological losses and build a cutting map based on 2400 or 2600 mm lengths.
Do I need to check other furniture items?
Yes. If 22 mm conflicts with one wardrobe, the same protrusion may interfere with dressers, the kitchen, sliding doors, radiators, and other elements.
When is it better to choose a different baseboard?
If most of the furniture stands closer than 22 mm to the wall and you do not want to design many endings, a thinner profile may be systematically more convenient. But it should be chosen as a new design for the entire room, not as a random insert behind the wardrobe.
If doubts remain after photo documentation, do not launch the entire volume into cutting. First, agree on one problematic joint at the wardrobe, and only after its confirmation, extend the solution to other areas of the room.
Result: with confirmed 18 mm PLT‑007, it is better to finish at the side panel or change the position of the wardrobe
The PLT‑007 card confirms the 97 × 22 mm profile for MDF, moisture-resistant MDF, beech, and oak. If in the actual installation area only 18 mm remains between the finished wall and the rigid part of the wardrobe, the skirting board is 4 mm thicker than the gap. It cannot be run behind the furniture without modifying the joint.
The first step is to re-check the gap at floor level and at a height of 97 mm, determine the position of the plinth and side panel, and pass the area with a rigid 22 × 97 mm template. If the actual space is larger and the profile installs freely, a continuous line can be considered. If 18 mm is confirmed, the solution shifts to ending at the side panel or moving the wardrobe.
For built-in furniture, the ending is usually simpler and more economical: the hidden section does not need to be included in the estimate. For a freestanding wardrobe that may be moved, it is worth assessing the long-term value of a continuous skirting board. In any case, the end, material, finish, and number of rods must be determined before ordering.
So buying PLT-007 becomes not a dispute of "18 vs 22", but a clear design solution: measure → make a template → choose continuity or termination → calculate the open length → determine the material → create a cutting map → place the order.