


Article Contents:
- What is a polyurethane sandrik
- Why you need a sandrik above the window: ten compelling arguments
- What types of sandriks exist: shape as a style choice
- Straight horizontal sandrik
- Triangular sandrik (pediment)
- Bow-shaped (arched) sandrik
- Broken sandrik
- Sandrik with brackets (consoles)
- Comparative table: choosing the sandrik shape
- Where sandrik is installed: scenarios and logic
- On facade windows of a private house
- Above the first-floor formal windows
- Above the door and in the entrance group design
- In a classic window portal
- On facades with corner rustication
- How to choose the size of the sandrik above the window
- Sandrik width
- Overhang from the wall
- Profile height
- Distance to the cornice
- Recess depth
- Proportionality with brackets
- How to combine a sandrik with other facade decor elements
- Sandrik + architraves
- Sandrik + window sill belt
- Sandrik + keystone
- Sandrik + brackets
- Sandrik + rustication
- Sandrik + facade moldings
- Sandrik + cornice
- Installing a sandrik above a window: technology without room for error
- Surface requirements
- Marking
- Adhesive
- Screws
- Sealing
- Painting
- How to calculate the purchase: a practical checklist
- Mistakes in choosing and installing a sandrik: learn from others
- FAQ: Questions and Answers
- STAVROS: when the facade speaks the language of architecture
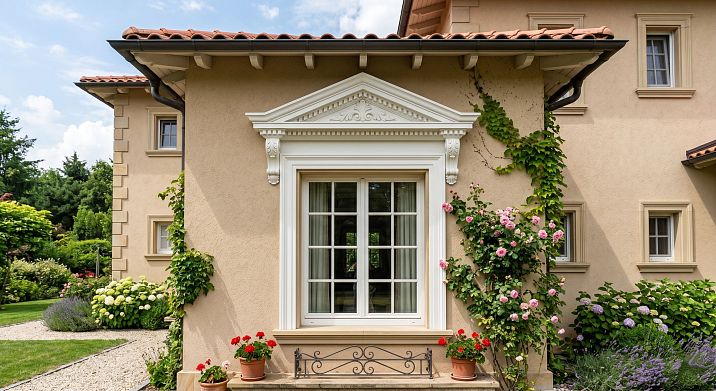
Imagine: two identical houses, the same layout, similar finishes. But one has strict horizontal canopies above the windows, the other has bare plaster. The difference in perception is striking. The first looks like an architectural object. The second looks like a box with holes. And all the difference is in the sandrik.
Polyurethane sandrik above the window — this is the upper decorative cornice that simultaneously completes the window frame from above, creates an architectural accent, and performs a practical task: diverts rainwater from the window opening. It would seem, just one horizontal element — but it determines whether your facade will look finished or forever "unfinished".
In this article — everything you need to know before buying: what a sandrik is, what types exist, how to choose the shape and size, what to combine it with, how to install it, and what not to do under any circumstances.


What is a polyurethane sandrik
The word "sandrik" is an architectural term borrowed from Italian. In classical architecture, this was the name for a small decorative cornice above a window or door opening: a horizontal canopy that imitated a shortened pediment or architrave. In the urban architecture of the Petrine and Catherine eras, sandriks became a mandatory element of any decent facade — not a single window of a noble house was without upper decoration.
Today, the sandrik lives in two dimensions. In the historical — as an attribute of classical architecture, which architects reproduce during the restoration and construction of houses in a historical style. In the practical — as an affordable facade decor for private houses, which any homeowner can buy, install independently, and get a completely different level of perception of their facade.
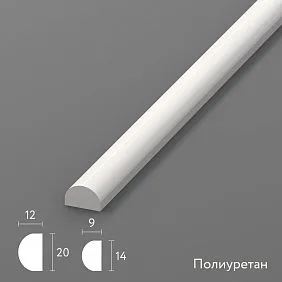
A polyurethane sandrik is an exact replica of a classic architectural element, made from two-component cast polyurethane. The density of the facade version is 350–420 kg/m³. This is higher than interior polyurethane because the facade material operates under fundamentally different conditions: temperature fluctuations from −40 to +60°C, exposure to moisture, UV radiation, snow loads, and dirt.
The frost resistance of STAVROS facade polyurethane is 300+ freeze-thaw cycles. This means the decor will survive several dozen seasons without deformation, cracking, or coating delamination. The main condition for durability is proper painting with facade paint with a UV filter. Without painting, UV destroys the surface in 2–3 years. With painting, the service life is 25–40 years.
Polyurethane molding for house facades — a wide system of decorative elements, in which the sandrik occupies a key position: it "closes" the window frame from above and visually crowns the entire framing composition.


Why you need a sandrik above the window: ten compelling arguments
Why install a sandrik at all if a window is still a window without it? The question is fair. The answer is multi-layered.
Completeness of the composition. Side architraves form vertical lines, the window sill belt covers the lower part. Without a sandrik on top, the window frame remains "open." The eye does not find a completion point — and the facade seems unfinished.
Architectural accent. The sandrik makes the window not just a technical detail, but an architectural element. It emphasizes the opening, highlights it from the wall plane, and sets the vertical rhythm of the facade.
Play of light and shadow. The horizontal canopy of the sandrik creates a shadow beneath it — expressive, dynamic, changing throughout the day. It is this shadow that makes the facade voluminous and readable even from a great distance.
Protection of the window opening. Rainwater flows down the glass onto the upper slope. Without an extended sandrik — directly into the joints of the frame and plaster. A sandrik with the correct overhang (60–100 mm) diverts water away from the window, reducing slope wetting.
Visual "weighting" of the top of the window. In classical architecture, the upper part is always slightly "heavier" than the lower part — this creates a sense of stability. The sandrik performs this role in the framing system.
Combination with a keystone. It fits perfectly above the center of the sandrik or between the sandrik and the casing a polyurethane keystone — a central accent that gathers the entire vertical axis of the window.
Supporting the facade style. A triangular sandrik is classicism. A bow-shaped one is baroque and soft classic. A straight horizontal one is modern neoclassicism. The shape of the sandrik sets the style of the entire framing.
Visual enhancement of the facade. A house with sandriks above the windows is perceived as more expensive, prestigious, and detailed — and this is not a subjective assessment, but an architectural fact. Details matter.
Assistance in designing the entrance group. A sandrik above the front door works as a "canopy" for the main entrance — without an overhanging structure, only with decor.
Facade rhythm. When sandriks are identical on all windows of a floor, they create a horizontal caesura: the facade becomes readable, organized, and "designed."
Facade window decor made of polyurethane — this is exactly that kind of transformation story: when well-chosen elements change the perception of an entire building.
Our factory also produces:


What types of sandriks exist: shape as a style choice
This is the most important choice. The shape of the sandrik is not a matter of taste. It is an architectural statement that directly determines the style in which the entire facade will be perceived. Making a mistake with the shape means creating a stylistic conflict that will catch your eye every time you look at your house.
Get Consultation
Straight horizontal sandrik
The most versatile. A horizontal slab or cornice profile without a pediment, with a clear straight top edge. Projection from the wall — 60–100 mm. Suitable for strict neoclassicism, modern classicism, minimalist facades with laconic decor.
A straight sandrik easily combines with any architraves and does not overload the facade. If you are unsure about the shape choice — start with a straight one. It works almost everywhere.
Variations of the straight sandrik: single-step (simple horizontal slab), multi-step (several ledges, classic cornice profile), with a frieze (ornamental band between the upper and lower overhangs).
Triangular sandrik (pediment)
The upper part of the sandrik forms a triangular pediment — a rectangular or acute pyramid. This is a direct reference to the classical architectural pediment that crowned openings in Greek and Roman classicist architecture.
A triangular sandrik creates a solemn, monumental accent. It works well on formal first-floor windows, above the entrance door, in portal compositions. It requires sufficient vertical space: there should be at least 500–700 mm between the top edge of the window and the cornice.
A triangular polyurethane sandrik can be solid or broken: in the broken version, the side slopes of the pediment do not meet at the apex — a gap remains between them, into which an additional decorative element (vase, cartouche, acroterion) is inserted.
Segmental (arched) sandrik
The upper cornice has not a straight but an arched shape: a gentle arc — "bow" — fits into the space above the window. This is an element of Baroque and Rococo, but in a modern interpretation it is perceived as soft, decorative classicism — without excessive strictness.
A segmental sandrik is especially good on facades in the "Italian" or "Mediterranean" style, on houses with plastic, picturesque architecture. It is less solemn than a triangular one — but warmer, more "homey".
Broken pediment
A pediment profile with a deliberate break in the center. A decorative element is installed in the break — most often Keystone or a cartouche. This is a more complex, more "rich" form — for a mature classical or baroque facade. It requires precision and symmetry from the craftsman.
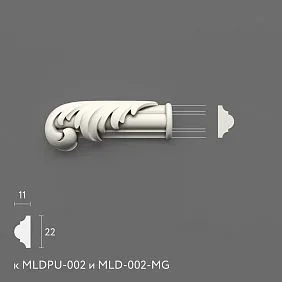
Pediment with brackets (consoles)
To any form of pediment — straight, triangular, or segmental — you can add console brackets on the sides. They "support" the horizontal slab from below, creating the impression that the pediment rests on supports rather than being simply glued to the wall.
Brackets dramatically increase the decorative value of the pediment — and at the same time increase its scale: such a pediment cannot be used on a small window; it requires space. More details about these elements can be found in the article about Polyurethane brackets.
Comparison table: choosing the shape of the pediment
| Type of pediment | Style | When appropriate |
|---|---|---|
| Straight horizontal | Neoclassicism, modern classic | Any plastered facade |
| Triangular (pediment) | Classicism, Empire | Grand windows, entrance group |
| Bow (arched) | Baroque, Italian style | Plastic decorative facade |
| Broken | Mature classicism, Baroque | Complex portals with central accent |
| With brackets | Classicism with volumetric decor | Large windows, grand elements |
| With a keystone | Any classical shape | Portal with axial accent |
Where to install a sandrik: scenarios and logic
On the facade windows of a private house
This is the most common scenario — and the most commercially significant. A cottage, country house, or townhouse with a plastered facade. Three to four windows on the facade, above each — a straight or triangular sandrik of the same width. Result: the facade gains rhythm, organization, and architectural expressiveness.
For this application, a straight or light triangular sandrik is suitable. Projection — 60–80 mm. Width — window opening plus the width of the architraves, with a small overhang of 30–50 mm on each side.
Framing windows with polyurethane stucco STAVROS offers ready-made solutions for selecting complete sets: sandrik, side architraves, window sill belt, keystone — all in one style and scale.
Above the grand windows of the first floor
First-floor windows are in the zone of active visual contact. They are seen from a distance of two to three meters, and relief details are noticeable. Here, the sandrik can be more expressive: triangular pediment, brackets, rich ornamental frieze. The first floor 'supports' more complex decor than the upper floors.
Above the door and in the entrance group design
A sandrik above the front door is a mini-portal without a physical canopy. It creates a ceremonial framing of the entrance, emphasizes its significance, and highlights it against the facade background. The combination is especially effective: a wide triangular sandrik + side pilasters or architraves + a keystone in the center. This is the level of an urban mansion's entrance group — but accessible for a private country house.
In a classic window portal
A full window portal is a four-element system: side architraves + sandrik on top + polyurethane window sill belt for facade on the bottom + a keystone along the central axis. The sandrik in this system is the most noticeable element: it catches the eye first, setting the shape and style of the entire composition.
On facades with corner rustication
When polyurethane rustications for the facade they frame the building's corners, and sandriks above the windows organically support the overall classical theme. Verticals of rustication + horizontals of sandriks = an architectural grid that organizes the wall plane.
In such a combination, proportionality is especially important: the scale of the rustication block and the scale of the sandrik must be comparable. If the rustication block is 200×400 mm, then the sandrik height is in the range of 120–200 mm. This is visual balance.
How to choose the size of a sandrik above a window
The question of size is the most practical and the most frequently asked. Let's break down the parameters one by one.
Pediment width
Basic rule: pediment width = window opening width + width of both side casings + 30–50 mm overhang on each side.
Example: window 1000 mm, casings 100 mm each, overhang 40 mm on each side → pediment width: 1000 + 200 + 80 = 1280 mm.
Overhang beyond the casings is critically important: it creates a horizontal "roof" over the entire framing, not just over the opening. Without overhang, the pediment looks "cramped."
Overhang from the wall
This is the distance the pediment projects forward from the facade plane. Minimum projection is 50 mm. Recommended for active rainy climates: 70–100 mm. For grand portals with brackets: up to 120–150 mm.
Projection also determines the depth of the shadow the pediment casts on the wall and window. Greater projection means deeper shadow and more expressive decor. However, with very large projection without brackets, the profile looks unstable. For projection over 100 mm, console brackets on the sides are recommended.
Profile Height
Vertical size of the pediment itself. For small windows up to 800 mm wide: 80–120 mm. For medium windows 800–1400 mm: 120–180 mm. For wide windows and portals 1400–2000 mm: 180–250 mm and above.
For a triangular pediment, the height of the gable is added to the height of the horizontal part — typically 30–60% of the profile height. Total height of the entire element: 200–350 mm.
Distance to cornice
This is the space between the top edge of the pediment and the bottom edge of the cornice or interfloor belt. It should be neither too small (less than 150 mm — decor "sticks" to the cornice) nor too large (more than 700–800 mm without additional decor — the wall looks empty).
The optimal distance depends on the floor height. For the first floor at 2.7 m, it is usually 300–500 mm. For the second floor with high ceilings — 400–600 mm.
Reveal depth
If the reveal is deep (more than 100 mm), the cornice should be slightly wider — to cover the opening considering the frame setback from the facade plane.
Proportionality with brackets
If you plan to use brackets under the cornice, their height should be 70–90% of the cornice profile height. Too small brackets under a massive cornice look disproportionate. Too large brackets overload the visual "support."
How to combine a cornice with other facade decor elements
A cornice alone is an accent. A cornice in a system is architecture. Let's break down each pair.
Cornice + architraves
This is a basic combination. Architraves cover the side reveals, the cornice crowns the framing from above. The main compatibility rule: the profile of the lower part of the cornice should match or echo the profile of the architraves. If the architraves have one molding belt, the cornice should have a similar one. If the architraves have a double profile, the cornice should too.
Style must be unified: classic architraves with curved transitions + a strict straight cornice = conflict. Classic architraves + a triangular or straight classic cornice = harmony.
Pediment + window sill belt
The upper and lower elements of the window frame should be proportionate. A general rule: the projection of the pediment is slightly larger than the projection of the belt — 1.2–1.5× — so that the top "overhangs" the bottom, creating the correct architectural proportion.
If the pediment has brackets (expressive, voluminous), the window sill belt can be more modest — then the system has a hierarchy: a strong upper accent + a quiet lower support. And vice versa: with a simple straight pediment, the belt can be slightly richer in profile.
Pediment + keystone
A classic combination, proven over centuries. The keystone is installed in the center — either above the window, between the pediment and the upper casing, or set into the lower edge of the pediment. It emphasizes the vertical axis of the entire frame.
For a triangular pediment, the keystone is inserted into the "break" of the pediment. For a straight one, it is mounted on the lower edge of the pediment in the center. Keystone size: its width is 20–30% of the pediment width.
Pediment + brackets
Brackets are placed on the sides of the pediment — most often two on each side or one each. They should be integrated into the overall system: bracket width ≈ casing width, height ≈ pediment profile height. Brackets reinforce the "support" theme and make the upper decor visually convincing.
Pediment + rustication
If corner rustication sets a vertical rhythm, pediments work as a horizontal "rhyme" to it. It is important to maintain proportionality: the height of the pediment ≈ the height of the rustication block or slightly less.
Sandrik + facade moldings
Moldings made of polyurethane In the role of inter-story belts — horizontal lines that divide the facade into tiers. The line of sandriks should be between the molding belts and not "compete" with them. If the inter-story molding is large (height 80–120 mm), the sandrik can be made slightly simpler — and vice versa.
Sandrik + cornice
The cornice above the facade is the largest horizontal element. All other horizontals — moldings, sandriks, belts — should be proportionally smaller. The cornice overhang is maximum, the sandrik overhang is 60–70% of the cornice overhang. This is the architectural hierarchy of "main — secondary."
Facade decoration made of polyurethane STAVROS is a system where cornices, moldings, sandriks, belts, and architraves are coordinated in scale and style, allowing you to buy them as a set without the risk of incompatibility.
Installation of a sandrik above a window: technology without room for error
The sandrik is a high-risk area in terms of installation. It is here that rain hits with the greatest force. It is here that joints work the most on expansion-contraction. If installation is done poorly, cracks in the sealant, delamination, and streaks on the wall will appear within one or two seasons.
Surface requirements
The wall above the window must be plastered, cleaned, and dried. Special attention to the upper slope: mounting foam often remains here, which needs to be cut off and puttied. Grease stains from technical oil — remove with a solvent.
The surface is primed with a penetrating primer. Installation — at a temperature of +5...+30°C, in dry weather, not on a facade heated by direct sunlight.
Marking
Marking is 50% of the quality of the result. The horizontal of the lower edge of the sandrik — strictly by level. The vertical central axis — coincides with the central axis of the window. If there are several windows on the facade, all sandriks should be on the same horizontal line — marking is done for the entire row at once.
A laser level is a mandatory tool. "By eye" is not allowed: even 3–4 mm deviation from horizontal is noticeable on the finished facade.
Adhesive
Installation adhesive — specialized polyurethane or MS-polymer, with high adhesion to polyurethane and mineral substrates. Apply in a zigzag pattern to the back surface of the sandrik: along the perimeter and crosswise in the center. Not in a continuous layer.
After applying the adhesive — "open time" 3–5 minutes, then press and hold for 30–60 seconds. Large and heavy sandriks (wider than 1200 mm) — with an assistant.
Dowels
For facade application — additional mechanical fastening is mandatory. Plastic facade dowels every 400–500 mm. For porous substrates (aerated concrete, foam concrete) — dowels for porous materials with an expanding element.
Dowel heads are recessed by 2–3 mm, recesses are filled with putty and sanded. On the finished painted facade, traces of fasteners should not be visible.
Sealing
This is the most critical stage specifically for the sandrik — because water is active here. All joints:
-
between the sandrik and the wall (top and sides);
-
between the sandrik and side trims;
-
at the end joints of a composite sandrik.
Sealant — acrylic, not silicone. Silicone cannot be painted. Apply from a gun, smooth with a wet spatula or finger, remove excess before drying. Masking tape along the edges — for a perfect joint line.
Painting
Mandatory. Acrylic facade paint with UV filter, 1–2 coats. Apply relief with a brush, flat surfaces with a short-nap roller. Allow 4–6 hours between coats. Work at +5...+30°C, not in rain, not at noon in direct sunlight.
molded decoration made of polyurethane STAVROS comes with a factory primer — the surface is ready for painting without additional preparation.
How to calculate your purchase: a practical checklist
To avoid missing anything when ordering, go through this list:
-
Recalculate all windows that need a pediment. All — not just the main facade.
-
Measure the width of each window. Write it down in millimeters.
-
Determine the width of the side trims — taking into account the allowance and overhang, calculate the length of the pediment.
-
Choose the shape: straight, triangular, arched. Make sure it matches the facade style.
-
Determine the projection from the wall: at least 60 mm for an active climate.
-
Decide whether brackets are needed under the pediment.
-
Decide if a keystone is needed in the center.
-
Count the number of identical sandriks. Add 10% spare.
-
Select architraves, a window sill belt, and a keystone in the same style.
-
Select glue, dowels, acrylic sealant, primer, and facade paint.
-
Order everything in one batch.
PU overlays In the STAVROS catalog, these include corner and central decorative elements that pair well with the sandrik as an additional accent in the upper part of the framing.
Mistakes when choosing and installing a sandrik: learn from others'
They install side architraves but leave the top without a sandrik. The most common mistake. The top is 'open' — the framing is not closed.
They buy a sandrik without considering the width of the architraves. A sandrik disproportionate in width disrupts the system: either it 'sticks out' beyond the architraves haphazardly, or, conversely, it is narrower than the architraves.
They do not create an overhang beyond the side elements. A sandrik exactly the width of the opening looks 'crammed in'. An overhang of 30–50 mm creates completeness.
They take a too large pediment for a small window. A triangular pediment 350 mm high on a 600 mm wide window is like a crown on a child. Disproportionate.
They use small decor on a large facade. A straight pediment 60 mm high on a two-story house is not readable from 5 meters. The scale must match the facade.
They don't account for the projection from the wall. A pediment with a 20–30 mm projection does not divert water or create shadow. The minimum working projection is 50–60 mm.
They don't seal the joints. This is especially critical for the top joint of the pediment with the wall — rain actively flows in there. An unsealed joint = a source of dampness.
They mix incompatible styles. Strict straight architraves + a rich baroque arched pediment = architectural conflict.
They don't think about the keystone in advance. If the pediment is made without a groove or cutout for the keystone, it's difficult to add later. The solution is before installation.
They buy pediments without the rest of the set. One pediment without architraves, without a belt, without a coordinated style is a detail without context.
FAQ: Questions and Answers
What is a polyurethane pediment?
It is a decorative horizontal cornice above a window or door opening, made of facade polyurethane. It completes the window framing from above, creates an architectural accent, and helps divert rainwater from the opening.
Why is a pediment needed above a window?
It completes the window frame from above, creates shadow and relief, makes the facade expressive, protects the slope from water, and supports a classic or neoclassical style.
How does a sandrik differ from a keystone?
A sandrik is a horizontal element above the entire window. A keystone is a point vertical accent along the central axis, placed at the top of the casing or in the gap of the sandrik. They complement, not replace, each other.
What types of sandriks are there for the facade?
Straight horizontal, triangular (pediment), arched (bow-shaped), broken, with brackets, with a keystone. The shape determines the style of the entire framing.
How to choose the size of a sandrik above a window?
Width = window width + width of both casings + 30–50 mm overhang on each side. Profile height — 80–180 mm depending on the facade scale. Projection — 60–100 mm.
Should the sandrik be wider than the window?
Yes. The sandrik covers not only the opening but also the side casings — with an overhang beyond them. Without an overhang, it looks narrow and unfinished.
Can a sandrik be used above a door?
Not only possible — necessary. A sandrik above the front door creates a grand decorative accent for the entrance group without a heavy physical canopy.
Are brackets needed under the sandrik?
For overhangs over 80–100 mm — recommended. For overhangs of 60–80 mm without brackets — quite stable. Brackets enhance the decorative value and add credibility to a large sandrik.
Can a polyurethane sandrik be painted?
Absolutely. Painting is not an option but a condition for durability. Without coating, UV degrades the material in 2–3 years. Facade acrylic paint with UV filter — 2 coats over primer.
Where to buy a polyurethane sandrik for the facade?
In the STAVROS catalog — a full range of facade sandriks, platbands, belts, keystones, and related decor. Delivery across Russia, consultations on kit selection.
STAVROS: when the facade speaks the language of architecture
Choosing a sandrik is only the first step. Next comes choosing the entire facade window decor system: platbands, window sill belt, keystone, brackets, molding belts. And here it is critically important that all elements come from one source: unified material, unified style, unified scale.
STAVROS is a manufacturer of architectural polyurethane decor with a full production cycle, own molds, and strict quality control at every stage. STAVROS facade polyurethane — density 350–420 kg/m³, frost resistance 300+ cycles, UV stabilizers, closed cell structure with no water absorption. This is not just decor — it is a durable architectural coating for your home.
The STAVROS catalog offers everything for window framing: straight, triangular, and arched pediments, side trims of various widths and profiles, window sills with drip edges, keystones, bracket consoles, and corner decorative elements. All items are compatible — buying a set from one manufacturer means getting a facade where every detail supports the next.
Your house looks at you and everyone around — every day. Let it say what you want to say: about taste, about quality, about how everything here is thought out. A pediment above the window is a small step. But it is from such steps that a memorable facade is built.


