Article Contents:
- What exactly the buyer receives in CPU.VRS-058
- Why 2300 mm cannot be directly compared to the room height
- Example for a 2700 mm room
- Allowance for precise trimming
- Allowance for assembly
- Arbitrary stretching of the composition
- In the color of a smooth wall
- In the color of the slat panels
- Contrastingly
- The free vertical is too narrow
- For the wall height, too much reworking of the composition is required
- There is too much electrical hardware on the wall
- The stucco vertical competes with the slats
- The decor almost completely covers the furniture
- A completely different scale is needed
- 1. Don't cut anything right away
- 2. Check the parts
- 3. Determine the vertical axis
- 4. Mark the top and bottom boundaries
- 5. Transfer the positions of the main decorative elements
- 6. Check the moldings
- 7. Assemble a dry mock-up
- 8. Look from the main viewing point
- 9. Only after checking, perform the final fitting
- 10. After fitting, assemble the composition again
- Mistake 1. Comparing 2300 mm directly with a 2700 mm ceiling
- Mistake 2. Treating CPU.VRS-058 as a solid panel
- Mistake 3. Assuming the molding allowance allows increasing the height indefinitely
- Mistake 4. Cutting the moldings before a dry layout
- Mistake 5. Measuring only the height
- Mistake 6. Not accounting for the 16 mm thickness
- Mistake 7. Ordering two sets at once for symmetry
- Error 8. Consider 3–7 days of production time as time for size correction
- Can I buy CPU.VRS-058 if the ceiling is 2700 mm and the kit is 2300 mm?
- If the moldings come with a margin, can I assemble CPU.VRS-058 exactly at 2700 mm?
- Can I order CPU.VRS-058 in advance while the slat wall is not yet finished?
- Do I need to use the entire molding margin?
- Can I place CPU.VRS-058 not in the center of the remaining vertical space?
- What to do if the lower part falls on a high baseboard?
- Can I join CPU.VRS-058 directly with the ceiling cornice?
- Can I leave more free space at the top than at the bottom?
- What should I do if the vertical is exactly 157 mm wide?
- Can I install CPU.VRS-058 next to a door casing?
- Will CPU.VRS-058 fit a wall that is 2500 mm high?
- Can I change the distances between the decorative elements of CPU.VRS-058 myself?
- Why can't CPU.VRS-058 simply be called a vertical trim?
- Should I paint the parts first or mount them?
- Can I make a pair of CPU.VRS-058 on both sides of a slat panel?
- What should I do if CPU.VRS-058 matches the style but not the height?
- Can I leave a free section of wall at the top and bottom?
- How to understand that CPU.VRS-058 is too short visually?
- Is it worth buying mounting adhesive together with the kit?
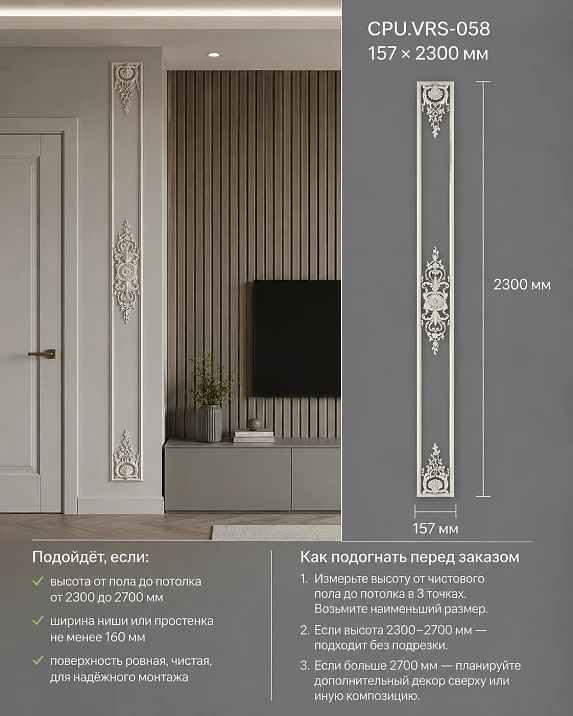
The slat finish already occupies the main part of the wall, but on the side of it there remains a narrow vertical strip up to the ceiling. I don't want to cover it with another row of slats: then the whole composition would become uniform. Leaving the strip completely empty is also not always successful — next to the pronounced rhythm of slat panels, a smooth vertical may be perceived as an unfinished part of the wall.
One option is to use the CPU.VRS-058 stucco decor kit made of polyurethane.
It has an important feature: the nominal size of the kit is 157 × 2300 × 16 mm, while the typical wall height in the scenario under consideration is 2700 mm. The difference is 400 mm.
But the conclusion "the kit is 400 mm shorter than the wall, so it doesn't fit" would be too simplistic.
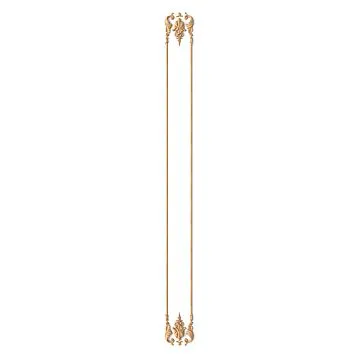
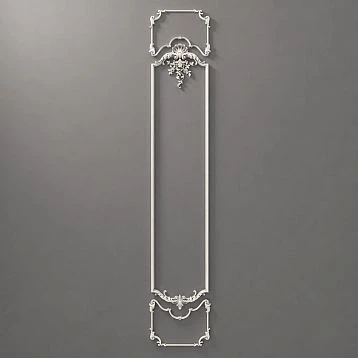
CPU.VRS-058 is not a solid polyurethane panel 2300 mm long. It is a prefabricated composition that is supplied uncut and unglued. The kit includes several decorative parts and the MLDPU-001 molding; elements with moldings have extended shoulders for cutting, and the moldings themselves are supplied with a margin.
That is why before purchasing, you need to compare not just the numbers 2300 and 2700 mm, but the actual architectural zone of the wall, the assembly method, and the allowable adjustment of the specific kit.
If after measurements and layout the kit fits, buy a set of stucco decor CPU.VRS-058 you can in the product card.
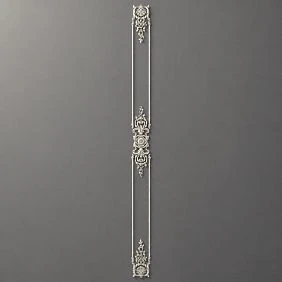
What exactly the buyer receives in CPU.VRS-058
CPU.VRS-058 is more correctly perceived not as a "long overlay 2300 mm", but as a kit for assembling a vertical decorative motif.
The composition includes:
-
NPU.VRS-005;
-
NPU.VRS-008L;
-
NPU.VRS-008R;
-
NPU.VRS-004;
-
MLDPU-001.
This fundamentally changes the approach to fitting.
If we had a single monolithic panel 2300 mm high, the task would look simple: either its dimensions fit the available space, or they don't.
For a prefabricated composition, first you need to understand:
-
where the main decorative parts are located;
-
where the molding sections work;
-
which parts require cutting;
-
how much actual allowance do the supplied profile elements provide;
-
what final distance between decorative nodes is permissible specifically for this composition.
The last point cannot be guessed.
The very fact that moldings come with allowance does not mean that CPU.VRS-058 can be arbitrarily stretched from 2300 to 2500, 2700, or 3000 mm without restrictions.
The allowance is needed for fitting. But the maximum allowable height, joint positions, and geometry of the finished composition should be checked against the actual parts, drawing, and product instructions.
Therefore, the article about CPU.VRS-058 should answer not the question "how to glue the overlay," but a more useful one:
how to understand before ordering whether the assembled kit of 157 × 2300 mm will fit into a specific vertical section of the wall.




Why 2300 mm cannot be directly compared with the room height
Suppose the ceiling is at the 2700 mm mark from the finished floor.
If you simply subtract:
2700 − 2300 = 400 mm,
you would get the impression that after installing CPU.VRS-058, an empty section of 400 mm will inevitably remain.
In practice, a decorative composition almost never has to start exactly from the floor and end exactly under the ceiling.
The wall may have:
-
floor skirting;
-
ceiling cornice;
-
shadow profile;
-
upper free zone;
-
lower decorative indent;
-
furniture;
-
sockets and switches.
Therefore, another value is needed — the actual working height of the decorative field.
The formula is simple:
working height = room height − lower occupied zone − upper occupied zone.
And 2300 mm should now be compared with it.
Our factory also produces:
Example for a room of 2700 mm
For example:
-
clear wall height — 2700 mm;
-
at the bottom, the baseboard and the necessary offset take up a total of 80 mm;
-
at the top, 100 mm is left under the ceiling.
Then:
2700 − 80 − 100 = 2520 mm.
Now the difference relative to the nominal 2300 mm is:
2520 − 2300 = 220 mm.
This is a completely different task than the initial 400 mm.
But even here one cannot automatically conclude:
"The kit includes a spare molding, so we'll definitely add 220 mm."
First, you need to determine the actual assembly capabilities of CPU.VRS-058.
Get Consultation
How to correctly measure the vertical next to a slat wall
For a preliminary decision, you will need not just one dimension, but a small sheet of measurements.
Write down:
-
the clear height from the finished floor to the ceiling;
-
height of floor plinth;
-
the height or projection of the ceiling cornice, if present;
-
the desired lower offset of the stucco composition;
-
the desired upper offset;
-
the actual width of the free vertical space;
-
distance from the edge of the slat panels;
-
position of sockets, switches, and other elements.
After this, it becomes clear what space is actually allocated for CPU.VRS-058.
For example:
| Parameter | Value |
|---|---|
| Room height | 2700 мм |
| Lower occupied zone | 80 мм |
| Upper zone | 100 мм |
| Working height | 2520 мм |
| Nominal height of CPU.VRS-058 | 2300 мм |
| Difference | 220 мм |
These 220 mm is already a meaningful value for further verification.
Table for ceilings 2500–2800 mm
There is no need to repeat the same calculation four times. It is more convenient to compare typical situations in a single table.
Let's take a hypothetical example where the bottom is occupied by 80 mm and the top has 100 mm left. These are not standard values, but a demonstration of the calculation method.
| Room height | Bottom zone | Upper zone | Working height | Difference relative to 2300 mm | What to check |
|---|---|---|---|---|---|
| 2500 мм | 80 мм | 100 мм | 2320 мм | +20 mm | How closely the nominal composition matches the actual layout |
| 2600 мм | 80 мм | 100 мм | 2420 мм | +120 mm | Is the actual stock of profile elements sufficient |
| 2700 мм | 80 мм | 100 мм | 2520 мм | +220 mm | How is the additional height distributed and does this kit allow it |
| 2800 мм | 80 мм | 100 мм | 2620 мм | +320 mm | Will a different kit or additional design be required |
The main conclusion from the table is not that CPU.VRS-058 is suitable for 2500 mm, but not for 2800 mm.
The conclusion is different:
the more the working height differs from 2300 mm, the more important it is to obtain a confirmed assembly scheme before purchasing.
What does “moldings are supplied with a margin” mean
This is one of the most useful characteristics of CPU.VRS-058.
The kit is supplied:
-
untrimmed;
-
unglued;
-
with extended sections of elements intended for sawing;
-
with a supply of moldings.
This means that the buyer receives not a rigid monolithic composition that needs to be glued in an unchanged form, but a system that assumes installation adjustment.
But the word "supply" cannot be interpreted as an unlimited opportunity to increase the height.
Three things need to be distinguished.
Allowance for precise trimming
On a real wall, rarely everything matches the drawing to the millimeter. Additional length allows for a neat joint.
Allowance for assembly
Profile sections can be adjusted relative to decorative parts within the limits provided by the design.
Arbitrary stretching of the composition
This does not follow from the mere fact of having a reserve.
If you make too large an additional gap between the upper and lower decorative parts, the proportions of the product may change.
Therefore, before ordering, it is important to find out not only:
"Is there an extra molding?"
But:
"What is the acceptable final geometry of CPU.VRS-058 after standard fitting?"
Why CPU.VRS-058 should first be laid out on the floor
After receiving the kit, you should not start working with the first piece on the wall.
It is much safer to assemble a preliminary composition horizontally.
Prepare a clean, flat surface and lay out:
-
NPU.VRS-005;
-
NPU.VRS-008L;
-
NPU.VRS-008R;
-
NPU.VRS-004;
-
MLDPU-001.
Do not cut elements at this stage.
First, you need to understand:
-
mutual position of parts;
-
the common axis;
-
places where moldings adjoin;
-
the intended cutting points;
-
actual length of existing profile sections.
After such a layout, it becomes clear how the real parts differ from the abstract figure of 2300 mm from the card.
This is especially important for a wall of 2700 mm: the task is not to find 400 mm of "missing length," but to assemble a composition within a specific field.
First the mockup on the wall, then the cut.
The price of CPU.VRS-058 is 20,550 ₽, so checking proportions after irreversible trimming is a poor workflow.
Before cutting, it's useful to transfer the main dimensions to the wall with painter's tape.
For the preliminary layout, it is enough to mark:
-
the left boundary at 157 mm;
-
the right border;
-
the top point;
-
the bottom point;
-
the approximate position of the main decorative elements.
This way you can see the entire vertical.
The slat panels are already nearby, so it's especially clear to see:
-
whether the molding comes too close to the slats;
-
is there a calm enough gap between the textures;
-
doesn't the vertical composition look too short;
-
is the upper decorative part not positioned too low.
For now this is just markup, the position can be changed without losses.
Width 157 mm: what exactly needs to be measured
The topic of this article should not repeat the separate scenario of choosing CPU.VRS-057 for a narrow wall section, but the width of CPU.VRS-058 still cannot be ignored.
The confirmed dimension is 157 mm.
If the free vertical space near the slat wall is, for example, 180 mm, you cannot automatically assume that the set fits just because:
180 > 157.
Need to check:
-
is there a technological gap;
-
isn't the decor too close to the edge of the panel;
-
isn't there a trim nearby;
-
is free space required on the sides;
-
how does the composition look from a distance.
That is, 157 mm is the physical size of the product, but the decorative zone usually also requires surrounding space.
If CPU.VRS-058 turns out to be too wide or too dense for a specific wall, it's more useful to immediately look at buy vertical stucco decor made of polyurethane and compare other vertical compositions.
How CPU.VRS-058 should work next to slat panels
Slat finishing already creates many vertical lines.
CPU.VRS-058 is also stretched vertically, but its role is different.
The slats provide:
-
a regular rhythm;
-
repetition;
-
modern geometry;
-
chiaroscuro from identical profiles.
The molding set provides:
-
ornament;
-
a more complex contour;
-
a local decorative center;
-
a distinction from the serial rhythm.
Therefore, an interesting composition option looks like this:
a large field of slats → a small transition → one independent molded vertical.
If you place CPU.VRS-058 flush against the outermost slat, the two textures may start to blend together.
If you space them too far apart, the decor will no longer be perceived as part of the same wall.
The exact offset should be determined by a mockup, not by a universal number.
If the slat panels themselves are still being selected, you can first take a look Buy slatted panels for wall finishing and only after approving their actual width, measure the remaining vertical space.
What to do when the working height is almost 2300 mm
This is the simplest scenario.
For example, after accounting for all real offsets, the available field turned out to be 2320 mm.
Difference relative to nominal size:
20 mm.
Here, it cannot be promised in advance that you will specifically need to cut 10 mm from the top and 10 mm from the bottom.
But the value itself already indicates: there is no need to try to radically redistribute the composition by height.
Before ordering, it remains to check:
-
actual dimensions of the resulting parts;
-
installation diagram;
-
allowable cut points;
-
real top and bottom margins.
If everything matches, CPU.VRS-058 turns out to be close to the original scale of the composition.
What to do if the working height is noticeably greater than 2300 mm
For a wall of 2700 mm, this scenario is most likely.
After the plinth and the upper zone, we got 2520 mm in the example.
That is, it is necessary to resolve the issue with a difference of 220 mm.
There are several fundamentally different options, and one cannot be chosen without a drawing:
-
part of the additional height may remain as a free margin at the top;
-
part — at the bottom;
-
it is possible to use the constructive allowance of moldings within standard limits;
-
a combination of these methods is possible;
-
perhaps the chosen height requires a completely different composition.
The most dangerous idea is to simply split 220 mm in half and say:
"let's add 110 mm at the top and bottom."
Such an arithmetic result says nothing about the correctness of the CPU.VRS-058 drawing itself.
First, you need to see the kit diagram.
Can the composition be placed in the center of the free height?
Yes, as a preliminary layout option.
If the working height is 2520 mm, and the nominal dimension of 2300 mm is used preliminarily, the remainder is:
2520 − 2300 = 220 mm.
With purely geometric centering:
220 / 2 = 110 mm
at the top and bottom.
This is a useful starting point for the layout.
But not a mandatory final position.
For example, there may be a high baseboard at the bottom and a ceiling cornice at the top. Then equal mathematical margins do not necessarily mean equal visual distance.
Make at least three layout options:
-
geometric center;
-
slightly higher;
-
slightly lower.
Look at the entire wall together with the batten part.
What to do if the working area is less than 2300 mm
This is already a task of reduction, not enlargement.
Since the kit is supplied uncut and requires fitting of profile elements, having the ability to cut is especially useful here.
But you cannot write:
"CPU.VRS-058 can be easily shortened to any size."
There is no such confirmation.
If the available area is, for example, 2180 mm, the difference is 120 mm.
Before purchasing, you need to find out:
-
in which places the profile can be shortened;
-
Will the decorative details remain in correct proportion;
-
Will the cut fall into the ornamental node;
-
whether the entire composition will be preserved.
The more the original format needs to be shortened, the more important preliminary coordination is.
Thickness of 16 mm and proximity to relief slats
The third confirmed dimension of CPU.VRS-058 is 16 mm.
This affects how the stucco decor reads in side light.
The slat wall already creates its own relief, so two shadow systems meet nearby:
-
frequent narrow shadows from the slats;
-
more complex chiaroscuro from the stucco ornament.
With soft frontal lighting, the composition may look calm.
With side lighting, both reliefs become more active.
That is why color and light need to be checked not only on a small sample of the material.
Take a photo of the entire wall:
-
during the day;
-
under the main evening lighting;
-
with the side sconce turned on, if there is one.
If the decorative vertical starts to visually compete with the slatted wall, the problem may not be with CPU.VRS-058 itself, but with too close proximity or contrasting coloring.
In the color of the wall or highlight CPU.VRS-058
For a narrow vertical next to the slats, there are three main scenarios.
In the color of the smooth wall
The calmest option.
The ornament works primarily through light and shadow, not as a color patch.
This way, CPU.VRS-058 is easier to integrate next to active panels.
In the color of the slat panels
The composition visually connects with the textured zone.
This option can be especially interesting if the slats have a pronounced color and the stucco decor is placed on a smooth base.
But you need to check whether the narrow vertical starts to look like a continuation of the panel.
Contrastingly
CPU.VRS-058 becomes an independent accent strip.
At a width of 157 mm, even a relatively narrow composition can stand out strongly on a light wall.
In this case, the accuracy of the top and bottom markings is especially noticeable.
The size and position should be approved before choosing the final color.
One CPU.VRS-058 or two
The original scenario is one remaining vertical next to the slat wall, so the base quantity is one set.
Cost:
20 550 ₽.
But sometimes the layout is symmetrical:
molding vertical → slat composition → molding vertical.
Then a pair may be needed.
Cost of two sets at the indicated price:
20 550 × 2 = 41 100 ₽.
This is already a significant difference in budget.
Therefore, for a symmetrical wall, it is especially useful to first mark both sides with painter's tape.
Do not order two sets just because symmetry seems logical on the plan.
In a real room, one side may be blocked by furniture, a doorway, or curtains.
If you need a pair, it's better to order CPU.VRS-058 made of polyurethane only after checking both verticals.
Why the price of a pair makes a preliminary layout especially important
A mistake in one part for a few hundred rubles is unpleasant.
A mistake when buying two sets for 41,100 ₽ already significantly affects the renovation budget.
Before ordering a pair, you need to check the left and right sides separately.
Do not assume they are the same.
Measure:
-
height;
-
width;
-
baseboard;
-
ceiling cornice;
-
sockets;
-
junctions;
-
the actual offset from the panels.
Builders can create two visually identical areas with slight differences.
If the kit is made to order, it is especially reasonable to complete such checks before making the purchase.
CPU.VRS-058 is made to order: what to check before payment
For CPU.VRS-058, production to order is indicated, with an average lead time of 3–7 days.
This is where the logic of "buy first, figure it out later" is especially weak.
Before placing an order, it is advisable to have a ready checklist:
| Check | Result |
|---|---|
| Clear wall height | Measured |
| Baseboard | Taken into account |
| Upper zone | Taken into account |
| Working height | Calculated |
| Free width | Checked |
| 157 mm fit compositionally | Yes / no |
| Actual difference relative to 2300 mm | Calculated |
| Fitting method | Refined |
| Position of decorative elements | Verified |
| One or two sets | Determined |
| Color | Pre-selected |
| Base | Verified |
| Mounting compound | Selected |
Only after this does the basket become meaningful.
How does CPU.VRS-058 differ from a simple vertical overlay?
With a separate overlay, the choice usually comes down to:
-
whether the width fits;
-
whether the height fits;
-
where to glue it.
CPU.VRS-058 is more complex and interesting precisely as an assembled product.
It has:
-
several decorative components;
-
profile connecting parts;
-
sawing;
-
molding stock;
-
the need to maintain the overall vertical composition.
Therefore, before buying, you need to think not "will the part fit," but:
"can the entire design be assembled within my architectural field without violating proportions?"
If you need a simpler vertical part of a different size, you can immediately look at buy vertical stucco decor made of polyurethane.
When it's better not to buy CPU.VRS-058
There are several situations where the right decision is to choose a different model.
The free vertical space is too narrow
157 mm physically doesn't fit, or the decorative field ends up cramped.
The wall height requires too much reworking of the composition
If the difference from 2300 mm is large and the allowable adjustment range is not confirmed, it is not worth risking an expensive set.
There is too much electrical hardware on the wall
Switches, sockets, thermostats, or control panels may fall directly into the ornamental zone.
The stucco vertical competes with the slats
Sometimes, next to an active wooden or polyurethane rhythm, additional ornamentation turns out to be superfluous.
The decor almost completely covers the furniture
If a tall cabinet is placed nearby, part of CPU.VRS-058 may end up invisible.
A completely different scale is needed
In this case, it is better to switch to the catalog. buy vertical stucco decor made of polyurethane and choose a different set.
How to prepare the base
CPU.VRS-058 will work as a single vertical only if all its parts are installed on a stable base.
Check the wall before marking.
Especially important:
-
strength of the finish coating;
-
absence of peeling paint;
-
flatness;
-
absence of dust;
-
compatibility of the selected adhesive with polyurethane and the base.
If part of the composition falls on one material and part on another, this must be considered separately.
For example, it is undesirable to consider the following as identical in installation:
-
painted plaster;
-
wallpaper;
-
laminated panel;
-
decorative plaster.
The specific preparation method depends on the actual substrate.
What to add to the cart along with the set
In addition to the CPU.VRS-058 itself, mounting materials will be required.
You can see the option used for mounting decorative elements via the link buy adhesive for mounting stucco decor.
But the number of packages cannot be correctly derived from just the figure 157 × 2300 mm.
The consumption is affected by:
-
number of individual elements;
-
application pattern;
-
contact area;
-
wall evenness;
-
losses during installation.
Therefore, the finished cart should contain:
CPU.VRS-058 × required quantity + mounting materials according to the calculated consumption.
There is no need to invent the exact adhesive consumption without instructions.
Practical assembly sequence on the wall
After the kit is received and checked, work should proceed sequentially.
1. Do not cut anything right away
First, lay out the entire kit.
2. Check the parts
Check the composition and orientation.
3. Determine the vertical axis
It must be aligned with the slat zone.
4. Mark the upper and lower boundaries
It is the actual boundaries of your composition, not just the floor and ceiling.
5. Transfer the positions of the main decorative elements
This allows you to see the pattern before gluing.
6. Check the moldings
Determine where the allowance is located and which sections are intended to be cut at an angle.
7. Assemble a dry mock-up
Without glue.
8. Look from the main viewpoint
The vertical should work together with the entire wall.
9. Only after checking, perform the final fitting
Cutting is an irreversible operation.
10. After fitting, assemble the composition again
And only then proceed to installation.
Why you cannot distribute the "extra" 220 mm arbitrarily
Let's return to the example with a working height of 2520 mm.
Nominally, relative to 2300 mm, 220 mm remains.
Mathematically, many options can be made:
-
110 + 110 mm;
-
80 + 140 mm;
-
50 + 170 mm.
But an arithmetically acceptable distribution does not yet mean a decoratively correct one.
If the upper and lower ornamental blocks have specific proportions relative to the molding, randomly increasing one section can disrupt the composition.
Therefore, the free remainder on the wall and the technological allowance within the set are not the same thing.
This is one of the key points before ordering CPU.VRS-058.
Should the molding be brought exactly up to the ceiling cornice?
Not necessarily.
Sometimes a small free field at the top looks better than a direct abutment.
Especially if nearby slat panels reach the ceiling and already form a strong vertical.
CPU.VRS-058 can be read as an independent decorative insert.
In other projects, on the contrary, it is logical to connect the upper finish with the ceiling design.
The solution depends on the actual pattern and cornice.
There is no need to automatically strive to "cover all 2700 mm."
The goal is not to fill the wall completely, but to create a proportional composition.
What to do with the baseboard
The lower part requires the same level of attention.
If the CPU.VRS-058 is installed flush against a tall baseboard, the lower decorative unit may visually merge with the horizontal profile.
If raised too high, the vertical will appear detached from the floor.
Therefore, first mark out the baseboard at full scale together with the kit.
If the baseboard is already installed, the task is simpler: its actual height is known.
If not yet, do not use a conditional value from the project without checking the future product.
What to do if slat panels run from floor to ceiling
This is a typical situation.
On the left, for example, there is a solid slat zone with a height of 2700 mm.
On the right is CPU.VRS-058, which has a nominal size of 2300 mm.
If you simply place a molding composition in the middle, the top and bottom will remain free.
This is not necessarily bad.
On the contrary, small margins can separate the ornamental vertical from the floor and ceiling and make it independent.
But the effect should be evaluated across the entire wall.
The main mistake is trying at all costs to visually align the top point of CPU.VRS-058 with the top of the slat panels without confirming the possibility of standard fitting.
If the slat panels have not been purchased yet
First, it is useful to understand the actual width of the textured zone.
To do this, you can look at Slatted wall panels for interior finishing.
After selecting the panels, the following is calculated:
total wall width − width of the slat zone − technical and compositional gaps = free vertical space for stucco decor.
You should not first buy CPU.VRS-058 and then adjust the entire panel layout to fit it, if the slats should remain the main object of the wall.
If you need other polyurethane decor besides CPU.VRS-058
It is not necessary to assemble the entire interior from one type of vertical kits.
To compare various decorative details, you can open Buy Polyurethane Molded Decoration.
If a wider selection of polyurethane products is required — You can buy ready-made stucco matching the Baroque style. Calculate the quantity: linear meters of cornices and moldings, number of rosettes, pilasters, consoles, corner elements. Add a ten to fifteen percent allowance for trimming..
This is especially useful if, after the mockup, it becomes clear that the idea of vertical decor itself is correct, but CPU.VRS-058:
-
too wide;
-
too tall;
-
not high enough;
-
does not match the ornament.
Then it's the model that should be changed, not forcing a specific set to work in an unsuitable field.
Errors before ordering CPU.VRS-058
Error 1. Comparing 2300 mm directly with a ceiling of 2700 mm
Reason: baseboard, upper zone, and actual offsets are ignored.
Consequence: the buyer thinks they definitely need to "add 400 mm."
How to avoid: first calculate the working height.
Error 2. Treating CPU.VRS-058 as a solid panel
Reason: the overall dimension is indicated in the product card.
Consequence: the very possibility of adjustment is misunderstood.
How to avoid: take into account that this is a set of several elements.
Error 3. Deciding that the molding allowance allows increasing the height indefinitely
Reason: too broad interpretation of the word "allowance".
Consequence: proportions of the composition are violated or parts are missing.
How to avoid: clarify the permissible assembly scheme.
Error 4. Cutting moldings before dry layout
Reason: it seems that the dimensions are already clear from the wall.
Consequence: irreversible error.
How to avoid: first a full mock-up.
Error 5. Measuring only the height
Reason: the theme seems exclusively vertical.
Consequence: width 157 mm conflicts with the edges of the slat trim or other objects.
How to avoid: measure both height and width.
Error 6. Not accounting for the 16 mm thickness
Reason: the front drawing looks flat.
Consequence: the side shading turns out more active than expected.
How to avoid: check the composition under real lighting.
Error 7. Ordering two sets at once for symmetry
Reason: the symmetrical layout looks nice in the sketch.
Consequence: one side of the room ends up blocked by furniture or has a different geometry.
How to avoid: measure both verticals separately.
Mistake 8. Considering 3–7 days of production as time to fix dimensions
Reason: sizes are checked only after ordering.
Consequence: the ordered set may not match the actual wall.
How to avoid: complete the geometric check before purchasing.
Decision table before purchase
| Condition | What to do |
|---|---|
| Working height close to 2300 mm | Check standard fitting and marking |
| Working height slightly larger | Clarify the actual stock of profile elements |
| Working height significantly larger | Do not promise stretching; check another assembly option or another kit |
| Working height less than 2300 mm | Find out acceptable places and volume of cutting |
| Free width is about 157 mm | Make a full-size mockup |
| Little space between rails and decor | Check an alternative vertical model |
| Need symmetry on both sides | Measure both zones and calculate the budget of the pair |
| Too active relief near the rails | Check color, spacing, and lighting |
| Size or pattern does not fit | Go to vertical decor catalog |
| All sizes checked | Place order |
How to create a ready-made cart
For one-sided composition:
-
CPU.VRS-058 — 1 set;
-
price — 20,550 RUB;
-
mounting material — separately, based on actual consumption.
For a symmetrical wall:
-
CPU.VRS-058 — 2 sets;
-
cost — 41,100 RUB;
-
mounting material — separately.
If after the mockup a specific set fits, you can buy a set of stucco decor CPU.VRS-058.
If the geometry does not match, it is better to first open buy vertical stucco decor made of polyurethane and choose a different composition.
For additional decor, the section is available Buy Polyurethane Molded Decoration, and a wider catalog is here: You can buy ready-made stucco matching the Baroque style. Calculate the quantity: linear meters of cornices and moldings, number of rosettes, pilasters, consoles, corner elements. Add a ten to fifteen percent allowance for trimming..
FAQ
Can I buy CPU.VRS-058 if the ceiling is 2700 mm and the set is 2300 mm?
The 400 mm difference itself does not answer the question. First, you need to subtract the baseboard, ceiling zone, and necessary clearances to get the actual working height, and then compare it with the standard fitting scheme of the kit.
If the moldings come with extra allowance, can CPU.VRS-058 be assembled exactly at 2700 mm?
This does not follow from the provided specifications. The molding allowance confirms the possibility of installation adjustment, but does not confirm arbitrary extension of the entire composition to any given height.
Can I order CPU.VRS-058 in advance while the slat wall is not yet finished?
Yes, but the risk of error is higher. For accurate selection, it is more useful to know the actual width of the slat zone, the finished wall height, the baseboard, and the actual junctions.
Do I need to use the entire molding allowance?
Not necessarily. The allowance exists for adjustment, not as a mandatory part of the visible composition. The specific length is determined after marking.
Can CPU.VRS-058 be placed not in the center of the remaining vertical space?
Yes, if such an offset has a compositional reason. But next to the vertical rhythm of the slats, random asymmetry is quite noticeable, so the position is better checked in advance with a tape measure or a paper mockup.
What to do if the lower part falls on a high baseboard?
It is necessary to separately determine the position of the lower decorative element relative to the plinth. Do not automatically trim the composition without checking which parts are intended for mitering.
Can CPU.VRS-058 be joined directly to a ceiling cornice?
The possibility of such a compositional connection depends on the shape of both products and the actual layout. A universal rule is not confirmed here, so the connection must be checked against the real profiles.
Can I leave more free space at the top than at the bottom?
Yes, if it is visually justified. Geometric centering is only one layout option, not a mandatory installation scheme.
What to do if the vertical is exactly 157 mm wide?
Physical coincidence of dimensions does not yet guarantee a good result. The decorative element may need a visual gap to the slats, trim, or adjacent wall. Make a full-size mock-up.
Can CPU.VRS-058 be installed next to a door trim?
Only after checking the actual free space and whether the two ornamental elements begin to compete. The width of 157 mm plus the surrounding margins is especially important.
Will the CPU.VRS-058 fit a wall 2500 mm high?
Possibility is determined not by the height of the room itself, but by the working field after accounting for the baseboard, top trim, and allowable kit adjustment.
Can I change the distances between the decorative elements of CPU.VRS-058 myself?
Without a confirmed installation scheme, it's better not to promise this. The set is prefabricated, but maintaining the proportions of the ornament remains an important part of the result.
Why can't CPU.VRS-058 simply be called a vertical overlay?
Because it is a set of several elements, including decorative parts and molding. The prefabricated structure determines both the fitting order and the adjustment method.
Should the parts be painted first or mounted first?
This depends on the chosen finish and installation technology. But the geometric layout and all cuts must be approved before final irreversible operations.
Can a pair of CPU.VRS-058 be made on both sides of a slat panel?
Yes, if there is suitable space on both sides. At the current price, two sets cost 41,100 ₽, so it makes sense to first mark out both verticals at a 1:1 scale.
What to do if CPU.VRS-058 fits stylistically but not in height?
Don't necessarily try to rework this exact set. First, look at buy vertical stucco decor made of polyurethane and compare other compositions.
Can I leave a free section of wall at the top and bottom?
Yes. The decorative vertical doesn't have to fill the distance from floor to ceiling completely. Free spaces can be part of the composition if they look intentional.
How can I tell if CPU.VRS-058 is visually too short?
Make a rectangular mock-up on the wall 2300 mm high and 157 mm wide, mark the position of the main decorative elements, and look at the entire wall from a normal viewing point. If the vertical looks cut off and no standard adjustment solves the problem, it's worth choosing a different model.
Does it make sense to buy mounting adhesive together with the set?
Yes, once the base and technology are known. You can view the mounting compound via the link buy adhesive for mounting stucco decorBut the number of packages must be calculated based on actual consumption, not on the height of the set.
Summary: for a 2.7 m wall, you need to calculate not the "missing 400 mm" but the actual composition
CPU.VRS-058 has a confirmed size of 157 × 2300 × 16 mm, is made of polyurethane, and costs 20,550 ₽. The set is made to order and is supplied uncut and unglued; profile elements require fitting, and moldings are supplied with a margin.
That is why a room height of 2700 mm by itself does not mean the set is unsuitable.
The correct order is different:
measure 2700 mm → subtract the actual baseboard and upper zone → determine the working height → compare it with 2300 mm → check the actual margin and assembly scheme → lay out the set → transfer the composition to the wall → only then perform cutting and installation.
If the room is 2700 mm, and after accounting for the lower and upper zones the working field turns out to be, for example, 2520 mm, the real task is already a difference of 220 mm, not 400 mm.
But even these 220 mm cannot be automatically "added with moldings": such a possibility must be confirmed by the CPU.VRS-058 design.
If after checking the set matches the wall, you can to order CPU.VRS-058 made of polyurethane.
If for the required height you have to change the proportions too much, it is better not to redo the expensive composition blindly, but to go to the section buy vertical stucco decor made of polyurethane and pick another ready-made option.
Thus, CPU.VRS-058 is purchased not on the principle of "2300 mm is almost equal to 2700 mm," but after a proper geometric check: real wall → real decorative field → set diagram → allowable fitting → order.