Article Contents:
- Tall skirting board PLT‑004 160×16 mm: what the product card actually confirms
- If there is 155 mm under the radiator, why can't you just say "160 is greater than 155 — it doesn't fit"
- What to measure before buying a tall wooden skirting board
- Can the PLT‑004 skirting board pass behind the radiator rather than under it
- Compatibility matrix: 155 mm height and depth behind the radiator
- Vertical check
- Depth check
- Dry fitting PLT‑004 under an already installed radiator
- How to cut an opening for a pipe without ruining the high profile
- What to do if PLT-004 only partially fits behind the radiator
- End cap return
- Straight painted end
- PLT-004 made of MDF
- PLT-004 with beech
- PLT-004 with oak
- Scenario 1. The radiator can still be re-hung before renovation is complete
- Scenario 2. The radiator is connected, renovation is complete
- Scenario 3. There are several radiators in the room
- How to accept PLT-004 after delivery before cutting and painting
- Short conclusion
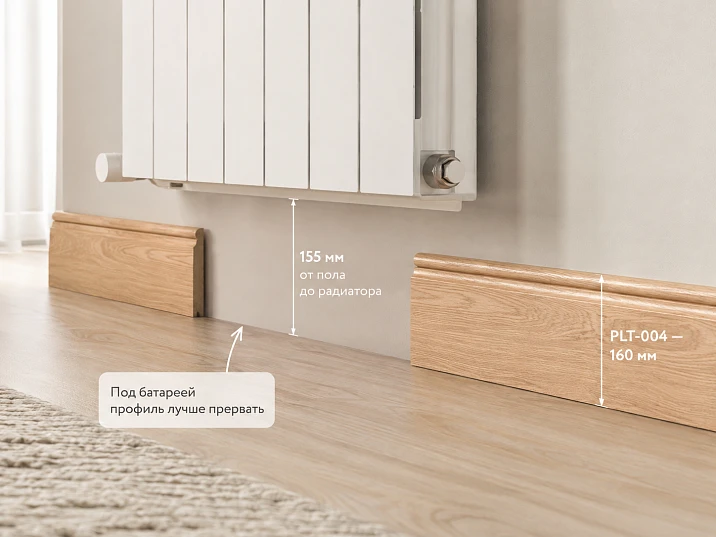
The finished floor is ready, the radiator is already connected, and the tall skirting board was chosen later. From the floor to the lowest point of the radiator, 155 mm was measured. For PLT-004, the profile height is 160 mm. If you compare only these two figures, you get a direct conflict:
160 − 155 = 5 mm.
That is, in the same vertical plane, the skirting board is 5 mm higher than the free space under the lowest point of the radiator. If the battery casing, bracket, or pipe is located exactly where the profile should pass, PLT-004 cannot be run continuously under this obstacle without modifying the joint.
But the decision cannot be made only by the formula "160 is greater than 155." The radiator has depth and offset from the wall. The PLT-004 skirting board is only 16 mm thick and can be positioned behind the plane of the radiator if there is indeed sufficient space between the wall and the rear of the appliance, the installation path is clear, brackets and pipes do not cross the profile, and maintenance of the heating device is preserved.
Therefore, for the initial situation, there are not two but four possible outcomes:
-
PLT-004 runs continuously behind the radiator — if the actual gap at the wall allows placing a 16 mm thick profile, taking into account the installation layer, wall unevenness, and fasteners.
-
The skirting board passes under part of the radiator but conflicts with pipes or brackets — then local endings, returns, or agreed cutouts are designed.
-
The skirting board physically does not pass behind the battery — the profile is ended before the technical zone and resumed after it, or a different scheme is chosen.
-
A continuous line is critical for the interior — only then is the cost and complexity of re-hanging the radiator compared with the value of preserving PLT-004, and the decision is made by a heating specialist, not a skirting board installer.
The main purchasing rule: first check one problematic joint at a scale of 160 × 16 mm, then order the entire room's length. A tall profile is expensive not only by itself; an error after painting and cutting increases losses.
If the project is still comparing options, you can to buy wooden baseboard after checking all technical zones of the room. If a specific PLT‑004 is already approved, first you need to find out whether it specifically fits behind the radiator and near the connection.
High skirting board PLT‑004 160×16 mm: what the card actually confirms
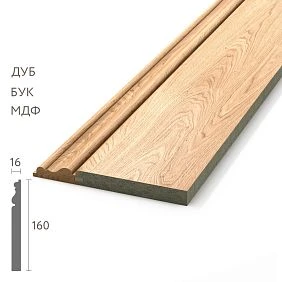
PLT‑004 is a high profiled skirting board/trim of a classic character. For this article, three dimensional configurations are important:
| Execution | Size A × C × L | What is important |
|---|---|---|
| MDF | 160 × 16 × 2600 mm | long strip for painting |
| Beech / MDF / beech veneer | 160 × 16 × 2400 mm | combined wood construction |
| Oak / MDF / oak veneer | 160 × 16 × 2400 mm | combined wood construction |
Here:
-
160 mm — profile height;
-
16 mm — thickness from the wall;
-
2400/2600 mm — plank length.
For the radiator unit, the first two digits are critical. The height of 160 mm determines the vertical conflict with the bottom point of the battery. The thickness of 16 mm determines whether the profile can physically pass between the wall and the back of the radiator.
Why wood versions cannot be called fully solid
Versions with beech and oak have a combined structure. Correctly write:
-
PLT-004 with beech;
-
PLT-004 with beech veneer;
-
PLT-004 with oak surface;
-
combined skirting board with MDF, veneer, and wood part.
Incorrectly:
"solid oak PLT-004"
or
"skirting board entirely from solid beech."
This is important not only for terminology. The combined structure affects the processing of ends, cutouts, and visible terminations at the radiator. If the profile has to be interrupted, the end must be designed taking into account which materials will be exposed.
Why 160 mm is not an "approximate height"
If the radiator's lowest point is indeed 155 mm from the finished floor and lies in the same plane, a 5 mm conflict is real.
But first, it needs to be confirmed:
-
the measurement is taken from the finished floor;
-
the lowest point of the unit/bracket is specifically taken;
-
the baseboard does not pass behind this point;
-
the floor has no local rise;
-
the mounting layer will not increase the actual profile thickness.
Why 16 mm is also not the full mounting dimension
The profile has a thickness of 16 mm, but the finished assembly may take up slightly more due to:
-
adhesive layer;
-
local wall unevenness;
-
mechanical fastening;
-
protrusion of the finishing layer;
-
loose fit on a wavy wall.
Don't invent universal "+2 mm for adhesive." The thickness of the mounting layer depends on the substrate and the composition. The correct action is to make a physical template and check the actual gap.
After confirming the geometry, you can go to the product page skirting board PLT-004 160×16 mm and select the desired configuration.




If the space under the radiator is 155 mm, why can't we just say "160 is greater than 155 — it doesn't fit"
The arithmetic 160 > 155 answers only one question:
can a profile with a height of 160 mm pass directly under an obstacle whose lowest point is at a height of 155 mm, if they are in the same plane?
Answer: no, it cannot.
But most wall-mounted radiators are offset from the wall. The baseboard is located at the wall. Therefore, the spatial layout needs to be checked.
Let's imagine the wall in a side view:
-
wall;
-
baseboard with a thickness of 16 mm;
-
bracket;
-
rear plane of the radiator;
-
radiator body;
-
lowest point of the body at the 155 mm mark.
If there is a free zone deeper than 16 mm between the wall and the rear part of the device, and the brackets do not pass through it in the lower section, the top 5 mm of the baseboard may end up behind the radiator rather than under it.
That is a different scenario.
Three planes that need to be distinguished
Wall plane.
The baseboard is installed here.
Plane of the rear part of the radiator.
It is at some distance from the wall.
Plane of the front casing of the radiator.
It is even further into the room.
The phrase "the radiator hangs at 155 mm" does not indicate at what depth its lowest point is relative to PLT‑004.
Why the bracket may be lower than the casing
Even if the battery casing itself starts above 160 mm, the lower mounting element may be lower.
Then the conflict is caused not by the radiator, but by the bracket.
You need to measure the lowest and closest-to-the-wall part that intersects the baseboard strip.
Pipes may change the decision
Supply and return pipes can:
-
come out of the wall;
-
come from the floor;
-
run horizontally;
-
have valves;
-
have thermostatic valves.
The profile can pass behind the radiator body but must stop at the vertical pipe.
Then the continuous line requires a separate solution at the pipe joint.
The floor may also not be perfectly level.
If the radiator is measured at 155 mm in the center, and the floor under the left side rises by 4 mm, the actual clearance there will become about 151 mm.
For a tall baseboard, what matters is not the average mark, but the minimum available geometry across the entire width of the technical zone.
This article cannot be used as instructions for permissible radiator clearances.
Minimum distances to the floor, wall, and windowsill depend on the specific radiator, brackets, and requirements of the heating equipment manufacturer.
The article solves the reverse problem: fitting a decorative profile into an existing assembly without arbitrarily changing engineering requirements.
Our factory also produces:



What to measure before buying a tall wooden baseboard
Before ordering the full volume for a room, you need to map out the radiator zone.
1. Height to the lowest point of the radiator
Measure from the finished floor, not from the screed, subfloor, or the level for future parquet.
Record the minimum at several points across the width of the radiator.
2. Height to the lower bracket
The bracket may end up lower than the housing.
3. Distance from the wall to the rear plane of the radiator
This is the main dimension for the “baseboard passes behind the radiator” scenario.
4. Thickness of the planned PLT-004
Nominally:
16 mm.
But the check must be physical.
5. Location of the supply pipe
They record:
-
height;
-
distance from the wall;
-
diameter;
-
direction.
6. Location of the return pipe
The same check.
7. Faucets and thermostat
The fittings may interfere with completing the high side plank.
8. Brackets by width
You need to know not only the height, but also their horizontal position. Sometimes the profile can be run along most of the radiator and interrupted only in one local spot.
9. Presence of a decorative screen or box
If the radiator is later covered by a screen, the plinth must be aligned with its side panels.
10. Wall length
It is needed for cutting after deciding which sections of PLT-004 actually run continuously.
Measurement table
| Parameter | Actual value |
| Radiator bottom from floor | ___ mm |
| Lowest point of the bracket | ___ mm |
| Wall → rear plane of the radiator | ___ mm |
| Wall → nearest pipe | ___ mm |
| Pipe diameter | ___ mm |
| Free section on the left | ___ mm |
| Free section on the right | ___ mm |
| Wall length | ___ mm |
This table is more useful than the phrase “about 15 centimeters there.”
Get Consultation
Can the PLT‑004 baseboard pass behind the radiator rather than under it
This is the main spatial scenario of the entire article.
If the distance from the floor to the bottom edge of the radiator is 155 mm, a 160 mm profile does not fit under the front edge. However, with wall mounting, the battery is usually offset from the wall, and PLT‑004 occupies only 16 mm in depth near the wall. Therefore, not only the vertical clearance but also the horizontal gap is checked.
Simple geometry in side section
Let:
-
T — thickness of PLT‑004 = 16 mm;
-
M — mounting layer and possible wall unevenness;
-
R — actual distance from the wall to the nearest point of the rear part of the radiator/bracket.
For free passage, the following is required:
T + M < R
or at least no more than the available space, considering the actual mounting technology.
But M is not specified by the baseboard manufacturer as a universal value. Therefore, one cannot write:
“If there are 18 mm behind the radiator, PLT‑004 will definitely fit.”
You need to apply a real template with a thickness of 16 mm and check the assembly.
Why the template must be not only 160 mm high, but also 16 mm thick
A paper strip 160 mm high will show a vertical conflict, but will not show whether the profile fits behind the radiator.
Best layout:
-
height — 160 mm;
-
thickness — 16 mm;
-
length — at least 500–700 mm.
It is applied to the wall under the radiator.
If the template passes in the free zone but hits the bracket, the problem is local. If it does not pass along the entire depth, a continuous PLT‑004 line without changing the node is impossible.
When the profile can pass completely behind the housing
Terms:
-
the rear plane of the radiator is sufficiently offset from the wall;
-
brackets do not cross the lower strip 0–160 mm;
-
pipes do not pass through in the same volume;
-
there is a possibility to insert a long plank after mounting the battery;
-
the profile does not block maintenance.
The last point is especially important. Even if the baseboard fits geometrically, it cannot be installed in such a way that removing the radiator would require destroying the finish without a pre-made decision.
Installation trajectory is a separate issue
Let's imagine there is 25 mm of free depth behind the radiator. PLT-004 with a thickness of 16 mm fits there.
But a long plank of 2400 or 2600 mm still needs to be inserted into this gap.
If the radiator is already hanging, there may be limitations:
-
on the left is a wall;
-
On the right is a cabinet;
-
pipes do not allow inserting the plank from the side;
-
There is no space above or below for tilting;
-
The long bracket does not pass behind the mounting bracket.
Therefore, not only the final position is checked, but also the installation path.
When you need to temporarily remove the radiator
Sometimes the profile can only be installed behind the appliance after it has been dismantled.
Such a decision cannot be treated as a regular carpentry operation. The radiator is connected to the heating system.
If installing PLT‑004 requires removing or re-hanging the appliance, the work must be assessed by a heating specialist, taking into account:
-
connections;
-
shut-off valves;
-
possibility of shutdown;
-
season;
-
guarantees;
-
need for repeated pressure testing/leak check.
The article does not provide instructions for dismantling the battery.
Compatibility matrix: height 155 mm and depth behind the radiator
To avoid mixing two different geometric tasks, it is useful to separate them in the table.
Vertical check
PLT‑004:
H = 160 mm.
Bottom point of the radiator:
Hr = 155 mm.
The difference:
H − Hr = 5 mm.
In one plane, this is incompatible.
Deep check
PLT‑004:
T = 16 mm.
Let R be the minimum free distance from the wall to the nearest part of the radiator assembly at a height from the floor up to 160 mm.
Then, by pure geometry:
| Free depth R | Comparison with 16 mm | Preliminary conclusion |
| 10 мм | less than the profile by 6 mm | does not pass |
| 14 мм | less by 2 mm | does not pass |
| 16 мм | nominally flush | no real installation clearance |
| 18 мм | +2 mm | only after physical fitting |
| 20 мм | +4 mm | potentially fits, check adhesive/wall/brackets |
| 25 мм | +9 mm | geometry is calmer, but installation trajectory still needs checking |
| 30 мм | +14 mm | sufficient nominal clearance does not rule out local obstacles |
This table does not establish a mounting standard. It only shows that 16 mm is the minimum intrinsic dimension of the profile. The actual assembly requires additional space for the fixing method and base unevenness.
Why 16 mm "exactly" is a poor working scenario
If the free gap is also 16 mm, the profile mathematically coincides with the space.
But on a real wall, there may be:
-
plaster protrusion;
-
glue;
-
local curvature;
-
radiator tilt;
-
fastener head.
Therefore, the 16/16 match cannot be presented as confirmed compatibility.
How to measure R correctly
Do not measure the distance to the back wall of the radiator in only one place.
At a height of 0–160 mm, find the element closest to the wall:
-
lower manifold;
-
bracket;
-
pipe;
-
nut;
-
decorative plug;
-
Fasteners.
The minimum R determines the passage.
Scenario A: the body is low but positioned far out
The bottom of the body is 155 mm.
Free depth to the rear surface is 30 mm.
Brackets above 160 mm, no pipes at the bottom.
In this case, the profile is 5 mm above the radiator at the front, but at the wall it potentially passes behind it.
A physical fitting test of 160 × 16 mm is needed.
Scenario B: the housing is offset, but the bracket is 12 mm from the wall
The radiator itself provides 30 mm, but the lower bracket in the 120 mm zone from the floor leaves only 12 mm.
PLT‑004 does not pass because the bracket becomes an obstacle.
Scenario C: depth is sufficient, but the vertical pipe is located at the wall
There is 25 mm of free space behind the housing.
However, the vertical pipe crosses the baseboard line.
A continuous strip requires:
-
cutout;
-
ends up to the pipe;
-
resumption after it;
-
or another technical solution.
Scenario D: the profile passes, but it cannot be inserted
Depth — 28 mm.
The brackets do not interfere.
But the radiator is located between two side walls, and the long 2600 mm plank cannot be fed from the side.
Then compatibility of the final position does not equal installation feasibility.
Dry fit of PLT‑004 under an already installed radiator
Before purchasing the full volume, it is useful to make one precise mock-up or use a real short profile sample.
What the mock-up should reproduce
Minimum:
-
height of 160 mm;
-
thickness of 16 mm;
-
length of 500–1000 mm.
Full relief is not necessary for the first geometric test, but a real profile is needed to check the ends and appearance.
Stage 1. Check under the housing
The mock-up is placed vertically against the wall.
Check:
-
whether it touches the housing;
-
whether the top edge passes;
-
whether there is any local pinching.
Stage 2. Check the brackets
The template is moved across the width of the radiator.
If it stops at one point, the coordinate is marked.
This makes it clear whether a local break is needed or the entire area is covered.
Stage 3. Checking pipes
Connection areas are examined especially carefully.
If the pipe comes out of the floor, measure the distance from the wall and the width of the free zone around it.
Stage 4. Checking the path of the long plank
A short sample may pass, but a long plank may not.
Therefore, it is separately simulated where the profile will be fed from:
-
from the left;
-
on the right;
-
after temporarily removing furniture;
-
before screen installation.
Stage 5. Service check
Ask the installer:
Is it possible to access connections and remove the radiator without destroying the entire wall after installing PLT-004?
If not, the assembly needs to be reconsidered.
Why it's better to check before painting
If the actual sample is already painted and it turns out a cutout is needed, the finish will have to be restored.
For a complex technical area, it's more correct to:
fitting → marking → cutting → re-fitting → finishing → final installation.
How to make a cutout for a pipe without ruining a high-profile design
Sometimes continuity can be preserved by making a local cutout around the pipe. But PLT-004 is a profiled element 160 mm high, so the cutout must be part of the carpentry project.
First, determine the shape of the pipe
Need to know:
-
outer diameter;
-
the distance of the axis from the wall;
-
the height of the outlet;
-
the presence of a fitting;
-
the possibility of removing the decorative cover.
The cutout must not clamp the pipe
The baseboard must not act as a rigid clamp for the utility line.
The size of the technical gap should be determined by the installer, taking into account the pipe and the finish. The article does not prescribe a universal number.
Where is it better to place the cutout
If possible, it is placed in a less complex part of the relief.
But the pipe assembly already exists, so often there is no choice.
Then the craftsman assesses:
-
whether the shape can be carefully replicated;
-
how to finish the edge;
-
what to cover the gap with;
-
whether it is better to end the profile before the pipe.
Cutout in MDF
A fresh edge requires:
-
sanding;
-
priming;
-
final painting.
Cutout on the veneered version
Risk is higher:
-
veneer can chip;
-
expose the MDF core;
-
get a noticeable edge.
Therefore, for a pipe, a return or separate termination is often neater than a complex shaped cutout.
What to do if PLT‑004 only partially passes behind the radiator
For example, along the radiator width:
-
first 500 mm — freely;
-
central bracket obstructs an 80 mm section;
-
then again freely.
There are several solutions.
Gap only in the bracket area
Technically possible, but creates two additional ends in an almost invisible area.
If the radiator covers this section, the solution may be acceptable.
Local cutout for the bracket
Possible only after checking the mounting shape and serviceability.
Full break across the radiator width
Sometimes it is easier to end the profile before the radiator and resume after it than to make several small cutouts.
This is especially rational if the radiator almost completely hides the lower wall.
Decorative screen as a boundary
If a screen is already provided, the baseboard can be extended to its side panels.
Then, instead of a random break, an architectural finish appears.
How to choose between four solutions
Compare:
-
visibility of the joint;
-
number of ends;
-
complexity of carpentry work;
-
access to heating;
-
cost;
-
repeatability on other radiators.
Do not choose the most complex option just for the sake of absolute profile continuity.
When it is better to run the tall baseboard PLT-004 continuously under the radiator
A continuous line is the cleanest architectural result. A high baseboard of 160 mm is especially noticeable around the room's perimeter, so a gap under the radiator is more visible than with a low profile of 60–80 mm.
A continuous solution is rational if all conditions are met:
-
the profile fits against the wall;
-
installation is physically possible;
-
pipes do not require rough cutouts;
-
brackets do not conflict;
-
the radiator can be serviced;
-
the PLT‑004 line does not interfere with the decorative screen;
-
the installer confirms wall mounting.
Why continuity is visually important specifically for 160 mm
A tall baseboard works as an architectural belt.
If it runs along the entire room and suddenly disappears for 1000–1500 mm under the radiator, the eye reads a technical gap.
This is not always bad. But the gap should be designed, not happen by accident.
When the radiator covers most of the gap
If the lower zone is barely visible from the usual viewpoint, the interruption can be visually acceptable.
But this is checked from eye level:
-
standing;
-
sitting;
-
from the entrance to the room;
-
from the side of the main furniture.
You cannot rely only on close-up photos.
If the baseboard runs behind the radiator but is partially visible
Then the even top line is especially important.
PLT-004 with a height of 160 mm must:
-
maintain one level;
-
not "sink" under the radiator;
-
not change height due to a local cutout;
-
not pull away from the wall.
If a cutout for a pipe is needed, it is placed so that the top architectural line of the profile is preserved, if technologically possible.
Continuous profile and decorative screen
If a screen is planned, there are two basic options:
The baseboard runs behind the screen.
Then the screen is in front of it and does not interrupt the line.
The screen starts from the floor and covers the skirting board area.
Then it makes sense to run PLT-004 up to the side of the screen and finish it there.
Both solutions can be correct. The mistake is to choose the screen after installing the skirting board and discover a size conflict.
When the PLT-004 baseboard has to be ended before pipes or a radiator
If a continuous pass is not confirmed, the profile does not need to be forced in at any cost. The tall PLT-004 can be ended before the technical zone and continued after it.
For an expressive profile, it is important how exactly the ending is executed.
Option 1. Finish before a vertical pipe
The plank approaches the pipe with a pre-set gap.
Advantages:
-
no need to cut out a complex semicircular shape;
-
the pipe remains serviceable;
-
the end can be finished neatly.
Cons:
-
a visible gap appears.
Option 2. Resume the baseboard after the pipe
Then the technical zone reads as a local gap.
Critical:
-
keep one level in height;
-
finish both ends identically;
-
check that the insert between the pipe and the corner is not too short.
Option 3. Bring the profile to the side of the box
If the pipes are enclosed in a box, PLT‑004 can end on its vertical plane.
This way, the end does not "hang in the air" but gets an architectural junction.
Option 4. Make a profile return
An end return is a short extension of the profile that covers its cross-section and leads the relief toward the wall.
This is especially useful for PLT‑004, because the 160 mm height makes the open cut noticeable.
But the exact shape of the return depends on the relief. Not every profile allows for a neat small return without trial carpentry work.
Option 5. Finish at the side of the screen
If the radiator screen has a full side wall, the baseboard can be brought up to it.
Then the trim is perceived as a unified system:
plinth → screen → radiator zone.
Why you can't just leave a cross-cut
The combined PLT‑004 visible end may show:
-
MDF;
-
veneer;
-
the wood part;
-
construction layers.
On the MDF version, the unfinished end also looks technical.
Therefore, any visible end must be:
-
sanded;
-
primed/painted or finished according to the material system;
-
protected;
-
Agreed in form.
How to finish the end of a tall baseboard 160 mm near a radiator
A height of 160 mm makes the end large. It is no longer a small point at the bottom of the wall, but a noticeable vertical surface.
End return
If the relief allows, the profile is turned toward the wall with the short piece.
Advantages:
-
the internal cross-section is hidden;
-
the relief gets a finished look;
-
the line looks like an intentional ending.
Disadvantages:
-
a precise cut is needed;
-
additional material is consumed;
-
the small piece can be difficult to manufacture.
Direct painted edge
For MDF under enamel, this can be rational.
Edge:
-
prepared;
-
primed;
-
sand;
-
painted in the same color.
But a well-executed direct edge should be designed in advance, not be the result of accidental trimming.
Edge of the combined version
For beech/oak PLT-004, the structure is non-uniform.
If the edge is open, you need to understand what a person sees.
For a project preserving the wood character, it is often better:
-
return;
-
connection to the box;
-
decorative side panel;
-
hidden ending.
Why the end needs to be agreed upon before calculating the quantity
Each return requires additional length.
If there are several radiators in the room and each has two ends, the number of small parts already affects the cutting layout.
For example:
-
2 radiators;
-
2 ends each;
-
4 returns.
Even if each return is short, they require a quality profile section and allowance for miter cuts.
Identical endings throughout the room
If the baseboard is interrupted in several technical zones, use one system:
-
either returns;
-
either straight ends;
-
or abutment to boxes.
Random mixing looks like on-site repair.
Wood or MDF baseboard near a radiator: what matters specifically for PLT‑004
No general debate is needed here about "which is better — MDF or wood." What matters is understanding the specific PLT‑004 configurations and the consequences for the technical junction.
PLT‑004 made of MDF
Size:
160 × 16 × 2600 mm.
Advantages for the radiator zone:
-
long plank;
-
easy to paint in the wall color;
-
a homogeneous material is easier to process on the visible end than a combined profile.
Limitation:
-
any cutouts and ends require proper preparation and protection.
If MDF is specifically needed, you can separately buy MDF skirting board after comparing profiles.
PLT-004 with beech
Size:
160 × 16 × 2400 mm.
Construction:
beech / MDF / beech veneer.
This is not a solid beech plank.
For the radiator, the following are especially important:
-
careful treatment of the open end;
-
preservation of the veneered surface;
-
identical finish of all parts.
PLT-004 with oak
Size:
160 × 16 × 2400 mm.
Construction:
oak / MDF / oak veneer.
The same requirements apply to visible ends.
If the room has oak doors or furniture, the wood surface of PLT-004 can tie the interior together. But it should not be chosen solely for the word "oak" without checking the technical unit under the radiator.
Why the material does not resolve the 155/160 conflict
All versions have a height of 160 mm.
Switching from MDF to oak or beech does not reduce the height.
If the problem is specifically in the vertical passage, the material does not help.
Why length affects cutting after interruptions
MDF:
2600 mm.
Combined versions:
2400 mm.
If the plinth is interrupted at radiators, short segments may allow more efficient use of leftovers.
Therefore, after approving the junction scheme, the quantity is calculated separately for the selected material.
Is it worth changing the radiator height for PLT‑004
This is a good question, because sometimes the interior is built around a continuous tall baseboard. But the heating device is an engineering system, and it cannot be moved just at the carpenter's request.
Scenario 1. The radiator can still be re-hung before the renovation is completed
if:
-
the system is not running;
-
the walls are not finished yet;
-
heating specialist confirms the change;
-
new marks correspond to the radiator instructions,
two projects can be compared:
A. keep the current radiator and stop PLT-004;
B. change the radiator position and run the profile continuously.
The decision is made based on cost, timeline, and design.
Scenario 2. Radiator connected, repair completed
In this case, for the sake of a single baseboard, it is usually more rational to first design a decorative transition around the existing unit.
Relocation may affect:
-
pipes;
-
wall finishing;
-
brackets;
-
seal integrity;
-
painting;
-
warranty.
The article does not claim that relocation "should never be done." It prioritizes engineering rework after checking simpler decorative solutions.
Scenario 3. Multiple radiators in the room
You cannot rehang one unit without checking the others.
Let's imagine:
-
radiator #1 — 155 mm;
-
radiator No. 2 — 172 mm;
-
radiator No. 3 — 148 mm.
PLT‑004 160 mm:
-
No. 2 potentially fits by height;
-
at #1 conflicts by 5 mm along the frontal plane;
-
at #3 — by 12 mm.
If only one unit is solved, the room line will still remain different.
Scenario 4. One radiator hidden by furniture
If the technical zone is closed by fixed furniture and the baseboard is not visible there, continuity may be less important.
But the furniture must be part of the final design, not a temporary justification.
One radiator lower than the others: can PLT‑004 be left only on open walls
If a room has multiple technical zones, you cannot look at only one radiator. A high baseboard creates a line around the entire perimeter, so the room map must be complete.
First, mark:
-
doors;
-
cabinets;
-
built-in furniture;
-
radiator #1;
-
radiator No. 2;
-
pipes;
-
niches;
-
window slopes;
-
ducts;
-
areas where the baseboard is completely hidden.
Scenario: one low radiator on a long wall
Suppose the wall is 5000 mm.
The radiator occupies the central zone of 1200 mm.
If PLT-004 does not pass behind it, the visible line splits into two sections:
-
left — 1900 mm;
-
technical zone — 1200 mm;
-
right — 1900 mm.
Such a symmetrical gap can look neat if the ends of the baseboard are finished identically.
Scenario: radiator shifted toward the corner
Wall 5000 mm.
To the radiator on the left — 600 mm.
After it — 3200 mm.
If the tall profile breaks off 600 mm from the corner, the short section may look random. Then it is useful to check another option:
-
bring the baseboard to the side of the screen;
-
combine the radiator zone with furniture;
-
use a continuous lower profile on this wall;
-
reconsider the baseboard height throughout the room.
Why can't PLT-004 be left only where it "works out"
For example:
-
one wall — high profile;
-
under the window — nothing;
-
near the door — a different baseboard;
-
on the adjacent wall again PLT-004.
Such a solution may look fragmented.
If PLT-004 is not used around the entire perimeter, the boundaries must align with clear architectural features:
-
doorway;
-
built-in wardrobe;
-
decorative box;
-
wall protrusion;
-
another deliberate transition.
Perimeter map before purchasing
It is convenient to divide the room into segments:
| Section | Length | Does PLT-004 pass through? | End type |
|
Wall A up to the radiator
For MDF 2600, both sections can be obtained from two separate planks with large leftovers.
For 2400 — also from two. But the remnants are different, and they can be used on other walls. Therefore, the quantity is calculated not by the total perimeter, but by the segment map after resolving all technical zones. Why you shouldn't choose a material just for a more convenient length 200 mm of extra MDF length is useful for cutting, but the material and finish must match the interior. If you need the woody character of the veneered version, switching to MDF just for one successful joint is worth it only after comparing the entire project. Where is the best place to place the joint If a continuous wall is longer than one plank, the joint is tried to be moved:
Thus, the battery technical unit does not receive two visual accents at once — the ending and the joint.
Mistakes when buying a tall baseboard after radiator installationMistake 1. Seeing 155 mm and immediately rejecting PLT‑004 Reason: only heights are compared. Consequence: the buyer rejects the profile, even though there might have been enough depth behind the radiator. Prevention: side cut and a 160 × 16 mm template. Mistake 2. Seeing a thickness of 16 mm and deciding the profile will definitely fit Reason: brackets, adhesive, and installation path are not taken into account. Consequence: the strip physically cannot be inserted behind the battery. Prevention: check the final position and installation path. Error 3. Measure only the radiator body The lowest point may belong to the bracket or pipe. Error 4. Forget the supply and return pipes The profile passes behind the battery but stops at the pipe. Error 5. Buying the entire volume before checking one unit One problematic battery changes the layout of the entire room. Error 6. Treating beech and oak versions as solid wood This creates incorrect expectations for edges and finishing. Error 7. Not designing the visible end The tall 160-mm end is left as a simple cross-cut. This is noticeable on the finished interior. Mistake 8. Making a cutout for the pipe without considering the relief If the cutout falls into a complex decorative area, the profile may lose its neatness. Mistake 9. Re-hanging the radiator without a specialist The radiator is part of the heating system. Changes to mounting and connection should be assessed by a qualified contractor. Mistake 10. Assuming all radiators in the room are the same One hangs at 172 mm, another at 148 mm. The buyer only checks the first one. Error 11. Calculate the quantity only along the room perimeter Not included:
Error 12. Paint first, then change the layout Any new cut opens a fresh end. Error 13. Installing baseboard flush against a technical element without maintenance access A beautiful joint should not block access to fittings and fasteners. Error 14. Hiding a conflict with a screen that hasn't been designed yet The screen also has thickness, side panels, and mounting. Error 15. Choosing PLT-004 based only on a photo A height of 160 mm in the catalog appears smaller than on a real wall. Before purchasing, draw a 160 mm line along the room and apply the volumetric mock-up. When it is better not to buy PLT-004 for an already finished radiator zoneA high profile should not become a mandatory element at any cost. There are situations where refusing a specific PLT-004 is a better solution than complex modification. The radiator overlaps the profile in both height and depth simultaneously if:
a continuous PLT-004 physically does not fit. Trying to cut out almost the entire upper part of the profile under the battery is pointless: the architectural pattern will be destroyed. For installation, the heating system needs to be completely redone, and the baseboard is not the central part of the interior If moving the radiator requires:
and the tall profile is chosen only as one of the decor options, it is more rational to compare a lower baseboard. In the technical zone, there are too many small cutouts For example:
If several sections shorter than a meter have to be cut from PLT-004, the relief turns into a set of fragments. Then a neat interruption up to the radiator may look better. Visible ends of the combined version cannot be finished properly on site. If the project chooses the option with oak or beech veneer, and the installer is not ready to perform:
it is better to resolve the joint before purchase rather than experiment on an expensive plank. The room already has many low technical obstacles. If PLT-004 has to be interrupted:
a high continuous band does not actually form. Then a different baseboard height can give a more cohesive interior. The baseboard conflicts with furniture more than with the radiator Height 160 mm and thickness 16 mm can interfere:
If there are many technical conflicts, PLT-004 should be evaluated across the entire room, not just at the radiator. When a lower profile is better If the main goal is to neatly cover the joint between the floor and the wall, rather than to create a prominent classical architectural line, a lower profile:
In this case, switching to a different category and choosing another baseboard is not a compromise, but a proper design decision. How to accept PLT-004 after delivery before cutting and paintingEven after correct calculation, you cannot immediately cut the entire order. Verify the execution Check:
Lay out the planks Before cutting, it is useful to distribute:
So good long planks won't go to short trims. Apply one strip or mockup to the problematic radiator again Between measurement and delivery, the following may have appeared:
A final fitting is cheaper than rework. Do not paint the entire batch until all ends are confirmed If one radiator requires an unexpected return, some parts will need to be reworked. First the final map, then the finish.
What to send to the manager before ordering PLT‑004A good request should include product parameters and information about the problematic radiator. What to specify
Ready-made wording "We plan to order a high PLT-004 160 × 16 mm. The radiator is already installed; the minimum bottom mark is 155 mm from the finished floor. We ask to confirm the current product versions and recommendations for finishing the visible end. The installer separately checks the possibility of passing a 16 mm thick profile behind the appliance. The required quantity is ___ strips according to the attached area map." If a wood surface is required: "We ask to confirm the design of the selected PLT-004 version and the appropriate finish system for open ends/returns." Why the manager does not need to ask the question "can it be done under my radiator" Without the object's dimensions, the seller cannot honestly confirm spatial compatibility. The best format:
After checking, you can order high skirting board PLT-004. Where to buy wooden skirting and PLT-004 after checking radiatorsIf PLT-004 passes and the technical zone scheme is approved, a specific model and quantity are specified. If 160 mm creates too many conflicts, it is better to return to the category and buy a wooden baseboard a lower height than to trim a high profile across the entire room. When PLT-004 can already be purchased Checked:
When the order needs to be stopped At least one of the critical conditions is not confirmed:
Thematic internal link For a more general overview of engineering zones, you can view the material how to design a skirting board near a radiator. The new article does not duplicate it: here a specific PLT‑004 and the 155/160 mm conflict are considered. Installation and delivery Before starting work, it's useful to double-check Advice on finishing and installation and current payment and delivery terms. Final decision tree for the radiator at a height of 155 mmStep 1. Is the lowest point really 155 mm?
Step 2. Is this point directly against the wall?
Step 3. Is there space behind the radiator for a 16 mm thick profile with mounting?
Step 4. Do the brackets and pipes not cross the 0–160 mm strip?
Step 5. Can the long plank be physically installed after the battery is mounted?
Step 6. Is radiator maintenance preserved?
Step 7. If the profile is interrupted, are the ends designed?
Step 8. Have all radiators in the room been checked?
FAQWhat is the height of PLT-004? 160 mm. What is the thickness of PLT-004? 16 mm. Will PLT‑004 fit under a radiator at a height of 155 mm? If the radiator and the baseboard are in the same vertical plane, no: the profile is 5 mm higher than the free space. But it can pass behind the radiator against the wall if the actual depth is sufficient and there is no conflict with brackets and pipes. Can the baseboard be run behind the radiator? This option can be considered if there is actually room behind the unit for a profile 16 mm thick and installation is possible after the radiator is mounted. Can the tall baseboard be interrupted near a pipe? Yes. But both visible ends need to be designed and finished, especially for composite wood versions. How to finish the open end of PLT-004? A straight prepared end, end return, or connection to a box/screen are possible. The choice depends on the material and relief. What is the length of PLT-004 made of MDF? 2600 mm. What is the length of the PLT-004 version with oak veneer? 2400 mm. Is the oak PLT-004 solid wood? No. The oak version has a combined construction with MDF, oak veneer, and a wood part. Do I need to remove the radiator to install the baseboard? Not necessarily. First, check if the profile can be inserted behind the already installed appliance. If dismantling is truly required, it is assessed by a heating specialist. How to calculate the quantity if the battery interferes with a continuous strip? Only the actual installation areas are summed up, end pieces are added, and then a cutting map is created based on 2600 or 2400 mm strips. Can the top of PLT-004 be trimmed by 5 mm under the radiator? Such a longitudinal modification cannot be considered a standard solution. It will change the profile and the visible top line. It is better to first check the clearance behind the radiator or design the ending. Is it possible to install a lower baseboard only under the battery? Technically possible, but visually there will be a height transition. Such a solution needs to be designed, not done randomly. What to do if one radiator hangs higher and another lower? Check each one and make a general map of the perimeter. You cannot calculate the purchase based on one unit. What is more important: 155 mm in height or the gap behind the radiator? Both parameters answer different questions. 155 mm shows a frontal vertical conflict; the gap behind the battery determines the ability to pass with the profile in another plane. Where to buy PLT-004 and compare it with lower baseboards? The specific PLT-004 is in the product card; alternatives are in the STAVROS baseboard category. Brief conclusionWith a radiator bottom mark of 155 mm, the tall PLT-004 at 160 mm has a 5 mm frontal conflict. If the battery, bracket, or pipe is directly in the plane of the profile, it cannot be continuously run under the obstacle. But this does not automatically mean rejecting PLT-004. The profile is 16 mm thick and can pass behind the radiator if the actual gap from the wall, brackets, pipes, and installation path allow it. If the passage is not confirmed, there is no need to change the heating or cut expensive profile 'on site' without a project. Rational options are to end PLT-004 before the technical zone, resume after it, make end returns, or connect the skirting board to a decorative box/screen. After checking all radiators in the room, cutting map, and finishing, you can place the full order. In this situation, the correct purchase starts not with the linear footage, but with one 160 × 16 mm unit under the already installed battery. |