Article Contents:
- Slat panel PAN-003 1000×11×2670 mm: which version are we considering
- PAN-003 made of MDF, 2670 mm long
- Wooden PAN-003 made of beech, 2400 mm
- Oak slat panel PAN-003, 2400 mm
- Short PAN-003 950 mm — a separate format, not an automatic replacement for the long one
- Why the thickness of a specific modification matters for the radiator unit
- Measure the distance from the wall to the nearest part of the appliance
- Measure brackets separately
- Check pipelines and shut-off valves
- Account for 11 mm PAN-003 only as a geometric change
- Why can't you independently assign the minimum allowable residual gap
- PAN-003 runs as a continuous field behind the radiator
- Behind the radiator remains a painted wall
- The slat field ends architecturally before the heating appliance zone
- The panel is sold as a module with a width of 1000 mm
- Invisible area does not always reduce the number of source panels
- One module can provide parts above and below the radiator
- The remainder of one PAN-003 can move to the adjacent segment
- Count the quantity according to the cutting layout
- Scheme A: continuous slat field
- Scheme B: slat segments around the radiator
- Scheme C: separate slat field 3000 mm wide
- What the example shows
- Draw vertical module boundaries every 1000 mm
- Apply the device to the layout
- Apply the pipes
- Determine the working full strips
- Only after this, select the number PAN-003
- Pipe inside the slat field
- Pipe in the smooth zone
- What will happen during future dismantling
- Why the pipe contour should be transferred to the template before ordering
- When a solid field really requires approval for dismantling
- Material cost and cost of additional work are different budgets
- Why the decision must be confirmed by the heating installer
- When it is easier to change the architecture of a slat wall
- Really check the 11 mm thickness
- Bring it to the junction point
- Check the shadow
- Compare oak, beech, and MDF next to the device
- See the actual rhythm
- PAN-003 made of MDF and a smooth wall of the same color
- Why the relief remains even if the color is the same
- Where to make the boundary
- Why a narrow random strip looks worse than a deliberate field
- Oak and painted wall
- Beech and painted wall
- Expand the smooth field or make a minimal cutout
- Why the natural pattern cannot be 'painted on' with paint
- Bottom line of the windowsill
- Side slopes
- Why the radiator cannot be considered separately from the entire window unit
- The plinth runs as a continuous line
- The plinth is interrupted at the pipe
- How to design the area behind the radiator
- Plinth material and PAN-003
- If the number of whole modules decreases
- If the number remains the same, but a useful remainder appears
- When there is no material savings at all
- Why you should count pieces, not just square meters
- When a short SKU helps
- When it creates an extra horizontal joint
- Why you cannot automatically replace a long panel with a short one
- Length 950 mm and cutting around the radiator
- Access to the base
- Panel clamp
- Mechanical fixation
- Painting and finish
- Engineering unit service
- Error 1: Subtract the radiator area and order that much less material
- Error 2: Accept the conditional residual gap as a technical standard
- Error 3: Not marking brackets on the drawing
- Error 4: Considering only the radiator, forgetting about the pipes
- Error 5: Making the smooth zone strictly along the battery silhouette
- Error 6: Buying short PAN-003 for each small fragment
- Error 7. Not accounting for the baseboard
- Error 8. Ordering material before deciding on radiator removal
- Side wall niche
- Slope or niche
- Furniture fragment
- Repair reserve
- Can PAN-003 be installed behind a radiator?
- What is the thickness of PAN-003 2670 mm?
- Do all PAN-003 models currently have a thickness of 11 mm?
- Do I need to remove the radiator before installing PAN-003?
- Can the wall behind the radiator be left without a slat panel?
- How to calculate PAN-003 if the area behind the radiator is excluded?
- Do I need to subtract the radiator area from the wall area?
- Can I use the remaining panel above or below the radiator?
- What sizes of PAN-003 are currently available?
- What should I choose — PAN-003 MDF, beech, or oak?
- What is the OPAN-003 sample for?
- How to finish the pipes on a slat wall?
- Which baseboard should I install with PAN-003?
- How many PAN-003 panels should I order for the wall?
- Where to buy slat wall panels?
- How can I check the current price of PAN-003?
- What should I do if the radiator overlaps the boundary between two panels?
- What should I do if only a few centimeters of the wall are visible behind the radiator?
- Can the smooth field be made wider than the radiator?
- Does it make sense to buy an extra PAN-003 as a spare?
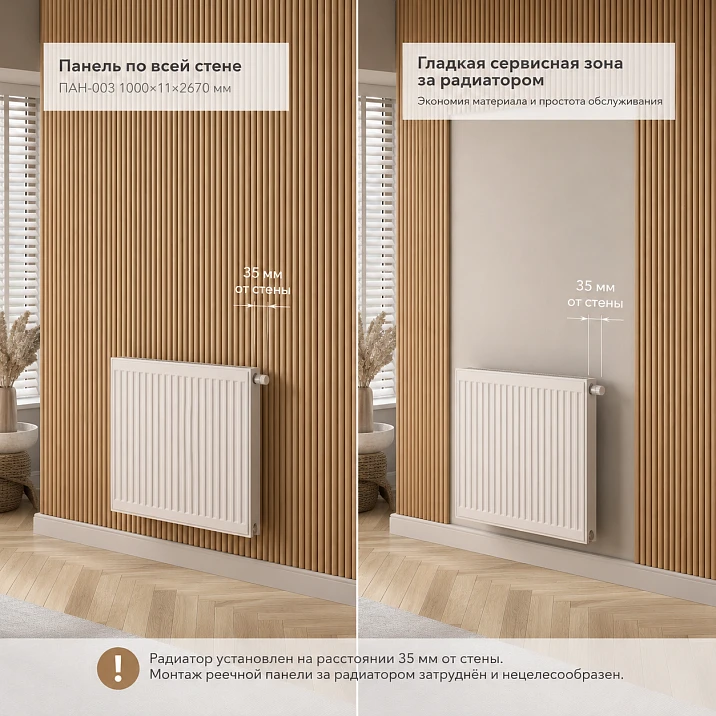
The radiator is already hanging on the wall, the pipes are connected, the finishing of the room is almost complete, and the decision to install a slat wall was made only now. In this situation, the main question is not whether PAN-003 will look good in the interior. First, you need to understand whether the panel should extend behind the heating appliance at all. Only after that does it make sense to calculate the quantity and place the order.
If the distance from the existing wall plane to the nearest part of the radiator is currently, say, 35 mm, installing a finishing layer with a thickness of 11 mm will geometrically reduce this distance. However, one cannot automatically conclude from such a calculation that the remaining space is sufficient or insufficient. Permissible distances, installation requirements, and conditions for normal operation are determined by the documentation of the specific heating appliance, its mounting scheme, and the actual connection point. Therefore, 35 mm in this article is not a standard, but an initial condition of a specific customer scenario.
The practical solution usually comes down to one of three schemes. The first is that PAN-003 runs as a continuous decorative field, including behind the radiator. The second is that a painted smooth wall remains behind the appliance, and the slat finish approaches this area from above, below, and on the sides. The third is that the radiator is included in a larger smooth architectural field so that the transition looks intentional rather than like a random cutout. Which option is more advantageous is determined not by the area of the wall covered by the radiator, but by the cutting layout of full-size panels.
This is where the mistake most often occurs: a person sees a radiator with an area of, for example, about half a square meter and decides to subtract this area from the total wall area. For PAN-003, this method can lead to an incorrect order. The panel is a specific module with a width of 1000 mm and a certain length. Savings can only be achieved when changing the scheme actually reduces the number of original modules or allows the use of offcuts in other areas of the wall.
If, after taking measurements and checking the radiator documentation, it becomes clear that the chosen scheme is compatible with the appliance, you can Buy PAN-003 slatted panel already based on the working specification, not on approximate area. For a wall with an installed radiator, this is a fundamental difference: first the connection point and cutting layout, then the quantity, and only then the cart.
Slat panel PAN-003 1000×11×2670 mm: which version are we considering
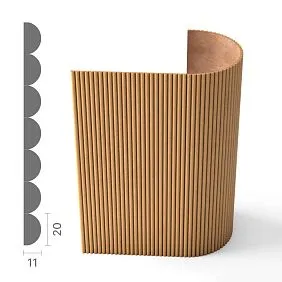
PAN-003 — slatted panel on fabric base. According to the current manufacturer's card at the time of re-check, several full-size versions are available. For the scenario under consideration, the main option is MDF 1000×11×2670 mm: the length of 2670 mm is convenient for vertical wall finishing of a height of about 2.6 m, because the panel can be trimmed on site by height without forming a mandatory horizontal joint.
The current PAN-003 card shows the following main options:
| Material | Size, mm | Practical scenario |
|---|---|---|
| MDF | 1000×11×950 | local fields, furniture and interior fragments, areas of small height |
| Beech | 1000×11×950 | short decorative areas with natural wood |
| Oak | 1000×11×950 | local decorative areas with pronounced oak texture |
| MDF | 1000×11×2670 | vertical wall finishing almost to the full height of a typical room |
| Beech | 1000×11×2400 | full-size wooden fields, if the length of 2400 mm matches the project |
| Oak | 1000×11×2400 | full-size oak fields with natural texture |
At the time of check, all versions listed in the current card have a thickness of 11 mm. Before payment, you should still re-open the card: the assortment, availability, and set of versions may change, and the working specification must correspond to the specific supplied item.




PAN-003 made of MDF, 2670 mm long
For a wall 2600 mm high, the MDF panel 2670 mm is interesting primarily because its original length exceeds the wall height by 70 mm. These 70 mm cannot be considered "standard waste" in advance: the actual allowance depends on the geometry of the ceiling and floor, the joining method, baseboard, gaps, and actual dimensions after finishing. But in basic geometry, the 2670 mm length allows designing a solid vertical piece without horizontal assembly from two panels.
MDF is also convenient when the slatted surface needs to be painted in a specified color. The manufacturer specifies for PAN-003 MDF versions for painting and provides recommendations for preliminary priming. For the buyer, this means that the choice of layout around the radiator is related not only to the number of panels but also to the sequence of finishing. If part of the wall behind the appliance remains smooth, it must be decided in advance whether it will be painted in exactly the same color as PAN-003 or become an independent background.
Our factory also produces:


Wooden PAN-003 made of beech 2400 mm
Beech is chosen not as a "replacement for MDF" but as a different decorative solution. Here, the natural wood grain is visible, and therefore the boundary between the panel and the smooth painted area is perceived more strongly. If a plain wall remains behind the radiator, its width and position should be designed as an independent compositional insert. A narrow arbitrary strip that appears only because the installer found it inconvenient to bring the slats to the bracket will be perceived differently than a pre-defined smooth field.
The 2400 mm length also means a different cutting layout on a 2600 mm high wall. The MDF 2670 mm calculation cannot be transferred to beech or oak PAN-003 2400 mm without verification: either a different height of the decorative field will be required, or a different top/bottom junction, or a different design approach. The fact that the profile is externally the same does not make the formats interchangeable in terms of cutting.
Get Consultation
Oak slatted panel PAN-003 2400 mm
Oak has a more pronounced natural texture. In the radiator area, this is especially noticeable because the open smooth insert will contrast not only in relief but also in material. If the interior is based on natural oak, the designer usually resolves the boundary issue deliberately: either the wooden field ends before the heating unit, or the radiator is included in a smooth architectural niche, or a more complex continuous solution is implemented after checking technical feasibility.
The cost of a mistake with natural wood is higher not because any cutout is unacceptable, but because an extra module and an inconvenient remainder are harder to justify. Therefore, wooden versions are especially important to calculate by whole panels and a parts map.
Short PAN-003 950 mm is a separate format, not an automatic replacement for the long one
The short PAN-003 can be useful if the slatted section near the radiator has a height less than 950 mm or if the project has independent horizontal boundaries. But replacing a long panel with a short one just because "nothing is visible behind the radiator anyway" cannot be done without layout marking. A short module can create a horizontal joint that may turn out to be more noticeable than the material savings itself.
For example, if a section 1750 mm high remains above the radiator, one panel 950 mm long does not cover it. This means a second element or another solution will be required. If the lower section is only 180 mm, buying a separate short module just for it may be less rational than taking the needed piece from the remainder of a long panel.
Why the thickness of a specific modification is important for a radiator unit
In the version under consideration, the thickness of PAN-003 is 11 mm. This value is part of the unit's geometry: after the finishing layer is applied, the free space between the previous wall plane and the radiator will decrease. But the figure of 11 mm by itself does not answer the question of whether installation is permissible.
The entire chain needs to be checked: the initial gap, the bracket protrusion, the shape of the device body, the position of pipes, shut-off valves, the possibility of maintenance, and the radiator manufacturer's requirements. You cannot take 35 mm, subtract 11 mm, and declare the resulting 24 mm as the "norm." That is just a geometric remainder in a conditional example.
Slat panel behind the radiator: first check the existing gap, not the beauty of the wall
When the radiator is already installed, decorative finishing becomes a secondary layer relative to the finished engineering unit. This changes the order of actions. During a new renovation, you can first coordinate the final wall thickness, then select brackets and the device position. Here it is the opposite: the device is already fixed, so the new finishing must fit into the existing configuration, or the configuration will have to be officially revised with whoever is responsible for the heating.
Measure the distance from the wall to the nearest part of the device
A single measurement at the center of the battery is not enough. The body may have protrusions, fins, mounting elements, or may not be perfectly parallel to the wall. Therefore, it is useful to take several actual dimensions: on the left, right, top, and bottom. If the values differ, the layout should be based on the actual geometry of the unit, not the average number.
It is better to record the measurement on a wall elevation drawing. There, the radiator dimensions, height from the floor, distance to the windowsill, and side offsets are also noted. Such a drawing is needed not for a "beautiful design project," but to answer a practical question: where the boundary of PAN-003 can pass and what parts can actually be cut from the original module.
Measure the brackets separately
The bracket may be closer to the wall than the radiator body itself. If you visually focus only on the front part of the device, you may not notice that it is the mounting hardware that first conflicts with the additional 11 mm of finishing. For a solid PAN-003 field, this is critical: the panel must physically fit in the mounting area, or the installation scheme must be changed by a specialist.
You should not loosen the fasteners yourself, extend them, insert random spacers, or move the radiator for the sake of a decorative panel. If the chosen solution requires changing the mounting of the heating device, that is already a separate engineering task.
Check the pipelines and shut-off valves
The layout must show not only the radiator body, but also pipes, fittings, valves, thermostatic elements, and other accessible parts of the assembly. The reason is simple: you can neatly finish the slat field along the radiator rectangle, but then discover that the pipe extends another 80–120 mm to the side and requires a separate cutout.
The scenario is especially inconvenient when the boundary of the decorative field ends up a few millimeters from the pipe. This creates a narrow fragment that is difficult to finish neatly and looks visually random. Sometimes it is better to extend the smooth area over the entire connection zone than to try to trace each pipe with a separate complex contour.
Consider the 11 mm of PAN-003 only as a geometric change
If the original gap is conditionally 35 mm, the plane of the decorative surface after panel installation shifts by approximately the panel thickness and the mounting layer. Considering only the nominal 11 mm is also insufficient: adhesive, base unevenness, primer, leveling layers, and the actual fixing method affect the final plane.
Therefore, the correct wording is not "24 mm will remain," but "the finished wall plane will move closer to the radiator; the final distance must be determined based on the actual installation build-up and verified against the device documentation." This wording protects against the main mistake—turning conditional arithmetic into a technical standard.
Why you cannot independently set a minimum allowable residual gap
Radiators differ in design, mounting method, convection requirements, and maintenance. Without the brand and model, it is impossible to reliably specify a single number suitable for all devices. Even if average recommendations are found online, they do not replace the instructions for a specific product.
For the PAN-003 buyer, the practical takeaway is simple: if a solid panel reduces the existing clearance, first find the radiator's datasheet or exact model, then confirm the feasibility of the chosen finish with the installer. If this cannot be done, it is safer to design a smooth service zone and not purchase material behind the appliance until clarified.
Buy slat panels for the entire wall or exclude the area behind the radiator
Once the technical feasibility is verified, the actual selection of the finishing scheme begins. Here you can already compare material consumption, installation complexity, maintenance convenience, and appearance. If you are just placing an order and want buy slatted panels, first choose one of the three schemes on the layout, not in the cart.
| Scheme | Material consumption | Installation | Access to the unit | Visual Result |
|---|---|---|---|---|
| Solid PAN-003 behind the radiator | Usually higher | More difficult | Depends on the design | maximally continuous rhythm |
| Smooth wall directly behind the radiator | may be lower, but not always | Simpler | usually more convenient | a neat transition contour is needed |
| A separate smooth architectural field | depends on the field width and layout | more predictable | convenient access with a proper scheme | the transition looks intentional |
PAN-003 runs as a continuous field behind the radiator
This scheme gives the most cohesive slat wall. The vertical rhythm is not interrupted, and the radiator is visually perceived as an object in front of an already finished decorative surface. But it is this scheme that imposes maximum compatibility requirements.
It is necessary to check whether the actual finish thickness fits in the bracket area, whether it interferes with the pipes, whether the required configuration of the appliance is maintained, and whether the panel mounting can be done properly. In addition, installation behind an already installed radiator may require temporary access that is physically impossible without removing the appliance. If the radiator cannot be safely and legally dismantled by the finishers, a continuous field may prove unjustifiably complex.
Behind the radiator, the painted wall remains
This is not necessarily a "simplified" option. With proper layout, the smooth zone can be technically and visually stronger. It eliminates the need to extend the relief behind the mounts, simplifies access to the pipes, and allows the existing heating unit to be preserved without intervention.
The weak point of this scheme is the random contour. If PAN-003 is cut exactly along the radiator silhouette with minimal offsets, pieces of painted wall of varying widths may become noticeable when viewed from the side. If the smooth zone is made wider and linked to the window, windowsill, or vertical axis, it is perceived as part of the composition.
The slat field ends architecturally before the heating appliance zone
The third scheme is useful when the radiator is located at the edge of the wall, near a window, slope, furniture, or curtain assembly. Instead of a complex bypass, PAN-003 can be ended along a straight vertical line, leaving the entire window-radiator area smooth.
In this case, the savings are determined by the width of the finished slat field. For example, if the wall is 4200 mm and the slat field ends at the 3000 mm mark, theoretically three panels of 1000 mm width may be sufficient instead of five to cover the entire wall. But such a reduction is only possible if the design boundary coincides with the modular layout. If the field ends at 3180 mm, it will be necessary to decide which module to take the remaining 180 mm from and how to use the remainder.
How many PAN-003 to buy: the radiator area cannot simply be subtracted from the wall area
This is the main calculation section. For modular material, the area is useful as a control value, but not as the final ordering method. The buyer pays not for abstract square meters of coverage, but for a specific number of panels of the selected format.
The panel is sold as a module with a width of 1000 mm
For a vertical field with a width of 4200 mm, a simple initial estimate looks like this: 4200 / 1000 = 4.2. This means that for continuous coverage across the width, at least five initial panels are required if the parts are formed from panels in standard orientation and there is no other agreed cutting scheme.
The fifth panel in this example is used partially: a section of approximately 200 mm is needed at the edge of the wall, plus adjustments for actual geometry and the joint. The remaining width of about 800 mm is potentially useful, but it cannot be assumed in advance to be suitable for any adjacent area. The rhythm of the slats, direction, need for joining, and cut locations must be taken into account.
Invisible area does not always reduce the number of source panels
Imagine a radiator 1000 mm wide, located roughly in the center of the wall. Its area seems equal to the width of one panel, so there is a temptation to subtract "one panel." But if the radiator overlaps parts of two adjacent modules, and the slat field continues above and below it, these two modules are still needed to obtain the upper and lower pieces.
Conversely: if the smooth area around the radiator is expanded to a full modular strip of 1000 mm from floor to ceiling, and this strip aligns with the layout grid, the number of source panels can indeed decrease by one. What saves is not the area of the battery, but a whole module excluded from the order.
One module can provide pieces above and below the radiator
Consider a conditional vertical section. The wall height is 2600 mm. The lower edge of the radiator is at the 150 mm mark, the upper edge at the 650 mm mark. If project PAN-003 does not run behind the appliance, two visible pieces are needed for one vertical strip: 150 mm at the bottom and 1950 mm at the top. In total, this is 2100 mm.
From a source panel 2670 mm long, these pieces theoretically fit along the length with allowance for cutting, if their geometry and rhythm allow using one source strip. This is an example of why subtracting area gives little information: one full-size module can simultaneously provide both the top and bottom around the excluded zone.
But such a calculation must be done for each strip separately. If the radiator is offset, its edge may pass inside a panel, and then the upper and lower pieces will have a different width. The more complex the contour, the more important the part map is, not square meters.
The remainder of one PAN-003 can transfer to an adjacent segment
The remainder after trimming the edge panel can be used at the slope, in the side part of a niche, on an adjacent decorative fragment, or elsewhere on the same wall—but only if the direction and geometry match. The conditional 800 mm remainder from the fifth panel of a 4200 mm wall can be more valuable than trying to reduce the order by 0.5 m² due to the radiator.
Therefore, before purchasing, it is useful to create a table of parts:
| Detail | Width | Height | From which panel | Remainder |
|---|---|---|---|---|
| Strip 1 | 1000 мм | 2600 мм | PAN-003 №1 | small remainder in length |
| Strip 2 top | By layout | By layout | PAN-003 №2 | calculated after the bottom part |
| Strip 2 bottom | By layout | By layout | PAN-003 №2 | total remainder is checked |
| Wall edge | About 200 mm | 2600 мм | PAN-003 №5 | large remainder in width |
This is not a ready-made map of a specific object, but a principle. Real dimensions are filled in after measuring.
Count quantity according to the cutting map
The working sequence is as follows:
-
Draw the wall in finished dimensions.
-
Mark module boundaries every 1000 mm.
-
Mark the radiator, brackets, and pipes.
-
Choose a scheme: solid panel, local smooth zone, or separate architectural field.
-
Divide the decorative surface into actual parts.
-
Distribute parts across original PAN-003 1000×11×2670 mm panels.
-
Count whole panels.
-
Check which remnants can be used without compromising the pattern and without unwanted seams.
-
Only after that add the technological reserve, if it is needed by the project and the installer.
It is this approach that answers the question "how many PAN-003 to buy" much more accurately than the wall area minus the radiator area.
Example of calculating PAN-003 for a wall 4200×2600 mm with a radiator
Let's take a conditional project to show the mechanics. The wall has a width of 4200 mm and a height of 2600 mm. The radiator is conditionally 1000×500 mm. It is located under the window. The lower mark of the housing is 150 mm from the floor, the upper mark is 650 mm. The actual dimensions of any object must be replaced with real values; this example does not set installation standards.
We choose PAN-003 made of MDF 1000×11×2670 mm.
Scheme A: continuous slat field
Five panels are required across the wall width: four give 4000 mm, the fifth covers the remaining approximately 200 mm. In height, each original panel is 70 mm longer than the wall, which allows obtaining a solid vertical piece with on-site trimming.
Quantity: 5 original PAN-003, if the installation scheme confirms the possibility of passing behind the radiator and if the actual joint grid does not require additional pieces.
The advantage is a solid rhythm. The disadvantage is that material goes into the invisible zone, and installation behind an existing appliance may be more difficult.
Scheme B: slat segments around the radiator
Suppose that behind the radiator itself there remains a smooth wall, but above and below PAN-003 continues. You cannot immediately subtract one square meter or half a square meter. You need to look at which modular strips the radiator passes through.
If it is located within one 1000-mm strip and its edges coincide with the boundaries of this strip, the upper piece 1950 mm high and the lower piece 150 mm can be obtained from one original module 2670 mm long. In this case, this strip still requires one PAN-003 — there is no savings in quantity, although part of the material behind the radiator is missing.
If, however, the project decides to leave the entire vertical strip 1000 mm wide from floor to ceiling smooth, this module can be completely excluded. Then, with a favorable layout, the theoretical quantity will decrease from five to four. But this is no longer "we do not clad behind the battery," but a different architectural solution: a smooth strip runs the full height.
Scheme B: separate slat field 3000 mm wide
Suppose the window and radiator are in the right part of the wall, and PAN-003 is used only on the left 3000 mm. Then the grid perfectly matches the width of three modules. The order can consist of three long panels instead of five.
This is real savings, because two whole modules are excluded from the project. But the solution must be justified by the composition of the room. If the slat wall was intended as a background for a TV or furniture, a 3000 mm field may look better than full coverage. If the goal is a solid textured wall, this technique will change the design.
What the example shows
The same battery can lead to three different orders: five panels, the same five panels with a different cut, or fewer panels when changing the field architecture. Therefore, the cost of the solution is determined not by the "area of the covered section," but by whether it was possible to remove a whole original module from the cut.
Buy slat panels for walls: how to build a modular layout around a radiator
If the task has already reached the stage of "Buy slatted panels for walls and not make a mistake with the quantity," it is most useful to make a simple layout in millimeters. For this, you do not need a complex CAD model: an accurate drawing of the wall with the main references is sufficient.
Draw vertical module boundaries at 1000 mm intervals
From the selected starting point, mark off 1000, 2000, 3000, 4000 mm, and so on. However, the starting point cannot be automatically taken from the left corner. The visual layout may require symmetrical trimming at the edges or alignment with the axis of furniture, TV, or window.
For example, on a 4200 mm wall, there are two basic approaches. The first is four full modules from one edge and a 200 mm trim at the other. The second is to distribute the trim symmetrically, roughly 100 mm on each side. The second option may be more aesthetic, but it changes the usage map of the fifth panel.
Place the appliance on the elevation view
The radiator should be shown according to its actual external contour, not as a symbolic rectangle indicating 'approximately here'. Its left and right boundaries determine which panel strips intersect with the appliance zone.
If the radiator occupies 1000 mm but is located from 1600 to 2600 mm, it intersects the second and third 1000 mm strips. If it is located from 2000 to 3000 mm, it coincides with one modular strip. The difference is only 400 mm in position, but the impact on cutting is significant.
Place the pipes
Pipes may extend beyond the radiator contour. On the elevation view, it is useful to show the axis of each pipe and the actual external contour with the technical clearance that the installer will confirm. This will allow early understanding of where the panel ends and whether a separate cutout is needed.
Determine the working full strips
After this, mark the parts of the wall that can be covered with full vertical modules. They serve as the order basis. Complex areas around the radiator are considered separately.
If three strips of 1000 mm run from floor to ceiling without obstacles, it is logical to reserve three original long panels for them. Then decide which modules will provide parts for the remaining area.
Only after this, choose the number of PAN-003
At this stage, you can not only determine the number of panels, but also understand which layout will yield useful remnants. If a large strip remains after cutting, its use is sought in advance. This reduces actual consumption better than trying to minimize every invisible part of the wall.
Slat panel PAN-003 and heating pipes: where the edge of the decorative field should pass
The pipe assembly often affects the result more than the radiator itself. The appliance body covers most of the wall, while the pipes remain visible and form complex intersections with the relief.
Pipe inside the slat field
If the pipe runs inside PAN-003, careful joining will be required. Its geometry must be decided before ordering and before painting. You should not first completely finish the panel and then cut a random hole "on site" without understanding where the slat, gap, and edge of the fabric base will land.
The template helps verify whether the pipe will pass through the relief element itself or through the inter-slat part. Even a slight shift of the field boundary sometimes allows for a neater joint.
Pipe in the smooth zone
It is often more rational to include the entire pipe assembly in the smooth field. Then the finishing panel ends along a straight line before the engineering zone, and access to connections remains easier.
This solution is especially logical if the pipe runs vertically from the floor and already visually creates a separate line. Instead of multiple cutouts, you can make one clean material transition.
What will happen during future dismantling
Any radiator can potentially require maintenance or replacement. If the panel is tightly fitted to the pipes and fasteners without thoughtful access, future dismantling could damage the finish.
The purpose of the article is not to set requirements for servicing a specific radiator. But it is useful for the buyer to ask the installer a question in advance: can the unit be removed without destroying PAN-003? If the answer is negative, a smooth service zone becomes a stronger option.
Why the pipe outline should be transferred to the template before ordering
A full-size template allows you to see in advance how many slats the pipe crosses and whether the boundary can be shifted. This is especially useful for natural oak and beech, where an unsuccessful cutout is more noticeable due to the wood grain.
Is it necessary to dismantle the radiator for a solid PAN-003
The very fact that the panel must be behind the radiator does not automatically mean the unit needs to be removed. But if the existing gap does not allow physically inserting and securely fastening the finish, or if the fasteners block access to the base, dismantling may become a necessary part of the work. The decision is made by a specialist working with the heating unit, not by the seller of the decorative panel.
When a solid field truly requires coordinating dismantling
The check begins with a simple question: can the panel be installed on the base with the required quality of fixation without disturbing the radiator? The manufacturer of PAN-003 specifies fixation with contact adhesive and recommends additional mechanical fastening with micro-pins. If it is impossible to prepare the base, apply adhesive, or ensure pressure in the area behind the unit, installing "as it happens" contradicts the very idea of quality finishing.
In this case, there are two options: an agreed temporary dismantling of the device or a change in the wall design. The second is often cheaper and more reliable.
The cost of material and the cost of additional work are different budgets
Sometimes a buyer tries to save on one panel, but for this they order the removal and reinstallation of the radiator, shutting off the system, additional finishing operations, and restoring connections. Then the material savings disappear.
You need to compare not only the price of PAN-003, but the full cost of the scenario: panels, preparation, painting, dismantling/installation of engineering equipment, possible wall restoration, and work time.
Why the solution must be confirmed by a heating installer
The installer has information that the finisher does not: the type of mounting, the condition of connections, the possibility of shutting off a section, and the requirements of the specific device. If a continuous field requires intervention in the system, this decision must be made before ordering the decorative material.
When it is easier to change the architecture of the slat wall
If the radiator is located close to the edge of the wall or inside a window unit, it is often easier to end the slat field before it. Such a boundary may coincide with a slope, curtain line, furniture composition, or the axis of a partition. As a result, complex cutouts and the need to buy material that will almost entirely be hidden disappear.
PAN-003 near a radiator: why the OPAN-003 sample is more useful than a photo
Especially useful before a large order to order a sample of the slat panel OPAN-003The current sample card indicates a size of 200×11×310 mm and versions made of MDF, beech, and oak. For a radiator unit, such a sample is needed not for an abstract color choice, but as a physical profile mock-up.
Actually check the 11 mm thickness
The sample can be placed against the wall next to the radiator to see how the visual depth changes. This does not replace a technical gap check, but helps understand the scale: 11 mm on a drawing is perceived differently than the actual relief surface near the existing appliance.
Bring it to the junction point
If the slat field is planned to end at the side of the radiator, the sample can be brought to the intended boundary to check its readability from key viewpoints. Sometimes it becomes obvious that the field needs to be extended by 100–200 mm or, conversely, ended earlier.
Check the shadow
The PAN-003 relief creates its own light and shadow. Near the radiator, windowsill, and pipes, it interacts with other shadows. Product photos do not show how this will look in a specific room under side daylight.
Compare oak, beech, and MDF next to the appliance
If the radiator is white, MDF for painting can provide a calm monochrome solution. Oak or beech create a material contrast. Neither option is universally better: the sample helps see whether natural wood starts competing with the window, floor, or furniture.
See the actual rhythm
A small sample shows the relief and profile pitch. This is important when choosing a vertical boundary: the panel edge is better perceived when it aligns with the slat rhythm itself, rather than being cut randomly.
Buy MDF slat panels: when a smooth area is easier to paint in the same color
If you plan to buy MDF slatted panels For painting, the smooth service area behind the radiator can be included in the overall color scheme of the wall. This is one of the most practical ways to maintain visual integrity without continuous relief finishing.
PAN-003 made of MDF and a smooth wall in the same color
The same color does not make surfaces identical. The slat panel remains three-dimensional, while plaster or a painted base remains flat. But if the shade is coordinated, the contrast becomes tonal rather than color-based. For a radiator, this is often successful: the appliance is not surrounded by several competing materials.
If the wall behind the radiator is already painted, before ordering you need to check the possibility of matching the new finish of PAN-003 to the existing shade. Even the same paint code can be perceived differently on different bases and with different levels of gloss. Therefore, a sample and a test patch are more useful than a verbal description of the color.
Why the relief remains even if the color is the same
The slats form vertical shadows. The smooth area does not have them. This means that the boundary will be visible under side lighting even with a perfect color match. Therefore, its position needs to be designed, not completely "hidden" with color.
Where to make the boundary
Strong boundaries are usually tied to architecture: window edge, partition wall, furniture, vertical axis, outer corner, curtain. A weak boundary is a random line 17 mm from the radiator edge just because a convenient slat ended there.
Why a narrow random strip looks worse than a deliberate field
If only the strictly hidden part behind the radiator is left smooth, a narrow light or dark stripe may appear when viewed from the side. It looks like an unfinished section. If the smooth field is wider than the appliance and has its own geometry, the viewer perceives it as an intended element.
Wooden slat panel PAN-003 made of oak or beech: the smooth insert should look intentional
When choosing natural wood, the task becomes more complex. MDF can be painted to match the wall color, but the grain of oak or beech cannot be reproduced with ordinary paint. Therefore, the transition to the smooth area becomes material.
If you are considering buy wooden slatted panels for a wall with a radiator, first decide whether the heating unit should be inside the wooden field or next to it.
Oak and painted wall
Oak has an active texture. A narrow painted insert directly behind the radiator may look like missing material. A wider area connected to the window is perceived much more naturally.
For example, if the window is 1600 mm wide and the radiator is 1000 mm and positioned along its axis, you can consider a smooth field the width of the window unit, with PAN-003 brought up to its side edges. Then the transition is explained by the window architecture, not just by the presence of the radiator.
Beech and painted wall
Beech is visually calmer, but the logic is the same. The difference in textures remains. If the interior is light and the wood is minimally tinted, the boundary may be softer, but its position should still be deliberate.
Expand the smooth field or make a minimal cutout
A minimal cutout saves visible tree area but creates many complex contours. An expanded field requires fewer precise passes and often improves service access. The choice depends on the room composition and cutting cost.
Why a natural pattern cannot be "painted in" with paint
Attempting to imitate the continuation of oak on a smooth wall usually creates
Bottom line of the windowsill
It is useful to check whether the top edge of the radiator matches the windowsill or if a noticeable gap remains between them. If the gap is visible, it becomes a separate cutting detail. Its height may determine whether it makes sense to use the remainder of a long PAN-003 or a short 950 mm format.
Side slopes
A slat panel can fit flush against the slope, end before it, or frame the window. Each option requires its own edge solution. Therefore, the radiator zone should not be calculated only by the rectangle of the appliance.
Why the radiator cannot be considered separately from the entire window unit
If the smooth zone matches only the battery, and above it between the radiator and the windowsill PAN-003 appears again, you get an "insert within an insert." Sometimes this is beautiful, but often it unnecessarily complicates the wall. A unified solution for the entire window-radiator block is much stronger.
Lower junction PAN-003: the wooden plinth is chosen together with the slat wall
The bottom of the wall is often forgotten in calculations, although it is there that PAN-003, the floor, pipes, and plinth converge. If the decorative panel ends at the floor, the plinth profile affects the visible height, the starting line of the slats, and the complexity of routing around pipes.
If a solid wood profile is needed, it can be selected in advance to buy wooden baseboard from the corresponding section, but its geometry must be included in the elevation before cutting PAN-003.
The plinth runs as a continuous line
The calmest option is for the plinth to run continuously along the entire wall, with the slat panel starting above it. Then the lower boundary of PAN-003 is uniform and does not depend on the radiator.
The plinth is interrupted at the pipe
If a pipe comes out of the floor close to the wall, the profile may require a cutout or break. It cannot be calculated "later": the pipe position can affect the width of the smooth service zone.
How to design the area behind the radiator
If the wall behind the appliance remains painted, the plinth can still run continuously. Then the smooth zone starts above the plinth, and the lower horizontal line is preserved. This often helps to connect different materials.
Material of the plinth and PAN-003
For an oak or beech panel, it is logical to compare the natural wood of the plinth with a sample of the panel. For MDF intended for painting, a unified color scheme is possible. However, matching the material name does not guarantee matching the shade after finishing — test samples remain useful.
Price of PAN-003: when omitting the panel behind the radiator actually reduces the order
The buyer's question of "not buying extra material" cannot be resolved without understanding how the quantity is formed. The price of one panel may vary, so specific amounts in the calculation quickly become outdated. It is much more useful to determine the conditions under which the number of modules actually decreases.
If the number of whole modules decreases
This is the most obvious case. There were five panels for a solid wall, and it became four after the smooth field occupied a full modular zone. The savings are real and easily verified.
If the quantity remains the same, but a useful remainder appears
For example, the radiator is excluded from the cladding, but the upper and lower parts still require a fifth panel. Then the number of panels does not decrease. However, the remainder can be used elsewhere: at the slope, on the end of furniture, in an adjacent niche. Savings appear not in the current wall, but in the overall project.
When there is no material savings at all
If the cutout around the radiator creates many small parts, and the remnants cannot be used due to direction, rhythm, or sizes, the order may remain the same as for a solid wall. At the same time, installation becomes more complicated. In such a situation, the idea of "not cladding behind the battery to save money" does not fulfill its purpose.
Why you should count pieces, not just square meters
The wall area of 4200×2600 mm is 10.92 m². The radiator area of 1000×500 mm is 0.5 m². Subtraction gives 10.42 m². But none of these numbers tells whether you need four or five panels. The quantity is determined by the modular grid and cutting.
That is why the request "price PAN-003" only makes sense after determining the quantity. The current price should be checked in the card of the selected configuration immediately before ordering.
Short PAN-003 950 mm: can a local decorative field near the radiator be used
The short 950 mm format can help in certain projects, but it is not a universal way to "buy extra pieces." It has the same width of 1000 mm and, according to the current card, a thickness of 11 mm, but its length determines a different type of cutting.
When the short SKU helps
If the windowsill is located at a height that allows forming an independent field up to 950 mm, or if PAN-003 is used only on the lower part of the wall, the short format may be more convenient than the long one.
It is also suitable for furniture and local decorative tasks where a long 2670-mm panel creates too much waste.
When it creates an unnecessary horizontal joint
If the visible height of the zone is more than 950 mm, parts will need to be joined. A horizontal joint interrupts the vertical rhythm. Sometimes it is hidden behind furniture or a windowsill, but if it remains on an open wall, it should be evaluated as a separate design element.
Why you can't automatically replace a long panel with a short one
The price of one short panel may seem attractive, but for a large height you will need several pieces. The total cost and number of joints may be higher than for one long panel.
Length 950 mm and cutting around the radiator
The short format is only interesting when its length matches a specific part. For example, for a lower section of 150 mm it is redundant if such a piece is already obtained from the remainder of a long panel. For an upper section of 1950 mm, on the contrary, it is insufficient in a single piece.
Material and quality of slat panels: what to check before choosing MDF, oak, or beech
The choice of material affects not only the appearance but also the method of preparation and finishing. For comparing characteristics, it is useful to use the manufacturer's page materials and quality of slat panels and the current PAN-003 card.
MDF is chosen when a predictable painted color and uniform surface are needed. Natural oak or beech is chosen for the wood texture, which is preserved with a transparent or tinted finish or, if necessary, covered with paint using the appropriate technology.
In the radiator area, it is especially useful to decide in advance whether finishing will be done before installation. The manufacturer recommends priming MDF before painting and states that priming should be done before installation. This means that complex parts around pipes and fasteners are better planned in advance rather than cut out after fully completed finishing without a plan for restoring edges.
You cannot automatically assume that proximity to a radiator makes any material suitable or unsuitable. The temperature regime and permissible operating conditions must meet the requirements of the specific finish and the room. In this article, we do not assign universal temperature limits because they depend on the chosen paint and varnish materials and the conditions of the site.
Installation of PAN-003 near a radiator: what work needs to be coordinated before purchase
The manufacturer specifies fixing PAN-003 with contact adhesive and recommends additional mechanical fastening with micro-pins. Detailed general recommendations are convenient to cross-check via the section Advice on finishing and installation. But the radiator unit adds several design questions that the standard instruction does not solve for you.
Access to the base
It is necessary to check whether the installer can fully clean and prepare the wall behind the appliance. If it is impossible to reach there with a tool, high-quality bonding becomes questionable.
Panel pressing
Contact fastening requires proper interaction between the panel and the base. The space between the radiator and the wall should not turn the installation into a blind operation.
Mechanical fixation
If additional fastening is provided by the chosen technology, it is necessary to understand whether the tool is accessible in the required area. You cannot simply abandon part of the technology because the battery interferes, without coordinating this with the person responsible for installation.
Painting and finish
If the MDF is painted before installation, the finished part must be cut and prepared so that no untreated visible areas remain after installation. If painting is done afterwards, the radiator may hinder access.
Engineering unit service
Finishing should not create a trap where accessing a connection requires destroying half the wall. That is why a smooth zone is sometimes not a compromise, but a more professional solution.
Mistakes when ordering PAN-003 for a wall with an already installed radiator
Mistake 1: Subtract the radiator area and order that much less material
Why it happens: panels are perceived as roll or sheet material, which is calculated only by area.
Consequence: the site is missing an entire module for top or side parts.
How to prevent: calculate based on the cutting map and whole PAN-003 units.
Mistake 2: Accepting a conditional residual gap as a technical standard
Why it happens: 11 mm is automatically subtracted from 35 mm, and the remaining 24 mm is considered acceptable.
Consequence: the finishing may conflict with the requirements of a specific radiator or mounting hardware.
How to prevent: use arithmetic only for geometry, and confirm acceptability from the device documentation and the installer.
Error 3. Not marking brackets on the drawing
Why it occurs: the visible housing seems to be the part closest to the wall.
Consequence: PAN-003 does not fit in the mounting area.
How to prevent: measure the brackets separately.
Error 4. Considering only the radiator, forgetting about the pipes
Why it occurs: the battery is perceived as a single rectangle.
Consequence: random cutouts and narrow fragments appear around the pipes.
How to prevent: apply the entire engineering contour to the layout.
Error 5. Making a smooth zone strictly along the battery silhouette
Why it occurs: the desire to leave the maximum amount of rack surface.
Consequence: irregular strips of smooth wall are visible from the side.
How to prevent: check a wider architectural field associated with the window or modular grid.
Mistake 6. Buying a short PAN-003 for every small fragment
Why it occurs: a short module seems natural for small parts.
Consequence: the number of joints increases and inconvenient leftovers remain.
How to prevent: first check whether the part can be obtained from the remainder of a long panel.
Mistake 7. Not taking the baseboard into account
Why it occurs: the calculation is made from floor to ceiling without the lower connection.
Consequence: after purchase it turns out that the working height of the panel is smaller, and the already made parts do not match the project.
How to prevent: include the skirting board in the layout before cutting.
Error 8. Ordering material before resolving the radiator dismantling issue
Why it occurs: it seems that the installer will "somehow fit" the panel behind the appliance.
Consequence: the purchased material is available, but it is physically impossible to install it using the chosen technology.
How to prevent: obtain the installer's decision before payment.
When PAN-003 does not need to be purchased yet
It is reasonable to postpone the order if at least one of the following issues is not resolved:
-
the radiator model is unknown and its installation documentation cannot be checked;
-
the actual gap to the wall has not been measured at several points;
-
it is unknown where the brackets run or protrude;
-
pipes and shut-off valves are not applied;
-
the radiator is planned to be relocated;
-
the decision 'panel behind the appliance or smooth zone' has not been made yet;
-
the quantity was obtained only from the wall area;
-
material PAN-003 has not been selected;
-
the length of the specific configuration has not been determined;
-
the bottom connection to the baseboard has not been resolved;
-
continuous installation will require dismantling the radiator, but this work has not been approved.
Refusing to purchase immediately in such a situation does not mean refusing PAN-003. It is protection against incorrect configuration. After clarifying the node, the same project can smoothly proceed to ordering.
When the slat panel PAN-003 can already be ordered
It is convenient to check work readiness using ten control points.
-
The exact radiator model is known.
-
The actual distance to the wall has been measured.
-
The manufacturer's requirements for the heating device have been checked.
-
Brackets and pipes are drawn on the layout.
-
It has been decided whether PAN-003 will be behind the radiator.
-
The architectural boundary of the smooth zone has been selected, if needed.
-
The material has been determined: MDF, beech, or oak.
-
The current panel size from the product card has been selected.
-
The quantity has been calculated based on the original modules and the cutting map.
-
Before payment, the current specifications, price, and availability were re-checked.
If all items are closed, the order becomes a specification, not an assumption.
How to order PAN-003 for a wall with an already installed radiator
It is useful to create a short technical description of the order. It allows the manager, designer, and installer to talk about the same option.
Example:
PAN-003 / MDF / 1000×11×2670 mm / wall 4200×2600 mm / radiator 1000×500 mm / actual gap from existing wall ___ mm / layout: smooth zone behind radiator / pipes: marked on the layout / quantity per cutting ___ pcs. / plinth ___ / finish ___.
If the solution is already confirmed, you can order PAN-003 1000×11×2670 mm in the product card, specifying the required version and quantity.
For a complex object, it is better to attach a layout to the specification. Even a simple PDF or image with dimensions is more useful than a long description over the phone. It should show the wall, window, radiator, pipes, plinth, boundaries of the slat field, and part numbers.
Where to buy slat panels after checking the radiator unit
If you need the specific profile in question, go to the product card and select it. Buy PAN-003 slatted panel in the current material and size.
If you need to compare PAN-003 with other models before ordering, it is more convenient to open the category and buy slatted panels after comparing geometry, materials, and formats.
For a wall-specific project, the category is also useful for those who want to buy slat panels for walls for interior finishing and evaluate not just one item, but several available solutions.
Before final payment, it is worth reopening the product card: the manufacturer indicates current prices and availability directly on the website. For logistics and timelines, use the section payment and delivery terms for slat panels.
Decision tree: what to do if the radiator is already installed
Below is a compact algorithm that can be applied directly on site.
Step 1. Will the radiator remain in its current location?
If not — first complete the relocation and only then calculate the finishing. If yes — proceed to the next step.
Step 2. Is the exact model known and is installation documentation available?
If not — find it. Without this, you cannot confidently assess the gap change. If yes — continue.
Step 3. Can PAN-003 be physically and technically installed behind the appliance?
If this is confirmed and a continuous rhythm is needed — consider a solid field. If not or confirmation is missing — design a smooth zone.
Step 4. Does the smooth zone reduce the number of full modules?
If yes — this is real savings on the order. If not — check whether leftovers can be used in other parts.
Step 5. Does the contour around the radiator look random?
If yes — expand the smooth zone to an architecturally explainable boundary: window, wall section, furniture, modular line.
Step 6. Are there pipes in the rack field?
If yes — make a template and agree on the node before finishing. If no — the transition is simpler.
Step 7. Are whole panels counted?
If no — do not place the order. If yes — check the current product card and only then buy.
Practical measurement checklist before ordering
To avoid returning to the site a second time, collect the following data in one measurement:
| Parameter | What to record |
|---|---|
| Wall width | final size at several levels |
| Wall height | left, center, right |
| Radiator | width, height, position relative to the floor and corners |
| Gap to the wall | several actual measurements |
| Brackets | position and most protruding points |
| Pipes | axes, outer contour, connection points |
| Window sill | height, overhang, position relative to radiator |
| Baseboard | height and thickness of the selected profile |
| Sockets/switches | position if they fall within the PAN-003 field |
| Boundary of the slat field | Exact alignment from corner or axis |
After that, a 1000 mm modular grid and a parts map are created. If at this stage at least one unknown dimension remains, it is better to measure it before ordering than to compensate for uncertainty with an extra panel "just in case."
What to do with PAN-003 remnants after cutting around the radiator
A remnant is not necessarily waste. In a good project, large remnants are planned in advance.
Side wall niche
If after trimming the outermost module a strip several hundred millimeters wide remains, it may fit a narrow side wall niche. Just need to check the direction of the slats and the possibility of a neat finish.
Slope or niche
Some remnants can be used on a local surface if the dimensions and mounting technology are suitable. Here it is important not to create extra small joints just to utilize the material.
Furniture fragment
PAN-003 is also used in furniture decoration. But transferring a remnant to furniture must be part of the project: thickness, base, and finish must be compatible with the construction.
Repair reserve
A small leftover of the same material and finish is sometimes worth keeping as a repair sample. This is especially relevant for natural oak or tinted beech, where matching an absolutely identical pattern later is more difficult.
The main rule: a leftover is considered useful only when a real use for it has been determined in advance. You cannot reduce the calculated order factor just because "we'll make something later."
How to compare three scenarios not only by material but also by total cost
For a commercial decision, it is useful to prepare a simple estimate of the options.
| Cost item | Solid PAN-003 | Smooth area behind the radiator | Architectural smooth field |
|---|---|---|---|
| Quantity of PAN-003 | across the full field | By cutting | by reduced/changed field |
| Part complexity | medium or high | high with precise traversal | usually lower with straight boundaries |
| Possible radiator dismantling | Possible | often not needed | usually not needed |
| Painting a smooth wall | no separate zone | Required | Required |
| Working with pipes | Depends on the scheme | remains more affordable | Usually simpler |
| visual integrity | Maximum | depends on the contour | high with good composition |
Such a comparison often changes the initial decision. The cheapest scheme by panel count may turn out to be expensive in labor, while a wider smooth zone can, on the contrary, reduce both material consumption and labor costs.
What changes if the radiator is not 1000 mm, but narrower or wider
The width of the appliance affects the number of modular strips it crosses.
If the radiator is 600 mm and is located entirely within one panel, excluding only its contour will almost certainly not remove a whole 1000-mm module, because parts of the same module remain above, below, or to the side.
If the appliance is 1400 mm wide and crosses two strips, parts from two original panels may be required around it. At the same time, a wider smooth zone, for example 2000 mm, coinciding with two modules, can significantly simplify cutting — but only if the wall composition allows it.
If there are two radiators, the task becomes cutting with multiple excluded zones. Then the area becomes even less informative: two identical radiators can be located in one modular strip or affect four different strips.
What changes if the wall is not 4200 mm, but 3900, 4000, or 4100 mm
A modular width of 1000 mm makes boundary values especially important.
Wall 3900 mm. Four panels are sufficient by original width: 4000 mm covers 3900 mm, leaving a total reserve of 100 mm in width before accounting for cuts and geometry.
Wall 4000 mm. Theoretically, four modules match the width. But the actual wall may have deviations, and the joint and edge layout must be checked before ordering.
Wall 4100 mm. Formally, five original panels are already needed if the field must truly cover all 4100 mm. Just 100 mm beyond four meters can add an entire panel to the order. In such a case, a well-designed architectural boundary near the radiator can provide noticeable savings.
This example shows why you need to work in millimeters before purchasing, rather than rounding wall dimensions to "approximately four meters."
How to account for uneven walls and non-parallel corners
Even a perfectly calculated grid may not match the actual room if the wall has deviations. Measure the width at the bottom, middle, and top. If the values differ, the edge piece will have a variable width.
The same applies to height. With a nominal height of 2600 mm, the ceiling may vary at several points. The length of PAN-003, 2670 mm, allows for trimming, but the exact allowance must be determined after final measurement.
In the radiator area, geometric error is especially noticeable: a rectangular smooth insert may appear visually non-parallel to the window or baseboard. Therefore, reference lines should be built along the chosen architectural axis, not just the nearest corner.
Why the decision to "leave it as is behind the radiator" also requires a project
Sometimes it seems that if PAN-003 is not installed behind the radiator, nothing needs to be done with that area. In practice, the hidden wall is still partially visible from the top, bottom, and sides. Its color, surface quality, and boundary with the slat panel affect the final result.
If the existing paint has a different shade or is damaged after radiator installation, the contrast may become stronger after installing the new slat wall. Therefore, the smooth area should be assessed in advance: whether local preparation, repainting, or leveling of visible sections is needed.
This is another reason not to consider skipping the panel behind the radiator as "zero work." There may be less material, but adjacent surfaces will need to be finished carefully.
How to avoid overcomplicating the cutting layout
A complex layout is not always a sign of a professional project. If there are ten small shaped pieces around the radiator, it is worth checking whether they can be replaced with two or three large rectangles and one smooth area.
Each additional cut increases the risk of measurement errors, finish damage, inaccurate rhythm matching, and installation labor. For natural wood, there is also the task of matching the grain pattern.
A good cutting layout usually aims for large, repeatable pieces. If the decorative idea requires a complex contour, it should provide noticeable visual value, not arise from an attempt to save a small section of material.
When a solid PAN-003 is the best option
A solid field is justified when several conditions are met simultaneously:
-
technical compatibility with the radiator is confirmed;
-
access behind the appliance allows for quality installation of the panel;
-
the slat wall is the main decorative backdrop of the room;
-
the pattern break worsens the composition;
-
the additional amount of material does not create a critical budget;
-
future access to the heating unit remains possible or is provided for by the installation scheme.
In this case, there is no point in artificially cutting out a smooth zone just to slightly reduce the area.
When a smooth service zone is the best option
It is stronger if:
-
the gap after adding the finish raises doubts and there is no confirmation of compatibility;
-
brackets and pipes make continuous installation difficult;
-
the radiator may require maintenance;
-
the smooth zone can be easily linked to a window or modular grid;
-
excluding the zone really reduces the number of panels or significantly simplifies cutting;
-
the interior allows a combination of textured and smooth surfaces.
The service zone should not look like a "place where a panel was missing." Its width, height, and color are designed as carefully as the slat finish itself.
When a separate slat field is better than a full wall
Sometimes the initial concept of "a panel across the entire wall" is too rigid. PAN-003 can work as a standalone accent: a background behind the TV, behind a console, behind a sofa, or in a niche. If the radiator is in an adjacent part, separating these zones can be both cheaper and more expressive.
For example, on a 4200 mm wall, a 3000 mm slat field can align with three panels in width. The remaining 1200 mm form a smooth window-radiator section. As a result, there is no complex bypass, the quantity is clear, and the composition reads as two architectural blocks.
But such a solution cannot be considered universal. If furniture occupies the entire wall and the slat background should tie it into one composition, separation may ruin the concept.
How to check current specifications before payment
The product card should be reopened again immediately before ordering. At the time of writing the article, for PAN-003 the following executions are confirmed: 1000×11×950 mm in MDF, beech, and oak; MDF 1000×11×2670 mm; beech and oak 1000×11×2400 mm. The manufacturer also specifies different quality/surface preparation options depending on the material and execution.
Do not transfer dimensions from an old estimate, screenshot, or saved article into the order without checking. For this project, it is especially important not to mix the 2670 mm MDF length with the 2400 mm length of full-size wooden options.
The same applies to price and availability. They change, so in the technical calculation it is better to fix the quantity and exact SKU, and pull the cost from the product card on the day of ordering.
FAQ
Can PAN-003 be installed behind a radiator?
This option can be considered only after checking the specific heating unit. You need to ensure that the additional finished wall thickness is compatible with the radiator requirements, mounting brackets, pipes, and the installation method of PAN-003. There is no universal gap value for all devices here.
What is the thickness of PAN-003 2670 mm?
According to the current product card, MDF PAN-003 with dimensions 1000×11×2670 mm has a thickness of 11 mm.
Do all PAN-003 models currently have a thickness of 11 mm?
At the time of re-checking, the current product card shows a thickness of 11 mm for the listed options of 950, 2400, and 2670 mm. Before ordering, still check the product card again, because the assortment may change.
Do I need to remove the radiator before installing PAN-003?
Not necessarily. It depends on access to the base and the chosen scheme. If it is impossible to securely attach the panel without dismantling, or if there is a conflict with the mounting brackets, the question of removing the appliance should be decided by a heating specialist. An alternative is to leave a smooth service zone.
Can the wall behind the radiator be left without a slat panel?
Yes, if it is coordinated with the design and technical conditions. It is better to plan such a zone deliberately — along straight boundaries related to the window, the partition, or the modular grid.
How to calculate PAN-003 if the area behind the radiator is excluded?
You need to draw the wall, create a 1000 mm grid, mark the radiator and pipes, divide the remaining slat surface into parts, and distribute them among the original panels. The quantity is obtained in pieces, not from a single subtraction of area.
Do I need to subtract the radiator area from the wall area?
It can be used as a reference value, but not as the final order calculation. Excluding 0.5 m² may not reduce the number of whole panels at all.
Can I use the panel remainder above or below the radiator?
Yes, if the dimensions, direction, and rhythm allow it. In a conditional example, parts with heights of 1950 and 150 mm together fit into a length of 2670 mm, but the actual layout depends on the width and position of the radiator.
What sizes of PAN-003 are currently available?
As of the check, the card shows 1000×11×950 mm for MDF, beech, and oak; 1000×11×2670 mm for MDF; 1000×11×2400 mm for beech and oak. Before payment, check the current card.
What to choose — PAN-003 MDF, beech, or oak?
MDF is rational for a painted solution with controlled color. Oak is chosen for expressive natural texture, beech for a calmer wood grain. In the radiator area, the material also affects how noticeable the boundary with the smooth wall will be.
What is the OPAN-003 sample for?
It allows you to physically evaluate the profile, thickness, relief, and material on site. The current sample size is 200×11×310 mm; MDF, beech, and oak are available.
How to route pipes on a slat wall?
There are two main approaches: include the pipes in the slat field with a pre-designed cutout or leave them inside a smooth service zone. The second option is often simpler, but the final decision depends on the composition and access to the node.
Which baseboard to install with PAN-003?
The profile is chosen based on the overall wall architecture, material, and finishing method. For wooden options, a solid wood baseboard can be considered; for painted MDF, a profile under the agreed paint color. The main thing is to include its height and thickness in the cutting before trimming the panels.
How many PAN-003 should I order for the wall?
As many whole source modules as required by the cutting map after all obstacles are applied. For a 4200 mm wall with a solid vertical layout, the baseline estimate is five panels 1000 mm wide, but the actual number may change with a different decorative field size.
Where to buy slat panels for walls?
You can compare options in the section slatted wall panels, and the specific PAN-003 in the product card.
How to check the current price of PAN-003?
Open the card of the specific configuration right before ordering. The price depends on the material, length, and surface preparation option; do not use old saved values for the final estimate.
What to do if the radiator overlaps the boundary of two panels?
Do not try to simply subtract its width. Build two adjacent modular strips and determine the parts above, below, and on the sides. Both original panels may still be needed.
What to do if only a few centimeters of the wall are visible behind the radiator?
Check visibility from real points: entrance, sofa, walkway along the wall. Sometimes a narrow smooth strip is indeed almost invisible. Sometimes a side view makes it the most noticeable defect. The decision is made after a mockup or sample.
Can the smooth field be made wider than the radiator?
Yes. A wider field often looks more deliberate and allows including pipes and a window in it. But its width needs to be checked against the overall composition and the PAN-003 modular grid.
Does it make sense to buy an extra PAN-003 as a spare?
Only if it has a clear function: a technical reserve, complex cutting, risk of damage, or a planned different section. Buying a whole module "just in case" without a cutting map is a poor substitute for precise calculation.
Summary: how many PAN-003 panels should you actually add to the cart if the radiator is already in place
If the radiator is already installed at a nominal 35 mm from the wall, do not start with the order and do not start by subtracting the battery area. Start with the geometry of the finished assembly. Measure the actual gap, find the radiator model, check the mounts and pipes. Then decide whether PAN-003 should physically be behind the appliance.
If a continuous field is compatible with the heating assembly and is truly needed by design, calculate the wall as a continuous modular surface. If a smooth zone remains behind the radiator, do not treat it as automatic savings: first check whether it reduces the number of whole panels. If it does not, try to use the offcuts above, below, or in adjacent elements.
For a nominal wall of 4200×2600 mm, a continuous vertical layout of PAN-003 1000×11×2670 mm starts with five initial modules across the width. A radiator of 1000×500 mm by itself does not mean you can buy four. The reduction to four only occurs when the chosen smooth zone or architectural composition actually excludes one whole module from the cutting plan.
Before purchasing, record the exact material, size, quantity, and assembly layout. If you need MDF 2670 mm long, go to the product card and order PAN-003 1000×11×2670 mm only after checking the layout. If you want to compare options, first open the category Buy slatted panels for wall finishing.
The main savings here appear not when half a meter of wall is hidden behind the radiator, but when the project turns that invisible area into a clear modular scheme and actually reduces the number of original PAN-003 panels or yields useful offcuts. That is the right moment to buy: not before verification, but also without excess stock after the cutting layout has already proven the required quantity.