Article Contents:
- Polyurethane stucco molding for chandelier: how to choose a ceiling rosette
- What is stucco molding for chandelier
- How this article differs from materials about ceiling decor
- Which STAVROS products are suitable for stucco molding under chandelier
- Polyurethane ceiling rosettes
- Polyurethane ceiling decor
- Polyurethane products: main section of stucco molding
- Polyurethane cornices: ceiling line
- How to choose a ceiling rosette for chandelier: eight steps
- Step 1. Determine the size of the chandelier
- Step 2. Measure the ceiling height
- Step 3. Account for the room area
- Step 4. Choose the rosette style
- Step 5. Check the relief type
- Step 6. Coordinate with the cornice
- Step 7. Decide if an extended composition is needed
- Step 8. Go to the STAVROS catalog
- How to choose the size of molding for a chandelier: summary table
- Where to use molding under a chandelier: four scenarios
- In the living room: main ceiling decor
- In the bedroom: subtlety and proportion
- In the hall and foyer: scale and grandeur
- In interiors with cornices: systematic thinking
- Five styles of ceiling rosettes: how to choose for your interior
- Minimalism
- Geometric neoclassicism
- Floral classic
- Neoclassicism
- Baroque and Neo-Baroque
- What to pair a ceiling rosette with: a complete architectural system
- Practical examples: three real interiors
- Example 1. Neoclassical bedroom, ceiling 2.8 m, 16 m²
- Example 2. Classic living room, ceiling 3.0 m, 28 m²
- Example 3. Empire-style hall, ceiling 3.5 m, 18 m²
- How to calculate a set of moldings for a ceiling composition
- Mistakes when choosing moldings for a chandelier
- Where to buy polyurethane moldings for a chandelier
- FAQ: polyurethane moldings for a chandelier


Polyurethane moldings for a chandelier: how to choose a ceiling rosette
The ceiling is the fifth wall. Architects say so, and they are right. But this wall is most often left bare: painted or wallpapered — and nothing more. Meanwhile, the only thing a person sees when lying on the sofa or looking up in the living room is the ceiling. And right in its center hangs a chandelier. Most often — without any decoration around it. Just a wire. Just a ceiling.
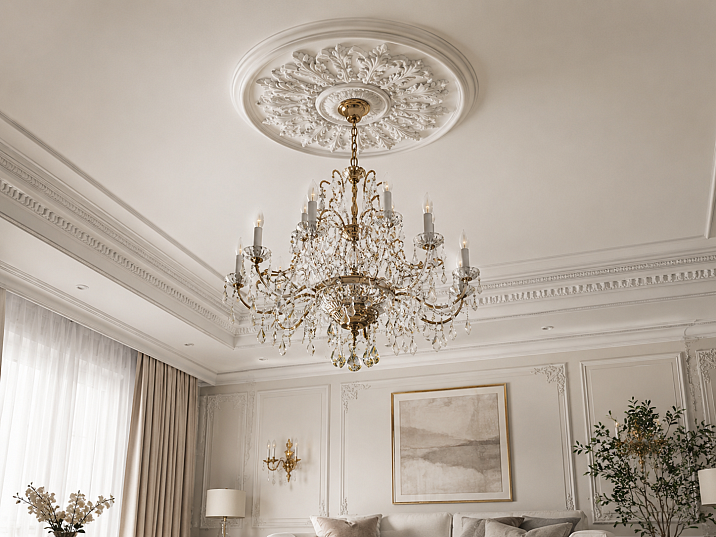
Polyurethane molding under the chandelier — this is what changes that picture. Ceiling decor that creates a frame for the light fixture, makes the center of the ceiling architecturally complete, and turns the chandelier from a "suspended object" into the semantic center of the space.
At STAVROS, they select for this task Polyurethane ceiling rosettes, ceiling decor и Polyurethane Crown Molding — so that the chandelier looks like part of a unified interior composition, not a lonely element on an empty background.
Buy polyurethane moldings for a chandelier, choose the right diameter, select the correct style, and not make a mistake — that is the topic of our conversation. Specifically, without fluff, with calculations and links to real catalog sections.


What is stucco under a chandelier
Let's start with the key question: what exactly is called "stucco under a chandelier" and how is it fundamentally different from ordinary ceiling decor?
Stucco under a chandelier is a central ceiling decorative element that is mounted at the attachment point of the light fixture. The classic name is a ceiling rosette. This is a custom-made product of round or polygonal shape with a relief ornament that "frames" the exit point of the electrical cable and creates a decorative medallion in the center of the ceiling.
Why a rosette and not just an overlay? Because a rosette is an architectural element with a history. In the classic interiors of the 18th–19th centuries, a ceiling rosette was a mandatory detail of any formal room: it masked the hook for the chandelier and simultaneously created a semantic center of the ceiling plane. Without a rosette, the ceiling was "unfinished" — regardless of cornices, stucco friezes, and other details.
Today, the principle has not changed. ceiling rose under the chandelier made of polyurethane — this is:
-
decorative framing of the light fixture attachment
-
visual center of the ceiling plane
-
architectural accent that sets the style of the entire room
-
element connecting the chandelier with the rest of the interior
Without a rosette, the chandelier "detaches" from the ceiling and hangs in the air. With a rosette, it becomes part of the ceiling composition.
Important: stucco under the chandelier is not just a rosette. For an extended ceiling composition, also used polyurethane ceiling decor: additional rings, medallions, ornamental belts around the rosette. And the horizontal line of the ceiling-wall joint is covered by a polyurethane cornice — without it, the ceiling composition also remains unfinished.
Our factory also produces:


How this article differs from materials about ceiling decor
A question worth clarifying right away.
There are articles about stucco on the ceiling in general — about ideas, styles, application, and inspiration. This is good informational content. But it does not answer the specific question: "I want to buy a rosette for a chandelier — how exactly do I choose it?"
This is exactly the question here. Not about whether stucco on the ceiling is beautiful (it is beautiful). Not about installation — for that, there is a separate instruction. Not about stretch ceilings. Not about types of ceiling decor in general.
Focus one: how to choose a ceiling rosette for a specific chandelier in a specific room. Diameter, proportions, style, compatibility with the cornice, transition to the catalog. This is a commercial guide for someone who has already decided to buy — and wants to avoid mistakes.
Get Consultation
Which STAVROS products are suitable for stucco molding under a chandelier
Only real sections — only real products.
Ceiling rosettes made of polyurethane
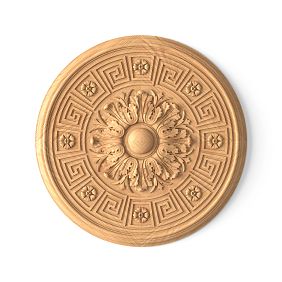
Polyurethane ceiling rosettes — the main section for choosing stucco molding under a chandelier. These are individual elements with a round, oval, or polygonal contour, with a diameter from 200 to 800+ mm. The relief ranges from smooth geometric to elaborate floral.
What is important about PU rosettes:
-
Lightweight: a standard rosette with a diameter of 400 mm weighs 400–700 g
-
Mounted with glue — without dowels or special fasteners
-
Cut with a regular knife if necessary (to bypass the cable outlet)
-
Painted with any acrylic paint — white, cream, patina, gold
-
Resistant to deformation under normal operating conditions
Price range in the STAVROS catalog: from 500–800 rubles for compact rosettes with a diameter of 200–300 mm to 8,000–20,000+ rubles for large ornamental elements with a diameter of 600–800 mm. The difference lies in size, relief complexity, and series.
It is this section you should go to when searching for "Polyurethane molding under the chandelier buy."
Polyurethane Ceiling Decor
ceiling decor — additional ceiling elements: ornamental rings around the rosette, decorative medallions, ceiling beams, coffered ceiling elements.
This section is used for extended ceiling compositions: when one rosette is not enough and a full ceiling decorative center is needed — with concentric rings, additional relief belts, ornamental frames.
For spacious rooms with high ceilings — Polyurethane ceiling decoration allows creating a multi-level ceiling "picture" that scales the rosette to the level of a grand element.
Polyurethane Products: Main Section of Moldings
Polyurethane moldings — the main section that contains the entire range of STAVROS decorative products. For those who want to see everything — from cornices to rosettes — this is the starting point.
Here — orientation by styles and collections. If you don't know where to start and are looking for "to buy molding" in a broad sense — start here, then go to the desired subsection.
Polyurethane cornices: ceiling line
Polyurethane Crown Molding — this is a horizontal profile along the ceiling perimeter. Why is it on the list for the topic "stucco under a chandelier"? Because a rosette without a cornice is like a painting without a frame. The rosette sets the center of the ceiling. The cornice sets the perimeter. Two elements together — that's already ceiling architecture.
If you have chosen a rosette but not selected a cornice — the ceiling composition remains incomplete. The rosette "hangs" in an empty field.
Matching rule: the cornice and rosette must be in the same style. A strict geometric cornice — with a simple geometric rosette. A cornice with floral relief — with a rosette with floral ornament.
How to choose a ceiling rosette for a chandelier: eight steps
This is the main practical block. Read in order, do not skip steps.
Step 1. Determine the size of the chandelier
The diameter of the chandelier base (shade or body) is the initial parameter. The rosette should be 1.5–2.5 times larger than the chandelier base. This creates a feeling of "framing" rather than "backing".
Examples:
-
Chandelier with a base of 200 mm → rosette 300–500 mm
-
Chandelier with base 300 mm → rosette 450–750 mm
-
Recessed light, base 100 mm → rosette 200–300 mm
-
Spider chandelier without clear base → reference room area
If the chandelier is large and visually occupies a significant part of the ceiling — the rosette can be smaller: it no longer 'frames' but 'supports'. But not smaller than the base diameter.
Step 2. Measure ceiling height
Ceiling height affects the permissible rosette size: the higher the ceiling, the larger the decor can be — and the more it is needed to be readable from floor level.
-
Ceiling 2.5 m → rosette 200–350 mm
-
Ceiling 2.7–2.8 m → rosette 300–500 mm
-
Ceiling 3.0 m → rosette 400–600 mm
-
Ceiling 3.5 m and above → rosette 500–800 mm, extended decor possible
A large rosette on a low ceiling feels oppressive — it "hovers" and visually "lowers" the space. On a high ceiling, a small rosette gets lost and looks out of place.
Step 3. Consider the room area
Area is an additional guideline that works together with ceiling height.
-
Up to 12 m² → rosette 200–320 mm
-
12–20 m² → rosette 320–450 mm
-
20–30 m² → rosette 400–600 mm
-
More than 30 m² → rosette 550–800 mm
For large halls and formal living rooms, an extended ceiling composition is used: a large central rosette + ornamental rings made of ceiling decor.
Step 4. Choose the rosette style
The rosette carries stylistic weight — sometimes more than the cornice itself. It is in the center of the ceiling, visible from everywhere. A poorly chosen style is immediately noticeable.
Three basic directions:
Modern classic and contemporary: smooth rosette without ornament or with minimal geometric relief. Diameter 250–400 mm. Clear outline, simple profiles.
Neoclassical: moderate relief, petal or geometric ornament. Diameter 350–550 mm. Reads well in both white and tinted colors.
Classic, Empire: developed floral ornament, several concentric relief zones, possible volutes and acanthus motif. Diameter 450–750 mm. Requires a corresponding cornice and overall decorative richness.
Step 5. Check the type of relief
The rosette relief should be readable under your lighting. This is important.
Direct overhead light (chandelier without diffusers) — relief reads well. Diffused light (chandelier with frosted shades) — relief reads softer, a richer ornament is needed. Side light (fixtures around the perimeter, no central light) — relief reads most expressively, even a simple profile will give beautiful shadows.
If you plan to backlight the rosette — a cornice with built-in LED strip will direct light along the ceiling and create a theatrical effect.
Step 6. Coordinate with the cornice
a polyurethane cornice and the ceiling rosette are two elements of a single ceiling system. They need to be chosen in coordination.
Principle: both elements must be from the same stylistic direction. Same level of relief detail, same profile character. Not necessarily from the same series — but from the same "language."
Additionally: the height of the cornice must match the scale of the rosette. A 60 mm cornice + a 600 mm rosette — a mismatch of scales. A 120 mm cornice + a 600 mm rosette — stylistic and scale harmony.
Step 7. Decide whether an extended composition is needed
One rosette — a basic solution. Good and sufficient for most rooms.
But for spacious halls, formal living rooms, studies with high ceilings, an extended composition is possible:
-
Central rosette (main element)
-
Ornamental ring around the rosette (made of ceiling decor)
-
A second, wider ring — for formal interiors
-
Additional medallions or ornamental inserts in the corners
This is already a ceiling "painting" — with a center, concentric bands, and a perimeter cornice. Such a ceiling becomes an independent decorative statement.
Step 8. Go to the STAVROS catalog
Once the parameters are defined, open Polyurethane ceiling rosettes and select a specific option: by diameter, style, and relief.
How to choose the size of molding for a chandelier: summary table
| Condition | What to choose | Catalog section |
|---|---|---|
| Bedroom up to 14 m², ceiling 2.5–2.7 m | Compact rosette 250–380 mm | ceiling rosettes |
| Living room 20–30 m², ceiling 2.7–3 m | Medium or large rosette 400–600 mm | ceiling rosettes |
| Hall or foyer, ceiling 3 m+ | Large rosette + additional decor | ceiling decor |
| Classic / neoclassical interior | Socket + cornice in the same style | Crown Molding |
| Selection of a complete stucco set | General section of polyurethane products | Polyurethane moldings |
| Grand interior, high ceiling | Extended ceiling composition | ceiling decor |
Where to use stucco under a chandelier: four scenarios
The question "where to use" for a ceiling rosette sounds strange — it would seem the answer is obvious: under the chandelier. But there are more nuances here than it seems.
In the living room: the main ceiling decor
The living room is the room where Polyurethane molding under the chandelier it works best. Here there is a high ceiling (as a rule), a large area, a representative light fixture, and high aesthetic requirements.
For a living room of 25–35 m²: a rosette of 450–600 mm with moderate or rich ornament. Cornice — 100–130 mm, in the same stylistic direction. Optionally — an additional ornamental ring of ceiling decor.
A spider chandelier with multiple arms? Then the ceiling rosette should be large enough to visually "hold" that scale: the diameter of the rosette should be no less than the diameter of the "spider."
A ceiling rosette in the living room creates an architectural center — a point around which the entire interior is organized. A properly selected Polyurethane ceiling decoration for the living room is a visible upgrade of the entire room's class.
In the bedroom: subtlety and proportion
The bedroom is a space of rest. Ceiling decor here should be less monumental than in the living room. But no less neat.
The task of the rosette in the bedroom is to create a calm decorative center. Not to press down, not to "shout," not to overload perception when you are lying on the bed and looking up.
For a bedroom of 14–18 m²: a rosette of 300–420 mm with a moderate or smooth relief. Cornice 70–90 mm. polyurethane moldings works best in the bedroom in white or cream — without gold, without contrasting patina.
Stucco molding under the chandelier in the bedroom is not "extra beauty." It is completeness. A bedroom with a cornice, rosette, and the right chandelier looks like a designed space, not just a "painted room with furniture."
Practical tip: if the chandelier in the bedroom is small (diameter 250–350 mm), choose a ceiling medallion with a relief that is readable from a distance of 2–3 m. A fine detailed ornament will not be visible from the bed — you need an ornament with large petals or geometric bands.
In the living room and hall: scale and grandeur
The living room is not just a large room. It is a space where people stop, look around, and form a first impression of the home. The ceiling is visible immediately — and its condition is "read" in the first seconds.
Ceiling Molding for Chandeliers in the living room or hall should be proportionate: diameter from 500 mm, possibly 650–750 mm. An expanded ceiling composition (medallion + ring of ceiling decor) — is appropriate and desirable.
Crown molding in the living room: 120–160 mm. This is not a decorative detail — it is an architectural element. Moldings on the walls, baseboard — everything should work in a unified system.
In interiors with crown moldings: systematic thinking
A separate scenario is when the interior already has a developed crown molding system and wall moldings. In this case, the ceiling medallion is not an independent "island," but a logical completion of the vertical: baseboard at the bottom, moldings in the middle, crown molding at the top, medallion in the center.
Consistency of all elements is key. Polyurethane moldings STAVROS presents collections that are stylistically coordinated: by choosing elements from one collection, you get an interior where everything "speaks" the same language.
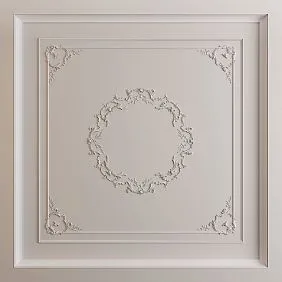
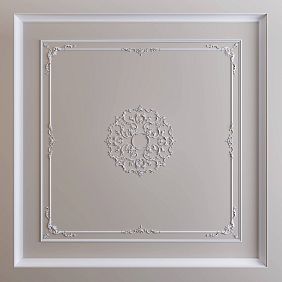
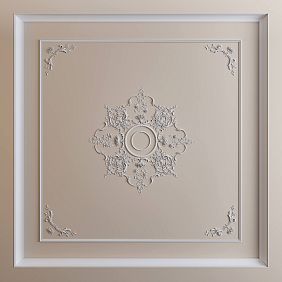
Five styles of ceiling rosettes: how to choose for your interior
Minimalism
Smooth disc with a thin profile along the edge. Diameter 200–350 mm. No ornament — only shape and border. Ideal for modern interiors, Scandinavian style, Japanese minimalism.
Cornice in pair: 50–70 mm, smooth. Chandelier: minimalist, with straight lines.
Geometric neoclassicism
Concentric bands with geometric ornament: diamonds, stars, zigzags, meander. Diameter 300–500 mm. Moderate expressiveness — for modern classic and neoclassical styles.
Cornice in pair: 80–110 mm, with geometric breaks. Chandelier: classic shape with symmetrical arms.
Floral classic
Petals, acanthus, scrolls, floral rosettes. Diameter 350–600 mm. Several concentric zones with increasing relief. Suitable for a full classic interior.
Cornice in pair: 100–140 mm, with developed profile and floral elements.
Empire
Strict large-scale geometry. Large profiles, powerful belts, symmetrical motifs. Diameter 450–700 mm. Monumentality without pomp.
Cornice in pair: 120–160 mm, with horizontal breaks. Chandelier: massive, with clear vertical lines.
Baroque and Neo-Baroque
Maximally rich relief: several tiers of ornament, volutes, winding ribbons, cartouches. Diameter 500–800 mm. For formal rooms with high ceilings.
Cornice in pair: 140–200 mm, rich profile. Extended ceiling composition is mandatory.
What to pair with a ceiling rosette: a complete architectural system
The rosette does not work alone. Complete system of ceiling and wall decor:
Ceiling cornice — Polyurethane Crown Molding along the perimeter of the ceiling. A mandatory element for any interior with a rosette. Sets the perimeter line and 'closes' the ceiling.
Wall moldings — moldings, cornices, and baseboards for frame schemes. Continue the architectural language from the ceiling downward.
A plinth is Polyurethane Baseboards lower horizontal element. Completes the vertical: rosette at the top — baseboard at the bottom.
Ceiling decor — Polyurethane ceiling decoration to extend the ceiling composition.
PU overlays — individual elements on walls for additional accents.
The complete system looks like this: baseboard → molding frames → horizontal belt → cornice → rosette. Five levels. Vertical from floor to ceiling.
Practical examples: three real interiors
Example 1. Neoclassical bedroom, ceiling 2.8 m, 16 m²
Chandelier — classic with a 280 mm base. Rosette: 420 mm, moderate floral relief in three zones. Cornice — 85 mm, with a break and a light ornamental frieze. Baseboard — 70 mm. All elements are white, for a single paint finish.
Result: a quiet, deep, "dressed" bedroom. The rosette doesn't shout — it frames. The cornice holds the space around the perimeter. The ceiling has ceased to be "just a ceiling."
Example 2. Classic-style living room, ceiling 3.0 m, 28 m²
Spider chandelier with a 350 mm base. Rosette: 580 mm, floral ornament, five concentric zones. Ornamental ring made of ceiling decor 900 mm in diameter. Cornice — 125 mm, rich profile. Molding frames on the accent wall, baseboard 95 mm.
Result: a formal living room with full ceiling architecture. The chandelier became the center of the space, not just a "light source."
Example 3. Empire-style hall, ceiling 3.5 m, 18 m²
Central light fixture with a 200 mm base. Rosette: 500 mm, geometric ornament with powerful concentric bands. Cornice — 145 mm. Vertical molding frames along the walls. Baseboard — 115 mm. Wall color — dark gray, stucco — white.
Result: a monumental, ceremonial hall. Despite the small area, the ceiling "holds" the height and works as an architectural statement.
How to calculate a set of stucco molding for a ceiling composition
Rosette: one piece. Diameter — according to the selection scheme (area + ceiling height + chandelier size).
Cornice: room perimeter × 1 + 10% allowance. Example: room 4 × 5 m, perimeter 18 linear m + 1.8 = 20 linear m = 10 pieces of 2 m each.
Ornamental ring (if necessary): one, diameter — 30–50% larger than the rosette.
Baseboard (to complete the system): perimeter − doorways + 10%. Select in the baseboards section.
Moldings (optional): in the corresponding section, calculation — using the frame scheme.
Total for the basic option (rosette + cornice + baseboard): three items from three different sections. This minimal set turns a "simple ceiling" into a "ceiling with architecture."
Mistakes when choosing stucco for a chandelier
Choosing a rosette without considering the chandelier diameter. A small rosette under a large chandelier — the decor "drowns" under the light fixture. A large rosette under a small chandelier — the light fixture looks random against the powerful decor. Proportion is key.
Not considering ceiling height. A 2.5 m ceiling and a 3.5 m ceiling require fundamentally different rosette scales.
Choosing a rosette without a cornice. A rosette without a perimeter line is an "island" on the ceiling. The cornice is a mandatory link.
Mixing incompatible styles. A baroque rosette with a minimalist cornice is a style conflict that is immediately visible.
Choosing too large a decor for a small room. A 600 mm rosette in a 12 m² bedroom takes up a significant portion of the ceiling plane and "weighs down" the space.
Buying only the rosette, ignoring the rest of the system. The cornice, baseboard, wall moldings are not an "addition." They are a system without which the rosette does not work fully.
Directing traffic to a general section instead of a specific one. For ceiling molding under a chandelier — ceiling rosettesExactly there, not into a random section.
Where to buy polyurethane ceiling molding under a chandelier
In the STAVROS catalog, polyurethane ceiling molding under a chandelier is concentrated in two main sections:
-
Ceiling rosettes → https://www.stavros.ru/products/izdeliya-iz-poliuretana/potolochnye-rozetki/ — main section for selecting and purchasing rosettes
-
Ceiling decor → https://www.stavros.ru/products/izdeliya-iz-poliuretana/dekor-dlya-potolkov/ — for extended ceiling compositions
For a complete ceiling kit:
-
Crown Molding — ceiling perimeter line
-
Baseboards — bottom line
-
Moldings — wall frames
General assortment moldings from polyurethane — in the main section of the catalog.
STAVROS — Russian manufacturer and supplier of decorative polyurethane products. Ceiling rosettes, cornices, moldings, baseboards, PU overlays and ceiling decor — real items with photos, sizes, article numbers and prices. All elements are paintable, use mounting adhesive, no special tools required. For those who want a finished ceiling — not just a "glued circle under a light bulb."
FAQ: polyurethane stucco for chandeliers
What is the stucco under a chandelier called?
A ceiling rosette is a decorative individual element that is mounted in the center of the ceiling around the chandelier attachment point. Main section: ceiling rosettes.
What diameter ceiling medallion to choose for a chandelier?
The diameter of the rosette is 1.5–2.5 × the diameter of the chandelier base. Additional guideline: room area and ceiling height. Up to 12 m² → 200–320 mm. 20–30 m² → 400–600 mm. Over 30 m² → from 550 mm.
Is a cornice needed if there is a rosette?
Yes. The cornice and rosette are two elements of a single ceiling system. The rosette sets the center, the cornice sets the perimeter. Without a cornice, the rosette looks like an "island" on an empty ceiling.
Can a rosette be installed on a stretch ceiling?
Special solutions exist for stretch ceilings. A polyurethane rosette is mounted on the main ceiling before stretching, or on a decorative ring of a special design. Check with the installers in advance.
How to match the rosette with the overall interior?
Choose the style of the rosette to match the style of the cornice and moldings. For neoclassicism — geometric ornament. For classic — floral. For a modern interior — a smooth or minimalist profile. All elements should be in the same direction.
Is an extended ceiling composition needed?
For rooms up to 25 m² — as a rule, one rosette + cornices are enough. For halls from 30 m² with high ceilings — an extended composition with rings from ceiling decor is appropriate and recommended.
Can I paint the socket a color other than white?
Yes. The polyurethane socket can be painted with acrylic paint of any color. Popular options: white, cream, "antique white," patina, light gilding of protruding parts.
Where can I buy a STAVROS polyurethane socket?
In the section ceiling roseThere, you can also filter by diameter and style.