Article Contents:
- Short answer: one SKU works if scale, joints, and finish match
- What is confirmed for PLT-006
- An old address with the word molding does not turn PLT-006 into a different product
- Why one profile can assemble a room
- Geometry becomes readable
- Less risk of accidental mismatch
- Easier to coordinate the finish
- Calculation turns into a single specification
- Office
- Library
- Classic bedroom
- Hallway
- Room with wall panels
- Low ceiling and strong contrast
- A complex ceiling cornice is already installed
- Built-in furniture up to the ceiling
- Cornice niche for curtains
- Active wallpaper or relief panels
- Beveled or multi-level ceiling
- Oak for the visible wooden contour
- Beech under enamel or calm finish
- MDF for painting
- Top and bottom in wall color
- Both perimeters in door color
- Bottom darker, top lighter
- Wood texture on both levels
- Flush joint
- Trim protrudes more
- Baseboard is thicker than the trim
- Baseboard passes under the door portal
- Paper strip
- Real sample
- Scaled photograph
- Temporary coloring
- Main finishing before installation
- Full finishing after installation
- Combined scheme
- Buy from photo without sample
- Multiply perimeter by two
- Not accounting for material length
- Mix materials randomly
- Confuse orientation
- Not checking trim
- Forget about cabinets to ceiling
- Order without reserve
- Start painting before acceptance
- Store planks vertically
- Open the product card
- Select material
- Order a sample
- Compile two lists
- Coordinate the installation
- Check the invoice
- First the category, then the exact card
- Can PLT-006 be used simultaneously as a floor and ceiling plinth?
- What is the size of PLT-006?
- What materials is the profile made from?
- Why is molding-mld-030 written in the page address?
- Will a height of 100 mm work for a low ceiling?
- Do I need to buy the same material for the floor and ceiling?
- What to choose: oak or beech?
- When is it better to choose MDF?
- How do I calculate the quantity of PLT-006?
- Do I need to subtract doors from the upper perimeter?
- Can I use leftover floor material on the ceiling?
- What spare quantity should I order?
- Can PLT-006 be glued to a stretch ceiling?
- Is PLT-006 compatible with any door trim?
- Is the profile installed the same way at the bottom and top?
- Do I need to paint the profile before installation?
- Where can I see other profiles?
- Can I install PLT-006 only on the floor?
- Can it only be installed under the ceiling?
- What to check upon receipt?
- Where can I check the current price and availability?
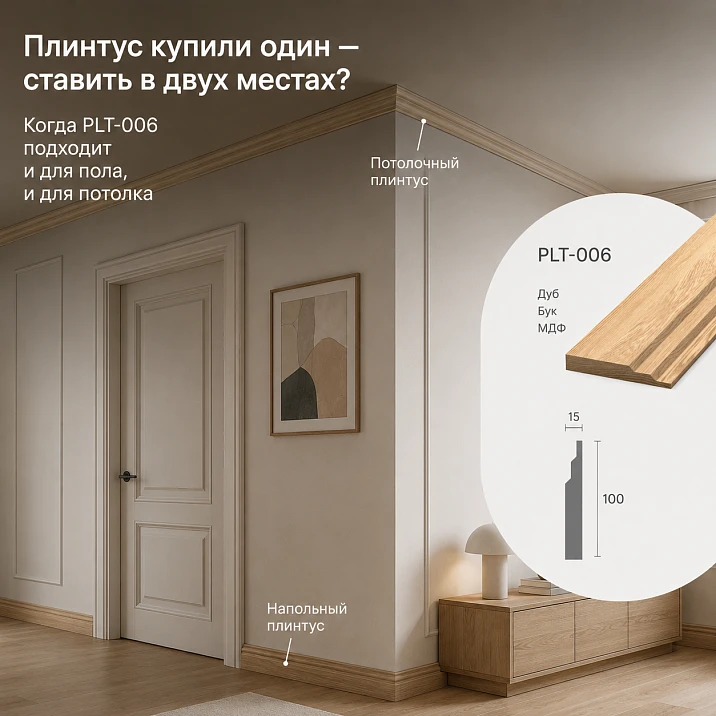
The idea seems almost foolproof: choose one beautiful wooden profile, run it along the floor perimeter, repeat it under the ceiling — and get an interior where the lower and upper boundaries speak the same language. The buyer decides buy wooden skirting board PLT-006, sees the height of 100 mm, options in oak, beech, and MDF, and most importantly — several purposes at once: skirting board, architrave, and cornice. A practical question arises: can one order a single item for both floor and ceiling without selecting two different profiles?
It is possible — but not automatically. One profile can indeed assemble the room into a cohesive architectural frame. However, a successful result depends not only on the matching item number. You need to check the room height, the shape of PLT-006 in the actual cross-section, door architraves, built-in furniture, ceiling finishing, material, plank length, profile direction, and two different installation nodes. The lower plank works near the floor, doors, and furniture. The upper one works near the ceiling, curtains, ventilation grilles, cabinets, and lighting. Identical geometry does not cancel out different conditions.
The strong side of the solution is that the buyer does not try to randomly find a "similar" cornice. He uses one confirmed profile and calculates two perimeters in advance. The weak point is the temptation to multiply the wall length by two and immediately place an order. Such a calculation does not account for doors, cabinets up to the ceiling, the difference in plank length for solid wood and MDF, corner cuts, and the fact that under the ceiling PLT-006 may require a different orientation.
For those who are going to to buy wooden baseboard not for one, but for two perimeters at once, what is needed is not a general overview of the assortment, but a check of the specific solution. Below is analyzed when PLT-006 with a height of 100 mm should be used at the bottom and top, when repetition makes the room heavy, how to calculate planks separately for two levels, and what to specify in the order on STAVROS.
Short answer: one item number works if the scale, joints, and finish match
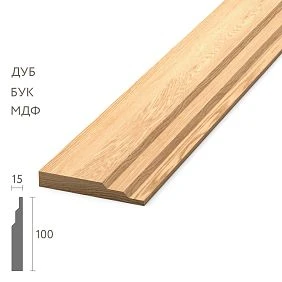
PLT-006 allows floor and ceiling application. The card calls it a wooden baseboard, trim, and cornice, and the description refers to it as a universal profile for finishing the wall-floor joint and the wall-ceiling joint. Therefore, the very idea of using PLT-006 in two places does not contradict the product's purpose. When the scale, material, cutting, and installation joints are confirmed, you can order PLT-006 for the floor and ceiling with one specification, but with a separate list for the lower and upper contours.
But you can buy the total length only after six checks:
-
The 100 mm height is proportionate to the room and does not visually lower the ceiling.
-
The profile does not conflict with door trims and wall panels.
-
In the upper perimeter, there are no cabinets, cornice niches, grilles, or other obstacles not accounted for in the plan.
-
One material is selected or a combination of materials is consciously agreed upon.
-
The lower and upper cutting plans are calculated separately.
-
The installer understands how to orient the profile and handle corners at each level.
If at least one item is not confirmed, before Buy skirting board, it is wiser to order a sample, apply it to the floor and ceiling, and then decide whether one SKU is needed for both perimeters.




What is confirmed for PLT-006
The product card contains several modifications. The height remains common — 100 mm. Thickness and length depend on the material: for beech and oak, thickness is 15 mm and length is 2400 mm; for MDF, thickness is 16 mm and length is 2600 mm. The page also features regular and moisture-resistant MDF. The sanding quality is "Prestige". Available preparation options depend on the selected material and configuration, so the specific line must be verified before ordering.
| Parameter | Confirmed data | What the buyer should check |
|---|---|---|
| Article number | PLT-006 | This exact SKU should be in the invoice and specification |
| Card name | Wooden baseboard / trim / cornice | The profile is designed for multiple application scenarios |
| Height A | 100 мм | Proportionality to the floor, ceiling, doors, and furniture |
| Thickness C for array | 15 мм | Joint with casing, panel, and base |
| Thickness C for MDF | 16 мм | Alignment with other elements and depth of abutment |
| Length L for beech and oak | 2400 мм | Number of slats and cutting map |
| Length L for MDF | 2600 мм | Number of slats and possibility to reduce direct joints |
| Materials | Beech, oak, MDF, moisture-resistant MDF | Required texture, finish, and room conditions |
| Sanding | «Prestige» | Surface condition before finishing |
| Preparation | For enamel or tinting depending on the option | Do not mix different preparation types in one visible contour |
| Application | Floor, ceiling, trim | For the article, floor and ceiling perimeters are important |
| Usage | Indoors | Do not transfer interior profile to facade |
The table shows the main feature of PLT-006: the geometric pattern is the same, but product modifications differ. The phrase "order one profile" means choosing one article number, but does not exempt from choosing material, length, and surface preparation.
Our factory also produces:


The old address with the word molding does not turn PLT-006 into a different product
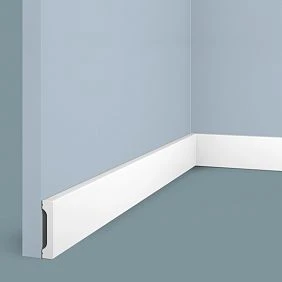
The card retains a URL with a fragment molding-mld-030The buyer might think the link leads to the old MLD-030 model or to a molding accidentally renamed PLT-006. You should focus not on the historical part of the address, but on the current card name, article number, drawing, and options table.
In the request, estimate, and correspondence, it is better to write:
PLT-006, height 100 mm, material ___, thickness ___ mm, strip length ___ mm, finish ___, application on floor and ceiling.
This format eliminates confusion. If you send only a link with the old word to the manager molding, and tell the installer "that same molding," the parties may understand the task differently. The article number PLT-006 and modification parameters remove ambiguity.
Get Consultation
Why one profile can assemble a room
An interior has lower and upper boundaries. At the bottom, the wall meets the floor; at the top, it meets the ceiling. When these two lines are decorated with completely different details, the room may look normal, but the connection between zones has to be created with wall color, doors, furniture, or stucco. Repeating PLT-006 offers a different technique: one relief frames the wall, like a frame frames a picture.
In practice, this gives several effects.
Geometry becomes readable
The same profile emphasizes the perimeter, especially in a rectangular room with clear architecture. The eye sees two parallel lines and more easily reads the wall height, door placement, and panel rhythm.
Less risk of accidental mismatch
Selecting a separate ceiling cornice that is 'approximately similar' is harder than repeating the exact profile. Differences in radius, ledge, or thickness are especially noticeable when painted in a single color.
Easier to coordinate the finish
One article can be ordered in one material and prepared according to a single system. This does not mean that the top and bottom must have the same color, but the initial shape will be coordinated.
The calculation becomes a single specification
Instead of two random purchases, a common order appears: lower perimeter, upper perimeter, margin for each level, material, plank length, finish, and bundle marking.
Why 'identical' does not mean 'mirrored'
The profile under the ceiling is in a different planar situation. At the floor, its lower edge adjoins the covering, and the working surface is read from bottom to top. Under the ceiling, the same plank is perceived from top to bottom. Sometimes the profile is mounted in the same orientation, sometimes it is rotated — this depends on the drawing and the desired pattern.
Do not choose orientation based on the product card photo. A cross-section sample is needed. Attach it:
-
to the wall at the floor;
-
to the joint of the wall and ceiling;
-
in the normal orientation;
-
rotated;
-
next to the door casing;
-
near the presumed line of a cabinet or curtain.
Take photos at eye level and step back a few meters. This test answers questions that digital visualization cannot resolve: how deep the shadow falls, whether the top line looks inverted, whether the relief becomes too active.
Height of 100 mm at the floor: a calm architectural boundary or too large a baseboard
A height of 100 mm is noticeable. It is not a thin slat that blends into the wall, but it is not a monumental tall baseboard either. On the floor, PLT-006 forms a confident bottom line, covers the joint, and helps connect doors with wall finishes. For a buyer who plans Buy wooden floor skirting board, it is necessary to check not only the height of the profile, but also its meeting with casings, furniture, outlets, and flooring.
The solution is usually successful when:
-
door trims have a comparable scale;
-
the ceiling is not too low;
-
the room has panels, frames, or other architectural lines;
-
furniture stands on legs and does not cover the entire perimeter;
-
the color of the baseboard supports the doors, floor, or wall;
-
the profile does not conflict with outlets and hidden utilities.
The error occurs when height is estimated only from a catalog image. On a white background, 100 mm is hard to feel. In a narrow corridor, the profile will be close to the eyes and take up a noticeable part of the wall. In a spacious office, it may look restrained.
The same 100 mm under the ceiling is perceived differently
Under the ceiling, the profile is seen at an angle. Light from a window or lamps creates a shadow on the relief, and the top line affects the sense of height. Therefore, PLT-006, which seems neutral near the floor, can become the main architectural element of the room from above. For those planning Buy wooden ceiling baseboard, it is especially important to check the profile in full scale: a height of 100 mm near the ceiling is perceived more strongly than near the floor.
The ceiling option works well if the profile:
-
does not overlap the cornice niche;
-
does not press against the top of the door portal;
-
does not interfere with cabinets up to the ceiling;
-
does not conflict with the stucco rosette and complex cornice;
-
does not make a low room feel visually more cramped;
-
receives sufficient side lighting;
-
remains readable against the wall and ceiling background.
Before ordering, draw a horizontal line on the wall at a distance of 100 mm from the ceiling or attach a paper strip of that height. This simple mock-up does not show the relief, but it honestly demonstrates the scale.
Baseboard and cornice in the same style: when repetition looks convincing
One profile at the bottom and top is especially expressive in interiors where architecture matters more than random decor. This is not necessarily about palace classics. PLT-006 has a universal medium cross-section and can support a calm modern interior if the color and surroundings are not overloaded.
Cabinet
In a study, a single contour helps bring together bookshelves, wooden doors, and a desk. The lower plinth protects the wall-to-floor joint and finishes the panels, while the upper one sets the ceiling boundary. If the cabinets reach the ceiling, the upper profile should either be interrupted along their contour or included in the furniture design in advance.
Library
Repeating the profile is appropriate near book sections and boiserie. However, first check how the top rail fits the crown of the cabinets. Two almost identical cornices placed nearby can compete. Sometimes PLT-006 is better run only along free walls, sometimes used as part of a unified system.
Classic bedroom
In a bedroom, the profile can support door trims, the headboard, and wall frames. A light finish reduces contrast, while an oak tint makes the frame more noticeable. With a low ceiling, it is better to check not only the 100 mm height but also the width of the shadow cast by the relief.
Corridor
In a long hallway, two parallel lines emphasize perspective. This can elongate the space, but any level discrepancy becomes noticeable. Before installing the upper profile, check the ceiling for levelness; for the lower one, check the floor line and the junction with doors.
Room with wall panels
If the panels end at a set height, PLT-006 can serve as the lower and upper framing of the entire wall. The 15–16 mm thickness should align with the panel thickness. The profile does not have to lie in the same plane, but any difference should be intentional.
When repeating PLT-006 becomes a mistake
A single profile is not a mandatory rule for a good interior. In some rooms, two identical contours create the feeling of a frame that has become tighter than the wall itself.
Low ceiling and strong contrast
Dark PLT-006 at the bottom and top on a light wall visually limits the height. The lower the room and the more contrasting the finish, the more careful a full-scale mockup needs to be.
A complex ceiling cornice is already installed
If there is molding with developed relief under the ceiling, the second profile may look like a technical strip under the decorative cornice. Here it is better to choose one main element rather than stacking two different accents.
Built-in furniture up to the ceiling
Wardrobes, kitchen, library, or dressing room break the upper perimeter. This does not prohibit PLT-006, but requires a joint design. You cannot start installation along a free wall and decide the junction with the cabinet at the last moment.
Cornice niche for curtains
The profile may hit the niche, cover its edge, or disrupt access to the rail. The joint needs to be drawn in cross-section.
Active wallpaper or relief panels
Two contrasting lines plus a saturated wall pattern create overload. In this case, one PLT-006 at the floor may be stronger than repeating at the bottom and top.
Sloped or multi-level ceiling
The universal profile is designed for linear application. Complex geometry increases the number of non-standard angles, waste, and visible transitions. Before ordering, a layout of all surfaces is required.
One SKU does not necessarily mean one material
The customer can order baseboard PLT-006 in oak for the floor and MDF for painting for the ceiling. The geometry will remain related, but the material, thickness, and length of the planks will differ. Such a solution is acceptable if it is provided for by the project and both modifications are separately listed in the invoice.
However, the phrase "one profile unifies the interior" more often implies a complete match. For the most cohesive result, it is more reasonable to:
-
use one material;
-
order visible sections in one batch;
-
choose coordinated preparation;
-
make samples of the finish coating;
-
mark the upper and lower sets separately.
Combining materials is useful when the bottom should retain a pronounced wood texture, and the top is planned to be painted together with the wall or ceiling. Then the shape is repeated, not the entire finish.
Oak, beech, or MDF: three characters of one PLT-006
The material changes not only the price. It affects the length of the plank, thickness, surface pattern, finishing method, and how noticeable the profile becomes. When a visible wood contour is needed, you can Buy solid wood skirting board; for a smooth opaque finish, MDF is considered. In any case, before payment, you need to order a plinth made of oak, beech, or MDF in the exactly selected modification, rather than limiting yourself to the general entry "PLT-006".
| Option | Size by card | Strong point in the project | What to pay attention to |
| Oak | 100 × 15 × 2400 mm | Pronounced natural texture, suitable for transparent or semi-transparent finishes | Matching the shade and pattern between the upper and lower perimeter |
| Beech | 100 × 15 × 2400 mm | Calmer texture, convenient for painting and restrained wood finishing | Specific type of lamination and chosen finish |
| MDF | 100 × 16 × 2600 mm | Smooth surface and long plank for painted contour | End protection, room conditions, and actual modification |
| Moisture-resistant MDF | 100 × 16 × 2600 mm | Additional card option for a project with higher substrate requirements | It does not turn the profile into an outdoor product; operation remains interior |
Oak for visible wooden contour
Oak has a pronounced porous texture. When PLT-006 is left wood-toned, the top and bottom profiles become noticeable elements. It is important to check whether the oak frame will be too contrasting and to coordinate the tone in advance with doors, floor, furniture, and trim.
Beech for enamel or calm finish
Beech is perceived as smoother. It is often chosen for opaque coating, but specific preparation should be checked in the selected card line. If the top and bottom are painted identically, beech allows preserving the wooden base without the bright oak grain.
MDF for painting
MDF is rational when precise geometry and uniform color are key. A length of 2600 mm can reduce the number of direct joints compared to a 2400 mm plank. But the floor and ceiling sections need equally careful protection and finishing, and regular MDF should not automatically be considered suitable for constant moisture.
One color or different: repeating the profile does not require literal matching
A single PLT-006 can be finished in three ways.
Top and bottom in wall color
The profile is read through shadow, not contrast. This solution suits small rooms where two bright frames would be too active.
Both perimeters in door color
This gives the interior a cohesive joinery system. Before ordering, it is especially important match the baseboard height to the casings, to check the thickness and decide how the bottom profile will end at the vertical trim.
Bottom darker, top lighter
The geometry is preserved, but the functions differ. The bottom line connects with the floor, the top dissolves at the ceiling. This technique is useful if the wood color on top makes the room feel lower.
Wood texture on both levels
The most expressive scenario. It requires samples, batch coordination, and a calm environment. A slight difference in shade at the top and bottom can be natural, but random mixing of beech, oak, and different tints will ruin the concept.
Door casings: where a single line is tested for precision
At the floor PLT-006, it almost inevitably meets doorways. If this junction is not thought through, the beautiful overall concept breaks down in the most visible place.
Check four dimensions:
-
the height of PLT-006 — 100 mm;
-
the thickness of the selected modification — 15 or 16 mm;
-
the width and relief of the trim;
-
the protrusion of the trim relative to the wall plane.
Flush joint
It is possible when thicknesses and shapes are coordinated. The end of the skirting board approaches the trim without an accidental step. Such a junction requires precise cutting and careful finishing.
Trim protrudes more
The skirting board butts against the side edge of the trim. This is a clear scenario if the end of PLT-006 is processed and painted as carefully as the front side.
The baseboard is thicker than the trim
A protrusion occurs that looks random and collects impacts. In this case, the trim is replaced, a different joining method is chosen, or PLT-006 is abandoned in the specific room.
The baseboard runs under the door portal
In a complex classical composition, PLT-006 may be part of the overall plinth. Such a joint is designed in advance, not cut on site as an afterthought.
The upper perimeter also meets doors
It seems that the door only affects the floor baseboard. In fact, a tall portal, transom, cornice above the door, or trim reaching the ceiling can intersect the upper line of PLT-006.
Before ordering, mark on the elevation:
-
the top of each door;
-
decorative cornices above openings;
-
built-in transoms;
-
height of cabinets;
-
transitions between rooms without doors;
-
beams and ceiling drops.
If the ceiling PLT-006 passes over a regular opening, it maintains continuity. If it meets a portal, you need to determine who is the main one: the room profile or the door cornice. The two elements should not accidentally overlap each other.
How to check room height without abstract rules
There is no single number after which PLT-006 automatically becomes right or wrong. Perception is influenced by proportions, color, relief, lighting, and furniture. So instead of a universal prohibition, use a mockup.
Paper strip
Cut strips 100 mm high. Attach one at the floor, the second under the ceiling. Walk around the room, look from the door, from the sofa, from the window. The strip will show how much of the wall the profile will take up.
Real sample
Paper doesn't cast shadows. Better order samples of molded products and check PLT-006 in two positions. The sample helps evaluate relief, depth, color, and orientation.
Photo with scale
Place a tape measure or an A4 sheet next to it. Without scale, the photo will again make the profile abstract.
Temporary painting
If enamel is planned, cover the sample with a test color. White, dark, and wood PLT-006 are perceived as three different elements in scale, although the size does not change.
Calculation does not start with doubling the perimeter
The most common arithmetic mistake looks simple:
room perimeter × 2 = amount of profile.
The formula is only suitable as a rough budget estimate. For ordering, it is too inaccurate. The bottom and top lines have different deductions, joints, and obstacles.
Correct scheme:
lower useful perimeter + upper useful perimeter + technological allowance = total length.
After that, the total length is converted into whole strips of the selected length, but the cutting map is made separately for the upper and lower sets.
Lower perimeter: what to subtract
From the sum of wall lengths, areas where PLT-006 is not installed are usually excluded:
-
width of door openings;
-
built-in furniture without a plinth behind the cabinet;
-
fireplace portal, if it has its own base;
-
stair opening;
-
areas with a separate stone or metal border;
-
technical hatches, if they require free access.
Do not subtract portable furniture. A sofa, dresser, or armchair may change position, and the baseboard should continue the wall contour.
Upper perimeter: other deductions
At the ceiling, door openings usually do not reduce the length: the profile passes above them. But other exceptions appear:
-
cabinets and kitchens up to the ceiling;
-
cornice niches;
-
beams;
-
ventilation ducts;
-
open mezzanines;
-
ceiling level differences;
-
areas with a different ceiling cornice;
-
stair openings and double-height spaces.
Therefore, the upper perimeter can be longer than the lower one even in the same room.
Example calculation for a room 4.2 × 5.1 m
Initial geometric perimeter:
(4.2 + 5.1) × 2 = 18.6 m.
The room has a door 0.9 m wide and a built-in wardrobe 2.4 m long that reaches the ceiling. The profile is not installed behind the wardrobe.
Lower line:
18.6 − 0.9 − 2.4 = 15.3 m.
Upper line:
18.6 − 2.4 = 16.2 m.
Total net footage:
15.3 + 16.2 = 31.5 m.
If you preliminarily add 10% for cuts and sorting:
31.5 × 1.10 = 34.65 m.
For a plank length of 2.4 m, linear division gives:
34.65 ÷ 2.4 = 14.44, i.e., at least 15 planks.
For MDF with a length of 2.6 m:
34.65 ÷ 2.6 = 13.33, i.e., at least 14 planks.
But this is not the final order yet. If on a visible wall 5.1 m long a minimum number of joints is required, cutting may increase the quantity by one plank. Therefore, after the linear calculation, a map of each section is made.
Why upper and lower remnants cannot be mixed without a plan
On paper, an 800 mm remnant from the floor section fits a 750 mm ceiling length. On site, it may turn out that:
-
the end is already cut in the other direction;
-
the profile is oriented differently;
-
the wood grain does not match the visible section;
-
the remnant belongs to another room;
-
the piece is damaged during the lower cutting;
-
the upper part requires a solid segment without a short joint.
Useful remnants should be considered, but not assumed to be universal in advance. Label each plank and each offcut: material, room, level, length, profile direction.
The allowance for floor and ceiling is calculated separately
A single percentage margin is not always accurate. The lower contour may have many doors and short sections, while the upper one has four long walls and four internal corners. Losses will differ.
| Situation | What increases consumption | How to proceed |
| Simple rectangular room | Four internal corners and straight joints | Create a base cutting map |
| Many doors | Short sections and end joints | Calculate each pier separately |
| Bay window | Non-standard angles | Make templates and increase the reserve after a test cut |
| Sloped ceiling | Complex geometry of the top line | Do not combine top margin with bottom |
| Oak for tinting | Pattern and shade matching | Order visible zones in one batch |
| Painted MDF | Fewer pattern requirements, but edge integrity is important | Plan long sections of 2600 mm |
| Installation without experience | Risk of incorrect angle | Add a control plank |
A reserve is not a formal surcharge. It must address a specific risk. To order the required amount of wooden baseboard, first create a detailed cutting map, and only then convert the footage into whole planks of a specific length.
How many planks to order: working table
Before placing the order, fill out the list.
| Section | Net length | Number of corners | Desired joint | Plank | Remainder |
| Floor, wall 1 | ___ mm | ___ | solid / composite | №___ | ___ mm |
| Floor, wall 2 | ___ mm | ___ | solid / composite | №___ | ___ mm |
| Ceiling, wall 1 | ___ mm | ___ | solid / composite | №___ | ___ mm |
| Ceiling, wall 2 | ___ mm | ___ | solid / composite | №___ | ___ mm |
| Door jamb | ___ mm | ___ | End abutment | №___ | ___ mm |
| Area near the cabinet | ___ mm | ___ | Special joint | №___ | ___ mm |
Such a table quickly shows where linear footage is insufficient. If one wall is 2700 mm, a solid wood plank of 2400 mm will not cover it entirely. MDF of 2600 mm will also require a joint. Therefore, its location must be chosen before cutting.
Straight joints: where to hide them, and where not to
A joint is not a defect. The problem arises when it falls in the center of the most illuminated wall, does not match the pattern, or separates after finishing.
On the floor, less noticeable places are usually:
-
behind an opening door;
-
behind tall furniture that does not change position;
-
near the inner corner;
-
on a short partition wall.
Under the ceiling, the situation is different. A cabinet can hide a section, but light from the window will emphasize the seam. The cutting plan must account for the direction of daylight and artificial light.
Floor and ceiling corners are cut according to different scenarios
The inner corner at the floor is accessible from the master's level. The ceiling corner requires a ladder, support for a long plank, and precise orientation holding. Marking errors are especially likely here.
Before cutting, label the plank:
-
"floor" or "ceiling";
-
wall number;
-
left and right end;
-
front side;
-
top of the profile;
-
length after cutting.
For general technology, it is useful to study in advance Installation of Wooden Skirting Board, but on site you still need a separate plan for the top node. Ceiling installation requires a reliable base and temporary fixation that will prevent the long part from sliding down before the glue sets.
Floor-level installation: load comes not only from the wall
The lower PLT-006 is located near cleaning, shoes, furniture, and possible impacts. The choice of fastening depends on the wall, the evenness of the base, the profile material, and the future finishing.
Check:
-
how even the wall is;
-
whether there is a floor expansion joint;
-
whether the base can be drilled;
-
where hidden utilities run;
-
whether the profile will be painted before installation;
-
how to mask mounting points;
-
how tightly the bottom edge fits the floor.
The baseboard should not forcibly follow the waves of the floor. If the base is noticeably uneven, first solve the problem of the planes, then order the finished trim.
Ceiling mounting: weight, fixation, and access
The upper PLT-006 does not experience shoe impacts, but constantly works against gravity. The adhesive compound, base, and temporary fixation must match the material and the actual surface.
Pay special attention to checking:
-
painted wall;
-
loose plaster;
-
stretch ceiling;
-
drywall structure;
-
hidden cornice;
-
electrical routing;
-
junction with ventilation;
-
availability of space for tools.
Do not transfer the lower mounting scenario upward without checking. A screw that is convenient at floor level may become noticeable in side light. Adhesive that holds a short floor segment may require different fixation on a long ceiling strip.
Stretch ceiling: profile is attached not to the fabric
If the room has a stretch ceiling, PLT-006 must not transfer load to the fabric. The assembly is designed on the wall or a pre-prepared embedded element, preserving access and not damaging the ceiling system.
Before ordering, clarify:
-
distance from the wall to the stretch ceiling profile;
-
possibility of gluing to the wall;
-
presence of a shadow or technological gap;
-
work order;
-
who is responsible for the junction of two systems.
First, the cross-section is agreed upon, then the footage is purchased. Otherwise, a wooden cornice may block technical access or not fit into the reserved zone.
Curtains and PLT-006: the upper profile must not interfere with the fabric
Ceiling plinth often intersects with the curtain rod. Check the fabric trajectory: when opening, the curtain should not catch on the relief and constantly rub against the trim.
Three solutions are possible:
-
PLT-006 runs continuously, and the rail is located farther from the wall.
-
The profile is interrupted at the curtain niche.
-
PLT-006 frames the outer edge of the niche as a separate architectural contour.
The choice depends on the cross-section. This cannot be decided from a single photo of the room.
Sockets, switches, and the bottom line
A height of 100 mm can come close to low-mounted sockets, internet outlets, leak sensors, and hidden hatches. Measure not only the perimeter but also the height of all devices from the finished floor.
If a socket falls within the profile zone, you cannot simply make a random cutout. It will weaken the pattern and complicate the finishing. It is better to plan ahead:
-
relocate the device;
-
choose a different profile;
-
change the PLT-006 route;
-
coordinate a neat frame;
-
check access requirements.
Ventilation and the top line
Under the ceiling, there are grilles, sensors, cable trays, fire safety devices, and hatches. The profile must not block openings or hinder maintenance.
On the elevation, mark the overall dimensions of each device, not just its center. Compare the bottom mark with the 100 mm zone from the ceiling. If there is an intersection, a separate detail or abandoning the continuous contour on that wall is needed.
How not to confuse PLT-006 with a regular floor skirting board
A regular floor skirting board is chosen only by the bottom assembly: height, gap coverage, floor material, architraves. In this article, PLT-006 is evaluated as a dual-purpose profile.
Signs of a conscious choice:
-
the card directly allows ceiling application;
-
the height is checked in full scale;
-
two perimeters are drawn;
-
a material is selected for each zone;
-
the profile orientation is confirmed;
-
the installation assemblies are separated;
-
the allowance is calculated not by a random percentage.
If these checks are absent, the buyer is essentially ordering floor plinth and hoping the leftovers will fit on top.
How not to confuse PLT-006 with a ceiling cornice for curtains
The word "cornice" is used in different meanings. PLT-006 can work as a decorative profile at the junction of wall and ceiling. It is not a rail along which curtains move, and it does not replace a load-bearing system for fabric.
In the specification, it is better to write:
-
"PLT-006 — decorative ceiling profile";
-
"curtain rod / rail — a separate system."
This way, installers will not confuse the purpose and will not try to attach curtains to the decorative trim.
How not to confuse one article with one length
PLT-006 is produced in different materials and lengths. For solid wood, it is 2400 mm; for MDF, it is 2600 mm. Therefore, a request like "need 30 meters of PLT-006" is incomplete.
It is necessary to specify:
-
material;
-
the length of the strip;
-
thickness;
-
preparation;
-
number of planks;
-
distribution to floor and ceiling;
-
allowance;
-
Checking geometry before painting and installation
The long profile must maintain its shape along the entire strip. Before starting the finish, it is useful Check the geometry and moisture of the baseboard. This is especially important for a project with two parallel perimeters: a slight deviation at the bottom may be lost next to furniture, while under the ceiling it will show as a long shadow.
The check is carried out on a flat surface:
-
inspect the strip along its length;
-
compare several items from the batch;
-
check the cross-section at several points;
-
look at the ends;
-
note chips and damage;
-
check the material and preparation;
-
divide the planks into upper and lower sets.
Do not straighten the profile with fasteners without assessing the cause. Strong forced pressing creates tension and may open the joint after installation.
One batch reduces the risk of visual inconsistency
For painted MDF, batch differences are less noticeable after opaque finishing, although geometry and surface are still checked. For oak or beech under a transparent coating, the batch matters more: planks differ in grain and shade.
If the top and bottom should look like a single wooden frame, it is better to order the entire volume at once. Then, upon delivery, sort the planks by tone:
-
calmer ones — for long visible walls;
-
similar in grain — for parallel sections;
-
contrasting ones — for less noticeable areas;
-
short leftovers — only after the cutting plan.
Ordering in different months does not necessarily result in incompatible material, but the likelihood of a noticeable difference is higher.
Finish before installation or after
Each order has its advantages and limitations.
Main finishing before installation
Planks are convenient to sand and paint horizontally. It is easier to treat the bottom edge, ends, and relief. On site, joints, fasteners, and local touch-ups remain.
Full finishing after installation
You can hide seams and achieve a uniform color with the wall. But it is harder to neatly paint the ceiling profile, protect adjacent surfaces, and avoid drips.
Combined scheme
The main coating is applied in advance; after installation, fastening points, joints, and damage are covered. For PLT-006 on two levels, this approach is often convenient, but the specific system depends on the material and chosen finish.
Before starting work, do a test on a scrap piece. The same color on oak, beech, and MDF may be perceived differently due to texture and absorption.
Materials for installation cannot be chosen solely based on the word "wooden"
The adhesive must match the base, the profile material, the position of the part, and the future finish. The compound for a floor area should not be automatically transferred to the ceiling without checking the technical requirements of the adhesive manufacturer.
In the STAVROS section you can Select materials for installation and finishing and compare them with the project. It is useful to inform the buyer:
-
PLT-006 made of solid wood or MDF;
-
the length and number of slats;
-
wall type;
-
the type of ceiling;
-
the presence of painting;
-
temporary fixation method;
-
room conditions;
-
the need for subsequent touch-up painting.
Adhesive, primer, putty, and finish coating form a system. A random set of different compounds may cause incompatibility in adhesion or color.
What to buy together with PLT-006
The profile itself covers the architectural line, but the project consists not only of slats. After deciding buy skirting board PLT-006 related items are selected based on the base, profile material, fixing method, and future finishing.
What to add Why For which scenario What to check Sample PLT-006 See the scale, relief, and orientation Any order for two perimeters Material and future color Construction adhesive Fix the profile on a suitable base Adhesive or combined installation Compatibility with wall, MDF, or solid wood Mechanical fasteners Additional fixation Uneven or complex bases Hidden communications and point masking Primer Prepare the surface Paintable MDF or solid wood Compatibility with finish Putty Close joints and fasteners Painting with opaque enamel Elasticity and color Finish coating Protect and design the profile Enamel, tinting, varnish, or oil Preparation of a specific modification Protective packaging Keep long strips during transportation Delivery of batch Terms in the card and invoice Cutting map Reduce waste Two perimeters and complex corners Lengths of 2400 or 2600 mm Not all items are sold as a single set. The invoice should clearly indicate what relates to the product, what to the packaging, and what is purchased separately.
The category is needed not to reject PLT-006, but for a control comparison
Even if the decision is almost made, before you to buy wooden baseboard, compare PLT-006 with neighboring profiles by height and relief. For those entering the query "buy wooden skirting board", the category helps to see not only the price and material, but also differences in the scale of profiles. The control comparison answers one question: does the 100 mm height and specific cross-section of PLT-006 really work best at two points in the room?
It is useful to compare based on the actual drawing:
-
height;
-
thickness;
-
relief protrusion;
-
bar length;
-
material;
-
finishing option;
-
possibility of floor and ceiling application.
If the adjacent profile is better only from above, perhaps the interior needs two different elements. Unity should not be achieved at the cost of incorrect proportions.
When one PLT-006 saves not money, but the number of solutions
The main benefit of a unified profile is not necessarily cost reduction. Two perimeters still require a large footage, corners, fastening, and finishing. The savings manifest in something else:
-
no need to coordinate two different patterns;
-
easier to order one sample;
-
easier to control color;
-
fewer items in the specification;
-
clearer for the installer;
-
residues can potentially be redistributed;
-
the interior gets a predictable repeat.
But if for the PLT-006 ceiling it is difficult to go around cabinets, niches, and grilles, a single profile can increase labor costs. You need to calculate the entire project, not the price of one linear meter.
When two different profiles are more rational
Choose a separate ceiling element if:
-
the room needs a lighter top;
-
floor trims require a height of 100 mm, and the ceiling seems low;
-
the upper joint needs to cover a larger gap;
-
there is complex molding;
-
The ceiling profile must hide the lighting;
-
The floor material requires oak, and the top is planned to be fully dissolved;
-
The PLT-006 shape is inconvenient for a specific orientation under the ceiling.
Different profiles do not mean a disjointed interior. They can be linked by color, material, repetition of simple lines, or door joinery.
Mistakes that prevent a common profile from unifying the interior
Buying from a photo without a sample
The image does not show the real height of 100 mm and the shadow under the ceiling. Solution: check a physical sample in two positions.
Multiply the perimeter by two
Doors reduce the bottom, but not the top; a cabinet to the ceiling reduces both contours. Solution: two separate lists.
Not accounting for material length
Array — 2400 mm, MDF — 2600 mm. Solution: count whole planks of the selected modification.
Mix materials randomly
Oak, beech, and MDF have different textures and thicknesses. Solution: fix the material of each level in the specification.
Mix up the orientation
Ceiling part may require rotation. Solution: approve the section and mark the planks.
Not checking the architraves
Baseboard hits the door with an ugly step. Solution: compare thicknesses and profiles before ordering.
Forgetting about cabinets up to the ceiling
Upper contour unexpectedly breaks off. Solution: draw all built-in furniture on the elevation.
Order without reserve
One erroneous ceiling cut leaves a visible area without material. Solution: tie the allowance to the complexity of the corners.
Start painting before acceptance
After finishing, it is harder to record damage and differences in configuration. Solution: first recount and inspect the batch.
Store planks vertically
Long trim may become deformed. Solution: follow storage rules for wooden decor and keep products in stable conditions on a flat support.
Acceptance of a batch for two perimeters
The recipient must understand that what arrived is not an abstract "baseboard," but two future lines of the room.
Before opening:
-
Take a photo of the packaging.
-
Check the number of seats.
-
Check the marking and article number.
-
Inspect the ends and long sides.
-
Record any packaging damage.
After opening:
-
Recount the slats.
-
Verify the material.
-
Check the length and thickness.
-
Inspect the front surface.
-
Sort the items by tone.
-
Separate the ceiling kit from the floor kit.
-
Keep the packaging until the inspection is complete.
Do not cut or paint the profile until the completeness and condition are confirmed.
Storage until installation
Solid wood and MDF products are intended for interior use. The room must have stable conditions without direct contact with water, sudden temperature changes, or a nearby heat source.
The planks are laid horizontally on a flat base. Support should be distributed along the length, and heavy materials must not be placed on top. If the batch is divided into floor and ceiling, keep the markings: this way the installer will not take a plank intended for the long upper wall for the short lower wall.
Who is the idea of one profile at the bottom and top suitable for?
The solution is worth considering if:
-
a complete architectural outline is needed;
-
the 100 mm height has been verified with a mock-up;
-
the interior has calm walls;
-
Doors and panels support scaling;
-
The upper perimeter is free of complex obstacles;
-
The buyer is ready to order the total volume in one batch;
-
The finish is agreed upon in advance;
-
Installation is performed according to the layout.
PLT-006 is especially useful in offices, libraries, bedrooms, hallways, and rooms with wall panels.
Who should choose a different scenario
Do not repeat PLT-006 under the ceiling just for formal consistency if:
-
The room is low and the contrasting profile feels oppressive;
-
There is already a developed ceiling cornice;
-
cabinets and niches break up almost the entire top;
-
the interior is built on shadow joints without a cornice;
-
the top should hide lighting or utilities;
-
the full-scale sample looks heavy;
-
the mounting assembly is not confirmed.
In such cases, PLT-006 can be left as a beautiful floor plinth, and the ceiling can be solved differently.
What to send to the manager before ordering
One precise message is more useful than a long piecemeal correspondence. Specify:
-
article PLT-006;
-
material;
-
the selected modification;
-
number of slats or preliminary footage;
-
lower usable perimeter;
-
upper usable perimeter;
-
number of rooms;
-
number of internal and external corners;
-
presence of doors, cabinets, and niches;
-
desired finish;
-
delivery city;
-
need for a sample;
-
question about packaging.
Attach the plan and photos. Ask to confirm dimensions, slat length, preparation, current price, availability, lead time, and invoice breakdown.
Where to buy and how to order PLT-006 for floor and ceiling at STAVROS
The commercial route consists of several solutions, not just one click on "add to cart."
Open the card
Open the product card to check the price of PLT-006, current materials, lengths, and preparation. Do not rely only on the old URL fragment.
Choose the material
Oak — for pronounced texture, beech — for a calmer wooden base, MDF — for a smooth painted contour. After choosing, you can order the wooden skirting board PLT-006 in one modification for both levels or distribute materials across the lower and upper contours.
Order a sample
Try it against the floor and ceiling, next to the trim and cabinet.
Compile two lists
Separate lower and upper perimeter. Then combine them into a single order.
Coordinate installation
The base, fastening, corners, painting sequence, and temporary fixation under the ceiling must be known before delivery.
Check the invoice
The article number, material, size, length, quantity, and packaging must match in it.
This way, the buyer can consciously buy skirting for floor and ceiling, without turning the versatility of PLT-006 into a guess. A combined order is placed only after the footage, cutting, material, finish, and installation of each level have been separately confirmed.
First the category, then the exact product page
The path to purchase depends on how defined the project is. When only a general task is known — such as finishing the joint between the wall and floor or repeating a profile under the ceiling — it is useful to start with the category and compare several cross-sections. Here, the buyer evaluates height, thickness, the nature of the relief, and available materials. This stage protects against a situation where PLT-006 is chosen only because it was the first one seen in a photo.
If the profile has already been verified with a mock-up, coordinated with trim, and fits in scale, further selection is made on the PLT-006 product page. There, not only the article number but also the material, length, thickness, surface preparation, and quantity of full strips must be recorded. For two perimeters, it is useful to request that the items be separated in the specification by purpose: "floor" and "ceiling." Even with the same modification, such labeling simplifies receiving, storage, and the installer's work.
Before payment, re-read the invoice as a technical document. It should not contain a general line like "baseboard — so many meters" if the product is sold in whole planks of different lengths. Cross-check the calculation against the number of items, verify the reserve, and ensure the sample belongs to the same modification that was included in the order. The commercial anchor leads to purchase, but the decision remains accurate only when dimensions and specifications back it up.
Pre-payment control checklist
-
PLT-006 card is open and verified.
-
Height of 100 mm is shown in the room with a mockup.
-
Profile orientation at the floor and ceiling is determined.
-
Material is selected.
-
Plank thickness and length are clarified.
-
Lower perimeter is calculated separately.
-
Upper perimeter is calculated separately.
-
Door openings are subtracted only where needed.
-
Wardrobes and niches are marked on the plan.
-
Joints with trims checked.
-
Corners and visible straight joints mapped.
-
Stock calculated by complexity.
-
Finish confirmed with sample.
-
Installation materials approved.
-
Storage conditions prepared.
-
Invoice checked by number of full planks.
FAQ: PLT-006 for floor and ceiling
Can PLT-006 be used simultaneously as floor and ceiling baseboard?
Yes. The card classifies PLT-006 as a universal profile for floor and ceiling finishing. Before ordering, check scale, orientation, obstacles, and installation points.
What is the size of PLT-006?
The height is 100 mm. The thickness of the array is 15 mm, MDF is 16 mm. The length of beech and oak is 2400 mm, MDF is 2600 mm.
What materials is the profile made from?
The card presents oak, beech, regular MDF, and moisture-resistant MDF. The current list of modifications should be verified before purchase.
Why does the page address say molding-mld-030?
This is a historical URL fragment. The current card name and article number are PLT-006. In the order, specify the article number and exact parameters.
Will a height of 100 mm suit a low ceiling?
Possibly, but the decision is checked with a mockup. Two contrasting lines of 100 mm height can visually reduce the wall.
Do I need to buy the same material for the floor and ceiling?
Not necessarily. You can keep one geometry and choose different materials, but for the most cohesive result, it is easier to use one batch and coordinated finishing.
What to choose: oak or beech?
Oak is more expressive in texture and works well with transparent finishes. Beech looks calmer and is often chosen for enamel. Specific preparation is checked in the card.
When is it better to choose MDF?
When a smooth painted profile is needed and a length of 2600 mm is convenient. Room conditions and end protection must be considered separately.
How to calculate the quantity of PLT-006?
First, separately calculate the lower and upper usable perimeters, add a margin, then convert the length into whole strips of 2400 or 2600 mm and create a cutting plan.
Should doors be subtracted from the upper perimeter?
Usually no, because the ceiling profile passes above the door. The exception is a tall portal or another element that crosses the upper line.
Can floor leftovers be used on the ceiling?
Yes, if the length, direction, material, finish, and joint map match. Do not consider every leftover useful in advance.
What stock should I order?
The margin depends on the number of corners, complex cuts, material, and the installer's experience. For a bay window or sloped ceiling, it is higher than for a rectangular room.
Can PLT-006 be glued to a stretch ceiling?
The profile is not attached to the fabric. A wall-mounted or prepared embedded node, coordinated with the ceiling system, is required.
Is PLT-006 compatible with any door casing?
No. You need to compare the height, thickness, relief, and protrusion relative to the wall. An unattractive step is best identified on samples.
Is the profile installed the same way at the bottom and top?
No. The base, access, effect of gravity, and temporary fixation differ. The overall geometry does not eliminate two installation scenarios.
Do I need to paint the profile before installation?
It is often convenient to do the main finishing in advance, and after installation, cover the joints and fasteners. The exact order depends on the material and coating.
Where can I see other profiles?
In the category of molding products, you can Buy skirting board after comparing the height, thickness, relief, and materials of neighboring models, without losing focus on PLT-006.
Can PLT-006 be installed only on the floor?
Yes. Versatility gives the right to choose, not the obligation to repeat the profile under the ceiling.
Can it be installed only under the ceiling?
Yes, if the geometry, orientation, and mounting fit the project. In this case, it works as a decorative cornice, not as a curtain track.
What to check upon receipt?
Article number, material, dimensions, quantity, surface condition, straightness, ends, preparation, and packaging. Do not start cutting and painting until the inspection is complete.
Where can I clarify the current price and availability?
Before issuing an invoice, you need to check the current price of PLT-006 in the card and confirm availability with manager STAVROS. Price and stock levels are variable data.
Full estimate: profile — only one line in the project
Even an accurate calculation of planks does not equal the full budget. The estimate for two perimeters includes the PLT-006 itself, allowance, packaging, delivery, sample, installation materials, surface preparation, painting, and corner work. The upper contour may cost more to install than the lower one due to height, temporary fixing, and difficult access.
Compare options by the total cost of the finished room. A longer MDF plank sometimes reduces the number of joints but requires painting. Oak is more expensive as a material, but it may be chosen for its visible texture. Beech allows preserving the wooden base and achieving a calm finish. No single option can be declared the most cost-effective without a room map and the chosen finish.
Ask to break down the quote into clear parts: quantity of PLT-006, material, length, packaging, delivery, and additional items. Then the decision of "one profile for floor and ceiling" can be compared with the option of two different profiles not by the price of a single plank, but by the final estimate.
Final choice: one profile must solve two tasks, not just be repeated.
PLT-006 can indeed be installed along the floor and under the ceiling. Its height is 100 mm, its universal purpose and options in oak, beech, and MDF allow you to assemble two room boundaries with one pattern. But this solution only becomes strong after checking the actual room.
First, apply the sample. Then separate the lower and upper perimeters, mark doors, cabinets, niches, and engineering elements. Choose the material, specify the plank length, create a cutting map, and agree on two installation nodes. Only after that combine the footage into one order.
Sometimes the check will confirm the original idea: PLT-006 at the bottom and top will make an office, bedroom, library, or hallway more cohesive. Sometimes it will show the opposite: the floor profile is suitable, but the ceiling needs a lighter cornice or a clean shadow gap. Both results are useful because the decision is made before purchase and cutting.
STAVROS company provides the PLT-006 card, drawings, material options, a catalog of linear products, samples, and recommendations for installation and storage. The buyer just needs to connect this data with their own room plan and order the wooden skirting board PLT-006 not as an abstract "universal profile," but as a precise set for two pre-planned perimeters.
-