Article Contents:
- Why divide a smooth panel with moldings crosswise
- What is RPU-003: current size range and prices
- Why the rosette size is determined by the node, not the panel size
- Template method: check before purchase, not after
- When a 30-millimeter rosette visually gets lost
- When a 50-millimeter rosette starts to dominate over the molding
- Depth: why 9, 11, and 14 mm are not just numbers in the size
- RPU-003 is a decorative element, not a structural connector of moldings
- How to count the quantity: a socket at each intersection
- When it's better not to install a socket at all
- How to connect a molding panel with the rhythm of slat zones
- What to buy together with RPU-003
- Final check before ordering
- FAQ
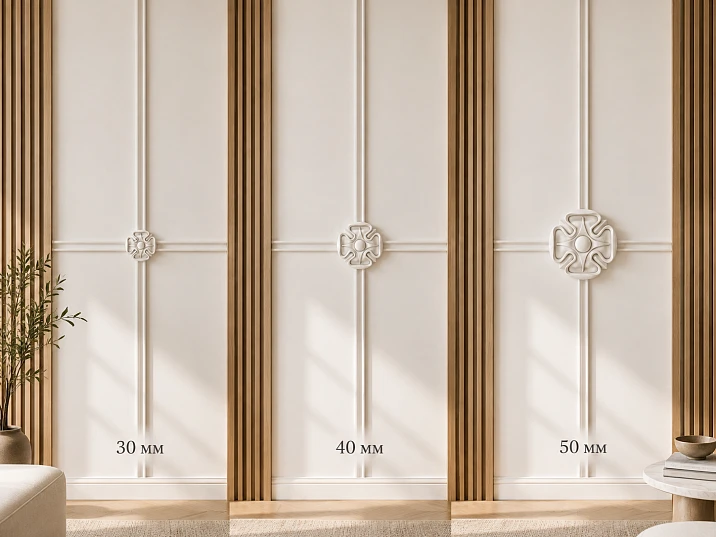
When between two zones of slatted panels a smooth field is left, it's rarely left completely empty. One vertical and one horizontal molding form a simple decorative grid that visually divides the panel and echoes the rhythm of the slat pattern on the sides. In the center of this grid, an intersection point appears — technically inevitable, but aesthetically unresolved. That's where they place a carved rosette RPU-003 made of polyurethane.
The question isn't theoretical: the product page offers three options — 30, 40, and 50 mm, each at its own price. A wrong choice means either a rosette that gets lost behind the moldings, or a decor that overwhelms the thin profile. This article is about how to make the decision before ordering.

Why divide a smooth panel with moldings crosswise
Slat panels create a dense vertical rhythm. When this rhythm is interrupted by a smooth insert field, a visual pause occurs — working well in large rooms, but risking "falling through" on medium-sized walls. Moldings on the panel solve several tasks at once.
Scaling. A bare panel without division is perceived as a monolithic spot. Two moldings divide it into four parts and bring the proportions of each part closer to those of the adjacent slatted sections — the wall begins to read as a unified system, not a set of heterogeneous zones.
Connection to the architectural language. Slatted panels are linear in themselves. A molding on a smooth field continues this principle, translating it from the three-dimensional relief of the slats into the flat graphic of a frame system.
Focal point. The intersection of moldings is a geometrically active place. Leaving it unresolved means getting a random joint. Placing a decorative element there turns a technical crossing into an intentional detail.
It is precisely this intersection that is the only place in the scheme where RPU-003 is a logical solution.




What is RPU-003: current size range and prices
Carved rosette RPU-003 is a small flat decorative element made of polyurethane with a geometric relief pattern. The product is square, which is important for the intersection of two moldings of the same width: the rosette covers the node symmetrically along both axes.
The current block of characteristics for the STAVROS card contains three options:
| Option | Size (W × H × D) | Price |
|---|---|---|
| RPU-003 30 mm | 30 × 30 × 9 mm | 410 ₽ |
| RPU-003 40 mm | 40 × 40 × 11 mm | 510 ₽ |
| RPU-003 50 mm | 50 × 50 × 14 mm | 600 ₽ |
Here it is important to immediately establish one practical rule: rely on this block of specifications, not on the descriptive text of the card below the page. In long SEO descriptions of cards, mentions of other sizes that were added or removed during assortment updates are sometimes preserved. The current price block with three positions — 30, 40, and 50 mm — is the only source of reliable information about what is actually available for order right now.
The material — polyurethane — means several things at once: the product is cut with a knife without dust, holds primer and paint well, does not warp from humidity within limits acceptable for residential spaces, and is installed with polyurethane or hybrid adhesive.
Our factory also produces:
Why the size of the rosette is determined by the joint, not by the size of the panel
This is the main mistake when choosing: taking a rosette "to the scale of the wall." The logic seems reasonable — a large wall, a large rosette. But RPU-003 solves not the task of wall scale, but the task of joint scale.
The intersection of moldings is the point where two profiles meet. If the molding has a width of, for example, 20 mm, then at the crossing point a square of 20 × 20 mm is formed. The rosette should:
- Completely cover this square so that ends and seams are not visible.
- Slightly extend beyond its limits — visually "fix" the joint.
- Not extend so much as to cover part of the moldings themselves for a noticeable length.
Hence the practical rule: the required rosette size is approximately equal to the width of the molding plus a small decorative allowance on each side. For most thin and medium polyurethane moldings, this is the 30–50 mm range.
There is no other "correct" calculation without knowing the specific profile of the molding.
Get Consultation
Template method: check before purchase, not after
The RPU-003 card allows purchasing from a single unit. This is convenient, but it does not mean you should order one at a time and try — installation with glue means irreversibility. The correct sequence of actions is:
Step 1. Select and install the molding. First, the molding intersection is done on a smooth panel without a rosette. The moldings are fixed, the joint is visible.
Step 2. Cut out three paper squares. 30 × 30 mm, 40 × 40 mm, 50 × 50 mm — at 1:1 scale from plain paper or thin cardboard. Draw a cross in the center of each — for precise alignment with the moldings.
Step 3. Apply them one by one. Place each template on the intersection node, aligning the cross with the center. Secure with a small piece of masking tape and step back to a normal viewing distance — not close up, but from the distance from which this wall is usually perceived.
Step 4. Evaluate three criteria.
- Overlap. Is no profile joint visible from under the rosette?
- Extension onto the molding. Does the rosette extend onto the molding itself by no more than 3–5 mm on each side? If it covers the molding for a significant length, it is no longer an accent at a point — it begins to overpower the line.
- Balance with the relief of the slats. How does the depth of the rosette (9, 11, or 14 mm) relate to the protrusion of the slat panels? This is covered in a separate section.
Only after a template check should you open the card and select the size.
When a 30-mm rosette is visually lost
The 30 × 30 × 9 mm option is the most affordable (410 ₽) and least noticeable. It makes sense in a few specific situations, but in some cases it works against the task.
When 30 mm is appropriate:
- The molding is very thin — about 15–18 mm wide. A 30-mm rosette provides sufficient extension beyond the joint without covering the profile.
- The decor is intentionally minimalist: the rosette should mark the point but not draw attention to itself.
- The viewing distance is small — a narrow corridor or a small entryway where details are examined up close.
When 30 mm does not work:
- The molding is wider than 20 mm. The rosette does not fully cover the joint — the ends or joints of the profiles are visible from underneath, which looks sloppy.
- The panel is large, the wall is high. On a large wall scale, a small rosette disappears — it is simply not visible from a normal viewing distance. The slat rhythm and molding lines are readable, but the accent element is not.
- There are other decorative elements of a larger scale nearby. 30 mm in such a system will look random, not intentional.
If a 30 mm template has to be applied flush against the joint just to cover anything at all, that's a signal to move to 40 mm.
When a 50-millimeter rosette starts to dominate over the molding
Option 50 × 50 × 14 mm (600 ₽) is the largest in the current range. Its relief is the deepest, and the decorative detail is the most noticeable. But that's exactly why it's important not to err in the other direction here.
When 50 mm works:
- Medium-width molding — 25–30 mm and above. A 50 mm rosette covers the joint with sufficient margin and keeps the molding line readable.
- The viewing distance is large — a spacious living room where the wall is perceived from 3–4 meters. At such a distance, small rosettes don't work.
- The overall decorative language of the interior is quite rich: stucco, cornice, relief elements. 50 mm fits into this system without dissonance.
When 50 mm is excessive:
- Thin molding — 15–18 mm. A rosette 50 mm wide overlaps the molding by 16 mm on each side. This is no longer an "accent at a point," but an element that overlays the profile and visually interrupts the line.
- The panel is small. If the smooth field is small, a large rosette in the center becomes not a detail, but a dominant element.
- Slat panels have thin lamellas with minimal relief. In such a system, a depth of 14 mm at the rosette creates a sharp contrast with the almost flat surface.
Depth: why 9, 11, and 14 mm are not just numbers in the size
The size line RPU-003 contains three numbers, the third of which is the depth/thickness of the product. When choosing, it is usually ignored, focusing on the two planar dimensions. This is a mistake.
Depth affects three things.
First: the visual weight of the relief. A rosette with a depth of 14 mm casts a noticeable shadow and creates a pronounced volumetric accent. With natural side lighting, this works well—the detail "lives." With direct uniform light, the relief can flatten out and lose its expressiveness. A rosette with a depth of 9 mm gives a more delicate effect in both scenarios.
Second: the relationship with the molding relief. If the molding itself Polyurethane molding MLDPU-003 has a modest profile, then a rosette with a depth of 14 mm sharply stands out from the system. A rosette depth approximately equal to or slightly greater than the height of the molding profile works well.
Third: the relationship with the relief of slat panels. Look at the joint from the side. Slat panels occupy adjacent areas and have their own protrusion from the wall. If the lamellas protrude, for example, by 10–12 mm, and the rosette by 14 mm, the system looks consistent: elements of the same order of depth. If the slat panels are flat (5–6 mm protrusion), and the rosette is 14 mm, you get a sharp drop that can look like a surprise rather than an intention.
Check the depth of all system elements before choosing the rosette size.
RPU-003 is a decorative element, not a structural connector for moldings.
This point is critically important for proper installation. The RPU-003 rosette covers the intersection point over already installed moldings. It does not connect them mechanically, is not a joining element of the system, and has no special rear recess for a specific profile — the product card does not claim this.
Practical installation procedure:
- The horizontal and vertical moldings are installed on a smooth panel and fastened independently — each one entirely, from edge to edge.
- At the intersection point, one of the moldings is trimmed and joined with the other. The joint is neat but visible.
- The RPU-003 rosette is glued over this joint, covering it and turning the technical node into a decorative detail.
For installation, polyurethane or hybrid adhesive is used — for example, KUDO HIGH TACK (990 ₽), which appears in the "Buy with this product" block directly on the RPU-003 card. Fixation on a flat polyurethane rosette on a smooth molding surface is reliable but requires holding under pressure until the adhesive cures.
How to calculate the quantity: one rosette per intersection
The main calculation rule: one molding intersection — one rosette. Not one rosette per panel, not one per entire wall. One for each node.
This is important because architectural solutions can vary:
- One panel can have one intersection (one cross: one horizontal + one vertical molding).
- If the molding grid is more complex — two horizontal and two vertical — there will be four intersections.
- If several identical panels are symmetrically placed on a wall or in different parts of the room, the number is multiplied by the number of panels.
A typical calculation for a common scenario — four identical panels with one intersection each:
| Size | Price per piece | 4 pieces |
|---|---|---|
| RPU-003 30 mm | 410 ₽ | 1 640 ₽ |
| RPU-003 40 mm | 510 ₽ | 2 040 ₽ |
| RPU-003 50 mm | 600 ₽ | 2 400 ₽ |
The difference between the minimum and maximum configuration for four panels is 760 ₽. This is not an amount worth choosing a smaller size for if it doesn't fit. The choice should be determined by the size of the node, not by the desire to save a few hundred rubles.
Product card carved rosette RPU-003 allows you to add the required quantity to the cart from one item — the purchase quantity is not limited.
When it's better not to install a rosette at all
A decorative element is not always justified. There are situations where a clean intersection of moldings works better.
Minimalist interior. If the entire system is deliberately built on clean lines without additional details, a rosette disrupts the logic. A neat butt joint of moldings at a right angle in such a system is the finished solution.
Very thin molding. A molding 10–12 mm wide forms an intersection area of about 1 sq. cm. For such a joint, none of the RPU-003 sizes will give a proportional result—a 30-mm rosette will be three times wider than the molding itself.
Molding grid with multiple intersections. If one panel has six intersections, six rosettes can create visual overload. In this case, either leave the joints clean or place a rosette only at the central intersection.
Another decorative element in the center. If the panel assumes a painting, mirror, or pendant light in the center, the molding frame serves as a border. A rosette at the intersection point then competes with the central object rather than supporting it.
How to connect a molding panel with the rhythm of slatted zones
A smooth panel with a molding grid and slatted zones on the edges are different decorative systems. They need to be visually connected, otherwise the wall will look like a set of mismatched solutions.
Several practical ways:
Unified color. The moldings and rosette are painted in the same color as the smooth panel. The slatted panels can then have the same or a contrasting tone. Color unity combines different textural solutions.
Consistent depth. The protrusion of the molding above the panel surface should preferably be matched with the protrusion of the slatted lamellas. If the lamellas protrude by 10 mm, a molding with a protrusion of 8–12 mm creates the feeling of one system.
The width of the slats and the width of the molding grid cells. If slat panels have a lamella pitch of, for example, 100 mm, a molding grid with cells of a multiple or similar size (200, 300 mm) works as a continuation of the rhythm at a different scale.
The rosette as a "point" element. In a slat pattern, there are no accent points—only lines. The RPU-003 rosette introduces a new structural type into the wall: a point. This is contrast, not a violation—provided it is intentional and singular, not chaotic.
What to buy together with RPU-003
The RPU-003 card directly shows several items in the "Bought with this product" block that are logically related to the task.
Polyurethane molding MLDPU-003 (7,580 ₽) — a polyurethane profile featured as a related product to the rosette. This does not mean that RPU-003 is a specialized connector specifically for MLDPU-003 or that it has a groove for its profile. But if the molding has not yet been chosen, MLDPU-003 is a reasonable starting point: both products are made of polyurethane, from the same manufacturer, with a consistent style.
KUDO HIGH TACK (990 ₽) — an adhesive based on hybrid polymers, also included in the related products block. Suitable for installing polyurethane decorative moldings on painted, primed, and drywall surfaces.
If you are selecting not only the rosette but also the entire decorative range for molding systems, it makes sense to browse Decor for polyurethane moldings — there you may find elements for corner joints or ends that complete the system.
Full catalog polyurethane rosettes и of polyurethane moldings is available in the relevant sections of the website.
Final check before ordering
A sequence of actions that eliminates errors:
- Select and install moldings — horizontal and vertical — on a smooth panel.
- Measure the width of the molding — specifically the one on the wall.
- Cut three templates — 30 × 30, 40 × 40, 50 × 50 mm.
- Apply each template to the joint and assess the overlap of the seam and the extension onto the profile.
- Look at the joint from the side: compare the depth of the molding with the depth of the appropriate socket size (9, 11, or 14 mm).
- Compare with the relief of the slat panels — is the socket depth consistent with the depth of the slats?
- Count the number of intersections — on all panels planned for finishing.
- Calculate the cost of the required size × the number of pieces.
- Open the product card RPU-003 and add the required size and quantity to the cart.
- Add glue and molding if they are not selected yet.
FAQ
Can RPU-003 be installed after painting the wall and moldings?
Yes, but with a caveat. The glue works on painted surfaces if the paint holds firmly and does not peel. If installation is done after final finishing, it is recommended to lightly sand the area under the outlet with fine sandpaper to improve adhesion. After gluing, the outlet is primed and painted to match the molding or panel — the seam is practically invisible with proper preparation.
What to do if three moldings on one panel create two intersections?
Two intersections — two nodes — two outlets. Both must be the same size: different sizes within one panel will look like a mistake, not a design choice. If the panel is symmetrical and the intersections are at equal distances from the center, equal outlets will support the symmetry.
Do I need to match the outlet to the style of slat panels?
RPU-003 has a geometric relief pattern. Slat panels have a purely linear texture. This is a contrast of forms, which is normal for decorative systems: linear base + point accent. The problem arises not from the contrast of patterns, but from a mismatch in scale and depth — and it is precisely these that the template method checks.
Can RPU-003 be used at the junction of three moldings (T-shaped node, not cross-shaped)?
The outlet is square and symmetrical on both axes. On a T-shaped node, one of the four "arms" will be without molding — the outlet will overhang the clean panel surface on one side. Visually, this works only if the depth of the outlet's relief is such that the "empty" protrusion does not catch the eye. Before making a decision, be sure to check the T-shaped node with the template — not the cross.
Does the room temperature affect installation?
KUDO HIGH TACK adhesive, like most hybrid compounds, works better at air temperatures of +5 °C and above. In freshly plastered or still unheated rooms, adhesion may be worse. For living rooms with normal operating temperatures, this limitation is not relevant.